Secrets of the Ark: A Broken Sword Game – Broken Sword 4: The Angel of Death
Broken Sword 4: The Angel of Death
by
Revolution Software and Charles Cecil
Walkthrough by
MaGtRo September 2006
Gameplay:
The game comes in DVD-ROM disk. It is best to read the manual to learn the game manipulations. The Main Menu has
the New Game, Load Game, Options Menu, Extra Gallery and Exit.
Under Options Menu; the
control preferences, graphics and sound
menu can be found. The control preference has the selection to change the game
settings (keyboard control and character movement) and also the mouse wheel run
option. The graphics selection has options to change the resolution, refresh
rate, windowed, antialiasing, detail, AMBX, language and subtitles. The sound
menu has the master, speech, effects, music and ambient volume controls.
The gameplay or pause
menu can be accessed using the ESC key. It has the resume, save, load, options
and quit selections. Saves can be overwritten or make a new save by selecting a
slot labeled ‘new save’ or delete a saved game by clicking on the X box
of the saved game. The saved game folder is in ‘My Documents’.
Game manipulations can
be done using the mouse alone or by combination of mouse and keyboard. The movement of the
characters can be controlled when the mouse wheel is enabled under the game
settings. The mouse wheel forward makes the character run; mouse wheel backward
returns to walk. If using the keyboard, the arrow keys will move the character
to those directions. The left CTRL key will make the character run.
The neutral arrow cursor
changes to a cross when placed over an active object. The possible actions are
seen as different icons beside the cursor. Left mouse click-held down on an
object or place will make the character move directly towards that place or
object. Right mouse click will toggle it back to normal mode of walking.
Once an item is
right clicked selected, the radial menu control will appear and the appropriate actions can be
selected: examine, take… Right click will close the radial menu.
The inventory is
accessed by placing the mouse at top of the screen to show the inventory bar.
Select an item using the left mouse or right click the item to examine it. Once
selected the item’s icon will be seen beside the cursor and can be clicked on
the object or character as needed. Right click will deselect the item. Place the
cursor below the inventory bar to close it.
PDA has the progress of
the game, can be used to make phone calls or hack computers and websites. Read
the manual to get the explanations of the icons and actions needed to perform
the hack puzzles.
Mount Horeb, 1338 BC: Watch as a woman is changed to the Angel of Death. 3 years ago, a skeleton is
found.
New
York
Note: Read the notebook
to follow the story and also reference the information obtained by hacking.
New
York Bail
Bonds
George meets a new
client: George enters his place of work,
the Bail Bond Office while being watched by goons. Meet Anna Maria, in need of rescue from the bad men that
wants to kill her because of a manuscript.
Escaping the goons:
George’s Office – Look around for a way to get out of the office. Take
the 9 iron golf club right of the door. Check the door at other end of
the room and see that it is padlocked but the brackets are loose. Take the golf
club from inventory and use it on door.Storage room – Move the file cabinet and George will push it to block the door.
See that there’s a hole on the ceiling. Climb on top of the cabinet and climb up
to the hole in the ceiling.Elevator – Anna Maria
rushes to stop the elevator and now needs help to hold the elevator open on this floor. Use
the golf club on the space below the elevator door.Fan Grill – Go to right side of the room and try to pull off the fan grill. Open
inventory and click on Anna Maria icon. Click Anna Maria icon on grill. She
helps pull the grill out. Click on the fan box again and George pulls it out.Elevator again – Pull the fan unit until by middle window. Right click to
release George from fan. Move George to the side of the fan unit and move it
towards the elevator. Right click and move George to front of fan. Now push it
under the elevator door. Don’t forget to take the golf club. Enter the hole on the wall.Ledge – Walk the ledge until the fire escape.
Go right and climb the fire escape ladder to get to roof of building.Loading joist – Climb the ladder to get to top of the metal platform-loading joist.
Walk to the end and release the chains from the loading joist. Use the golf club
to get the chains. See George swing across to the next building’s roof.Get Anna Maria to
this side – Go to the wheel handle on a stand behind and right of the tower
(the left one is broken). Turn it to get both loading joist together. Anna Maria
crosses to this building.
Finding a way to
street level: Anna Maria hires George
to decode the manuscript. And you do Medieval, don’t you?
Third floor – Go to the left of the room. Jump up to catch the metal on the top
of the wall. Shimmy to the left. A pipe breaks and flips a lever to turn on live
cables.
Continue to the left and right click to jump off. Walk around the room, jump
over a break on the floor, shimmy on the ledge until a break on wall.Enter through break and see an open door. Try the door and see that it is tied
open. Take the string that tied the door. Close the door. Slide the bar
top left of the door. Right click on door and select the use-gear icon. That gets
Anna Maria to cross.Go down to the first floor and find out that the door is blocked from the other
side.Breaker switch – Go up the stairs to the next floor. Go across the room and look
at the rusty pipe. Go down to the next level by going around the room and
jumping down. Go forward and see (left-right click) live cables on the floor.Go back to top floor by
the rusty pipe. Check (left-right click) the second breaker switch on the left by the wall. It
won’t stay off. Click Anna Maria Icon on breaker switch. You have to see and
click on the live wires below for Anna Maria to continue holding the breaker
switch.First floor – Go back down to lower floor and cross by the formerly live
cables.
Go right, push the big box blocking the door and open the door. Anna Maria joins
George.Shutters – Go to the
roll up door on the right. Use Anna Maria icon on handle right of door to roll
the shutters up. Click on door to get George to hold it up. Now, Anna Maria can
exit.
New
York Hotel: Hotel
Alfonso in Brooklyn
Trying to get
upstairs: Anna Maria recognizes one of the goons. George
will find a way to get her to her room #23 second floor while she stays in the
alley.
Lobby – Go to the double doors on the left
end of the lobby. Click on double doors
and the man behind the desk will say ‘you need a key card…’ Look around at
the 3 out or order pop machines and the grandfather clock.Talk to Alfonso, the
manager completely. Get a hotel flyer. Check-right click the flyer in
inventory and get the hotel’s phone number.Go to the right and talk
to man reading a book. Talk to him completely and learn that there’s a keycard
used as a book mark and that he’s waiting for a phone call. Learn also that his name is Thelwell Minster. Click to
touch the book. Touchy!Bathroom – Go to the bathroom right
of the out of order pop machine and use the PDA. Select the cell phone on the
PDA and call Alfonso’s Hotel. Ask to talk to Thelwell Minster.Exit bathroom and get
the book on the table. The hotel keycard is in inventory. Use the keycard
on slot right of the double doors.
Getting into Anna
Maria’s room:
Second floor – Climb the stairs and get a call from Anna Maria. She is trapped
on the fire escape. She wants George to open the bathroom window.Look at the yellow
‘currently close for fumigation’ sign across the stairs. Pick up a ‘death
watch’ beetle.Go to the left hallway.
Check the first room on the left that the banging sound is coming from. Talk to the
Elvis look-alike guarding room 23 door at end of hallway. Check the
dried plant on the table. Open the window at end of hallway and then go back
downstairs. See that Elvis double closes it. Plan brewing here.Lobby – Use the keycard on left of double door. Talk to Alfonso. Hmmm…the
beetles eat wood. See the lighter behind the glass partition. Place the death
watch beetle on the clock. Talk to Alfonso about the clock. Be quick – go to the
right, open the glass partition of reception desk and get the lighter.Second floor – Go back to the window at end of hallway. When Elvis look-alike is
doing his a-hah-hah dance, open the window and immediately go to the plant on the
table. Use the lighter on the plant. My hair, my suit! Enter the room left of the plant.
Getting Anna Maria
into room:
Bathroom – Go to the bathroom. Look at the fan system on the wall. Press the
button left of the fan to stop the fan. Attach the string on the fan. Turn the
fan on again by pressing the button. There it goes!
Searching for clues: Anna Maria loses hope
when she sees the manuscript is gone. Take the pen with a black cat logo
right of the bed.
Cleaner’s closet – Exit the room.
Go down to the first door on the left where
the banging sound comes from. See a key code panel right of door. Elvis is
watching from the open elevator. Use the hotel flyer and pen on door. The pen
and the flyer come back out from bottom of door with 5837x written on it. Click
on key code panel. See Juanita, the receptionist tied up. She described Elvis
with the snake tattoo. And away he goes…
Back at Big Bros:
Virgil is upset about his MP3 player – really, really upset. Talk to Virgil about
music. 🙂
George’s office – Go to the office and look around. Take the Italian
cigarettes at end of the desk.Exit to next room and
out the door. See a map. The only other place is Hotel Alfonso. Go there.
Back at Hotel:
The hero returns. Talk to the policeman – Officer O’Halloran. 2B’s 2 T’s. With
the tattoo description – Yes, a salami, I say… Ah – the Martino gang is
identified. Click the Italian cigarettes on Officer O’Halloran. Learn that they
are black market cigarettes. Talk to the policeman again to learn about Mama
Martino Meat Packing at East River docks. Talk to Alfonso and Juanita. Exit the
hotel and select the meat packing on map.
Mama Martino’s Meat Packing:
Gain entry
to factory:
Salami store – Enter the salami store. Look around. Talk to Chico Garella.
Mama Martinos retires you. Give Chico the Italian Cigarettes. Get a trade of
Vintage Salami. Exit the store and stand by the pallets right of the
store window. See Chico enter the green door and smokes outside. Use the take
icon on the bloody apron hanging behind the counter.
Searching factory for
clues:
Factory – Wearing the apron, move George to bottom of screen, left of truck,
climb the ramp and go right to talk to the guard. Look inside the truck and see a
pig and a sack of ice.Enter the factory and
look around. The shutter-roll up doors are all locked. The one at back at left
side with a red light on top has people talking behind it. Enter the doorway on
the right of the guard. Go downstairs and take the fire proof blanket from wall
across the conveyor belt. Check the shutters on the right of the conveyor belt.
Hear strange noises like someone is being beaten up. Enter the doorway right of
the shutters.Aria – Enter the aqua-blue door on the left. Hear an aria. Open the
medicine box
on the wall and see an electronic card reader. Exit room.Dumpster area – Take the machine
safety keys from left of the big white bone cruncher. Go outside and see an
air vent on top of the building where the music is coming from.Forklift – Check the forklift. It
appears to be dead. Use the machine safety key on the lock of the forklift below
the red-green buttons. Go to the green dumpster right of the area and push it
onto the forklift forks. Press the buttons to lift the dumpster close to the
vent. Climb the back and roof of the
forklift and then on top of the dumpster.Office – Look through the air vent and hear Fingers talk to Mr. Spallacci. The
manuscript is to be filed under F for found. Have to find a way to get the
guys out of there. Go down and enter the factory again.Main Factory – Climb the stairs pass
the conveyor belt. Go left of the hanging pigs and see a control panel. Click on
panel and see the hanging pigs move on the overhead carousel. Go left and now see that the
earlier closed shutter is open with green light on top.Smoking room – Enter, go down the stairs and see a room with logs. Try to open
the metal door on the left. Aaaaagghhh! Use the fire proof blanket to open the
door. Enter and look around. Get grease on hands when the pork being smoked is
touched. Use the fire proof blanket to pick up the smoldering log by George’s
left foot to get fire blanket holding smoldering wood. Go back to the
vent above the forklift.Smoke the baddies – Climb up the dumpster on the forklift. Place the smoldering
log on the air vent of the office. Need more smoke.Go down the forklift and go
to the truck outside. Save game here. Take ice and run back to
the air vent. It would be best to have the mouse wheel ‘run’ enabled here. If
the ice melted before getting to the air vent – get another one. Place the ice
on the smoldering wood at the air vent. <choke>Watch the family leave.
Getting to secret
office:
Main factory – Go to the hanging pigs in the main factory. Press the control
panel left to get the carousel going. eek! See Tony, the one being beaten up
behind the shutters. Search Tony to get a keycard.Side room – Go to the room with the aqua blue door and medicine box on the wall.
If you haven’t yet opened the medicine box, do so now. Use the keycard on the
electronic keycard reader. See the secret doorway.
Getting manuscript
from cabinet:
Office – Enter through the secret doorway and climb up the stairs.
Go to the desk. The side
drawers are locked. Open the center drawer and take something wrapped in silk
hankie. Go to inventory and right click the silk hankie to get a
photograph of Lucy Chu and silk hankie.Check the metal cabinet
where the manuscript is kept and find it securely locked. Right click the
metal cabinet and select the push icon – the wheels are rusty. Look through the
open glass window and see the bone crusher below.Smoking room – Go to smoking room left of the pig carousel. Enter the metal door and use the silk hankie on the hanging meat to get grease soaked
silk hankie. Go back to the forkliftForklift – Take the keys from the forklift by right clicking on the keys
and then selecting the pick up icon.Bone crusher – Use the keys on the bone crusher. Turn it on by pushing the
buttons left of keyhole.Secret Office – Go up to secret office and use the grease soaked silk hankie on
the metal cabinet. The wheels are greased. Right click the metal cabinet and select to push the cabinet
towards the glass window. Watch cabinet vs. the bone crusher. Go down and take manuscript and mp3 player.Leave the factory.
New
York Bail
Bonds
Research manuscript:
Examine the manuscript by clicking on the (can be found at PDA’s notepad under
red Latin):Latin Header –
Below the fortress of the one true patriarch awaits the angel. For he who is
worthy follows the path of the righteous…Latin part 1 – The
first – Find the knights who share a horse, And grasp the stone that opens the
way.Latin part 2 – The
second – Address the arms upon the shields, And close the circle for the
knights to let you pass.Latin part 3 – The
third – Follow the Master’s worldly route, and prove yourself worthy to lift.First, the fortress
where he did fight, but overwhelmed by Mamluk’s might.Then he travelled
to Longshanks’ fair city, and as Grand Preceptor he was received.To the Temple of Villeneuve where he was appointed as Grand Master of the Order.
Before journeying
to the island where he holds his court.Latin part 4 – The
last – to see the light, turn from Holy Sion to face, The great fortress of
the empire of the East. The seat of the Holy Church in the West. The learned
Coptic city to the South.At left side of the
manuscript, click on the fleur-de-lis that is in some kind of pattern. Check the castle with Holy man and King, fires
of hell.At right side of manuscript; check the coat of arms,
fortified city with minarets, holy man and idol at tower Knight-St. George and
the Angel.Click on the Anno (1307) and black symbols
(cross, Star of David, crescent moon and cross) at bottom of the page.When all parts of the
manuscript are examined-clicked on, the back arrow at bottom right appears.Further research is
needed and access to Lobineau’s site is blocked.Virgil – Give Virgil the mp3 player. Talk to Virgil about everything. Virgil
gives a flash card to be used on the PDA. It is automatically installed on the
PDA.PDA – Click the Connect to access Lobineau’s Private Server. Hack the firewall.
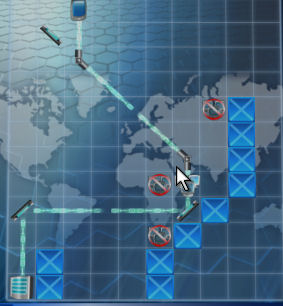
Virgil gives an explanation. Listen well.Hacking – Review the
manual to learn about hacking. The aim is to get a data stream from the PDA
to the data server to be hacked (square with lines).The stream should
pass once only on network point(s) (3 monitors icon).The stream can be
directed or diverted by several items: mirrors that can reflect or bounce
the data stream 90 degrees and splitters that takes in the data stream on
one end and out the other ends. The mirror can be one sided or double
sided. The splitter can be 45 degrees or 90 degrees.The squares with X
are walls and the data stream cannot pass through them.The circles with
slash line
are no nos. The data stream should not pass through them. A few seconds only
are possible.To move the
diverters, click-hold-drop a mirror or splitter on the square you want it to
go. Click on them to turn it the
way you want.Study the set up and
plan ahead before moving the diverters.Hack Lobineau’s
firewall – One possible solution
to hack into Lobineau’s firewall:
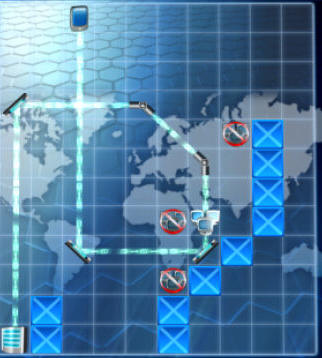
Check the PDA’s notepad
and click on red historical database. Scroll the text using the mouse wheel and
read about Baphomet, Philippe IV, Clement
V (mentions the fortified city in the manuscript) and Jacques de Molay. Click on
the X at top right to close the PDA.Look at the manuscript
again on the table and click on the fortified city with minaret on the right
side. George deduced that Istanbul is the fortified city. Click on door to
go to Istanbul.
Istanbul
Pasha
Palace Hotel
Locating the citadel:
Learn about the
Citadel – Talk to the snotty receptionist completely. Go to the dining area
and talk to Mevlut, the waiter completely. Learn that the old Citadel is under
the Topkapi Palace which is closed at present because of a world conference. Take the knife from the
middle table on the right.Topkapi map – Look at the tourist map
right of the reception area. The map shows the Topkapi Palace (seen only after
talking to the waiter). Click on all the active spots in the map: entrance,
courtyard, harem, fountain (aqueduct), Lover’s vestibule (maybe the waiter
knows) and museum. Talk to the waiter again and learn about the Lover’s
Vestibule and the gates.Exit the Pasha Palace
door and select the Topkapi Palace from the map.Topkapi Palace – Talk to guard and learn that the only one that hasn’t signed in
is Eamon O’Mara (BS3 fame). You need his ID card.Get an ID card –
Go back to hotel. Talk again completely to the snotty receptionist. Learn that there’s an
important letter for Eamon from Topkapi. Try to take the letter at end of the
desk. Hmm…Talk to Anna Maria about Eamon or use the Anna Maria icon on the
letter.Click on the framed picture beside
the computer and note the receptionist swinging a golf club. Talk to the receptionist again especially about golf. Then,
click the Stobbart golf club in inventory on her. While George is showing his
form, see Anna Maria take
the letter.Talk to Anna Maria and
get the map and Eamon’s ID card. In inventory, right click to separate the
map and ID card. If you haven’t yet, take the knife from middle right
table at the dining area. Use the knife on George’s Bail bond ID card to get
photo of George. Combine the photo of George with Eamon’s ID card to get
ID for Topkapi and Eamon’s photo. Go to Topkapi.
Topkapi
Palace
Gaining Entry:
Get to the wall – Talk to guard. Up your alley. The other guard at the gate has a
poster of Eamon in his home. Uh oh. The guard by the gate will not let George
pass. Try passing through the patrolling guard or the guards by the arch. Still
no go. Talk to Anna Maria and she will distract the guard. Walk behind the
distracted guard
and see scaffoldings.Scaffoldings – Climb to the top of the right scaffolding. Wait until the guard
starts to move to the left and take the cell phone seen on the ledge above the
lamp. Look-right click the cell phone in inventory to learn the guard’s cell
phone number. Place the phone back where you got it.Go to the left end
scaffolding and climb up. Go to the right end of the top scaffolding and use the
PDA. Call the guard’s cell phone. Watch and wait for the patrol guard on the
left to just turn away and then climb up on the broken part of the wall.
Sneaking through
palace:
Harem garden guard
– Wait until the guard turns around. Follow close to him to the
arched opening on the wall ahead. Climb the arched opening.Distract guard with
dog – George faces a window. There’s a guard and a dog
at the other hallway.Click on the blue spot on the window sill
in front of George and George will note that there’s loose plaster here and
rubble underneath. Use the knife on the loose plaster and it falls on the
ground. The guard and his dog check the noise.Run to the other hallway
where the guard was and click on the cup on the window sill. George will drink
the tea. Run back and hide at the other hallway. The guard leaves to make a new
tea but leaves the guard dog behind.Distract the dog – In inventory, use the knife on the salami to get slice of salami.
Go to the windows at the corner. See a clothes line hanging from the third
window from the corner. Pull the string up and attach the slice of salami on clothes
line. The dog comes to the bait. Go down to the garden and walk through the open archway.Museum – While at
the balcony, see the fountain and the museum entrance below.Hack the Museum
computer – Go down the stairs and see
a computer. Use the PDA to connect-hack into the Topkapi Security Management.Select System, Laser in
test mode for 1 hour, Doors unlocked. Then click OK.

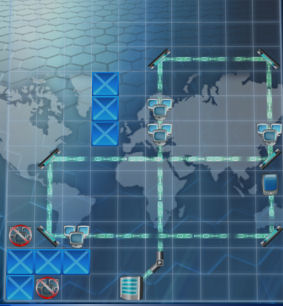
Getting through
museum:
Laser puzzle – Go
to the door at opposite end of the computer. Read the sign on the right about
infrared alarm system.Enter and right click
the metal box right of the door. Open the door of the ventilation system. Place
the hotel flyer on the grille and George closes the door. Use the lighter on the
flyer. The smoke fills the hallway. Now the lasers can be seen.Go down the hallway.
Wait for the laser lights to go off and walk a few steps until the next one. Do
this until the end of the hallway.Door lever puzzle – Talk to the door
on the left to learn that Anna Maria is at the other side.Pull the levers on the
left to lower the bars. From left to right, pull down levers 1, 2 and 4.Macabre head door puzzle – Go to the door left of the statue. Right click one of
the macabre head planking the door. Click the Anna Maria Icon on one of the
macabre heads. Together George and Anna Maria open the door.
Below the fortress
of the one true patriarch awaits the angel. For he who is worthy follows the
path of the righteous…
Courtyard fountain:
Get to the fountain – Look across
to the right of the area. See a control panel on the wall right of the guard
standing by the museum door.Walk over there by
keeping behind the columns. Use the power switch and the water drains out.
George moves to the right but the guard pulls the power switch backs on.When the guard goes back
to sit down, go back to the control panel. Use the paper clip on the power
switch. This shorts the power switch. Move George to hide.Wait until the guards
talk and move away. Immediately go down to the dry fountain and click on the
center statue. Need another pair of hands. Use the Anna Maria icon on the
statue. Together Anna Maria and George push the statue and a hole is revealed.
Go down the hole.
Searching the
catacombs:
Pipes – Walk the walkway with the pipes running on the wall. At intervals are
red valves that change the flow of the water in the pipe. Close to the end of
the pipes at lower pipe, there’s a gauge that shows some amount of water running through the
pipes. Click on it and George says not a lot. At the end of the line of pipes, there’s light colored
block on the wall. Let’s divert all the water to the pipe close to this light
colored block.Divert the water flow
– Starting from the
rightmost red lever, turn the valves to get the water to flow: left, down,
top-down and bottom- left. Then turn the red round valve to close. Check the gauge
on the left and note that pressure is very high now. Now, turn the last valve on
the line to valve open.See the light
colored block pops out.
The first – Find
the knights who share a horse, And grasp the stone that opens the way.
2 knights on a horse
– Climb through the hole on the wall. Go forward until the ledge. Climb down to
the citadel floor. Look at the white drawing at the center of the floor – 2
knights on a horse.Following the manuscript
clue – click the Anna Maria icon on the button right of the closed door. Move
George to stand on the drawing of the knights on the horse at the center of the
room before Anna Maria presses the button. The door opens.
The second –
Address the arms upon the shields,
Knight 1 – Go
through the door and forward to an open chamber. Go left of the open doorway and
see a statue of a knight holding a shield. Look close to see a puzzle.The black symbols at bottom of the page of the
manuscript showed cross, Star of David, crescent moon and cross.The next progression from that icon arrangements would
be moon, cross, star, moon.Click on the Roman
numerals to turn the icons to show = moon, cross, star, moon.The entryway opens on the right to reveal another
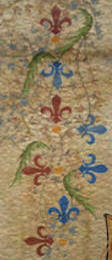
knight statue.Knight 2 – Study the manuscript and note the
position of the fleur-de-lis on the left of the text.Note that the red fleur-de-lis on the manuscripts
shows 2 top and then 2 left. Logically, the next set will be 2 red bottoms.The blue fleur-de-lis showed one bottom, 2 right blues
and one top. Logically, the progression would be 2 of blue at a position. So the
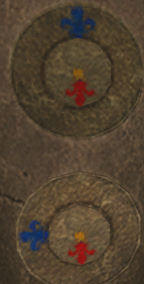
next in sequence would be one top and one left blue fleur-de-lis.Solution – Arrange the top circle with blue on top and
red at bottom. The bottom circle should be arranged to have the blue on the left
and the red at the bottom.
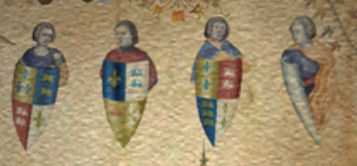
Knight 3 – Study
the coat of arms at top right of the manuscript.The top left quadrants of the
manuscript shields in order left to right:1. Showed blue fleur-de-lis, the next gold fleur-de-lis and
then blue. The logical next color will be gold fleur-de-lis.2. Showed gold background, then blue background and
then gold background. The next logical color will be blue background.The top right quadrants of the manuscript shields in order left to right:
Showed 2 gold lions in blue background, then 2 blue (from previous background)
lions in white background and then 2 white (from previous background) lions in
red background. The logical next one would be 2 red lions (from previous
background) in gold background (from lion colors).The bottom left quadrants of the manuscript shields in order left to right:
Showed 2 white lions in red background, next is one red lion in gold background
and then 3 gold lions in blue background. The logical next one would be 2 blue
lions in white background.The bottom
right quadrants of the manuscript shields in order left to right:
Showed 1 gold fleur-de-lis in red background, next is
?# white fleur-de-lis in gold background and then 2 gold fleurs-de-lis in white
background. The logical next one would be ?# white fleur-de-lis in gold
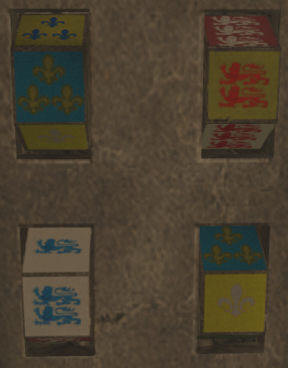
background.Solution – Arrange the
tumbler: top left to 3 yellow fleurs-de-lis on blue background, bottom left to 2
blue lions on white background, top right 2 red lions on yellow background, and
bottom right to one white fleur-de-lis on yellow background. Hear a click.
And close the
circle for the knights to let you pass.
4th puzzle – See that the 2 alcoves planking the Knight 3 puzzle are now active.
Note the angel inside an alcove at bottom right of the manuscript.Click the Anna Maria
icon on one of the active spots on the ground in front of a side alcove.George and Anna Maria
enter the alcoves. See the floor lower to another chamber.
The third –
Follow the Master’s worldly route, and prove yourself worthy to lift.
First, the fortress
where he did fight, but overwhelmed by Mamluk’s might. – Acre
Then he travelled
to Longshanks’ fair city, and as Grand Preceptor he was received. – London
To the Temple of Villeneuve where he was appointed as Grand Master of the Order. – Paris
Before journeying
to the island where he holds his court. – Cyprus
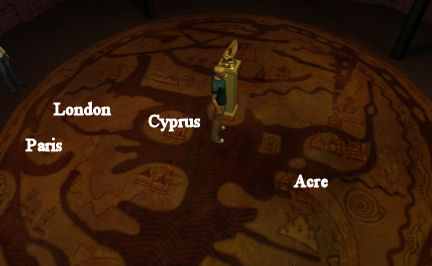
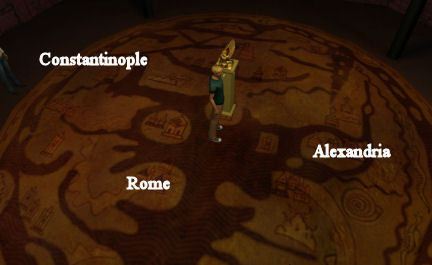
Worldly route puzzle – Enter the new chamber and see the Angel
on a stand. The door closes.
Do not pick up the Angel yet or you die.Click on the different buildings on the
floor. See that it is a map of sorts and learn the different cities locations.Based on the manuscript
clues and the hacked historical data base, right click and use the gear icon to stand in order on: Acre, London, Paris and
Cyprus. Pick up the Angel.
The last – to see
the light, turn from Holy Sion to face,
The great fortress
of the empire of the East. – Constantinople
The seat of the
Holy Church in the West. – Rome
The learned Coptic
city to the South. – Alexandria
Find the exit or to
see the light – Based on the manuscript clues and the hacked historical data
base, click the arrows on the central stand so that it points to left to
Constantinople and press down
arrow (hear a click). Then get the stand to point down to Rome and then press down arrow.
Lastly, get the
stand to point right to Alexandria and then press down arrow.
After a night of
interlude, George reminisces on how he reached his present situation.
Jailbird George:
Jail cell – The inventory is empty. Look around the jail cell. Look at the damp
wall, the mortar is crumbling. See a rat run inside the rat hole at bottom left
wall. Check the rat hole. Ouch! Check the rat hole again and get a bracket.
Use the bracket on the loose mortar on the right wall. Right click to pull the
block.
Escaping cell:
Father Nicolas and Sister Immaculata come to visit. Father Nicolas gives a
bag of marbles, mechanical mouse and squeaky toy.Before
Sister Immaculata leaves she says – On the roof, one hour – be there. In
inventory, right click the bag of marbles to get piece of cloth,
marbles and string. Look at the table on the left by cell bars to see
moldy cheese.Take care of the
guard – Look at the drain system
on the floor and see that the drain system runs out of the cell.Place the
marbles on the drain. Go to the next cell. Click on the jail door to call the
guard. Oopsie!Go back to next cell and
take the cell key from the napping guard. Use the cell key on door.Use the piece of cloth
and string on the guard. Now he can’t follow you.Guard dog – Go up the stairs. On the way, George thought that his things were on
the table on the left of the hallway.See a dog and a can of beef on the
table. Right click the mechanical mouse to get mouse key and mouse.Use the squeaky toy on
dog and immediately get the can of beef. Use the mouse key on can of beef
to get open can of beef. Use the open can of beef on dog bowl. Now the
dog is busy.Go to the right and
climb the stairs.
Escaping palace:
Museum – See that you are back at the museum computer area.
Click to find out that the computer has additional firewall and can’t be hacked.Go back up the stairs
and look on the first open railing on the balcony. Click on balcony to see that
George will not climb the rail if the guards are not distracted.Distract the museum
guards – Go back down to the museum grilled door where the laser alarm
system is on. Use the mouse on the grilled door.
View this guide raw, exactly as the archive holds it