Black Mirror
Chapter 3
hidden
legacy…
Samuel had nightmares
of birds, wind chimes and a body on a slab. He leaves for Wales and arrive at
the gate of the manor.
Get pass the
gate:
Welsh manor
gate: Press the doorbell but it would not work. Right
click to note that the wires barely connect. Use the small knife-rook on
doorbell. Look at the broken statue on the left. See the leg is broken. Click
again and see a nail Take nail. Use the nail on doorbell and someone
comes.
Louis wants proof that
you are a Gordon. Show him William’s mourning card. He lets you in.
Inside the
Manor – Talk to Eleonor about everything. Learn that William was there with
Robert 2 years ago and acted strange after being in the tomb. Dergham’s grave is
older than the tomb and has a monument in the grounds. Richard, Eleonor’s
husband works on his Chemistry experiments in an old house in the garden. After
the talk, look at everything and see a mahogany box with a 9 field chessboard
top.
Find
Richard:
Go outside and look
around. Go to the path fork and talk to Louis about the doorbell. Go to the Old
garden.
Abandoned House
– Look at the house and note a tower attached to it. Look at faucet by
Richard’s feet to take firm wire holding the hose from faucet. Take the
path to abandoned house. The door is locked and no other possible way to enter.
Enter abandoned
house – (Right) click the door and note that the key is on the other side.
Insert William’s mourning card on door and then use the firm wire on door. Get
the key, use on door and enter.
Table – Check
the table by right wall. Open the small drawer and take the fountain pen.
Right click the pen in inventory to see it has blue ink. Look at everything.
Cabinet – Pet
the sleeping cat on the mantel of the fireplace and it runs away. The cat went
inside the cabinet. Open the cabinet and see it is dark there. Check the
newspaper clipping on the door and realize that Richard Gordon is a promising
biochemist doing research on mammalian blood.
Fireplace – Go
back to the fireplace and see a small door on the right. It is locked, right
click to note that it has a hexagonal lock. Pick up the key off the floor
just close to the logs by your feet. Use the key on small door and take the
candle and lighter with no wick.
Lighter with no
wick – Right click on candle in inventory and it says candle with a firm
wick. Right click on lighter and note it is an alcohol lighter with no wick.
Use the small knife-rook on candle to get wick. Click wick on lighter
to get a lit lighter.
Cabinet – Use
the lit lighter on cabinet to see a latch to a secret passage. Enter the secret
passage.
Richard at last
- Samuel surprised Richard and he dropped a flask containing the last sample of
EX-52 oxidant. Be positive on your answer to him. He wants you to go to
Leechdale and to the drugstore in the square to get Boron Oxidant EX-52. It
should be vigorously saturated blue in color.
Get the Boron
Oxidant:
Tower
laboratory – Look around at everything. Take a small bottle from
table by door and take the shards from the floor by Richard. Right click
on shards to note the label of the broken bottle. Exit to the abandoned
building.
Inside building
– Take the log, old newspapers from floor and tea
kettle from table. Exit to go outside.
Faucet by wall
- Click the empty bottle on faucet to get bottle with water. Right click
on fountain pen to see it has blue ink. Click fountain pen on bottle with water
to get bottle with dissolved ink. Click tea kettle with water from faucet
to get tea kettle with water.
Inside building
- Go to stove at bottom left of screen. Place old newspaper in stove, then logs
and then use lit lighter on the logs. Place kettle with water on stove. Wait –
the water will boil in a minute. Remember – a watched pot never boils.
<whistle> <tap fingers> Go out and look around. Go back and look at
the kettle to see steam coming out. Click the shard on the steam to get
label. Now to glue it on. Ah, where’s the glue?
Toolbox trial
– Go to gate. There’s a tool box beside Louis, who is fixing the doorbell.
Talk to Louis. Go to Eleonor inside the house and she wants Louis to mow the
yard. Back to Louis at the doorbell. Talk to Louis about mowing. Back to
Eleonor and ask her about everything. Back to Louis. Back to Eleonor. Then see
Louis mowing outside the manor patio.
Go to the toolbox at
the main gate. Take the glue and firm wire from the tool
box.
Use the glue on
label and then the label on the bottle with dissolved ink. Voila!
Oxidant.
Richard in the
tower lab – Give Richard the ‘oxidant’ and then talk to him about
everything.
Get in the
tomb:
Tomb – Go to
the Chapel left of the abandoned house. Check the stone flower pot (the soil is
different color) and the monolith of Dergham. Check the tomb to find out the
grate is locked. The path to the ruined old church is swamp.
Richard – Talk
to Richard and he says to ask Eleonor or Louis about the tomb key. Samuel says
to better ask Louis.
Garden – Go to
where Louis is mowing the grass. See his jacket hanging on the tree. Drop the
wire on the lawn. Watch. When Louis leaves, Click on jacket to get tomb
key.
Decipher the Tomb Puzzle:
Inside the tomb
- Use the tomb key on tomb grill door. Enter and look around. There are 3
statues, 3 inscriptions and 3 empty stone bowls. Read the 3 inscriptions –
Veine, Odire and Malite. Duh!
Richard – Talk
to Richard about the signs. Go out, visit the tomb, look at the soil, wait for a
while and then go back to Richard. Patience! When you go back to him and ask Can
I bother you for a moment? That’s the right time to get an answer from Richard.
Veine is the Irish God of Strife. Odire is the Druid Goddess of Harvest and
Malite is Old God of Water.
If you already saw the
newspaper clipping on the cabinet about Richard during his younger days worked
on mammalian blood experiments, you will be able to ask him for blood. He will
give you an ounce. Click on freezer to get blood.
Go back to the tomb
and on the way pick up the kettle with water from the stove. When in
front of the tomb, pick up some soil from the stone flower pot. Now we
have all of them.
Tomb – Place
the blood on left stone bowl under Veine. Place soil on middle stone bowl under
Odire. Place water from kettle on right stone bowl under Malite. When done
correctly for each statue, the light comes on. I can hear something.
Altar Puzzle
– The altar rise from the floor. See a Zodiac slider puzzle. There are 4 signs
under the tiles that show that the Zodiac tiles are to be arranged in
chronological order around the 4 blank ones at the center. Good
luck!
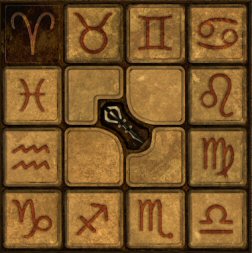
Take the key.
Automatically see Louis come, takes the keys and closes the tomb. You’re not
done yet but Samuel says to come back at night. What now?
Richard – Talk
to Richard and ask for his help. He wants something in exchange and is as
secretive as you. Come back when it’s dark and to tell no one.
Get back in the
tomb at night:
Watch Samuel climb out
of his bedroom when all is quiet. Look at the gardens under moonlight. Fireflies
and bats fly around. The tower lab is lit up and Richard must be waiting.
Abandoned house at
night – The door is locked. You must get Richard’s attention somehow. Go
back to the tower but pick up grit-stone on the walkway beside the pond. Click
the stones on the lit tower window. Enter and help Richard with his experiment.
Oxidant? What oxidant! Bang! As part of the agreement Richard tells you about
the acid in the flask to use on the tomb door. Pick up acid on table left
of door.
Tomb – Use the
acid on the lock of the tomb. Look at the stone lock on the tomb on the right.
Use the key taken from zodiac puzzle on stone lock. A secret passage opens.
Secret passage
- Enter and see a grilled door that is locked. Look at the lock and note that
the symbol looks familiar.
Richard – Ask
Richard about the symbol of the gate. He tells you about the key in Eleonor’s
jewelry box (remember the one on the table left of the piano). Take key
to the mansion from the table left of door.
Mansion – Use
the key on door and go to the table with mirror left of the piano. Look close at
jewelry box.
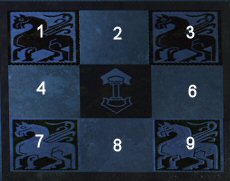
Knights
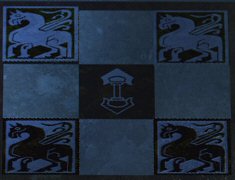
puzzle – The object of the puzzle is to get the white knights and the
black knights to exchange their position – white on top corners and black at
the bottom corners. Knights move in an L-shaped path.
white 7 to 6
white 9 to 2
black 1 to 8
black 3 to 4
white 6 to 1
black 4 to 9
black 8 to 3
black 3 to 4
white 2 to 7
white 7 to 6
black 9 to 2
black 2 to 7
black 4 to 9
white 1 to 8
white 8 to 3
white 6 to
1
Automatically take the
amulet. Go to the secret passage.
Crypt – Use the
amulet on the gate and enter the crypt. Save Game here!
Read the engraving on
the central altar – Use a stranger’s head or you’re own will
shed! Do NOT open the tomb or you will lose your head for
sure!
Look at the skulls
hanging at the middle wall. One of the skulls is labeled skull – third from
right. Click on it and Samuel will note that it is cracked. Click stones on the
cracked skull. The skull falls and breaks into pieces and a key falls behind a
grill. It is unreachable. Go to abandoned building and get the poker. Use
the poker on the key behind the grill. It is a key with a skull.
Use key with skull on
the monolith and a sound is heard. Now, you can safely move the tomb. Take
Dergham’s red sacred key.
Chapter 4
forgotten
bound…
Victoria is upset.
Bates explains that Robert has not returned from the Ashburry since you last saw
him. The nurse reported that he left the gates at midnight. Detective Collier
reported that a boy was found killed in the woods possibly by wolves.
Find out what
happened to Vick:
Village – Go
the Pub and talk to Harry and the gravedigger. The grave digger says that Vick
was torn in pieces and found by the Druid altar in Stonering where Samuel used
to play when he was a child.
Stonering –
Talk to Detective Collier. Note that the blood is only on the altar. Henry’s
cause of death is still unknown. There are 3 of the menhirs around the altar.
Look at the middle menhir and see the third symbol. Click William’s diary on the
symbol to record it. The vines clinging to the tree beside the symbol is burned.
Talk to the detective about the symbol.
Distract the
detective – Look at the plant on the ground by the menhir to the left, right
click and Samuel will note a piece of cloth. For you to get the cloth, the
detective needs to be distracted. Go to the rock on the ground at right of where
the detective is standing. Click the bottle of blood on it. Talk to the
detective about the blood. Right click the fern plant and get a
handkerchief that has the Gordon symbol on it.
Dr. Hermann’s
morgue – Talk to Dr. Hermann. Find out that Vick was not killed by any
animal.
Castle – Talk
to Morris about Vick.
Find out what
happened to Robert:
Castle:
Mail box – Go
to the mail box at the main gate and pick up a letter from James to
Father. He cannot stand being confined anymore and decided to do something about
it. He will wait at their meeting place.
Kitchen – Talk
to Bates and ask about Victoria. She is in her room and doesn’t want to be
disturbed.
Victoria’s room
- (Letter is trigger to talk to Victoria). Talk to Victoria about Robert and
find out that James is William’s illegitimate son. Victoria wants you to go to
Ashburry and check about Robert.
Ashburry:
Front desk –
Press the doorbell and later talk to the nurse. Learn about Robert’s time there
and James’ escape.
Outside the
building – Check the sewer. Go left and around the building. Take the
hammer from the roof of the shed. Check twice the dustbin by shed to get
syringe. Knock on metal door and talk to boiler man about everything.
Learn that to escape, one must go through foyer or sewer to the outside. Samuel
wants to see James’ cell.
Graveyard – Go
left and check the graveyard and the rear part of the graveyard.
Get into James’
cell:
– Drug the
boiler man:
Front desk –
Talk to the nurse and she will make a phone call for Samuel.
Sedative –
Enter the counter door. Take the vase and find out the cabinet is
locked. Check the vase in inventory and hear it clink. Right click the vase to
note that it has a slot of some kind at the bottom. Right click the
wallet to get coin. Combine coin with vase to get key. Use key
on cabinet. Check the medicines and pick up the bottle of white powdered
sedative at middle shelf close to left door.
Talk to nurse about
the graveyard.
Boiler man – Go
back to metal door of boiler room. Combine syringe and sedative. Use syringe
with sedative on beer by metal door. Now, how do we get him to drink it?
Turn the heat
up – Look close at boiler room window left of beer case. See the machinery
of the boiler.
Go back inside the
sanatorium. Use the handkerchief in fountain to get wet
handkerchief.
Go back to boiler
room window. See a loose rod. Hit the brick holding the loose rod with hammer.
OOPS – he heard us. Let’s try again, this time wait for the noise of the
machinery to increase and thump. Hit the brick with hammer in time with the
thump of the machinery.
Use the wet
handkerchief on machinery to trick the sensor of the thermostat to increase
the temperature.
Watch the boiler man
get a bottle of beer.
– Go through
Boiler room:
Boiler room –
Wait for a while for the sedative to work. Visit the graveyard again. Then enter
the metal door and see the man asleep. Sssh!
Go to the rear part of
the room and notice the intercom and the notice board.
Door – The
door has a numerical pad beside it and a key slot.
Go to the notice
board and take pin, small key and note all the poster especially
the Follies 1918 and the schedule.
Go back to the door.
Insert the small key and then press 1918. Door opens.
– Distract the
Doctor on duty:
Go through door and
see a doctor at the table. Samuel goes back to the boiler room.
Foyer – Talk to
nurse and get the duty schedule.
Boiler room rear
part – To call the Doctor away from the desk, click the duty schedule on the
intercom.
Go through the door
and down the foyer.
– Find Mr.
Bubby:
Talk to Ralph, the
patient. Samuel agrees to find Mr. Bubby to get his approval for the patient to
talk to you. Look in the dustbin on the right side of the foyer. Right click the
dustbin to get a doll’s head.
Go to the boiler
room’s stack of coal beside the furnace. Right click the coal to get the body
of a doll. Combine head and body of doll. The doll is still separated.
Right click the
separated doll parts to find a thread. Combine the thread and the pin
from the notice board together. Click the pin and thread on the separated doll
parts to make Mr. Bubby.
Give Mr. Bubby to
Ralph and he tells you that James cell is next door. Dr. Smith has all the keys
to the cells.
– Get the keys
from Dr. Smith:
Flip the light switch
found on the wall above the dustbin off. Click the wire connected to it to pull
it off. Click the other end of the wire to the fencing over the window. Samuel
says now to attract the attention of the doctor. Place the music box on the
fencing of the window. Samuel flips the switch on the make a live connection to
the fencing. Samuel hides and Dr. Smith touches the fencing. Samuel takes the
music box. Take the cell keys from Dr. Smith.
James’ cell –
Check everything.
The eye picture on
left wall is crumpled. Click on eye picture twice until it falls off and an eye
appear. Talk to Ralph and find out about James and Robert. Robert does his
experiment at night giving medicines to patients.
Take the dark
picture that James painted on the easel. Check and right click the hole in
the mattress to read James’ diary.
The doctor has locked
you in. You must get out before he comes back. Talk to Ralph about James’ escape
and he will talk about the hole under James’ bed.
Exit through the hole
under James’ bed.
Look for James
at Lighthouse at Sharp Edge:
Castle – Ask
Bates in the kitchen about the lighthouse depicted in James’ drawing. It
is at Sharp Edge.
Sharp Edge –
Saved Game here! Go to entrance and Samuel will say to look around first.
This will open a ‘look around’ exit to left of building. Go around and
scream.
Caught –
Everything has to be done fast. See that James will bury Samuel alive. Click
on Samuel to find out he is tied up feet and legs. Use the small knife-rook on
Samuel. James needs to be distracted. Now that the hands are free, click the
music box on James. James will look at the music box. If you’re not fast
enough, James will hit Samuel on the head and RIP.
Samuel and James have
a heart to heart talk. Find out about Robert’s experiments on the patients and
where James’ sacred key is. It is in the sewers under the cellar accessed from
one of the cellar drains.
In search of
Castle sewer:
Castle cellar –
Take cellar key in kitchen and use on door. Enter cellar and see that
there are 3 sewer grates that have unpleasant smell – by the door, right of well
and by the pump control in the rear. Look at the well and take a rope with 2
hooks. It might come handy.
Which sewer
grate? – Go to each sewer grate and drop a coin (right click
wallet). Find out which one doesn’t have water at the bottom – the grate to
the right of the well.
Sewer – Check
the fountain and pick up the cogwheel on the floor beside it. Go to the
right and see a mechanism that has a stuck red wheel. Look above the wheel and
see a cogwheel and it is missing 2 others.
Get to the
sewers:
Underground –
Go to underground and see a stairs that is flooded. We have to find a way to get
all this murky water drained.
See an opening on the
pillar and a wheel that is chained. Look in the murky water and also see 2
openings on the sides. One of the openings is for letting out water and one for
letting in water. The one for letting in the water is closed. See a cogwheel
floating at right edge of the murky water. Combine hook and rope together
and use it on cogwheel – the rope is bending too much.
– To get
cogwheel in murky water:
Open the closed
water outlet – Go to the railing on the left of the platform and take a
loose rod. Use rod on the opening on the pillar but it is too wide.
Remember what Bates was doing at the cellar. Go to the cellar above and use
the rod on the grinder. Go back and use sharpened rod on the opening
underground. That opened the flap of the drain. Aack – no water.
To get water to
flow – Use acid on the chains holding the wheel. Then turn the wheel.
Water flows.
Cogwheel –
The cogwheel reached the level of the drain but is still unreachable. Used the
combined rope and hook taken from the well on the cogwheel. The rope is still
bending too much. Combine rod on rope and hook to make a fishing pole. Use it
to fish the cogwheel.
– Drain the
murky water: Go back to the mechanism with red wheel.
Place the 2 cogwheels on the cogwheel above the red wheel. Turn the wheel and
the mechanism is running. Go back to the underground and see that the murky
water is drained.
James’ sacred
key – Go downstairs and pick up James’ chest. Open the chest to
get James green sacred key. A headache came on and you will come back
later to check this place.
Chapter 5
confession of
the truth…
Another nightmare –
the morgue, the saw, the body and the head of Dr. Hermann. Samuel is awakened
again by Bates. Ashburry’s head nurse called and wants you to go there. The
weather is foul.
Murder pouring
like rain:
Ashburry – Ring
the doorbell. Talk to the nurse. Robert is dead. He and James were found at the
lighthouse.
When the nurse leaves,
enter James’ cell. See James hanging from the ceiling. Look at Samuel’s name on
the wall in blood. Click on James to get Robert’s key.
Go to the plastered
hole and use the small knife on it. The knife breaks. Talk to Ralph and find out
that James didn’t kill Robert and knows who killed Robert.
Lighthouse at Sharp
Edge – Look at dark hole. Use lit lighter on the dark hole and see another
symbol. Click William’s diary on symbol to record it.
Morgue – Ring
the doorbell and nobody answers. Click on door and find it open.
Go down to the morgue.
Click on the sheet of the body on the table. It is Dr. Hermann. His head is in
the bucket. After Samuel’s bout at the sink, look at the symbol on the sink.
Click William’s diary on symbol to record it. See the rise of an altar on a
tower in front of a throne. The tower came up from a green abyss. It seems that
the 5 mortals’ statement on the book found with Marcus is coming true. Mordred
is coming!
Look at the body again
and see his clamped hand holds something but you can’t open the fingers.
Go to the lamp at the
table at far wall. Click on drawer for a close up look at the table. Take the
medical forceps. Click on the book at the drawer to get small plastic
bags.
Go back to the body
and use the forceps on Hermann’s hand to see hairs. Use plastic bag on
hair. Black hair – James has black hair. You need to get a sample.
The doorbell rings.
Meet Detective Collier at the foyer. He blames James for all the killings.
Get some of
James’ hair:
Ashburry – Ring
the doorbell and talk to nurse. Find out that James’ body is at the chapel in
the old graveyard behind the sanatorium.
Chapel at
Graveyard – Go left and back of the sanatorium. Talk to the boiler man and
he won’t talk to you. Go to the graveyard at left and see that the chapel is
locked.
Boiler man –
Talk to him and find out that he has the keys but he will not give it to you
even for a bribe.
– Get the chapel
keys:
James’ cell –
Go to the front of the sanatorium and climb down the sewer to James’ cell. Go
out of cell and to the boiler room.
Boiler room –
Look at the locker close to the exit of the boiler room. See and take the man’s
rubber boots. Hmm…
Get the rag
from the rail by coal. Use rag on boiler door. Too hot. Go back to James’ cell
and wet the rag either from the fountain in the foyer of the sanatorium or the
tap by the toilet in James’ cell.
Back at the boiler
room, open the boiler using the wet rag. Try to throw the rubber boots in
boiler. It is best to turn the valve above the boiler door to shut the vent to
the chimney. Place the rubber boots in boiler. Automatically leave the room.
Go back to James’
cell, under bed and to the boiler room in the back. Take the keys from
the boiler room door.
Chapel – Use
the keys on chapel door at graveyard. See James’ body. Take glass shard
from floor and use it on James to get hair.
Morgue – Click
on microscope and automatically focus the microscope. Click James’ hair and the
murderer’s hair on microscope. They differ. Morris?
Get Morris’
hair:
Stable – Read
the letter on the vise. Morris ran away. Click on the switch by one of the
stall. The light comes on. Take Morris’ cap. Right click on Morris’ cap
in inventory and see a hair in it. Click one of the plastic bags on cap to get
Morris’ hair.
Morgue – Click
Morris’ hair on microscope. It’s not Morris! Then who? Who else has black
hair?
Check on
Robert:
Castle – Talk
to Bates in kitchen and tell him about Robert and convince him not to tell
Victoria.
Robert’s study
– Use Robert’s key on door of Robert’s study.
Picture – Enter and look close at the picture above the table on the
left. The man has one of the sacred keys. We have to find out who this man from
the past.
Table – Look close at table and see a cocoa box. Click to open the lid of
the cocoa tin and click inside the tin to get a small key. Use the key on
top drawer of the table. Take a paper. Right click on the paper in
inventory and see it a code of some kind. It’s blank. Open the lower drawer and
see a picture of Robert’s wife that left him – Sophie. Go to one of the lights
by the bookcase and click the paper on the lamp. See 6 3 0 8 1.
Bookcase – Click on the MCXX (1120) above the middle bookcase and Samuel
says it is the year prior to building the foundation of the castle.
Clock – Note the clock chimes and is exactly 12 o’clock. Hmm. Click on
the red button at the middle of the hands and change the time to 11:20. Press
the needle on top. If done correctly, the needle will do a full turn and the
clock will chime.
Safe – The middle bookcase opens to reveal a safe.
Safe puzzle –
From the paper we need to enter 6 3 0 8 1.
Click on first frame
at bottom. Click on dial to change it to 6. Click on first frame to close
it.
Click on next frame
and change it to 3. Do all until you have entered 6 3 0 8 1.
If correctly done, a
click will be heard and the safe opens.
Look in the safe and read Robert’s diary about his experiments and his plans for
James. Read William’s last will that states that Victoria gets all of William’s
personal possession while Samuel gets the family’s estate – Black Mirror and the
lands. James was to stay in the Castle for as long as he wants. Robert was
disowned. Take the ring. Read undelivered William’s letter to
Samuel right before he died. Right click on the ring and see that it has
runes and Latin words.
In search of
Lothar’s key:
Victoria –
Knock on Victoria’s room. Talk to her about the picture. Learn that the man is
Lothar Gordon, who started Ashburry. He died mad and buried at the graveyard
behind the sanatorium.
Ashburry –
Press the doorbell and then go to the graveyard. Look at the graves and at the
rear part of the graveyard find an unmarked grave surrounded by dried, thorny
bush. Right click on the unmarked grave and see that it has the Gordon coat of
arms. You have to remove the thorny bush first.
Chapel – Enter the chapel and check the box by the door to get broken
gardening scissors.
Boiler room door – Look close at boiler room window left of the door. Take
the screw holding the clamp of the gutter pipe. In inventory, combine the
screw and the broken garden scissor to make gardening scissors.
Gordon grave – Use the gardening scissors on dried shrub. When done
clearing it, try to push the lid off but it is too heavy.
Boiler room shed – Go to the dark corner of the shed. Click and
right click the dark corner to get a metal rod. Use the metal rod on the
grave. Oh no! The grave is empty!
Foyer – Talk to the nurse about ancestor’s grave and find out that the
Warmhill parish administered the graveyard before Ashburry.
Warmhill
vicarage – Enter the church. Go to the altar and talk to Father Frederick
about the ancestor. He wants you to come back. Go out and look around. I went to
the castle, morgue, pub and cemetery twice before I got an answer from Father
Frederick. He said that Lothar was cremated and is now kept at the Gordon family
vaults.
Rear Cemetery – Go to the rear cemetery. Find that one of the crypts is
open. Talk to the gravedigger and ask him to look for Lothar’s urn. He comes
back and gives you the urn. Right click the urn to get ancestor’s sacred
key. Now only William’s key needs to be obtained. Click on tool box to get
flashlight.
Get William’s
key:
William’s grave
- Look at William’s grave and Samuel says that the ground has still not
hardened.
Cemetery by
church – Go to the cemetery right of the side entrance to the church. Look
at the grave and barrow. It’s too dark. Use the flashlight and take the
shovel lying on the barrow heap at extreme right of screen.
William’s grave
–
Get rid of
gravedigger – Click the shovel on William’s grave but Samuel says to get
rid of the gravedigger first. Take the peg (bottom of door) holding the
door open. Click on the wire tied to the door and fence and Samuel will untie
it. Samuel then places the peg on the closed door.
Dig
William’s grave with the shovel. Watch. Take the William’s blue sacred
key.
Church – Go in
front of the church and see the Gordon carriage. Samuel enters the church and
sees Bates go in to the confessional. Samuel stops Father Frederick from going
any further. Samuel enters the confessional and hears Bates’ confession.
Samuel!!!!
Chapter 6
Look through
the mirror…
Catacombs – Go
to the underground that you drained. Go down the stairs and look at the symbols
in circle on the wall.
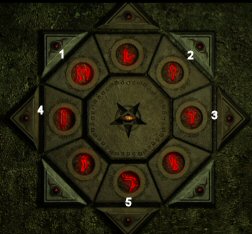
Pentagram –
The symbols surround a pentagram at the center. Use the ring on the pentagram
and the symbols similar and those seen beside the bodies of the 5 mortals
killed light up. Click the red jewel beside the symbols in the order seen
throughout the game. The door will slide open when done correctly.
Maze – Enter
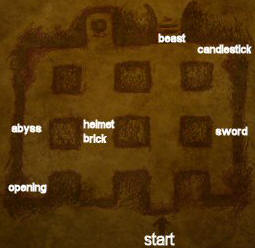
the catacomb. Look at the writing on the archway. Samuel doesn’t understand it nor do I.
Save Game here. Enter a maze. Look around as you
please. Don’t look at all the openings or you might get killed.
Ornate Door:
1. Go left from start (sign on archway). Go to room at top
of screen. Take the helmet from left at ground. Press the brick. You
will hear a sound.
2. Go at top of screen and see an ornate door that has an
opening where the lock should be.
3. Go 2 screens down and left. Look in opening and take
the talisman.
4. Go back to ornate door and place the talisman on
the opening where the lock should be.
5. See a stand and 2 alcoves behind it. Place the black
sphere from inventory on the stand. Hear sounds and the button under the lamp
lit up. Look in left alcove and get map of the
maze-catacomb.
Lights:
1. From the globe
stand , go right 2 screens down past the beast wall.
2. Light the candle
with your lighter. Hold the map on candle to see areas that are lit.
3. Go down one
screen from candle and pick up the sword from left at ground
4. Go to 2 screens
down from the globe stand and press button on the right wall to light the
lamp.
5. Go back to globe
stand, go left, go one screen down and see an abyss. You cannot get to the
button on the right.
6. Throw the helmet
and sword down the abyss and the floor slides to cover it.
7. Press the button
to light the lamp.
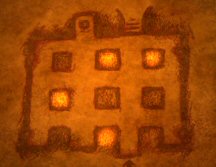
8. Go in front of
the beast wall and press the left and right buttons to light the 2 lamps.
An eerie gate is
seen. Enter
Black Mirror
Gate:
Look at the altar.
Pick up the dagger. Right click dagger in inventory to note that it is
Volpar, the ritual dagger. Click dagger on Samuel. He will shed his blood on the
container in front of the book on the altar. Blood flows to open the holes
around the book. Place the 5 sacred keys on the holes based on the color of
their jewels.
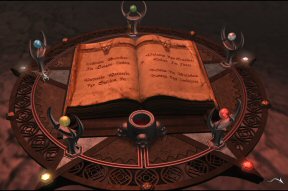
Read the verses.
Samuel has sealed the gate – Black Mirror between evil and this world.
Here there is
no judge to pass judgment. There is only me.
This document
may not be distributed without express written permission of the author and the
content may not be altered in any way.
For Questions
or Comments on this Walkthrough,
Please write to: MaGtRo
Copyright ©
10/2003 MaGtRo