Just Adventure original
Azrael’s Tear Walkthrough by Dan Kennedy
Soothing the Savage Beast
Make your way along the corridor to the east – you’ll pass by an intersecting corridor to the south – and walk up to the doorway. Your scanner will tell you several things: the room ahead is the Cathedral, there’s a large beastie in here, and you’ve got a distress signal from Colin the Raptor (he was the one who sent the letter to you telling you to come to Aeternis).
Open the door and take a peek inside – you should see a very large Saurian walking about (remember the viewing from the Library?). Note the layout of the room – there is a smaller walled room (the Vestry) completely inside the Cathedral. You want to make a run for the door to the Vestry and get inside before the Saurian eats you. You know from before that these beasts can be pretty slow, so this can be done fairly easily. The location of the door is pictured below. You must run a bit to the left, and then find the door in the wall of the Vestry.
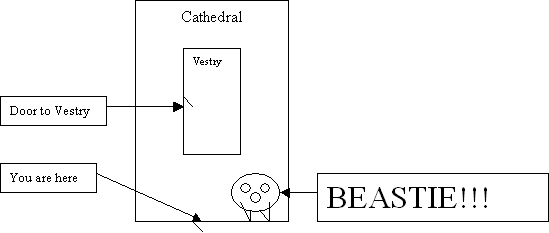
Once you find the door, open it and go in. Walk to the southwestern corner of the room, and spot the chain hanging on the wall (left of the organ). Unlatch the pin at the bottom end of the chain…and listen as all of the organ pipes fall into the outer chamber (the Saurian doesn’t sound too happy about it either). Now walk back to the northeast, and enter the door on the east wall to the other part of the vestry. Turn to your left and pick up the page on the table. Now click on the box to open it and take the medallion key inside the box. But wait – click on the box a second time to open a false bottom, and pick up the brooch as well.
Before you return to the outer Cathedral, note the staircase leading down to the south in here. Return to the main Vestry room, and go out the north door. Once you are back in the Cathedral, go east, and then south – the beast has been trapped between a large hole in the floor in the southeastern part of this room, and the large organ pipes that have fallen to the floor behind it. Carefully take a look into the hole – it appears that there is another room down there.
There is a large mosaic on the floor of the Cathedral at its eastern end – click to view it. Hmm, maybe there is something to this holy thief business, as the people reaching for the grail in the picture look like Raptors. Note the set of 12 crests along the east wall of the room. Finally, look at the stained glass picture of a group of 4 Templars enjoying some biscuits – Malik, Tobias, Jacques (de Molay), and a knight whose name is obscured (although comparing the crests indicates that this is Tallum). This picture is obviously a further clue for the door mouth puzzle that you already solved.
Now walk all the way around the Vestry to the southwestern corner of the Cathedral where the organ pipes lay on the ground. There is a brass lever lying up against the first pipe here, quite close to the Vestry wall. Grab this lever, go back to the door in the west wall of the room, and leave the Cathedral.
Odde Claude
Walk up the corridor, and when you get to the intersecting corridor going south, take it. Walk to the door and enter another spiral staircase. Open the door at the bottom and walk down the hall to the next door. The next room is the Crypt – open the door and come in. If you look up, you should be able to see the head of the Saurian looking around – you’ll certainly be able to hear it. The blocked doors here in the north and south walls actually lead to inaccessible burial chambers.
Have a look at the stone coffin on the floor closest to you – the plaque reads “Claude”, the knight that Malik’s experiments were conducted on. Look into the crack to see the hideous beast that they created. The coffin is locked, and thank goodness! The other coffin is uninteresting, so walk to the southeastern corner of the room – there is a narrow corridor you can walk along that will take you behind the bars along the eastern wall of the room.
Once you get to the northeastern corner of the room, turn around and watch the beast, who can finally see you from its perch above. Unfortunately, it very slowly topples into the Crypt, and crushes its head below. Carefully watch Claude’s coffin area – the beast’s tail knocks the lid off the coffin, and the Claude-creature is let loose. Don’t worry though, it sort of staggers around a bit, and then disappears into the wall.
If you want, go check out the dead beast and Claude’s now-empty coffin, but return to the northeastern corner of the room and look up at the statue against the east wall. Does it look familiar? It should – you have a picture of it in the Flytrap papers you got hidden inside the plant. The statue in the picture has four items that are not present now – a knife, a hilt for the knight’s sword, a ring, and a shoulder-piece. You already have the hilt and the shoulder-piece, so place them on the statue in their proper positions. Keep an eye out for the ring and the knife as you progress through the game.
Open the door to the north here, and walk along the corridor to the bottom if a staircase with pictures on the walls. There will be a door about half-way up, but continue all the way up to the top. Open the gate here with the medallion key, and walk out onto the balcony. Read through the book on the lectern for a summary of Tobias’ thief vision. Return to the stairs, and now open the door half-way up. Follow the golden corridor, and unlatch/open the door that leads out into the cathedral again.
Spin The Wheel
Return to the Vestry and go through the door to the east. Note the locked lever on the floor to the northeast. Attach the brass lever to gain more leverage, and click – still jammed. Descend the stairs to the south, and follow this hallway along until you reach a water wheel room. The lever to the left stops and starts the wheel. Click to stop it so that the edge between two of the flat sides of the wheel sits right at the top of the wheel when stopped.
Walk out on the wood walkway, get onto the wheel, and climb down to the wooden platform in the southeastern corner of this room. Exit though the door, and walk over to the eastern wall of this oddly-shaped room. The door to the north here is locked, and a strange looking barrier with a familiar symbol in its centre is found to the south. The symbol matches that on the brooch, so grab the brooch and click on the barrier to send it flying backwards into the water to the south.
Proceed down this corridor, and scan the door to your left – a chamber of unknown use filled with poisoned gas. Instead of opening the whole door, just click on the panel on the bottom part of the door – the heavier-than-air gas will run out and into the grate on the floor here. Once your scanner says it’s safe to go in, open the door and do so.
Inside you will find a round room with a locked door to the east, a ramp leaving to the south, and a mummified body to the north. Walk up to the body, and have a close look at its left hand (that’s his left, not your left). Grab the ring on his finger, and proceed up the ramp to the south. At the top you find an odd room with ramps running up either side to the south. Go up to the top of the ramps and examine the symbol at the top – its got the grail in there, but the mechanism behind it is locked. Return to the round room, exit to the hallway, climb back up the water wheel, and walk back up to the Vestry.
Now try pulling on the brass lever again – something happens this time, but a trip out into the main part of the Cathedral reveals nothing new. Evidently the moving water wheel jammed the lever from working – but perhaps the wheel has to be turned on again to make the mechanism work (wherever it is!). Walk back down the staircase to the water wheel, turn it back on, and return to the surface. Now walk out into the main Cathedral room to the eastern wall – the crests have been removed to reveal a shiny symbol and a stone triangle.
Coolin’ with Colin
Walk up to the stone triangle and click on it to shift it towards you. Move around to the back of the triangle to reveal a narrow passageway leading west under the stone. Proceed down this twisty passage to a staircase – go to the bottom and enter a similar hallway. This hall ends at a round, decorative room – your scanner should indicate that Colin’s helmet is in here (he is actually dead), and that there is a Saurian present as well.
Peek in – the beastie is asleep on the right side of the room, and the only other exit leads to the south. You can either wake the beast up and then blast it with your gun, or just walk along the opposite (left) side of the room to the south exit. Once you get there, note Colin’s very dead body impaled under the grate. Click on the grate to open it, but before proceeding through, click on the lever on the right side of the doorframe. This activates a piece of metal that will catch the grate when it tries to fall on top of you.
Inside this next room, find a diary page and the 4th Shield on the ground here. When you touch the shield, the grate comes down fully blocking your retreat, and the long dead Colin tries to talk to you. Evidently he doesn’t realize he’s been cut in two – if you want to keep speaking to him and asking him questions, don’t let him know he’s dead. Apparently he wasn’t the one that sent the letters that brought all of the other thieves to Aeternis.
Decisions, Decisions
Once Colin zaps out, leave the room via the corridor to the southeast. The room ahead has a large stone statue, and a human is present. Open the door and walk into the room – note the large stone head to your right. Once you get far enough in, the mouth of the statue opens and Tobias speaks. He tells you to choose the door to the right, and warns that others are trying to sabotage the test – you can only trust him.
When the message ends, and you progress farther into the room, Geffrye hails you from the window of the door on the left. He indicates that Tobias is planning to betray you and the test, and that he cannot be trusted. Tobias wants to use the grail to become supreme leader of the world. Geffrye can help us get back to the Orrery, but we will have to go through Malik’s old area, which has been sealed for centuries. He will meet us at the exit to Aeternis after we get the grail. When finished, Geffrye walks down the corridor behind him, leaving you to decide which path to follow.
You will definitely want to save here, since following either knight will lead you into new, different parts of Aeternis – when finished, you can come back and play the other choice (it is possible to win by following either path).
Followyng Geffrye….
Walk into the corridor after Geffrye, and follow it to the west. Geffrye opens a door here and beckons you to enter. Start proceeding down this chute – it isn’t long before you are sliding uncontrollably down the passageway. You end up in a bright, swirling room with no discernible exit, and poison gas (courtesy of a glowing fungus) eating away at your health bar. The trick here is to move to the west wall of the room – clicking on the vague outlines of a door in the centre of the wall will expose a doorway (4 clicks should clear the fungus away). Immediately open the doors and go through them.
You immediately have a choice of direction: go left / downstairs, or right / upstairs. Do not go to the left – this leads to a locked door and certain death (interestingly, the locked door is the same one that you saw in the round room with the mummified corpse). Turn to your right, go up the staircase, along the hallway, and open the door before you. Enter Malik’s lab of unspeakable acts.
Inside, you’ll see a table with a piece of meat on it – of unknown origin. The door on far side of the room (north) is locked. There is a small empty alcove along the east wall of the room. Standing by the door you came in through, you should see a scorpion tail blocking a narrow hallway to the south. In the southern part of the room, some kind of strange creature attached to wires lies dormant surrounded by bookcases. Walk past the creature to the southwest corner of the room and click on the bookcase here – the way forward is evidently locked.
A central pillar has three levers sticking out of it on its east side. Click on the right lever first – this raises the previously dormant creature up via wires. Click on the centre lever, and the beast awakens. The left lever frees the creature, which promptly runs forward and circles the table in a clockwise direction (meaning that it runs past you and around the other side of the table). It will circle the entire table and then eat you, so as soon as it passes by you the first time, follow the creature around the table and dive into the east wall alcove. The creature will lose you, and then bust through the door to the north.
Come out of the alcove, and go back to the southwestern corner of the room. Click on the bookcase again to open a secret door, and pick up the book on the stand. The book lists the followers of Malik. Now pick up the papers hidden under the book. These are Malik’s journal entries; a window into his developing madness.
Exit the room to the north, and follow the corridor until it ends – you find yourself at an opening overlooking the wall of the Ziggurat. Take a deep breath and walk straight out the opening – you will fall onto a ledge on the outside of the Ziggurat wall. Walk along the edge until you reach the opening to the tower room, and then proceed up the stairs to the Shield alcove.
Skip ahead to the section titled “The Downward Spiral”.
Following Tobias…
Open the right door and enter the ornate-looking hallway. The door behind you closes and locks. Open the door at the end of the corridor to enter a maze room. You begin atop a small platform with the maze below – walk to the edge of the platform and look to the northwest – that doorway you see in the northwest corner of the maze is your required destination.
Jump down and enter the maze. Immediately turn to your right and proceed to the northwest. That crackling sound you hear is the sound of scorpions running around the maze. Take a short jog to the southwest, and again turn to your right to continue. Keep going to the northwest until you enter an open area – now turn to the south and go straight, making your way to the maze’s southwestern corner. Run up the wooden staircase, and go through the door at the top.
The next corridor takes you to a spiral staircase – leave via the middle exit, follow the next hallway, and unlatch/open the door at the end. You find yourself back in the flooded grain silo with a human and the water monster present. Proceed inward a few steps, and Jack hails you from atop his beastie boat. A number of the paths in here have been damaged – Jack is floating over to lend you a hand. All of a sudden, the water monster reaches out and grabs Jack for some lunch.
Walk across the Saurian’s body to the other side of the path. Continue in a southwestern direction past the first intersecting path, and turn to the northwest at the next path. Walk northwest to the next intersecting path. Look to the left – you will see part of the water monster’s body sticking out of the water here. As at the Docks, any of several items applied to the water – Oisin’s amulet, Aqua Fortis, Inkwell – will get rid of the monster.
Continue travelling northwest, and enter the double doors on the northwestern wall. Proceed through Geffrye’s Studio and leave via the north door. Take the narrow ledge back to the tower room, and go up the stairs to the shield outline alcove.
The Downward Spiral
As before, click on the shield to bring you back to the 8 sided room with the models. Walk into the centre of the room, grab Shield 4 from inventory, and place it on the shield outline on the north wall. The room returns to its position just outside the Orrery. Pick up the shield again, and go out to the east. Open the door to the Orrery, and step through.
Now walk over to the east side of the room, and step on the stone step that is sticking out of the floor on this side of the planet model. The hole that accepts Shield 4 is uncovered. Place the shield in the hole, and the entire model lifts up to reveal a pit with a spiral path leading downward. Grab the note lying near the start of the path. This is a map showing the proper way to leave Aeternis, but who left it here, and is it a trap?
The object here is to navigate along the narrow boards to the bottom of the pit without falling off onto the sharp spikes below. You will probably need a bit of luck to get to the bottom – if you do fall, hopefully you will land on another board below. Judicious use of your save game function can also be useful. Be sure to grab the knife lying at the beginning of the second board.
How do you get down this pit of despair? Keep trying! You can try the following path, but I make no guarantees as to your success with it. Carefully make your way along the first 3 boards in succession. Now walk onto the next board that crosses across the centre of the pit. Staring straight down, walk along this board until all you can see is the wall ahead. Take two steps backward, turn 90 degrees to your left, and jump off – hopefully you will end up on one of the lower boards below, and can walk to the bottom of the pit. If not, try jumping off from various points on this board.
Once you’ve successfully arrived at the pit’s bottom, make your way to the centre of the spikes to the hole in the floor and jump through. You land onto a flat, wide surface as your precious lifeblood drains away…but wait – something has pulled you back from the brink of death! It’s the grail – resting on a raised pillar in the centre of this big cavern.
All Hail the Grail
Walk up the ramp, and face the grail looking to the east. The pattern design underneath the grail describes the path one must take to get out alive. You are currently standing on the white square in the bottom left part of the diagram. The correct sequence is to go east two nodes, northwest one node, south two nodes, southwest one node, east two nodes, southwest one node, and northwest one node. This takes you to the second white square, and freedom. Don’t walk off this exact path, or the ceiling of the room will come down and crush you.
Grab the grail as the floor falls away, and begin running along the correct path to the exit.. Once you get to the final node, the square of stone rises up through the roof of the cavern, and places you into a small room with a door to the north. Open the door, and exit the room. You are suddenly standing on a rock platform rising through a deep cavern. The platform finally stops, and you find yourself standing inside the Ziggurat tower room. Open the door to the northwest, and enter the hallway to the Cathedral.
Its almost time to depart dark Aeternis, but before you go, finish off the Statue puzzle from the Crypt. Go to the door in the southeastern corner of the Cathedral, walk along the golden hallway, walk down the staircase, proceed along another corridor and enter the Crypt. Place the ring (from the mummy) and the knife (from the spiked pit) on the statue, and a small shelf will emerge from the left side of the statue. Pick up the papers from the shelf and read them. Evidently Malik (Spider) and Philip (Cobweb) were the two spies placed by the Prieure in Aeternis.
Return to the Cathedral and approach the door in the north wall. This door has been unlocked by the placement of the 4th Shield in the Orrery. Enter the door and walk along the hallway into the next labyrinth room. You will spot Tallum standing in the centre of the room waiting for grail thieves. As you begin your descent down the ramp towards him, the grisly figure of Claude comes out of a door below and advances on Tallum. They wrestle about, and eventually fall into the depths.
You are now free to walk through the room to the door on the far (east) side. Open this door and enter the small chamber beyond.
Up or Out
Your choice of ending is in part dependent on the path you took through the game. If you followed Geffrye’s path, he will be waiting for you beyond the next bend. If you instead followed Tobias, Geffrye will not be present, and thus that ending will not be available to you. Whatever your path, there is always a way to win your freedom and end the game alive. There are also some ways to die. Save your game and be sure to try them all.
Geffrye’s Path
Enter the corridor to the east – as you come around the bend, Geffrye will emerge and encourage you to follow him. He has secured Tobias’ grailstone so that he might leave Aeternis with you. After he disappears, walk forward until you reach the corridor to the west and follow Geffrye. The next room is a foyer in front of the exit door. Walk towards Geffrye – the rumbling sound signals that the corridor has collapsed behind you. All of a sudden Tobias emerges from the south, steals the grailstone back, and breaks Geffrye’s neck. He gives you a mean stare, and leaves. Has he conceded defeat? Walk up to Geffrye and listen to his last words before shrivelling up into a 1000-year old man.
Skip to the “Blow This Joint” section.
Tobias’ Path
Proceed down the corridor to the east – when you get to another corridor leaving to the northeast, take it. Proceed to the next door, and enter the Aqueduct area. There is a Saurian beast in a cage immediately to your right. Click on the cage to let the beast out, and stay behind the open door of the cage. The beast will eventually take off to the north away from you. It keeps going until it gets caught in the booby trap that was waiting for you.
Cross the bridge and approach the dead beastie and the killer statue. Walk into the small alcove to the east, and proceed around the statue to continue north. Open the door at the end of the hall, and follow the next corridor. The door ahead of you is the way out of Aeternis.
Skip to the “Blow This Joint” section
The Beast is Dead
If you’ve killed the Saurian beast on the Aqueduct by flooding this area of Aeternis from the model room (I told you not to do this!), you still have a way out. Backtrack all the way back to the Cathedral, enter the Vestry, and descend the stairs to the water wheel. Stop the wheel and cross it to the room to the southeast.
For a laugh, go to the small alcove to the left of the north door in this room, and open the door from your position in the alcove. The monster from Mailk’s Lab comes tearing through, and then runs straight into the water to the south. Stupid monster. Proceed into the circular room with the mummified knight, and go up the chimney ramp to the south. Go up one of the side ramps, and face the crest at the top. Grab the grail and click on the crest to open a trap door below your feet. Move forward and drop into a maze.
That sound you hear are scorpions looking to bite you. Head south past the first intersection, and turn right (west) at the next intersection. Now go straight until you come to a door with a grail crest on it. Use the grail to open the door, and walk into the exit chamber towards the big door.
Blow this Joint
Approach the door, grab the grail and press on the lower crest to unlock the portal. Your scanner indicates that more than 3 years have passed in the outside world. Open the door with a click, and proceed outside.
The final movie of the game plays – the Prieure descend on you as you step out into the fresh air again. You eventually become a super important knight along with Tobias’s brother Cesar. Only the very best of humanity will be saved. Who wrote this game anyway, Ayn Rand?
Other Endings
There are two ways to come to a bad ending for in the game (other than dying!):
- From the “Up Or Out” Section, proceed down the last corridor and enter the room at the north end of the corridor. Tobias, Edgar and Warren the Raptor are all waiting for you in here. First Tobias gets Warren to off Edgar, his crazy buddy. Then Tobias explains how he is the true thief – he will take the grail, and your outfit, and eventually rule the world. Warren then shoots you dead.
- From the “Tobias’ Path” Section, walk to the Aqueduct, and head directly north without letting the Saurian out of its cage. At a certain point a weird statue comes directly towards you, and you are eventually skewered. You turn your head to gaze on the co-conspirators Lurka and Philip, who will take the grail for themselves.
View this guide raw, exactly as the archive holds it