Just Adventure original
Azrael’s Tear Walkthrough by Dan Kennedy

Although billed as an action-adventure, Azrael’s Tear contains few of the elements traditionally associated with the action genre. True, there are many ways to die in the game, the most common involving falling off a narrow path into poisoned thorns / biting scorpions / gaping chasms / deep water, and there are a few instances when shooting is required. But really this is a pretty standard adventure game, with a few action elements.
Introduction
Although billed as an action-adventure, Azrael’s Tear contains few of the elements traditionally associated with the action genre. True, there are many ways to die in the game, the most common involving falling off a narrow path into poisoned thorns / biting scorpions / gaping chasms / deep water, and there are a few instances when shooting is required. But really this is a pretty standard adventure game, with a few action elements.
The game is dark, both in mood and in colour, taking place in a giant underground complex. The game universe seems to go on and on from one amazing location to the next. The story, although confusing, is a quite engaging tale involving your quest to find the Holy Grail, which is guarded by a number of ancient Knights Templar. The game’s secret weapon is its graphics, which manage to be simple (real-time rendered 3D on one CD!) and extremely evocative at the same time. Those looking for the clarity of a Cryo release should look elsewhere – the graphics are quite blocky and pixelated, but manage to really set the mood and capture the proper tone.
The interface is a little difficult to master; I found the easiest configuration was to use the four keyboard arrow keys for movement, with Page Up and Page Down to look up/down, and the left mouse button to pick-up/examine things.
As a mostly pure adventure fan who delights in exploring and solving every nook and cranny of a game, Azrael’s Tear presents a few problems – occasionally there is more than one way of solving a puzzle, or getting around an obstacle. Even worse, choosing a particular path can sometimes prevent you from exploring some locations of the game. My approach with this walkthrough is to present a tour that gets you to all of the locations, with some alternative paths discussed at the end. I’ll try to take care of some of you “action-avoiders” as well where appropriate.
The Story So Far….
Apparently its 2003, and everyone’s sick – things are just not going well. [Note to developers – next time, set your game more than 7 years in the future!] Mankind has gone in the dumps for some reason, and somehow the Holy Grail has made a strong comeback as a potential saviour of the human race.
At the same time, sever tectonic upheaval (ooh, the geologist in me is getting excited) has unearthed many previously unreachable archaeological locations across the globe [thankfully for adventure players, Atlantis was not one of them!]. A new breed of thieving archaeologists known as Raptors with advanced technology have been scouring the planet using advanced technology, and competing with each other for old booty.
As a Raptor yourself (no, you’re not Vince Carter), you have received a note from a competitor named Colin Scott that indicates he has potentially found the present location of the Grail in Scotland within an underground complex known as Aeternis. Apparently a dozen Knights Templar transported the grail from Jerusalem to Scotland in the 12th Century. He offers to split the profits with you, and naturally you high-tail it to Aeternis.
You watch a rather cryptic introduction that indicates that the knights have been waiting for almost 1000 years for you to show up and try to find the grail. The game then plops you directly into Aeternis. You find yourself in a northeast – southwest running corridor, with a couple of strange looking lizards running around. That greyed area (with the 2 scrolling buttons) on the left side of the bottom panel is your inventory. A local map can be seen by clicking on the lower of the 2 buttons next to the inventory (right-click to go back). The orange-y bar near the centre is your health-o-meter, and the button underneath it brings up an interface to load/save/quit etc. (hit the button a second time to remove the interface).
The writing on the right side of the screen is your automatic scanner, which spits out information whenever you are about to enter a new area, or when you click on something to scan it. The cross-hair cursor turns into a boxy-looking thing when you can scan something (like the lizards, or the big rock in the hallway).
Let’s Move, Helmet-Head!
Proceed down the hallway towards the northeast door (a compass at the top of the screen tells you which direction you are moving). Grab the piece of paper on the floor half-way towards the door. This is a page from the Head Knight Tobias’ journal – you’ll find these pages spread all over the place in here. The pages give little snap-shots of the lives of the Templars over the last 1000 years. Right-click to end the page view (the page is now in your inventory).
Keep moving to the northeast door, and click to enter (note the arrow shaped cursor that turns yellow when you are close enough to open the door). Go through the short hallway, and read the scan for the next room (this is handy when men or beasts are about). The scan tells you that there are 3 exits to the room ahead, and “scalding” water present. Open the door and proceed in, but be careful about walking along the wooded walkway – if you fall off, you will drown and die!
As you move along the walkway, note the round valve to your right. Click on it once to turn on the water power to…something in the next room? The door straight ahead is locked (go check if you don’t believe me), so turn to the right, and exit the doorway at the end of the walkway’s right branch. Proceed down the short hallway and read the scan for the next room – lots of equipment here, 5 exits, and a human present (mutation?!??).
Enter the room and look about – almost immediately you should hear a voice calling out for help. Note the big doors to your left (locked), a funny looking metal car in the centre of the room, blocks of granite here and there, and the ramp along the far wall. Begin walking towards the mine car, keeping to the left of the holes in the floor. Pass to the right of the car, and creep up to the large crevice in the floor beyond the car. You will see a strange-looking person standing below. Look down, and inch up to the crevice until the creature addresses you. Ask him about his name, and the “tests” – if you want to hear the response again, hit the “R” button in the bottom right corner of the screen. “Lurka” is trapped down here – he will answer some of your questions before you help him, but he may get tired of you and tell you to buzz off.
After your conversation is completed, if you still want to help him (this is optional), press the grey patch on the top of the right-hand iron train rail, just as it starts to cross the crevice – the rail will fall into the hole, allowing Lurka to climb up and disappear. Now turn to your left, and head off towards the exit located south of where you stand.
Join the Baptist
This room is the Bapistry, and your scanner indicates there is complicated optical equipment in the floor. Walk in and examine the stone font in the centre of the room (stagnant water), and the stone bath in the corner (ignore the door to the west for now). Have a look at the mirrors along the south wall – the mirror on the far right is broken enough to allow passage to a room behind.
Step through the mirror into another room similar to the first. Walk around the stone font and examine it – here is your optical equipment, along with a stone bible and a pressure pad in the ground. Interesting – now walk over to the stone bath and look at the plaque on the wall behind the basin – better copy it down.
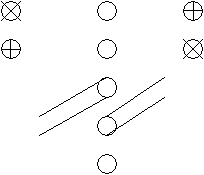
Now walk up the staircase (west wall) to the balcony above the room. There are 4 frames set up here, with the third occupied by a piece of a tapestry, and two additional pieces on the ground below the frames. Flip over the third frame (the one with the tapestry piece already attached) and read the message. Pick up the pieces and place them on the proper frames: the one with the red man in the foreground goes in the first position, while the one with the marching baldies goes in the second. We are still missing the fourth piece, so climb down the stairs and exit the room through the mirror. Exit the Bapistry, and re-enter the Mine Working Area.
Lift and Separate
Just after you re-enter the mine room, click on the large granite block closest to you – your scanner should indicate that this piece has a key inside it – but how do we get it out? Walk along the south wall of the room, and proceed up the ramp to the top. Grab the pair of rusty tongs on the floor here (for later), and then examine the lever control box (four top levers, with an additional one located on the front of the box), which controls the crane hanging to your right. Now look across the room at the two pieces of equipment on the far wall – on the left is a crusher, and on the right a giant saw. We’ll want to saw the block in half to get the key (don’t crush the block, or you’ll wreck the key!).
Press the second lever to the right, and the crane will come towards you and stop. Now press the lever on the far right to lower the crane, and then press the front lever to close the claws. Press the far right lever again to raise the crane, and click on the block to confirm you’ve grabbed the one with the key in it. Now hit the second lever from the right (this puts the crane back in its original position), and then press the far left lever twice to bring the crane to the other side of the room right in front of the saw equipment. Finally, press the front lever once more to place the block in front of the saw.
The controls for both the crusher and the saw are located just to the left of the door you first entered the room by in the northeast corner. There are two levers on the wall here – press the right one to activate the saw…..uh-oh, nothing happened. Try the crusher – well, it seems to work. You will have to exit the room, and go back into the wooden walkway room to change the valve setting to operate the saw. Exit the door, enter the wood walkway room, walk to the circular valve, and click it twice to switch the power to the saw. Now re-enter the mine area, and press the saw lever to operate it. Walk to your left to the spot under the saw, and pick up the rather large key now on the ground here.
Making Water
Proceed over to the door in the southeastern corner of the room, open the door, and go down the hall to the next room, which our scanner says is “moist”. Enter the room, and go to the right to the large piping panel on the wall. Does it look familiar ? It should – our sketch from the Bapistry! We can see the five holes, the two pipes leaving the holes, and the four surrounding valves, but the configuration seems wrong. Specifically, the pipe leaving the 3rd (middle) hole – down and to the left – appears to be in the right position, but the pipe that should be leaving the 2nd hole from the bottom (up and to the right) is attached to the 2nd hole from the top.
Pull on the straight lever on the very right side of the panel to unlock the right-side pipe, and press on the lower right valve to position the right-side pipe in the proper configuration. Finally, press the lever to lock the pipe back into place. You should hear the water start to flow.
Now approach the well on the other side of the room – once you get close enough, a ghost rises out of the well and asks you about Oisin her beloved. Apparently this lady doesn’t know she’s dead (this happens a lot in Aeternis). Try talking to her, but she’ll get upset once she realizes she is dead. Once she goes back into the well, have a look at the corpse, and note the key here. The water is too hot to grab the key, so use the rusty tongs to grab it. Once you’ve got the key, leave the moist room, and proceed back to the Bapistry.
Go through the mirror again and approach the stone bath – the water has caused a glass brick to become dislodged, and it is now sitting on the bottom of the bath. Grab the brick and place it on the stone bible on top of the stone font. It fits into place, but you cannot look through the glass as the tapestry above has not been completed. Exit the room through the mirror, and proceed through the doorway in the northwest corner of the Bapistry.
What a Sorrry Orrery
According to your scanner, the room ahead contains complex machinery, including a large model of the solar system. Enter the Orrery, and note the sorry state of the model, lying about on the floor.
Your first task is to raise the central turning mechanism of the model. Approach the control panel in the northwest corner of the room and click on it for access. The screen displays a series of circles with a small dot at the top of the panel. You control the downward progress of this dot using the button in the top left corner of the panel. Hit the button once to move the dot down one position, and now rotate the 2nd interior circle (by clicking on it) so that the opening will allow the dot to progress further downward. Move the dot down two more spots, and now rotate the two smaller interior circles so the gap in the upper one will allow the dot to progress downward even further. Again move the dot downward until it reaches the centre of the diagram, and the mechanism kicks into gear.
The central post has now been raised and is turning, but you’ll have to leave the room to get the whole thing up and running. Leave the Orrery via the north door, and proceed up the hallway. Your scanner warns of a large Saurian beast up ahead in the next room, but the animal is actually trapped in the central portion of the room – so go ahead and enter.
The Saurian is held behind iron posts located between the 4 main pillars of the room. If you look closely, there are some levers and pictures in the inside surface of the north and south pillars – but access is blocked by the beast. Circle around the cage to the north pillar, and pull on the lever. Duck your head around the pillar to see the beast cruelly crushed by the cage bars (well, at least you didn’t have to shoot it in the cage!).
Move around to the inside of the north pillar and examine the two plaques here – the lower one shows a set of open doors. Pull the lever to the right of the upper plaque, and a set of doors somewhere off to the north opens. Now move over to the south pillar and examine the plaques – the lower one shows the Orrery model. Pull the lever to get that baby swingin’. Just to make sure everything is peachy, return to the Orrery (via the south door) to view the model in action. Note the ceremonial shield-shaped hole in the floor in front of you (at the base of the model) as you enter the room.
Return to the dead beastie’s room, and exit via the east door. Move along the hallway until you come to a wooden platform to your left. Your scanner will tell you that there is another Raptor about (Lincoln), and a violent one at that. This wood platform actually conceals a passageway below, but there is no way of opening it from this end. Continue along the hallway and enter the door at the end – you are back in the main mine area, one the far side of Lurka’s crevice. Nothing to do here, so proceed back to the dead beastie’s room.
Lincoln Assassination
Proceed to the north, and approach the set of doors you opened remotely earlier. This is an unfinished room with several doors. Once you step into the room, a motion detector seals the doors, but since you unlocked the double doors behind you, they stay open. The now-sealed doorway in the northwestern corner of the room actually leads out into that first hallway you arrived in – we’ve almost come full circle.
A mirror is propped up in the southwestern corner of the room. You need to move it to light a patch on the eastern wall, but the mirror is booby-trapped with poisoned gas. Move the mirror, and quickly leave the room, retreating to the beastie’s lair for a few minutes to let the gas dissipate. Go back to the room, and check out the wall panel the mirror is now directing sunlight to on the eastern wall. The panel is locked, but can be easily opened with the key you got from inside the granite block. Inside you find a shield, which will be useful back at the Orrery.
Head over to the door in the northwestern corner, and try to step through – instead you find yourself falling through the floor into an underground passageway. The decidedly unfriendly Lincoln is up ahead. Before moving, hit the space bar to toggle into shooting mode (you’ll get a set of cross hairs on the screen – fire with the left mouse button). Move along the passage – Lincoln will appear to the right, down a branch tunnel, with his back to you. One shot in the back (how honourable) will bring him down – he will turn and fire if he notices you.
Approach Lincoln’s body, and pick up the extra ammunition lying on the ground here. Proceed along the passage past Lincoln’s body until you come to a T intersection. If you look to the left, you’ll see some coloured material on the ground – this is the last part of the Bapistry tapestry. Pick it up, and look for a narrow, dark passageway leading off the main one very close to where the tapestry lay on the ground. Follow this narrow passage until you spot several objects on the ground. One is an elephant gun that you may need later (with only one bullet though). The other object is a locked chest – use the well key to open the chest and retrieve the amulet with Oisin’s name marked on it.
Continue to follow the narrow passage until it ends – you are now back in the main passage. Going left, you will soon be back in the location where you picked up the tapestry (you’ll see passages leaving to the left and right). This time, keep going straight until you spot another passage leading off to the left. You can duck your head down this passage, but it ends in a chasm that cannot be crossed. Return to the main passageway and go left. You will soon come to some shoring on the wall, and a rope hanging from the ceiling. Pull the rope to lower a ramp that takes you out of this area.
You are back in one of the hallways above (remember that wooden platform you couldn’t get by before? That was the ramp!) Turning right and travelling west will return you to the beastie’s room, and heading south from there will take you to the Orrery. Head out of the Orrery to the east and re-enter the Bapistry. Proceed into the back of the room, up the stairs, and place the last piece of the tapestry on the fourth frame. Now return to the ground level and look into the crystal block on the font to view a message from Baphomet, the “bearded face of god”. He gives you some clap-trap about a “holy thief”, and afterwards a door opens in the southeastern corner of the room.
The door reveals a small alcove containing another Shield 1 (the same one you found previously). Return to the Orrery, grab one of the Shield 1’s from your inventory and place it in the hole near the base of the model by the north door. The screens blocking doorways to the south and west are removed, although the door to the west is still locked. Be sure to grab the pages located in the south side of the model, where a new shield-shaped hole has been uncovered.
Goin’ To the Chapel
Open the door to the south and exit the Orrery. You step into a corridor with a door at the other end (this door is blocked), and two different pages on the floor here. There are 2 side passages off to the left, but both corridors lead to yet another north-south hallway. In the second hallway, the north door is also blocked, but the south door leads to the chapel. Proceed into the chapel, and head directly to the altar straight ahead. Your scanner detects lots of gears and levers behind the altar, but no way to access them.
There is a door located to the left of the altar (in the southeastern corner of the room) but it is blocked. Now check out the pianola located in the southwestern corner. A note on the keyboard is from Cobweb, a secret ally (?) who has been leaving the diary pages for you to find, and suggests that you check the confessional. You can try and play the keyboard, but the pianola is missing its roll. Head over to the confessional booth in the northeastern corner of the room – open the curtain and click on the keyhole.
We watch a lengthy movie of Lurka speaking with Tobias (the head knight). Tobias is incensed that Cobweb has stolen pages from his diary and left them about Aeternis. Cobweb is apparently trying to sabotage this “test” that we spoke to Lurka about earlier.
The door along the eastern wall is locked, so move over to the western wall and proceed through the door here. This leads into another short hallway. Your scanner should warn you that there is a human present in the next room – the Vestry. Go ahead and enter – Philip the knight has been waiting to speak to you through a grill off to the right. Philip has no love of the grail, and wants you to take it away from Aeternis. He does not care for Tobias, and tells us that Edgar is the only other knight that we can trust – we must mention a chest to Edgar when we see him.
Philip departs, and we cannot follow him as the grill is locked. Turn back to the west, and go through the next door into a short hallway. The room ahead is the Cloisters, and contains an entrance to a drain, as well as a mouse. Walk around to the far side of the drain, and go down the ladder. Unfortunately, you have a nasty surprise waiting for you at the bottom. Tallum, an oversized knight with a bone to pick with thieves is waiting for you. You may be able to ask a few questions, but he comes after you eventually. Your only way of defeating him is to grab the elephant gun, switch over to shooting mode, and shoot Tallum before he chops you.
In the Liberry
However, all is not lost if he gets you. Tobias saves your hide in time, and you wake up in Tobias’ library. Feel free to ask him some questions, but don’t ask about the elephant gun that he is holding in his hands (he will shoot you by mistake). Eventually Tobias rushed away, leaving you free to search the Library.
Meanwhile, if you managed to off Tallum, step over him and open the grate that blocks the sewer drain. Travel straight north along this drain until you reach the end of the hall, where a ladder leads upward. Travel up the ladder into the Library’s outer room. Open the double doors, and walk into the Library.
Begin by going to the centre of the room and click on one of the listening tubes to hear Tobias discussing hiding a “roll” with Lurka – could this be the pianola roll? The object will be placed somewhere beyond the Docks area. Tobias doesn’t seem to think much of the thieves who have arrived thus far. Move over to the west side of the room and pick up the diary pages located here (note the latest one). Have a look at the vision book over on the east side of the room, and be sure to pick up the key underneath. Finally, proceed to the north side of the room, pick up the page lying in the corner, and open the curtains located here.
The curtain reveals some sort of viewer – click on the eyepiece to view a big beast from above (make sure you are standing right in front of the viewer to make it work). Walk around the viewer and click on the centre mirror hanging above to change its position, and return to the viewer. This new view shows another big beast in what looks like a large church or throne room. Return to the mirror, click on it twice to move it to a third position, and go back to the viewer. The third view shows a knight walking along what appears to be a giant plant stalk – he moves off to the right, and then jumps out of view.
The door just west of the curtain is blocked, and the small room just right of the curtain contains nothing, so proceed out the southern doors of the Library and descend the ladder. You are back in the sewer drains. Move south along the hallway, and turn left at another hallway. Follow this hall along until you get to Lurka’s bedroom. There is a broken quill located on the floor in here, just under the window next to the bed. Pick it up, and return to the main drain. Turning south again, open up the grate blocking your progress if you haven’t already opened it. Pass by the ladder back up to the Cloisters, and Tallum’s body (if you shot him) and proceed to the end of the corridor.
Dealing With Ed
The way west is a dead end, so turn east towards an open door. On your right, note a shield recessed into the wall; unfortunately the grill is locked, and the mechanism needs a winch handle for it to open. Continue on to the room (there’s a human present), and step in to meet Edgar. He seems friendly; be sure to mention Philip and agree to everything he says – this way you’ll be able to ask him some questions after you agree to find his chest. He also gets angry and kills you if you don’t agree. Once he leaves you are free to look around the Court Room.
There are 12 seats located around the room – one for each knight. The knight’s crests become important later so you may want to jot them down:
- Claude – fleur-de-lys
- Tallum – spear
- Tobias – feathered crown
- Malik – lion
- Geffrye – griffin
- Ewatt – trident and eel
- Vincent – heron
- Guy – crossed crosslet fitchee (tee hee!)
- Philip – crossed keys
- Edgar – thistle
- Ordo – crossed swords
- William – rose
In addition, many of the benches of the knights open to reveal items to grab. Edgar’s bench contains mouldy cornmeal, Philip’s bench has a key to take, Guy’s bench contains a confessional note from Tallum, Geffrye’s bench has gloves that cannot be taken, Malik’s bench has a pagan item, and Tallum’s bench contains an inkwell. The other benches are locked.
View this guide raw, exactly as the archive holds it