Just Adventure original
Azrael’s Tear Walkthrough by Dan Kennedy
Docks of the Bay
Leave the room and travel along the drains until you reach the ladder to the Cloisters. Go up the ladder, and return to the Vestry where you met Philip. Unlock the barred door using Philip” key from the Court Room, and step into the room. There are two pages to be picked up in here – one along the floor to the east, and one on the western wall bookcase. Open the door to the north, enter another short hallway, and proceed to the next door ahead. This leads to a short spiral staircase.
Descend the stairs (the first door is blocked) and exit using the bottom door. You hear a beastie roar, and the sound of gunshots – probably another Raptor about. Proceed down this new hallway until you come to a locked gate with Tobias’ initials on it. Use the library key to open the gate, and travel along the hall until it ends. The door here is blocked, so go up the ladder to the Docks.
Note the warning on your scanner – there is a biggie beastie in the water here, but its not going to jump out at you…yet. Note the ships off to the north, and the large stone bridge to the northwest. Walk towards the stone bridge – note the hallway leading off to the left – and located the lever attached to the wall just before the bridge. Pull the lever, and listen to something shifting and grinding. Now return to the hallway and go west.
Your scanner indicates there is a Raptor and a beastie in the next room. Open the door and walk in – Kurt will address you from the window in the far wall. Use one of the first two answers for him (the third will get you shot). After he replies, a Saurian comes up behind him – you can either warn him (you can ask questions afterward) or let the beast kill him. Make sure that you give him some of your own information at the end of the conversation, or he will shoot you for lying.
After either Kurt or the beastie leaves, unlatch and unlock the door in the far wall and enter the next room. Go to the box in the northeastern corner and open it to reveal another page. Leave via the western door, and travel along the hallway until you reach another door (another beastie screams loudly as you travel down the hall). You enter another stairway – go up to the very top to see why the Saurian screamed. Now return to the middle doorway and exit the stairway.
The next hall takes you to another door, with a hot steamy watery room behind. Unlatch the door and then open it to reveal….the old wooden walkway room! Proceed directly to the main min area to see that the big double doors are now open (this is what that lever at the docks did!).
The Shipping News
With the doors open, you can now drive the mine car to the deserted ship. Go over to the car, walk in, and close the side-doors using the right lever. Now pull the central lever to start your journey through the tunnel and over the stone bridge to the ship.
Once the car stops, open the side doors and get out to the north. Walk up the plank onto the ship’s deck. Make your way over to the southeastern corner of the deck, where you’ll see a body hanging from the mast – approach the body (look out for the hole in the deck!) to initiate a conversation. The man was a member of the unsuccessful assassins of the Prieure (the Templars’ treacherous sister order) sent to kill the Guardians. You have the opportunity to ask him questions until he grows tired of you and tells you to get lost.
Pick up the page on the deck here, and proceed up the wooden ramp to the top of the ship, where the ship’s manifest can be retrieved in the northeastern corner of the upper deck. Return to the main deck and enter the ship via the door to the north. The hall bends to the right, and descends via a ramp. A door to the south leads to the ship’s hold. Inside you will find a large chest (conveniently under the hole in the deck above), a smaller box and a barrel. Pick up the bottle of Aqua Fortis located on the floor between the hold’s items, and step up on the smaller box to grab a lever from the top of the barrel.
Return to the main deck of the ship, and approach the control until to the east – this controls the ship’s crane, which is currently situated directly above the hole in the deck. Pull the right lever to lower the crane into the hold, and then pull it again to raise it – the chest will be in the grips of the crane. Pull the left lever to move the crane over to the mine car, and pull the right lever to lower the chest to the car. Finally, pull the right lever once more to lift the claws away from the chest.
Return to the mine car, get in, and close the side doors with the right lever. Now pull the left lever to close the car’s claws onto the chest. Pull the central lever to return – oops, its been damaged. Pour some Aqua Fortis on the lever to get it working again, and pull the lever to return to the main mine area.
Your buddy Edgar is waiting for you at the crusher / saw control panel when you return. He’s actually a crazed animal just waiting to slice and dice you. Get out of the mine car and leave the mine area via the northeastern door without following his instructions. Return to the docks area by going through the north door of the wooden walkway room, down the stairs, and through the two rooms where you met Kurt the Raptor.
On the Waterfront
Your next task is to get by the great beastie that is swimming around the docks area. There are a number of ways to temporarily dissuade the monster from attacking you, but there is one way of permanently banishing the beastie from the docks area. Back at the docks area, move to the north, under the stone bridge, and go down the ladder into the drain found here.
You will find yourself on a narrow ledge – don’t move around, or you will fall in the water and drown. You see a large metal gate off to your right, with a wheel valve beside it. Click on the door to open the gate – the area immediately below fills with water. Once your scanner picks up that the beastie is below (you will see its tentacles sticking out of the water), click on the valve to shoot some hot water on the beast. It will leave the area forever.
Return to the surface and travel south past the bridge and the other ladder. Enter the passage in the south wall, and proceed into the tunnel. (The plaque on the wall above the tunnel shows another way of getting rid of the beast by resetting the water connections in the room off of the main mine area, and using the hose found in the boat). Travel along the dock to the boat, get in, and pull the lever to the south – this sets the boat in motion to the east. The boat eventually stops at another dock to the south. Get out of the boat and walk along the dock, up the ramp, and off to the east to the large door in the wall.
[The other ways of ridding yourself of the nasty beast in the water include the following:
- Drop the inkwell in the water by the boat
- Drop Oisin’s amulet in the water by the boat
- Drop some Aqua Fortis in the water by the boat
- Pick up the hose in the boat and attach it to the mechanism on the western end of the boat. Now travel back to the room containing the well and reset the water connections to match those depicted in the plaque above the tunnel leading to the boat]
All Mixed Up
Open the door and enter the hallway ahead. Your scanner tells you that a Laboratory is ahead, along with a live person, and a corpse. Enter the room and speak to Philip – he is more than willing to answer all of your various questions. Once Philip leaves the room, pick up all of the items on the table in front of you, including a flask, 3 bottles and a book.
As Philip may have mentioned, the corpse is covered with a hearty poison that will degrade your health bar if you get too close. The mixture that will neutralize the poison in order for you to grab the corpse’s key ring is found in the book: Decoction of Moon, Earth’s Blood, and Aqua Fortis. To make up the mixture, turn around and face the chemical mixing machine behind you (to the south). Place the flask on the flask holder below the mixer, and then add each of the three ingredients in order to the mixer. If you mess things up, grab the flask and empty it into the sink to your left. Don’t use the Red Salt for anything – the mixture will explode and hurt you badly.
Once your mixture is complete, grab the flask and click on the corpse’s keys to neutralize that part of the corpse. Take the keys and use them to open the door to the west. Before you leave, peek behind the chemical mixer – hey, there’s a shield back here, but its covered in crud. Apply some Aqua Fortis to the shield to get it sparkling new, and put it into your inventory.
The Trouble with Edgar
Proceed through the west door of the lab, and down the hallway. Your scanner reveals that another live body is in the next corridor. Peek your head around to see Edgar waiting for you. Good news: he’s forgotten all about that chest you were supposed to get for him. Bad news: he’s aligned himself with another Raptor named Warren, and is ready to do some chopping on your head.
You wake up inside a gibbet in the Torture Room – but with a friendly face in front of you. The mysterious man seems to want to help you, but is chased away by Lurka who comes into the room. Speak to Lurka – once he leaves, the stranger comes back in. Be honest with the man, and don’t try to cut any deals with him, and he will let you out of the gibbet. Follow Jack to his hideout down the hall, and ask lots of questions until he decides to sleep.
Leave Jack’s home via the door and go straight to return to the Torture Room. There’s another Raptor in the other gibbet, but he or she is dead. Return to the hallway outside (the door Lurka came through is locked), and take the passageway going north. Eventually you will find another hallway going west – take this route to the other portion of Lurka’s room. You will find some wax, the pianola roll, and a plaque with three crests on Lurka’s desk in here. Return to the north-south hallway, and continue to travel north.
This hallway ends in a T-intersection. The way to the east is blocked. Heading west, you come to another T-intersection. The hallway to the north ends at a blocked door. A passage open to the east here leads back to the Laboratory. Returning to the T-intersection, proceed to the south. The door at the end of this hallway is also blocked, but follow another passageway going off to the west. The door at the end of this hallway leads out into a spiral staircase. The door at the bottom is blocked, so go up the stairs and exit the door at the top. This next hallway ends at a latched door. Unlatch the door, and enter the Chapel again (you enter from the east wall of the Chapel).
More Trouble with Tallum
What’s that big lumpy shape praying by the altar? Tallum? Didn’t we shoot him with the elephant gun? (It doesn’t matter). Travel to the northeastern corner of the room and look into the keyhole in the confessional booth. We see Tobias pretending to be Baphomet, probably for the local yokels. He doesn’t seem too trustworthy, does he?
Walk around the outside wall of the Chapel to the pianola in the southwestern corner (so as to not disturb Tallum). Place the pianola roll in the recessed area on the north side of the pianola – we get a pre-recorded message from Tobias congratulating us on our progress, but warning that it will get even more difficult to get the grail. Have a look at the altar now (from afar, of course) – it has split open, obviously revealing a new passageway.
Unfortunately, we’ve got to engage Tallum in conversation to get rid of him. Make sure you save your game, and approach him to get his attention. There is a way that you can calm him down and convince him to leave – use the following conversation choices:
Paranoid (3) – No Offence (3) – Sir Guy (2) – Corinth (2) – Guard the Grail(2) –
Time to Go (1) – don’t ask him any other questions at the end – he flies off the handle at a moment’s notice.
If Tallum does come after you, be ready to back away as fast as you can, and leave the Chapel to the north (believe it or not, he will be gone by the time you get back).
Return to the Orrery, and place the Shield 2 in the hole in the floor to the south of the model. Something moves to the south. Now return to the Chapel – the bars blocking the new passageway behind the altar have been removed. For you completists out there, you can go back to the hallway outside of the Throne Room to retrieve the other copy of Shield 2 (using the ship’s lever to winch the grill open), and then return to the Chapel. Move to the altar, and drop through the new opening.
Down the Drain
You drop into a northwest – southeast running drain, with a booming sound coming from the north. Take a guess as to what ‘s making that noise. The way to the southeast is blocked by a door with water behind it, so proceed to the northwest to the big stone wheel. The wheel is lying up against the wall with a rope pinned underneath; neither the rope nor the wheel can be moved. There is also a ladder leading upward behind the wheel.
Continue along the hall towards the opening to the northwest, but keep a close watch on the floor – there’s a patch of oil here that will whisk you out into the gain silo beyond (complete with giant beastie). You can trace the extent of the oil slick with your mouse. Keep to the extreme left of the hallway to proceed farther. Your goal here is to grab the pin lying on the ground near the end of the hall. Once you grab the pin, go back to the ladder, and proceed up. You enter a room with a table in the centre, and some ropes and pullies along the southwestern wall.
First grab the bag of flour lying on the floor along the southwestern wall. Now find the rusted lever panel on the same wall (just up and to the left of the flour). Take the pin from the hallway below and attach it to the panel. Now pull the pin to winch up the rope. Go back down the ladder and examine the stone wheel – our meddling upstairs has managed to push the wheel to an upright position. Give the wheel a tap to start it rolling down the hall. The wheel heads out the end of the hallway, and evidently does some damage below.
Proceed back down the hallway to the northwest, and jump off the end down to the floor of the grain silo. The wheel has done a number on the beast living in here. Have a look around, but there isn’t much down here except for a dead Saurian. Proceed over to the winch elevator lift, and examine the shards of the beasts egg. The lever on the wall just above the egg shell is used to return the lift to this bottom level (useful if you fall down here again).
C is for Cookie
Get in the lift and press on the interior handle to go upwards. The lift arrives at a catwalk level. Climb out of the lift onto the stone walkway (but be careful while doing so, or you will fall back down into the silo). Proceed straight northeast, and go through the open doorway and up the long ramp. The room ahead appears to be a kitchen. Enter the room, and take a close look at the kitchen’s oven, located on your left as you walk into the room.
The oven door opens, but the tray inside is locked in place. Walk along the side of the oven (to the northwest) and pull the lever found here to unlock the tray. Return to the tray – it displays biscuit moulds in the shapes of the 12 knight’s crests. We do have some flour, but which of the biscuits should we make?
Anything in your inventory with knights’ crests on it? Try the plaque you found in Lurka’s “office” with the pianola roll and the wax. You should be able to find the three crests on the tray that match those on the plaque – in the back row it’s the third and the fifth from the left, and in the front row it’s the fourth from the left. These three crests correspond to Tallum (spear in shield), Tobias (feathered crown) and Malik (Lion). Place flour on all three of the crests (you can also use wax, although there are limited amounts of each). Close the lid of the tray to press the wafers into shape, and then open it again. Put the three wafers into your inventory for later use.
Move off to the northwest again, and approach the dumbwaiter on the west wall of the room. Climb in, and pull on one of the ropes to raise the contraption. The dumbwaiter stops moving, and you enter an abattoir (a slaughtering room) complete with hanging mystery meat. There isn’t much to see in here, and the door to the south is locked, so climb back into your personal elevator, and pull on the other rope to return to the kitchen.
Veg-o-matic
Open the door to the northeast and enter a sickly green looking corridor that sounds alive. Very creepy! Proceed up the corridor until your scanner kicks into gear – you are inside a giant cavern almost completely filled with an oak-like vegetation. You may want to have a quick look at the map here – we have entered the area near the top-left (note that the room with the flour and the table connects to the vegetation cavern in the bottom part of the map). We will move towards the cavern’s two other exits.
Proceed along the corridor past the first intersection, and continue up to the cavern in the centre – this holds the main truck of the plant. Don’t bother going this way though – you almost certainly be killed by the vegetation or the scorpions. Backtrack to the last intersection, and head to the north. Follow this corridor, and go straight through the first intersection you see. Keep going until your scanner indicates you are coming to the next room.
The room up ahead contains fewer plants, but these are a little more dangerous. Enter the room – does it look familiar? This room was the setting for one of the viewings we witnessed in the Library. Do you remember where to go? Proceed along the central path until you get to the second pink-coloured plant to your right. Be careful – if you go off the path, you are plant fodder. Just as the knight did, walk to the southwest on top of the pink plant, and walk off the far edge – you will land on another stem. Walk straight forward (southwest) to the green coloured plant with the blue and red coloured spikes, and click on it to reveal a secret hiding place.
Pick up the sword hilt, and the set of notes found here. These documents include some notes about Cobweb and Spider, some of Tobias’ diary entries, and a picture of a statue. Turn around, walk to the northeast back onto the pink plant, return to the main path, and leave the room. Return to the last intersection, and head off to the north-northeast. Follow this path until it exits the veggie cavern via a narrow bridge.
Tickety-Tock The Killer Clock
The next area seems to resemble a giant clock. Get off of the bridge and walk northeast to the door in the stone wall. Enter the empty chamber beyond. The way forward is blocked with a number of hanging pendulums wrapped with poisonous barbs. Walk to the southwestern corner of the room and pull the lever on the wall to start the first pendulum. Now walk to the entrance to Pendulum Alley. This is a great place to save your game.
The first pendulum seems fairly easy to get by – just wait for the pendulum to swing by, and then rush through to the other side (hit Shift+arrow to run). Pull the lever on the wall here to get the second pendulum swinging like the first. There’s a problem though – if you rush across to the other side, you will discover that the next lever does not activate the third pendulum. Instead of zipping past the second pendulum, wait for it to swing to the left, and then run to the right (northeast) – at the end of this corridor you will find an alcove to the right (southeast) that contains the lever which will activate the third pendulum.
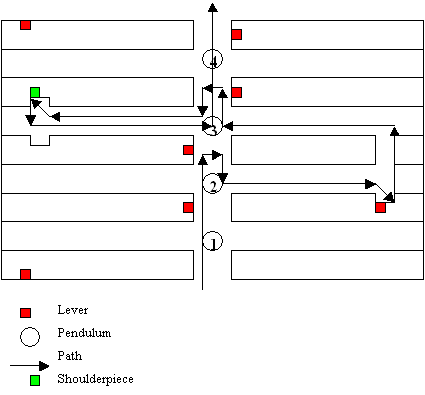
Now turn around – you should see a short cut passage to the northwest. Take it and wait for the third pendulum to swing away from you – now run like the dickens back to the centre of the clock. Unfortunately there’s something down the other side of the third pendulum that you need to pick up. Wait for the pendulum to swing to the left (northeast), and take off to the right (southwest). You will find a shoulder-piece located in a small alcove to the northwest. Once you grab it, return to the centre of the clock. Pull the lever here to activate the fourth pendulum, and race past it into the empty room beyond.
Zmoking the Ziggurat
Leave the room via the door in the northwestern wall. Enter the hallway, and open the door at the far end. You enter a large room containing a hollow tower dating back to the Byzantine ages – a Ziggurat. Feel free to go look to the left and right of the big ramp in front of you, but there isn’t anything there. Proceed up the long ramp until you get to the doorway into the tower. The route to your right (northeast) is a dead end. The stairs to your southwest lead up to a small alcove containing the outline of a shield embedded in the wall. There’s not much to do here yet, so return to the entrance to the tower.
Enter the tower room, walk towards the door, but take the path to the left (northwest) – we’ll save the door and what’s behind it for later. Follow the path but be careful – it turns into a very narrow ledge that hugs the side of the cavern wall until reaching its end at an open doorway to the south. Go through the doorway and proceed down the hall until the next room is reached. Open the door and go in – welcome to Geffrye’s studio. The Architect of Aeternis is over on the west side of the room, so walk over and approach him to start a conversation.
Geffrye is a friendly chap – he will answer most of your questions. After finishing with him, pick up the book on the table to the southeast – it’s a travelogue of Geffrye and Malik’s adventures in the depths of their new home. Afterwards, approach the door in the southeast corner of the room, open it, and march down the hallway. The double doors lead back out into the large grain silo. Walk back over to the elevator lift (its over to your right), get in (careful!), and click on the winch to take you up to the next floor.
Vincent’s Torment
Once the lift stops get out to the southwest, and follow the hallway to the door with the face built into it. The plaque read some message from Jacque de Molay. Once you get close the spectre of Vincent, a long-dead knight appears, begging you to help him end his torment. Choose the option that asks Vincent how to get through the door – he explains that biscuits with the crests of the three most senior knights can be fed to the mouth on the door to gain entrance.
You now have the option of asking him a bunch of questions (conversation choice 1), or letting him tell the story of his murder (choice 2). Since the questions are the same stupid ones you ask everyone, take the second option and learn why and how Vincent was brutally murdered. After, you can tell him about the note that Tallum left in his locker in the Court Room and let him rest for eternally, or you can try to lie to him and watch him disappear in a huff. He also may tell you about the second way of opening the door behind him – by using the “shoulder-piece” that you found inside the big clock (you don’t want to do this though because you need it to solve another puzzle later!).
Either way, take the three biscuits out of your inventory and feed them to the mouth on the door. The door opens – walk in and approach the door on the far wall. Clicking on it sets off a message from Tobias, and causes an ornate key to stick out of the wall. When you grab the key, Geffrye appears behind you. He tells you that he has hidden the Third Shield in the Abattoir – he was worried about it disappearing – and suggests you go and get it as soon as possible.
After Geffrye leaves, return to the lift, get in (careful!), and click on the winch to return to the second level. Go back to the double doors on the northwest side of the silo, and return to Geffrye’s studio. Now go to the door facing east, open it, walk along the hallway, and unlatch/open the door to the Abattoir. Move to the right, towards the east wall, and click on the carcass hanging closest to the east side of the room – it will open to reveal the shield. Place it in inventory, leave the Abattoir, and return to the Studio.
Return into the Ziggurat via the door to the north, and creep along the narrow ledge until you are back within the tower room. Follow the wooden walkway to the southeast, and go back up the staircase on the outside of the tower (to the southwest) to the shield alcove. Place the Shield 3 on the shield outline on the wall, and the alcove will shift around. Pick up the shield again, and leave the alcove to the west. Turn to the north, walk to the end of the hallway, and open the door to the east – you are back in the beastie’s lair!
Supermodels
Proceed south to the Orrery, and place the Shield 3 in the hole on the west side of the model. The door behind you (to the west) is now unlocked – open it and walk into a small chamber. Go up to the 2 triangular doors and click to open them. Move into the small 8-sided room with maps of different Aeternis areas on the walls. Face the wall to the south, take out the ornate key (from Vincent’s room) and stick it into the hole in the centre of the crest. Six models of Aeternis areas appear on the floor in the room. As Tobias said, you now have a God’s eye view of Aeternis.
Be careful of the three models closest to the room’s exit: the grain silo (to the northeast), the Aqueduct (east – you haven’t been here yet), and the Ziggurat (southeast). These models should not be touched; clicking on them fills the models with water, thereby filling the actual rooms with water as well. Do however pick up and read the note from Cobweb that is inside the Aqueduct model to the east.
The models to the southwest (the Cathedral Vestry), west (the Waterwheel) and northwest (the Chimney) are a little friendlier. There are orange coloured doors somewhere on each of these models that you should click on to unlock the real doors at these locations. The Vestry and Waterwheel models each have one locked door to unlock, while the Chimney has 2 doors to unlock.
When finished, walk east out of the 8 sided room to the shield outline on the wall and click on it – the alcove spins, and you find yourself back at the shield outline alcove on the outside wall of the Ziggurat. Walk down the stairs, enter the tower room, and go straight to the door we skipped earlier. Open the door and proceed along the hallway ahead – the hall ends at a T intersection. The way west is blocked by a inaccessible door, so proceed to the east.
View this guide raw, exactly as the archive holds it