This Guide will help you and Darren Michaels find your way through the game
A Game Guide
by Peter Olafson
Version: This is version 1.0. It’s based on the UK edition of the game played in “Normal” mode.
Contact: Lingering questions? Mistakes? Something unclear? You can write to me at [email protected].
Copyright: This document is copyright 2010-12 by Peter Olafson. You may not post it, distribute it, edit it, excerpt it (except for “fair use” purposes in news coverage), sell it or publish it in any fashion without my prior written consent. At this time, the only site with permission to post the guide is JustAdventure.com.
Introduction
The fire in the old wing of Black Mirror castle was a regular reference point in the early chapters of the original The Black Mirror. However, that game was weirdly vague about its source — we learned only that protagonist Samuel Gordon blamed himself for the death in the blaze of a certain “Cathrin” — and even about Samuel’s relationship to the dead lady.
This introduction, set in 1969, clarifies those two issues and suggests why Samuel vanished from Black Mirror after the fire. Even 12 years before the events in the original The Black Mirror, when Samuel fell victim to the Gordon curse and killed five people, things were going badly wrong with him. We see Samuel running wildly through the woods in the rain — as if pursued.
Where has he been and what has he seen? We don’t know. But he is plainly in a state — inarticulate and aggressive — when he turns up in the old wing of the castle and, when confronted there by wife Cathrin, we learn his disappearances are a nightly event.
Samuel pushes Cathrin roughly against the table and, in so doing, dislodges the lighted lantern. It falls to the floor and sets fire to the carpet. The room is soon in flames — and we next see Cathrin apparently trapped and Samuel outside bemoaning what he’s done.
Chapter I
The Photo Shop
Twenty-four years later, we find a Darren Michaels in the cellar of a photo shop in Biddeford, Me. The power’s out and Darren’s boss Fuller has ordered his summer assistant to replace a fuse.
Left-click on on the “crammed shelf” to the left of the photo screen to identify a box of fuses, again on the box itself to take it and right-click on the box in inventory to extract the single fuse. Open the fuse box to the left of the shelf, remove the cover of the second fuse from the left, remove the burned-out fuse, drag the new one into its place and throw the little switch at the bottom right to turn on the power again.
Odds & ends: After you’ve restored the power, drag your camera onto the fuse box to take a picture of it.
When used on 31 locations spread across the game, the camera unlocks 26 pictures — a 27th is unlocked automatically when the game is complete — and five mini-games in the “Extras” menus. (The six end-of-chapter videos — five dream sequences and the game’s final cut scene — are unlocked simply by playing through each of the chapters.)
For instance, this particular shot unlocks picture #23 — an artist’s rendering of the photo-shop cellar.
– The other item in your inventory — a postcard of the town of Biddeford — allows Darren to travel instantly between previously-visited locations in those portions of the game when he is free to move about the town. Usually, this is summoned with a right-click, but you can’t use it just yet — Darren hasn’t visited any other locations — and he’s currently locked into performing tasks in and around the store.
– You can have some fun here by taking your sweet time with the fuse. Until you replace it, Fuller will periodically open the cellar door and call down different insulting orders.
– You can take the bottle of developer fluid. It’s on a shelf behind the palette. (Double-click on the palette to tip it over.) You’ll use this later in the chapter to develop some pictures.
– You’ll note that, even after you’ve elicited a full description, the photo backdrop and the ropes at the upper left never lose their interactivity — a signal you’ll be using them in Chapter II. (This can have other meanings as well. Some such locations change their state or acquire additional interactivity farther along in the story.)
The Front Room
Climb the stairs. Fuller, who appears to be on leave from the Twilight Zone episode “The Masks,” now orders Darren to place the shop’s sign out on the sidewalk. Simply left-click twice on the sign to do so automatically.
Odds & ends: Or don’t. Darren can venture into the darkroom (the near-left exit), the rear office (the middle exit) or return to the cellar. At the first two locations, you’ll have time to grab a couple of items — in the former, the pen in the mug to the right of the office phone; in the latter, the distilled water at your feet — before Fuller summons Darren back to the task at hand. (Otherwise, you won’t be able to visit these locations until Darren lures Fuller from the store later in the chapter.)
– On the Lingering Interactivity Front, note that the camera on the tripod to the left of the corner remains red under the cursor even after you elicit a full description. This just means it’s going to change its state later in the chapter.
– Also click on the TV set and talk to Fuller about the store to get a sense of his small-time trade, and click on the spotlight to learn about his high-powered gear. Interesting disparity there. You’ll soon get a hint about the source of Fuller’s money.
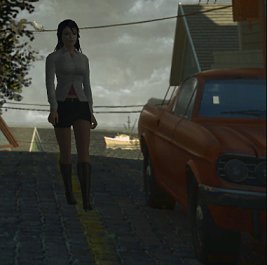
The Street
Outside the store, you’ll meet Angelina.
Are we sure it’s not still 1969?
Little Miss Swinging London wants her photo taken. Darren automatically ushers her inside, where Fuller automatically takes over the shoot and dispatches Darren on a pair of errands: delivering a letter to Mrs. Biba at the diner and collecting a parcel from the post office.
These new tasks are not inter-dependent and so can be performed in either order. We’ll do the delivery first simply because it gets you into the swing of things a bit faster.
(And while you’re out here, take a picture of the door to the junk shop just up the street. This unlocks picture #2.)
Odds & ends: After the encounters with Fuller and Angelina, you can ask about each of them around town — Angelina in only a limited way (via Rosie at the post office by the water).
In particular, talk to Eddie, who runs the junk store next door. He can’t stand Fuller and is sure he’s hiding something. (Then again, Eddie also has little tolerance for Darren at this stage of the game.)
Town Square
From the photo shop, head downscreen to the town square. This scrolling screen is a hub that includes exits to Town Hall (which you can’t enter until Chapter II), a hospital over at the left (which comes into play later in this chapter), an exit to Darren’s mother’s little house (ditto; it’s the street between Town Hall and the hospital) and Biba’s Diner over at the right.
Odds & ends: Named for Bideford ((editor: this is the correct spelling)) in Devon, England, Biddeford, ME is an actual place — it’s on the Saco River southeast of Portland — and it appears that at least one real-world location is used as the basis for in-game ones. Here’s Biddeford’s City Hall:
And here is the Town Hall in the game (in rainy Chapter II):

Biba’s Diner
Mrs. Biba (“CLAIRE!” to her husband in the kitchen) is the perpetually-busy and rather bruised-looking lady behind the counter. A man who appears to be wearing mascara (we’ll call him “Mr. Mascara” for the time being) is speaking to her when Darren enters — lots of folks asking about the photo shop today! — and bumps by Darren belligerently, perhaps even deliberately, on his way out.
Talk to Mrs. Biba. She takes delivery of Fuller’s letter out of sight of her husband and is righteously pissed off by its (as-yet unknown) contents, for she orders Darren out with a message that Fuller can go to hell. Follow up by asking about “Fuller’s letter,” and you’ll get a hint about the nature of her exchange with Fuller.
Darren protests that he’s just the messenger. “ … but you still work for him, don’t ya?” Mrs. Biba puts in. “Making some nice dough? Problem is, it’s not his money,” she says, “it’s … ah, forget it.”
It’s what? Is “mine” the missing word?
Leave. On the way out, Darren is stopped by the doctor in the front booth. He was to meet with Darren’s mother to make arrangements to hang her paintings in the “Health Centre,” but she hasn’t turned up.
Darren doesn’t pay much attention to this and can’t do anything about it now in any case. (Darren isn’t permitted to visit his mother’s house until the automatic visit after he tries to phone her from work.) In the manner of unsettled young people with too much on their plates, he’s suddenly in a great rush and hurriedly tells the doctor he’ll call his mother later.
(Take a picture of the doctor. This unlocks picture #3.)
If Darren has completed both tasks, return to the photo store. If not, head for the post office.
Odds & ends: Biba’s Diner appears to have been modeled on the Johnny Rockets chain of restaurants. (http://www.johnnyrockets.com/index2.php)
– The jukebox at the back cycles randomly through three instrumentals — running from “In My Room”-era Beach Boys to rockabilly.
Souvenir Store/Post Office
The post office is in the souvenir shop by the harbor just up the street from the photo shop. The counter lady Rosie is running her yap with a girlfriend when Darren arrives. Listen for awhile. (Rosie so wants to be street.) The conversation runs through a range of gossipy topics before establishing that the red convertible outside belongs to the nameless blonde customer.
Darren will have to try to interrupt them (ineffectively) by talking to Rosie to come up with a solution: setting off the alarm on the convertible. However, note that the lady won’t notice the alarm until she’s distracted from her chatter by the open door coincident with Darren’s reentry into the shop — and that you have just 10 seconds to enter before the alarm clicks off on its own. (If that happens, you’ll have to set off the alarm again.)
Talk to Rosie again. Darren hands over the collection note automatically and comes up with a parcel. (No, you can’t open it, but you’ll establish what is inside in Chapter II.) You’ll also establish that there’s another parcel for Fuller awaiting collection — but Rosie’s not about to turn it over to a rude boy who doesn’t have the paperwork.
(Strictly speaking, this isn’t on your to-do list at the moment — it doesn’t become pressing until Darren sets out to develop Angelina’s pictures — but an observant player can get a leg-up on this task now. During his exchange with Rosie, Darren is standing right in front of a pad of blank collection slips. Looking at them earns you an extra conversation topic — “Package for Darren” — and using that topic gets Rosie to turn her back just long enough for Darren to peel off a slip.)
Outside, take a picture of the ocean off the dock. This unlocks picture #22.
If you’ve completed both tasks, return to the photo shop. If not, head for the diner. (See “Biba’s Diner” above.)
Odds & ends: Note that the travel guides in the far right corner of the shop remain red under the cursor even after you’ve elicited the full description. They’re just waiting for Darren to collect one piece of salient information — the reference to Willow Creek that pops up later in the chapter when he liberates his mother’s bank book. At that time, you’ll be able to peruse the pamphlet. Most of the photos are from the original The Black Mirror — save one that suggests the decrepit asylum has been converted into a hotel!
– That’s Angelina’s hotel up the coast. Eventually, you’ll reach it by left-clicking on the “Wild Coast Hotel” sign on the dock or the hotel itself (“on the beach”), but Darren can’t visit it until the photos are ready and the photos can’t be prepared until after Fuller clears out of the shop. That’s still a little down the road.
– You can talk to the young woman watching the sea at the railing outside the post office to learn she’s mourning her late friend, Carrie, who drowned herself here two years earlier.
This is not necessary to the story. But it’s the one occasion where Black Mirror II offers even a semi-substantial sub-plot — albeit only in dialog.
This conversation enables Darren to inspect Carrie’s picture in the window of Fuller’s shop (on the second click, provided you haven’t already elicited the full description) and to ask about her around town — with Rosie at the post office (after getting rid of her yappy friend), Mrs. Biba at the diner (after delivering Fuller’s envelope), Fuller (after delivering the envelope and handing over the parcel) and the nurse at the hospital (after visiting Darren’s mother).
You’ll assemble a picture of a happy woman full of plans who seemed to suddenly change. (You can discount Rosie’s description of Carrie as “always a little strange.” I think she’s just being loyal to her friend “customer” who married Carrie’s widower.)
Why did Carrie change? Plainly, there is more to the story. Mrs. Biba knows more than she lets on. (She says, “If I’d only known,” but won’t expand.) And Fuller, the only character with a documented link to Carrie, claims not to know her and then gets defensive. (“What’s it to you anyway? Do your work or I’ll kick your ass.”) That seems to be the end of it.
What does it all mean? You don’t find out for certain — the thread goes nowhere from here — but we’ll return to it in Chapter II when there appears a clearer context in which to place Carrie’s tale.
And yet, her death notwithstanding, Carrie is in the game. On rare occasions, she appears as an incidental, non-interactive character on the side street outside the shops — entering shortly after Darren does and walking up the hill from the promenade on the left side of the screen. This has no special significance (i.e. She’s not a ghost.) Black Mirror II gives its ghosts (which begin to appear once you reach England in the second half of the game) special treatment, and most Biddeford locations have such incidental characters. For instance, the older man in the plaid shirt who can sometimes be seen from the promenade occasionally enters this screen at the right near corner. Since Carrie was modeled for the purpose of her conversation-topic picture, the designers probably thought it a waste not to use this resource.
Here’s the conversation topic icon:

And here’s Carrie on the street:
Side Street
When Darren returns to the photo shop after completion of the delivery and pick-up errand, he runs into Angelina again. She’ll complain of being groped by Fuller and the two make arrangements to have Darren deliver the photos to Angelina’s hotel . She takes off down the hill to the promenade and Mr. Mascara emerges from the alley beside the shop and sets out in pursuit.
You can’t pursue the pursuer. Fuller emerges to summon Darren back to work and, inside, takes delivery of the parcel and assigns a raft of domestic tasks. However, if you look in your diary, you’ll see only one of them achieves “task” status: the one we anticipated earlier about collecting the photo paper from the post office.
Odds & ends: You can bounce a lot of topics off Fuller now without getting much in return beyond defensiveness and aggression. The only thing he’ll actually tell you is that the letter to Mrs. Biba was a “bill.”
It’s almost the truth.
Photo Shop
However, you can’t leave the shop until Darren calls his Mom with the reminder of her appointment at the diner. There’s a phone on the desk in Fuller’s office (through the middle of the three exits at the back). Simply left-click on it. Darren gets a busy signal and, after a to-do with Fuller (in which Darren learns his mother had called earlier about “Adrian” and a “mirror” — anticipating events in chapters V and VI), he sets out to his Mom’s house automatically.
Mom’s House
Darren finds his mother unconscious on the floor by the telephone. Use the phone on the table to call an ambulance and note the three-part task supplied by the doctor afterward. Darren needs to find all his Mom’s medicine, her medical history and her insurance card.
The card is easy: It’s in a pillow-like blue handbag on the flowered chair in the living room. The pill dispenser left of the tea cup covers most of the medicine and the rest comes with a left-click on the medicine cabinet in the bathroom to the left.
That leaves just the medical history. Darren doesn’t recall the name of his mother’s doctor (as you’ll learn if he tries to use the phone again at this stage) but it has to be around here somewhere. Best bet: the address book in the bottom drawer of the commode beside the bed. (Note that you have to open the top drawer first. Try a second time to open the bottom one.)
Alas, like every address book in every adventure game ever, it is locked. The key is beneath the flower pot on the bedroom windowsill. Use it on the address book to open it, right-click on the open address book to identify Mom’s old doctor as Dr. Wakefield and use the phone in the living room to arrange for her records to be sent to the hospital. Darren can then set out for the hospital.
Odds & ends: The painting to the left of the bathroom door is the ruined lighthouse at Sharp Edge from the original The Black Mirror. It’ll turn up again in the dream sequence at the end of the chapter and you’ll visit the location in Chapter IV.
Hospital
Darren automatically turns over the medicine and insurance card to the nurse at the front desk and, after a prolonged, non-interactive wait, gets a new task: sorting out his mother’s insurance.
Evidently she either didn’t initiate the last payment, the bank didn’t make the transfer or the payment somehow didn’t register with the insurance company. You need to bring documentation for the transfer to the nurse and she’ll take care of it for you. (There is no special urgency about this, but the task has to be completed to finish Chapter I. You’ll get a reminder about it if you haven’t taken care of the insurance issue before delivering the pictures to Angelina.)
Darren then automatically enters his mother’s room and learns she’s in a coma. He blames Fuller over the missed message. (This is rather strange. Darren learned from the doctor before speaking to Fuller that his mother was late for an appointment, so if anyone’s due a share of the blame, it’s Darren himself.)
Leave the room. You’ll find Mr. Mascara talking to the nurse at the desk. He gets one look at Darren and is off like a shot.
You don’t have to follow him now — events will wait on your arrival back at Fuller’s shop — but that’s one of two tasks you can perform at this point. Either order will do.
Odds & ends: You can take the stethoscope at the foot of the bed and the laxative in the bedstand. The former comes into play later in the chapter and the latter in Chapter II.
Talk to Darren’s mother twice and she’ll grab Darren’s wrist and say: “Mirror. Don’t go through the mirror!”
I: Following Mr. Mascara
Outside the hospital, this strange man will cross the square and vanish into the side street leading to the shops. (You’ll have to be quick to see him do this, as this section of the game is in real-time.)
You’ll seem lose him as soon as you enter that screen.
Or have you? Try to enter the photo shop via the front door and Darren sees Mr. Mascara inside talking to Fuller. It’d be nice to hear what he’s saying. (It’s required before you do anything else in this thread.) The front door is too obvious an approach and the back door turns out to be locked with a hook-and-eye arrangement. But the window above the door is open. If Darren could lower a hook of his own through the gap, he’d be able to lift the latch.
Sure enough, the fishing line from the tool shed at the rear combines nicely with the broken-off handle of the rusted bucket to the left of the back door. Slip this “fishing line with hook” through the window and the latch lifts. Step inside to learn only that Mr. Mascara seems interested in Angelina and Darren both and Darren decides to followup with Angelina. But that’s still a ways down the road.
(When you’re in Fuller’s back yard, take a picture of the spin dryer to the left of the shed. This unlocks picture #21.)
Odds & ends: Actually, Darren can cobble together the hooked line as early in the game as the start of the post office/diner errands. He just can’t use it. And there’s an interesting logical snarl if he tries to use it after wrapping up business at his mother’s house. (The game can’t decide if the door’s unlocked or not!)
Confronting Fuller
You can’t continue the surveillance — Mr. Mascara is gone by the time Darren reaches the street — but Darren can now venture inside and confront Fuller. (Again, this can wait on other tasks. And, honestly, it may seem counter-intuitive, as Darren would have easier access to Fuller’s photos and dark room without this nasty exchange.) Reenter the shop to find Fuller has vanished. Descend to the cellar to find the photo screen has been raised to expose a door. Fiddle either with the control ropes at the upper left or the door itself and Fuller emerges. A to-do quickly develops and Darren ends up jobless on the sidewalk out front, ruminating about how to lure Fuller out of the shop so he can develop Angelina’s pictures.
Odds & ends: You can now report your firing to Mrs. Biba by talking to her about “Fuller’s store.” She’ll end the conversation, but you can take it up again and ask about “Biddeford” to get a (sour) taste of her marriage.
II: Find Proof of Mom’s Insurance Payment
You probably already have an idea of the target: the previously untouchable “bureau” (i.e. roll-top desk) in Mom’s bedroom.
It’s locked, and the lock is a puzzle. The 4 x 4 panel is scrambled randomly each time you play, so there’s no way to give a blow-by-blow account, but the basic trick to all sliding block puzzles is to first see the big picture in your head. (This will be easier for folks who have played the original The Black Mirror: It’s the Warmhill church. This does not appear in Black Mirror II but will turn up again in the finale.) Another is to work through the puzzle in stages — say, from top to bottom or left to right.
Here’s the assembled picture:
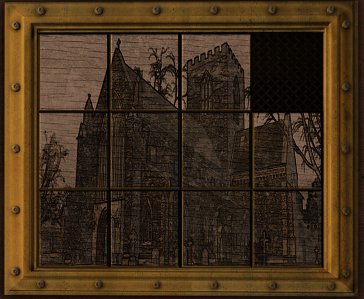
The open desk yields three items: an odd jewel box or “casket” that can’t be opened at present (you’ll have to pick this up first to get at the other stuff); the bank book (which shows with a right-click that Darren’s mother did make the insurance payment); and, inside the bank book, a letter from a unidentified “C” that refers to payments (monthly $1,500 transfers from a bank in Willow Creek in England that run counter to Mom’s stories about her income) and seemingly to Darren (“even if he has now left home”).
After extracting the letter, bring the bank book to the nurse at the hospital desk and you’re good.
If you haven’t yet followed Mr. Mascara from the hospital to Fuller’s shop, head there now and see the entry above. If you have, drop down to the one below.
Developing the Pictures
The scheme forms pretty much out of the ether. You’ll want to look for something that’s changed since your last visit.
Visit the post office. You’ll now find the convertible-driving blabbermouth in the corner looking at fashion magazines.
That’s a clue. However, you’ll have to first talk to Rosie about “customer” — blabbermouth doesn’t have a proper name — to actually hatch the plot. She observes that the lady’s husband is loaded and that even if he wasn’t, her friend would do well as a fashion model.
Now talk to the woman. Darren feeds her load of bull about working on a magazine story and, when it turns out she doesn’t have any pictures of herself, volunteers that Fuller is a famous New Zealander working undercover. Blabbermouth seems genuinely interested, but she’s not quite sold. You’re to bring her some of Fuller’s work.
Of course, it doesn’t have to be Fuller’s actual work. You’ve probably seen magazines at a couple of locations: Mom’s coffee table and the hospital lobby. You can take the ones in the hospital lobby — they’re on the table near the door — and then talk to Rosie’s pal again and represent a handful of the pictures therein as Fuller’s. Fortunately, blabbermouth is too flattered to ask questions and says she’ll call Fuller from her car straightaway. Head back up the hill to the shop to find Fuller setting out for the photo session. The shop is now empty and the rear door remains unlocked from Darren’s earlier surveillance.
Search the shop. The film isn’t lying around in the open. Click on the tripod in the front room and Darren suggests that, if Fuller left the Angelina pictures behind, they must be in the safe. That’s on the right side of the office in the rear.
Combination? You will have to sort it out as bad guys did in old movies . Use the stethoscope from the end of Mom’s hospital bed on the safe and, in the close-up view, turn the dial back and forth using the left and right mouse buttons, reversing directions when you hear the tumblers fall into place (and not allowing yourself to be distracted by the faint tinkling sounds you’ll sometimes hear for wrong numbers). Starting clockwise or counter-clockwise, the combination will always be 90-50-70-20-30. Then open it up and take the film canister.
You’ll need four additional items to develop the photos.
– Distilled water. Right at your feet when Darren enters the darkroom. (This is behind the curtain at the left side of the shop’s front room.)
– Fixer. Also right here — at the upper right-hand corner of the water dish on the counter.
– Developer. On the cellar shelves behind the pallet. (:Left-click twice on the pallet to knock it over.)
– Photo paper. This may prove a challenge — especially if you neglected to collect a blank collection slip at the PO in the earlier visit and so have no handy reminder of this incomplete task.
The uncollected parcel contains the photo paper. You cannot find the missing collection slip in Fuller’s ratty office and will have to create one yourself. To reprise: Visit the post office, look at the pad of blank slips on the counter (just left of the register), ask Rosie for a fictitious parcel for Darren and steal a slip when she turns her back.
Now you just have to fill it out. Use the pen in the mug just to the right of the phone in Fuller’s office at any location other than the post-office interior and Darren scribbles the details on the slip. Will that do?
It will not. Back at the PO, Rosie objects to the absence of the mailman’s signature.
You can’t track down the mailman. Though modeled for the purposes of a fading-out conversation icon, he’s not in the game. But two characters will give you a lead on him: Mrs. Biba says he’s probably at the hospital and the hospital nurse that he delivered get-well cards for Darren’s mom. And of course once Rosie has mentioned the mailman, you can cut to the chase and just visit Mom’s room. Sure enough, you’ll find an array of cards on her nightstand — including one from mailman P. Puck. Click on them to identify the mailman’s signature, take the leftmost card and use the pen or card on the collection slip to add the signature. Take it back to Rosie and the photo paper is yours.
Odds & ends: At the same time, the doctor reappears in Mom’s hospital room. He has some surprises for Darren. Ask about “Mother” to learn her old injuries are not consistent with a car crash and are more likely the result of a fall.
Once Darren says he’s got everything he needs, you’re ready for the darkroom.
The developing part’s easy; it’s just a matter of using the right items in the right places. Use the developer fluid and distilled water on the developer dish at the left, distilled water on the water dish in the middle and the photo paper (unwrapped in inventory with a right-click) on the enlarger at the right. Now use the film can on the developer container between the two dishes and pour in some developer. Left-click on the container to pour out the developer fluid, then add the fixer and left-click on the container again to extract the negatives.
Here’s where the potential for mistakes creeps in. Use the negatives on the enlarger, left-click on the enlarger to activate it, wait four or five seconds (using the little timer to the left ) and turn off the enlarger with a second left-click. The exposed photo paper is automatically returned to your inventory. Drop it in the developer tray. No in-game timer is available here, so, once the developer tray appears in close-up, tick off about 15 seconds on your watch (counting “one-one thousand, two-one thousand …” will work in a pinch) and then drop the photo in the water to arrest the process.
Darren here comments on the quality of the picture. As long as he says the contrast and brightness are OK, you’re on the right track — it’s the photographer who was the problem — and you’ll just have to run through the process a second time at the same specs to complete the batch. Darren will then automatically complete the remainder.
And if not? Pay attention to Darren’s advice.
“Not enough contrast”: Expose the picture under the enlarger for a longer period. (One to three seconds isn’t enough.)
“Too much contrast”: A shorter period. (Six to the maximum of nine seconds is too much.)
“Too light”: More time in the developing tray. (Fifteen to 18 seconds is ideal.)
“Too dark”: Less tray time.
Odds & ends: Note that the waste basket to the left of the developer tray remains red under the cursor after Darren has examined it. What gives?
This enables you to toss out any photos that you botch during the initial exposure phase — rather than having to dunk them in the developing tray even when you already know they’re going to turn out badly.
Once Darren’s work is complete, the doorbell rings. It’s a visibly perturbed (and more than usually bruised) Mrs. Biba with a sealed envelope for Fuller and the raw material of a new task for Darren: Find a way to open the envelope so Fuller won’t notice.
You don’t have to address this right now. It’s one of two tasks you can perform — three, if you haven’t yet dealt with Mom’s insurance — and, once again, any order will do.
Blackmail
How to open the envelope in an undetectable way?
Ah, steam — friend eternal to nosy 20somethings and adventure-game designers! (You’ll recall this was also used in the original The Black Mirror.)
Jet back to Mom’s house, take the empty tea kettle from the stove, use it on the sink just to the left to fill it with water, then on the stove and activate the stove with a left-click. The kettle begins to boil instantly — hey, I want to live in this accelerated world! — and you just need to use the envelope on the kettle to unglue the mucilage and produce $1,500.
Blackmail money, evidently. Suddenly you’re beginning to make better sense of the contempt in which Mrs. Biba holds Fuller … and how Fuller was able to afford his expensive kit.
But what did Mrs. Biba do to expose herself to blackmail? Darren can’t sort that out right now, so just place the resealed envelope in Fuller’s mail slot and make for the hotel.
Photo Session
Enter and climb the stairs. Long, increasingly weird cut-scene (dig the violins) in which Darren takes his own pictures of Angelina. Once Darren finishes up the roll, they agree to meet for dinner at the diner. On automatic, Darren leaves to find Mr. Mascara downstairs questioning the porter about Angelina’s stay and again quickly vanishing when he spots Darren. (Darren takes copious notes — presumably the better to identify him for police the following day.) You can follow him again, but only to the hotel exterior.
Odds & ends: If you’ve already identified the coin for Eddie at the junk shop, you can now retrieve his cane from the porter and save yourself a separate trip later. (See below.) That clears the way for Darren to borrow Eddie’s slide projector later in the chapter.
– In the hotel lobby, click repeatedly on the door marked “Private” for a funny exchange between Darren and the porter.
This leads straight into preparation of the second batch of photos. Outside the hotel, Darren runs down his requirements to develop the photos in his mother’s bathroom: a red light, two flat dishes, something to serve as fixer and a makeshift enlarger.
– Red light. The necessary red light can be found on the string hanging outside Biba’s Diner. Go grab it. Darren will automatically use the trash bin at the right to reach the lights suspended in front. No clue why this makes the other lights in the chain go out — except perhaps as a reminder to the player that Darren’s already completed this task.
Odds & ends: This remains interactive afterward. (You’ll be back for a second helping in Chapter II.)
– Fixer. The acidic vinegar just right of the bread bin on the middle of the diner’s counter will work fine. (It’s possible you have this already. You can take it at any earlier point in the chapter.)
– Flat dishes/bowls. Mom’s kitchen is a good bet, and you’ll find one in the drawers beside the sink. The other is in the dog cage beneath the left-hand window in the photo shop’s backyard.
– Enlarger. This requires a bit of work — though it’s possible you’ve already inadvertently cleared the path.
Darren can adapt for this purpose a slide projector atop the shelves in the junk shop next door to Fuller’s place. Click on it and talk to proprietor Eddie and he declares it’s not for sale or loan.
Actually, the situation is not quite so cut-and-dried. Eddie is a curmudgeon. You just have to draw him out — finding a topic that allows him to break out of this mode — and it’s not one of his initial array. Look at the microphone on the left side of the counter and then talk to Eddie. Now you can ask him about “blindness” and “coin” and identify a rare coin for him. Just use the catalog on the right side of the counter. (It’s hidden behind the left rear pocket of Darren’s jeans.)
Eddie now invites you to retrieve the cane he lost to the owner of the Wild Coast Hotel in a poker game. The only hotel employee we’ve run into is the porter in the lobby and apparently they’re one and same. Just be persistent: Talk to the porter about “poker game” until you run out the topic and he’ll surrender the cane.
Back at the junk shop, talk to Eddie about the cane (or just use it on him) to return it and then about the projector as a proposed quid pro quo and it’s yours.
With all this stuff in inventory, enter the bathroom at Mom’s house to set about developing the pictures. This time, the developing process is automated and Darren winds up with a batch of pictures for Angelina and one picture for himself in inventory.
Epilogue
The scene should shift automatically to Darren’s date at Biba’s Diner. (If it doesn’t, some task or tasks remain incomplete. Have you held off addressing Mom’s insurance business or held onto the blackmail money?)
Key event at dinner: Angelina opens the casket from Mom’s desk to find it contains a picture of Darren’s mother and a man that was shot outside Black Mirror castle. It’s dated October 1969. Darren suggests his mother doesn’t look five months pregnant.
Maybe she wasn’t?
Odds & ends: In the original The Black Mirror, the between-chapter dreams turned out to be windows into murders that were actually being committed by protagonist Samuel. Given that there’s going to be a murder overnight, that’s also a natural assumption here. However, in Black Mirror II, these are innocent images that seem to run the gamut from memories of actual events to anxiety-driven imagined ones.
Chapter II
Darren is awakened at his mother’s house by the doorbell. Captain Conley from the local PD reports that Fuller has been stabbed to death and that Angelina, caught literally red-handed at the scene, has been arrested. Darren offers such little exculpatory evidence as he possesses and is invited to come to the station and describe Mr. Mascara. When he leaves the house, he’ll reappear directly in Town Hall.
Run through the conversation with the police woman and you’ll find yourself in a mini-game. Called “Photofit” (after the facial composite system used in the United Kingdom), it’s always a blank slate at the start. Two leftward clicks on the hair, two rightward ones for the chin and one leftward one for the eyes and you’ve got it. Just save the portrait to exit. The final product should look like this:
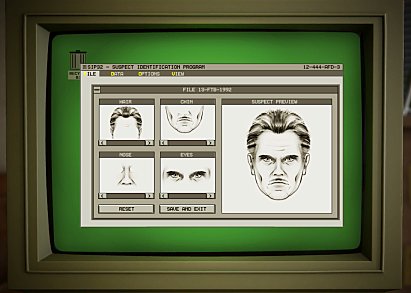
(Take pictures of the police woman and the “manhunt pictures” on the near wall of the captain’s office to unlock picture #4 and mini-game #1 (Photofit), respectively. Note that you must take the shot of the posters before you complete the mini-game.)
A brief exchange with Angelina (en route to the cells) and then the police woman, and Darren has his next goal: Obtain evidence of Fuller’s blackmail operation.
This has two stages: finding the material Fuller was using to blackmail Mrs. Biba and obtaining proof of the actual coercive act. — i.e. a statement along the lines of “You give me $1,500 or I’ll …” You can perform these tasks in either order.
Odds & ends: Once you’ve completed the description, you’ll find the composite in your inventory and posted to the right of the door to the souvenir shop and (after you’ve entered and exited Biba’s Diner) to the left of the diner door. You can also ask Mrs. Biba, Dr. Newhouse (at the diner), Eddie, the hotel owner/porter and Rosie whether they’ve seen the man, and Captain Conley and Sgt. Kinney (the police woman) whether he’s been picked up for questioning. (No and no.)
The Blackmail Letter
The easy part.
Simply visit Biba’s Diner. Outside, you’ll find Mrs. Biba dropping something in the dumpster over at the right — evidently something she couldn’t trust to the indoor trash can even on this rainy day. When she returns inside, open the bin to retrieve the pieces of a torn-up letter — evidently the one Darren delivered in Chapter I — and right-click on them in inventory to put them together in another mini-game.
As puzzles go, this one is easy. Rotate each piece with right-clicks so it is in its proper orientation, then assemble the border on one side of the screen and fill in the interior.
What exactly passed between them? Fuller’s wording is sufficiently vague (“visit,” “our time together,” “fun”) to permit multiple interpretations. But the threat is clear enough: Fuller will expose Mrs. Biba unless she pays him off.
(Take a picture of the dumpster to unlock minigame #2: Letter.)
The Secret Room
The hard part.
Darren believes that whatever Fuller had on Mrs. Biba must be concealed in the secret room behind the photo backdrops in the cellar. But there are multiple barriers to entry. This will take a while.
The Photo Shop
Darren arrives back at the photo shop to find both doors blocked with yellow police tape. Suddenly respectful of authority, he won’t break the seals.
But the grate covering the well outside the basement window has no such seal. Perhaps the cops thought it impassable. With a little art, Darren can raise it.
The key is the grate’s proximity to an effectively immovable object — the grille over the window above the window well. Use the tow rope from the car hood at the left on either to connect the grate below to the grille above.
Now you need something durable with which to twist the rope. Try the fallen-down piece of the upper railing on the promenade outside the souvenir shop. (It’s on the ground outside the shop’s far-left corner.) Use it on the rope loop and Darren inserts the tube, twists it and pries up the grate.
In the cellar, you’ll find the photo backdrop has been lowered again. You’ll need to raise it to expose the door by pulling in a certain order the five control ropes in the backdrop’s upper-left corner. If only because this is an adventure game, you can be fairly sure that order must be noted down or encoded somewhere.
First step: Pull each of the ropes once. This changes their designations from numbers to place names. When you’re done, they should read (from left to right): Beach, Castle, Great Wall of China, Monument Valley and Sphinx. (This is not strictly required, but it will allow you to identify the ropes more readily in the sequence that follows. Hints to the proper order in which you’ll need to pull the ropes can be found upstairs, but they are keyed to the locations of the associated scenes rather than the rope numbers.)
Check Fuller’s office. There are two levels of clues here: the note on the right side of the map behind the desk (which provides positions for three ropes and a hint at a fourth) and the map itself. It’s visible only in part in the closeup, but Darren’s spoken description gives all five locations: Utah/Arizona, Hawaii, Egypt, China and Germany. This translates into Monument Valley on the Utah/Arizona line (rope #4), Beach (#1), Sphinx (#5), Great Wall of China (#3) and Castle (#2).
(And while you’re upstairs, pop into the dark room and take a picture of the chalk outline that marked the position of Fuller’s body. This unlocks picture #17.)
Pull the ropes in that order and the backdrops lift.
Now you have access to the door, but still need a code for the keypad to the left. Left-click on the door twice to learn this requires a search of Fuller’s belongings at the local morgue.
The Morgue
The morgue’s off the left side of the hospital waiting room. This can play out a couple of different ways, but they both work out the same in the end.
– Try to talk to the morgue guard (previously seen at the counter at Biba’s) and the nurse speaks up and shoos Darren away. Darren says to himself that he has to find some way to distract her. (See below. Once Darren has a delivery note, the nurse no longer intercedes.)
– This is a bit more direct: Try to enter the morgue. The guard stops you, asks if you’re making a delivery and, when Darren confirms, asks for his delivery note.
Needless to say, Darren doesn’t have one. And, just to cut to the chase, he’s also missing an actual parcel and a hospital ID badge. (You can acquire the delivery note and parcel without first talking to the guard, but you’ll need to talk to him with the first two in inventory to set up collection of the ID.)
– Delivery notes. They’re on the corner of the counter at the left side of the nurses station. Darren won’t take one with the nurse sitting here. You’ll have to distract her by unplugging the monitor in your Mom’s room — first left-clicking on the monitor itself and then on the cables. This sets off an alarm, the nurse comes running and Darren can use the interval to slip back out to the lobby to grab the note.
– Parcel. The parcel doesn’t have to be an actual parcel. The empty box on the floor at the near end of the shelves in the souvenir store will do just fine.
– ID card. With the slip and box in inventory, talk to the guard and discover you still need a visitor’s pass.
This is a bit more obscure. The nurse won’t provide one. (She knows you to be a family member of a patient and they don’t require passes.)
Maybe the doctor? He isn’t here — but you did run into him at Biba’s Diner in Chapter I. Check there. Yup: A badge-wearing Dr. Newhouse in his usual booth.
You need to get the doc to lose that coat. Its simple: Talk to Mrs. Biba, order coffee and use the cup on the doctor. He heads for the restroom to clean up and Mrs. Biba leaves his soiled coat on the end of the counter. Click on it twice to take the ID badge. Your way into the morgue is clear.
The top deck of the trolley in front of Darren has nine little containers for the belongings of the departed. You’ll have to examine with a left-click each of the six clipboards on the wall above to sort out what number has been assigned to Fuller’s belongings and then return to clipboard #448 at the lower left to ascertain that this is the right one. Then left-click twice on the boxes of personal effects below and once on the one at the back center to identify it as Fuller’s. Open it to take the keys — among them a hexagonal brass stick that might be used for winding.
(Also snap a picture of Fuller’s covered corpse at the rear. This unlocks picture #16.)
The Photo Shop II
The winder fits in the hole in the lower right corner of the cuckoo clock just inside the rear door. Examine the clock face in close-up and use the keys on the hexagonal hole. The clock clicks and chimes once, the doors at the top open and out pops a little box. Right-click on it to discover it contains four negatives — all with apparent defects in the form of bars or stripes.
Can you examine them in closeup? Head to the shop’s front room and use the negatives on the light box to the left of the register. The content is nondescript, but the bars could Rotate the top two and the one at the lower left so they are displayed in their real-world, right-side up orientation and the one at the lower-right (a shot of the hospital) so it’s upside-down. Now drag them on top of each other and the bars will spell out “2482.” Plug this into the keypad and hit the return key at the lower right to elicit a promising bright sound.
But the door remains shut. The code isn’t enough. Something is missing.
If you explored down here earlier in the game, you may have noticed a certain sponginess to the floor in front of the backdrop. Left-click on the floorboards now to find a scale concealed here. The weight on the scale must match Fuller’s weight to unlock the door, and Darren has no idea how much Fuller weighed.
Odds & ends: Unless he was willing to adjust the locking mechanism every few days, Fuller would have had to watch his weight assiduously!
Morgue II
But you’ve seen a scale under your mother’s hospital bed, right? Right. So it’s back to the hospital. You can take the scale and, irrespective of the absence of a box and delivery note, reenter the morgue without a hitch. But try to weigh Fuller’s body and Darren anticipates a “racket” and suggests distracting the guard first.
Actually, you’re going to try to drug him. Here the game harks back to a sanitarium sequence in the original The Black Mirror. Take the syringe from the lower shelf of the cart under which you placed your faux parcel upon first arriving in the morgue and the laxative from the bedside table in your Mom’s room, buy a soda from the machine outside the guard booth and, in any location save the hospital lobby, combine the syringe and laxative and then the loaded syringe and soda in inventory.
Drag and drop the laxative-laced soda onto the suspicious guard. (Don’t just talk about it; he won’t accept it that way.) Seconds later, he takes off — evidently not for the bathroom — and Darren’s free to weigh Fuller and his gurney and then the empty gurney in the foreground. Encounters with the lunatic guard and annoyed police captain follow swiftly — after which Darren is free to return to Fuller’s cellar.
Photo Shop III
Don’t worry about the math. Simply left-click on the scale in front of the door and Darren automatically assembles sufficient cellar junk to supplement his own weight. (Too bad about the “automatically” part. That might have been a fun puzzle.) Plug in the “2482” code again, the door clicks and you have only to activate it to enter Fuller’s hideaway.
The blackmail material is in the locker at the left. It’s unlocked using the hexagonal recess in the metal plate behind the curtain at the right. Simply take the brass ball off the lower left bedpost, use it on the recess, open the locker and take the compromising photos of Mrs. Biba within.
Odds & ends: Darren doesn’t speculate aloud what Fuller did down here, but the knockout drops on the table beside the bed are a dead giveaway.
Police Station
Enter the police station for a long sequence. Mr. Mascara appears, identifies himself as British private eye Reginald Borris, and asserts that Angelina did have a motive to kill Fuller: Fuller had photographed her. Darren thinks he’s framing Angelina for the murder and it does appear that way. Borris claims the photos he produces were received from Fuller, but Darren recognizes them as photos he took the previous day — meaning Borris must have stolen them from Angelina’s hotel room. After a quick chat with the police woman, that’s your next destination.
Odds & ends: Conley’s questioning of Borris takes no time at all. Having left the station, you can march right back in, talk to Conley about “Stranger” and learn he now smells a rat. However, you won’t get the full story on Fuller’s dungeon until after Darren completes his mission at the hotel.
Hotel
Darren arrives outside the Wild Coast to find the owner/porter screaming hysterically at the sea gulls on the left-hand porch. He’s not going to let Darren up to Angelina’s room so you’ll have to distract him, and what better way to the demonstrated one: Bring back the gulls. Gulls love bread and, as mentioned earlier (in context with grabbing the vinegar), you can find some on the counter at Biba’s Diner. The intact slices would draw down only one bird (or so Darren thinks) so right-click on the bread in inventory to crumble it and use the crumbs on the hotel veranda. The birds fly in, the shrieking owner/porter emerges to chase them away and, behind his back, Darren is free to step inside, grab the key from behind the desk and climb to Angelina’s room. (If you miss your window, you’ll have to retreat to Biba’s Diner and collect more bread.)
Left-click on the lamp beside the bed to discover a microphone and then twice on the ventilation grate above the dresser to find a transmitter. Right-click on the transmitter in inventory and Darren suggests checking with Eddie at the junk shop. (You’ll recall that it was the inquiry about his radio that got him to open up a bit.) Let yourself out for another display of hysterics by the owner/porter.
(Also use the camera on the wine glasses on the table for Darren to snap a picture and unlock picture #1 — a candid shot that appears nowhere in the game. Is that Angelina? You would think so, being that it’s her hotel room, But given the shadow on the back wall of a man preparing to strike a blow, I think it’s supposed to be Mrs. Biba.)
Odds & ends: Actually, even if he has completed this sequence, Darren can collect a second helping of bread from Biba’s, squish it down to crumbs again and take it all the way to England in Chapter III. But it never finds another use.
Junk Shop
Get back to Eddie and ask about the transmitter (or just use the transmitter on him). He reports that he picked up some Morse code the previous day from a stranger who transmitted that a certain girl is “now safe” (which could mean “locked in a cell”) and that he’d be in touch again at 6 p.m. today.
Eddie suggests you use directional antennas to locate Borris’s transmitter. Eddie has one and will build another for Darren if Darren collects the necessary raw materials: a metal bar, headphones, compass and a length of copper wire.
– Metal bar. Simply pop into Fuller’s back yard and disengage the piece of railing from the rope. (You can do this even before you get the antenna assignment from Eddie.)
– Headphones. To the right of the TV at Mom’s house.
– Compass. On Mom’s telescope.
– Copper wire. You can retrieve it from the same chain of lights where you earlier found the red light bulb, but you’ll need some way to cut off a section. Buy the wire cutter on the rack on the front of the junk-shop counter and use the cutter on the wire at Biba’s and then on the wire in inventory to strip off the plastic.
Odds & ends: Note that Eddie now gives Darren a 50-cent discount on the $2 he charges if Darren buys the wire cutter prior to the coin and cane favors. (Albeit a meaningless one — money being an intangible in BM2.)
– This is the last sequence where Darren has the run of Biddeford — once the antenna is assembled, you’ll be limited in the regions you can explore — so if there are people with whom you want to speak or locations to examine or shoot with the camera, now is the time.
In particular, ask both Captain Conley and the police woman about “Secret basement” to learn the police search of the dungeon has borne fruit. Conley now says “there’s a lot of people with reason to cut Fuller up.” And the police woman gives you a taste of Borris’s cover story: He’s supposed to working for an insurance company and watching Angelina over a matter of some stolen books.
– And what about that business with the late Carrie? The game lets it go once you’ve questioned everyone with a “Carrie” topic. Given the Fuller connection, the implication seems to be that she too was blackmailed over some prurient photos and took her life.
With all these components in inventory, drop back to Eddie’s shop and talk to him. He’ll give you instructions and Darren automatically removes to a spot outside the Wild Coast Hotel. Use the mouse to adjust the compass to 73 degrees and, with the gadget now beeping rapidly, press the red button at the lower right. Darren jumps back to the junk shop to plot the coordinates (again, automatic) and discover that Borris must be on a boat two miles offshore.
Borris’s Boat
It might have been fun getting out there, but that’s automatic, too — Eddie cashes in a favor with a fisherman — and you’ll suddenly find Darren at the aft end of Borris’s sailboat.
Let yourself into the cabin and left-click twice on the picture on the far wall to reveal a safe. The dial is similar to a compass and the combination consists of a sequence of six compass headings.
Is this written own somewhere? Not exactly. But the folder to the right of the laptop computer contains a transparency that fits over the map of Africa on the wall to the left. You want to align the transparency so its lines fill the gaps between similar lines on the map to complete a route around the southern tip of Africa.
That may give you some trouble. The lines don’t all sync properly. But the process can be simplified: Only one line needs to fit perfectly. Right-click twice on the transparency to rotate it so no line appears in its upper right-hand corner and then slide the foil so the line in its lower right corner completes the link between the line at the bottom of the map and the one above it and to the right. (The latter line ends in a circle.)
This completes a route, the view drops back to the cabin and Darren reads off the combination from the pictured directions: SW, S, SE, E, NE, NW. Plug this into the safe — as with the safe at Fuller’s shop, the direction in which you turn the dial first doesn’t matter — and liberate a ring bearing a tree symbol and a computer disk. Pop the latter into the laptop to discover the computer’s internal battery is dead and that the boat seems not to have electricity.
A generator can be found under the right-hand sofa. Naturally, the seat turns out to be locked down so you’ll need a key. It’s in the third drawer from the top beneath the laptop. And, naturally, the generator is almost out of fuel, so you’ll need gas. (You’ll have to try to start to generator in order to take the gas can.) It’s in the drawer under the left-hand bench up on deck. Start ‘er up and activate the laptop again for evidence that Darren’s mother wasn’t hurt in a car crash after all and that Fuller was killed by Mrs. Biba’s husband.
Naturally, this is where Borris shows up. Darren automatically clubs him with the bust but not hard enough and when he retreats to the deck the private detective is still at his heels.
Darren can die in this standoff — the first of several such encounters — and there’s only one way out: Within five seconds, try to conk Borris in the head with the sailboat’s boom. Darren then automatically wallops him with the oar and sends him overboard. (If you miss the window or click on anything else — Borris himself or the oar — Borris shoots Darren and you’ll have to replay the scene from the automatic save.)
Cut to a scene of Darren and Angelina on the rocks overlooking the Wild Coast — it’s established here that Angelina is returning to England without Darren to continue her investigations — and then Darren alone at Biba’s Diner a few days later. (No evidence of Mr. Biba in the kitchen; he’s evidently been arrested.) Mrs. Biba approaches and reports that the hospital has called looking for Darren. It’s the only place you can go — the Biddeford postcard is broken and all other exits are locked out — so enter the lobby and then Mom’s room to find the bed unoccupied and monitor off. The doctor enters and tells Darren that his mother’s heart gave out.
Darren dreams are followed by a real-world sequence — an alarming message from Angelina on Mom’s answering machine — and Darren’s flight to England.
Chapter III
Gordon’s Palace Hotel
We find Darren outside a hotel. This location will be familiar to those who’ve played the first game. (This is the Ashburry sanatorium from the original The Black Mirror.)
Enter. Darren automatically talks to proprietor Murray — again, a familiar name: he ran the Willow Creek pawn shop in the first game — and takes a room and and learns Angelina has the one next door. Use the double doors to the left and Darren automatically drops off his backpack. (This contains most of the leftovers from chapters I and II: the letter from his mother’s bankbook, the photo from the casket and the ring from Borris’s safe. They all vanish permanently from your inventory but you’ll nevertheless be able to raise questions about the ring a little down the road.)
First things first: You need to get into Angelina’s room to see what’s going on with her. Proprietor Murray won’t just give you the key — and you’ll have to ask him about Angelina and then her room key so he can say so — so you’ll have to create another diversion: a smoky little fire in the pile of leaves outside.
For this purpose, you’ll need the matches from the ashtray in the middle of the table in the lounge outside your room and, since the leaves are wet, some kind of kindling. The newspaper at the left edge of the table will do admirably. Place the paper in the leaves, use the matches on the leaves and then go back inside and tell Murray about “fire.” (This may feel like another timed sequence, but isn’t. Murray stays outside until Darren has the key.)
Use your new key on the door to Angelina’s room or simply try the door. Inside, you’ll find an oddity that seems designed to attract Darren’s attention: a framed picture of Angelina on the left wall. Take it down with two left-clicks and you’ll find two seemingly blank sheets of paper behind it. Darren speculates they contain a message written in invisible ink.
So they do. Angelina used lemon juice as her ink and the wood sliver on the table as a pen. You just have to make the message visible by oxidizing the ink. A little heat should do the trick — as you’ll learn if you use the matches on the paper — but the heat source will have to endure longer than your average match.
Take the Schnapps from the table in the hotel lobby, pull a woolen thread from the ratty blanket on the bed in in Angelina’s room and use both on the glass on the table beside the window in Angelina’s room. Then use the matches and finally the papers on the glass over on the table. Then right-click on Angelina’s singed message in inventory to read it. It’s series of short diary entries that sketch out a little about Willow Creek and Black Mirror castle, supplies details about the ring Darren recovered from Borris’s safe (evidently the symbol of a secret society that “wants to summon up dark powers”) and refers to Borris’s appearance at the hotel, Angelina’s desire to “investigate the passage” and her intention to “send off some insurance.”
Darren assumes that Angelina is being held prisoner by Borris — remember the answering-machine message — and suggests putting an ear to the ground in Willow Creek.
Willow Creek
Which you can now do. Take a postcard from the display in the lobby — this isn’t required, but, as in Biddeford, enables instant travel between previously-visited locations — and exit right from the hotel exterior to reach the village.
Odds & ends: There is one task you can still complete at the hotel — finding the entrance to Angelina’s passage — but it’ll keep. You can’t open that entrance until you locate Angelina’s “insurance.”
In Willow Creek, Darren almost runs into the town librarian, Miss Valley. She’ll give him an obligatory (and rather plodding) tour of the place to the tune of Darren’s conversation topics and finally bolt when he asks after the symbol on Borris’s ring and she discovers Darren is from Maine — as though she’d suddenly put 2 and 2 together and the answer frightened her.
Odds & ends: Talk to Tom at the chili stand about Miss Valley for a rather unsympathetic take on her sad history: She’s the sister of young Vic Valley — murdered by Samuel Gordon in the original The Black Mirror — and seems to have been almost as much a victim as her brother.
– And snap a picture of the street to the left of the central tower in Willow Creek. This unlocks picture #6.
That little freak-out sets your agenda. You want to learn more about The Order. You can do so at the museum. Enter, listen to the German tourist complain and then left-click on the display case initially just off-screen to the right and in the closeup read the Gordon Family Chronicle within. It supplies the rules of the Order, but not what the society is about. You’ll need to read the earlier pages to sort that out. A quick chat with guard Bobby establishes that he’s not permitted to remove the book from the locked case — but that he does have the key.
Distractions make Darren’s world go around and he needs to distract Bobby twice to steal his key. Bobby’s initial three topics don’t suggest avenues for distraction, but he grows additional topics as you examine locations around the museum: the broken display case to the left of the door (which quietly becomes relevant in Chapter VI) and, more importantly here, the “bubble mixture” on the front counter. Use the latter topic and it turns out Bobby is hungry and would accept something to eat.
Leave the museum, cross the canal to the chili stand and order a bowl from Tom. Give the bowl to Bobby or just talk to him about it. He’ll provide a sparkler in exchange and remove his jacket. However, he remains in his chair. To coax him out, talk to him again about the bubble mixture and Darren volunteers to refill the container with soapy water. Take it with you.
The soap can be found in the supply cupboard to the left of the display case. (Darren automatically squirts some into the bubble container.)
You’d think the water would be easy, being that there’s a river right in the middle of town, but the surface of the reveals no hotspots. The closest thing is the rope tied to the little pier off the left side of the waterway. Reel it in to find that there’s a bucket at the end and that, naturally, it’s full of water. Use the bubble mix container on the bucket and Darren’s work is done. Give the mix back to Bobby, who promptly stands up and starts blowing bubbles out the window. While his back in turned, left-click on his jacket to take the key.
Odds & ends: Check out the broken the display case to the left.This is explained in Chapter VI.
Also take a picture of Bobby when he’s blowing bubbles. This unlocks mini-game #5: BigHead Mode.
This is notably different from the other four mini-games, which simply enable the player to replay mini-games found in Black Mirror II. It activates this gag mode in the “Options” menu — including a sliding scale, initially set at the normal size, that allows you to control how huge or pinhead-sized the characters’ heads appear. (Try it; it’s funny for a while.)
Look at the display case in the close-up view and use the key on the lock at the top … only to learn the museum is closing for the evening. Browsing in the Chronicle will have to wait until Chapter IV. Darren leaves automatically for a run-in with a bedraggled man who calls him “Death” and refers to “the curse.”
You can now return to the hotel, where a new task awaits.
Odds & ends: However, you can also follow up with the bum, who has removed to the bench outside the pub on the left side of the canal, and now learn that Darren is the Antichrist.
– Moreover, the pub is now open and you can poke around a bit inside — albeit to no useful purpose. (Inside, snap a picture of the mugs in the foreground. This unlocks picture #7.) And note that the high-score on the pinball machine includes an entry for “Vic” — one of the murder victims in the original The Black Mirror.
Gordon’s Palace II
Outside the hotel, you’ll find an agitated Miss Valley. She doesn’t say much that is coherent — except to disclose that, every 12 years, something terrible happens here.
Inside, Darren finds Murray fiddling with a letter. Turns out its for Angelina. Could this be the “insurance” she mentioned in her diary? Naturally, Murray refuses to turn it over and, once again, you’ll have to find a way to get around him and into the lockboxes behind the central columns.
Darren automatically moves to the lounge outside the rooms. The next time he returns, he’ll find find Murray reading the paper and drinking tea.
If Darren could drug the tea, he’d have the run of the place. Happily, there is a sleep aid in the cabinet under the TV in Angelina’s room. Simply use it on the tea. No special stealth or prep work required. However obvious the maneuver, Darren automatically leaves again and returns to find Murray catching Zs. He’ll be out of commission until wakened by the tourists later in the chapter.
Left-click on the lockboxes to the right and you’ll learn Darren’s reluctant to risk waking Murray by searching his pockets for a key.
That leaves a lockpick. Who around here might have a lockpick? If you spoke to Bobby and Tom only on the necessary topics, you may be a little vague on that. But if you asked Bobby about himself and then Tom, it’ll be crystal clear: Tom is a burglar.
Return to Willow Creek. At the pub, talk to Tom and simply keep up the cycle of “shops” and “beer” topics until he’s sufficiently drunk to turn over the lockpicking tool.
Back at the hotel, use the lockpick on the lockboxes to start another mini-game. You’ll need to configure its shape so it simultaneously depresses the four tumblers to align the top of each with the central red line. The tumblers are set up randomly each time you play, so there’s no fixed solution. But, honestly, it’s pretty easy. Insert the pick, note which sections of the pick depress the respective tumblers and then configure each section — somehow, it’s as flexible as a pipe cleaner — to the right position. When you have it right, you’ll hear a click and the scene will switch back to the lobby. Open the lockbox, remove the letter and open it with a right-click.
As we guessed earlier, it’s the “insurance.” Angelina is scared of noises coming from a space beneath her floor and seems to be trying to smooth Darren’s path in that direction with an entry code should she disappear. “The solution was known by two story-telling brothers from Germany,” she writes. “GFT/62/17/1/25.”
Odds & ends: Isn’t it a little strange that Angelina knows the solution ? (If she’s scared of the sounds from down there, why was she opening the manhole?)
But let’s begin at the beginning. Where’s the entrance? If you played the original game, you probably have guessed: Angelina’s hotel room was James’s room at the asylum and there’s still a sewer-access hole under the bed. Just move the bed to expose the manhole — now equipped with a cover and an intricate locking mechanism.
However, you can’t inspect it in closeup until you decode Angelina’s clue. “GFT” has to be Grimm’s Fairy Tales. Sure enough, there’s a copy in the bookshelf out in the lounge and, sure enough, the four numbers in Angelina’s insurance correspond to page numbers in the table of contents — 62 to “The Queen Bee,” 17 to “The White Snake,” 1 to “The Frog King or Iron Henry” and 25 to “The Seven Ravens.”
And now for the puzzle. If need be, rotate the central circle so the four relevant numbers are adjacent to the four outer circles and then rotate those four circles so the appropriate pictures appear in the space adjacent to the related Table of Contents numbers. (The overall orientation of the numbers doesn’t matter; they ) The frog and raven are easy to identify, the snake and bee a bit harder. When the last circle is properly adjusted, you’ll hear a click and drop back to the view of Angelina’s room — now with a dark smelly hole.
Accent on dark. Darren won’t descend without a light source, But you’ll have to make him look down the hole twice in order to mention the darkness and thus set up the next task.
Darren needs a light. That may give you pause. The Schnapps ‘n’ thread candle on the desk has gone out and the game won’t let you waste a match on Bobby’s sparkler. But given that Willow Creek is pretty much shut down for the night and the rest of the map currently inaccessible, there are only so many places you can look. Check the lobby. The “soul keys” on display between the masks and the postcards — left-click three times on the souvenirs to take one — are supposed to light up.
Alas, they don’t come with batteries.
Odds & ends: After you’ve picked up a soul key, ask Murray about them to learn that the originals vanished with Samuel Gordon’s suicide at the end of The Black Mirror. I suspect the designers -meant- to have him say that the soul keys were never found. (How would anyone know they had vanished without entering the summoning chamber at the end of The Black Mirror? In fact, they’re still down there.)
– And after the German tourists have finished waking Murray and complaining about the stench from the open sewer, snap a photo of the hotel proprietor to unlock photo #8.
The clock atop the bookshelf in the lounge does contain batteries — and I’d venture that they’re probably dead, being that the clock is only right twice a day– but Darren can’t simply remove them, being that the clock is screwed to the shelf. No screwdrivers are in evidence so he’ll have to improvise, using the butter knife from the little table in the lobby. (Click on “Dishes” to take it.) Use the knife on the clock and the batteries on the soul key and drop down into the sewers.
Sewers
This is a small maze. You’ll have to find a metal gate — and the means to open it and keep it open — and beyond it the entrance to a World War II bunker. (You may have read about this earlier if you clicked on the rolltop desk at the right side of the museum.)
1) At the bottom of the ladder, you’ll find yourself at the near end of a dark corridor. You can go only one way: “round the corner” to the left at the far end.
2) Here you’ll find a ladder. Presumably this leads up to the manhole from The Black Mirror — now hidden under the fountain outside the hotel. In any case, Darren can’t open the lid at the top.
From here, head right to find two sets of stairs flanking a channel. Grab the metal bar from the right side of the bridge between them. You’ll need this shortly to pry up the gate.
3) The path continues right from here. That’ll work — but this much longer route has greater potential to get you all turned around, being that it includes two extra four-way intersections.
So instead, return to the ladder from #2 and head left (“back that way”) . You’ll find yourself at the front-right portion of a screen with pipes on both walls and two exits to the left (front and back) and a third to the back-right.
4) Use the back-left exit. You’ll find yourself in a dead-end corridor with an oblong hole near the floor in the right near corner. Follow it to the end, where you’ll find a short, sturdy bit of wood leaning against the right wall. Take the beam — this is your gate support — and retrace your steps to the four-way intersection.
5) Following the rat that passes through this scene, use the right rear exit and you’ll come to a gate. Pry it up with the metal bar. This is the another spot where Darren can die, so be sure to use the little beam to prop up the open gate.
6) On the far side, you’ll find yourself at the front-left exit of another four-way intersection. The right exits loop around and reconnect, so use the back-left exit and then go right twice to an impassable gate. You’ll find a pipe protruding from the left wall with a piece of green fabric on its rim. Left-click on the pipe once to take the fabric and again to slide down the pipe.
Tank Room
In your fall at the end of the pipe, the soul key shatters and Darren thus finds himself in total darkness. You can use the flash on your camera (right-click) to sort out your surroundings, but it’s not strictly necessary. Just skate your cursor around the screen. In the process, you should locate several “??” spots. Just left-click on them to identify them by feel. The important ones are:
– a metal door over to the left (important right now only as a reference point for the bucket below)
– a bucket containing oil (to the right of the door)
– a rag (lower right corner)
– a metal tube (lower left corner)
You’re going to make a torch. Take the rag and tube, combine them in inventory, dip the combination in the oil bucket and light the torch with your remaining match.
Escape now is simple. Try the metal door, remove the blocking metal bar (which Darren does not keep; he’ll be able to take it later in the game), reconnect the cables below the switchbox to the left and activate the box with one left-click to turn on the lights and another to open the door.
Odds & ends: The indicator lights on the box were glowing before Darren reconnected the cable Why couldn’t we see them in the darkness?
– Take a picture of the giant water tanks to unlock picture #14.
\\
Cell
Leave the room to discover you’re still locked in — the door leads to a cell — and for a brief exchange with a masked man (who quietly uses some levers to close the door back to the tank room).
Your lockpick won’t work on the rusty padlock. However, look at the padlock and Darren will come up with an alternative: creating welding powder that will melt the lock. This consists of iron oxide (i.e. rust) and aluminum powder. Simply use the butter knife from the hotel lobby on the rusted cell bars to scrape together the one and (in inventory) on one of the aluminum trays on the table next to the camping stove for the other. Darren collects the powder on the table of contents page from the Grimm Fairy Tales book. (We’ll overlook the issue of how the scraping from the tray were pulverized into a powder.) Then use the powder on the lock, the igniter hanging from the left side of the shelf to light the stove, the stove to light the sparkler and the sparkler to light the welding powder.
Success! (And some well-considered comments about the potential unhappy consequences of trying this at home.) Simply open the door and Darren has access to the bunker’s dark outer room.
Odds & ends: The game pretends you’re under the gun here — trying to get you to turn off the stove and use the sparkler quickly. In fact, no time limits apply. Take your time.
The Big Room
Try the big steel doors at the left end — en route, Darren flicks on the light switch left of the compressor (this’ll happen before any action in the big room) — to discover you’re still locked in. You can’t go back the way you came. That is, you can get back into the tank room — throw the leftmost of the three levers to the left of the shelves to open the door — but the pipe is too slippery with oil to climb at this stage of the game. The only way out is the closed hatch.
Open it and descend the ladder to find a second hatch in the floor. The wheel on this one won’t move. You’re going to need explosives.
Dynamite can be found in the left of the three lockers topside, fuse cables in the right locker and a detonating device amid the junk atop the crate in the corner to the right of the steel doors. Use the dynamite on the stuck hatch and Darren tapes it in place with I don’t know what tape. Use the cable on the dynamite, return to the main room, use the other end on the detonator and activate the detonator..
Kaboom.
Well, sorta. The places rocks and rolls a bit, but when you descend again to see your handiwork you won’t find much more than scorch marks.
So you’re going to do it again with the second stick and second cable — but this time plant the dynamite on the overhanging beam. (No, you can’t plant it here the first time around.) The hatch is gone. But the beam now blocks the hatchway and Darren must find some way to raise it.
A self-inflating dingy can be found upstairs beneath the shelves to the right of the levers. But if you try to simply squeeze it under the beam, Darren opines that it will slip out when inflated. You first need to connect the raft to the beam. The chain in the middle of the shelf in the cell is ideal for this purpose, as this is connected automatically to the eyelets on the dingy. Use this on the beam, then the dingy (or vice-versa) and activate the dingy with a left-click to raise the beam out of the way.
Enter the hatch to find a raft (groan) of new problems. This clearly wasn’t intended as an exit. The ladder leads down to a short tunnel and the tunnel to a shaft up to a grate outside the steel door — a shaft not equipped with a ladder. Left-click twice on the grate and Darren suggests flooding the passage.
That’ll require access to the giant water tanks in the room where our boy landed with so little ceremony so, if you haven’t already done so, use the leftmost lever to open the sliding door to the tank room.
Now you have to find a way to get the water from the tanks down to the hatch. Neither of the two hoses — one beside the left-hand tank and the other beneath the levers — is of adequate length, so combine them in inventory, hook the combined hose up to the outlet at the bottom of the left tank and drop the other end down the lower hatch.
However, you can’t turn on the water just yet. Should you try, you’ll be reminded that live wires are still present in the shaft below the blasted hatch. Two are visible just to the right of the ladder. needless to say, you can’t handle them without protection. A pair of gloves can be found just left of the base of the first ladder. Take them — at the same time claiming a wrench. (Remember this: It’ll be important in the final stage of your escape.)
Alas, the gloves are in bad shape and require repair. And that brings us to the middle locker — the one with blood pooling outside. How is it that we haven’t opened this? It contains a dying Reginald Borris. “Don’t … let it happen!” he implores Darren with his final breath. “You have too [sic] … stop … the evil!”
Hmm. If the masked man is with the Order (as the Gordon Chronicle suggests) and Borris was working for the Order, why would the Order kill Borris? It’s another early clue that things are not quite what they seem.
In Borris’s pocket, you’ll fine part of a poem — you won’t hear the whole thing until Chapter IV– and in the locker a roll of insulation tape. Use the tape on the gloves and then the repaired gloves on the wires to remove them to the room above.
Odds & ends: Take pictures of Borris’s body in the closeup view of the locker and the compressor to the left of the lockers to unlock pictures #5 and #27, respectively.
Time for the water. Turn the valve atop the left tank outlet, then return to the lower chamber and drop down the hatch. The scene changes to the chamber outside the steel doors with Darren struggling below the grate — which turns out to be bolted in place. Another do or die spot: You have a few seconds to select your newly-acquired wrench and use it on the grate or Darren drowns.
Did you think yourself free? You’re still locked in. The big gate upscreen can’t be opened.
Odds & ends: … though, confusingly, the cursor remains red after Darren has elicited a full description of said gate. Usually, that means you’re not done with a location — and indeed on a second click Darren does allude to a possible control room.
But it’s all a red herring. There is no control room — the levers back in the bunker are now non-interactive — and the gate never opens for you. (Presumably, it stays red because you’ll be back here in Chapter IV, when the gate will be opened from the other side.)
However, the crevice to the left of the gate is blocked only by a grate, and it’s pretty clear you’re supposed to pull off the grate with the wagon downscreen. But first you’ll have to repair the wagon, which is missing a wheel (as you’ll learn on a second left-click) and connect it to the grate.
There is nothing even vaguely wheel-like in your inventory or this new chamber — but you may recall seeing a wheel against the wall to the left of the compressor back in the bunker. Alas, this remains as non-interactive as ever, but the neighboring compressor has an interactive flywheel that’s just a little smaller.
And, no, you don’t have to swim back through the drowning pool to get there. Simply press the button above the steel doors back into the bunker (i.e. to the left of the doors, in-scene) to open the way, use the wrench on the flywheel and the flywheel on the wagon. (If the flywheel resists your best efforts, you haven’t inspected the wagon yet.)
Give the wagon a left-click to test it out. (Shucks. You’d think they would have made the wheels turn.)
In the process, you’ll dislodge the boards atop a mine shaft. (You can also do this by simply approaching the shaft sans wagon — but you do need to try out the wagon in any case.) Clear away the remainder.
Odds & ends: And then snap a pic of the cleared shaft to unlock picture #15.
Now you need to connect grate and wagon. You had a nice chain connecting the concrete beam and raft, but if you drop down into the bunker’s lower chamber you’ll discover the beam, raft and chain have all vanished into the drink and that Darren has no taste for further diving.
But there is another chain — initially hard to spot, as Darren’s standing right on top of it after he exits the bunker. It’s below the lower railing on the landing outside the bunker doors. Just connect it to grate and wagon. (If you can’t connect it to the wagon, you haven’t installed the wheel and tested it yet.)
Is the wagon by itself heavy enough to rip out the grate when it falls? Maybe not. As Darren observes, he won’t have a second chance so you’ll want to make sure beforehand. Pile those stones just upscreen into the wagon. (If you can’t, you haven’t yet cleared the top of the shaft or tested the wagon.)
And now of course the wagon is too heavy to push over the edge unassisted. You’ll need one of the cleared-away planks to the left of the wagon to gain some leverage. Take one with two left-clicks, use it on the wagon and over it goes, taking the grate with it.
Darren can now crawl through the crevice and emerge in what appears to be the Order’s meeting room with a large portrait of Marcus Gordon (the same one that hangs in the main hall of Black Mirror castle in the original game). Not much to do here beyond inspecting the cloaks and banner, so try the door, which opens in response to Darren’s tantrum. Is that good or bad?
It is bad. As Darren stops in the doorway to ponder the meaning of life, a masked man like the one from the bunker appears out of nowhere and shoots him with a blow gun.
Darren’s dreams include a burning display case — a metaphorical reminder that our boy still hasn’t read the rest of the Gordon Chronicle.
Chapter IV
Darren wakes tied to a chair in a disused room. Happily, the chair is on wheels and Darren can scoot about the room collecting with his bound feet (and, hence, one at a time) the few items required for his escape.
For starters, grab the green bottle against the back wall just right of the chair — Darren automatically drags it into the light — and have a look at it. Kerosene. Then take one of the glass shards beneath the right side of the boarded window and use it on the plastic bottle to produce a pool of this flammable liquid. Take the cloth over to the left and use it on the pool to soak up the kerosene and a second glass shard on the cloth as a magnifier to start a merry little blaze.
Darren can’t use the fire directly on his bonds, but can to light the thin wooden strip beneath the middle of the desk built into the rear wall. Take this and use the burning strip on Darren’s bonds in inventory. He’s free.
Open the door. Darren then descends the stairs automatically. If you’ve played the original game, you’ll recognize the chamber below as the parlor of the Gordon estate in Wales.
But it’s a strange scene. There’s a slash of ghostly lightning. A woman over at the piano calls Darren “Samuel.”
Odds & ends: Stranger still: This isn’t a ghost — more like psychic residue, I guess — for that’s Eleanor from the original The Black Mirror and she’s not dead!
The scene corrects itself: The woman is replaced by museum guard Bobby watching cartoons. He takes a phone call and we learn that the house belongs to the person at the other end — hence either Eleanor or her husband Richard — and that Tom is out shopping.
To escape, Darren needs to lure Bobby upstairs. This requires:
– a distraction. Experience shows that Bobby distracts easily. In the middle of the rear wall, just left of the desk, is a secret compartment (“Strange place”). Open it and retrieve the toy car within. You’ll eventually skate this down the stairs, but the room must first be prepped for an ambush.
– laying a trap. You’re expected to drop the big bundle on Bobby’s poor head. Pick up the bigger of the cast-off ropes and tie one end to the bundle and sling the other over the beam overhead.
– setting up the room so, at a glance, nothing appears amiss. You want to make it look as though Darren is still tied to the chair so Bobby doesn’t take alarm. Take the clothes dummy at the far right, the head (somehow called “carton”) on the shelves on the far wall and the sheet covering the Gordon family tree at the right. And if you haven’t already done so, open the door to set off the strange scene in the parlor. (This scene enables you to assemble the dummy.) Then use the dummy, the head and the sheet on the chair in that order.
Now just use the toy car on the door and the whole trap unfolds on automatic. (Wouldn’t you like to play an adventure in which the devil is in just these details?) Bobby winds up unconscious and in Darren’s former spot in the chair — tied up with the rope from the bundle — and Darren is free to explore the parlor downstairs. (To save yourself a trip later, take the short rope as well.)
Odds & ends: After Darren retrieves his camera, return upstairs and take a picture of the room’s closed door to unlock picture #9. (This is one people tend to miss.)
Darren’s belongings are in the chest in the right foreground. Left-click on the top of the chest in the closeup view until Darren suggests the decorative lines-and-circles motif is music-related.
However, he can’t read the notes directly off the chest — there being (as another left-click reveals) too many of them. You’ll need to transcribe the notes. Take the sandwich paper off the right corner of the table and a charred bit of wood from the fireplace. (The latter takes three left-clicks.) In the close-up view, use the paper on the chest and Darren traces the musical notes. Then use the traced carving on the badly out-of-tune piano to set off a mini-game.
No, it’s not as hard as it first looks. Only the middle eight keys on the piano are interactive. You have to play a sequence of eight notes and you can start with any of the left four keys. So if you were to start with the leftmost key and the keys were numbered 1-8 from left to right, you’d hit: 1, 3, 3, 2, 5, 3, 2, 3.
The piano answers back. It produces one note three times, another twice and a third five times. And that is the combo for the lock on the chest: 3, 2, 5. Then left-click on the chest to recover your camera, picture of Angelina, postcard, room key, lockpick, poem, display-case key … and, bizarrely, a metal bar — presumably the one you used to pry up the gate in the sewers. (Missing and gone forever are the two notes from Angelina, the butter knife from the hotel, the bit of cloth from the sewers and conceivably the screwdriver you may have picked up in the bunker cell (which has no use in the game as far as I can tell). You’ll also want to retrieve the toy car, as you’ll be able to trade it for an axe a little farther along in the segment.)
Odds & ends: Take a picture of the piano to unlock mini-game #3: Piano.
Leave the house via the door at the left rear. (This is a switch from the original game, which had the exit to the right.) Outside is a small boy who identifies himself as “Van Helsing.” He’s almost invisible in the weeds near the left corner of the house. Talk to him — at a minimum about “castle,” “abductor” and “Angelina.” (Later on, this last one allows Darren to work out a way into the right-hand sarcophagus in the tomb on the property.) He learns he is at the Gordon estate in Wales, that a blonde Angelina had been here weeks before (that is, before she bumped into Darren by accident/on purpose back in Biddeford), that she took away with her blood samples for “research” and seems to have been interested in both the tomb and a ruined summer house that housed the late Sir Richard’s lab. (Hence, it can only have been Richard’s wife Eleanor on the phone with Bobby.)
What is going on? Is Angelina really girlfriend material or has she been working for The Other Side (whatever The Other Side may be)?
Odds & ends: Take a picture of the statue at the lower right to unlock picture #24 — a picture of the estate c. 1981.
Let’s find out what so interested her. Head down and left to reach the side of the summer house, around the corner and over the fallen tree to reach its non-interactive front door and then left again through muck & mire on this scrolling screen to reach the tomb. Look at the right-hand sarcophagus once to note that the lid is out of position and a second time to find stone chips nearby. It’s been opened and imperfectly re-closed. Can you open it again?
Odds & ends: Snap a picture of the monolith in the background between the summer house and the tomb to unlock picture
– And click on the left-hand sarcophagus for a line that will amuse graduates of the original The Black Mirror. (They’ll recall that a stairway beneath that sarcophagus led down to the trapped tomb of Dergham Gordon.)
You’ll get in the same way Angelina did. A lot of her gear is still lying around — notably, the carrying slings in front of tomb’s central statue and the pulley outside and just to the left of the entrance.
You can install the slings on the lid now, but something seems to be missing. Use the pulley on the sling and Darren makes a joke about forgetting his crane. He’ll need to cobble-together a support structure.
The three slender trees just right of the tomb entrance are suitable tripod material, but you don’t have anything with which you could cut them down. However, if you retreat to the mansion exterior of the old mansion, you’ll notice that Van Helsing (standing closer to the house than before) is now holding a hatchet. Give him the toy car from the parlor — either use it on him or talk to him about it — and he’ll leave the axe behind. (It’s just to the right of Darren.)
Use the axe on the trees outside the tomb and Darren fells them diligently. Use the short ropes from the upstairs room where Darren was held to bind together the stacked trunks and then activate them with a left-click to automatically set up the tripod over the sarcophagus. Then use the pulley on the tripod and activate the pulley with two left-clicks to to raise the lid. Enter the sarcophagus to squeeze through the gap into poor Richard’s ruined lab.
Odds & ends: There’s an alternate path here with a bad ending. Suppose instead you use the pulley on the dilapidated ceiling overhead? Darren then says he’s missing a hook needed to hang the pulley there.
And there is a take-able hook in the game. It’s secured to the wall just left of the door to the summer house. Too well secured to detach with just Darren’s hands, but easy enough with the hatchet. Use it on the ceiling before assembling the tripod … and the ceiling caves in and kills him.
Richard’s Lab
There are two significant locations here. The poster on the wall to the left of the blocked passage at the right lists blood types — AB, B, A and O — and those letters in that order just happen to be the combination for the other location (the safe). Plug in the letters and examine the safe interior to sort out that Angelina made off with the blood of William and Richard Gordon. (William Gordon was murdered at the outset of the original The Black Mirror.)
It’s now clear to Darren that Angelina has deceived him — though not why — and he can now exit the lab for a short chat with young Van Helsing, who reveals that Tom has returned.
Odds & ends: A non-essential item can be found in the right lower portion of the ruined shelves. Left-click on the folder twice to take it and right-click on it in inventory to inspect the contents. It’s Darren’s first non-museum opportunity to acquaint himself with events of the original The Black Mirror: William Gordon’s apparent suicide, the murder of Vic Valley at a stone circle in the woods and Samuel Gordon’s suicide.
Make your way back to the mansion exterior, where you’ll find Tom ordering Bobby to “get that old cow on the phone” (presumably Eleanor) and setting out to search for Darren. Our hero then returns to the side of the summer house and lays out a plan: trap Tom and steal his car.
Darren has already stepped into the would-be trap himself — the stretch of marshy ground between the summer house and the tomb — and noted upon exit that he might not have been able to escape a wetter marsh unassisted. So you need to pipe in some water from the tap –located at the far right at the side of the summer house.
Unfortunately, the hose just to the left of the tap is in terrible shape. Fortunately, you have the means to repair it. In inventory, use hatchet on hose to cut out the damaged section. Unfortunately, each of the remaining pieces is too short to reach the marsh. Fortunately, you can rejoin them in the ruined lab: the plastic tube on an open book just below the shelves.
Unfortunately, you can’t do so straightaway. The hose and tube openings don’t match. Fortunately, you can change the size of the tube openings. Use Angelina’s welding set (at the right side of the lab) on the tube and then the heated tube on the hose (or vice-versa). Drop one end of the mended hose in the swamp, connect to the tap, drop the other end in the marshland, turn on the water and move back toward the mansion to get Tom’s attention.
The rest is automatic. Darren calls to Tom and runs. Tom follows, gets stuck, gives up his gun and car keys and answers questions. He doesn’t know Angelina and doesn’t know much about the Order — beyond the fact that they hang out at the mine and that his contact on Darren’s kidnapping sounded “quite old.”
Darren automatically returns to the hotel to find a letter from Angelina waiting. He reads it automatically. She comes clean, or seems to, and proposes a meeting to set things straight at 11 p.m. at the lighthouse. In the meantime, Darren wants some straight answers and is determined to get them from the chronicle at the museum. You can head there directly.
You’ll arrive to find the guard post unmanned (not surprising)and the place still haunted by the German tourists. You can’t very well open up the display case with them around. Look at it anyway and Darren suggests hiding until the museum closes. Left-click twice on the cupboard behind the case and it’s done: Darren scares off the lady tourist, makes himself scarce and resurfaces at 9 p.m.
Use the key on the case or in closeup on the lock at the top, use the curled lower-left corner of the book to turn back one page and read. You’ll come away with a picture of the Order rather different from the sinister one painted by Angelina. It’s dedicated to preventing the re-ascendance of evil in the person of Mordred Gordon by guarding over “the academy and the key, the sacrifice room and the scriptures.” (This first reference to Mordred sets up events in chapters V and VI.)
Now to find a way out. Everything seems to be locked and alarmed but, with the right gear, you can get through the narrow window above the shredding machine in the rear “Black Museum” section with no one the wiser. You’ll need the board (“wooden plate”) from the left side of the sewing-machine display and the chewing-gum wrapper from the waste basket just right of the guard post. Use the board on the shredder to give Darren a solid platform on which to work and, left-clicking on the window first, the the aluminum-foil wrapper on the window to preserve the electric circuit when the window is opened. The window then becomes an exit. Use it.
Around front, another encounter with the institutional bum, who this time recites a poem. It should be familiar — it’s the complete version of the one you found in Borris’s pocket — and the bum says he heard it from “spirits of the forest” (i.e. Order members) near the old mine.
Mine
Darren reappears automatically in the Order’s meeting room and has the first of what will be several encounters with a ghost — this one of Vic Valley. (The body — rather large for a small boy’s — is sprawled on a stone slab.) Darren hears members approaching and must take cover. But there’s no rush at all. This sequence and the ones that follow are not timed. You just have perform certain tasks to kick the sequence forward.
Your first stop is the elevator over to the left. Here, you’ll watch the five members gather — all masked, save operational leader Miss Valley — and pick up some interesting comments about “the boy” (presumably Darren) not being in his grave and “drastic action” (which seems to mean murder).
When Darren edges forward (automatically, what else?) to hear more, he’s spotted and flees out the crevice at the far left. Reenter the bunker at the right — there are no other options on this screen — and, before doing anything else, close the door behind you and bar it with the metal rod. Thank goodness for the unexpected return of rogue inventory items, I guess!
You’re going out as you originally came in. But the door to the tank room has been closed again and the known method to open it — pulling the left of the three levers between lockers and shelves — no longer works. This time you’ll have to pull the middle and right levers. (Someone has visited the bunker, tidied up Darren’s mess and rejiggered the mechanism.) (Either order will do.)
The door now open, enter the tank room, use the switchbox to the left to close the door again and take both the metal bar beneath the switchbox and the re-coiled hose. Combine these two in inventory as a makeshift grapple and use it on the pipe at the right and Darren finds himself back in the sewers.
Ostensibly the pursuit by The Order continues here. When Darren start to exit the screen on the far side of the heavy gate, two Order members appear from the wings. But this is just for appearances. You should have no further problems. Go left three times to a four-way intersection and then use the front-left exit to reach the gate. You can take the wooden block that’s holding it up to elicit an extra line or leave it in place; it doesn’t seem to matter. Go left again to another four-way, use the front-right exit and then head left to reach the ladder up to Angelina’s room — where you’ll find an angry Murray, who boots you out of the hotel.
Darren automatically heads for the lighthouse. Left-click twice on the tall grass at the base of the tree to find a burned corpse. Darren believes this to be Angelina — and though we can’t see much of her face, who are we to say different, based on the available evidence? (After all, Darren was to meet Angelina here and the corpse is wearing the same bracelet on its left wrist that we saw her with in chapters I and II.)
Grief stricken, he collapses — Darren is supposed to be a guy, isn’t he? — and dreams his end-of-chapter dreams. The wildest: Darren stabbing with one hand a prone form while seeming to hold Angelina’s hand with the other.
Chapter V
Darren wakes, or seems to wake, at night beside a fog-shrouded lighthouse with two new features: skulls underfoot and a tombstone at the right. In fact, he’s still dreaming and Darren just has to summon three resurrected corpses to move the story forward: Fuller (via the gravestone on the left), Darren’s Mom (the upper portion of the tree) and Borris three times over (the lighthouse entrance).
One interesting comment here: Darren’s Mom says, “You aren’t my son anymore.”
The Academy
When Darren finally wakes, it’s on a new location (and a real one): just inside the entrance to the ruins of the Academy, which is adjacent to the lighthouse site. He’ll automatically talk to Ralph, who has a little corrugated-metal hovel in the left corner.
Ralph is a character from the original The Black Mirror. Unseen there save as an eye seen through a hole in a wall — and here, save as a conversation icon — he occupied the room next door to James (the illegitimate son of William Gordon) in the asylum that now serves as a the Gordon’s Palace hotel.
You don’t actually have to talk to him right now. But his “fire” topic, along with establishing how Darren got to the Academy, should cast a little doubt on what Darren thinks he found at the lighthouse, while the “Angelina” one (which appears after you ask about “fire”) establishes that you’re following in her footsteps. She was looking for a door that led underground,
That’s easy to find. Head up and right into the ruins to reach a circular door and a chessboard atop a stone pedestal. Four holes around the board are empty and you’ll need to fill the right ones with the right chess pieces to open the door.
Two are right here: the queen in the grass at the base of pedestal and the pawn beneath the rocks to the right of the door. A clue can be found back at the lighthouse about where they should go — a note with the positions has conveniently been pinned to the tree — but, criminy, there are just four holes and trial and error will take just a few seconds to determine the queen goes in the left hole and the pawn in the near one.
The others? After you’ve left-clicked on the chessboard, return to Ralph and talk to him about “Chess pieces.” It turns out Ralph’s imaginary pal pal Mr., Bubby has a knight and Ralph makes clear that Mr. Bubby might loan it out in exchange for music.
You don’t have anything like that and you’re not going to find it lying around in the academy ruins. But the bush to the right of the entrance seems to want more interaction than you can provide right now and the description suggests Darren needs a tool to cut off the branches.
It’s hard to see, but a knife is sticking out of a beam not quite halfway up the left side of the lighthouse entrance. Take it, use it on the bush to cut off a branch and then on the branch in inventory to fashion a whistle. (Actually, it sounds more like a recorder.) Talk to Ralph about “whistle” and the knight is yours. It goes in the right hole on the chessboard.
And the last piece? The game messes with you a bit here. The appearance of a raven and Ralph’s confirmation that the bird is a thief seem to suggest the missing king is in a nest somewhere.
But note Ralph’s exact words: The bird seems to like shiny things. I guess that could include a glossy chess piece, but not these particular chess pieces. That means the king must be here someplace and so it is. Just let of the lighthouse entrance is a ladder, and just right of the ladder is a crevice. Reach in to take the king and plop it down in the remaining (upper) hole to open the door.
Odds & ends: Snap a picture of the stone head over the exit from the Academy ruins. This unlocks picture #19 which, uncharacteristically, includes Darren’s figure. And return to the lighthouse to snap the patch of the burned grass at the base of the tree to unlock #26, which, also uncharacteristically, is simply of the in-game shot of the corpse (minus Darren).
Step inside. You’ll disturb a raven that was picking at a backpack. (Did it make off with something?) Left-click twice on the pack to liberate Angelina’s diary and a note. Darren reads the diary automatically.
The key revelation: Angelina believes Darren to be a Gordon. “His mother had an affair. And after the fire she went to the USA” (Of course, that doesn’t explain how Darren’s mother doesn’t look pregnant in a picture when she’s supposed to have been five months pregnant.)
And the note? An admonition to Darren to complete Angelina’s work by destroying the soul keys and a summoning chamber beneath the Academy.
To open the gate, you’ll need three mosaic tiles. Angelina is supposed to have one in her knapsack and the two others are believed hidden in Black Mirror castle. She has one clue to their location: the name Maximillian Mortimer Gordon
The thing is, the promised mosaic piece isn’t in the knapsack or the sleeping bag to the right. (You’ll have to check both to leave.) Darren then fastens onto the raven as the culprit.
Odds & ends: Snap a picture of the “stone plinth” (the chessboard) in the Academy ruins to unlock picture #25.
Black Mirror Castle
Leave this enclosure and Darren appears outside the castle gate. The main gate is impassable and the hinges (“braces”) on the smaller one to right are so badly rusted that it won’t move — until you give it some help using the invisible branch in the lower right corner. Use it on the small gate to pry it open and enter to reach a unique close-up view of the portico outside the front door. Here Darren is intercepted first by Louis (gardener at the Wales estate in The Black Mirror) and then by long-time Gordon family retainer Bates.
Run all his topics — Angelina’s picture seems to resonate with him — and Bates will usher Darren inside and, after the appearance of a spectral form in the mirror in the room’s upper right corner. introduce him to ladies Victoria (Samuel’s grandmother in The Black Mirror) and Eleanor (Samuel’s host at the Wales estate).
You won’t learn much — but Darren, pretending to be a police inspector investigating the lighthouse murder, does receive permission to roam the castle.
Odds & ends: If you played the original The Black Mirror, you’ll quickly discover the castle has been pared down significantly. The family bedrooms, Robert Gordon’s study, the attic area, dining room and parlor are all missing — the parlor will turn up in the third game — and the library has been scrunched down to one screen. The exterior now consists only of the front view and the stables to the left of the castle. (The greenhouse and the castle gardens appear in the third game.)
Mosaic Piece 1
You can go after the first piece of the mosaic directly. The raven’s nest is atop the well near the stables. (You can reach this either by going left from the portico or out the kitchen door.) Take the ladder to the left of the stable door and use it on the well.
However, the raven’s going to fight off any attempt to get at its nest and you’ll have to distract it first.
Remember your conversation with Ralph. It likes shiny things. You don’t have anything shiny, but you can take a teaspoon from the counter in front of the cupboard at the right side the kitchen. (Use the right exit from the main hall.)
The spoon can’t be used directly on the raven. You’re going to have to secure it somewhere to keep the critter occupied while you retrieve the mosaic piece, and you don’t have anything suitable for this purpose.
Eleanor does. She was knitting before your earlier conversation. Either in the full-room scene or the closeup, simply left-click twice on the knitting basket at her feet to secure a bit of yarn (“thread”) with her blessing. Use the thread on the spoon and then the “Spoon on thread” on the stairs to the right of the big stable door. The bird flies down to grab at the spoon and Darren now can climb the ladder to the nest and mosaic piece without further obstruction.
Mosaic Piece 2
You’ll find the clue from Angelina’s note ( “Maximillian Mortimer Gordon”) engraved on the stone plate on the pedestal at the center of the main hall. Presumably the mosaic piece is behind it. But Darren doesn’t have the tools for this operation — you can try the knife from the lighthouse, but it’s not sturdy enough — and in any case he can’t go to work with the two old ladies in attendance.
Distraction? Distraction. Enter the kitchen . On the stove in the far corner, you’ll find a teapot. Left-click on it twice and, provided you’ve checked out the plaque in the main hall, Darren will suggest ringing for teatime. As you may have intuited from the tea table in the library (through the main hall’s left exit ), the ladies have their cup in there.
But a third left-click with a view to taking the pot is greeted with alarm by the maid Sally, who lets drop in the process that fact that Bates has gone into Willow Creek for some fresh tea. Darren won’t be able to claim the teapot until Sally is out of the kitchen.
Distraction? Distraction. If you’ve been upstairs, you doubtless noticed the highly polished bathroom floor. Look at it and Darren marvels at the work required. What if you were to get it dirty? Take the rubber boots beside the kitchen’s rear entrance and use them on the muddy patch beside the base of the ladder out at the stables. Then take the muddy boots upstairs and use them to foul the bathroom floor. Now tell Sally about it (via the “dirty bathroom” topic). She runs off and Darren can take the teapot. Drop the pot on the tea table at the left side of the library and Darren hatches a plot to venture into Willow Creek for some tea — first luring the Order to the hotel. Phones were notable in their absence from the castle in the original The Black Mirror, but now there are two — one on the right side of the library and the other on a bureau in the upstairs hall. Use either to call Murray with the news that Darren will be checking out.
Odds & ends: In the library, reached via the left exit from the main hall, take a picture of the Gordon family tree at the far right to unlock picture #12.
Then off to the village — both to spy on Bates and to collect the tea. The spying part is automatic. Darren arrives near the museum, spots Bates coming from the library — not exactly a likely source of fresh tea — and follows him to a rendezvous with Tom outside the Three Kegs Inn. Tom’s off to find Order leader Valley.
Which is convenient, because Darren now needs to get into Tom’s locked pub — the only place in town likely to have anything resembling tea. Use Tom’s own lockpick on the door — ah, the mocking laugh of fate! — just as you did on the lockboxes back at the hotel and take the tea from the table nearest the window. When you leave the building, you’ll jump straight back to the castle gate. Return to the library, use the tea on the tea table and, despite the reference to the missing hot water, pop back to the kitchen to ask Sally to announce that tea is served. When Darren returns to the main hall, he’ll find the ladies absent. Time to get to work.
You’ll quickly discover that, even with the old ladies off guzzling caffeine, you can’t do anything with the slab. It does seem as though the low fence around the globe must play some part — the cursor remains red even after you elicit its description — but no explicit hint is provided for your next step.
However, if you’ve already been meticulous in your inspection of the castle, it stands to reason that the hint will appear in connection with some new feature — i.e. something activated by Darren’s having distracted Sally.
That’d be in the bathroom. Left-click on the mirror for a vision of Samuel’s ghost and a second time after Darren smashes the mirror to verify that Samuel was holding a book and pointing at a particular tile on the opposite wall.
Darren can’t dislodge this tile on his own, and you’re going to have to go looking for tools. Bet you have an idea where to find them. On each of our visits to the stables, we’ve found Louis working under the car — presumably not entirely with his bare hands. Sure enough, just right of the rear of the car (and almost invisible in the rain) is a toolbox. Inspect it and Darren grabs a hammer. Use this on the tile and Darren knocks it out, automatically reaches into the gap behind it and pulls out a page of William Gordon’s diary with some annotations by his grandson Samuel.
Look at the page. The only part we can see is a drawing of six little pyramids — the second, fourth and fifth from the front crossed out. These correspond to the ornaments atop the little fence around the pedestal. Return there and click on the fence to discover that the pyramids can now be depressed. Darren automatically does this to the nearest one. That’s not among the ones pictured, so left-click on it to raise it again, depress the three crossed out on the diary page, activate the stone slab with a left-click to open it and reach inside to claim the second mosaic piece.
Mosaic Piece 3
The diary reports that Darren has no idea where the third piece is hidden.
But you do by now, don’t you? If you tried the locked double doors in the lower left-hand corner of the main hall while the ladies were present, Victoria warned you off. And if questioned about them, Sally reports that Bates angrily told her off when he caught her listening at there. Twenty-four years after the fire, this all speaks more to a hidden secret than an actual danger.
The diary pushes you toward Bates, who has retired to his room on Victoria’s instructions. You can question him and get a lot of good background info. But he’s loyal to a fault on the whole “fire damage” story and you’ll get only the party line.
Instead, just decoy him out of his room. Head for the bathroom, take the head of the mop Sally left behind, stuff it in the bathtub drain and turn on the water. Then tell Bates and Sally (in either order; it doesn’t matter) the bathroom is flooding and enter Bates’s room,
Left-click twice on the bedpost above the medical gear on the bed to extract a small key. Use it on the top drawer of the dresser in the corner. You’ll find a locked metal box that uses symbols in its combination lock, another photo of Darren’s mother outside Black Mirror’s gate (this one taken of a slim young woman in December 1969 — two months before Darren’s birth) and documents that include transfers matching the ones in Ms. Michaels’s bank book, Right-click on the documents to extract a four-part memory-aid for the combination to the box and again on the memory-aide to read it. It consists of four references that Bates used to remind himself of the correct symbols.
“The nymphs’ numbers:” We’ll start here because it’s where Darren starts after his exit from Bates’s room.
Voluptuous naked women make four appearances at Black Mirror and each is now numbered. The painting in the upstairs hallway is marked with the Roman numeral XVIII (18) while the three statues at the gate (from left to right) display numerals for 20, 19 and 1.
Once you’ve left-clicked on all four locations, Darren weighs the possibilities and finally translates the numbers into the letters A, R, S and T which, rearranged, spell out “Star.” (Shame we’re not allowed to do it ourselves.)
“On Sir Egmont’s portrait:” The “portrait” part is bound to confuse. The castle is full of pictures. But none of them have anything to so with an “Egmont.”
Sally, now back in the kitchen, is your contact on this one. But she won’t help you until “Inspector Falk” has helped her brother with his speeding tickets. Darren figures he can just pretend to help Rupert Wood and put one over on her.
It’s a little tricky. At this stage, a call to directory assistance (only available via the upstairs hall phone) will establish that there are 18 Rupert Woods in England. Naturally, you’ll want to narrow that down and here Bates is your man. He’s now on the sofa at the upper side of the main hall and, at one remove from the original question about Sir Egmont, it’s fine to talk to him on this topic. Ask him about “Speeding ticket” and he says Sally’s family has a farm in Sussex.
Armed with this info, use that upstairs phone to reach the Sussex Rupert directly. With a bit of deception, Darren establishes that his age is 34.
Back for another chat with Sally. Darren’s knowing Rupert’s address and age convinces her “Falk” has done as she asked and she reveals that Sir Egmont’s is a a brand of breakfast cereal — its emblem a small cross.
“The builder’s eldest sister:” Victoria can get you started on this. Go see her in the library and ask about “Builder.” She’ll offer that the builder most responsible for Black Mirror’s current appearance was Frederic Arthur Gordon. Then check the family tree on the room’s right side and left-click on the centrally-located pairing of Frederic Arthur and Andrea to learn that the oldest of Fred’s four sisters was named Rose.
“My Christian name:” Tough one. No one seems to know it — not Victoria, not Eleanor, not Sally. (She loathes Bates and suggests “Lucifer.”) Asking isn’t an option with Louis and of course you can’t ask Bates himself.
The diary suggests the name might be written down. Did you notice the mailbox between the two gates at the entrance? Empty before, it now contains a letter. The envelope is addressed simply to “Mr. Bates” but the contents — a bill for a gravestone (as the medical gear in his room suggests, Bates is dying) — reveal that his given name is “Edward Bartholomew.”
Darren’s unclear how that will translate itself into a symbol, but Victoria knows the story of the apostle St. Bartholomew — a martyr who was skinned alive and whose symbol is thus a knife.
With all four symbols now noted in the diary, get back up the Bates’s room, left-click on the box on the dresser and plug in the symbols — starting at the top with the cross and working clockwise with rose, knife and star. Inside, a key and half a locket containing a picture of Darren at 3 or 4. Only it’s marked “Adrian ” (of which “Darren” might be a glaringly imperfect anagram).
The large key opens the double doors in the lower left corner of the castle’s main hall. (Bates has vanished from the hall and seemingly from the game.) Darren enters automatically and follows the corridor beyond to a large disused room with a spooky mirror frame at the far end. A second left-click reveals a mechanism at the bottom that seems to want a small ball.
No such ball here. However, you can take a “wooden plate” from the floor beside the covered picture leaning against the right wall. When Darren picks it up, he suggests it goes with a game and reports that “Ralph” is written on the back.
Odds & ends: Take a picture of the mirror to unlock picture #11 — a shot of Darren and Samuel that appears nowhere in the game. (It was used in early promotional materials.)
Return to the Academy and talk to Ralph about the plate. He’ll turn over the rest of the game and say he received it from a “a nice lady.” “I couldn’t recognize her,” says Ralph, “but Mr. Bubby says she is ‘a holy one’.”
Odds & ends: “Couldn’t” being the operative word.
The game is unplayable in its broken condition, but use the plate on the sliding tile puzzle and it proves to be the missing piece. Darren automatically sets about solving it.
The Sliding-Tile Puzzle
This is a different type from the one that unlocked the roll-top desk back in Biddeford. No picture. And no randomness. Here you arrange 15 pieces — eight silver ram heads and seven golden lion heads — so that the designated numbers of silver pieces appear in each column and gold pieces in each row.
It’s actually quite simple and can be completed in three discrete steps. Part of the solution (the left column) is already in place at the start and the remaining portion of the puzzle can be solved by simply rotating the pieces counter-clockwise in ever-smaller formations.
1) The top row must be all silver heads. Simple rotate border of the the 4 x 3 array (i.e. the four right most out the golden heads here and bring in three silver heads — two from the rightmost column and one (when a vacant space appears above it) from the second row.
Afterwards, the puzzle should look like this:
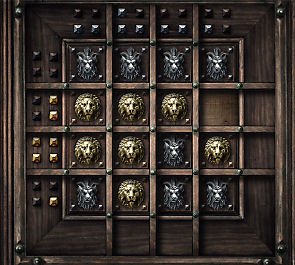
2) With the top row and left column now in place, you’ve solved almost half the puzzle. Now we’re just going to rotate counter-clockwise the pieces around the rim of the 3 x 3 unsolved region to complete the second row.
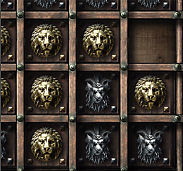
Stop when the puzzle looks like this:
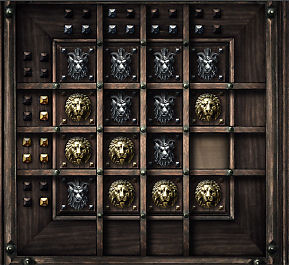
3) Finally, just rotate counter-clockwise these five pieces ….
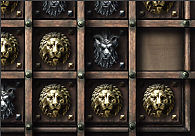
… until the puzzle looks like this: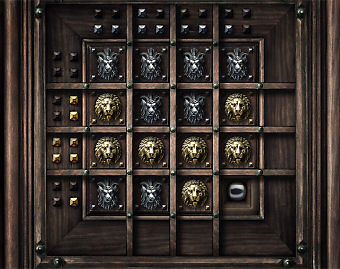
When you move the final gold head into the third row, you’ll see you’ve exposed a recess beneath the square in the lower-right corner. Within, a small steel ball. Take it, use it on the mirror in the castle old wing and left- or right-click on the mirror to kick off a second puzzle.
Ball Maze Puzzle
Here, you just have to enable the ball to reach the center of the five-ring maze by pressing the side buttons to lower the walls between rings at the appropriate times. This is beyond easy and gravity will do most of the work.
Press the round button at the lower left to release the ball. It’ll rotate clockwise between the two lowest openings between the fifth and fourth rings.
You want to break up this go-nowhere cycle, so, as the ball approaches the entrance to the fourth ring, press the uppermost button on the left side of the maze. This lower the third wall from the center and changes the ball’s course. It now goes over the top of the maze, down the right side and then toward the middle.
As the ball approaches the entrance to the innermost ring, press the lowest button on the right. The ball drops down the hole at the center and the mirror slides back to reveal an entrance.
Use it to enter what appears to be the well-kept up room of a young girl. Left-click on the left drawer of the desk at the right to retrieve a music box and the third mosaic piece.
Odds & ends: Take a picture of the music box to unlock the final mini-game (#4: “Turning Discs”).
Your natural inclination will be to return to the Academy and insert the mosaic pieces in the plinth — and you can’t. Try and Darren says “This room … it holds the answers:” Something remains undone. Left-click on the music box. Darren has a fit of some kind and falls into a restless sleep.
Chapter VI
Our hero comes to again for the big talk with his true mother, Cathrin, who explains a great deal — except the identity of the masked man who imprisoned Darren in the bunker (which will be revealed soon enough) — and a much shorter one with Bates in the main hall. The plan is to get Darren (now revealed as Cathrin and Samuel’s son Adrian and Angelina’s twin brother) back to the US — far away from Black Mirror and whoever killed Angelina. Bates tells Darren — we’ll stick with that name to avoid confusion — to see Louis for his tickets back to the US.
You can go see Louis, though it’s not necessary to the story. (Still under the car beside the stables, he professes to know nothing about tickets.) Or you can make straight for the bathroom, where you’ll find Sally’s body — its right hand seemingly pointing at something on the bathtub’s exterior wall.
Close the window and turn on the water to re-steam the bathroom and then look at the tile again to see a “B.” As in Bates. Darren immediately interprets this as a false clue inserted by Sally’s killer.
Odds & ends: But why offer a false clue and then have Darren interpret it as false himself? Wouldn’t it have been nice to allow us to sort that out on our own?
– Take a picture of Sally’s body to unlock picture #18.
When Darren tries to leave the bathroom, he’ll find the castle ablaze. Take a towel from the drawer at the left, wet it in the tub and head into the hall downstairs. (Alternate route: On the way out of the house, Darren can detour into Bates’s newly unlocked room, be overcome by the smoke and die.) In the hall, Darren watches tries to rouse the dying Bates and then steps outside.
And here begins the endgame. Darren is held at gunpoint by Louis, who confesses that he locked Darren in the bunker cell and started the fire, but asserts he’s “no murderer” (What does he imagine killed Bates and conceivably Victoria and Eleanor? And who else could have killed Sally?)
Then, in the manner of ’30s mobsters, he takes Darren for a little ride. At the Academy, out of the darkness steps the true nemesis: Angelina — not dead after all. Was anyone actually surprised by this?
Long explanations ensue — including the actual circumstances of Mrs. Michaels’s accident back in Biddeford, the identity of the corpse at the lighthouse (Miss Valley) and the focus of Angelina’s ambition: to harness Mordred’s power.
Odds & ends: Exactly how she plans to bring this off, she never says. In fact, this whole sequence raises about as many questions as it answers. Why didn’t Richard Gordon’s blood work? (Or William Gordon’s for that matter? Angelina took both from Richard’s ruined lab.)
The scene now moves to the antechamber where Darren found Angelina’s backpack in Chapter V. Do the following in any order: Use the three mosaic tiles on the stone plinth, take the candle to the right of the entrance and the lantern to the left of the plinth, use the candle on the lantern (or vice-versa) and then the lighted lantern on the plinth. The assembled mosaic focuses the lantern light on the symbol on the door. Darren then automatically cuts his hand on a built-in blade to the left of the door and places his hand on the symbol on the inner door. It opens . (Apparently this age-old facility includes a super-speedy DNA reader.)
The party enters automatically. Inside you’ll find a semi-circle of eight pressure-sensitive stone slabs. Clearly the eight Order members would stand on the slabs to open the great gate upscreen. But Darren is in a party of only four and he’ll have to figure out how the Order intended to work with less than a full house. There must be a way to lock out certain of the slabs.
Odds & ends: Take a picture of the closed gate to unlock picture #13 (evil Angelina, basically).
This involves rooms beyond the closed stone doors to the left and right. Your first task is getting them open. This requires two things: Test any of the slabs — Darren tries out the second slab from the right and steps back as a great weight plummets onto the platform — and collect the note at the right side of the big gate.
The spoken description of this “user manual” isn’t especially helpful in decoding which slabs are safe/unsafe — it has a different purpose, which we’ll get to in a moment — but a Darren thus informed is willing to experiment. And the experiments will go much faster if you inspect the note in the close-up view in the diary. (If you right-click on it in inventory, Darren describes it only in part.) Two of the slab icons are doors. The second from the left opens the left door and the third from the right.
Trouble is, Darren can’t explore beyond the doors without someone holding down the slab for him. So once you’ve tried the slab for the left door, talk to either Cathrin about “stone slab for left door.” (You can also try Angelina, but she’s only going to put forward Cathrin anyway.)
Open the left door first. Each of the four panels on the wall lays out a simple seasonal riddle. You need to sort out the answers and then adjust the central mechanism so the answers all appear at the same time.
The answers: flower for spring (either the full flower or the blossom will do), flame for summer, windmill for fall and snowflake for winter.
Adjusting the mechanism has an extra wrinkle. Three of the four control wheels change the answer for more than one season. Summer (the top one) also adjusts spring and winter, spring also adjusts winter and winter adjusts fall. (Fall adjusts only fall.) So you’ll want to start at the top, with summer (which isn’t effected by any other season) and work counter-clockwise.
When the answers are in place, four compartments open in the columns. Three (spring, summer and winter) contain staves.
You just know the missing fall one is going to be a problem.
When you return to the main room, you can use these staves in the slots that appear on four of the slabs. The yellow (spring) one goes in the slot on the near left slab, the summer one (green) in the fourth from the left and the winter one (blue) in the near right. In each case, you can then step on the relevant slab and discover the trap above has been locked out.
And fall? You’ll have to compensate for its absence in the control room through the right door. Open that now by talking to Cathrin about “Stone slab for right door” — first testing the third-from-the-right slab if you haven’t done so already — and enter to find Darren is now above the main room.
This will probably be confusing at first. Symbols. Rope. Traps. Chains. A panel at the upper right. What do you do with it all?
It’s tempting to over-think this segment. Don’t. It’s simple: You just need to drop a trap onto one of the slabs below by cutting one of the ropes arrayed about the chamber. You’ll determine the correct one — the third rope to the left of the panel — by decoding the symbols beside the ropes in what is effectively another mini-game. Call up the panel with two left-clicks. Make sure each of the five symbols appears in either the left or right bracket, that the color is correct and that the toggle in the middle is set to designate the appropriate bracket.
When you’re down, it should look like this:
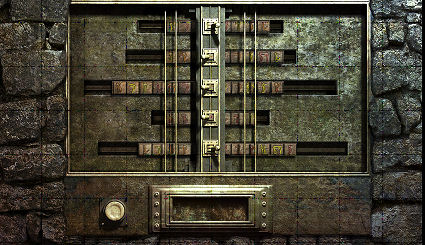
When you’re done, press the big button at the bottom left. The scene switches back to the full room and Darren confirms he’s found the correct rope.
But how to cut through it? Click on the rope and our boy suggests a knife.
And you’ve already heard about a knife. It’s one of the symbols on the “user’s manual” for the stone slabs. Step on the third slab from the the left — the one that shows a knife on the note — and, after Darren jumps back safely, look for a new hotspot at his feet. Take the knife — oddly, Angelina and Louis raise no objections– and you can cut the appropriate rope in the room above. Gears spin and when Darren returns to the main room, you’ll see a massive weight descend onto the slab beside Cathrin.
Odds & ends: “One more slip-up like that and our mother gets it!” bawls Angelina. I’m not sure why she is so ticked off. The weight didn’t come anywhere close to her or Louis. If it endangered anyone, it was Cathrin herself, so threatening Cathrin seems a bit bizarre. Perhaps, like the warning shot she fires a little later, this is just to show her emotionally heightened state.
Now talk to Angelina about “Louis” to set the wheels in motion. Darren assigns seats. Louis is suspicious, asks to swap places with Darren, steps on the un-staffed “fall” slab and instantly dies. Reverse psychology apparently works. But his weight nevertheless does the job and when Darren and Angelina take their places on the remaining slabs, the great central gate opens.
Left-click twice on the pedestal beside the gate. Angelina fires a warning shot and places the black sphere stolen from the museum atop this receptacle and a fiery portal opens in the “Demonic gate.” Darren automatically steps through into the hellish scene from the finale of The Black Mirror — seen from a slightly different angle than the 6 o’clock of the original game. Cathrin starts toward Angelina, is shot and yells to Darren to run. He does and you’ll find him back on the other side of the portal.
You can’t do anything meaningful in the slabs room. Darren can only retreat to the antechamber, where he’ll realize he’s now penned in by members of the Order and return automatically to the main room. Left-click on the portal. Darren here realizes he’s out of options and passes through the fiery circle a third time for the final scenes.
Odds & ends: Continuity issue: There’s a strange line here about Angelina getting into the “labyrinth.” Huh? The closest we’ve come to a maze in BM2 is the rolling-ball puzzle at the end of Chpater V. Presumably this is a reference to the small maze from the end of the original The Black Mirror. (This led to a different portal that zapped Samuel into the summoning chamber in a position immediately opposite the throne.)
Reunion with wounded mother, reappearance of Angelina from the left (i.e. not from the labyrnith at all), recitation of the words in the book on the central pedestal (with rather more feeling than appropriate for a purported nonbeliever) and a bloodletting. Cathrin sneaks up on Angelina and falls with her into the surrounding firepit. As Darren whirls about in despair, his blood stains the book. Wreathed in metaphorical flame, he undergoes a transformation.
Into what, we’ll find out in Black Mirror III.
Odds & ends: Once you’ve completed the game, you’ll find picture #20 has been automatically unlocked. It’s a cast shot — 15 characters arrayed about Biba’s Diner. That’s Samuel between Bobby and Tom at the back. And that appears to be Louis over at the jukebox.
Leave a Reply