
Don’t get stuck on puzzles in Beyond Atlantis II any longer!
Beyond Atlantis II (Atlantis III):
A journey through absurdity
A big hello to everyone out there! This is my first attempt at writing up a walkthrough for any game. I have been a gamer for nearly seven years, and yes sadly, I have at times made use of these walkthroughs. So when I was asked to make one for the latest installment of Cryo’s Atlantis series, I jumped at the chance. Ah, yes, little did I know what a huge undertaking this would be. Beyond Atlantis 2 (or Atlantis III as our European friends like to call it) has some of the most abstract environments and fiendish puzzles I’ve ever had to deal with. Of course, this is no Schizm, Rama, or Obsidian, but be fair warned! This is no Sunday walk in the park.
Basics
I played this game from an early release, so I apologize ahead of time if things have changed from my version to yours. The only real bug I found in my version is a problem with autoplay and virus software. If you are running this game under a Windows platform, I recommend you have autoplay and any virus software turned off before going too far into the program. There will be one place where you have change to disc one, causing the autoplay program to begin and try to load the game while you are playing. In my version, this caused the game to dump me out and lock up my machine, having to reboot in safe mode and uninstalling McAffee. Just a lovely evening all around. Otherwise, the game proved to be very stable.
For left and right movement, I sometimes abbreviate with L and R. I mean, who doesn’t? And for more complicated solutions, I have supplied visuals from a very rough walkthrough found here (Editor’s note, link is dead)
This game has your basic node-to-node movement with 360 degrees of view within each node. Available paths are shown with an arrow cursor and objects that can be interacted with are shown with an action cursor. The options and save game screen are revealed with the Esc button and you can look with at your inventory by right-clicking your mouse. For more details on the options screen, consult your game manual. Of course, you all were good children and bought your game from the nice people at Dreamcatcher, right? (smile)
Well let’s get started!
Hoggar
Select your player and insert disc 2 when prompted. The opening movie begins with the discovery of a crystal skull within some Peruvian ruins by a man with a laugh to befit any adventure game villain. This must be our nemesis! Afterwards, we watch as our astute heroine (played by actress Chiara Mastrionni) crashes her car after being distracted by a stray antelope. Hasn’t this girl ever played Amber? We all know that you always keep your eye on the road if you want to hold on to your car. She is then rescued by a desert traveler, the Targui, who informs her that he has to kill some men at the site of her excavation before he can help. Sounds pretty foreboding (or pretty stupid) to me. And of course, Chiara has to follow to get in on the action.
Once arriving at the site of the well, the game comes under your control. Not much in the way of scenery here, so take the only path available to you. Once moving forward, Chiara should mumble something under her breath to let you know you are moving in the right direction. But be careful, they are guards all over this joint. And like all evil guards, they don’t have nice dispositions. Don’t try talking to any of them as they only get angry and knock you out. Best to keep to the perimeter of the camp. Eventually, you will run into of those nasty guys, but your friend the Targui intervenes to do away with him. Aw, my hero! Not bloody likely, as Chiara informs her friend that she’s a big girl and can take care of herself. Finally! I thought April Ryan was the only liberated woman in adventure gaming! Continue onward through the camp and you will arrive at the entrance to a cave. Sure, we all know that caves are cool to explore, so go ahead and take a look inside.
Cool machines! But no one is around to operate them. Go ahead and leave them alone. Take a look at the cool design on the floor.
Spinning Top Puzzle
The object of the game here is to recreate the design of a pentagram on the floor by correctly activating five lights on the circle. “But with what?” you ask. Check out your inventory. Most people carry their wallets or car keys with them. Our darling Chiara likes to carry a clay disk and peg in her pockets. Go figure. You need to use these items to make a top that will be used on the design. Place the disc on the ground first, followed by the peg. These will form your needed top. Now, in which order do I need to spin this thing? What? (blink, blink) You want me to tell you? Oh right, I’m writing a walkthrough. Almost lost my head for a second.
Okay, start out by numbering the marks at the top of the circle 1-5, from left to right. Here is the order in which the top needs to be dropped: 4, 1, 3, 5, 2.
After completing the puzzle, the strange doorway in front of you should start to glow. Cool! Let’s take a look!
Ancient Egypt
After a sequence that reminds of the time traveling bits from The Messenger and the dimension shifts in The Longest Journey, you arrive in what appears to be a burial tomb within an ancient Egyptian pyramid. Okay, so you don’t know that it’s in a pyramid, but I thought I’d tell you to save you the trouble. In the center of the room sits a large sarcophagus that is sealed tight. And a terribly annoying bird flies around the room. Go ahead and take a look at the exit. There is no way that you are getting of here without help. Let’s check out the walls of this place. Know anything about hieroglyphs? If you turn back towards to the sarcophagus from the doorway of the tomb, you will see a five-pointed star on the right wall with a large eye in the center. After playing with the star, you figure out that by clicking on the lateral points, you can make the star shift from the left to right. Kind of like a safe lock. But where is the combination? Take a look on the opposing wall. See those symbols? I do believe this is your solution. Go back to the star and try this combo (just make sure the star is in its starting position beforehand). Move the star in these directions: L, R, R, L, R. Creak! The sarcophagus opens! Oh dear, and out jumps an altogether too jolly mummy. This guy is no Billy Zane, let me say that. He introduces himself to you as your Pyschopomp. Don’t ask me what a Psychopomp is; I just write the walkthroughs.
The mummy says he will explain your quest to you, but he seems to be pretty forgetful as to what that is. Must be all the dust in his brain. He will then give you a box. Go ahead and open it. Yes children, that’s a scarab, but I promise you, this one won’t crawl under your skin like those seen in The Mummy. In fact, the little guy doesn’t look too spry at all. Go ahead and talk to your new friend about the scarab and any other questions you may have. Not very helpful, is this guy? Geez, where is Arthur when you need him? (Yes I was one of the few that actually liked Arthur from JP3!) Unfortunately, you are still clueless as to how to get out of this tomb and the last thing you want is to end up shriveled and dusty like your friend. If only you could take that annoying bird and fly out like he could. Hmmm . . . take a look around on the floor near the back left of the temple. See anything behind the back left pillar? I thought so! Put the wooden bird in your inventory, and then return to the doorway. Take the bird in your hand, then click forward to fly out of the temple. Wee! There we go!
After flying to the top, you see the entire landscape. Quite nice, huh? Turn to see the Psychopimp, er pomp (this is a family page!) sitting in a wooden boat. Talk to the mummy before boarding the craft. Still not too helpful, but this high priest sounds promising. Go ahead and board, and he will take you to the temple. While in flight, he supplies you with a map of the area. Hey, didn’t some guy try to sell me one of these things in Hollywood? Except this one is missing Mel Gibson’s house. Rats! After another nice cut-scene, the mummy drops you off on a beach. It’s no use talking to him or going anywhere else before you talk to the priest. Enter the temple through the bat-infested passageway, and make sure not to step in the guano. The priest hates it when people leave guano tracks all over his floor. The priest will automatically start talking to you once you enter his temple. He will tell you about how the pharaoh is dying and needs the symbols of judgment and life in order to be reborn and save the land from its current drought. And guess what? You are just the girl for the job! Great! After this conversation, the priest won’t talk to you anymore. Okay, guess we have to find those objects of salvation.
Temple of Isis
Return to the ship and exhaust all conversation options with the mummy. Afterwards, open your Hollywood map and select the large temple in the upper left corner. This is the Temple of Isis and the next stop on our tour. Upon reaching the ruins, exit the boat and enter in. You’ll meet the temple priestess, who after a sad tale of her story being lost, is not much on conversation. Very friendly people we have here in Egypt! Look towards the wall covered in pictures and hieroglyphs. In order to solve this puzzle, you must reconstruct the story of Osiris and Isis by placing the pictures and their corresponding text in the right order. By clicking on a text stone, the priestess will read it to you.
Okay, here is the right order. I will describe the picture plate, then type out the text that corresponds to it in italics. These go from left to right, like reading sentences.
- Isis is seated at left while Osiris stands to the right. Osiris, son of Earth and Sky, is Pharaoh and Isis, his sister, is Pharaoh’s wife. He brings knowledge to Egypt.
- Seth, the man with the dog head, stands solo at center with flames behind him. Seth, twin to Osiris, is jealous of his brother and plots his murder.
- Seth stands with a large casket. During a feast, Seth offers a splendid casket to anyone who can fit perfectly inside it.
- Osiris inside the open casket. All the guests try the casket, but only Osiris can lie down inside it.
- Two men pushing the casket into the water. Before Osiris can leave the casket, it is shut tight by Seth’s servants and thrown into the Nile.
- Casket stands beneath a palm tree. Isis seeks her lost husband. At Byblis, she sees the casket caught in the branches of a tree.
- Seth with an ax. She hides Osiris in a swamp, but Seth learns of her actions and resolves to discover his brother’s whereabouts.
- Large face at left with various body parts at right. He finds him and cuts him into 14 pieces, which he hides throughout Egypt.
- Isis at center, surrounded by body parts. The faithful wife succeeds in recovering all of the pieces.
- Isis at left with Osiris’s mummy at right. She puts the body back together and prepares it with oils and perfumes. Then she wraps it in bandages. He appears almost reborn!
- Horus, the man with the falcon head, at center. After that, she lies with him and conceives their son, Horus, the Falcon. (Jen’s comment: um, ew.)
- Horus at left and the reborn Osiris at right. Who, one day, will avenge his father, henceforth, King of the Dead.
Once you have completed the story puzzle, turn back to the priestess and try to speak to her again. She will give you an interesting luck talisman for your troubles. Afterwards, she clams up and becomes completely silent once again. Was Cryo trying to save on voice actors? Let the woman speak! Eh well, what can you do? Head back out to the boat, talk to the mummy and exhaust all conversation options. Time for the next stop! Whip your handy-dandy map and select the beach at the bottom right corner. Man, where did I leave my sunscreen?
The Beach
Once at the beach, go around to your right until you run into a little boy who is trying to catch fish with his net. Seems like he’s having no luck. Talk to him and he will confirm this, citing the dying pharaoh as the cause. Hmmm, is there anything you have that will help this little guy? Ah right, the talisman from the Temple of Isis. Go ahead and give it to the boy. Easy come, easy go I suppose. Afterwards, the boy will try again, this time retrieving two fish and a set of scales. Oooo, those could be useful later. The boy will offer them to you; gladly accept them. He will also give you a piece of stone shaped like a woman’s head. Very pretty, wish I had time to make it into a swell brooch for my grandmother. But we have other pressing matters. Return to the boat, talk to the mummy, wax on, wax off . . . then select the bottom center island on your map to travel to the next stop.
Island of the Feathers
The mummy drops you off at the bottom of a flight of stairs. Walk up these and you come to another sealed sarcophagus. Man, not another Psychopomp! Ah, but wait, those pictures look familiar, like my grandmother’s new brooch. Oh well grandmom, gotta use this so I can get out of this level and further on. Use the stone head on the similar design on the front to open up the casket, revealing several multi-colored feathers. Looks like a parrot exploded in here. Put all of the feathers into your inventory and look to your left. There is a large column with a peg jutting from it where you can place the weighing scales. Do so and now you are set to find the heaviest feather. This puzzle appears to be randomized by game, so I can’t give you a definite solution to this one. The best strategy is to weigh one feather against the others, changing them as you find heavier ones. You should be able to come up with the heaviest one this way. Once you have found the right one, return the rest to the casket and head to boat. Talk to your friend once again, and then select the small doorway behind the Sphinx’s left front leg. Off we go!
Hall of the Ankh
Believe it or not, there is no puzzle in this room. Zip, zero, zilch, nada. I mean, how much easier could this be? Just walk up to the altar, open the box, and take the ankh. Return to the boat, talk to the mummy, the select the large columns at the front of the Sphinx to return to the High Priest’s temple.
End of Egypt
Upon returning to the temple, place the feather on the pedestal to the left of the priest. If you selected the correct feather, a new movie should start with the priest performing the rebirth ceremony for the pharaoh. After the first movie, place the ankh on the right pedestal. Watch the second movie to complete the ceremony. After you are successful, try talking to the priest. Man, anything? Guess not. Return to the boat, talk with the mummy, and open the box with the little scarab. Bet you forgot about him! Wow, he’s gold now! So what do we do with him? You must return to the Hall of the Ankh, which is the small door on the Sphinx. Now, the only guess I have at why you have to return here, besides the obvious lack of puzzles, is that the golden scarab symbolizes life, like the ankh. Go figure. (smile) Once inside, open the box with the scarab inside. A door will be opened that will send you back to Hoggar. Hasta la vista Pyschopomp!
Hoggar
Upon first arrival, you will be in a strange windowless room with four pillars. On one of the pillars, you see a drawing of a man who looks distinctly Atlantean. Leave him alone and return to the Hoggar cave through the doorway in front of you. Ah, cave sweet cave. Still quiet, with the useless machinery standing nearby. That, by the way, is a cardinal sin of adventure gaming. Don’t give us toys and not let us play with them!!!!! As you look around, you hear shots coming from outside. Rushing to see what’s going on, you run head on into your nemesis, the bald man from the first video. He has the Targui bound and gagged. Lovely! How does a nice girl like me get mixed up in situations like these? Professor X seems surprised at your story as you tell him that you’ve been through the gateway, since he has had no luck. Just doesn’t have the touch I suppose. Forcing you to prove your tale, you go through the door into a new room, one with strange pedestals and no walls. The man places the crystal skull on the center pedestal and stares into its sockets, only to get nothing. Frustrated, he asks you to try. Pick up the skull and examine it closely. Without warning, you are pulled into a new realm.
Inside the Skull
You arrive on a platform in a strange world that appears to be underwater as the view flickers back and forth.
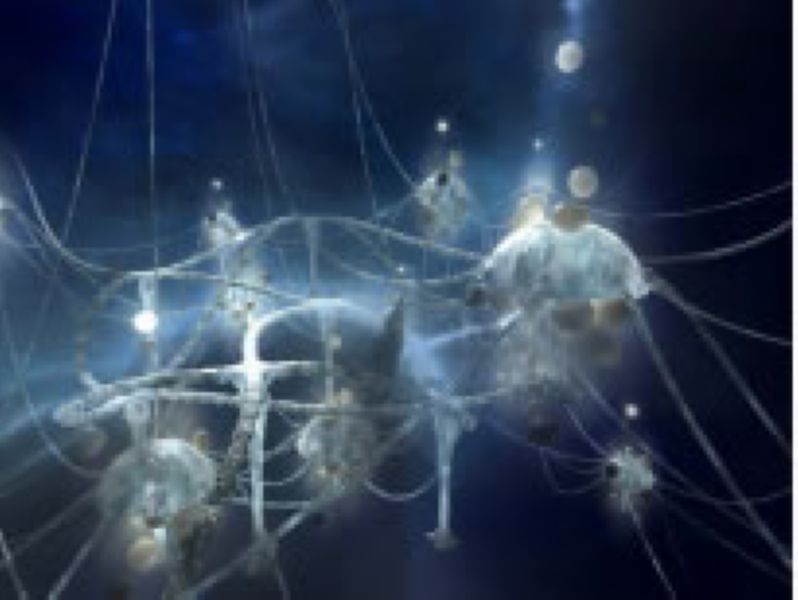
On my first visit to this place, I nearly became seasick. It’s very difficult to navigate. Each platform has 3-4 paths extending from it. The paths create circles, making it very easy to get turned around in this area. The best advice is to navigate this area slowly, making sure to observe the bubbles that surround you at every platform. You will see images inside each one. These will become VERY important later. After a bit of exploring, you meet up with dolphin creature. Speak to her, she provides very valuable advice. Now, to find a realm with many doors. Did you happen to see a platform that had many bubbles with a strange corridor inside of it? Go find that platform, then enter into this corridor realm through on of the bubbles.
This realm made me feel like Alice chasing the white rabbit. The real Alice, not the twisted version by American McGee. The only thing to do here for the moment is to open a door and step through. You will end up in an identical hallway. Return through the door you came through, and then back out into the underwater realm.
Once again, you are not with the dolphin. I found the easiest way to find her was to always try going down and further into the jellyfish structure. You will eventually find her. Talk to her again if you wish, then return to Hoggar. With no apparent way out, take a look at the bubbles that surround you on this platform. Turn 180 degrees, and you will see a bubble with a hall of doors in it. Go ahead, choose that bubble. This will return you to the strange Temple past the doorway.
Hoggar
The room is empty now, except for one of those creepy looking guards outside the doorway. Take a look at the column to your left as you’re looking out the door. That’s a strange looking guy on there. And oh look! You can interact with him! Click on him and he will come to life, and ask you a question. When he asks what is beyond the corridor, answer with “Another corridor.” Well, I mean, duh! It’s just a huge labyrinth! He seems please with this answer and returns to his earlier form. Look back into the room and you will see a set of bells hanging from the ceiling. Touch these and you will be given a strange looking panel with four triangles etched into it. Each triangle represents a different world within the game. Cool, an inter-dimensional remote control! The middle Triangle represents your current place in the Hoggar complex, the triangle with hot air balloon is Baghdad, the one with the arrowhead represents the Paleolithic age, and the one with the crystals takes you back the beginning of the game. Okay, just between you and me (and everyone else who has read this) the triangle with the crystals is useless. Select that one, and it cracks. So don’t even bother. Go ahead and click on the other two to see shots of the landscape. These two worlds can be played in any order. Well, since it’s so warm in the Hoggar, I’m ready for a change of scene. Let’s take a look at the Paleolithic age.
Paleolithic
Go forward towards the wall of snow to be transported to the Paleolithic age. When asked for disc one, insert it to start the next level. This is where I ran into my autoplay problem from earlier in the game, so make sure you’ve disabled this before going to the Paleolithic. As the CD spins up, you find that you’ve been transformed into a Paleolithic woman, following behind her male companion as they try to find shelter from the blizzard. Seeing a mammoth up ahead, your companion tries to kill it, and misses terribly. The mammoth, which is REALLY ticked off, chases the two of you into a cave. Once inside, don’t even think about going outside. The mammoth will only kill you. Your guy friend isn’t much on conversation (gee, what else is new?) so let’s take a look around the cave.
Well folks, here’s another cardinal sin of adventure gaming. Character death and not a thing you can do about it. No matter how hard you try to avoid this next cutscene, it will ALWAYS happen. So guess what? You’ve slipped down through the cave and landed face down on a stone slab. You’re dead. Man, that’s gonna leave a mark. You wake up outside your body. You’re a ghost! But wait, I thought there were supposed to be clouds and singing angels to greet me when I die. Not this lousy cave! Who wrote this? Get that guy on the phone! (sigh) Oh well, guess I better find a way to get back into my body.
The Wolves’ Cave
Look past your dead body and you will see a tunnel just to the right of your head. Take that tunnel until you get to an empty cavern with a still glowing fire pit. Sure, I’m ghost and I’m cold. Let’s get some warmth in here. Take the stick from your inventory (again, random like the top from the beginning) and use it on the embers to create a warm glowing fire. (I have created fire! Sorry, Tom Hanks moment.) Oooo . . . take a look at the pretty colors on the wall. There are the shadows of five wolves on the walls of the cave, each with his own color. The object of this puzzle is to let the other wolves know that the white wolf is the dominant wolf of the black. You have to make all the wolves fight until only the white wolf is left. I’ve been told there are many solutions to this puzzle, so here’s on of them:
- Black vs. Green
- Red vs. Black
- Gray vs. Red
- White vs. Gray
After the final battle, the white wolf will appear to you in his real form and will then disappear through the cave wall, showing you the path to the next section of the Paleolithic age.
The Marsh
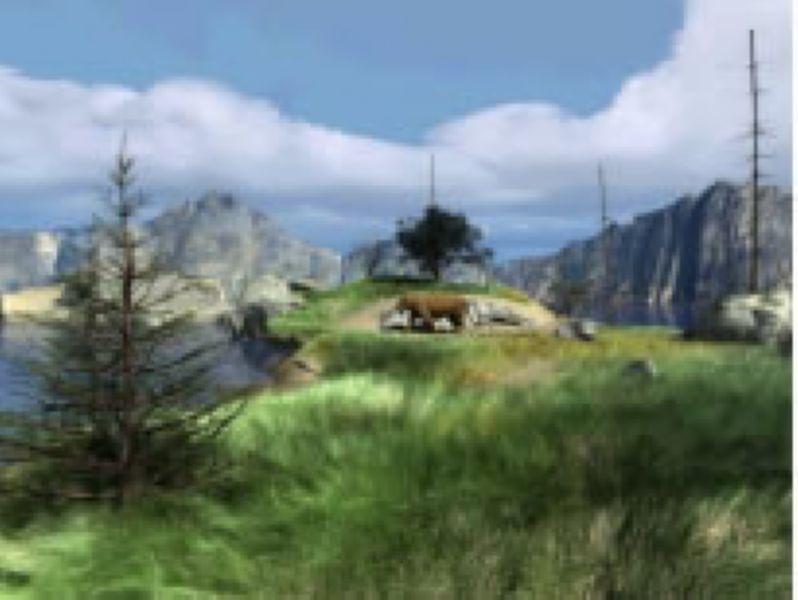
Ah, more falling! However, this time you land in water instead of on a flat rock. Now I’m a cold AND wet ghost. Sheesh, I thought the afterlife was supposed to be easy! You drag yourself onto the nearest island and take a moment to look at the land around you. There are several islands, and in the center hovers another jellyfish structure, similar to those seen in the crystal skull. That looks to be our goal. Now, to get around these islands without having to get wet . . . .
First Island
Looking towards the end of the island you are on, you see a dead tree. That would make a perfect bridge to the next island! Unfortunately, upon looking at it, you see that it’s too high to climb. This rotten bearskin skirt. Guess I need something to stand on. On the opposite side of the island from the dead tree, there is a lone stump. Use your brute strength and pull it up. Carry it over to the tree and use it as a step stool. Once on the long branch of the tree, the tree will bend under your weight and carry you to the next island. No sweat!
Second Island
As you land on this island, immediately look down to your left and grab the small white rock. This is will help you with that ticked off cat pacing up ahead.
Here kitty kitty . . . well, he doesn’t look too friendly, so let’s not go pet him. Instead, get as close as you can without alarming him. Look to your right and pick up the branch you see laying nearby. This will later help you, not that poking an angry tiger with a stick is smart thing. We’ve got to get him angry enough to run around to the right side of the rock face and fall into the quicksand. Important: Save your game here! Unless you are a god, you will not get this on the first try. If you do, then I stand corrected. Aim for the kitty’s head just as he crosses the center of your view. You’ll have to actually toss the rock a little before he comes center. It’s all about the timing here. Once you’ve sunk the tiger with your badass curve ball, walk around the LEFT side of the rock face. If you head right, then you’ll end up with the same fate as the tiger. And that would be bad. Now, to cross to the next island, approach the large boulder behind where the cat was pacing. Use the stick you found earlier as a lever and push the boulder down into the water. You now have a cool little path to the next island.
Third Island
Geez, wolves, and wolves, and bears! Oh my! Just when you thought you were done with the fuzzy animals, you encounter more! Perhaps this game should have been called Zoo Tycoon. But I digress. Let’s face these furry beasts. Past the bear to your left you see a fjord that leads to the last island. Word to the wise: don’t try and deal with bear head on. He’s not very friendly. Nor is the wolf that sits behind him. In order to get across the fjord behind the bear, you’ll need to find a way to jump across. Wish we still had that wooden bird from the Egyptian level. That stick behind the dark wolf would certainly be of help, but it would unwise to try and get it from him. In fact as soon as you hear our little friend growling, get the heck out of there. He will follow you the island. Man! How do I get rid of this guy? Remember your lesson from earlier. Who is the head wolf in this pack? That’s right, the white wolf, just like the one you see up there on top of the hill. Lead the dark wolf to him and watch the white wolf remind him who’s boss. Once he’s been done away with, return to his lair and retrieve the long pole. Turn around and head up the grass slope behind the bear and you’ll come the fjord. Since he can’t see you, he won’t bother you. Use the stick on a rock directly below to vault across to the next and last island.
Fourth Island
Since there is no excitement here, take a moment and look around at the view. Wow, I could build the bed and breakfast of my dreams here. But the jellyfish is calling us, so let’s keep moving. Unfortunately, Chiara is still not in any worry to get wet, and there doesn’t appear to be any sort of natural bridge to the hovering structure. So guess what kids? It’s time to improvise. Ooooo, see that cool dead tree on the beach? Pick it up and use it as a surfboard to get across to the spiral island.
Central Island
Walk up the spiral path to the plateau below the jellyfish. Look up at the structure, and then click to go forward when the direction arrow appears. You will be sucked up into the jellyfish like aliens are abducting you.
Once inside, you see the crystal skull and what I am told is a spear thrower, not that you can tell that, but again, I’m all the all-knowing walkthrough author, so I solved that mystery for you. Put the spear thrower in your inventory and take the crystal skull in your hands. You then look into its eyes and be whisked away to strange underwater realm of the dolphin.
Inside the Skull
Well, navigating this mess hasn’t gotten any easier, so head down and inside as much as you can until you get to the dolphin. Talk to her again and she’ll give you two more directions for the hallway labyrinth. Return to the Paleolithic Age via one of the bubbles near the dolphin.
Paleolithic Age
The bubble will deposit you back inside the jellyfish (or outside of it if you took the spear thrower before the skull.) Once you are back on the plateau, head down the spiral path until you are one node from the bottom. Turn to your right and you will see a drawing of a white wolf. Click on this and you will be returned to the Wolves’ Cave. Head to the main cavern where your body still lays. Okay, time to work some magic and get back inside of yourself so you can get the heck out of here. It’s too cold in this age! Move around your body until the top of you head is facing you. Dead ahead you should see another tunnel. Take this passageway to enter into a new cave. On the ceiling, paintings of deer and antelope circle endlessly around you. Use the spear on the floor and shoot these animals with it. For each one, you will receive a red heart stone. See that nifty drawing on the floor? That represents you lying on the stone slab with four strange symbols surrounding you. Hmmmm. . . . After you have all four, head back to the main cavern.
Look at each heart stone closely. You’ll see that each has a symbol that corresponds with a symbol on the stone slab. Place each stone on top of its matching symbol and watch as your spirit is returned to your body. Pretty nifty, huh? I thought so. Turn slightly to your left and you’ll see the tunnel that you fell from. Head up this way to return to the mouth of the cave and your mute companion. You will hand him the spear thrower and show him how to kill the mammoth. After this, you will be returned to the Atlantean temple for your journey to the next realm.
Baghdad
I believe that this level was created for all the gentlemen out there. Not that I’m a militant feminist, but it would have been nice to play Chiara the whole way through. C’est la vie as they say over there at Cryo. In this level, you are thrust into the role of an Arab thief. The story is told by Princess Scheherazade, who is also Chiara. She had to be in there somewhere. After changing to disc 3, Chiara will begin the tale of the thief and the black rose. It’s a nice little story, and we get to be the main character. Oh goody!
You’re hidden inside of a large piece pottery in the courtyard of some wealthy man. There’s a cat howling outside. Man, I love cats and all, but can I get this one to be quiet? Poke your head out to see the cat sitting nearby. In the distance you can hear a guard shouting at the cat to be quiet, calling it all sorts of awful names that I can’t repeat here. Ew . . . what’s that smell? Look to your right and you’ll see a jar full of fish. Open the lid and watch as the cat goes flying to the jar. Yum yum, dinnertime. Okay, next crisis . . . how do I get past the guard, let’s see. Climb out of the jar and pick up the pebble lying on the ground. Throw it to your left, aiming for the palm tree, causing the cat to howl. The guard goes to investigate, so you have enough to time to run over and grab the ladder that is leaning against a wall to your right. Be very quick to head back to your hiding spot though cause the guard will catch you if you linger too long. Once you’re safe again, take the ladder and prop it up against the balcony above and behind you. Climb up. Once at the top, head towards the door in front of you. What? Not that cat again! Good kitty, be quiet, don’t make any noise . . . . oh no . . . rats, stupid cat! Okay, must think, must think. The door! Go through the door! Once inside, you’ll meet a young girl who lets you hide under her bed. The guards come and go without you being caught, and you are very grateful. She asks for a gift in return . . .a black rose. And of course, being the stud that you are, accept her request and go off towards the garden of the sorcerer to see if you can get one for her.
The Garden
You’ll arrive at the garden after leaping over the outer wall. Turn to your right and head down the brick alleyway until it dead-ends. Take the long pole propped up again the wall and make your way out to your starting position. Go ahead and take a tour around the garden. You’ll see three belly dancers, but don’t try and talk to them as they are being guarded by weird magical demons. You can talk to them later, Hot Stuff. Let’s keep looking around. Near the back left corner of the garden, you will come upon a reflecting pool with a mechanical monkey dancing on the right side of it. He appears to juggling three colored sticks. Hmmm, those might be useful. Now to get them away from the monkey. We’ll need a trade. Bananas! We need bananas! But where to find them? Go around to the other side of the reflecting pool and you will see a bunch of bananas hanging from a tree. Use the long pole in your inventory to poke the bunch and make one fall. Turn around and you’ll find lying behind you on the ground. Give it to the mechanical monkey, who turns into a real one and jumps away, leaving the sticks behind. Collect them and keep them in your inventory.
Retrace your steps to the spiral tower in the center and go around it until you are at the gazebo. Nothing can be done with the lamp at your left yet, so keep going through until you encounter a very angry griffin that wants nothing to do with you. He’s guarding a cool little box, which we would like to have. And there’s a cage above him, but how do we get it down? Look to your left and take the large pearl on the ground. I love it when we find random things. And trust me, this level only gets MORE random as we go on. The controls for the cage are at the head of the path towards the griffin, but it needs something small to activate it. Well, the pearl certainly isn’t going to do it, so let’s look around.
Unicorn Maze
Head back towards the gazebo and place the large pearl in the lamp at your right, this will activate the Unicorn Maze puzzle. The object of this game to get the unicorn from it’s starting point in the bottom right to its safe house in the top left in the shortest distance. There are numerous paths to get through the maze and to the safe house, but by using the colored circles at the bottom you need to make the shortest distance. The circles have to be placed in the order they appear on the bottom. The unicorn will be drawn to those like a homing device after you set her free to run. This puzzle isn’t especially difficult, just takes patience. Save your game here before attempting the puzzle. However, if you want to cheat, since you are by reading this, here is a graphic of one of the many solutions.
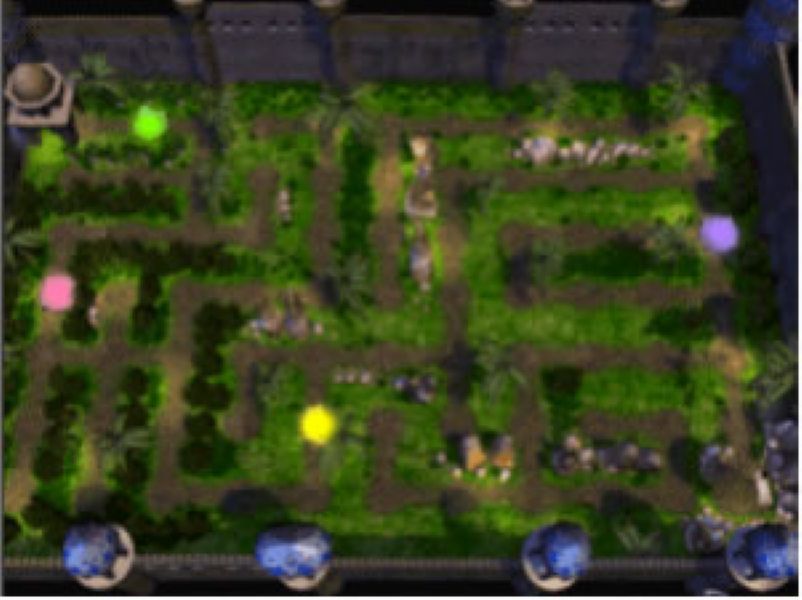
Once you have placed the orbs in this order, click on the unicorn to start her running. Once she has made it safely to the upper left corner, you will be rewarded with a unicorn horn. Take this horn back to the griffin’s cave and use it on the control panel at the entrance. This will release the cage above the griffin and let you take the case he’s guarding. Oooo, pretty jewels. And they match the colors of the sticks you collected from the monkey. I think we can safely check out those other houses, the ones with the scantily clad women. Does this world scream testosterone or what?
Head back towards the gazebo, but pass on through it, and walk towards the center tower. Head right, and then down the stairs to your left. Don’t worry about the gate at the tower yet; we’ll get to that later. Head towards the stairs directly in front of you, but turn left at the foot of them. You’ll approach one of the belly dancers’ houses. When you try to talk to her, one of those ugly looking guards pop out. Hmm, what to give this man so he’ll leave us alone. Check out the color of the light shining over the girl. It’s blue! So take the blue stick from your inventory, hold it in your imaginary hand and walk towards the dancer. The guard will see the stick and disappear. Yes! Now I can use those pick up lines I’ve been rehearsing. She’ll tell you that she’s lost her jewel. Would that be the blue jewel I saved from the griffin? Go ahead, hand her the pretty sapphire. She will accept with glee and give you a present for your troubles: a cool little key! And we all know how cool keys are in adventure games. She won’t be much on conversation after that. Is that all I’m good for? Jewel hunting? Sigh, oh well, better to press on to the other girls. The second dancer can be found by turning around, going right, up the stairs and then to the left. She’ll be the green dancer, so use the items in your inventory accordingly. She will reward you with a funny looking map. Stick that in your pocket, then turn around, go up two flights of stairs and go straight until you see the last dancer’s house. Go right to get to the door, and hand over the red items to get a second key from her. Okay, looks like we have what we need to access the tower!
The Snakes and Ladders Puzzle
Ladies and gentlemen, welcome to what I have deemed as being the most random puzzle of all time! I mean, I have faced some pretty silly puzzles, but they have all had something to do with the game. This well, okay, it has a little something to do with being in a middle-eastern sorcerer’s garden, but there’s this monkey and coconuts . . . just keep reading.
After unlocking the gate in the center tower with the golden key you just acquired, you will be greeted by a VERY obnoxious little troll. You will then be pitted against him in a game of snakes and ladders. Remember chutes and ladders from back in the day? Same idea, except you and the troll are the puzzle pieces. Little hint: SAVE YOUR GAME HERE! The movement system will take a little getting used to. Instead of receiving a die to throw, you will select your moves based on a little monkey that will appear in a window at the bottom right of the screen. He throws a coconut and you will move as many spaces as hippo heads he hits with the coconut. By clicking on the red button as the monkey slides down, he will release the coconut and you will move. The farther down he his, the more hippo heads get smacked. With me so far?
Now, at any time in the game, you can check to see where you and your opponent are by looking at the strange map in your inventory. Now, here’s a cool hint: your strategy should be to get to the spaces marked with a star every time. This is the only way you will beat the troll. He will move to the same spaces every time you play, so your goal is to always stay ahead of him. Do not under any circumstances land on the spaces with the snake; you will be moved back quite substantially. If you follow my advice, you should reach the top in no time. Once there, use the silver key on the door. Inside you will find a flying carpet. Take a ride on it. Now all we need is Jasmine and some Disney music.
The Sorcerer’s Den
After a really nifty cut scene, you will land on the top of the sorcerer’s house. Take a look around if you wish, but then head inside through the only door. You will be greeted by six ticked off cobras. Since you have nothing to defeat them with, get up the courage and head towards them. In return for your bravery, you will be hypnotized and taken to your next challenge: The Stars Puzzle.
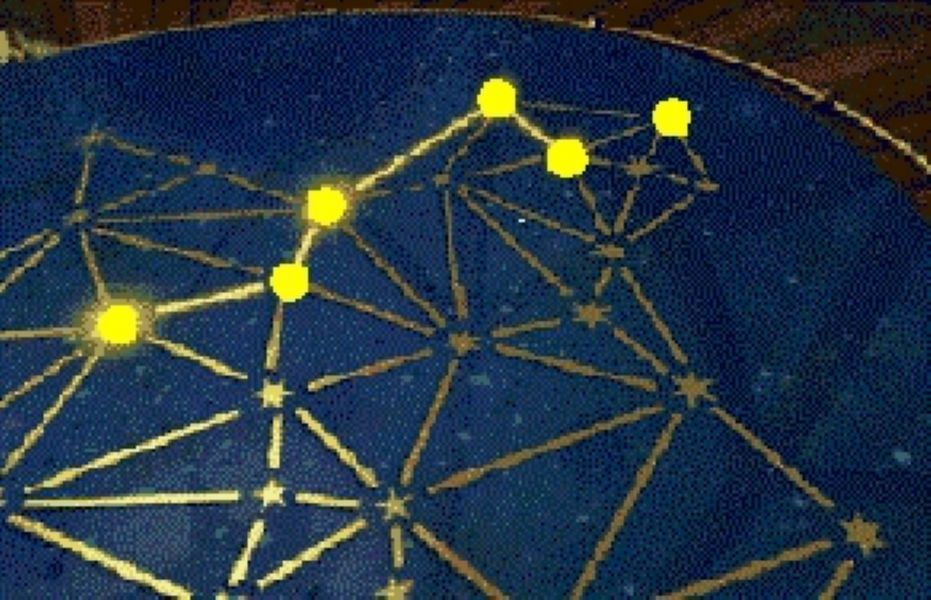
The Stars Puzzle
The object of this puzzle is to recreate all the constellations you see outside the windows on the star grid you see on the floor. Since this puzzle is too difficult to describe in words, I was able to find pictures thanks to the good people at the link I supplied at the top. (Editor’s note, link no longer functions)
Once you have completed the above designs, you will then be asked to map out one final constellation, one that matches the picture of the snake and anchor you will see on the wall behind you. Here is the solution for that.
When all the constellations have been correctly identified, you will be sent to the sorcerer’s lab where two more puzzles await you.
The Cabinet Puzzles
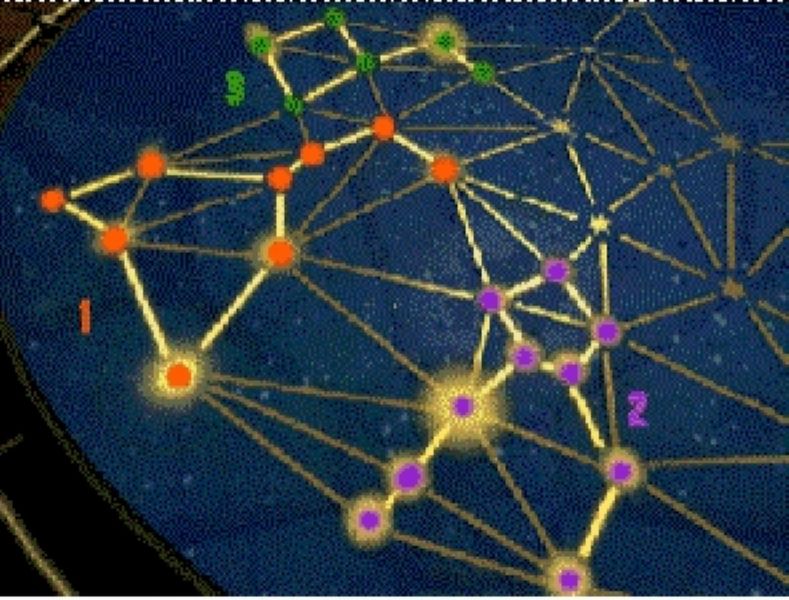
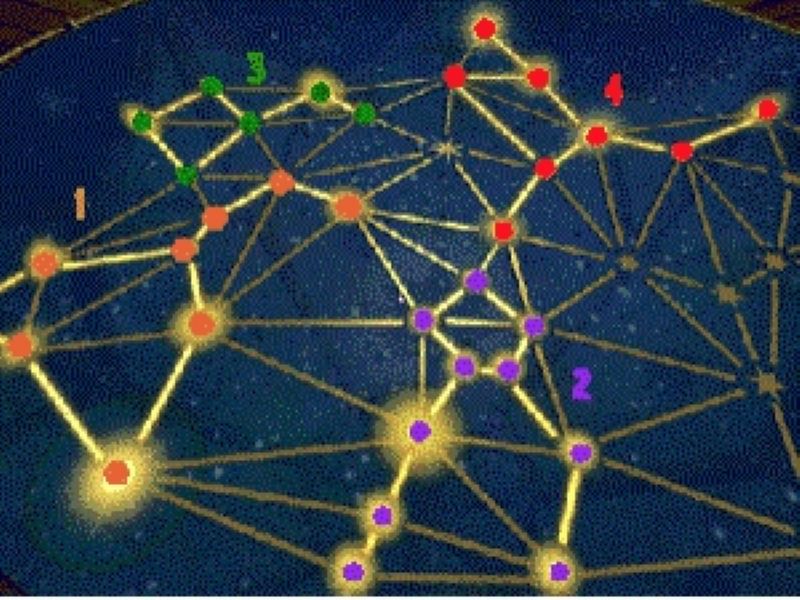
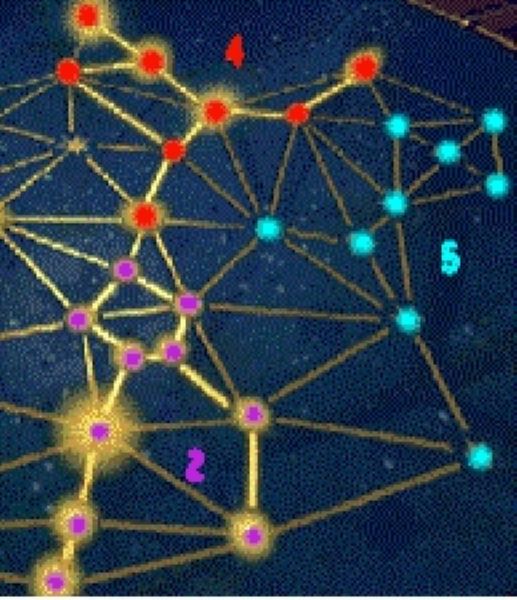
These require a little patience and strategy to solve without the walkthrough, but if you’re reading this, my guess is you aren’t in the patience business. So let’s get to it then. You will find the cabinet to your right, covered in strange triangle formations. DON’T TOUCH ANYTHING YET! Once you have hit a panel on this cabinet, this puzzle cannot be reset without loading a previously saved game. Yours truly learned that the hard way. (sheepish smile) The object of this is to get all the drawers with squares around them in the open position. And nothing is ever as simple as just opening drawers. Here’s how we do this. Number the drawers thus: Top row, 1-4, second row, 5-8, third row, 9-12, bottom row, 13-16. Open the drawers in this order: 10, 2, 3, and 11. Take the four pieces of paper inside each and place them in your inventory. The cabinet will rotate once you have done this to reveal a similar puzzle. The pieces of paper you collected from the previous puzzle will tell you which drawers to open. Same strategy applies here; keep the drawer numbering the same. Here is the order for this cabinet: 15, 3, 8, and 1. This will open the cabinet!
You will find a lamp and rubbing cloth inside. Rub the lamp with the cloth like you have seen a dozen times to reveal a genie who will grant you only one wish. He’s no Robin Williams, and I doubt Cryo had the budget to secure his services for voice over. You ask for a black rose, and the genie grants your wish, surprised at your small request. Once you have the rose, the crystal skull will appear in the cabinet. Take it to be transported to the underwater realm.
Inside the Skull
Once you have reached this point, you should have a pretty good feel for this area. Go find the dolphin by heading down and inside. She will give you the final steps you will need to make it through the maze of doors. Head back to Baghdad through the bubble with the large candle in it, then back to Hoggar through the lab door.
Hoggar
You will end up back in Hoggar. Now, to finish this game up. Strap yourself in; it gets a little bumpy. Return to the underwater realm by staring at the skull. Head upwards to find the landing with access to the maze and follow the dolphin’s directions:
- 1st left
- 3rd right
- 4th left
- 3rd left
- 1st right
- 6th left
Rhea Garden
After crossing through the last door, you will find yourself in a lush green garden. In the distance, you see an older man and woman. This is a puzzle, veiled as a series of conversation trees. You must speak to these people in a certain sequence in order to proceed. First, speak to the woman by selecting the image with their pictures on it. The man will ask you to come over. Walk over to him, but don’t speak; he will initiate conversation. After some mumbo jumbo about the skull, ask him about it by selecting the skull icon in your menu. He will then spin another tale about growth and rebirth. Once he has said this, select the icon with your picture on it. After his response, select the icon with the image of the world on it. The woman will offer her two cents during the man’s response. Walk back to her to continue the conversation. Select the icon with the arrows moving outward. When the man responds, stay with the woman and finish your conversation with her by selecting the image with the weird crystal scepter on it. It’s called the Omega scepter according to Cryo. She will reply and tell you that it can be found in the pond. But wait, I though Chiara hated getting wet? Guess not when it comes to getting pretty shiny things. You will get the scepter and be taken back to Hoggar.
Endgame
You will be caught by one of the mean guards who will demand you hand over the scepter to him. Don’t move (if you do, you get shot); open up your inventory and select the scepter to be returned to the underwater realm. Find the bubble with the representation of the Hoggar camp (brown rocks) and you will be transported back outside the cave, outside the guard’s reach. Looking up, you will see that there is a guard with his back to you. Grab the flashlight that is laying on the tent to your left and smack him over the head with it. Night night! Take his knife and car keys while you’re at it.
Looking to your left, you’ll see the Targui tied up inside a tent. Use your newly acquired knife to release him. Now, to find a way out of this place. Look in front of you from your starting node and you’ll see a brown bag hanging from a pole. It’s small, so you may have to pixel hunt for it. Inside, you’ll find another set of keys. Make sure you have both sets of keys before stealing a car. If you leave a set behind, the guards can catch up to you and you’re toast. Look ahead and you’ll see a jeep with a large gun mounted on top. Go quickly to that and use the keys you found on the guard. Safely marooning the guards, you drive off with the Targui into the sunset. Romantic ending perhaps? Nah, I don’t think he’s my type.
The End
Happy adventuring all!
Leave a Reply