Just Adventure original
Zork Nemesis: The Forbidden Lands Walkthrough by Dan Kennedy
Introduction
Zork Nemesis was Activision’s
attempt at recasting its long-running adventure series as a graphically-driven
game during the mid-1990’s. Gone is the goofy humour, and the kitchen-sink-think-out-of-the-box
style puzzles that were the cornerstone of the Zork games; instead
we get a dark, brooding, eerie atmosphere and Myst-style puzzles.
There are numerous references to familiar Zorkian terms and titles,
but the laughing never really gets louder than a chuckle.
The game actually comes
across as sort of a Myst "plus" – better graphics, longer
gameplay, better developed story, and more puzzles. Although never
managing to capture Myst’s uniquely immersive feel (let’s face it
– Myst pretty much created and broke the mould at the same time),
the gameplay is a good blend of story-driven sequences and "wandering
around" time. Where the game suffers is in the all-too familiar
story structure and "good is bad/bad is good" characters.
Nemesis is undoubtedly
the black sheep of the Zork family – a great, engaging (and sometimes
gory) game that perhaps tries a little too hard to be Myst. In fact,
Activision all but admitted that it had strayed a little too far from
the essence of the Zork series with the release of the much funnier
Zork Grand Inquisitor a few years later.
Like other mid-90’s games
that relied heavily on the best graphics of the day, Nemesis suffers
by comparison with the look of today’s adventures. Having said that,
the visuals are decent, and the game controls are simple – just follow
the cursor. I understand that some fairly detailed documentation comes
with the game – I did not get a chance to review it since my copy
came from a cheap distributor.
You can be killed in this
game, but only at a few select spots. Also, you may wish to find and
download the Nemesis patch which displays character’s speech at the
bottom of the screen.
Goin’ to the Chapel
Intro movie – stabbed guy,
murdered woman needs to be rescued, everyone cursed, future unravelled,
spiralling down into a dark, dreary, deserted world. Any of this sounding
familiar? Once the movie ends, you find yourself standing in a deserted
courtyard outside what appears to be a church. This is your first
look at the Nemesis cursor; a forward pointing arrow indicates you
can move in that direction.
Wander around the courtyard
a bit, but there isn’t really anything of interest here. You can see
what looks like a city off to the right of the church. Turn around
and click on the locked gate (note how the cursor turns yellow over
something that can be touched); the chain jiggles, but the way is
blocked. Use the "back" arrow cursor to return to the normal
view.
Approach the building opposite
the gate, climb the stairs and walk towards the sun symbol on the
outside wall of the building. Proceed to your left, turn right at
the corner of the building, and move forward. You’ll spot another
sun on this side of the building. Continue along to the next corner
– you should now be able to see a much larger cathedral-like building
straight ahead. Turn to your right, and follow the back wall of the
small building to the next corner (another sun symbol is found here
too).
Turn to your right, and
spot the open door along the fourth wall of the small building. Walk
forward, turn to your right, and enter. This seems to be some sort
of chapel, or mausoleum. Walk forward several steps towards the candle
burning in the alcove on the far wall, and click on the flame. The
vision of a woman tells us that "..they’re in the temple."
Back away from the alcove,
and turn to your right to see a stone crypt. Walk towards the crypt,
and then click on it to see a red violin float around. Once the music
is done, move forward again, and click on the note lying inside the
crypt beside the violin. The note says: "I will be waiting at
the Gates of Hell. You will not escape my wrath.". Click again
to put the note down, and then back away.
Look up…look WAY
up
Turn around and make you
way back outside. Turning to your left, walk to the corner of the
building and turn to your left again. Walk forward, and turn to your
right – you will see a clear pathway to the door of the temple. Three
steps forward will take you right to the temple door.
The double-arrow icon indicates
a spot where the panning feature can be changed from horizontal to
vertical. Find the yellow coloured up-pointing arrow icon on the screen
and click to change the panning direction. You should now be able
to look upwards at the top of the doorway. Click on the plaque above
your head, which reads "When the sun and the moon are joined,
the entrance to eternity is opened". Back away from the plaque,
and find the yellow coloured horizontal arrow to switch back to horizontal
panning.
Click on the left-hand
door knocker for a close up – the sun symbol is in the centre, and
the moon symbol is on the piece that hangs down below. Mouse over
the hanging piece – the cursor switches to an open hand, indicating
that the object can be manipulated in some way. Click and drag the
hanging piece upward until the moon and sun symbols are touching –
as the plaque said, the doors will now open. Walk into the temple
as the doors close behind you.
The front hallway of the
Temple has a number of walled-up doorways leading off that make an
ominous thump when you click on them However, there is only one doorway
the leads to anywhere. Proceed forward one step, listen to the threatening
message from Nemesis, turn to your right, and enter the Library.
Easy Reading
You’ll see book shelves
in every direction, some hanging screens to your right, and a giant
globe to your left. Ignore the screens for now, and move to your left.
Turn around and face the long wooden desk opposite the globe. There
are 6 accessible books along this desk that contain varying amounts
of useful information. The left-most book has some circular symbols
on its cover, and is a journal written in the same handwriting as
the note from the Chapel’s Crypt. We can guess that the journal belongs
to Nemesis.
The first pages indicate
that he has killed four alchemists, but must continue whatever work
they were doing before their deaths. The facing page contains a map
of the Temple – I suggest you quickly sketch this map out. The library
is located in the bottom right corner of the map. The rest of the
journal indicates the following:
- Nemesis has hidden the
4 alchemists’ elements in different spots in the Temple. - Nemesis also murdered
the last explorer to come here (Bivotar), but because of the circularity
of time, Bivotar may return (are you Bivotar?). - He is having trouble
recreating the elements in the lab .
The next book is titled
"Astronomy For a New Age", and contains some typical Zorkian
gibberish, and well as the pictures of 8 planets. Four of the planets
have names scrawled next to them; two of the names were mentioned
as alchemists in Nemesis’ journal, so we can deduce that the 4 names
belong to the 4 Alchemists: Sartorius (planet Juperon), Malveaux (planet
Saturnax), Sophia (planet Venusnv) and Kaine (planet Murz).
The third book from the
left "Interview with a Grue" again contains some Zorkian
humour that players of other games in the series will recognize. The
fourth book, "The Best of the New Zorker" contains some
interesting information on what has occurred in this "Forbidden"
land.
The fifth book, "Alchemy
of Pure Love" describes the mysterious fifth element: the "quintessence",
or pure love, or Philosopher’s Stone (Harry Potter, eat your heart
out!). The sixth and last accessible book, "My Best Excesses",
is written by Zork’s most famous tax-crazed leader Dimwit Flathead.
Message in a Haunted
Temple
Turn around and walk towards
the exit located in the far corner beyond the large globe. Before
you leave the library, click on the small table with the knife and
crystal ball on it (to the right of the doorway). Get a close-up on
the knife, and click it again. Yikes, what was that? Back away, and
exit the room via the corner doorway.
You are now at one of the
corners of the Temple’s interior courtyard. Turn to your left, and
move forward. If you pan to your left, you will see the entrance hallway
with the front door visible at its far end. Turn back to your original
direction and move forward again.
Nemesis pings you with
another message (these seem to be magical recordings since he hasn’t
rushed out and finished us off). So far he seems very peeved with
the alchemists, and desperately wants you to go away. Turn to your
left, and enter the Lab – this is marked on the map you should have
sketched out from the journal.
Black Lab
You will see a red book
lying on the bench directly in front of you as you enter. Click on
it to reveal a photograph underneath, and click on the photo to show
a girl playing the violin. In fact, it’s the same girl that we saw
in the Chapel vision. Back up away from the picture, and pan around
until the left side of the doorway is visible. Click on the dusty
red book propped up next to the door frame. This book contains more
Nemesis notes connecting each alchemists to a specific element: Sartorius
– Air, Malveaux – Fire, Sophia – Water, and Kaine – Earth..
Turn around and take a
step to the right of the doorway. There’s a picture on the wall to
your left that plays some peaceful violin music to soothe your worries.
Pan towards the centre of the room, and take a step in that direction.
Turn to your left, and hit the yellow vertical arrow to pan down.
Four broken shapes are displayed on the counter here, but they only
glow when you try to touch them. Back away, and turn to the opposite
direction.
Pan downward again, and
check out the naked fella diagram set into the wooden counter here.
Malveaux’s name is scrawled beside a symbol that looks like an "h"
with a tick along the letter’s stem. "May he burn in hell"
is written next to an inverted open triangle. Back away, pan to the
left, and click to move towards the ladder. Standing directly in front
of it, click to go up the ladder. The only item that can be examined
here is a sketch book located to your right. The sketches show four
individuals doing various tasks – could these be the 4 alchemists?
Back away, and click on
the downward arrow to descend the ladder. Make your way into the lab’s
back room. Pan a bit to the right, and click on the papers on the
writing desk here. The top sheet displays the relationships between
the alchemists, and their respective elements and metals. Symbols
for each are also displayed. The rest of the documents mentions things
like changing earthly matter into perfection, base metals into gold
and silver, and mortal flesh into eternal life.
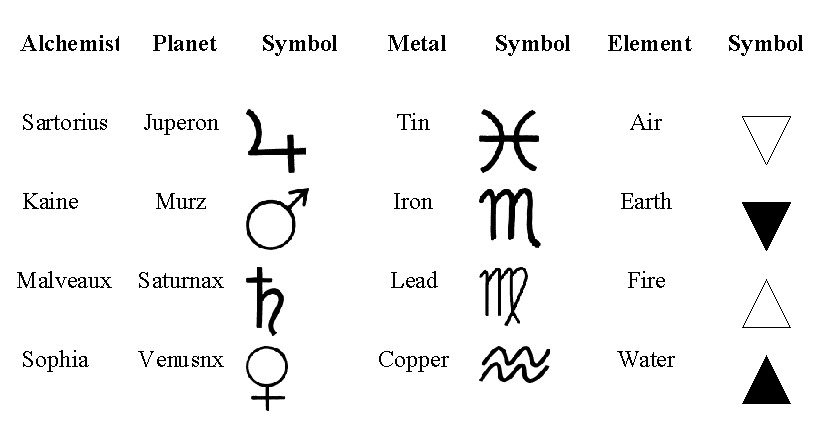
Back away from the desk
and turn to your left to see six recording disks mounted on a frame.
Click on each of the disks (starting from the left) to hear more of
Nemesis’ notes from the lab. He appears to be torturing the alchemists
to learn their secrets (how to torture someone you’ve already murdered
is beyond me), but he’s not having much success. Nemesis has learned
four steps in the alchemy process (sublimation, distillation, calcification,
coagulation), but is missing a mysterious vital step. He’s also left
the premises in search of more riches, and a wizard to help him.
The Fountainhand
Back away from the recording
disks, turn around, and exit the lab via the doorway. Once outside,
walk forward one step, turn to your right, and move forward another
step. Turn to your right, and approach the two fountains in the centre
of the courtyard. The ivory tusks on either side of each fountain
control the water flow; clicking on the left tusk turns the water
on, while the right tusk turns it off.
The fountain to your right
doesn’t contain anything interesting. Turn the water flow off on the
fountain to your left, and move forward to examine the object behind
the water. The object resembles a hand sticking out of the wall. Clicking
on it yields a metallic clang, and little else. It appears that whatever
mechanism this operates is not functional as yet.
Back away from the fountain,
turn to your left, and walk forward two steps into another central
hallway. There’s a painting on the wall to your left that can be examined
in greater detail if one so desires. Now turn to the opposite wall
to find an doorway to the outside.
Exit the Temple onto a
large balcony containing a central gazebo and a sundial. Feel free
to wander about, but there’s not much to see here. Note the other
doorway that lead back to the Temple’s interior courtyard. Approach
the sundial near the outer wall. The dial has the 4 alchemists’ symbols
on it, as well as two others (the sun and the moon?). Grab the piece
that creates the shadow in the dial’s surface (it looks like a paint-brush),
and right-click to place it into your inventory.
Re-enter the Temple building
through the entrance you left by. Turn to your right, and take a step
forward to enter a cavernous room used for worship.
The Living Dead
Walk two steps forward,
and turn around to see the bodies of the four alchemists in their
glass coffins. Approach each in turn and click on their bodies to
get a message from each one. They all mention that you must find the
four hidden elements, and that to watch out for Nemesis.
Once you’ve heard from
all four alchemists, make your way onto the dais behind where you’ve
been standing (from the centre of the room, just move to the left
or right, and walk onto the raised area. Walk to the back of the dais,
and then forward to the round altar at the front of the dais. The
top of the altar has the four symbols etched into it, and well as
a central depression that is empty at the moment.
Our next step is to find
the four elements that Nemesis has hidden about the Temple. It’s a
good idea to consult that map at this point (your sketched copy, or
the map back in the Library). If you look carefully on the map, you
will see the 4 alchemists’ symbols displayed; three of the symbols
are located along the outer edge of the great room, while the fourth
(Malveaux’s symbol) indicates that the Fire element is found beyond
the screened wall in the Library.
If you’re not already there,
return to the Library using any path you wish – there are several
ways of doing so, and you should be familiar enough with the layout
of the building by now. Approach the screens at the far end of the
room, and click to get even closer. For each screen, there are two
choices: click on the left side to move it left, or click on the right
side to move it to the right. Each screen will only shift completely
out of the way in one of the two directions. Click on the left side
of the first screen, right on the 2nd screen, right on the 3rd, and
left on the 4th.
Blue Angel
The screens peel back to
reveal a doorway – step through, and find yourself in a torch-lit
corridor. Turn to your left, and take two steps forward to find a
familiar-looking diagram on the wall (just like the one on the lab
counter). Mouse over the man’s head until you get the open hand cursor,
and then click and rotate the centre disk. Remember what the symbol
for fire was? It’s the open, upright triangle, which is found in the
lower left part of the outer circle. Position the centre wheel so
that the man’s head is pointed at the fire symbol, and the door opens
straight ahead.
Walk straight ahead to
the sundial, and click on the right button to bring up the arm from
the outdoor sundial. Click on the hole on the right-hand side to place
it there. The centre portion of this dial can also be rotated by grabbing
the arm and making a circular motion. Remember how a sundial works
– rotate the centre disk until the shadow of the arm lays across the
symbol.
The sundial spins, and
a door opens along the far wall – step beyond the dial and walk over
to the door. Take one step into the room, and pan to the right. Grab
the mirror hanging on the wall here, pan back, and continue into the
room of candles.
The object here is to find
the true fire element, which is burning on only one candle in the
room. That candle’s flame is the only one that appears blue in the
reflection from the magical mirror you picked up a moment ago. Note
the six brass hooks above the candles to place the mirror on to reflect
the flames – place the mirror on each hook, and look for the blue
flame. The correct candle will be visible when the mirror is hanging
on the first hook to the right of the doorway.
Now, how to find that candle?
Obviously its on the side of the room that’s reflected in the mirror.
Use the configuration of the other candles in the image to find the
correct one. Or, if you’re really stuck, face the doorway and start
counting candles along the third shelf from the top to the left of
the doorway – the correct candle is the 12th one left of the doorway.
Click the close-up of the
blue flame, and you are transported back to the dais in the great
room, directly in front of the altar. Click on the burning fire, and
then walk to Malveaux’s coffin (it’s the second from the left). Malveaux
has a clearer message for you – Nemesis killed his daughter Alexandria,
and he wants to bring her back to life.
Once you’re done listening
to Malveaux, turn to your left, and head off towards the back corner
of the great room to go after Sartorious’ air element. Proceed towards
the side of the dais, pan to your right, and go towards the dark corner
of the room. You should spot a large two-story porch like structure
in the corner, with a doorway in the centre. Walk through the doorway
into the room beyond.
Star Power
Move towards the centre
of the room, and click on the strange looking contraption to the right
– it’s a table with 5 coloured horns sitting on it. Click each horn
to hear a tone followed by the sound of an element – note that the
blue horn emits a higher tone than the rest, and the wind sound afterward
indicates blue represents air. Note to self: blue is important here.
Back away from the horn
collection, and change to vertical panning to look down at the large
star-chart on the ground in front of you. There are a number of different
coloured stars shown here, but the wind element symbol flashes over
the 5 blue stars on the right side of the chart for a few moments
when you first look at it. I told you blue was important! The object
here is to make all five of the blue stars flash, while turning off
all of the flashing purple stars to the left.
You can try solving this
puzzle by clicking on various combinations of stars, but to quickly
get the 5 blue stars shining, do the following: back away and approach
again, and then click on each of the twinkling purple stars in order
from left to right. This should shut all of them off. Now simply click
on the centre blue star, and the symbol morphs into a bird that flies
up into the air as a mammoth spiral staircase descends.
Gas Regulations
Walk towards the stairs,
and then click to ascend to the top. Enter the room ahead, and approach
the strange looking gas mixing apparatus. The close-up view shows
a set of five tubes leading into a mixing chamber. Levers regulate
the flow of gas for each of the five tubes. Other than that, we’re
not sure what’s going on here.
Back away, and proceed
to the left of the central installation. Turn around and look at the
coloured disk on the side of the central equipment. Hmm… Circle
around the back of the central installation, and look at the similarly
coloured disk located here (this one has an air symbol in the centre).
Continue around the equipment, and examine the third coloured disk.
This one’s a bit different – we’ve got equal shares of green, yellow
and dark blue, with only half as much red on the disk.
Back away, and click on
the glass mixing chamber above for a close-up. Mouse-over the small
picture of the bug located just below and to the right of the glass
container. Find the hotspot and click – this shuts the blinds, allowing
you to see the colour of the glass inside the chamber, and within
the tubes.
Walk around to the front
of the equipment again, and re-examine the tubes. We’ve already got
green gas flowing at full capacity (the left-most tube). Match the
ratio of the colours to the third disk by turning on the dark blue
(3rd tube form the left) and yellow (4th tube) gases to full capacity,
and the red (2nd tube) gas to half-capacity (the middle setting on
the red gas lever). Leave the light blue tube (the 5th) off completely.
A cyclone will appear within the mixing chamber. Click to grab it,
and be transported back to the dais in front of the altar.
Click on the cyclone again
to place it into the altar, and then walk to Sartorius’ coffin to
hear his message (the one on the far left). He admits that the alchemists
were not innocents, but Nemesis is one really bad dude.
Earthly Delights
Our next target is Kaine’s
earth element. Back away from Sartorius’ coffin, pan to the left,
and walk to the right of the dais. Once you’ve walked past the dais,
turn to your left, and take several steps straight ahead. Note the
dome-covered room located directly behind the dais – we’ll need to
come back here later. Angle off to the right towards the back corner
of the room – you will see a porch structure similar to that which
lead to the air element.
Approach the closed door,
and click on each of the skeletal fingers to raise them off the door
locking mechanism. The four alchemist’s symbols are on the left, and
the corresponding four metal symbols are on the right. Click on the
fingers again to cover up all of the symbols except the one for Kaine
(left-most finger on the left side), and the one for the corresponding
metal iron (the second finger on the right side).
The door opens, revealing
a room with a spiral staircase leading upwards – except that there
are no steps. Walk up to the staircase, and click on the lever located
to the right of the entrance to the staircase. The staircase is actually
an elaborate elevator that carries you down into the basement of the
temple.
At the bottom, turn around
and attempt to walk back up the stairs – we can’t get back up since
there are no steps. Take a step away from the stairs, and turn around
to see a set of cogs and levers on a table to the left. Click on the
red-coloured gear on the right side to lock the elevator in place,
and raise the stairs on the staircase. You can now go up the staircase
in case you wish to return to the main level before finding the earth
element.
Riding the Rails
Facing away from the stairs,
walk through the doorway into the next room. Take three steps forward,
and click on the telescope before you. We get a close-up shot of the
earthen mask that is our goal. Back away from the telescope, and turn
around to see a set of stairs leading up to a raised area. Walk up
the stairs, and look to your left to see a four-button panel, and
what looks to be a mine car.
Click on the panel for
a close up – we’ve got four buttons with four different buildings
displayed on them. Click each of the buttons in turn, and find the
one that displays the symbol for earth (a downward pointing filled
triangle) – the top right button is the correct choice here. Once
you’ve clicked the button, back away and click on the mine car to
go for a wild ride. If you choose one of the other buttons, your trip
will end in death by whatever element you chose – fire (burning),
water (drowning) or air (falling from a great height).
Once you crash through
a wall, and come to a stop, turn to your right and walk up the stone
stairs. At the top, turn to your left and proceed over to the earthen
mask. Clicking on it transports you back to the dais – click on the
piece of earth to add it to the altar, and walk over to Kaine’s coffin
to hear him mourn his son Lucien, who he claims was killed by Nemesis.
Play the Piper
We have only the water
element to find now, so turn away from Kaine’s coffin, and proceed
to the left of the dais. Take about two or three steps forward, and
then turn to your left – you should see a staircase leading off to
your left. Walk up the stairs, and stop before the two doors at the
end of the hall. Try going through one of the doors – you end up coming
back out the other door. Clearly there’s something funny going on
here.
Facing the doors again,
turn to your left, and click on the statue of the head playing the
pipes. Three notes play out – if you have installed the patch, the
words at the bottom of the screen will read "Do…Fa…So".
Back away from the statue, and turn around to face the opposite wall.
There are a number of knobs on the wall here that emit tones similar
to those played by the head on the other side.
Use your tremendous musical
ear to figure out which of the knobs to hit in sequence. If your ear
is not working correctly, use your knowledge of musical notes (you’ve
all seen The Sound of Music – what’s the note sequence? Do…Ray…Me…Fa…So…La…
Ti…Do"). Hit the left-most knob, then the 4th from the left,
and then the fifth from the left to recreate the statue’s notes. That
clicking sound you hear sounds like success.
Facing the two doors again,
open the one on the right, and click to descend the stairs. The door
at the end opens to reveal…nothing. Use the special "turn-around"
cursor to, well, turn around, and then climb back up the stairs. This
time choose the left doorway. Walk up the stairs, and enter the gallery
room at the top.
Icicle Works
The room you’ve entered
contains 6 paintings on the wall, an hourglass on a table in the centre,
and a window on the far wall. Examine the 6 painting in order starting
to the right of the doorway. The paintings illustrate the 6 ages of
Zork’s existence. Moving from left to right: an Ice Age, a Prehistoric
Undisturbed Age, the Age of Fire and Lava, the Age of Temple Construction,
the Age of Magic (with a completed Temple) and a Futuristic Age.
Now approach the blue hourglass
in the centre of the room. Click on the hourglass to trigger a mechanism
that flips over to reveal a plush chair. You don’t have to tell me
twice to sit down. Click on the chair to climb aboard, and use the
mouse to turn so that the chair faces the window. Walk towards the
window and examine the blue bowl – a great container for some special
elemental water. The view out the window shows the Temple wall, and
the grey skies.
Back up to get back into
the chair, and rotate it around to the left two complete turns. As
you go around the second time, you may notice a short hesitation as
you pass the doorway to the room. Keep turning to face the window,
and walk towards it. The sounds of hammering and construction greet
you. We’ve gone from the Age of Magic to the Age of Temple Construction.
The chair actually allows you to switch between the six ages of Zork
by spinning forward or backward through time.
Have a look out the window
– there still isn’t any water in the bowl, but there is a saw sitting
on the scaffolding just outside the window. Pick up the saw and right-click
to put it into your inventory. Now back up and get into the chair
again. What age should get us some water? We haven’t seen any in the
two ages we’ve already been to, and there isn’t likely any in the
Futuristic or Fire and Lava Ages. The Ice Age sound like its your
best bet. Turn three turn to your left, and spin to face the window
again.
It certainly looks cold
out there. That big icicle right above the bowl looks a little loose.
Right-click to bring up the saw, and click on the icicle to knock
it into the bowl. Now we must melt the ice – likely the Fire and Lava
Age. Get back into the chair, and spin to the right two complete turns.
Walk towards the window to see the icicle melt into water, and then
click on the bowl to get a close-up. Finally click on the water to
send you and the water element back to the dais. If you somehow mess
this sequence up, just go back to the Temple Construction Age to retrieve
the saw, and begin the sequence all over again.
Four Heads are Better
Than One
Once you click on the water
bowl to pour it into the water symbol on the altar, the four heads
of the alchemists appear above you, and speak of the need to now collect
the four lost metals. We must journey to the planets that each of
the alchemists hail from to do this. Suddenly Nemesis shows up and
tries to throw his weight around. The four put their minds together
and somehow banish him away, yielding a gold ball that they give to
you.
Walk off the dais to the
left or right, and proceed around behind it to the dome-shaped structure
located there. Proceed down the recessed staircase into the room below.
You will find six posters of the gods that are represented by the
4 planets (Juperon, Saturnax, Murz and Venusnv), as well as the sun
and moon.
Now click on the orrery
(the model of the planets) and note the two levers on either side
of the equipment. The left lever raises and lowers the central cage
(the thing attached to the centre of the model via an arm), while
the right lever controls the rotation of the model. Right now, the
model can be rotated, but nothing happens since a vital component
(the model sun) is missing.
Grasp the left lever, pull
it up, and then over to the middle-right position. The cage that hung
down below the orrery has now swung up and is accessible. Take out
the gold ball that the alchemists gave you, and place it inside the
cage. Grasp the left lever again, push it over to the left, and pull
it up to the top position. The cage raises up and places the gold
ball in the centre of the orrery, creating a model sun for the display.
Travel to each of the four
planets is accomplished by simply rotating the right lever until the
sun shines directly onto one of the 4 planets (you will here a small
"ping" when the planet is directly in the sunlight). Although
it does not matter in what order the planets are completed, let’s
start with Sartorius’ cold Juperon, and the Asylum. Rotate the right
lever until it sits in the 2 o’clock position, and listen for the
"ping" that tells you the planet is properly placed. You
will now travel to Juperon.
Be forewarned: this world
contains some fairly disturbing scenes involving blood, severed heads,
and other corpse manipulations – not for the squeamish.
Record Keeping
Once your swooping approach
to Sartorius’ Asylum ends, you are placed on a small platform just
outside the front door. Brrrr. If you ever need to "Return to
Zork" (heh heh), you can return here and click on the glowing
planet to the right of the doorway. Face the doors, and enter the
tall cylindrical building. Each floor is made up of a catwalk that
rings the inside wall of the cylinder. Turn to your left, take a step
forward, and enter the filing room located to your left.
Take one step into the
room, and turn to your left. Click on the open filing drawer to the
right of the ladder, and click on Zoe Wolfe’s file to read about the
now-deceased patient. Put the file back, close the drawer, and turn
around to face the opposite wall. Find the accessible drawer (it has
a piece of paper sticking out of it), and open up Patient X’s file
to see a disturbed drawing. Close the file, back away from the drawer,
and take another step into the room.
Again, turn to your left,
and click on the middle drawer in the second column of drawers from
the end. Open up Malveaux’s file, and read through the letters to
Sartorius – evidently they conspired on some experiments. Back away
once more, turn around to face the opposite wall, and click on the
open drawer to the right of the ladder. Open up Lucien Kaine’s file,
and read about his "rebelliousness and cowardice" (according
to his alchemist father).
Back away, and take another
step into the room. There’s a medical poster over to the right that
is of little interest. Click on the examination table, and then touch
the flashlight (click on the light after it spins through the air)
to see Sartorius examining women for an unknown purpose – maybe experiments?
Back away, turn around, and exit the room.
Turn to your left, take a step forward, and enter the lab on your
left.
Losing Your Head
There are some disturbing
stains on the creepy equipment in this room, not the least of which
is a table of mounted heads directly in front of you. Walk to the
table, and click on each of the heads to read the labels below. Notice
one head is missing – the 5 buttons below don’t seem to do anything.
(Eek! Do you see what’s coming?). Turn around, face the door, and
walk to the chest freezer located to the right of the doorway. Get
a close-up, and the click on the top door to open the freezer. Grab
the locked box in the upper right corner, and back away from the freezer.
Turn around and approach
the equipment located directly behind you. Click on it to get a close-up,
and then again on the large box on the left side of the contraption
. Place the locked box from the refrigerator inside this box, and
then click near the top of the locked box. We get a close-up of the
lock tumbler, but have no idea as to the combination. Back away from
the tumbler, and then the box, and click on the yellow lever located
just to the right of the box. This turns on a shiny blue light. Click
on the box once more, and part of the combination to the locked box
is shown on the box’s side – "20-18" is now visible (we
know there must be something further to this combination – who every
heard of a two-number combination?). The faint outline of what looks
to be a key is also illuminated in the blue light.
We’re missing a head, and
part of a locked box combination, so we’ll need to keep searching.
Before you leave the room, check out the weird blood filtering machine
along the far wall of the room (to the left of the heads poster).
We’ll need to put something into the clamp above the filter later
on. Walk back to the centre of the room, and leave via the exit.
Turn to your left, take
two steps forward, and enter the elevator to your right. Pan to your
left, and click for a close-up of the number panel. There appears
to be keys in the locks for the first floor (the current one) and
the basement. Back away, pan to your right, and click on the elevator
control panel. Click the right-hand yellow button to close the door.
Now back away, click on the number panel again, and hit the Basement
button to lower the elevator. Once it stops, press the yellow open
door button on the control panel, back away, turn around, and exit
the elevator into the morgue.
Head Games
Disembodied voices crying
for salvation, bloodied cutting instruments, perhaps a decaying body
hidden somewhere inside – fun for the whole family. Walk towards the
equipment in the centre of the room – yes, this is the control panel
for the guillotine you can see in the background. Hmmm…we need
a head, and we’ve got a method for detachment – all we need is the
body.
Proceed to the right of
the control panel to stand to the right of the guillotine. Looks like
its seen some use. Turn around and face the wall of cadaver drawers.
Have some fun by opening random drawers looking for something to hack.
The actual drawer you are looking for is found 4 "columns"
from the corner you are standing next to, and three rows up from the
floor. Once you’ve found the body, pick it up, turn around, and place
it into the pan located behind the guillotine’s blade.
Walk back to the control
panel, click on it to get a close-up, and hit the lever on the left
to lift the pan holding the body up into position. Hit the middle
lever to raise the blade mechanism up into position, and then do the
deed by pressing on the right lever. Back away, walk to the guillotine,
and pick up the now-severed head which sits in a bowl. Walk back into
the elevator, click on the control panel to close the door, and hit
"1" on the number pad to go back up to the ground floor.
Whew, glad that’s over!
Once the elevator stops,
remember to open the door on the control panel before leaving. Turn
to your right, walk two steps forward, and enter the lab to your right.
Walk up to the "head" counter, click on the empty spot,
and place your head there. Hit each of the 5 buttons below to hear
various messages from the head’s former owner. Among other things,
he tells us that he had to swallow a key that he stole, and lets us
know his secret: 36-24-36. Could this be part of the combination code?
Bloodletting
Back away, turn left, and
walk to the discombobulating machine in the corner. Click on the box
to the left, then at the box’s top to see the combination tumbler.
Input the five number code that you’ve put together from the head
(36-24-36) and the illuminated box (20-18). Click on the ticks that
correspond to those five number in order, and the box should open
(its kind of finicky, so keep trying).
Grab the container of what
looks to be blood from the open box, and back away from the machine.
Be sure not to hit any of the buttons on the control panel before
you grab the container, or the machine will pitch it into the hole
in the wall behind the equipment
Proceed over to the other
side of the room, click for a close-up, and place the container into
the clamp above the glass receptacle. The machine will automatically
pour the container into the receptacle below, and toss the empty container
into the dumpster to the side. Click on the receptacle, and grab the
key which now sits inside. Move back to the centre of the room, and
leave via the door. Turn to your right, take two steps forward, and
get into the elevator on the right.
View this guide raw, exactly as the archive holds it