Just Adventure original
Zork Nemesis: The Forbidden Lands Walkthrough by Dan Kennedy
Introduction
Zork Nemesis was Activision’s
attempt at recasting its long-running adventure series as a graphically-driven
game during the mid-1990’s. Gone is the goofy humour, and the kitchen-sink-think-out-of-the-box
style puzzles that were the cornerstone of the Zork games; instead
we get a dark, brooding, eerie atmosphere and Myst-style puzzles.
There are numerous references to familiar Zorkian terms and titles,
but the laughing never really gets louder than a chuckle.
The game actually comes
across as sort of a Myst “plus” – better graphics, longer
gameplay, better developed story, and more puzzles. Although never
managing to capture Myst’s uniquely immersive feel (let’s face it
– Myst pretty much created and broke the mould at the same time),
the gameplay is a good blend of story-driven sequences and “wandering
around” time. Where the game suffers is in the all-too familiar
story structure and “good is bad/bad is good” characters.
Nemesis is undoubtedly
the black sheep of the Zork family – a great, engaging (and sometimes
gory) game that perhaps tries a little too hard to be Myst. In fact,
Activision all but admitted that it had strayed a little too far from
the essence of the Zork series with the release of the much funnier
Zork Grand Inquisitor a few years later.
Like other mid-90’s games
that relied heavily on the best graphics of the day, Nemesis suffers
by comparison with the look of today’s adventures. Having said that,
the visuals are decent, and the game controls are simple – just follow
the cursor. I understand that some fairly detailed documentation comes
with the game – I did not get a chance to review it since my copy
came from a cheap distributor.
You can be killed in this
game, but only at a few select spots. Also, you may wish to find and
download the Nemesis patch which displays character’s speech at the
bottom of the screen.
Goin’ to the Chapel
Intro movie – stabbed guy,
murdered woman needs to be rescued, everyone cursed, future unravelled,
spiralling down into a dark, dreary, deserted world. Any of this sounding
familiar? Once the movie ends, you find yourself standing in a deserted
courtyard outside what appears to be a church. This is your first
look at the Nemesis cursor; a forward pointing arrow indicates you
can move in that direction.
Wander around the courtyard
a bit, but there isn’t really anything of interest here. You can see
what looks like a city off to the right of the church. Turn around
and click on the locked gate (note how the cursor turns yellow over
something that can be touched); the chain jiggles, but the way is
blocked. Use the “back” arrow cursor to return to the normal
view.
Approach the building opposite
the gate, climb the stairs and walk towards the sun symbol on the
outside wall of the building. Proceed to your left, turn right at
the corner of the building, and move forward. You’ll spot another
sun on this side of the building. Continue along to the next corner
– you should now be able to see a much larger cathedral-like building
straight ahead. Turn to your right, and follow the back wall of the
small building to the next corner (another sun symbol is found here
too).
Turn to your right, and
spot the open door along the fourth wall of the small building. Walk
forward, turn to your right, and enter. This seems to be some sort
of chapel, or mausoleum. Walk forward several steps towards the candle
burning in the alcove on the far wall, and click on the flame. The
vision of a woman tells us that “..they’re in the temple.”
Back away from the alcove,
and turn to your right to see a stone crypt. Walk towards the crypt,
and then click on it to see a red violin float around. Once the music
is done, move forward again, and click on the note lying inside the
crypt beside the violin. The note says: “I will be waiting at
the Gates of Hell. You will not escape my wrath.”. Click again
to put the note down, and then back away.
Look up…look WAY
up
Turn around and make you
way back outside. Turning to your left, walk to the corner of the
building and turn to your left again. Walk forward, and turn to your
right – you will see a clear pathway to the door of the temple. Three
steps forward will take you right to the temple door.
The double-arrow icon indicates
a spot where the panning feature can be changed from horizontal to
vertical. Find the yellow coloured up-pointing arrow icon on the screen
and click to change the panning direction. You should now be able
to look upwards at the top of the doorway. Click on the plaque above
your head, which reads “When the sun and the moon are joined,
the entrance to eternity is opened”. Back away from the plaque,
and find the yellow coloured horizontal arrow to switch back to horizontal
panning.
Click on the left-hand
door knocker for a close up – the sun symbol is in the centre, and
the moon symbol is on the piece that hangs down below. Mouse over
the hanging piece – the cursor switches to an open hand, indicating
that the object can be manipulated in some way. Click and drag the
hanging piece upward until the moon and sun symbols are touching –
as the plaque said, the doors will now open. Walk into the temple
as the doors close behind you.
The front hallway of the
Temple has a number of walled-up doorways leading off that make an
ominous thump when you click on them However, there is only one doorway
the leads to anywhere. Proceed forward one step, listen to the threatening
message from Nemesis, turn to your right, and enter the Library.
Easy Reading
You’ll see book shelves
in every direction, some hanging screens to your right, and a giant
globe to your left. Ignore the screens for now, and move to your left.
Turn around and face the long wooden desk opposite the globe. There
are 6 accessible books along this desk that contain varying amounts
of useful information. The left-most book has some circular symbols
on its cover, and is a journal written in the same handwriting as
the note from the Chapel’s Crypt. We can guess that the journal belongs
to Nemesis.
The first pages indicate
that he has killed four alchemists, but must continue whatever work
they were doing before their deaths. The facing page contains a map
of the Temple – I suggest you quickly sketch this map out. The library
is located in the bottom right corner of the map. The rest of the
journal indicates the following:
- Nemesis has hidden the
4 alchemists’ elements in different spots in the Temple. - Nemesis also murdered
the last explorer to come here (Bivotar), but because of the circularity
of time, Bivotar may return (are you Bivotar?). - He is having trouble
recreating the elements in the lab .
The next book is titled
“Astronomy For a New Age”, and contains some typical Zorkian
gibberish, and well as the pictures of 8 planets. Four of the planets
have names scrawled next to them; two of the names were mentioned
as alchemists in Nemesis’ journal, so we can deduce that the 4 names
belong to the 4 Alchemists: Sartorius (planet Juperon), Malveaux (planet
Saturnax), Sophia (planet Venusnv) and Kaine (planet Murz).
The third book from the
left “Interview with a Grue” again contains some Zorkian
humour that players of other games in the series will recognize. The
fourth book, “The Best of the New Zorker” contains some
interesting information on what has occurred in this “Forbidden”
land.
The fifth book, “Alchemy
of Pure Love” describes the mysterious fifth element: the “quintessence”,
or pure love, or Philosopher’s Stone (Harry Potter, eat your heart
out!). The sixth and last accessible book, “My Best Excesses”,
is written by Zork’s most famous tax-crazed leader Dimwit Flathead.
Message in a Haunted
Temple
Turn around and walk towards
the exit located in the far corner beyond the large globe. Before
you leave the library, click on the small table with the knife and
crystal ball on it (to the right of the doorway). Get a close-up on
the knife, and click it again. Yikes, what was that? Back away, and
exit the room via the corner doorway.
You are now at one of the
corners of the Temple’s interior courtyard. Turn to your left, and
move forward. If you pan to your left, you will see the entrance hallway
with the front door visible at its far end. Turn back to your original
direction and move forward again.
Nemesis pings you with
another message (these seem to be magical recordings since he hasn’t
rushed out and finished us off). So far he seems very peeved with
the alchemists, and desperately wants you to go away. Turn to your
left, and enter the Lab – this is marked on the map you should have
sketched out from the journal.
Black Lab
You will see a red book
lying on the bench directly in front of you as you enter. Click on
it to reveal a photograph underneath, and click on the photo to show
a girl playing the violin. In fact, it’s the same girl that we saw
in the Chapel vision. Back up away from the picture, and pan around
until the left side of the doorway is visible. Click on the dusty
red book propped up next to the door frame. This book contains more
Nemesis notes connecting each alchemists to a specific element: Sartorius
– Air, Malveaux – Fire, Sophia – Water, and Kaine – Earth..
Turn around and take a
step to the right of the doorway. There’s a picture on the wall to
your left that plays some peaceful violin music to soothe your worries.
Pan towards the centre of the room, and take a step in that direction.
Turn to your left, and hit the yellow vertical arrow to pan down.
Four broken shapes are displayed on the counter here, but they only
glow when you try to touch them. Back away, and turn to the opposite
direction.
Pan downward again, and
check out the naked fella diagram set into the wooden counter here.
Malveaux’s name is scrawled beside a symbol that looks like an “h”
with a tick along the letter’s stem. “May he burn in hell”
is written next to an inverted open triangle. Back away, pan to the
left, and click to move towards the ladder. Standing directly in front
of it, click to go up the ladder. The only item that can be examined
here is a sketch book located to your right. The sketches show four
individuals doing various tasks – could these be the 4 alchemists?
Back away, and click on
the downward arrow to descend the ladder. Make your way into the lab’s
back room. Pan a bit to the right, and click on the papers on the
writing desk here. The top sheet displays the relationships between
the alchemists, and their respective elements and metals. Symbols
for each are also displayed. The rest of the documents mentions things
like changing earthly matter into perfection, base metals into gold
and silver, and mortal flesh into eternal life.
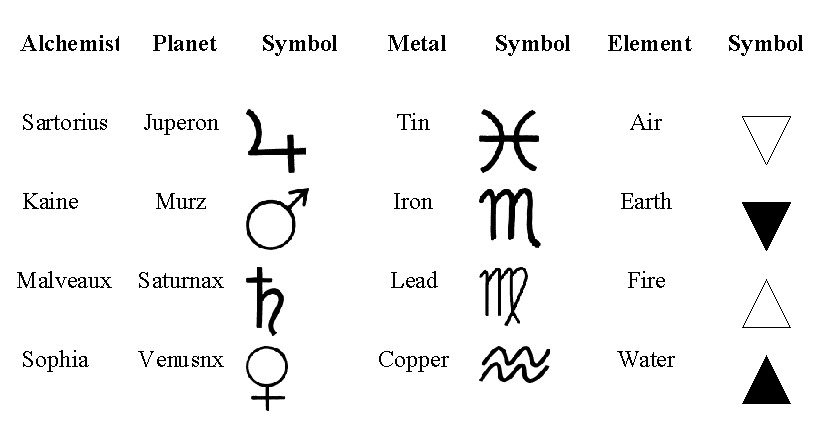
Back away from the desk
and turn to your left to see six recording disks mounted on a frame.
Click on each of the disks (starting from the left) to hear more of
Nemesis’ notes from the lab. He appears to be torturing the alchemists
to learn their secrets (how to torture someone you’ve already murdered
is beyond me), but he’s not having much success. Nemesis has learned
four steps in the alchemy process (sublimation, distillation, calcification,
coagulation), but is missing a mysterious vital step. He’s also left
the premises in search of more riches, and a wizard to help him.
The Fountainhand
Back away from the recording
disks, turn around, and exit the lab via the doorway. Once outside,
walk forward one step, turn to your right, and move forward another
step. Turn to your right, and approach the two fountains in the centre
of the courtyard. The ivory tusks on either side of each fountain
control the water flow; clicking on the left tusk turns the water
on, while the right tusk turns it off.
The fountain to your right
doesn’t contain anything interesting. Turn the water flow off on the
fountain to your left, and move forward to examine the object behind
the water. The object resembles a hand sticking out of the wall. Clicking
on it yields a metallic clang, and little else. It appears that whatever
mechanism this operates is not functional as yet.
Back away from the fountain,
turn to your left, and walk forward two steps into another central
hallway. There’s a painting on the wall to your left that can be examined
in greater detail if one so desires. Now turn to the opposite wall
to find an doorway to the outside.
Exit the Temple onto a
large balcony containing a central gazebo and a sundial. Feel free
to wander about, but there’s not much to see here. Note the other
doorway that lead back to the Temple’s interior courtyard. Approach
the sundial near the outer wall. The dial has the 4 alchemists’ symbols
on it, as well as two others (the sun and the moon?). Grab the piece
that creates the shadow in the dial’s surface (it looks like a paint-brush),
and right-click to place it into your inventory.
Re-enter the Temple building
through the entrance you left by. Turn to your right, and take a step
forward to enter a cavernous room used for worship.
The Living Dead
Walk two steps forward,
and turn around to see the bodies of the four alchemists in their
glass coffins. Approach each in turn and click on their bodies to
get a message from each one. They all mention that you must find the
four hidden elements, and that to watch out for Nemesis.
Once you’ve heard from
all four alchemists, make your way onto the dais behind where you’ve
been standing (from the centre of the room, just move to the left
or right, and walk onto the raised area. Walk to the back of the dais,
and then forward to the round altar at the front of the dais. The
top of the altar has the four symbols etched into it, and well as
a central depression that is empty at the moment.
Our next step is to find
the four elements that Nemesis has hidden about the Temple. It’s a
good idea to consult that map at this point (your sketched copy, or
the map back in the Library). If you look carefully on the map, you
will see the 4 alchemists’ symbols displayed; three of the symbols
are located along the outer edge of the great room, while the fourth
(Malveaux’s symbol) indicates that the Fire element is found beyond
the screened wall in the Library.
If you’re not already there,
return to the Library using any path you wish – there are several
ways of doing so, and you should be familiar enough with the layout
of the building by now. Approach the screens at the far end of the
room, and click to get even closer. For each screen, there are two
choices: click on the left side to move it left, or click on the right
side to move it to the right. Each screen will only shift completely
out of the way in one of the two directions. Click on the left side
of the first screen, right on the 2nd screen, right on the 3rd, and
left on the 4th.
Blue Angel
The screens peel back to
reveal a doorway – step through, and find yourself in a torch-lit
corridor. Turn to your left, and take two steps forward to find a
familiar-looking diagram on the wall (just like the one on the lab
counter). Mouse over the man’s head until you get the open hand cursor,
and then click and rotate the centre disk. Remember what the symbol
for fire was? It’s the open, upright triangle, which is found in the
lower left part of the outer circle. Position the centre wheel so
that the man’s head is pointed at the fire symbol, and the door opens
straight ahead.
Walk straight ahead to
the sundial, and click on the right button to bring up the arm from
the outdoor sundial. Click on the hole on the right-hand side to place
it there. The centre portion of this dial can also be rotated by grabbing
the arm and making a circular motion. Remember how a sundial works
– rotate the centre disk until the shadow of the arm lays across the
symbol.
The sundial spins, and
a door opens along the far wall – step beyond the dial and walk over
to the door. Take one step into the room, and pan to the right. Grab
the mirror hanging on the wall here, pan back, and continue into the
room of candles.
The object here is to find
the true fire element, which is burning on only one candle in the
room. That candle’s flame is the only one that appears blue in the
reflection from the magical mirror you picked up a moment ago. Note
the six brass hooks above the candles to place the mirror on to reflect
the flames – place the mirror on each hook, and look for the blue
flame. The correct candle will be visible when the mirror is hanging
on the first hook to the right of the doorway.
Now, how to find that candle?
Obviously its on the side of the room that’s reflected in the mirror.
Use the configuration of the other candles in the image to find the
correct one. Or, if you’re really stuck, face the doorway and start
counting candles along the third shelf from the top to the left of
the doorway – the correct candle is the 12th one left of the doorway.
Click the close-up of the
blue flame, and you are transported back to the dais in the great
room, directly in front of the altar. Click on the burning fire, and
then walk to Malveaux’s coffin (it’s the second from the left). Malveaux
has a clearer message for you – Nemesis killed his daughter Alexandria,
and he wants to bring her back to life.
Once you’re done listening
to Malveaux, turn to your left, and head off towards the back corner
of the great room to go after Sartorious’ air element. Proceed towards
the side of the dais, pan to your right, and go towards the dark corner
of the room. You should spot a large two-story porch like structure
in the corner, with a doorway in the centre. Walk through the doorway
into the room beyond.
Star Power
Move towards the centre
of the room, and click on the strange looking contraption to the right
– it’s a table with 5 coloured horns sitting on it. Click each horn
to hear a tone followed by the sound of an element – note that the
blue horn emits a higher tone than the rest, and the wind sound afterward
indicates blue represents air. Note to self: blue is important here.
Back away from the horn
collection, and change to vertical panning to look down at the large
star-chart on the ground in front of you. There are a number of different
coloured stars shown here, but the wind element symbol flashes over
the 5 blue stars on the right side of the chart for a few moments
when you first look at it. I told you blue was important! The object
here is to make all five of the blue stars flash, while turning off
all of the flashing purple stars to the left.
You can try solving this
puzzle by clicking on various combinations of stars, but to quickly
get the 5 blue stars shining, do the following: back away and approach
again, and then click on each of the twinkling purple stars in order
from left to right. This should shut all of them off. Now simply click
on the centre blue star, and the symbol morphs into a bird that flies
up into the air as a mammoth spiral staircase descends.
Gas Regulations
Walk towards the stairs,
and then click to ascend to the top. Enter the room ahead, and approach
the strange looking gas mixing apparatus. The close-up view shows
a set of five tubes leading into a mixing chamber. Levers regulate
the flow of gas for each of the five tubes. Other than that, we’re
not sure what’s going on here.
Back away, and proceed
to the left of the central installation. Turn around and look at the
coloured disk on the side of the central equipment. Hmm… Circle
around the back of the central installation, and look at the similarly
coloured disk located here (this one has an air symbol in the centre).
Continue around the equipment, and examine the third coloured disk.
This one’s a bit different – we’ve got equal shares of green, yellow
and dark blue, with only half as much red on the disk.
Back away, and click on
the glass mixing chamber above for a close-up. Mouse-over the small
picture of the bug located just below and to the right of the glass
container. Find the hotspot and click – this shuts the blinds, allowing
you to see the colour of the glass inside the chamber, and within
the tubes.
Walk around to the front
of the equipment again, and re-examine the tubes. We’ve already got
green gas flowing at full capacity (the left-most tube). Match the
ratio of the colours to the third disk by turning on the dark blue
(3rd tube form the left) and yellow (4th tube) gases to full capacity,
and the red (2nd tube) gas to half-capacity (the middle setting on
the red gas lever). Leave the light blue tube (the 5th) off completely.
A cyclone will appear within the mixing chamber. Click to grab it,
and be transported back to the dais in front of the altar.
Click on the cyclone again
to place it into the altar, and then walk to Sartorius’ coffin to
hear his message (the one on the far left). He admits that the alchemists
were not innocents, but Nemesis is one really bad dude.
Earthly Delights
Our next target is Kaine’s
earth element. Back away from Sartorius’ coffin, pan to the left,
and walk to the right of the dais. Once you’ve walked past the dais,
turn to your left, and take several steps straight ahead. Note the
dome-covered room located directly behind the dais – we’ll need to
come back here later. Angle off to the right towards the back corner
of the room – you will see a porch structure similar to that which
lead to the air element.
Approach the closed door,
and click on each of the skeletal fingers to raise them off the door
locking mechanism. The four alchemist’s symbols are on the left, and
the corresponding four metal symbols are on the right. Click on the
fingers again to cover up all of the symbols except the one for Kaine
(left-most finger on the left side), and the one for the corresponding
metal iron (the second finger on the right side).
The door opens, revealing
a room with a spiral staircase leading upwards – except that there
are no steps. Walk up to the staircase, and click on the lever located
to the right of the entrance to the staircase. The staircase is actually
an elaborate elevator that carries you down into the basement of the
temple.
At the bottom, turn around
and attempt to walk back up the stairs – we can’t get back up since
there are no steps. Take a step away from the stairs, and turn around
to see a set of cogs and levers on a table to the left. Click on the
red-coloured gear on the right side to lock the elevator in place,
and raise the stairs on the staircase. You can now go up the staircase
in case you wish to return to the main level before finding the earth
element.
Riding the Rails
Facing away from the stairs,
walk through the doorway into the next room. Take three steps forward,
and click on the telescope before you. We get a close-up shot of the
earthen mask that is our goal. Back away from the telescope, and turn
around to see a set of stairs leading up to a raised area. Walk up
the stairs, and look to your left to see a four-button panel, and
what looks to be a mine car.
Click on the panel for
a close up – we’ve got four buttons with four different buildings
displayed on them. Click each of the buttons in turn, and find the
one that displays the symbol for earth (a downward pointing filled
triangle) – the top right button is the correct choice here. Once
you’ve clicked the button, back away and click on the mine car to
go for a wild ride. If you choose one of the other buttons, your trip
will end in death by whatever element you chose – fire (burning),
water (drowning) or air (falling from a great height).
Once you crash through
a wall, and come to a stop, turn to your right and walk up the stone
stairs. At the top, turn to your left and proceed over to the earthen
mask. Clicking on it transports you back to the dais – click on the
piece of earth to add it to the altar, and walk over to Kaine’s coffin
to hear him mourn his son Lucien, who he claims was killed by Nemesis.
Play the Piper
We have only the water
element to find now, so turn away from Kaine’s coffin, and proceed
to the left of the dais. Take about two or three steps forward, and
then turn to your left – you should see a staircase leading off to
your left. Walk up the stairs, and stop before the two doors at the
end of the hall. Try going through one of the doors – you end up coming
back out the other door. Clearly there’s something funny going on
here.
Facing the doors again,
turn to your left, and click on the statue of the head playing the
pipes. Three notes play out – if you have installed the patch, the
words at the bottom of the screen will read “Do…Fa…So”.
Back away from the statue, and turn around to face the opposite wall.
There are a number of knobs on the wall here that emit tones similar
to those played by the head on the other side.
Use your tremendous musical
ear to figure out which of the knobs to hit in sequence. If your ear
is not working correctly, use your knowledge of musical notes (you’ve
all seen The Sound of Music – what’s the note sequence? Do…Ray…Me…Fa…So…La…
Ti…Do”). Hit the left-most knob, then the 4th from the left,
and then the fifth from the left to recreate the statue’s notes. That
clicking sound you hear sounds like success.
Facing the two doors again,
open the one on the right, and click to descend the stairs. The door
at the end opens to reveal…nothing. Use the special “turn-around”
cursor to, well, turn around, and then climb back up the stairs. This
time choose the left doorway. Walk up the stairs, and enter the gallery
room at the top.
Icicle Works
The room you’ve entered
contains 6 paintings on the wall, an hourglass on a table in the centre,
and a window on the far wall. Examine the 6 painting in order starting
to the right of the doorway. The paintings illustrate the 6 ages of
Zork’s existence. Moving from left to right: an Ice Age, a Prehistoric
Undisturbed Age, the Age of Fire and Lava, the Age of Temple Construction,
the Age of Magic (with a completed Temple) and a Futuristic Age.
Now approach the blue hourglass
in the centre of the room. Click on the hourglass to trigger a mechanism
that flips over to reveal a plush chair. You don’t have to tell me
twice to sit down. Click on the chair to climb aboard, and use the
mouse to turn so that the chair faces the window. Walk towards the
window and examine the blue bowl – a great container for some special
elemental water. The view out the window shows the Temple wall, and
the grey skies.
Back up to get back into
the chair, and rotate it around to the left two complete turns. As
you go around the second time, you may notice a short hesitation as
you pass the doorway to the room. Keep turning to face the window,
and walk towards it. The sounds of hammering and construction greet
you. We’ve gone from the Age of Magic to the Age of Temple Construction.
The chair actually allows you to switch between the six ages of Zork
by spinning forward or backward through time.
Have a look out the window
– there still isn’t any water in the bowl, but there is a saw sitting
on the scaffolding just outside the window. Pick up the saw and right-click
to put it into your inventory. Now back up and get into the chair
again. What age should get us some water? We haven’t seen any in the
two ages we’ve already been to, and there isn’t likely any in the
Futuristic or Fire and Lava Ages. The Ice Age sound like its your
best bet. Turn three turn to your left, and spin to face the window
again.
It certainly looks cold
out there. That big icicle right above the bowl looks a little loose.
Right-click to bring up the saw, and click on the icicle to knock
it into the bowl. Now we must melt the ice – likely the Fire and Lava
Age. Get back into the chair, and spin to the right two complete turns.
Walk towards the window to see the icicle melt into water, and then
click on the bowl to get a close-up. Finally click on the water to
send you and the water element back to the dais. If you somehow mess
this sequence up, just go back to the Temple Construction Age to retrieve
the saw, and begin the sequence all over again.
Four Heads are Better
Than One
Once you click on the water
bowl to pour it into the water symbol on the altar, the four heads
of the alchemists appear above you, and speak of the need to now collect
the four lost metals. We must journey to the planets that each of
the alchemists hail from to do this. Suddenly Nemesis shows up and
tries to throw his weight around. The four put their minds together
and somehow banish him away, yielding a gold ball that they give to
you.
Walk off the dais to the
left or right, and proceed around behind it to the dome-shaped structure
located there. Proceed down the recessed staircase into the room below.
You will find six posters of the gods that are represented by the
4 planets (Juperon, Saturnax, Murz and Venusnv), as well as the sun
and moon.
Now click on the orrery
(the model of the planets) and note the two levers on either side
of the equipment. The left lever raises and lowers the central cage
(the thing attached to the centre of the model via an arm), while
the right lever controls the rotation of the model. Right now, the
model can be rotated, but nothing happens since a vital component
(the model sun) is missing.
Grasp the left lever, pull
it up, and then over to the middle-right position. The cage that hung
down below the orrery has now swung up and is accessible. Take out
the gold ball that the alchemists gave you, and place it inside the
cage. Grasp the left lever again, push it over to the left, and pull
it up to the top position. The cage raises up and places the gold
ball in the centre of the orrery, creating a model sun for the display.
Travel to each of the four
planets is accomplished by simply rotating the right lever until the
sun shines directly onto one of the 4 planets (you will here a small
“ping” when the planet is directly in the sunlight). Although
it does not matter in what order the planets are completed, let’s
start with Sartorius’ cold Juperon, and the Asylum. Rotate the right
lever until it sits in the 2 o’clock position, and listen for the
“ping” that tells you the planet is properly placed. You
will now travel to Juperon.
Be forewarned: this world
contains some fairly disturbing scenes involving blood, severed heads,
and other corpse manipulations – not for the squeamish.
Record Keeping
Once your swooping approach
to Sartorius’ Asylum ends, you are placed on a small platform just
outside the front door. Brrrr. If you ever need to “Return to
Zork” (heh heh), you can return here and click on the glowing
planet to the right of the doorway. Face the doors, and enter the
tall cylindrical building. Each floor is made up of a catwalk that
rings the inside wall of the cylinder. Turn to your left, take a step
forward, and enter the filing room located to your left.
Take one step into the
room, and turn to your left. Click on the open filing drawer to the
right of the ladder, and click on Zoe Wolfe’s file to read about the
now-deceased patient. Put the file back, close the drawer, and turn
around to face the opposite wall. Find the accessible drawer (it has
a piece of paper sticking out of it), and open up Patient X’s file
to see a disturbed drawing. Close the file, back away from the drawer,
and take another step into the room.
Again, turn to your left,
and click on the middle drawer in the second column of drawers from
the end. Open up Malveaux’s file, and read through the letters to
Sartorius – evidently they conspired on some experiments. Back away
once more, turn around to face the opposite wall, and click on the
open drawer to the right of the ladder. Open up Lucien Kaine’s file,
and read about his “rebelliousness and cowardice” (according
to his alchemist father).
Back away, and take another
step into the room. There’s a medical poster over to the right that
is of little interest. Click on the examination table, and then touch
the flashlight (click on the light after it spins through the air)
to see Sartorius examining women for an unknown purpose – maybe experiments?
Back away, turn around, and exit the room.
Turn to your left, take a step forward, and enter the lab on your
left.
Losing Your Head
There are some disturbing
stains on the creepy equipment in this room, not the least of which
is a table of mounted heads directly in front of you. Walk to the
table, and click on each of the heads to read the labels below. Notice
one head is missing – the 5 buttons below don’t seem to do anything.
(Eek! Do you see what’s coming?). Turn around, face the door, and
walk to the chest freezer located to the right of the doorway. Get
a close-up, and the click on the top door to open the freezer. Grab
the locked box in the upper right corner, and back away from the freezer.
Turn around and approach
the equipment located directly behind you. Click on it to get a close-up,
and then again on the large box on the left side of the contraption
. Place the locked box from the refrigerator inside this box, and
then click near the top of the locked box. We get a close-up of the
lock tumbler, but have no idea as to the combination. Back away from
the tumbler, and then the box, and click on the yellow lever located
just to the right of the box. This turns on a shiny blue light. Click
on the box once more, and part of the combination to the locked box
is shown on the box’s side – “20-18” is now visible (we
know there must be something further to this combination – who every
heard of a two-number combination?). The faint outline of what looks
to be a key is also illuminated in the blue light.
We’re missing a head, and
part of a locked box combination, so we’ll need to keep searching.
Before you leave the room, check out the weird blood filtering machine
along the far wall of the room (to the left of the heads poster).
We’ll need to put something into the clamp above the filter later
on. Walk back to the centre of the room, and leave via the exit.
Turn to your left, take
two steps forward, and enter the elevator to your right. Pan to your
left, and click for a close-up of the number panel. There appears
to be keys in the locks for the first floor (the current one) and
the basement. Back away, pan to your right, and click on the elevator
control panel. Click the right-hand yellow button to close the door.
Now back away, click on the number panel again, and hit the Basement
button to lower the elevator. Once it stops, press the yellow open
door button on the control panel, back away, turn around, and exit
the elevator into the morgue.
Head Games
Disembodied voices crying
for salvation, bloodied cutting instruments, perhaps a decaying body
hidden somewhere inside – fun for the whole family. Walk towards the
equipment in the centre of the room – yes, this is the control panel
for the guillotine you can see in the background. Hmmm…we need
a head, and we’ve got a method for detachment – all we need is the
body.
Proceed to the right of
the control panel to stand to the right of the guillotine. Looks like
its seen some use. Turn around and face the wall of cadaver drawers.
Have some fun by opening random drawers looking for something to hack.
The actual drawer you are looking for is found 4 “columns”
from the corner you are standing next to, and three rows up from the
floor. Once you’ve found the body, pick it up, turn around, and place
it into the pan located behind the guillotine’s blade.
Walk back to the control
panel, click on it to get a close-up, and hit the lever on the left
to lift the pan holding the body up into position. Hit the middle
lever to raise the blade mechanism up into position, and then do the
deed by pressing on the right lever. Back away, walk to the guillotine,
and pick up the now-severed head which sits in a bowl. Walk back into
the elevator, click on the control panel to close the door, and hit
“1” on the number pad to go back up to the ground floor.
Whew, glad that’s over!
Once the elevator stops,
remember to open the door on the control panel before leaving. Turn
to your right, walk two steps forward, and enter the lab to your right.
Walk up to the “head” counter, click on the empty spot,
and place your head there. Hit each of the 5 buttons below to hear
various messages from the head’s former owner. Among other things,
he tells us that he had to swallow a key that he stole, and lets us
know his secret: 36-24-36. Could this be part of the combination code?
Bloodletting
Back away, turn left, and
walk to the discombobulating machine in the corner. Click on the box
to the left, then at the box’s top to see the combination tumbler.
Input the five number code that you’ve put together from the head
(36-24-36) and the illuminated box (20-18). Click on the ticks that
correspond to those five number in order, and the box should open
(its kind of finicky, so keep trying).
Grab the container of what
looks to be blood from the open box, and back away from the machine.
Be sure not to hit any of the buttons on the control panel before
you grab the container, or the machine will pitch it into the hole
in the wall behind the equipment
Proceed over to the other
side of the room, click for a close-up, and place the container into
the clamp above the glass receptacle. The machine will automatically
pour the container into the receptacle below, and toss the empty container
into the dumpster to the side. Click on the receptacle, and grab the
key which now sits inside. Move back to the centre of the room, and
leave via the door. Turn to your right, take two steps forward, and
get into the elevator on the right.
Weady to Wobble
First close the door via
the control panel, and then place the key in the slot for floor “20”
on the number panel. Once you reach the top floor, open the door and
get out. Turn to your right, and take a step forward. That peculiar
noise you hear is coming from the inaccessible, strangely wobbling
door off to your right. Take another step forward, and enter the room
to the right.
Walk towards the medical
equipment at the end of the walkway, and then turn to your left when
you reach the end. Approach the microscopes on the bench, and click
on each in turn to see the stages of conception. Afterwards click
on the books on the bench, and glance through “The Embryo”
– mystical conception indeed!
Turn around and approach
the bloodied examination table. Click on the needle on the table’s
surface, and click again to see Sartorius and Malveaux try to convince
Zoe Wolfe to undergo an important fertilization procedure. Disturbing.
Now walk to the other side of the room, past the control panel for
the creepy looking chair off to the left, and click on the drum sitting
here. A crazy lady comes out and tells us that our appointment is
waiting.
Back up, turn to the left,
walk towards the chair, and get in – the crazy lady is back, and zaps
us with juice. After its over, our vision is wobbling like crazy –
just enough to get through that wobbly door back out in the hallway.
Head out of the room, turn to the left, walk a step, and turn to the
left. Enter the wobbly doorway, and step into the elevator on the
other side. If you lose your “wobbliness” before you can
get to the door, just go back into the room and sit in the chair for
another zapping.
This elevator is simpler
to operate – just click on the control panel and click the left button
to go up. Once it stops, turn around and walk out into Sartorius’
inner sanctum.
The Intimate Sartorius
This room contains a lot
of personal effects of Sartorius. Turn immediately to your right to
see some lab equipment. Back up, move another step into the room,
and turn to your right to view the doctor’s diary – evidently he’s
having trouble living up to the legacy of his father. Another step
forward takes you into the corner, with several pictures to see and
letters to read. Once finished, turn around, take a step back towards
the elevator, turn to your right, take a step forward, turn to your
right towards the bed, and walk towards it. Click on the box on the
bed to open it, and grab the axe inside.
Back up a step, turn a
bit to the left, and walk into the corner of the room. Straight ahead
you’ll spot a miniature replica of the asylum. Click on the switch
at the model’s base to open up a small window at the top of the tower.
Back up, turn around, take a step towards the far wall, and turn to
you right. The open book here, “The Blood Alchemist”, speaks
of the elements, and includes an instruction list for creating tin:
- Given that Flourine
is present in the atmosphere - Helium raises
- Oxygen alone is without
effect - Hydrogen and Oxygen
burn cooly and create water
The other book contains
some humorous information on miniaturization. Be sure to click on
Sartorius’ diplomas on the wall to the left of the books – he appears
to be proud of his accomplishments and his expulsions. Back away,
turn to your left, take a step forward, turn to the right, and walk
through the open doorway.
Give Yourself a Hand
You’ve walked into another
wheel-shaped room, with a doorway directly in front of you. Click
on the electrified keypad to get a close-up, but don’t touch it again
– you will be sent packing in a most unfortunate way. Instead, back
away and look for something that can be used to touch the lock without
frying yourself.
Turn to your right, and
walk forward. As you walk around the circular room, you will see a
number of “displays” to your left that consist of wired-up
body parts that jiggle and move when electricity is applied to them
via the button below. On display is a torso, a brain, a skeleton,
and an arm with the hand attached. None but the hand will be any help
here. Take out your axe, smash the glass protective shield, and then
grab the arm.
Walk forward one more step
to reach the two doorways again, and turn to your left to view the
electrified keypad. Click for a close-up, and then use the arm to
unlock the door (apparently the fingers have been here before). Walk
into the inner room, click on the ladder once to look up, and again
to climb.
Pushing Tin
You arrive at the top and
step onto a rooftop laboratory with two large pieces of equipment:
a sink and set of tanks to the left, and a large gas mixing chamber
and cylinders to the right. Approach the sink first, and look at the
tanks – evidently something’s not working, because each has a red
light lit up on it. Click on the sink to get a close-up, and click
on the tap in the centre to fill the sink with water. Now click on
the switch near the back right corner of the sink to drain the water
into the tanks, each of which now shows a healthy green light indicating
they’ve been filled.
Walk over to the gas mixing
equipment – you’ve got a central gas mixer (made of glass), a helium
tank to the left, and a spark switch to the right. Click near the
top-right corner of the screen to examine the oxygen and hydrogen
tanks to the right of the spark switch. Currently, the oxygen tank
is turned on, and the hydrogen tank is off. Since we know that oxygen
does nothing by itself, switch off the oxygen tank using the toggle
lever at the top of the cylinder, and switch on the hydrogen.
Back away to face the gas
mixing chamber, and click on the spark switch to get the gas fired
up. The metal present inside the mixer turns a hot orange colour.
Time to cool it down. Since we know oxygen and hydrogen will burn
cooly and produce water, click to the right to see the tanks, turn
on the oxygen tank (leave the hydrogen tank on as well), back away,
and hit the spark switch.
The resulting reaction
cools the molten tin. In order to grab the newly created metal, click
on the helium tank switch, which raises the mixer cover. Click on
the tin symbol to reclaim the lost metal and be transported back to
Zork. Back at the altar, click on the new symbol to set it into the
surface, and then click on the pool in the centre for a quick vision
of Sartorius burning – is that how he died?
Once again, walk to Sartorius’
coffin to hear him speak (it’s the first from the left). He admits
that they weren’t innocents, but Alexandria’s conception was necessary
to save the land and to locate the quintessence. Maybe so, but the
whole thing is rather creepy.
I’m On Fire
Make an about-face, walk
to the right of the dais, and cut over to the left to the dome-covered
transporter room. Walk down the stairs and approach the orrery. Grasp
the right knob, and turn it clockwise just a tiny bit (maybe two or
three notches – keep it at the 9-o’clock position) until you hear
the bell tone. The transporter will whisk you away to Malveaux’s monastery
on Saturnax.
Saturnax is a fiery-lava
filled land, and the monastery is perched on a big mound of what looks
to be basalt. From your initial position, turn around to see the small
planet that will take you back to Zork if need be. Now turn to your
left, and walk through the doorway here. There’s a plaque on the rock
wall to your left that is mildly interesting. More importantly, pan
to the left until you find the yellow down-pointing arrow near the
right side of the doorway. Look downward, and click on the funny looking
clump on the ground – you will uncover a coin here. Pick it up, and
back away.
Advance back through the
doorway, and continue straight ahead through the next one as well.
Now click on the stairs in front of you to ascend part of the way
to the monastery. Click again on the stairs ahead to climb to the
top. Walk towards the building, and then toward the main doorway off
to the left a bit. Walk right up to the door and click on it – you
can pound and pound, but you won’t get in. Click on the door’s note
to see why – closed for exorcism.
Pay Your Dues
There’s got to be some
way in – turn to your right, and click between the two pillars there
to get a close-up of a tunnel leading down into the ground. Another
click sucks you inside the monastery’s front room. To the left of
the door you’ll find a wooden box, and a framed picture on the wall
which says “Donate Now”. What are you waiting for? Grab
your coin and insert it into the slot at the top of the box. A series
of papers will drop out of the box on the right side. Grab them and
start reading.
The papers show a series
of symbols that represent emotions. These symbols are important, so
pay attention!
- a face with a long,
narrow upright mouth represents fear - a face with slits for
eyes and a wavy mouth represents anger - a single flat line represents
boredom - a large upturned curve
represents happiness - the outline of someone’s
back represents sensualness - a face with wavy eyebrows
and narrowed eyes represents suspicion
Once you are done with
the papers, they disappear. Pan to the right and click on the bulletin
board to the right of the door. The notes and pictures here mentions
more Zorkian jokes (try typing “hello sailor” into your
keyboard right now!), and one grisly story about a monk who was drawn
and quartered for messing up the ringing of the 7th tone.
Back away, turn around,
and make your way through the front room via the centre aisle. In
the centre of the room click on the yellow up-arrow to see a full
view of the giant flame displayed. Back in horizontal panning mode,
continue forward, and up the stairs at the end of the room.
Getting Emotional
Look to the left and right
of your current position – you’ve got 3 sculpted heads on either side,
with four large urns situated below. Click on each of the urns for
a close-up; inside each you will find two emotion symbol tags that
can be picked up – six will be familiar, and two will not. Now click
on each of the six heads to hear them speak – their emotions should
be fairly evident from the tone of their speech and the look on their
faces.
Note the empty slots under
each head. Match the proper symbol tag to its head: on the left side
(from left to right) place the fear, anger, and bored tags in the
slots; on the right side (from left to right) place the happy, sensual
and suspicious tags in the slots. Once you’ve matched the 6 tags (the
other two were red herrings) to the correct heads, the poem is recited
in correct order. Pay attention to the order of the speakers, this
becomes important later: anger, suspicion, sensual, bored, fear, and
happiness.
Walk forward a step, and
turn to your left. Proceed straight ahead and enter the darkened room
before you. This is the base of a tower, with a central spiral staircase
leading upwards. You can switch to vertical panning to see the full
extent of the stairs above you. Click on the bottom of the stairs,
and eventually you will make your way up to the top. The large contraption
with the ropes and all the buttons is the bell-ringer.
Click on the framed picture
behind and to the left of the ringer. This sheet gives the codes for
the different bells for the monastery, with the previously mentioned
“7th Bell” left blank on the bottom. Although we’ve already
worked out what the 6 buttons are to ring the 7th bell, let’s leave
this for a bit and come back to it. Turn to your right, and walk along
the catwalk a few steps. Turn to your left, and click on the wooden
doors to open them.
Oh, Brother!
You step through into a
hallway lined with bedrooms for the brothers who lived at the monastery.
Immediately to your left and right you can peek into the rooms of
Ben and Cilius (note the still-lit candles). Another step brings you
to Brother Andrew’s room on the left, and a staircase leading upwards
– the nameplate beside the stairs reads “Brother Malveaux”.
Click on the stairs, climb to the top, and bang on the door – you
won’t be getting through here any time soon. Retreat down the stairs
and take another step along the hallway.
On the left you’ll glimpse
Will’s room, and on the right – Alexandria! We’ve found our child
from the Asylum. Click on the door to open it, and walk through –
we are immediately greeted by the cries of the baby Alex – evidently
she was brought here after her birth. Walk to your left, turn to your
right and take a step forward. Now turn to your right and click on
the sheet music to watch a movie of the child Alexandria playing violin
for her adopted daddy.
Back away, walk forward
into the corner, turn to face the bed and walk forward. There’s a
diary lying up against the wall here that gives you a look into the
young Alexandria’s mind. Now approach the bed and click on the violin
to get a tune to explore by. Turn around, walk to the door, click
on it and leave.
Continue down the hallway another step – Brother Steve’s room is to
the left, and a closed wooden doorway lies directly ahead. Click on
the door to open it, and step into Malveaux’s study.
Memoirs of Malveaux
There are photographs hanging
on the wall on either side as you enter the room. Oddly enough, the
guy in the photo on the wall to the left looks like George Hamilton
(he of the Day-Glo tan), while Malveaux seems to be hanging out with
John Forsythe from Dynasty in the photo to the right. Continue into
the room, turn left when you get to the desk, and approach the medical-looking
book on the table. This book contains some letters from Sartorius
to his father (who may have come to the monastery in the last stages
of his life).
Sneak a peak at the kewl
candles, turn to your right, and walk forward. You will find a set
of scales and a flat looking glass object on the counter here. Click
on the looking glass, and read the passage it magnifies. You can now
take the glass with you. Pan to the right, and walk around to the
far end of the central desk. Walk into its centre, and approach the
items in the middle.
Click on the urn on the
desk to send a cloud of smoke into the air, which triggers a vision
of a discussion of the Nemesis between three of the alchemists. Now
click on the letter in the very bottom left corner of the screen –
it identifies the glass thing we picked up on the counter as the Implementor’s
Eye. Now turn around and exit the central desk. Turn to your right,
and approach the letters on the counter. Both are written by Sophia,
and detail Alexandria’s life at the Conservatory, and her worrisome
love for Lucien, Kaine’s son.
Move to the right along
the counter, and examine the book on the counter here to the left
– it contains a letter from Sartorius. Make your way forward, exit
the room, proceed along the hallway to the far end, and re-enter the
bell tower. Walk around the catwalk until you are positioned directly
in front of the bell ringing apparatus. Click on its base to get a
closer look at the keys, and key in the six symbols representing the
emotions of the six sculpted heads back in the front hallway. The
order to hit the keys matches the order of the poem’s lines that were
read by the heads: anger, suspicion, sensual, bored, fear, and happiness.
In the Bedroom
We see a rope descending
from a trap door over to your left. Walk over to the rope and click
on it to go for a quick ride. That window you see as you quickly hop
up and down on the rope is your destination – click on it as you go
up, and you are shot out onto an exterior second floor balcony. Pan
to the right, and follow the balcony for a few steps. Then pan to
the right again, walk forward under the covered portion, and then
turn to the right once more – you should spot an open doorway in front
of you.
Enter Malveaux’s bedroom
– turn to your left and step into the room. There’s a small table
to your right that contains a funny looking disk, and a picture of
Alexandria. Back away, and move towards the wall with the windows
– now click on the same table again, and again on the disk. We see
a short movie showing Malveaux agonizing over the choices he’s made.
Turn around and approach
the bookcase immediately to the left of the windows. Click on the
book located front-and-centre, and read a passage from Malveaux’s
journal. Now turn to your left, and walk towards his bed (you can
stop at the door and pound away, but you won’t get through). Standing
facing the bed, examine the painting on the wall – the five flames
are coloured (left to right) blue, yellow, red, orange and white.
There’s another book lying
on the bed – click on it to see a blurry image. Didn’t we read that
the Implementor’s Eye helps to clear up images? Grab the glass item
and click on the book to reveal a picture detailing 5 skulls in various
positions. If you follow the path of the pink ribbon, the five skulls
face the following directions in order: front, left, front-right,
front-left, and right.
Turn around and find the
important book on the bookcase here (try the 5th book from the left
on the middle shelf). Click on the book to send you down a secret
passage that deposits you near the talking heads on the ground floor.
Never fear though – you can return to Malveaux’s bedroom if you so
desire by turning around and clicking on the wall straight ahead.
Chapel Madness
Move forward a step, turn
to your left, and take a few steps towards the wooden door ahead.
Click on the doors to open them and enter the monastery’s chapel.
This is a pretty bare-bones place – walk forward until you are almost
to the garish altar at the end of the room. A lonely brother scurries
out from behind the altar (you may recognize Horace from some of the
photos), and tells you the place is haunted. He is quite mad, and
the screams send him over the edge.
Once he’s cleared off,
turn to your right and enter the bapistry straight ahead. Approach
the font in the centre of the room, and click on it to see Alexandria’s
baptism. Pan to the right, and walk into the far corner of the room.
Find the yellow down-pointing arrow, and look down – there’s a loose
grate on the floor here. Click it twice to shift it from side to side,
and pick up the note that will be visible on the left side of the
grate.
The paper says “OPEN”
at the top, and gives a set of example words (“push on the glyphs’)and
the corresponding ornate symbols for each letter. Of course, its easy
enough to figure out the correct symbols for “OPEN” using
the example words: O = infinity (sideways “8”), P = fork
with a cross at the base, E = a curvy snake, and N = a little stick
figure with lines coming from the head.
Back away from the grate,
and return to the outside hallway via the chapel. Take a step out
into the hallway, turn to your right, go forward, turn to the left,
take a step forward, and enter the room on your right.
Difficult to De-scribe
You enter the scribe’s
room, with writing desks set up to the left and right. Step into the
room, and walk down the aisles between the desks to the left and right.
You can examine the books that the scribes were working on, but there
aren’t any clues here, nor any reading material. Make your way back
to the centre aisle, and continue into the room. Malveaux’s desk is
straight ahead – click on the book here, and watch a scene where Malveaux
has apparently agreed to marry Alexandria and Lucien. But he’s double
crossed them, and Kaine storms in to arrest Lucien; Alexandria turns
for help, but Malveaux has slipped away.
Pan to the left, and spot
the left-most book displayed on an upright display bench. Walk over
to the book, and read about the merchant Yoruk and his journey into
the Underworld. The story continues in the book immediately to the
right. Once your done with it, turn around and walk over to the two
books on the other side of the room to finish the story. Yoruk uses
a shield with 5 imbedded rubies to get past the guardian demon.
After you’ve finished the
story, pan to the left and walk towards the back of the room. Now
turn to the left, and walk towards the open door ahead. Walk through
the door into the museum. You can walk along the balcony that circles
the room on this level, but none of the other doors open, and there
aren’t any accessible ways down to the ground floor. Return to the
corner where you first entered the room, and walk to the centre of
the intersecting pathways.
Click on the central pedestal
to get a close-up view of some sort of dial mechanism with familiar-looking
symbols placed in a circle. Time to use the information learned in
the chapel to open the way ahead. Click the symbols for the four letters
in OPEN to unlock a gate down to the ground floor of the room. The
correct symbols are at the 2 o’clock, 10 o’clock, 3 o’clock, and 12
o’clock positions. Back away from the pedestal, turn around, take
one step towards the open doorway, and turn to the left. A gate with
a opened lock lies in front of you – click on the door to descend
into the museum.
The Grand Tour
A female voice immediately
warns you that the premises are protected from theft. Since you will
need several items from the museum displays, you’ll have to de-activate
this protection system. A little more information on the theft protection
system is available on a placard to the right of the stairs behind
you.
Turn around to face away
from the stairs, and spot the blue mushroom-shaped item to the left
of the central pillar. Walk to the left of the mushroom item, then
turn around and face it. One click will open the top of the mechanism,
and another click on either of the two red buttons inside deactivates
the theft protection system. Thought it was going to be harder, didn’t
you?
Now its time to take a
tour around the museum to see what we can find. Turn around and face
the set of table and chairs in the corner of the room, and click on
the bookcase to the left. There’s an hourglass here that looks interesting.
The next bookcase to the left contains some scrolls of historical
importance. Back away, pan to the left and step forward. You can now
access another bookcase (containing a magic wand), and two sculptures.
The one to the right is a neat little serpent number, while the one
to the left contains a large ruby stone (from Yoruk’s shield, no less).
Click on the stone to grab it, and back away.
Another bookcase to the
left of the statues has a spell book on it. Pan towards the left,
and walk a couple of steps past the staircase (to your right) to the
other side of the room. The bookcase to the left of the stairs contains
more scrolls, and there’s a neat globe in the corner of the room here.
Click on the bookcase to the left of the globe to view a replica of
the famous shield, as well as a torch hanging on the wall. Grab the
torch, and back away.
The remaining displays
about the room contain a large blue jewel, a glowing stick and a sword,
a shroud, a sheath, a crystal ball and a bowl of “Sacred Granola”.
Once you’ve seen them all, return to your spot standing in front of
the blue mushroom object. Turn around to face the table and chairs
in the corner again, and pan to the right – you should easily find
the downward pointing arrow here. Look down to spot a trapdoor in
the floor, and click to travel downward.
Tales From the Crypt
You will find mummies staring
at you from the left and right – click on their heads to hear messages
about the shield again, and a warning about flames. Walk forward into
the darkened passageway. Instead of walking towards the fire-lit doorway
to your left, head to the right of the pillar in front of you. Go
straight ahead, pan to the right, and walk towards the strange looking
gate (there’s another narrow passage here that leads off to the left
to a room filled with coffins, but it’s a dead end).
Walk forward towards the
lone burning torch in the wall. You hear some ominous grunting and
moaning in the darkness to your left, but resist going off in that
direction yet (unless you want to meet a Grue face-to-face, and die
in the process). Click on the flame for a close-up, grab your torch
from inventory, and light it. Now you can turn to your left, and walk
in that direction. Ignore the empty torch holder set into the wall
to your right, and instead click on the crypt to your left.
Click on the plaque on
the front of the crypt to see whose final resting place this is: Yoruk!
Now click on the crypt lid to climb into your new bed. Click on the
lid to close it (I know this is against your better judgement). You
should now see Yoruk’s actual shield set into the bottom of the lid,
with a missing spot in the centre. Grab your ruby and place it into
the shield. Now take the shield, click to the left of the lid to open
the crypt again, and climb out.
Leave this room via the
open gate as before, and walk forward – proceed up the stairs to your
left, and the click on the fire-lit doorway to the right. You enter
a dimly lit room of unknown purpose. Walk forward until a wall of
flame (and the voice of Nemesis) blocks your path. Take out Yoruk’s
shield and click on the fire to clear a path forward.
Step straight ahead until
you reach the wall at the far end. There’s a closed door to your left,
and a bench to your right. Click on the bench to see a set of five
skulls laid out. We know the correct orientation of the skulls from
the Implementor’s eye view in Malveaux’s bedroom: front, left, front-right,
front-left, and right. Change the angle of the skulls by clicking
either on the left or right side of the skulls. After the correct
sequence is achieved, the door behind you opens to reveal Malveaux’s
secret alchemist lab.
Heavy Metal
Walk forward into the room,
and angle off to the left of the central pillar. Turn to your left,
and approach the stone bench here. There’s a small piece of metal
and a brass key on the bench to be picked up, plus a book on alchemy
to peruse. Back away, turn to your right and approach the equipment
here. Turn to your left, and click on the machinery for a close-up.
You first must unlock the mechanism by clicking on the handle of the
small metal panel set into the wall – this reveals a recessed compartment
with a keyhole in it. Place the key into the keyhole, and click again
to spin it around for a bit.
Click on the gold coloured
lever on the controller to move it to the right, and the egg-shaped
thing on the left opens. Place your small metal piece in the central
bowl, and then click on the gold lever again to close and spin the
egg. Hit the lever one last time to open the egg again – our jagged
piece of metal has been transformed into a sphere. Pick the sphere
up, and back away form the equipment.
Turn to your left, and
walk back towards the door – turn left again, and walk towards the
equipment on the other side of the room. In the close-up view, click
on the left side to show a container suspended over a bath of liquid.
Place the sphere in here, and back away. Now click on the weight hanging
close to the ground on the very right side of the equipment to bathe
your sphere in the liquid. When its done, click to the left again,
and retrieve the now polished sphere from the container.
Old Flame
Back completely away, and
walk back to the other machinery on the other side of the room. Facing
the equipment with the small flames and the lion’s head, turn around
to face the central pillar, and click on the pipe here to see a wheel
valve attached to some piping. Click on the valve to turn on the flow
of lava to the equipment. Now back away, and face the flame equipment
again.
The flames that are shown
must be set in the same order as the painting in Malveaux’s bedroom:
from the top down, the order should be blue, yellow, red, orange and
white.
Click each of the flames to change them to the correct colour sequence.
Now grab the silver sphere, and click the lion’s head to send it into
the mechanism. Find the downward pointing arrow and look down to see
the molten metal ooze in a cup on the floor. Finally, click on the
bellows to the right to change the molten metal into a symbol of lead.
Click on the symbol to
transport yourself back to Zork, and click again to push the symbol
it into the surface of the altar. Touching the central pool of liquid
brings about a vision of Malveaux being stabbed. Now walk over to
Malveaux’s coffin to hear how sorry he is for hurting Alexandria.
Take an “about-face”
and proceed behind the central dais to the transporter room under
the dome. Approach the orrery, grab the brass lever on the right,
and twist it around to the 2-o’clock position – when you hear the
ding, let go. You are transported to the sandy dunes of Murz, home
of Kaine’s fortress Irondune.
Soldier of Misfortune
You begin on the lookout
turret of Irondune, staring at the planet that will take you back
to Zork with a click if you so desire. Spin around and take in the
view – lots and lots of sand. Locate the lever to the left of the
planet, and click it to descend into the keep. By now you’ve probably
noticed the sound of guns and battle cries in the background – apparently
we’re under attack.
Exit the elevator onto
a balcony overlooking the front room of the complex – stairs descend
off to the left and right. Walk to the left, and descend down to the
ground floor. There is a large fortified door immediately to your
left as you reach the bottom of the stairs. You can walk forward and
examine the door, but there isn’t any way through. Pan around and
face the suit of armour standing to the left of the door. Upon closer
inspection, its missing something at its belt, and its visor can be
moved up and down.
Back away, and walk out
into the room towards the large gun in the centre. You can’t really
examine it, so turn towards the front wooden doors of the keep, and
walk towards them. Click for a close-up, and then click again to open
the door. An old soldier comes and tells you that it isn’t safe to
come out since Irondune is under attack.
You can examine the two
paintings to the left and right of the wooden doors if you wish. Pan
to the right, and approach the other fortified door on this floor
– it’s located directly across the room from the first, and cannot
be opened. Examine the suit of armour here as well – this one is not
missing anything at its belt, although its visor can also be manipulated.
Back away, and walk to
the base of the stairs located nearby. Walk up the stairs, turn to
the left, and follow the passageway up to the top. To your left you
will find a third inaccessible fortified door, and a suit of armour.
Pan back to the right, and enter the doorway ahead.
Letters From the Front
Kaine’s bedroom contains
bookshelves to the left and right as you enter his room. You can examine
the second shelf from the ceiling on the right-hand side, but there
isn’t really anything there. Instead, move towards the desk to the
left of Kaine’s bed, turn around, and click on the desk to examine
it. The most obvious clue is the note visible on the top surface –
it’s a threatening letter from Ellron, Kaine’s enemy.
Back away, and click on
a small drawer on the left side of the desk, just below the top shelf.
Inside, you’ll find a small vial of nitro, and a note mentioning something
about 5 knights – 3 that are blind, and two that can see. Is this
referring to the suits of armour? Back away, and click to view the
right side of Kaine’s desk. Open up a similar drawer on the right
side to find several more letters (a fallen ally, missing gunpowder)
and a picture of Sophia. Are they sweet on each other? Hmm…
Back away, and walk to
the centre of the room. Turn around and click on the note now visible
on the front side of the desk – it’s a message reminding Kaine to
get more nitro. Now turn to your right, and click to the left of Kaine’s
bed. Examine the photographs next to the bed – Sophia and Lucien.
Return to the centre position, and walk to the right of the bed to
examine a page from Kaine’s diary. He suspects his son of stealing
items, including the gunpowder.
Return once more to the
centre of the room, and click on the trunk at the foot of the bed.
Its locked, so grab the vial of nitro and click on the lock to blow
it to smithereens. Inside the trunk, you’ll find a stack of letters
on the right – several love letters from Sophia, and something about
a cat-shaped cannon. There are also two scrolls on the left – the
left one shows a good map of the Forbidden Lands (was I the only one
who thought we were travelling to different planets?!?), while the
right one shows some battle plans. Evidently, Kaine plans to “build
bridges while enemy is distracted”, “split troops”,
“distract enemy with powder”, and “infiltrate”.
Back away from the trunk,
turn to the right, and walk into the alcove. To the left, find a scrap
book with pictures of Kaine’s young family, a note about casting iron
(not too hot or cold!) and several newspaper articles about the war
with Ellron. Back away, turn around, and examine the book on the left
– it contains information on encryption, with several passages circled:
“codes…must be hidden”, “don’t have to hide”,
and “encryption is a game”. The letters beside the book
are notes from Sartorius about the use of air as a purification instrument.
War Games
Exit Kaine’s room, pan
to the left, and proceed up the set of stairs ahead. After two steps,
turn to your left and enter the games room. Take a step forward towards
the game tables, and click on the foozball table to the right. A click
on the player handles will give the game a good spin.
Back away, and approach
the pool table to the left. Click on the rule sheet, which is posted
on the wall to the left of the table. Numbers 3 “Fishing in the
Desert” and 5 “Shoot” look particularly suited to our
current location. Click on the table to get a better view of the proceedings.
Clicking buttons 1 through 4 will set the pool shots up by loading
the balls into the mechanical arm (which racks them up) while button
5 initiates the shot. Hit Button No. 3, and then Button 5 to shoot.
Now click on the window in the side of the table (to the right of
the buttons) to see the alignment of the balls, which yields a 6-digit
number: 741953.
Back away from the table,
turn around, and exit the room. Turn to your left, and descend
the stairs. You are staring at a fourth fortified door, and corresponding
suit of armour. Turn to your left, and enter Lucien’s room.
The Kaine Mutiny
Take several steps into
the room, turn to the left, and walk to the left of the bed. Examine
the mirror on the wall straight ahead, and note the piece of paper
in the bottom left corner – its Lucien’s draft notice. Back away,
turn to your left, and look down using the yellow arrow. There are
two odd items lying on the floor here: a sack of gunpowder is hidden
under the bureau (you can just see the side of the bag), and a note
from Kaine lies to the right. Read the note, take the gunpowder, and
return to the centre of the room.
Pan to the left and click
on Lucien’s desk for a close up. There are two pieces of paper on
the desk; one describes Kaine’s experiments with Thaddium, a highly
explosive substance, and the other is a love letter from Alexandria.
Back away, turn to the left, and click on the easel to the right.
Grab the paintbrush at
the base of the easel, and rub it (hold the left mouse button down)
over the canvas. You should be able to slowly uncover the hidden message
beneath. The message consists of twelve numbered commands:
1. build bridge
2. ambush
3. dig trenches
4. latrine cleaning
5. coup d’etat
6. infiltrate / destroy
7. serve meal
8. burn / pillage
9. split troops
10. distraction
11. drop thaddium
12. verify message
Several of these commands
look familiar (we saw them on Kaine’s battle plans), but we’ll have
to wait to see how they will be used. Back away, turn a little to
the right, and click on Lucien’s paint palette to see a movie of Kaine
counselling Lucien to be discrete about his affair with Alexandria.
There are also several pictures hanging on the wall, and in the fireplace
that can be examined on this side of the room.
Blasting Cats
Make your way out of Lucien’s
room, descend the stairs ahead, and return to the ground floor of
Irondune’s front room. Walk to the gun in the centre room, and turn
around to face away from the main wooden door. Click forward and enter
the parlour.
Turn immediately to your
right, and pick up the broken sword hilt that is in front of you.
Now turn around and face the other way. This is the famed “cat
cannon” that was mentioned in one of Kaine’s letters. Click on
the end of the gun’s barrel to get a closer view. Clicking on the
cat’s right ear causes the bowl of bones to lift up and dump its contents
into the gun.
Back away and click on
the cat’s bum to get a close up of the back of the gun. Click below
the cat’s tail to open up the gun, and click again to get an interior
view. This seems like a logical place to deposit the gunpowder, so
do so. Back away, and click on the cat’s tail to fire the cannon.
The doorway on the far side of the room is now demolished, allowing
you to enter.
Back away from the cannon,
and walk two steps further into the room (past the chairs, tables,
and piano). Turn towards the fireplace to the left, and walk towards
it. The sword hanging from the mantle looks like it could use a hilt
– take the broken sword hilt out and click on the broken end to restore
the sword. We are treated to a movie in which Kaine goads his son
into fury by insulting his lovely. Once the movie is done, take the
sword, and back away. Continue through the room, and enter through
the doorway at the end.
The Art of War
The smallish room at the
far end of the parlour contains six wooden displays, five of which
depict famous battles in Zorkian history. The sixth display (second
one from the right) contains some sort of communications device. Step
towards each of the displays, click on them to open the display case,
and hit each of the three (or four) red buttons to hear about the
significance of the battles. Each one suggests a certain tactic:
- Fort Griffspotter –
Infiltration - Flood Control Dam 3
– Distraction - Stonewall – Split Troops
- Yipple Rebellion – Build
Bridges - Diablo Massacre – Decoy
The first four tactics
are on the list of twelve hidden under Lucien’s easel, while the fifth
is not. Open the communications device, and note the input screen
to the left. We must enter a string of five numbers that represent
commands for the old soldier to carry out. Based on the battle plan
in Kaine’s room, and the displays in this room, we have a fairly good
idea on what four of the five numbers are, but we’ll need more information.
Exit the display room,
and return to the front room of the keep. Walk to the centre gun,
turn to your left, and proceed to the fortified door straight ahead.
Turn around, and click on the suit of armour standing here. Remember
that it was missing something at its waist. Grab the sword from your
inventory, and click on the knight’s waist. The doorway behind you
rumbles as it opens.
To See or Not to See
Step into the armoury,
and examine the display cases to the left (powder) and right (archery).
Walk forward to the right of the stained glass windows. Examine the
displays straight ahead (weapons) and to the left (“The Age of
Kaine”) inside this nook. Be sure not to touch the funny shaped
bottle with the lights, nor the item to its right – we’ll come back
and deal with this very dangerous material later.
Walk towards the door on
the other side of the room, and note the suit of armour standing to
the left – this makes a total of five knights. Displays can be found
to the left (the future) and right (barbarity). Turn around, and walk
towards the stained glass windows behind you. These represent the
five knights (suits of armour) found around the keep.
Remember Kaine’s notation
about the knights (something to the effect that two can see while
three are blind). Examine the five windows by clicking on each one;
from the left, the first two knights have their visor down, the next
two have them up, and the fifth has his (or her) visor down. Pan to
the left, and walk back over to the knight located within the armoury
– this knight corresponds to the second stained glass window (from
the left). The knight’s visor is already down, so nothing needs to
be changed here.
Exit the room, and click
on the knight outside the door (this one corresponds to the fifth
window from the left). This knight’s visor is already down, so nothing
needs to be changed here. Walk across the keep’s front room to the
other knight on this floor – this one corresponds to the third window
from the left. This knight’s visor is down, so click it once to raise
it up. Now back away, walk forward, and go up the stairs to your left.
At the top of the stairs,
turn to your left and approach the knight here (this one corresponds
to the first window from the left). Switch this knight’s visor to
the down position, turn around, and walk up the ascending stairs.
Keep moving forward past the games room until you reach the final
knight outside Lucien’s room. This one corresponds to the fourth window
from the left, so click on the visor to raise it up. A groaning click
indicates that the door inside the armoury has now opened.
What Geneva Convention?
Descend the stairs to your
right, continue to the ground floor of the front room, enter the armoury,
and proceed off to the left towards the newly-opened door. Walk through
the doorway, and descend to the dungeon. Turn to your left and walk
forward. There’s an open cell located immediately to your left; enter
the cell and examine the chalked message on the wall; apparently the
“man” symbol is important here. There are also two drawings
pinned to the walls above the bed that may be of interest. Evidently
Lucien has spent some time in here. Exit the room, turn to your left,
and enter the doorway straight ahead.
Welcome to Kaine’s torture
chamber. Begin your tour of his various information gathering tools
by clicking on the faint metallic outlines off to your right. Click
on the spinning blades to hear the screams of a victim. Back away,
and click on the table located to the left of the wall-light. Here
we find a skull crusher – click on the tool to hear more screams,
and a secret: “Code 9”. Back away, and move forward two
steps. You’ll find a rack on your right side, which yields more screams
and another code (6). A metallic wheel located straight ahead yields
another secret “3 equals retreat”.
Turn to your left, walk
forward, and click on the spiked chamber ahead; this yields “Code
10”. Now turn to your right, and click on the wheel located here,
which yields “Code 12”. Turn in the opposite direction,
and walk forward a step. On your right you will find a stock, but
no clues are forthcoming. Turn back, walk forward another step, and
click on the skeleton off to the left a bit; this yields “Code
12”.
Chain of Command
Back away, turn to the
left, walk forward, turn to the right, and exit the room. Walk forward
several steps, turn to the right, and exit the dungeon. Make your
way through the armoury to the front room; walk to the gun, turn to
your right, and enter the parlour. Proceed to the display room, and
open the 5th display from the left to access the communications panel.
From the phantom victims
in the dungeon, we know five code numbers: 9 (split troops), 6 (infiltrate/destroy),
12 (verify message), 10 (distraction) and 1 (build bridges). We were
also told that 3 equalled retreat, but since that doesn’t jibe with
what was on Lucien’s easel (3 = dig trenches), we can ignore that
one. The only problems is that we don’t know the proper order to make
the commands.
Let’s have another look
at that battle plan from Kaine’s room. It begins on the left saying
“could build bridges if enemy is distracted”, then (following
the red arrows) “split troops”, and “infiltrate…”.
This would place the order as 10 (distraction), 1 (build bridges”,
9 “split troops”, and 6 “infiltrate/destroy”;
followed by 12 “verify message”.
Using the up/down arrows
on the device, punch in “10 1 9 6 12”, and press the large
enter button to the right. The old soldier’s voice comes over the
speaker and tells you they’ve won the battle. Leave the display room,
and cross the parlour and the front room to reach the front door.
Click on the wooden door to receive congratulations from the old soldier.
Click on the door again to open it, and walk through.
Heavy Fuel
Proceed more or less straight
forward about five steps until you reach the general’s tank, and get
in (you will have to pan a bit to the left and right to find the proper
path). The tank has a control panel to the right (with a control stick
and a place to key in a destination code), and a doorway to the left.
The door doesn’t open, but there is a blue coloured tube to the left
of it – open it up to see that it is empty. Since the control stick
does nothing, its likely that this machine needs some fuel to operate.
Exit the vehicle, and walk
back into the keep (remember to pan a bit to the right or left to
find your way. Proceed off to the right and enter the armoury. Walk
over to the right to the “Age of Kaine” display and look
down. Click on the end of the black bottle to open up a small door
in body of the container. Now click on the other container to the
right of the bottle. Pick up the thaddium capsule (be quick, its poisonous),
place it inside the bottle’s compartment, and click on the end of
the bottle again to close the small door.
You only have a few minutes
before the container will blow up, so don’t dawdle. Pick up the bottle,
exit the armoury, and leave via the front door of the keep. Make your
way to the tank through the barricades, and get in. Turn to the left
to face the blue container in the corner, open it up by clicking on
its top, place the bottle inside, and close the container. The thaddium
is now contained, and will power your desert-mobile.
Turn around and face the
control panel; click on the small squares just to the left of the
sexy calendar. This brings up an input display requiring a six digit
code. Now, where did we get a six-digit code? How about the pool table
game? Using the arrow keys input “7 4 1 9 5 3” into the
display. Now back away, and click on the control stick to the right.
The vehicle takes off into the desert, pulls up to a cliff face, waits
for a door to open, and drives inside.
Pumping Iron
Leave the vehicle, and
enter the cavern ahead. You can walk forward to the wooden desk straight
ahead, but the books on the desk’s surface cannot be examined. Instead,
make your way over to the large machine on the left. Approach the
mould making machine, and click to get a close-up. The correct symbol
must be displayed on the right in order to construct the correct mould.
Build the symbol by choosing the correct squares from the eight on
the left, and then clicking the appropriate spot on the right.
Since we know Kaine’s symbol
is the male ( ) symbol, use the four squares across the top on the
left side to form the image to the right. Click on the first square
to the left along the top row, and place it by clicking on the top-right
square on the display on the right. The second square from the left
goes in the top left part of the display; the third square from the
left goes in the bottom left part of the display; and the fourth square
from the left goes in the bottom right corner of the display. Now
pull the lever to the right, and pick up the mould that comes out
below the 8 squares.
Back away from the machine,
pan to the right, and proceed down the passage leading forward. This
is a good spot to save your game since there is a timed sequence up
ahead. Get into the elevator at the end of the passage, turn around,
and click on the switch to drop the elevator. As you stop, a voice
tells you that you are in danger, and must leave immediately.
Pan to the right a bit,
and exit the elevator. Walk towards the funny looking keypad on the
right. This gadget sets the temperature of the iron, which has to
be just right. Start by hitting the RESET button, and then click on
different combinations of buttons to slowly raise the temperature.
When you get the right temperature (about half-way up the scale),
you will hear a “ding”, but it is easy to miss the temperature
and go too high (in that case just hit the reset button again). Hitting
the following combination of red buttons will set the correct temperature:
Back away, and walk towards
the final piece of equipment. Place the mould next to the silvery
pipe-thing on the left, and press the “arm” button. Once
the symbol is raised by the arm, press the “fan” button
to cool it to room temperature. Click for a close up of the symbol,
and again on the iron to send yourself back to Zork.
Press the symbol into the
altar, and click on the pool in the centre to see Kaine with his throat
cut. Walk over to his coffin, where he asks for your forgiveness,
and pleads to have Lucien brought back.
Follow the Music
Return to the transport
room behind the dais for the last time, and approach the orrery. Position
the right lever to the ten o’clock position, and you are zipped away
to Madame Sophia’s music conservatory on the banks of a wide river.
You begin your journey situated on a small balcony at the corner of
the building. Just click on the planet to the left of your starting
point to return to Zork; otherwise enter the building through the
open doorway behind you.
You will spot a music practice
area off to your right, and a staircase straight ahead (the wall to
your left has been destroyed). Walk forward up the stairs, turn to
your right, and proceed down the hallway. About half-way along, turn
to your left to see a picture of Sophia with all of her charges, including
Alexandria front and centre. Continue straight, turn to your right,
and descend the stairs ahead. Have a quick look at the record player
located almost directly in front of you at the bottom of the stairs
– there are several hot spots, but nothing to do here without a record
to play.
Back away, pan to your
left, and click on the picture hanging on the wall to the right of
the stairs – this is a diagram showing the positions of various instruments
in a Zorkian orchestra. The front row (left to right) contains a Violin,
a Nambino, a Miano and a Fleezle, while the back row consists of a
Wertmizer, a Gederaglini, a Frobophone and a Popperkeg (whatever THEY
are!). Back away from the picture, turn around, walk towards the centre
of the practice room, turn to your right, and enter the band area.
There are music stands
and chairs located in front of you, and to the left and right. Pan
off to the left a bit, and click on the yellow downward pointing arrow
to look down here. You’ll find four musical instruments on the floor
that you must pick up, including the following:
- A violin (“Boo
Dee Dah De Do Dee Dee Dah Doo”), - A stick with a gold
end (“Plonk Plonk Plink Plink Plonk Plunk”), - A round drum (“Boom
Buddah Boom Buddah Boom Boom Boom”), and - A saxophone-looking
instrument (“Hoowoo Doo Dooooooooo”).
Return to horizontal panning,
pan to the right, click on the downward pointing arrow, and pick up
the four remaining instruments:
- A gold and purple pipe
(“Hrrrm Hrrrrrr Hrrrm Hrrrr Hrrrr”), - An accordian looking
instrument (“Leeee Lah Leeee Lo Lah Lee Leeee”), - A curvy horn (“Whooo
Whoo Whooo Whaaa Whooo Whooo”), and - A small harp (“Blanga
Danga Donga Danga Danga”).
Return to horizontal panning,
and quickly mouse over the musicians’ chairs to find a number of hotspots
in the practice area. Clearly we must place each instrument in its
proper location within the Zorkian orchestra – however, we’ll need
to identify each instrument first. Turn your back to the practice
area, move forward, turn to your left, and walk past the record player
into the hallway ahead.
The Lobbyist
Click on the door ahead
to open it, and enter the main lobby of the building. Immediately
turn to your left, and walk straight forward directly towards the
poster for an upcoming concert. You pass a staircase leading off to
the left; we’ll come back here a little later. Click on the poster
to get a close up – looks like this was a concert given by Alexandria
and her violin. The poster is too damaged to stay up on the board
by itself.
Turn to your left, and
note the door to the Boiler Room – it’s locked, but you will be seeing
more of it later. Back up, turn around, and walk into the centre of
the room. Turn to your left, and walk towards the set of double doors
here – this is the entrance to the auditorium. Approach the doors
and click on them – a woman comes out and tells us we’ve missed the
show. We’ll try again later.
Turn around, and walk straight
across the room to the main entrance to the Conservatory. We can’t
open these doors, but there are objects to see to the left and right;
to the left find a plaque commemorating the building’s main benefactor
(our friend General Kaine), and to the right view a picture taken
during the building’s construction.
Return to the centre of
the room, turn to your right, and walk forward to the wall. On your
right find a deserted ticket booth that allows you to view a close
up of the ticket window. Back up, turn around, and enter the doorway
straight ahead.
Getting in Tune
This appears to be Sophia’s
office – surely a great place to find some useful clues. Turn immediately
to your left, and walk to the left of the grand piano. There’s framed
violin music on the wall to your left, but the main item of interest
here is the piano’s keyboard located to the right. You can click on
some of the keys, and the small red box above the keyboard on the
left side, but nothing seems to be working yet. Back away from the
keyboard, turn to your right, and walk towards the room’s entrance
again.
Walk forward one step into
the room, and turn to your right to see a small table. Click on the
box on the table’s surface to open it, and grab the tuning fork inside
the box. Now back away, and return to the piano keyboard. Grab the
tuning fork and click on the red box above the keyboard to place the
fork inside the box. Now click on the fork, and attempt to find the
piano key that matches this tone exactly. For those of you musically
challenged, the correct piano key is the 24th white key from the left.
You should hear a clunk the first time you hit the correct key.
Back away, walk to the
room entrance and take one step into the room again. Turn around and
click on the open portion of the grand piano to look closer – and
again closer – and pick up the key next to the piano wires – you dislodged
it when you hit that note.
Back away from the piano,
and turn around to face the small table again. Click on the collection
of records located to the right of the table. Flip the records over
by clicking on each in turn until you reach the fifth record (an introduction
to the orchestra). Take this record, and the sixth one as well – it’s
a recording of Alexandria’s live performance.
Back away from the record
collection, turn in the opposite direction and examine the far wall.
Click on the photograph of Alex above the book on the lectern, and
then click on the book. “On Music and Perfection” tells
us about the Violin, the Fleezle (the instrument that resembles a
saxophone), the Nambino (the round drum), and the Popperkeg (the stick
with the gold end). We’ve accomplished half of our instrument identification
task!
The Sound of Music
Turn towards Sophia’s desk,
walk to the right of it, turn to your left, and walk forward. Now
turn to your left and click on the desk itself. Click on the left-bottom
drawer on the front of the desk to open it, and click on the letters
inside. All of the letters are from Kaine, discussing the war, his
wife, and Lucien. There’s also a receipt for a gas recharge for Sophia’s
gas lamp (and a warning about leaving the key in the lamp’s keyhole).
Close the drawer, and open the bottom-right drawer of the desk. Inside
find some letters from Malveaux about Alexandria, Lucien and their
experiments, as well as some notes from Sartorius that discuss “…supersaturating
liquids in generation of large crystals” and the use of calcium
bromide for purity.
Click on the top of the
desk to get closer to Sophia’s gas lamp, and use the key from the
piano to unlock it at its base. Now find the pull cord for the lamp
(a very faint line just to the right of the lamp’s stem) and click
on it to turn the lamp on. The surface of the desk is illuminated
showing a plan of the Conservatory. Note the “woman” symbol
near the bottom of the plan – it’s located below (and to the right
of) the Boiler Room, which is below the Prop Room, which is below
the Stage. Note the “recipe” written on the plan: “Prepare
the boiling solution; Seed with crystal; Purify crystal; Ring notes
together”
Back away, walk around
the desk, and proceed back out to the lobby. Walk into the centre,
and angle off to the left towards the door marked “Practice”.
Walk through the door, and turn to the left to view the record player.
Take out the Orchestra Introduction record, and place it on the turntable.
Now click the lever on the right to power up the player, and then
click on the switch below the record to start your listening session.
The voiceover explains
the origin of the eight instruments, and plays a sample of each allowing
you to identify the four remaining instruments: the harp (a Miano),
the accordian (a Wertmizer), the gold and purple pipe (a Gederaglini),
and the curvy horn (a Frobophone). Take the record off the turntable,
and replace it with Alex’s live recording. Hit the right lever, and
the switch again to start the recording. Listen to Alex play the “Harmony
of the Spheres” (yet again), and then listen closely to the Zorkian
Conclusory Fanfare (note the instruments that play, and their order).
The correct sequence is Popperkeg, Nambino, Popperkeg, Wertmizer,
and Violin.
Musical Arrangement
Back away from the record
player, and walk back over to the practice area for the orchestra,
where you first picked up the instruments). Face the chairs on the
left side, and using your new knowledge of the instruments, and the
diagram showing where each sits in the orchestra, place the instruments
on the proper chairs.
On the left side, place
the Violin and the Nambino in the front row (from left to right),
and the Wertmizer and the Gederaglini in the back row. One the right
side of the orchestra, place the Miano and the Fleezle in the front
row, and the Frobophone and the Popperkeg in the back row. Once the
instruments are placed in the proper configuration, the sound of the
players tuning their instruments can be heard. Be patient – a recording
of Sophia criticizing Alexandria for lack of concentration plays in
a few moments. Be sure to note the string of notes that Sophia mentions
several times: C D E B G.
Leave the practice area,
and return to the lobby through the door to the left. In the lobby,
turn to the left, take a step forward, and ascend the staircase to
your left. On the landing, turn around and click on the second flight
of stairs to complete your ascent. At the top of the stairs, turn
to your right, and walk along the hall to the corner. Turn to your
left, take a step forward, and enter the girls’ dormitory on your
right.
Sophia’s Choice
Inside the dormitory room,
turn to your right, and walk forward three steps. Alexandria’s living
quarters are located on your left. Pan to the left, examine the picture
hanging on the wall above her bed, and click on the scrapbook lying
on the bed’s surface. It contains several posters from her appearances,
including a good copy of the poster displayed in the lobby. Place
this poster into your inventory, and close the scrap book again.
Find the downward pointing
arrow to the right of the bed, and examine the floor to find a loose
floorboard that can be lifted. There are letters from Malveaux and
Lucien hidden in the uncovered space under the board. Back away, and
click on the two books on the table by the window – “The Musings
on the Power of Melody” and “The Path to Musical Perfection”
contain the usual mumbo-jumbo.
On the dresser, click on
the red music box, and click again on the turnkey to see a silver
violin. Click once more to the right of the silver violin to see a
movie showing a private moment between Lucien and Alexandria that
is interrupted by Sophia (and causes the loss of Alex’s locket through
the floorboards – landing next to some sort of well). Now click on
the mirror next to the music box – we see a vision of Sophia begging
Alexandria to remain at the Conservatory instead of running off with
Lucien.
Turn around and exit the
dormitory via the doorway. Turn to your right, and walk forward two
steps into Sophia’s bedroom. Move off to your right, and then walk
towards the purple sofa near the far wall. Click on the book on the
seat to read more musical alchemy nonsense. Back away from the sofa,
pan to left, and walk to the privacy screen to the right of the vanity.
Click to peek at the bathtub behind the screen, and then click inside
the tub to see a steamy movie of Kaine and Sophia getting friendly.
Back away from the screen,
turn around to face the table and chairs in the centre of the room,
and walk towards them. Now turn around again and walk to the vanity.
Click on the mirror to see a close up, and read the letters on the
surface of the vanity (various letters, one of which is from Kaine’s
wife!). Back away, and exit the room.
The Show Must Go On
Turn to your right, and
walk forward along the corridor. When you get to the corner, turn
left and walk along this side of the second floor. Once you are to
the next corner, turn left again, and walk forward a step – you are
now able to descend the staircase. Turn around on the landing and
descend back to the lobby., Turn to your left and approach the torn
poster for Alexandria’s show. Click for a close up, and place the
mint copy of the poster over top of the torn one. Immediately the
lights grow brighter in the lobby, and you can hear the murmur of
a crowd.
Walk into the centre of
the room, and turn to the left towards the doors leading into the
auditorium. Approach the doors and click to open them.- the woman
comes to the door and implores you to hurry and get your ticket. Walk
back to the centre of the room, turn to the left, walk forward, and
turn to the right to approach the ticket window. Click for a close
up of the window, and grab your ticket to the show, directing you
to Box C.
Proceed back to the theatre
doors, and with the ticket in your hand, click on the doors to enter.
The woman lets you in – walk forward into the darkness. A velvet rope
blocks your path forward so pan to your left and climb the stairs
located here. Turn around at the top, and ascend the next staircase
to the first balcony level. Turn to your left and move forward along
the corridor, examining the doors to the right to find Box C. You
won’t find it on this level though. Retrace your steps, walk past
the stairs on your right, and continue forward.
Turn to your left, and
note the narrow stairs leading up to the next level. Walk forward
along the hallway, again examining the doors to the right for Box
C. You find your private Box C three doors before the end of the hall
Click on the door to enter, and again to walk forward and sit down.
You’ll need something to see the stage, so click on the opera glasses
– you see a movie of Alexandria playing the Harmony of the Spheres.
Lucien appears to be the only other audience member.
Holding the Audience
Hostage
Turn around and exit the
room – walk left along the corridor and descend the staircase ahead.
At the bottom, turn to your right, walk forward, and descend the stairs
on your left. On the landing, turn around and descend to the base
of the stairs. Turn to your left, walk forward, turn to the right,
and walk forward into the darkened auditorium.
Walk three steps forward
as a voice calls for the orchestral fanfare in order to end the concert.
Walk up onto the stage, and pick up the baton lying on the floor here
You now have to play the fanfare by clicking on the correct hotspots
on the dark stage – the orchestra is laid out just as it was in the
practice area, and in the diagram on the wall.
Remember the fanfare –
Popperkeg (back row, fourth hotspot from left), Nambino (front row,
second hotspot from left), Popperkeg, Wertmizer (back row, first hotspot
from left) and Violin (front row, first hotspot from left). I found
that the easiest way to find the correct hotspots was to centre myself
using the dimly lit aisle behind you, and then panning across to the
left. Make sure you can find all of the hotspots as well – some are
pretty close together.
Stagehand
Once you get the right
five instruments played in order, the lights come on revealing a doorway
at the back of the stage. Proceed forward and enter the doorway into
the backstage area. Turn to your left, walk forward, turn to your
right, and step forward again. Turn to your left, and click on the
note lying on top of a crate here – it appears that Sophia has a secret
laboratory back here somewhere.
Turn around to face the
opposite direction, and take two steps forward. Now look to your left
– there’s a rip in the backdrop here, but it doesn’t lead anywhere.
Turn to your left, walk forward, then make two left turns – you should
now be able to walk two steps forward into the stage control room.
Click on the clipboard located to your right – it contains drawings
of all seven of the backdrops hanging in the back of the stage area.
Remembering that the rip
is in the bottom left corner of the first backdrop, which of the six
others might allow for an opening into what lies beyond the backdrops?
Backdrops 5 (a door in the corner) and 7 (an open hut) offer the best
choices. We now must lift Backdrops 2, 3, 4 and 6 out of the way.
The control board to the left of the clipboard will do the trick.
Noting that the first button has been burnt away, press the 2nd, 3rd,
4th, and 6th buttons (from the left) to lift the appropriate backdrops.
Return to the ripped portion
of the backdrop – you should have a clear pathway into the room beyond.
Walk into the room, pan to your right, and click on the staircase
here to descend to the prop room. Proceed forward (to the right of
the giant swan), and walk towards the wooden mask along the far wall
of the room. Turn to your right, and click on the old-time radio here
to get a message about the locket Alexandria dropped into the floorboards.
Back away, and turn back
towards the big swan. Turn to face the large drum located to the right
of the swan. Click on the rope hanging from the ceiling to the right
of the drum, and watch a small statue of a man fall from the ceiling
onto the drum and bounce off. Now turn to look at the swan, and click
to move towards it. You are now standing inside the swan – pan around
until you find the winch handle, and click on it to raise the swan
up into the air. Now turn to face the drum again, look down, and click
on the drum’s surface to jump. You pass through the drum into the
room below.
Boiler Room
Welcome to the Boiler Room!
Look down at the floor, and click on the well in the centre of the
room to get a close up of Alexandria’s locket. Grab it…oops!
Time to do a little underwater diving. Click on the water’s surface
twice to jump into the well. At the bottom, look down at your feet,
and spin round until you spot the locket. Reach down and grab it.
Now look up again, and pan around until you spot a doorway that will
take you out of this room (there’s a clock above the door).
Click on the door to leave
the submerged room, and travel up a spiral staircase. You now find
yourself in Sophia’s strange laboratory. From your current position,
walk forward between a large blue crystal and a green one shaped like
a seal. Note the three blue crystals located off to your left – walk
to the left of these crystals. You will now be staring at the crystal
mixing bath – unfortunately it doesn’t appear to be “on”.
Back away from the bath, pan to the right, and go forward. From your
new position, proceed to the right of the drawing on the wall, and
click on the steel doors to your left to re-enter the boiler room.
We’ve got to find some
way of turning on the bath. Turn to your left and walk forward – there
will be six levers on the wall here to your left. Click on the second
one from the left – it stays down for a few seconds, and then pops
back up, If we could weight it down somehow…take out the locket
and click on the faulty lever – the locket is enough to keep the switch
down. Back away, turn to your left, walk forward, and turn to the
right. You can now proceed back into the lab straight ahead.
The Crystal Key
Again walk to the crystal
bath by proceeding left of the three blue crystals. The bath is now
happily bubbling away. Since we’ve now “Prepared the Solution”
(remember the steps on Sophia’s blotter in her office?), we’ve got
to “Seed with Crystal”. Back away from the bath, turn to
your left, and walk towards the wall straight ahead. A small hollowed
out area contains a number of dark green crystals – just click to
grab one. Turn around, return to the crystal bath, and toss the crystal
into the bath liquid. A big black crystal grows out of the centre
of the liquid.
Now to “Purify Crystal”
– back away from the bath, turn to your left, and walk towards the
crystal hollow again. Turn to your left and walk forward – you are
now standing next to the green crystal seal again. Clicking on the
seal yields a white tablet. Grab the tablet, turn around, and return
to the bath. Tossing the white tablet into the bath causes the crystal
to turn white.
Time to “Ring Notes
Together” – back away, turn to the right, walk forward, pan to
the right, and click on the drawing on the wall. This plan shows the
relative positions of all of the items in the lab. In order to ring
the notes, you must recreate those five notes that Sophia drilled
into Alexandria during her lessons: C D E B G. Note the locations
of the crystals that will chime the first four notes.
Begin by turning around,
walking to the left of the three blue crystals, turning to your left
at the crystal bath, walking forward, and turning to your right. You
should be staring at two small blue crystals in front of the wall
here. Click on the crystal to the right first to ring the “C”
note, and then the left one to ring the “D”. Turn to your
right and go forward two steps (past the crystal bath); pan to your
left, and click on the first blue crystal you see (the furthest right
of the three blue crystals) to ring the “E”.
Keep panning to the left,
and take two steps forward to walk between the green seal crystal
and the tall blue one. Click on the blue crystal located in front
of you to ring the “B” note. Pan to the right, and walk
forward. Walk to the crystal bath, and click on the white crystal
inside the bath to ring the final “G” note. A few moments
later, the crystal shatters – click forward and grab the copper symbol
to be transported back to Zork.
Choosing Sides
Back in the Temple, the
four alchemists who you’ve just released from their death state are
already brewing up some mischief. They implore you to drink a special
elixir that will turn to poison in a matter of moments. If you haven’t
figured it out by now, these people are the real villains of the story.
Don’t drink the liquid, even after they beg you. After you refuse,
they summon Nemesis, who berates you for listening to the alchemists
and doing their bidding. He tells you that there is once chance to
stop them by saving Alexandria’s spirit, and gives you a gold ring.
You are transported to
the interior courtyard of the temple, with the ring that Nemesis (who,
by now, you know is Lucien) gave to us suspended in space. Click on
the ring, and watch Alexandria’s sacrifice, and the subsequent murder
of the alchemists. Now grab the ring, turn to your right, and walk
out into the courtyard to the two fountains (don’t go anywhere else
in the temple, or you will be killed!). Turn to the fountain on your
left, click the right ivory tusk (if the water is still flowing),
and click on the metallic hand inside the fountain structure for a
close-up.
Grabbing the ring from
your inventory, click on the hand – a passageway is revealed, and
you are pushed forward. Walk forward and look to your left – there’s
a plaque here that indicates the “Frobozz Magic Construction
Company” is responsible for the digs. Back away, and turn to
the right – a message is displayed on a carved stone. Turn back to
face the large brown circle straight ahead, and click to be transported
into another tunnel.
Silver and Gold
Walk forward – there appears
to be a body covered with a shroud in the middle of the room. Walk
off to the right, and turn to face the large statue of a dragon against
the wall. Something can be placed in the bowl in front, but we don’t
have anything to place there yet. Turn around, walk to the right of
the body, and turn again to face the centre of the room. Look up towards
the ceiling here – find the arrow that allows you to look up above
the body, and the room shakes. Grab the mace that has shaken loose
from the ceiling, and back away.
Turn around and examine
the elephant statue – again, we can’t do anything here yet. Walk to
the right of the body again, and then turn to face the shroud. We
can now walk forward and examine the body – click to see a brief glimpse
of Alexandria placing a silver ring on her chest. After the vision
clears, grab the ring from atop the body by holding Lucien’s gold
ring in your hands and clicking on the silver ring. Back away, turn
and walk towards the bear statue. The bear hold a large container
in its hands. Walk forward again and examine the Snake statue – more
machinery here to operate.
Cross the room once more
and approach the dragon statue. Place the rings in the pan, and click
on the triangular “fire” symbol beside the dragon, who melts
the rings with his breath. Grab the bowl from the statue, and walk
over to the elephant statue. Place the bowl in the pan in front of
the elephant and click on the triangular “air” symbol to
cause the elephant to cool the rings with his trunk.
Carry the cooled metal
to the snake statue, and place it in the bowl. Click the triangular
“earth” symbol to trigger a press which forms the rings
into shape. Pick up the rings once again, bring them over to the bear
statue, and place them on the pad. The bear lowers the large container
of water in its hands. Grab your mace and click on the top of the
container – the bear smashes the container, which covers the rings
with a shiny coating.
Ring Toss
You are transported to
a catwalk up above the main room of the temple. Turn to your left
and click to go forward. You approach the alchemists just as they
begin their last ritual to make themselves immortal – they’ve found
Alexandria’s body, and are trying to steal her spirit. Take out the
finished rings, and click on the picture in front of you to cause
utter chaos. They scream frustration as you are transported out into
the grey outside – to the yard where you began the game.
The temple explodes in
front of you as Lucien and Alexandria thank you for your help. They
invite you to follow them as they leave. Turn around, and walk through
the now-unlocked gate. Turn around again, and spot a painting from
the temple – the one hanging in the passage between the large room
and the interior courtyard. Click for a close-up, and again to end
the game.
Screenshots

View this guide raw, exactly as the archive holds it