Valhalla Classics: Episode 5 – The Servants Hall – Episodes 5 and 6
Banish Spell:
Hallway below the Oracle room – Look at wall
behind the disappearing pearl and see a hole. Insert the wizard’s wand on hole.
The pearl gets knock off the stand. Enter the Pearl room and take pearl
and wizard Blentok’s wand.
Wizard’s room – Go to cauldron at upper
right of room. Drop love letter (if you haven’t yet), pearl, lock of hair and
wizard’s wand in cauldron. Take banish spell.
Hot coals passageway – Drink the anesthetic
potion and then run to Greylim’s room.
Greylim’s or Start room – Place the banish
spell right in front of wizard Greylim. Infinity, where did you
get that? He banishes.
Enter the hallway. Operate the holes on the floor
in front of the locked door . Take up the letters; M, E, R, L, I, G and Y.
Yup! Arrange them to form GREYLIM on the holes on the
floor. Door opens. Enter the hallway.
We did it! Well, I did it! I’ll see
you in the Dungeon, my friend!
Episode 6 – The
Dungeons
The Dungeons may feel like a far cry
from the splendor of the royal apartments. Nestled as they are, in the
underbelly of the great castle, and full of damp and drafty chambers. But here
are as many secrets as an adventurer could hope to find. Infinity must use the
Dungeon’s teleport system to navigate the complex rabbit warren of chambers and
corridors. Talking his way past Herman’s uncouth soldiers who will always try
and hamper his progress. Can you help Infinity unravel all the mysteries of the
genesis device? Allowing him to finally recover Herman’s lost prophecy, and
begin to realize his destiny.
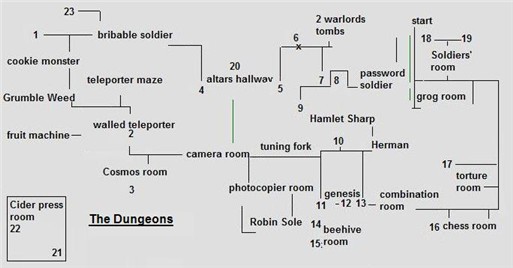
| Teleporters: 1 2 3 4 5 6 7 |
8 9 10 goes to 2 11 goes to 14 12 goes to 3 13 goes to 9 14 goes to 11 | 15 goes to 16 16 goes to 15 17 goes to 19 18 goes to 20 19 goes 17 20 goes to 18 21 goes to 4 22 goes to |
Operate tile and take fiddly little key.
Feeding the Soldiers:
Green water hall: Take
tankard from stand. Read the blue book about Herman’s Dungeons.
Drop book. Look at green water – green gungy poison. There’s a green
poison blob on tile between the green water areas. If you touch it – you’ll burn
your finger. Go down, turn right on hall and up to the room.
Soldiers’ room:
Operate tile on the right and take tankard. Take stamina
potion from table. Take another tankard from the other table and read
the purple book about The Norse Warlords Device (teleport device). Drop
book on floor. Go close and look at a soldier – Get us some grog
and be quick about it.
Grog room: Go down the
hall and operate lever to open door to Grog room. Enter room. Insert fiddly
little key on chest and take Hergie Mergie Homie paper. Operate
tile on left side of room and take whopping great key. Take tankard from
stand. Now we have 4 tankards for 4 soldiers. Operate lever on wall for a
shortcut. Drop tankard on area beside grog tap at top of the room. Operate tap
to get tankard with grog. Do it 3 more times to get a total of 4 tankards of
grog. Go back to soldiers’ room.
Soldiers’ room: Drop
a tankard of grog in front of each soldier. They drink them and now want food. A
door opens.
Go down the hall and enter hall on the right. Take
2 chicken legs and a stick. Go back to Soldier’s room, take the
4 empty tankards and drop the 2 chicken legs in front of 2 soldiers – we
need 2 more. Go back to grog room and leave the 4 empty tankards
here.
Go out to the hall with green poisoned water. Walk
across the green water and up the room on the left that is just across the Grog
room. You will lose some stamina but do not take the stamina potion yet until
the stamina level is really low.
Password Soldier room:
Look at soldier between 2 chests and he will ask for a password. Let’s ignore
him for a while. Insert stick on hole at bottom left wall. Operate lever. Enter
the hallway.
Turn to first hallway above. Operate 3 tiles and
get 3 sapphires. There’s a closed door on the left. Turn right and go up
to enclosed teleporter #8 with ornate tile.
You’re teleported to hallway parallel to sapphire
hallway. Go around, up, down and operate 2 tiles to get 2 chicken legs.
Go up the hall to the Warlord’s room.
Angry Hours and Femur Link
Puzzle:
Norse Warlords’ (Angry Hours and Femur Link)
tomb room: There is a chest here. Look at warlord with green
shield – ‘Angry Hours’ and warlord with pink shield is ‘Femur Link’.
Remember those names! Take and look at note on table between the tombs –
‘It all depends on the order‘. The note has green,
orange and yellow lines on it. Drop note. Go back to the teleporter tile #7 and
arrive back close to sapphire hallway. Go back to the soldiers’ room.
Soldiers’ room: Drop
the 2 just taken chicken legs on 2 empty places in front of the soldiers. Now
they want more grog. Take the purple chest key on the table – given as a
tip, maybe? Go back to the Norse Warlords’ tomb by crossing the green water and
using the teleporter.
Norse Warlords’ tomb room:
Insert the purple key on chest and take the translation potion. Go to the
soldier that wants a password.
Password Soldier Room:
Look at soldier, he will ask for password, consume translation potion and then
look at Hergie Mergie Homie paper – Herman’s Home. You had help
– didn’t you? Drop the paper. The 2 chests open. Take protection
potion and cross – phew, thought that might burn
me!
Green water hall: Cross
green water and walk up the green water hallway to the wall close to where you
started. Cross the green water again to the other side. Insert the whopping
great key taken from the grog room on close door. Take the bone from
stand. Cross the green water again. Go down and now let’s tackle the green
poison on the tile. Consume the protection potion and then take the green
poison.
Grog room: Drop the poison
on the grog barrel and it will turn to poisoned grog. Now fill the 4 tankards
with the green poisoned grog – Bwahahahahaha! – and
give 4 tankards of poisoned grog to the 4 soldiers. The soldiers drink
the poisoned grog and all go to sleep. He who laughs last … is
smug, hah! The door above opens.
2 teleporter
hallway: Take and read blue ‘A Children’s Story’
book. Drop book. Walk to left teleporter #18.
Altars hallway: Turn right
and drop a sapphire on above altar. It lowers down. Take chain from next
altar. Place the 2 other sapphires on the next 2 altars. Take last will and
testament. Go back to teleporter #20 and then walk to the right teleporter
#19.
Take the pink, trendy pair of shoes. Go down
the hallway. Enter the first room on the left.
Torture Room: See 2
guards and 2 unfortunate prisoners on racks. Take the watch in front
of the sleeping guard. Go down the hall and then left.
Combination stone
room: Take the ‘What’s the combination?‘
paper from top of the combination stone. There is a cookie on the floor.
You don’t need to pick it up.
Go down to the room below the torture room and see
that it is a chess room. Go back to the teleporter #17 we arrived here on
at the hallway above the torture room, go down, cross green water and then to
the other teleporter #8 to get to the Norse Warlord’s room.
Norse Warlords’ tomb room:
Place on the pink shield warrior called ‘Femur Link’ the bone first and then the
chains. Bone, chains – Femur links – get it? LOL! He gives
you a castle chess piece. Place on the green shield warrior called ‘Angry
Hours’ the cross (angry) first and then the watch (hours). Hahahaha – I think it’s funny! Take the bishop chess piece.
Infinity is Accused:
Go back to the right teleporter #19 above the
soldiers’ room and then go to the Chess room.
Chess room: Take the
cigar from the stand and then look at all the chess pieces around the
room. It looks like there are 5 blue bishops and a king hidden behind the stand
close to the sapphire. Bishops move in diagonal and the castle moves in a
horizontal or vertical line. Position your bishop and castle in tiles safe from
all the blue bishops and at the same time checkmate the blue king. Drop your
castle close to the left entryway – 3 tiles above the king. Place your bishop on
the ornate tile close to the wall at bottom of room, 2 tiles right of the blue
bishop. This checkmates the blue King and it disappears together with your chess
pieces. Take the sapphire. Go forward to use the teleporter
#16.
Beehive room: Take and
look at the authentic newspaper. Take the bee tray beside the
beehive. Use the teleporter again #15. Go back to the altars hallway via the
teleporter #17 above the torture room and left teleporter #18 above the
soldiers’ room.
Altars hallway: Place the
sapphire on next altar. Take the ‘Let him have it’ paper. Go across
the water to the left landing and take the stamina potion. Go back to
torture room.
Torture room: Go in front of
the right guard and look at the ‘let him have it’ paper. The right prisoner is
tortured and the prisoner dies. Take the whopping great key on dead
prisoner’s body. The guard says I’m going to tell. Go
back to Altars hallway.
Altars hallway: Go to the
south end of the hallway. Consume a stamina potion because by now your stamina
line is way down. Cross-run to the south through the poisoned green
water.
Camera room: Insert the
key taken from the dead tortured prisoner on the door. This room has a camera
and a chest. Go to room below and see a hole where a lever should be. Operate
the tile and see stamina potion. Just remember where it is if needed. Take the
‘to get to the other side‘ paper. Go to room at the right and see a
tuning fork on a stand. Go down the hall and walk on teleporter #11.
Use the lever at teleporter #14 and find yourself
in the Beehive room. Use the teleporter #15 at bottom left of room.
Arrive at Chess room. Go up to the torture room.
Torture room: The King,
your brother is here. The guards did snitch on you. Look at king to talk to the
king about the prisoner that was killed. You denied it and he wants you to prove
it. Go one tile away from the king and drop the newspaper on the tile in front
of the king. He says that’s yesterday’s paper. The
guard on the right throws a stick. Take the authentic newspaper and the
stick. Go back to the camera room via the teleporter #16 in the chess
room and then the teleporter #14 in the beehive room.
Make Proof of Innocence:
Camera room: Insert stick
on hole on the wall and then operate lever.
Photocopier room: Enter
right, go down the hall and take blank newspaper from stand. There’s a
crown stand beside the closed door below. Drop the authentic newspaper on the
photocopier and something happened. Drop the blank newspaper on the photocopier
with the authentic newspaper. Something happened again. Take forged
newspaper from the tray. Bwahahahaha! Go back to
the king via teleporter #11 on parallel hallway, beehive room #15, chess room
and then torture room. Haheheh!
Torture Room: Start over
with the king. Look at king, Infinity denies killing the prisoner and the king
will say – prove it. Go back one tile away from the King and drop the forged
newspaper in front of the king. The forged newspaper got you off the hook.
Don’t torture the prisoner. He’s such a snothead!
Take the poxy little chest key where the king was. Go back to
camera room – #16 and #14 teleporters.
Access to Other Places:
Camera room: Insert
the poxy little chest key on chest by camera. Take the King’s Crown.
Warlord Robin Sole Tomb Room:
Go to Photocopier room and drop the king’s crown on crown stand. Door opens.
Enter the warlord’s tomb room. Look at warlord with red shield – his name is
‘Robin Sole’. Drop the pair of shoes on floor for later use (shoes – soles,
see). Take sapphire and orange. Look at soldier and he asks a
riddle – Why did the chicken cross the road? Look at ‘to get to the other side’
paper. That’s not funny! Also, drop joke paper for later use. Operate lever at
left bottom of room. Ignore the cookie that is here. Cross the
green water to go up. Take eye. Consume stamina potion if you’re very low
in stamina. Go back to torture room – #11 and #15 teleporters.
Torture room: Go in
front of left soldier and look at ‘let him have it’ paper. The left prisoner is
tortured. Go to by the head of the prisoner, face him and look at ‘What’s the
combination?’ paper. The prisoner will say ‘I will betray’. Drop combination
paper on floor. Go to combination rock room. Go down and left on hall.
Combination stone
room: Drop the eye on left, then the will at middle
and the bee tray on right side of the combination stone. Door opens. Enter and
walk to the teleporter #13.
Arrive at teleporter #9. Walk to top of hall and
take whopping great key. Operate lever but do not enter. Go back to the
teleporter #9 and then walk left from teleporter #13. Ignore the 2
cookies. Insert the whopping great key on door. Go up to the new
room.
Warlord Hamlet
Sharp:
Herman’s room: Look at Herman
and he looks a bit out of sort. Look at ‘let him have it’ paper. Let who have
it? – Herman asks. We have to find an answer to that one. Go up and operate tile
just in front of grog barrel. Take musical note. See a locked chest
between 2 tankards. Take a tankard from one side of the locked chest.
Fill one tankard with grog from barrel. Look at Norse Warlord Hamlet
Sharp. Look and take C.R.U.M.B.L.I.W.A.L.L.Y paper.
Tuning Fork room: Go back down
to hall. Turn left, see a hole where a lever should be, forward and operate
other lever to open door to camera room and the tuning fork stand. I need a wee wee! Drop musical note on tuning fork stand. Take
the sharp icon, a fancy musical thingamy. Ouch it’s
jaggy. Go back to Norse warlord Hamlet Sharp. Place cigar on his
shield (Hamlet is a brand of cigar in the UK) and then drop the sharp icon. Take
stick. Go back to hole in the hallway. Insert stick on hole. Operate
lever and then walk up to the now accessible teleporter #10.
Joke Puzzle:
Walled Teleporter room:
You arrive in a teleporter surrounded by 4 walls – #2. Don’t
panic! Don’t panic! Look at C.R.U.M.B.L.I.W.A.L.L.Y paper – crumble
wall. The walls disappear. Drop crumble wall paper. Take and read green book
about the cider competition and Grumble Weed. Drop book. Go to room
above.
Teleporter maze room: Take
the comedian potion on stand. Look at the family album stand.
There’s a teleporter maze on top of the room.
Grumble Weed Room: Go left
to Warlord Colored Fish’s tomb. Why are we going to ignore this Norse warlord?
Because it’s a red ……. Take film for camera. Go up and look at
Grumble Weed (remember the green book). There are 2 cookies here.
Go back to walled teleporter room. Go to right
hallway and operate lever.
Camera Room: Find your
self in the camera room. Insert film for camera on camera. Operate camera and
take photograph of me.
Robin Sole’s Tomb Room: Go
down to photocopier machine room and then down to Robin Sole’s tomb room. Take
‘to get to the other side’ paper. Look at soldier and he asks a riddle – Why did
the chicken cross the road? Consume comedian potion and then look at ‘to get to
the other side’ paper. The chests open. It wasn’t that
funny! Drop ‘to get to the other side’ paper. Take thermometer
and map. Look at map and see ‘The Norse Extravaganza’ and the direction
for the teleport room is N W S S N N S E.
Herman’s Prophecy:
Teleporter maze room:
Place the ‘photograph of me’ on the family album stand. Take the picture of
‘my pesky brother, the King‘.
Herman: Go back to Herman.
Let’s do the routine again (have to do it in this sequence to work) – Place the
picture of the King on his hands. Go beside Herman. Look at ‘let him have it’
paper. Let who have it? – Herman asks. Infinity will say – ‘my
pesky brother, the King’. Herman will say Bring me my
prophecy! Drop the let him have it paper. Take the chest
key that appears where the King picture was. Go up to the chest by the beer
barrel. Insert chest key on chest. Take green The Book of Icarus.
Cookie Monster Puzzle:
Teleporter maze room: Go to the
teleporter maze and follow the directions – N W S S N N S E. Exit and then
drop the map.
Cookie Monster Room:
Take the rings. Take cookie from floor and then drop cookie on the
bowl. Watch the cookie monster who is blocking an open doorway rolls over, eats
the cookie and then go back to block the doorway. Operate the lever at bottom of
room. Go down to Grumble Weed room. Take a cookie from floor. Go to room
below the walled transporter room.
Cosmos Room: Go down to
the room below. See Stone of Ageing by the entryway. Place a cookie on the Stone
of Ageing to get a gross, moldy cookie. Look at 5 cosmos altar. There’s a
cookie here and a teleporter #3. Step on teleporter and arrive at a place with
amplifier, cookie and Genesis device. Take amplifier. Drop rings on
floor. Step back on teleporter #12.
Cookie Monster Room:
Go back to cookie monster room and place the moldy cookie on the bowl. The
cookie monster gulps it down and get sick. Go up to the now unlocked doorway.
Warlord Robin Sole Puzzle:
There’s a sapphire at end of hallway – just
remember it’s there. Step on teleporter #1 and come out to a hall parallel to
altar hallway. Go up and take pear.
Altars Hallway: Drop sapphire
on altar. Take banana from stand at top of room. Take earth from
right side by plant. Go down on left side of room and use the teleporter #4. Go
out #21 and see a cider press. Use the teleporter on the left #22. Come
out on a short hallway on teleporter #6. Operate the lever on the left. Go back
up, left and forward to soldier room.
Bribable Soldier Room:
Operate lever and enter room. Take the arrow in front of the guard. Look
at soldier and he will say – It will cost you
Infinity. Pull lever at left of room to open door. Go left, down to
the walled transporter, right to camera room and down to the warlord Robin
Sole’s room by the photocopier machine.
Warlord Robin Sole
room: Place the arrow on pink shield of Robin Sole.
Then take the pair of shoes from floor and place it on shield of the warlord.
Take the Potion of Extreme Luck. Go back to walled teleporter
room.
Burping Contest:
Fruit Machine: Go to left side of
room and see a fruit machine on the left. Remember the note on table
between the 2 warlords’ tombs – ‘It all depends on the
order‘. The note has green, orange and yellow lines. Drop the pear on
the left roller, have orange in the middle and the banana on the right roller.
Hear a fanfare. Consume the potion of extreme luck and then pull the
lever. The rollers come out 3 apples. Take the 3 apples. A pile of gold
is won but it is behind a locked door.
Cider Press Room: Go to the
Cider press via the teleporter #1 off the cookie monster room, turn right on
hallway and step on teleporter #6. Drop all 3 apples on cider press and take the
bottle of cider.
Grumble Weed Room: Go to
Grumble Weed. Look at Grumble Weed, the burping contest loser. Place the bottle
of cider in front of him. He will drink it. Place the amplifier on the tile
beside Grumble Weed’s right. Stand on amplifier. Drink a tankard of grog (this
step is not necessary – maybe a glitch). Look at Grumble Weed again and he will
say may the best man win. I
feel a burp coming on. Smug is good, smug is fun! Take a
carnivorous fly trap plant. Drop tankard. Go to cosmos room.
Genesis Machine:
Cosmos Room: Step on
teleporter tile #3 at bottom of room. Pick up the gold rings. Cross the
green water to the Genesis device. Insert the thermometer on Genesis device and
then take Mercury. Insert earth to get Earth. Insert fly trap to
get Venus. Insert rings to get Saturn. Use teleporter #12. Back in
the cosmos room drop from L – R: Saturn, Earth, Venus and then Mercury on the
cosmos altars. The rightmost altar will light up as the Sun. Drop the Book of
Icarus on the Sun altar. Take and look at Black book of Herman’s
Prophecy. Less than full shilling. That bit can’t be
right.
Herman: Go back to Herman.
Drop the book of Herman’s Prophecy in front of Herman. What will
be will be, Infinity. Take the whopping great key. Go back to
the walled teleporter room.
Walled Teleporter Room: Insert
the key on the locked door and then take the gold coins.
Bribable soldier: Go to
bribable soldier to the right passage off the cookie monster room. It’ll cost you, Infinity! Drop gold coins in front of the
soldier. Door opens. Go up and step on teleporter #23.
I Would Say It Was Fun, But That
Would Be Out Of Character!
Episode 7 – The
Gallery
Stories have been passed down through
generations of courtiers concerning the mysterious entities that inhabit the
Gallery. No-one dared to venture there, until now. Infinity is faced with the
task of finding his way through the catacombs in order to find the secret
entrance to the Royal Chambers. But the stories were true, the Gallery is
infested with manifestations of every nature and description. Infinity must
negotiate his way past ghostly apparitions, mummies, zombies and vampires in
order to find the most evil entity of them all – Mestophilys, who will claim his
soul in return for a gift. The gift is evil itself, the last requirement for the
one who dares to murder his brother.
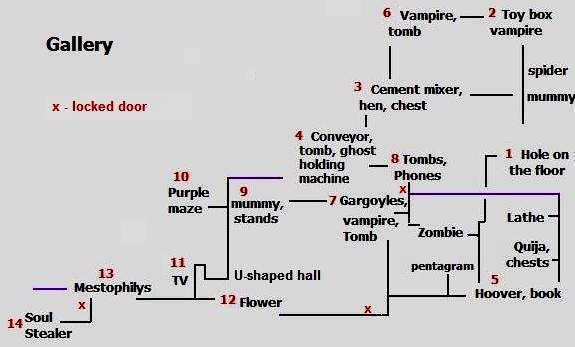
Take care of ghost in the
hole:
Room 1 – Go forward and look
around the first room. At the side hall, see a Molecular stabilizing device by a
mummy. Operate a tile and take a match. See a grinding machine, a
hole on the floor and poisoned slime in front of a door lever. When you walk on
poisoned slime, energy level goes down. Pull the lever and door opens. A ghost
comes out of the hole and before you can go through the ghost pulls the lever to
close it again. We need to take care of him.
Go up and talk to the mummy – he’s
tired. Operate the tile on the floor and take a stamina potion. See a
spider on a cobweb before entering the next room.
Room 2 – Operate a tile on the
floor and take a key. Take the bag of cement on the floor. See a
vampire and take the toy block. Drop the toy block on the toy box at top
of room and side door opens. Another ghost comes out and takes the toy block.
Hmmm! Another ghost to take care of.
Go back down and take the side hall by
the mummy. Operate the lever and enter.
Room 3 – See a chicken blocking
access to a machine and an interesting floor tile. There’s a nest, cement mixer
and barrel of water. Read the book on the stand and learn about a ghost
trap. Drop book. Take the pebbles in front of locked chest. Walk on
purple slime and operate the door lever. Enter door at bottom.
Room 4 – Walk to left side and
see the tomb of Arson Molar. Take the ‘Will you move, please’ paper from
stand. Go to the other side and operate the lever to start the conveyor belt.
Glass goes through and smashes on the floor. Another task! Operate the
floor tile and take stick. See the green ghost holding device at bottom
of room. Walk the hall of poisoned slime at left of this machine. Take
binoculars and stamina potion. Walk to the left, insert the key on
the chest and take guttering. Take the stamina potion on the
floor. Go back to other end of poisoned slime hall. Time to consume a
stamina potion. Go back to room 1 and the grinding machine.
Room 1 – Drop pebbles at center
of grinding machine, move to bottom of machine and operate the machine. Take
sand from top end of machine. Go back to Room 3 and the cement
mixer.
Room 3 and Cement Mixer – Drop
cement and sand in cement mixer. Place guttering to the right of cement mixer.
Operate the barrel of water and then operate the cement mixer. Take
cement from guttering. Time to take care of that ghost. Go back to room 1
and the hole in the floor.
Room 1 and hole in the floor.
Drop cement on hole on the floor. Operate lever to open the door and enter the
side door.
Take care of ghost by toy
box:
Timid Zombie – Go down the hall
pass the long purple slime hallway. See a stamina potion on the floor.
Check energy level to see if you need to consume more stamina potion. Read
the book to learn about the timid zombie. Drop book. Go down, then left and see
the timid zombie. Look at ‘Will you move, please’ paper while facing
zombie. He wouldn’t budge. Go back to center hall and continue down the hall.
Insert stick on hole on the wall, operate lever and enter the door at the
bottom.
Room 5 – Take the ghost
trap from floor. See a Hoover and read the red book about the vampire’s wife
named June who apparate once a year at her death’s anniversary. Drop book. Take
piece of wood. Go down, operate the floor tile and take ‘Where is
M’ paper. Read silver book to learn about Mestophilys’ demands and 2
pentagrams. Drop the book. Go back to Room 2 and the toy box – time to trap a
ghost.
Room 2 and toy box – Take a new
toy block from the vampire. Drop the ghost trap beside the closed door on
the left. Drop the toy block on the toy box and watch. Take ghost trap.
Enter door on the left.
Take care of the Timid Zombie:
Room 6 – Look at vampire who
misses his wife. Operate tile on floor and take fly. Look at tomb of
Brahms Seefor Miles. Take egg and operate door lever.
Go down to room 4 and drop ghost trap on
ghost holding machine. Take ghost trap.
Room 1 – Go to spider below room
2 and drop fly on cobweb below the spider. Take spider. If you drop this
spider anywhere it partly changes to a key. Go around to the other side of the
mummy, drop the key on table and take spider-key. Drop spider-key on
molecular stabilizing machine. That scared the mummy. Take key. Go
around and talk to the mummy and find out he’s in shock. Go to room
3.
Room 3 – Insert the key in locked
chest and take stick.
Purple slime hallway – Go down
to room 1 and down to the long purple slime hallway. Take the right purple
slime hallway. Insert the stick on hole on the wall. Operate the lever and enter
door at bottom. Check energy level to see if you need to take stamina potion.
Lathe – Go down the hall and left
on first hall. Drop the wood on lathe machine, operate machine and take
stake.
Quija board and Brandy – Continue
down the hall and operate the tile in front of the barrel of brandy. If you have
enough stamina potion, you do not need to take the stamina potion on the floor.
See also the Quija board between 2 locked chests. Operate the wall lever to open
the door at bottom. Enter door and go back up to room 2 where the vampire
is.
Room 2 vampire – Drop the stake
on it’s body. Take the vampire’s teeth. Go to Room 4 and the
tomb.
Room 4 and Arson Molar – Remember
this is the tomb of Arson Molar. Drop match and teeth on tomb. Take the angry
potion. If you drop one item the tomb requires it will just take it and
Infinity will make a sarcastic remark about fair trade. Go back to timid zombie
by purple slime hallway.
Timid Zombie – Consume the angry
potion. Look at ‘Will you move, please’ paper while facing zombie.
Mummy!
Take care of zombie with
attitude:
Room 7 – Enter and read book
about telekinesis and an allergic invisible zombie named Soosan that has
identity crisis. Drop book. Operate lever to open door to room 8. Go
forward to room 7 and see a zombie in between 2 gargoyles. The zombie will not
let you through the left door. Take bell from stand. Look at vampire that
has a calendar. If you take the calendar, he zaps you and loses energy. Across
is an unreachable bottle of something. Look at the tomb of Doctor Love at bottom
of room.
Go down the hall and go right. There’s a
pentagram in a side hallway. Operate wall lever to open shortcut door. Go back
and take the musical score from floor beside a locked door. Go back to
room 5 and the tomb.
Room 6 and Brahms Seefor Miles –
Drop the musical score and the binoculars on the tomb. Take the key. Go
back to the long purple slime hallway. Take the left hallway.
Room 8 – Insert the key on locked
door at end of left purple slime hallway. There’s a stamina potion on floor.
Check energy level for need to consume stamina potion. See a blue vase, a
ghost and 2 phones. Take the tape from the tomb of Nicholas Kiss. The
tomb of Martina Bronte is on top of the room. Operate the floor tile and take
cupid’s bow. Take another bell from stand. If you operate the
bottom phone, the ghost answers the other phone. Place the trap in front of the
ghost and then operate the bottom phone. Take ghost trap. Go to bottom
right corner of room and see Book of Names. Drop the ‘Where is M’ paper on
Book of Names. Take ‘Where is Mestophilys?’ paper.
Go out of room and immediately go left
on the hall. Operate lever, enter room and drop the ghost tarp on ghost holding
device. Take ghost trap. Go to Room 7 and the zombie by the
gargoyles.
Room 7 and the Zombie – While
facing the zombie with an attitude problem, look at the ‘Where is
Mestophilys?’ paper. After running away scared, the door on the left is opened.
Enter Room 9.
Where is
Mestophilys?
Room 9 – Take the ‘Is there
anybody there?’ paper from the stand. Operate the lever and see the 3
hammers on the wall move. Look at mummy. The mummy wants you to play something
soothing. Place the 2 bells on the stand by the 3 hammers on the wall. Operate
the wall lever. We’re missing a third bell. Pick up the Santa hat.
Operate the door lever on the wall by hat. Go to Room 3.
Room 3 and the chicken – Drop the
egg on the nest and the chicken will move to sit on the nest. Go around and now
operate the floor tile and see a stamina potion. If your inventory is full, you
don’t need to pick this up. Look at the tape player. Drop tape on tape player,
operate tape player and hear a dog bark. The chicken gets scared and flies away.
Take the feathers the chicken left on the nest. Go to Room 4 and the
conveyor machine.
Room 4 and Conveyor machine –
Drop the feathers on the floor at end of the conveyor belt. Operate the lever
and then take the upturned glass. Go to Quija board room above Room 5.
Quija Board – Place the upturned
glass on the board. Look at the ‘Is there anybody there?’ paper. Take
stethoscope and Hoover bag from the now opened chests. Drop ‘Is
there anybody there?’ paper.
Go to Room 5 and place Hoover bag on
Hoover. Go back to room 7.
Room 7 and Doctor Love – Drop the
stethoscope and cupid’s bow on the tomb of Doctor Love. Take another
bell. Guess what, back to Room 9 and the other bells.
Room 9 and bells – Place the
third bell on the stand and then operate the lever. Take the
key.
Room 10 Purple Slime Maze –
Insert the key on the door by the mummy. Check if you have enough energy. Check
the energy level frequently while going through the maze and consume stamina
potion as needed. There are enough stamina potion to be found in the maze.
Enter, go up to the room, immediately turn left, down, left, up on first
opening, and follow the maze until the top. At the top, take the right path,
take the 2 stamina potions and the key. Go back out of the maze
room. Go down to the hall below.
U-shaped hall – Enter the
u-shaped hall with 2 switching items on stands. Hmm! Take the tennis
racket. Go around enter Room 11.
Room 11 – See a not working TV
and a ghost. Go back to room 7 and down the hall.
Room 7 hallway – Insert key on
locked door. Enter and go forward to Room 12.
Room 12 – Take the flower
from the vase. Read the book and learn about the Soul Stealer. Drop book.
Go to top left hallway and operate lever to open a way to the TV room. Continue
to the left hallway and note there’s a key behind the ghost at the TV room.
Room 13 – Mestophilys’ room –
Take the ‘I wish I were in Kansas’ paper. Take the chalice from
the stand. See a pentagram in front of the sofa. Stand on pentagram and read the
‘Where is Mestophilys?’ paper. Oh! Mestophylis appears. Look at Mestophylis.
Bring me my ring! Drop the ‘Where is Mestophilys?’ paper.
Bring me my ring!
Quija board room by Room 5 – Go
to the Quija board room and the barrel of brandy. Place chalice on table and
then operate the barrel of brandy. Take chalice with brandy.
Room 1 and the shocked mummy –
Drop chalice of brandy on table in front of shocked mummy. Take potion of
thieves.
Room 8 and tombs – Drop the
flower on the tacky vase. See Soosan, the invisible allergic zombie. You’re
so handsome!
Room 7 and calendar vampire –
Consume the potion of thieves and take the June calendar from the
vampire. Go to Room 6 and the Hoover.
Room 5 and the Hoover – Drop the
calendar on the stand. Move to the Hoover and operate the Hoover with the Hoover
bag in it. Take Hoover bag with the June, the vampire’s wife in it. Let’s
return her to her hubby.
Room 6 and the vampire – Drop the
June filled Hoover bag on the vampire. Take the mirror spell. Go back to
Soosan.
Room 8 and Soosan – Drop the
mirror spell in front of Soosan. Ugh! Another Infinity look-alike. Take the
ring. One Mestophilys order done.
Room 13 and Mestophilys –
Place the ring on the stand by Mestophilys. Another Mestophilys’ order
– Prove that you’re evil. Take the mistletoe.
Prove that you’re
evil!
Room 8 and Nicholas Kiss – Drop
the Santa hat and mistletoe on the tomb of Nicholas Kiss. Take tiptoe
potion. Go to u-shaped hall with 2 switching items on stands close to Room
11 – TV room.
U-shaped hall – One tile before
one of the 2 switching items on stands, consume the tiptoe potion. Take the
‘Innocent’ paper and telekinesis potion. Where did we see that
bottle that was unreachable?
Room 7 – Right across the
calendar vampire is a bottle that is unreachable. Face the 3 stands with a
bottle on one of them. Consume telekinesis potion and look at ‘Will you move,
please’ paper. The bottle will move closer. What power! Take potion of
evil. Drop ‘Will you move, please’ paper. Go to the pentagram by room
5.
Pentagram by Room 5 – Stand on
pentagram and look at ‘I wish I were in Kansas’ paper. You find yourself
transported to a Zombie trial. Look at Zombie at center. You are asked what is
the verdict. Consume the potion of evil and then look at ‘Innocent’ paper. Yuck!
Take Zombie head. To go back to the pentagram at Room 6, stand on
pentagram and look at ‘I wish I were in Kansas’ paper again.
Room 13 and Mestophilys –
Place the Zombie head on the stand by Mestophilys. Another Mestophilys’ order
– Give me your soul. Take the Wuthering Heights book.
Give me your
soul!
Room 8 and Martina Bronte – Drop
the tennis racket and Wuthering Heights book on the tomb of Martina Bronte. Take
TV aerial. Just in time for the Waltons.
Room 11 and TV – While standing
above the ghost’s level, drop ghost trap in front of ghost. Drop TV aerial on
TV. Take ghost trap. Walk the purple slime to take the key behind
the ghost.
Room 4 and Ghost holding machine –
Drop the filled ghost trap on ghost holding machine. Wow! It exploded – must
be too full! Infinity got hurt. Take one step away and take Infinity’s
blood from floor. Go to Mestophilys’ room.
Room 14 and Soul Stealer – Use
the key on locked door at bottom of room 13. Enter and see the soul stealer.
Drop blood on blue circle. Take Infinity’s soul.
Room 13 and Mestophilys –
Place Infinity’s soul on the stand. Now you’re evil enough to finish
your quest. Go with my blessings.
Enter the left door that
opened.
You’re really going to miss
me now! Aren’t you?
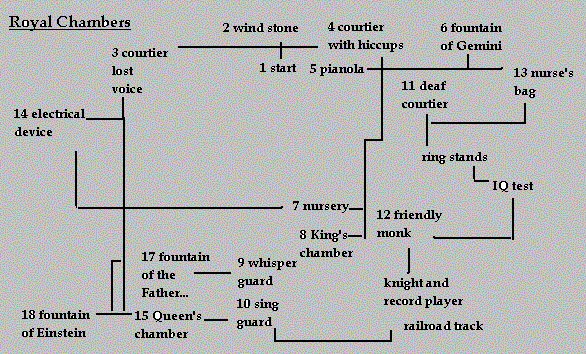
Episode 8 – Royal Chambers
It’s Showtime! Infinity has finally managed to get close to King
Garamond. Loyal royal courtiers and a whole bunch of monks are the only
staff left who are standing in the way of Infinity’s evil plan. A plan to murder
his own brother and crown himself King. But how can Infinity actually kill the
King? What devices lie at his disposal? And how can he lure King Garamond to his
death? Time will only tell…