|
Catacombs – Go forward and see a stone slab blocking a passage. Pull the
lever beside it – the door opens a little and then push on the slab. That
doesn’t work. Darrel needs help. Bring Victoria here. Get Victoria
to pull the lever and Darrel pushes the slab – the other way around
doesn’t work, Victoria is not strong enough to push the slab. (4:50 PM,
+10 mins) Teamwork!
Crypt – Look close at the altar (used by a religious sect) and the cups
held by the cherubs. If the cups are touched, they move. The right cherub
wears a bracelet. Bracelet, where did we see that before?
Chapel – Go out the door by pulling the bolt of the door.
In search of the
Pendulum Chamber:
Greenhouse – Go the garden behind the greenhouse, look close at the statue
of the lion. Place a medallion on lion’s mouth. A passage opens and
Victoria arrives. Darrel is insistent that he goes down and gives Victoria
the medallions to study.
Labyrinth entry – Darrel finds Raul’s body and says that he died from
suffocation in the sand trap. He picks up a silver object (5:00 PM,
+10 mins) with 6 buttons on top and 6 buttons at the bottom, a black face
on the left and white face on the right. It seems like sand filled the
room from the openings on the wall. Save Game! Look at the door and note that it is similar to the
silver disk taken beside Raul’s body. Push the buttons (right click) on
the door. But when Darrel steps on the dark paved floor, the sand trap is
activated. He cries to Victoria for help. Immediately get Victoria to
place a medallion on the lion’s mouth. If not on time, see Darrel
suffocated by sand and dies. Game ends! If in time, Darrel comes out,
shakes his arms, wipes his mouth, looks at Victoria, says they need to
look for another way and walks away. Ooh! How macho! (5:15 PM, +15 mins)
If you try to place another medallion in the lion’s mouth, Victoria will
say it might be needed later.
Fixing the Clock at the
Clock Tower:
Enter the castle by the
Nauturium and meet an irate Greta Snyder, the housekeeper. You are
reprimanded for getting Stephen the cook drunk, who is late in preparing
for teatime. Watch the cut scene with Greta finding Stephen in the Plain
bedroom drunk and had to wake him because Mrs. Roberts hates to have her
tea late. Time to have some tea then.
Dining Room – Look close at the tray with cup and saucer and a rose in a
vase. It is for Jude Roberts. Hmm! Remember the book. Place blood on the
rose. (5:30 PM, +15 mins) Greta brings the tea tray to Jude at the
Supervisor’s quarters.
Supervisor’s quarters – Take the service elevator to the 2nd floor and
turn right. Knock on door. (5:45 PM, +15 mins) Watch the cut scene of
Darrel telling Jude about the curse on the necklace, she wore on the
picture. Darrel spins a good yarn and ended with Jude giving him the
necklace. She will take tranquilizers to rest. Enter the
Supervisor’s quarters again. Go to the sitting room and look behind the
green painting. Look close and enter the numbers from the invoice in
Anderson’s filing cabinet – 1, 2, 4, 8, 0, then press the arrow key. Take
the old gold coin. (5:55 PM, +10 mins) Place the painting back on
the wall.
Victoria:
Old Wing Hallway – Go back to the Old Wing, climb the stairs and forward
to the hallway. Look at the weigh scale in front of the mirror. Where did
we see a weigh scale before? Look at the picture in inventory. It shows
the hands on the right wearing bracelet holding 3 coins and the left has 2
coins – cherub, altar, scale, coins – Hmmm! We have to get a weight
equivalent to 2 coins and then another weight equivalent to 3 coins.
Transfer the coin and incense from Darrel’s inventory to Victoria’s. Place
the coin on the left scale and place the incense on the right scale.
Collect the incense on the right scale in one of the envelopes. Add
incense to the right pan again and collect it in the envelope with 1 dose
of incense = 2 coins weight. Repeat the same procedure with the other
envelope to get another envelope with 2 doses. So now there are 2
envelopes of 2 doses each the equivalent in weight as 2 coins each
envelope. Pick up the old coin from the left pan.
Orologia – Enter the room at the end of the hallway and see a roomful of
clocks and watches. Look close at the clock in the middle of the room.
Right click the angel on top and the head turns. Look in the back of the
clock and open the compartment. It has a rectangular hole, semicircular
hole and a round hole at the center. The semicircular hole looks familiar
but what about the round hole and rectangular hole.
Planetarium – Look in the display case and read the manuscript on the
left. The stellar coordinates of the Horologium constellation are 4 hrs.
15 mins and -41 deg.
Darrel: Crypt of the chapel – Go to chapel through the door.
Go down the stairs behind at the altar. Transfer the 2 2-doses of incense
in envelopes and the coin from Victoria’s inventory to Darrel’s. Place 2
doses on the cup of the left cherub. Place 2 doses on the cup of the right
cherub. Place the coin on the cup of the right cherub. A compartment opens
on the altar. Pick up the metal plate made up 2 faces, one black
and one white – similar to the silver object taken from Raul and the door
of the sand trap room. Look at it in inventory and when clicked it
separates into 2. (6:10 PM, +15 mins)
Victoria:
Arcanium – Open the door behind Chronos again setting the clock at the end
of the Hallway to 8:55 on the left dial and 7:10 on the right dial.
Transfer the metal plates from Darrel’s inventory to Victoria’s. Place the
metal plates on the incisions of the slabs of the candlesticks previously
moved. Look at the sphere and see that it has risen from the base. Pick up
the sphere. (6:25 PM, +15 mins)
Orologia – Go back to the clock room at the end of the hallway upstairs.
Transfer Anna’s necklace and crystal from the mausoleum from Darrel’s
inventory to Victoria’s. Open the back compartment of the clock at the
middle of the room, if not done yet. Insert the round crystal from the
Arcanium at the round hole, Anna’s necklace on the semicircular hole and
the crystal from the mausoleum on the rectangular hole. Turn the angel’s
head. (6:45 PM, +20 mins) Watch the cut scene that started with a close up
of the chest seen at the church tower. The scene continued showing the
death of the Watchmaker by removing his heart and the heart burned. The
evil immortals are still looking for the pendulum. Take the rectangular
crystal, which has been activated by the energy that passed through the
clock to make activated crystal from the back compartment of the
clock. Remember the chest has a rectangular slot.
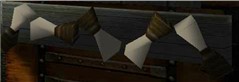
Clock Tower – Look close at the chest. Insert the activated rectangular
crystal on the rectangular slot. Arrange the dumbbell levers similar to
that seen in the cut scene in the clock room by clicking it clockwise
until the correct position is reached – (white part L-R, NE, W, SE, SW,
NW. (7:00 PM, +15 mins) Look in the trunk-chest and pick up the new
metal disk. Go to the trap door and place the new metal disk (add to
trap door not the other metal disk) to replace the broken one. Now, we
need the cog for the machine on the wall.
Darrel: Caretaker’s cottage – Talk to Henry about Anna.
Remember he made those nice carvings on the shelf. Show Henry the bronze
ring and he said he could make a wooden cog if you have the dimensions.
Multinational Offices – Go to the Supervisor’s office and see Anderson
come out of the dark room. He gives Darrel the old photo and
photo plan and leaves the office. (7:10 PM, +10 mins) Look at the
old photo in inventory. 3 of those guys look familiar from the clock cut
scene. Look at the photo plan and see the design of the clock mechanism.
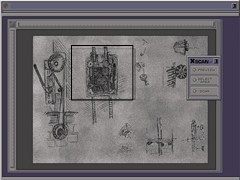
Use the photo plan on the scanner. (7:30 PM, +20 mins) Darrel says the
image will be in the computer. Look close at computer. Click ‘Preview’ and
then ‘Select Area’. Move the select square to the front view of the
machine at middle of the screen. Click ‘Scan’ and then click the upper
right corner. The enlargement is automatically printed and taken.
If the wrong part of the plan is selected and scanned, it will not get
printed.
Caretaker’s cottage – Give Henry the bronze ring and then the
enlargement. (7:50 PM, +20 mins)
Henry immediately gets to
work and later comes back to give Darrel the cog gear with the
bronze ring at the center.
Clock Tower – Place the cog gear in the machine. Pull the lever beside it.
(8:00 PM, +10 mins) The floor started to move and Darrel jumps on it and
goes down to the Labyrinth Entrance. Look at the machine and lever on the
wall similar to the one just fixed – it is used to go back up to the tower
via the platform. Look at the door to the Labyrinth. Look at symbols on
door and then look at Raul’s silver object. The top (L-R) 2, 4, 5 and 6
buttons are pushed in and the bottom (L-R) 1, 2 and 5 buttons are pushed.
Press the buttons the same way. (8:15 PM, +15 mins)
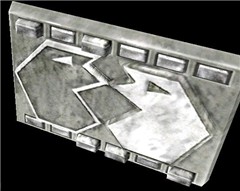
The door opens to show steps.
Before going in Darrel calls Victoria to join him. He insisted on going in
by himself because the Pendulum chamber will have the thugs and other
machinations by the watchmaker. He also has something to ‘settle’ with his
father, who Victoria says is dead. Darrel’s father is a vicar who insists
that there is no death. He gives Victoria his entire inventory except for
the telephone. Darrel walks in and the door closes.
Getting to the Pendulum
Room:
Darrel: Labyrinth
hallway – Check the wooden lever on the left side of the stairs and
nothing happens. Go down the stairs, pass 2 gated side passages and go in
the only open passageway at the end of the hallway.
Astrologium – On the right wall, there are 3 levers. Look close at the
ceiling is frescoed with the constellations and note one of the
constellation looks like the drawing on the manuscript at the Planetarium
– Horologium constellation. Look close at the giant clock carved directly
into the rock face and the degree marks at the bottom of the clock. Move
the 3 levers to show the coordinates of the Horologium constellation – 4
hrs. 15 mins and -41 deg. Look close at the levers. The first lever moves
the hour hand ahead one hour – click 4x on first lever. The second lever
moves the minute hand ahead 5 minutes – click 3x on second lever. The
third lever moves the hand ahead by one degree as seen at the bottom of
the clock – click 6x on the third lever. A sound is heard. (8:30 PM, +15
mins) Go out to the passageway and see that the gates blocking the 2
passageways have been raised but the way to the stairs is now gated.
Facing the stairs, take the left passageway and down the stairs.
Clockwork room – Look at the machine. Note the closed compartment at the
bottom and a star-shaped cavity at the top of the machine. Look
at the cogs. There is an opening that leads to another passage
at the other side of the cogs. Anyone going through the moving cogs will
be sliced. Go back to the other passageway.
Enter the watchmaker’s study
(8:40 PM, +10 mins) and Victoria calls on the telephone. Somebody has
arrived. It is one of the immortals, Victoria recognizes from the photo.
The immortal berates Anderson and is looking for Victoria and Darrel. The
Hunter and Anderson go to his office. Darrel advises Victoria to hide.
Watchmaker’s study – Look at the plans on the wall. One plan is the
diagram of the castle. The other says – The leyline crosses at the lowest
point under the castle and its energy is concentrated at the Pendulum
Chamber. The other plan shows a passage that connects the machine room to
a corridor.
Pick up the letter dated
1910 from Vienna. It is the letter of the Watchmaker to the rest of the
immortals. The Watchmaker has faced reality that his old plans have
failed. He has seen the other immortals enslaved the world and has decided
to end it. He started the pendulum moving therefore time is back for the
immortals’ Internal Clock and they will die in the end. (Internal Clock
and Pendulum explained in the diary). Open the drawer and take a
parchment. The parchment explains about the sand trap that would
slow down the evil immortals while an alarm in the cistern warns the
watchmaker. Read all the old records at the top of the desk. The old
records are of those immortals that need to be intervened with immediately
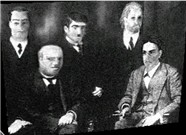
as noted by the Watchmaker. Some of them are the ones in the picture. Alex
Pakhilov – The Conqueror, F W Bessel – The Astronomer, Bernard Nym – The
Weaver, Charles Barlow – The Elder, Sebastian Himmler – The Surgeon,
Abramo Hazande – The Translator and Gregor Moore – The Preacher. Pick up
the old record on the left side of the desk by itself – Angel Bluemont –
The Hunter. It exposes a metal star. (8:55 PM, +15 mins)
Darrel calls Victoria and kept
her up to date about The Hunter. Darrel advises to render him harmless in
some way.
Victoria:
Victoria stands in the Castle Garden facing the Supervisor’s window and
can see Anderson and the Hunter in there. How to render the Hunter
harmless. Throw the padlock on the window to catch their attention. (9:05
PM, +10 mins) Hunter looks out and Victoria runs for cover behind the
Mausoleum. Hunter fires at Victoria. Now, run to the greenhouse and to the
garden behind it. Use a medallion on the lion’s mouth and the secret
passage opens. (9:15 PM, +10 mins) Victoria hides to one side of the
garden. The Hunter arrives and sees the open passage. Presuming that she’s
down there, he enters and gets entrapped by sand. Victoria calls Darrel to
tell him what happened and to hurry him up for time is getting
short.
Darrel: Watchmaker’s
study – Pick up the Watchmaker’s metal star from the desk. Go to
the Clockwork room at the opposite passageway.
Clockwork room – Insert the Watchmaker’s metal star at the star-shaped
cavity on the machine. (9:25 PM, +10 mins) The compartment below opens up
and indicators are seen. Now what to enter, remember the set of indicators
seen on the machine by the underground cistern. Enter (L-R) 2, 7, 4, 11
and 9. Silence!!! (9:40 PM, +15 mins) Save Game!
Enter the opened passageway and see Corona crushed to death by a stone
block, another trap by the watchmaker. Corona’s henchman sees Darrel and
shoots. Darrell goes back to the clockwork room and faces the indicators
again. How to stop him – start the cog again by entering the same numbers
on the machine in the underground cistern – 6, 6, 6, 6 and 6. (9:45 PM, +5
mins) The cog starts.
The turning cog catches the henchman. Darrel calls Victoria to tell her
about 2 that got killed and there are two more to watch out for. They will
now be in constant radio contact.
Enter the passageway and see Corona caught in the trap. There are blood
drops going into the next room, the Pendulum Chamber: (9:55 PM, +10 mins)
Enter the room. Look at the Clock. Krenn hits Darrel unconscious from
behind. Note the blood smears on the floor. Krenn stops himself from
shooting Darrel because he might get info from him about the
immortals.
Victoria realizes that Darrel
is in trouble and that she needs to hurry.
Victoria:
Labyrinth Entrance – Press buttons – on the top (L-R) 2, 4, 5 and 6 and on
the bottom (L-R) 1, 2 and 5. Pull down the lever on the left of the stairs
to raise the gate. (10:00 PM, +5 mins)
Go to the Pendulum Room and before entering – Save Game!!!
Pendulum Room – Stand behind a column. Look close (space bar) and see
Darrell tied up on the right side. Look at the path of the streak of blood
to the left side of the room and goes in an open entryway. Carefully inch
up to 4 steps behind that column – press space bar and watch Krenn. See
him look around to your side, look at the clock and then look at the other
side. As soon as he looks at the clock, press space bar to get out of
first person view and RUN (Shift key + forward or Caps lock and right
click) to the open hallway where the blood is. If not successful, a view
of the bullet coming is seen and game ends.
Leylines Room – Look at Duke’s body and Victoria says something about
stealing from the dead – so pick up something from Duke’s body and get a
Zippo lighter. Look at the lion’s head with mouth open and on the
opposite side of the room see a bas-relief planked by 2 star-shaped
cavities. As before with another lion, place a medallion on the lion’s
head. (10:05 PM, +5 mins) A stairs open up on the wall. Climb
up.
Astrologium Passage – Pull down the lever by the stairs to open the
entryway at the end of the passage. (10:20 PM, +15 mins) Enter the room
and find yourself in the room with the big clock.
Clockwork room – Pick up the Watchmaker metal star from the
machinery. We need another one.
Watchmaker’s study – Let’s make a star then. Take a candle from the
candlestick on the desk. Place the candle on the brazier. Light the candle
to melt wax on the brazier using Duke’s lighter. Use the watchmaker’s
metal star on the melted wax to make a star mold. Now, use the half empty
phials on the mold. Victoria picks up the new star. (10:25 PM, +5
mins) Now, go back to that bas-relief with the star
cavities.
Leylines room – Place the Watchmaker metal star and the new star on the
star-shaped cavities on either side of the bas-relief. (10:30 PM, +5 mins)
The bas-relief slides down and opens a compartment. It has an altar, a
parchment and blue, green, red and yellow phials. Read the parchment on
how to use the colored liquids connected to the alchemy of the leylines.
By pouring the blue, green and yellow liquids into the hollow, the
leylines will be visible. Click on the blue, green and yellow phials and
Victoria pours it on the hollow of the altar. (10:40 PM, + 10 mins)
Pendulum room – The leylines flow brightly like a river under the clock
and plumes up to obscure the clock. Krenn watches the astounding show.
Victoria karate chops Krenn unconscious. Look at Darrel and see him
handcuffed. Pick the keys off Krenn’s body. Look close at Darrel
and use the key on the handcuff. (10:50 PM, +10 mins).
Darrel thanks Victoria –
partner! They look at the clock and notice that it is one hour ahead. The
Death of the Watchmaker. The Hunter comes in and tells Victoria and Darrel
to kneel in front of him. The Elder calls the Hunter and orders him to
stop the clock and kill Victoria and Darrel. But the Hunter says that he
still has one hour to go and wants to question the two. When he finally
will obey the elder and kill the main characters, the clock strikes
midnight and the immortals die.
9:00 AM, Castle Garden –
Victoria and Darrel walk out and then turn to look at the
castle.
If the players are all gone
… is the Game Over?
Translation of the Watchmaker’s
Diary:
As year follows year, I
am convinced that our land is governed by men both noble and just. Yet
enmity between sovereigns brings suffering to our people. From that which
I have seen and that which I have read in my books only the blueblood of
the knighthood and the great wisdom of the nobles have strength enough to
burn and destroy the troubles of this world. My plan, my great design
shall be to create a new immortal kingdom. A world without end, founded by
men of nobility and great intellect. They shall govern with peace, justice
and chivalry over all peoples and their kingdom shall have no end. With my
knowledge and time control apparatus, I shall guarantee the immortality of
their bodies and souls and the strength to hold the fiercest armies ever
created in the palms of their hands. No more shall there be war,
pestilence or persecution of the weak and oppressed. No more shall there
be lords and masters, peasants and slaves or any other injustice which
leads men to revolt. There shall be years of good government. With this
accomplished, I shall withdraw into peace and silence as I have so often
dream. My eternal, life-giving apparatus in its most complete form appears
in the guise of a Pendulum clock The energies which course through the
veins of our ancient land and the path taken by wandering spirits ensure
its working through eternity. The form of the Pendulum, is no mere choice.
On the contrary, it is the clock of the soul an instrument capable of
reaching a true equilibrium of the depths of the human spirits, capable of
of controlling the Internal Clock hidden in every man. This Internal Clock
represents that part of us which silently governs the rhythms of our
lives. Here is how the Pendulum can offer eternal life: the internal clock
is stopped, leaving spirit in harmony with the running of time. My studies
have 2 separate phases. In the first phase, 24 noble men including myself
shall be chosen and gathered together to receive the gift of immortality.
24 noble hearts , like the 24 hours of my Pendulum. In the second phase, I
myself shall bring the pendulum to a halt causing the Internal Clock to
stop inside the chosen men. They shall become immortal. The Pendulum shall
be transported to a safe place and shall be buried forever. For if the
strength of the eternal life is to remain. The Pendulum must never swing
again. The man who gives his soul to the Pendulum and so to eternal life
will acquire virtues which raise him above other mortal creatures. These
virtues are linked to he Internal Clock and particularly allow: Control
over physical aging or the gift of eternal youth or maturity, according to
the Immortal’s desire. Invincibility of the flesh or the gift of
invulnerability. Not fire, nor blade nor sword nor any mortal weapon can
touch the Immortal. Physical excellence or the gift of constant perfect
health never victim of disease or plague or hunger or of other pestilence
which afflict our people.
The Watchmaker: Myself.
The Elder: My one and only friend and the first chosen noble in our
immortal kingdom. The Translator: Known as the greatest virtuoso of the
art of fortune telling. The Surgeon: During my visit in France he was
introduced to me as the most respected surgeon in the land. The
Philosopher: This man is greatly admired for his merits in literature and
philosophy. The Trader: An astute trader and an able salesman whom I met
during my council with His Majesty, Charles II. The Poet: In the Italian
lands of .. as he knew how to use the sword and the lyre. The Conqueror:
The most able General and Man of Arms you’re likely to meet. Never has his
blood tarnished the battlefield. The Mediator: Advisor to His Majesty
Louis XIV. I met him whilst crossing the kingdom of France. The Collector:
In the archives of the kingdom of ..his hands .. in peace. The Weaver: His
great talent lies in his ability to manipulate people as though they were
mere tatters of cloth. The Toreador: Of knightly values and noble heart,
he is always ready to depend the weak and oppressed. The Traveler: More
widely traveled than any other man. He has seen the sun rise over
continents far and wide. The Maestro: As soon as I heard him speak I
understood. Today, they call him mad, tomorrow they will recognize him as
the Light of the World. The Judge: Without justice, that the kingdom will
never .. him and always .. and strength. The Painter: Patron of great
painters and sculptures and .. arts and great civilization in this world.
The Banker: If wealth is needed in our new kingdom, he is surely the
person who knows how to make it prosper and grow. The Preacher: This
Cardinal is the bravest and most revolutionary thinker to ever cross the
threshold of the Holy Sepulcher. The Admiral: Master of the English art of
naval warfare. The Astronomer: Stargazer who refuses philosophy and
deduction. His observations are made with new lenses and instruments. The
Foreigner: Born in a land where silk ..with the wisdom of his people. The
Hunter: First Knight of the crown and the master of the sword in the
French Court. The Prophet: There where the shadows .. darkness can be
conquered by the profession of his faith. The Monk: The wise,
knowledgeable guardian of the Library of …
This document may not
be distributed without express written permission of the author and the
content may not be altered in any way.
For Questions or
Comments on this Walkthrough,
Please write to: MaGtRo
Copyright ©
6/2002 MaGtRo |