Game Play:
The game is both mouse and keyboard controlled. Mouse or arrow keys
do the movement of the characters. Holding the Shift key will make
the character run. Or press Caps lock and just use arrow keys all
through the game and the characters run all the time. To change from
one character to another, press F8 key. To Save game, press F1 or
use the Option menu, then click on the picture with a NEW in red in
the saved game frame. To use a frame with an old save on it, click
on it and the new save replaces it. Press Close button to return to
the game. To Load game, press F2 or use the option menu. It is advisable
to just use the Options menu to save and load. To access Audio options
press F3 or the Option menu. To access the PDA, where a record of
conversations is recorded, press the P key or the telephone icon in
inventory
First Person view –
Pressing the spacebar will change from third person view to first
person. In first person view, objects can be seen closer than in third
person view but the character cannot run or walk. In first person
view: to look around – use the arrow keys or Shift key + cursor, to
crouch – press Z key or to raise the view – press the A key. To examine
an object, left click the mouse and to take an item, right click the
mouse.
Inventory screen – Pressing
the Tab key opens the inventory
and pressing it again closes it. Select an object by left click of
the mouse and to turn the object for 3-D examination by left click/hold/move
cursor. To combine objects or give to a person – select an object,
then right click (cursor will change to an arrow with +) and left
click the object to combine with or person to give the item to. If
the 2 main characters are in different rooms, a telephone icon will
appear above the inventory item list. When the telephone icon is clicked,
the other character will come to that location. When a bar appears
on the telephone icon, it means that both characters cannot be together
at that same location. If the characters are very close to each other
or one floor down, the change of character is not possible – specifically
in the church tower. Left click on the name of the current character
at the top of the screen will open the inventory of the second character.
Then left click on an item on that list will transfer that item to
the current character’s inventory. When an object is selected the
Option Menu appears on top the screen. The Save, Load and Audio options
is seen.
To talk to other characters,
right click on that character and a list of possible conversation
will appear. Be sure to check if there is an arrow key to show more
dialogue selections. Right click outside the dialogue frame will stop
the conversation.
The game clock starts
at 9:00 AM with the arrival of Darrel and Victoria at the castle.
The progress during that time is based on the actions done within
the time frame and is not related to real time.
At 2:40 AM, Darrel Boone,
a paranormal expert was awakened by a call from a Law Office for an
emergency consultation. In the Norman Mac Green Law Office, he meets
Victoria Conroy, a lawyer and was hired to retrieve a stolen device
before midnight. The stolen device looks like a big pendulum and could
be used to amplify the energy of leylines. There are already disruptions
noted and the eclipse of the sun will amplify it. The stolen device
is possibly in an Austrian castle that is the headquarters of an organization
called Multinational. They are supposed to call the Law office when
the device is located. They arrive at the Castle Garden at 8:45 AM
and met by Christopher Anderson, castle supervisor. They were shown
to their rooms. At 9:00 AM, Victoria and Darrel meet at the 4th Floor
hallway.
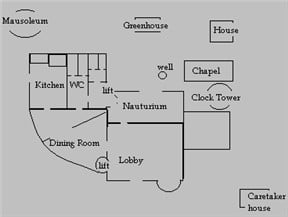
Castle Orientation
4th Floor
– The 4th floor has 2 locked rooms,
Victoria’s room, Darrel’s room, service lift and the main lift.
Victoria’s and Darrel’s rooms goes out to a common balcony that
overlooks the mountains, a house in the yard to the north, hothouse,
garden and a clock tower to the left.
Using
the Main lift:
3rd Floor
– The third floor opens to a party
area and a lounge to the left of the stairs that goes down to
the mezzanine. The lounge has a stairs that goes down to the Multinational
offices and a French door to the terrace (not used in the game).
2nd Floor
– The Mezzanine is accessed by the
party room stairs. The stairs from the lounge accesses the Multinational
Offices. The Offices have a bathroom, security door, Bureau door,
blue door and stairs going down to the kitchen.
Ground (0)
Floor – The Lobby is accessed
by the stairs from the mezzanine. It has the lift, main door,
glass door to the Dining Room and door to the Nautorium.
In the Dining room, there is a fireplace with a clock on it. The
adjacent room has a cupboard. There are 2 doors, one that goes
to the Guest restroom and the other that goes to the kitchen.
The Kitchen has a pantry door, a fridge door, door to go to the
Multinational office, door to go outside close to the Mausoleum
and door to dining room. Inside the fridge door is a glass-topped
freezer that has a temperature control panel that can be adjusted.
Inside the Guest restroom, there are doors to the male and female
WC. The adjacent room has the male and female showers, entry
to nautorium and the service lift (blocked from 9 -9:20 AM).
In the Nautorium, there is the swimming pool, door to lobby, an
old door and a door to the outdoors by the well and greenhouse.
Using
the service elevator (accessed after 9:20 AM):
2nd Floor
– The second floor has the
door to the supervisor’s apartment and the gym.
1st Floor
– The first floor
has the sauna and locker rooms.
Basement
(-1) – The basement leads to a wood
door of the cellar, metal door to the boiler room and the laundry
at the left hallway.
Castle
Gardens (Facing the main door to the castle):
At right
bottom corner is the caretaker’s house. At top right corner is
the gardener’s house. The chapel is in front of the gardener’s
house and beside it is the clock tower.
At the left
bottom corner is the underground garage. At top left corner is
the rose garden and mausoleum.
At the back
of the castle is the greenhouse with an enclosed garden in the
back, an aviary and an old well.
Either main character can
do the activities shown unless stated by the main character his or
herself and described only as such for ease in the flow of the game.
The time shown is when an activity is done that moves the time and
the amount of time added by such action. Some actions can be done
later or earlier than what is shown. Check the PDA for clues and what
to do next. After initial interviews with other cast of characters,
talking to them again about new topics might reveal clues.
Exploring the Castle:
9:00 AM:
Enter either room of the main character at the 4th floor and go out
to the balcony. Look at the clock tower at the upper left corner and
see a gap-crack that makes it accessible. Right click on gap to climb
to the clock tower. The tower has a bas-relief of a creature and an
old clock on the roof. To the right of the bas-relief is a plaster
that upon examination shows ‘something underneath’. Look close by
pressing the space bar and see a crack in the plaster.
Take the main lift to the
first floor.
Darrel: Dining
room – Look close (space bar) at the carriage clock on the fireplace
mantel. Take (right click) the clock key. Go
to the adjacent room and open the cupboard. Look close (space bar)
and take a knife.
Shower room – Enter the door to the guest bathroom and then to the
adjacent shower room. Look inside the cupboard and find a bottle of
sulfuric acid at the bottom shelf. Darrel says it is used to fix water
pipes but needs a container to use it. .
Victoria: Nautorium – Knock
on old door. Greta
Snyder, the Housekeeping supervisor
opens the door and says that you need authorization to enter the Old
Wing (trigger for Old Wing dialogue). Talk (right click) to
the supervisor’s wife, Jude Roberts. Ask
her about all dialogues and specially Carla Hoffman, the maid and
Carla’s private life (Darrel
can not ask this question).
Carla goes to Jude for advice to trap a rich man and settle down.
Jude sounds to be not happy in her situation and her impression of
the Multinationals are interesting. Right click outside the dialogue
frame to end conversation.
Go outside using the front door by the foyer. Talk to Raul Hernandez, the gardener found at the right side of the front
yard. Chris Anderson maybe one of the top person in the Multinational
and that his wife is one thing the other Multinationals envy him about.
The Old Wing is the only place left untouched centuries ago and is
full of antiques. The door to the clock tower has been removed and
the entrance has been walled up.
There is a plant stand close
by. The tree close to the caretaker’s house has a magpie nest that
cannot be reached and Raul does not want the plant stand to be taken.
The caretaker’s house and
chapel are locked. When you try the door of the house close to the
chapel, Raul, the gardener runs over to stop you and find out that
he lives there (gardener’s house dialogue added).
Go to the left side of the
castle’s main door and see a locked entry to the garage. Go to the
left side of the yard and enter the Mausoleum. The Mausoleum has a
chessboard that has squares that can be clicked. Look at the plaque
on the wall about Anna, beloved daughter.
Walk towards the Greenhouse.
The greenhouse vibrates and finally explodes making a hole on the
side (explosion dialogue added). Look close at the glass splinters
and note that the glass burst towards the Mausoleum. Look close at
hole and see that nothing else was destroyed except for that hole.
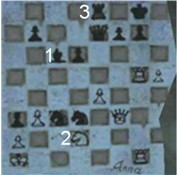
(9:20 AM, +20 mins) Go to the mausoleum and examine the crack made
by the explosion. It shows an unfinished chess game with Anna’s signature
on it.
Look inside the greenhouse
and see another hole at the opposite side of the hole formerly seen.
Open the door opposite the entry door and go out to the garden behind
the greenhouse. Look at fountain, statue of angel and lion fighting.
Go outside and look at the hole made at the side of the greenhouse
close to the gardener’s house. Seems to come from the gardener’s house
but no damage is seen at the walls of the house.
Exit and look at the padlocked
Aviary and see a scraggly pigeon inside. Look up at the window on
the abutting extension to the right of the aviary overlooking the
mausoleum. It is Anderson’s office.
Finding about the
people in the castle:
Darrel: Well – Look at well beside the nauturium door and
try to take the well cover off. There is a ladder going down the dry
well. Raul comes over and gives warning. Raul throws a plastic
bottle in the bin. Look close (space bar, look down, then
shift forward arrow to see the bottle) at bin with your back to the
chapel and take plastic bottle.
Nauturium – Enter the nauturium and look close at the bottom of the
swimming pool. There seem to be something glittering at
the bottom of the pool.
Gym – Take the service lift, which is now accessible to the 2nd floor.
Enter the door to the right and look around the gym. Look close at
the bicycle and its console. Right click on battery compartment and
then right click again to take the batteries.
Sauna – Take the service elevator to the 1st floor and enter the sauna
with glass windowed door. Pick up the paper bag of incense
crystals.
Getting the bracelet:
Basement – Take the service elevator to the basement (-1). The boiler
roomis locked. Enter the wood cellar door. Look
at bottles of wine and note that somebody has been there before you
drinking. Take a bottle of wine.
Exit and go to left hallway and enter the laundry room. Look close
at dispenser for liquid soap between the 2 washing machines and Darrel
says it is useless unless he has a container for it. Open inventory
(Tab), click on plastic bottle, right click on screen (get arrow+),
close the screen and click on dispenser and get detergent
in inventory. (9:30AM, +10 mins)
Kitchen – Go to the Kitchen and watch the cook imbibe while cooking.
Look at the pegboard by the door and see a hook and key.
Talk to Stephen
Klausmann, the cook about
his past life as a sailor. He mourns the destruction of his ship Aurelius.
He has some interesting things to say about the caretaker and gardener’s
house. (Bring Victoria into the
kitchen by pressing Tab and then click on her picture). Give the cook
the bottle of wine (open inventory, select wine, right click, close
window, click on cook). Darrel will invite him to drink by the table.
The cook recounts his problems and drinks. Midway the drinking bout, Victoria takes
the keys from the peg by the door. (9:45 AM,
+15 mins) To take the keys from Victoria’s inventory – press Tab,
click telephone, click Darrel’s name (will change to Victoria’s name)
click on Cook’s keys, click on Victoria’s name
and see that under Darrel’s inventory the keys are transferred.
Boiler room – Go to the basement and then boiler room using the service
lift. Use the cook’s keys on boiler room door and enter. Look close
at control panel at the far end of the room. Click the switch to turn
off the pump. Go to the 2 pumps for the swimming pool and look at
either of the 2 filters before water enters the pool. Open one of
the filters using the knife. Pour detergent in the filter. Close the
filter and turn the switch on again in the control panel. (10:00 AM,
+15 mins) Watch the cut scene of Jude calling Raul because there is
foam in the swimming pool.
Nauturium – Use the service lift to the ground floor. Go down the
drained swimming pool via the steps beside Jude. Darrel picks up the
gold bracelet with Carla etched on it. (10:15
AM, +15 mins)
Caretaker’s House – Go to the plant stand close to the caretaker’s
house, pick it up, Darrel moves it to the tree, climb on plant stand,
look at magpie nest and pick up a pair of eyeglasses.
(10:30 AM, +15 mins). Enter the caretaker’s house and talk to Henry Eistermeier especially about the gardener’s house (underground
cistern and tunnels), explosion in the greenhouse (happened before),
old clock tower (old door covered by frescoes). Look at the desk while
Henry is searching everywhere and see an open eyeglass case. Look
at the carvings on the shelf done by Henry. Give him the eyeglasses.
(10:40 AM, +10 mins) Take the chisel from the
shelf above the writing desk.
Victoria: 4th
Floor – Take the bracelet from Darrel’s inventory. Go up to the 4th
Floor and talk to Carla Hoffman, the maid (Darrel will not do this conversation). She is so shy she won’t stand still. Give her the
bracelet. (10:50 AM, +10 mins) Talk to her again about everything
especially about the supervisor, Carla’s private life and the gala
evening. She met Antonio Corona and a friend. They were talking with
Raul, who acted like he doesn’t know her. When Corona was alone, he
asked champagne from Carla. Corona is a bigwig from Las Vegas and
asked her to go with him. He left several visiting cards to Carla.
<Victoria silently says that she saw Antonio Corona on TV in FBI
Most Wanted Show>. Carla gives Victoria a visiting card
of Corona’s. (11:00AM, +10 mins) Look at the visiting card (banknote)
in inventory. Turn it around and see the #s 4, 17, 30 covered by chips.
Enter the Fireplace room Carla just finished cleaning. Look around
and open the desk drawer. Take 2 plain envelopes.
Lounge – Go to the lounge at the third floor and talk to Greta Snyder, housekeeper.
Multinational offices – Enter the blue door of the Meeting Room. Open
the bottom door of the second bookcase from the door. Take the walkman.
Enter the door marked Bureau (Supervisor’s office). Talk to Christopher Anderson.
Investigate the cause
of the explosion:
Darrell: Well
– Open the well cover and then enter the well. (11:15 AM, +15
mins) Cannot change character once in the underground
cistern. Walk to the end of
the underground cistern.
Underground cistern – See a hole blown on the wall. Climb over the
rubble to enter the hole. Look at the tubes at the bottom edge of
the walls, marble door, the luminous crystals and the machine. Pull
the lever down and the indicator numbers are all the same – 6. Pull
the lever back up again. Look at indicator of machine (L-R 2, 7, 4,
11 and 9). Push button and lights go around the room from the crystals
and open another hole in the wall. It does not matter whether the
lever is up or down; when the button is pressed an explosion occurs.
The button is now fused, completely destroyed. (11:25 AM, +10 mins)
Gardener’s cellar – Enter the new hole to the gardener’s cellar. Take
the cutter on sideboard. Open the door of the
sideboard and pick up a briefcase with a combination lock and marked
Corona. Need the combination. Look close at briefcase. Click on the
switch and enter L-R 4, 1, 7, 3 and 0. Press the button to the right.
(11:40 AM, +15 mins) Look at all the money in the briefcase and take
the cassette. Look close on briefcase and then
close it. The trapdoor on top of the steps is closed. Go out by way
of the underground cistern and the well. Oops! Raul sees you and runs
to the greenhouse. (11:50 AM, +10 mins) Close the well cover.
Greenhouse – Go inside the greenhouse and in the garden to look for
Raul. Where did he go?
Investigate the Multinationals:
Aviary – Remember that the aviary is close to Anderson’s window. Go
to the aviary; look close at padlock on aviary door. Use the cutter
on padlock. (12:00 PM, +10 mins) Open the door
and the pigeon fly out. (12:15 PM, +15 mins) Chris Anderson sees it
and calls Henry to catch it. Anderson and Henry look up a tree at
the pigeon. Now, check his office.
Multinational Offices – Go up to the Multinational office using the
door to the right of the cook via nauturium and guest bathroom. On
the way, see Henry fixing the washbasin in the Guest bathroom. Enter
the door marked Bureau (Supervisor’s office). Look at the photo
of Jude. Darrel comments on her unusual necklace. Look
at the photo in inventory and turn it around. The date September 7th
’95 is written on the back. Look in the filing cabinet and see an
invoice for an installation of a safe in Anderson’s apartment with
a combination 12480.
Secret lab – Go to the door beside the bathroom. Look close at the
keypad and press number from the back of Jude’s picture – 9, 7, 9,
5 and then right click the enter arrow at bottom right. (12:30 PM,
+15 mins) Darrel enters the secret lab. Press the red button on the
metal box close to the door. Take the bag of blood
and look at the preserved heart and brain. (12:35 PM, +15 mins) Open
the drawer by the computer table and take the syringe.
Use the syringe with the nitric acid on the table
by the microscope. (12:40 PM, +5 mins) Enter the supervisor’s office
and try to talk to Anderson about stolen organ but Darrel wants Victoria,
the lawyer to deal with this part.
Take the walkman from Victoria’s inventory. In inventory, combine
batteries with walkman and then cassette with walkman. (12:45 PM,
+5 mins) In inventory, look at and then right click the walkman. Listen
to Antonio Corona quotes 4 different passages from the Apocalypse.
In the end of the conversation, a phone number was dialed. (12:55
PM, +10 mins) In inventory, combine walkman with telephone to use
the tone sequencer. In the screen, press ‘acquire’ and then ‘process’
to get 231074. (1:00 PM, +5 mins) Corona and his henchmen must still
be around here.
Investigate the Old
Wing:
Victoria: Multinational
offices – Take the picture of Jude from Darrel’s inventory. Enter
the Supervisor’s office and talk to Christopher Anderson about the
Stolen Organs under Supervisor dialogue. Anderson denies any knowledge
of work done at the secret lab and that he has no access to that lab.
Show him the photo of Jude with the access number in the back. Victoria
did a major bluff about pictures, testimonies and other things to
make Anderson admit his involvement. Victoria demands the keys
to the Old Wing of the castle and gets it. (1:15 PM, +15 mins) One
tough lady!
Nauturium – Go to the Nauturium and pick up the book, Negative Karma
Jude left on the chair. Look close on the book in inventory and right
click the pamphlet bookmark. It says that the
bleeding rose was once considered to bring bad fortune. (1:25 PM,
+10 mins) Open the old door with the key.
Old Wing Salon – Enter the white double door to the right. Look around
and see a nail above the dresser. Click on nail and the cursor automatically
moves to a painting under and behind the dresser. Right click on painting
and Victoria pushes the dresser and picks up the painting.
Look close at the painting in inventory. It shows a weigh balance,
2 hands with no bracelets holding 2 coins on the left and 2 hands
with bracelets holding 3 coins on the right. (1:35 PM, +10 mins) Go
out the door.
Old Wing Hallway – Look around and at the picture of Chronos, the
God of time. At the end of the hallway look at a clock with 2 intersecting
dials and 4 hands. Turn right and go up the stairs.
Study – Enter the white door on the right. Open the showcase on the
wall. Look close at the painting of Anna wearing a unique necklace
(remember Jude’s picture) and holding 3 chess pieces – black bishop,
white knight and black castle. (1:45 PM, +10 mins) Pick up the metal cylinder, used on old recordings below her portrait.
Place the metal cylinder on the phonograph on the desk and then right
click the phonograph. The father of Anna expresses his worry about
Anna, who does not speak to them, speaks only to the watchmaker that
tends the clock tower. Exit the room.
In search for clues
about the pendulum:
Darrel: Guest
Bathroom – Henry is not here anymore. Go to the cupboard at the adjacent
shower room and open the door at the bottom. Use the nitric acid in
the syringe on the bottle of sulfuric acid to make an acid
mixture that is highly corrosive. (1:55 PM, +10 mins)
Mausoleum – Look at the exposed chessboard at the side of the mausoleum
and note where the position of the pieces in Anna’s hand in the portrait
are. Then enter the building and look close at the chessboard. Press
on the positions of the noted chess pieces – black bishop, white knight
and black castle.
The side of the chessboard
base opens. (2:15 PM, +20 mins) Pick up the old objects – doll, paper scroll and crystal.
Look close at the paper scroll and note the time is 8:55 on the left
clock and 7:10 on the right clock.
Victoria:
Old Wing Hallway – Go back down the stairs and then go to the clock
with intersecting dials. Arrange the clock similar to the paper scroll
Darrel found – 8:55 on the left dial and 7:10 on the right dial. The
wall behind Chronos swings open. (2:30 PM, +15 mins) Victoria enters
the room.
Arcanum – There are 6 green crystals on walls that light the room.
Look at the altar used for some mystic rites. Pick up the parchment
and read the parchment in inventory. Read the diary written in Latin about the historyof
the founding of the Immortals (Darrel cannot read Latin). The transcript can be read at the end of the walkthrough.
(2:50 PM, +20 mins) Try picking up the sphere on a clock-faced base.
Look at the 2 candlesticks with black candles. Look close and move
the candlesticks and see strange incision at the middle of the slabs.
Look at the polystyrene box on the right side of the altar used to
transport a spherical object.
Open the bag on the other
side of the altar and read Krenn’s diary. (3:10
PM, +20 mins) Listen and watch carefully for clues. Krenn’s Diary
states how he found the Watchmaker’s diary. The machine looks like
a clock with a moving pendulum inlaid with arabesque pattern. Sometime
in 1670 to 1700, the machine was moved into an underground room called
Pendulum Chamber by its designer. The room is found in a middle of
a labyrinth accessible by a duct that flows into the surface. The
entrance to the chamber is close to a sculpture of an angel’s victory
against a lion. Cut scene of Krenn asking for a million dollar loan
from Corona but instead got a partner. Krenn continues his ramblings
about the Immortals running the major organizations in the world and
their corruptions. His 3 questions are about Where is the Watchmaker?
Why did he show the truth to Krenn? Is the Watchmaker dead? Another
cut scene is shown of a shooting of an immortal.
Pick up more items from the
bag and look close at them in inventory – 2 photographic
plates (never been developed), mold
has shape of 4 round medallion-like objects, red phial
and a blue phial. Pull the lever by the door
to leave the room.
Check the garage and
the clock tower:
Darrell: There are places that are
not yet checked – like the garage and the clock tower.
Garage – Use the cook’s keys to open the garage door. Enter and go
to the Multinational van close to the exit door. The van door is locked.
Look close and use the acid mixture on the lock of the van door. (3:20
PM, +10 mins) Move the bag of earth to reveal a computer.
The computer has a modem
and might be useful. Right click on the computer shows that it wants
the code number of the CIA. CIA! Guess who the operative is? Look
close at the computer and connect the telephone to the lead of the
modem. (3:40 PM, +20 mins) It wants a user number. What number?
Try the number processed by the tone sequencer from the Corona briefcase
cassette – 231074, then click OK. Check the new mail. Read the Re:
ARL-1998-1 (Operative Instructions). The operative wants this file
– lets check it. Click on Search, select subject, type ARL on case
name and 1998-1 on year. The document describes a procedure for making
a solid synthetic material, high resistance and minimum weight. The
kit consist of Phial A (red liquid) to be cooled to -25o
Celsius for 60 seconds and Phial B (blue liquid) to be heated to 70o
Celsius for 60 seconds. The processed phials are stable for a while
at room temperature. Mix the 2 liquids in equal amounts in the mold.
The cycle of reaction is completed in 15 secs.
Kitchen – Transfer mold, phials and photographic plates from Victoria’s
inventory to Darrel’s inventory. Open the microwave under the hot
oil fryer. Place blue phial in the microwave. Look close, crouch (Z)
to see display, press knob to turn the microwave on, use + or – buttons
to change the temperature to 70. Open microwave and get blue phial.
If successful, Darrel will say – it’s been heated to 70 degrees and
the label will change to Phial B. (3:50 PM, +10 mins) Open fridge
door. Open glass top freezer and place red phial inside. Close freezer
lid. Look close at display panel. Change the temperature to -25 using
the + or – buttons. Open freezer and take Phial A. (4:00 PM, +10 mins)
Exit the fridge room. In Inventory, combine full phials
to mold and get 4 medallions. (4:10 PM, +10 mins)
Lounge (3rd floor use main elevator) – Give the photographic plates
to a drinking Chris Anderson to have it developed. (4:25 PM, +15 mins)
Clock Tower – Go to Darrel or Victoria’s room, exit to the balcony
and climb the gap to the clock tower. Look close at the plaster to
the right of the bas-relief. Use chisel on crack in plaster. (4:35
PM, +10 mins) It reveals a clock face. Look close at clock and Darrel
says that there is a keyhole. Use clock key on clock face. (4:40 PM,
+5 mins) Wow! The bas-relief goes down and opens an entryway.
Look at machine to the right
of entryway. There is a lever and a door to the machine. Open the
door and see sawdust (once a cog). Pick up a bronze ring,
which was once part of the clock mechanism. Look at the tube at the
middle of the floor going to the ceiling. Look at the chest with blocked
levers and a rectangular slot. Open the trap door and see 2 metal
disks, one intact and one broken. Take the broken disk out. Go down
the stairs.
Catacombs – Go forward and see a stone slab blocking a passage. Pull
the lever beside it – the door opens a little and then push on the
slab. That doesn’t work. Darrel needs help. Bring Victoria here.
Get Victoria to pull the lever and Darrel pushes the slab – the other
way around doesn’t work, Victoria is not strong enough to push the
slab. (4:50 PM, +10 mins) Teamwork!
Crypt – Look close at the altar (used by a religious sect) and the
cups held by the cherubs. If the cups are touched, they move. The
right cherub wears a bracelet. Bracelet, where did we see that before?
Chapel – Go out the door by pulling the bolt of the door.
In search of the Pendulum
Chamber:
Greenhouse – Go the garden behind the greenhouse, look close at the
statue of the lion. Place a medallion on lion’s mouth. A passage opens
and Victoria arrives. Darrel is insistent that he goes down and gives
Victoria the medallions to study.
Labyrinth entry – Darrel finds Raul’s body and says that he died from
suffocation in the sand trap. He picks up a silver object
(5:00 PM, +10 mins) with 6 buttons on top and 6 buttons at the bottom,
a black face on the left and white face on the right. It seems like
sand filled the room from the openings on the wall. Save
Game! Look at the door and note that it is similar to the
silver disk taken beside Raul’s body. Push the buttons (right click)
on the door. But when Darrel steps on the dark paved floor, the sand
trap is activated. He cries to Victoria for help. Immediately get
Victoria to place a medallion on the lion’s mouth. If not on time,
see Darrel suffocated by sand and dies. Game ends! If in time, Darrel
comes out, shakes his arms, wipes his mouth, looks at Victoria, says
they need to look for another way and walks away. Ooh! How macho!
(5:15 PM, +15 mins) If you try to place another medallion in the lion’s
mouth, Victoria will say it might be needed later.
Fixing the Clock at
the Clock Tower:
Enter the castle by the Nauturium
and meet an irate Greta Snyder, the housekeeper. You are reprimanded
for getting Stephen the cook drunk, who is late in preparing for teatime.
Watch the cut scene with Greta finding Stephen in the Plain bedroom
drunk and had to wake him because Mrs. Roberts hates to have her tea
late. Time to have some tea then.
Dining Room – Look close at the tray with cup and saucer and a rose
in a vase. It is for Jude Roberts. Hmm! Remember the book. Place blood
on the rose. (5:30 PM, +15 mins) Greta brings the tea tray to Jude
at the Supervisor’s quarters.
Supervisor’s quarters – Take the service elevator to the 2nd floor
and turn right. Knock on door. (5:45 PM, +15 mins) Watch the cut scene
of Darrel telling Jude about the curse on the necklace, she wore on
the picture. Darrel spins a good yarn and ended with Jude giving him
the necklace. She will take tranquilizers to
rest. Enter the Supervisor’s quarters again. Go to the sitting room
and look behind the green painting. Look close and enter the numbers
from the invoice in Anderson’s filing cabinet – 1, 2, 4, 8, 0, then
press the arrow key. Take the old gold coin.
(5:55 PM, +10 mins) Place the painting back on the wall.
Victoria:
Old Wing Hallway – Go back to the Old Wing, climb the stairs and forward
to the hallway. Look at the weigh scale in front of the mirror. Where
did we see a weigh scale before? Look at the picture in inventory.
It shows the hands on the right wearing bracelet holding 3 coins and
the left has 2 coins – cherub, altar, scale, coins – Hmmm! We have
to get a weight equivalent to 2 coins and then another weight equivalent
to 3 coins. Transfer the coin and incense from Darrel’s inventory
to Victoria’s. Place the coin on the left scale and place the incense
on the right scale. Collect the incense on the right scale in one
of the envelopes. Add incense to the right pan again and collect it
in the envelope with 1 dose of incense = 2 coins weight. Repeat the
same procedure with the other envelope to get another envelope with
2 doses. So now there are 2 envelopes of 2 doses each
the equivalent in weight as 2 coins each envelope. Pick up the old coin from the left pan.
Orologia – Enter the room at the end of the hallway and see a roomful
of clocks and watches. Look close at the clock in the middle of the
room. Right click the angel on top and the head turns. Look in the
back of the clock and open the compartment. It has a rectangular hole,
semicircular hole and a round hole at the center. The semicircular
hole looks familiar but what about the round hole and rectangular
hole.
Planetarium – Look in the display case and read the manuscript on
the left. The stellar coordinates of the Horologium constellation
are 4 hrs. 15 mins and -41 deg.
Darrel: Crypt
of the chapel – Go to chapel through the door. Go down the stairs
behind at the altar. Transfer the 2 2-doses of incense in envelopes
and the coin from Victoria’s inventory to Darrel’s. Place 2 doses
on the cup of the left cherub. Place 2 doses on the cup of the right
cherub. Place the coin on the cup of the right cherub. A compartment
opens on the altar. Pick up the metal plate made
up 2 faces, one black and one white – similar to the silver object
taken from Raul and the door of the sand trap room. Look at it in
inventory and when clicked it separates into 2. (6:10 PM, +15 mins)
Victoria:
Arcanium – Open the door behind Chronos again setting the clock at
the end of the Hallway to 8:55 on the left dial and 7:10 on the right
dial. Transfer the metal plates from Darrel’s inventory to Victoria’s.
Place the metal plates on the incisions of the slabs of the candlesticks
previously moved. Look at the sphere and see that it has risen from
the base. Pick up the sphere. (6:25 PM, +15 mins)