The Secrets of Da Vinci: The Forbidden Manuscript – Cheats
And the path of power will open before you: Find the
entrance to the secret passage to the King’s castle.
There are 2 ways to get to the secret passage.
Both ways should be prepared, so do both 1 and 2 below but heed the
warning on #1.1. One way is to break the
bricked wall using the cannon.Prepare gunpowder – Go to the lab bench in
the study. Place charcoal on mortar and use pestle to get charcoal powder. Mix in the right bowl saltpetre, sulphur and
powdered charcoal. Take powder.Prime the cannon – Go down to the cellar and
open the lid at right end of the cannon. Be sure that you have already placed
the cannonball inside the cannon. Place the powder in the slot.Warning: If you want to see another alternative
path later – make a saved game and do not fire the cannon yet. You can
replay to do the other alternative.If you want to open the brick wall now, light
the powder using the lighter. You can still get to the end.2. By
elevator.Red & yellow balls elevator puzzle – Go back
to the workshop and close the formerly leaning door to access the metal
cabinet.Open the door and see circular metal plate that has
red and yellow colored balls around the perimeter. At the center are 2
superimposed circles that are stationary. At the bottom are 2 cups: left is
red and right is yellow. On the right is a weight that turns the rotating
plate.The object of the puzzle is to alternate dropping a
red and a yellow ball to their respective cups.The smaller left circle receives balls from the pipe
or from the ones around the edge of the big rotating plate. It has 2 yellow
buttons; the top turns the circle clockwise and the bottom button turns it
counterclockwise. At the bottom of the smaller circle is the path that drops the unused
balls back to the edge of the rotating circle.The right larger circle also has 2 buttons; top
button
turns it counterclockwise and bottom to turn clockwise. There is a path to drop at the
bottom and this is where the selected balls are dropped alternating to right
or left cups.The 2 circles have 2 places that overlap each
other. These are the 2 places that the ball on the left circle can be moved by
the right circle. The bottom overlap hole is where you want to position the
selected colored ball to drop to the cup.The green button at bottom left resets the puzzle or
empties the cups.First, check which color of ball is dropped to the
cups. Then reset if dropped on wrong cup.While the big plate is stationary, move the correct
balls from the left circle so that the right circle can drop it to the
correct cup.When out of balls on the left circle to work on,
pull down the weight to drop balls to the smaller circle and simultaneously
moving the left (to get balls) and right circle (to select balls and drop them
in the cup).Do these – pull the weight and drop correct colored balls until
the bowls at the bottom automatically empties. This means the puzzle is
completed.Pull the lever on the right to raise the elevator.
BALL DROPPING PUZZLE SOLUTION by Robert Ellison:
Here’s
how the thing works. There’s no set order of collecting the balls except as
mentioned below.Each time
a ball drops to a cup it goes into the opposite cup than the last one so if
you get out of sync you will be dropping balls in the cup opposite the one it
should go into.If even
one ball drops into the wrong cup then you have to empty them and start over.
To empty them from the cups and start over click on the round, green button on
the bottom left of the puzzle. This routes the balls from the two cups back
into the pipe at the top of the big wheel which feeds them back into the big
wheel.Note the
little paddle like gizmo at the intersection where the ball goes left or
right. The long piece of the divider points to the cup which will NOT get the
next ball.Whether
you first drop a red or yellow ball depends on the position of the divider
indicator when you begin dropping balls into the cups.Where the
two little circles of ball holders are located, the top left yellow button
rotates the little wheel on the left clockwise and the one under it rotates it
counterclockwise.The top
right yellow button rotates the little wheel on the right counterclockwise and
the one under it rotates it clockwise.Dropping
balls into the downward slot on the left sends them back to the rotating outer
wheel for "recycling". The slot on the right drops them into the cup in the
sequence.It is
easier and less confusing to "capture" two or three balls at a time and, of
course, in order if you can. If you cannot get them in the proper order then
use the two small rotating wheels to sort them into their proper order and
according to how the indicator at the "separating" point is set. Any out of
order can be dropped back into the big wheel until needed.After
collecting three or four balls it might help to wait until the big wheel stops
turning so you can concentrate on which button moves what to where. Then you
can restart the big wheel, collect three or four more and do it all again
until the puzzle is done and you can pull the big lever on the right to
operate the “lift“ (elevator).Start the
puzzle by pulling the handle hanging from a chain on the right.Elevator – Enter the elevator and pull the lever to
go down. Across the elevator is the metal cabinet to raise or bring down the
elevator.See the bricked wall on the left. This is the one
seen in the cellar under the kitchen (if you have not blasted the bricked door
yet).Etchings at secret passage: Go forward
and at the corner, see etchings on the floor. Click on it to clean up one
etching. Use the broom to remove the dirt over the second etching.
Place the incomplete sheet of paper over the cleaned etching and use the charcoal
crayon on the paper to get a sheet of paper.Add it to the portfolio and read it. It showed the 4
circles with sun, star, moon and planet and lines and dots. No way to decode
it yet.Door to the King’s castle: Continue forward and see a door that has similar
pictures as the 2 medallions. Place the 2 medallions on the indentations. The
door opens.
Beneath the King’s
castle: Use the lit lamp on the dark passageway. Go down,
forward, pan left, forward, pan left, forward and be under the King’s castle.
There is an open door that leads up to the castle.
Turn left and see a closed door. Enter through the closed door. Hear people
talking behind the metal panel. If you open the metal panel and are heard, Valdo will be tortured. Another chance is given.
Oil the metal panel and open it
completely. Overhear 2 hooded men talk about Valdo’s research. They also talked
about their plans for the codex and Valdo when they have the notebook in hand.
Codex must be destroyed.
Go back to the manor by
going right when at the hall, forward, right while facing a gate, forward and up
the stairs.
Francois I:
Babou calls down and Valdo automatically has a talk to Francois I. Valdo now works
for the King. The King gives his signet ring and told Valdo to contact him through
Hector when he finds the notebook. He also gave a sheet of paper that has
the code for the Leonardo’s series of signs.
Day
4: 25 September 1522
Valdo wakes up and reminisces about the happenings the night
before. Babou calls to Valdo and at her apartment, informs him that there are
guards around the manor. They think that Valdo has escaped with the notebook.
Find and decode the 4 series of signs:
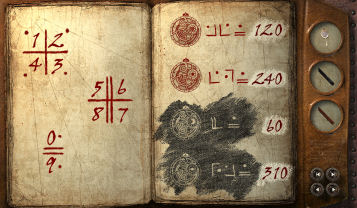
Decode the etching taken from the
floor of the secret passageway: Open the portfolio to the
etchings picture. Decode the etchings using the paper given by the King that is
on the left page.
The right page has line-dots after 4 circles with celestial bodies
– from top to bottom: sun, star, moon and planet. The left page has line/dots
with numbers.Look for the line-dot from the left page that
corresponds to one of the line-dots right of the celestial body symbol on the
right page.Click the number inside the line-dot chosen on left
page to turn it to orange and then click the corresponding line-dot on the right
page to orange. A white area appears right of the line-dots.Do the same to next line-dot until that celestial body
is completed. Take the blood stone from bottom circle and click it on the
whitened area after the line-dots to write the numbers chosen.Do this for all the other celestial bodies’ line-dots.
The decoded numbers are: sun – 120, Star – 240, moon – 60 and planet – 310.
Correlate to Map: Open the
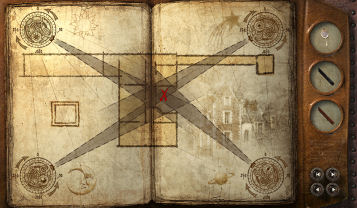
page in the portfolio that shows the map of the Cloux Manor that was taken from
Leonardo’s Venetian cabinet.
See that the map of
Cloux Manor also have the same celestial body circles seen on the etching
paper.The degrees of the
celestial body circles are labeled. Turn the circles’ pointer to point to the
number decoded from the etchings: sun – 120, Star –
240, moon – 60 and planet – 310.At the intersection of the 4 bodies, an X that marks
the location of the notebook is seen. It is on the front door of the manor.
Saturnin:
Go talk to Saturnin in the kitchen. He is surprised by the presence of the
guards. Valdo confronts Saturnin. Valdo realizes the reasoning given by Saturnin.
Babou:
Go back to Babou’s apartment and find her gone. Valdo wants to check the
Venetian cabinet.
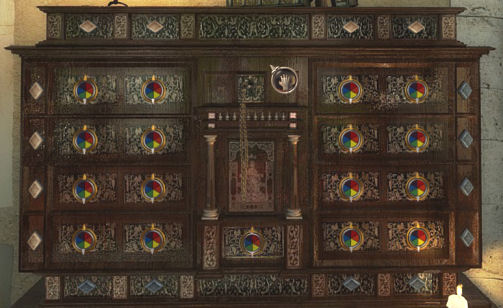
Unlock Babou’s
Venetian cabinet – Take the key from the mannequin in the bedroom.Insert the key
on the keyhole at center of the locked cabinet. Save game here since there’s
no reset.There are white diamonds at left end of each row of
colored circles and at the top of each column. The white diamonds turns the
yellow arrows of the colored circles.There are blue diamonds at right end of each row of
colored circles and at the bottom of each column. The blue diamonds turns the
white arrows of the colored circles.The object of the
puzzle is to have all the colored circles in the panel to be similar to
the single panel below the center statue.1. Click the top white diamonds (L-R: 1, 2 and 4) to turn the top row yellow
arrows to point up.2. Click the bottom blue diamonds (L-R: 1 – 4) to turn the top row white arrows
to point down.3. Click the 2nd from top left white diamond to turn the 2nd row yellow arrows
to point up.4. Click the 2nd from top right blue diamond to turn the 2nd row white arrows
to point down.5. Click the 3rd from top right blue diamond to turn the 3rd row white arrows
to point down.6. Click the bottom right blue diamond to turn the bottom row white arrows to
point down.The drawer opens. Read the letter and see that it is the letter of
introduction for Valdo. Move the dark paper over the letter and Valdo will
read it and learned that he will be framed.
Babou arrives and states that she is blackmailed because of her relations with
Charles V. She was ordered to leave the Mona Lisa in the dovecote for the
blackmailers to pick up.
Prevent the theft of the Mona Lisa:
Retrieve the Mona
Lisa: The Mona Lisa is at the dovecote.
Manor guards – Go
to the balcony and see that there is a guard in front of the manor entrance and
one patrolling the side. Pick up some pebbles at end of balcony if
needed. You need 3 pebbles. Wait for the side guard to just be facing back to the
side of the manor; then throw a pebble in front of the guard by the entrance.
Immediately, go down the stairs, pan left, forward to the trees, pan left to the
path, forward to the bridge.Caught: If caught at anytime, Valdo
will be placed in his room. Look at the doorknob. Use the paper on the base of the
door and use the nail (or drill bit or knife – Thanks, Joao) on the keyhole. Pull the paper and take the key. Use key
on door. If no paper is in inventory, a paper will be seen at bottom
right of door. (Thanks, Joao.)Tapestry – Click on tapestry for Valdo to say
that there is way through. Use pliers on the 2 nails holding
the tapestry at the bottom corners. Since this is the backside of the bookcase –
click on the reverse of the password – I A L A S. Door opens. Go through and try
again to get to the dovecote.Bridge guard –
The bridge guard has his back to you. Pan left and throw a pebble to the water
or use the iron bar on him (Thanks, Chrissie).a. If the ladder is at
the far side close to the dovecote or if the ladder is in inventory – Immediately, pan right and go to the wooded area right of the bridge.b. If the ladder is
close to the bridge, immediately go forward and pick up the ladder and go
back across the bridge and go left to the wooded area.Boat – If not yet done, remove the
camouflage and drop it to the right. Enter boat; go towards the bridge and right
to dovecote.Dovecote guard –
Throw a pebble on the left by the small bridge. Enter the dovecote.Take the Mona Lisa
behind the sheet hidden by the sacks. Take pebbles from the ground
by the ladder, if needed. Climb up to the landing.Turn around and throw a
pebble to the window on other side of the dovecote. The guard comes in.
These are the actions that can be made:a. You can jump out the window and go to the boat. You
also can drop the packed straw before you jump (Thanks, Chrissie!).b. Push the barrel using
the iron rod on top of the guard below. Go down and take his uniform. Click the
uniform on Valdo.a. Take the boat back to
the landing by the bridge. Turn right; go to the bridge and left to the manor.b. With the uniform on, walk forward, cross the bridge
and go to the manor.Note: If you have a high angelic conscience, you will
not be able to hurt the guard and take his uniform.Manor guard –
a. If not wearing a uniform, sneak to get to the
manor.b. If wearing uniform, side guard will stop you.
Answer him with ‘Leave me alone…’ The other response will get Valdo recognized
as not one of the guards and get caught. If this is the second time caught, a
replay will occur and not sent back to your room.Go to the balcony via
the stairs on the right.
Make a copy of the Mona Lisa: Go
to the workshop.
Make an Albarti’s grid – Place nail on the hole
at middle left edge of the wood stand. Place the Mona Lisa on stand. Click the
sewing spool on the Mona Lisa. Alternative – the game will allow the
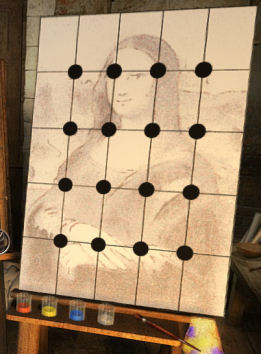
continuation even without the sewing spool.Charcoal sketch – Place the red, yellow, blue
paints and then varnish on the holes of the easel. Take the charcoal crayon
beside the paints and
sketch Mona Lisa.Note that a click on a square affects the adjacent
squares:The central square or any inside square affects the
top, bottom, right and left squares – forming a cross.The corner squares affect the 2 side squares – forming
a right angle.
The middle edge squares affect the 3 squares around it – forming
a T.The object of the puzzle is to completely fill the
easel with the charcoal drawing.Click on the squares below in order.
Colored Mona Lisa – Click on a square to turn
the charcoal to colors. The object of the puzzle is to reform the Mona Lisa. Click to turn all the
frames in to colors. Then using the black dots move the squares into the correct
position. Once the colored square is in the correct position, click on that
square to turn it to white and see if they are the same as the original charcoal
drawing.Cheat obtained by accident – Have the active
dotted easel puzzle on the screen, move around a bit to other rooms and then
come back. Click the start-windows button at bottom left
of keyboard to hide the game to the taskbar and show the desktop. Click the game
on the taskbar to get back to the game and see that the puzzle is solved.
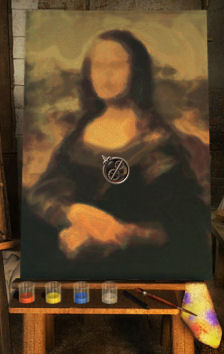
Correct the color of Mona Lisa – The color of
the Mona Lisa has to be corrected.Take the brush and dip into varnish and blue and then click
it on the painting. Do this 3 times. Clean brush on rag at right.Take the brush and dip into varnish and red and then click
it on the painting. Do this 4 times. Clean brush on rag at right.Take the brush and dip into varnish and yellow and
then click it on the painting. Do this 3 times.
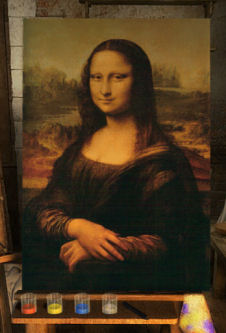
Take the copy and
original Mona Lisa.
Saturnin:
Talk to Saturnin in the kitchen and he reveals his identity as well as the last
key. And you thought he was a baddie!
Corrected map
alignment – Saturnin said to subtract 10 from the stars, subtract 10
from the planet and add 10 to the moon.Adjust the degrees of
the 3 celestial bodies in the Cloux manor map. The x marks the chapel.
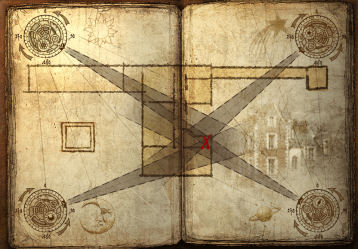
Go to the chapel and click on the lock. It is locked! Talk to Saturnin again
and learned that Madam has the key to the chapel.
Babou:
Save Game here for other possible ending. Look at the picture of Babou
and Valdo in inventory. Note that Babou still has her hand on Valdo’s shoulders.
Talk to Babou and make a
decision on the reply:1. Me either, I must
admit… This choice will show Babou’s hands off Valdo’s shoulders.2. I shouldn’t have lost
my temper… This choice will continue to show Babou’s hands on Valdo’s
shoulders.
Either response will
show that Babou gives the chapel key. Talk to Babou again and she will ask that you say
goodbye.
Chapel and the
Manuscript: Go to the chapel left of hallway before
entering the workshop. See the altar and empty frame of the Mona Lisa.
Altar – Insert Francois I’s signet ring in the hole of the tabernacle. Take the
sceptre from the altar
and use it on the signet ring in the hole.The secret compartment
opens. Take Leonardo’s manuscript. Take the signet ring and
sceptre.
Go to dovecote to
contact Hector: Still wearing the uniform, go directly to the
dovecote and will not be stopped. If no uniform is available, use the pebbles
again to distract the guards. Climb up the landing of the dovecote and a black
pigeon lands. Give the pigeon Francois I’s signet ring. Go back to the manor.
Saturnin is not in the
kitchen.
Meet Hector at secret
passage: Use the elevator or if you have opened the
bricked wall in the cellar, enter the hole made and go to the hidden passage.
Talk to Hector. Manuscript is given and no escape plan as of yet.
Saturnin:
Talk to Saturnin and he wants you to take back the manuscript from Hector and
protect the original Mona Lisa. He gives the wooden bow for the flying machine. You
need a smoke screen when you fly out from the gangway or balcony. NOTE:
If you made the fumigant early – Saturnin will take it and will do his part in
the end of the game. (Thanks, RichardO). He will also
ask that if you need anything he will leave his door open. If you don’t have
sugar, you can get it now.
Prepare the flying
machine:
Make smokescreen
– Go to lab bench in the study. Light the stove and place water, sugar and saltpetre
in the still. Click the iron box to
get fumigant.Prepare the
steering shaft and strut – Go to the saw in the workshop and cut the broom
to get wooden shaft. Place the wooden bow on the borer and use the small drill. Bore a
hole on the bow to get bow of perforated wood. You might need the crank
that might still be attached to the cannon in the cellar. Click on the crank
to take it off the jack.Flying machine – Go down to the cellar and
place the fumigant on the floor beside the flying machine. Use the bow of
perforated wood on the wing and the wooden shaft on the platform at the
center.
Take Manuscript from
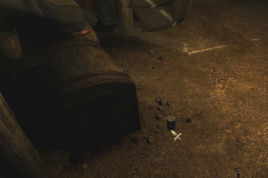
Hector: Look for Hector at the secret passage. Walk around
if you cannot find him. Then go to the kitchen, you should hear a noise that
makes Valdo say that Hector is back and he should take the manuscript by force.
1. If you blasted the
brick wall with the cannon, go down using the elevator and see Hector with his back turned. Use the iron bar on him.2. If you have not
opened the brick wall with the cannon, do so now. Check if the cannonball has
fallen off the floor if you took the crank earlier. Light the powder using the
lighter and the brick wall will be blasted and Hector flattened.Take the manuscript
from Hector. Pan right and place the copy of the Mona Lisa against the wall
left of the formerly bricked up wall. If you have a high angelic conscience,
the Leonardo’s Mona Lisa is left at the corner.
The Alexandrian Manuscript:
Leonardo talks about the manuscript. It was passed down to him from his master
Verrocchio. The manuscript was passed down through the ages. The manuscript
contains precious knowledge from classical times. It is the only surviving
knowledge of the Alexandrian library. It contains the most precious secret of
all – the hiding place of the Museum of Alexandria.
Farewell to Babou:
Talk to Babou.
If you continued to be angry with Babou, the picture
in inventory will show her with her hands off Valdo. Goodbyes will be said and
the cutscene at the balcony will happen.If you have been understanding and the picture
showed her still holding on to Valdo, she will ask to come with you. Now, you
have a choice to take her with you or not.
Escape: Watch the ending and
the flight on the flying machine made by the greatest mind in the world.
This
document may not be distributed without express written permission of the author
and the content may not be altered in any way.
For
Questions or Comments on this Walkthrough,
Please write to:
MaGtRo
Copyright ©
5/2006
MaGtRo
View this guide raw, exactly as the archive holds it