The Secrets of Atlantis: The Sacred Legacy
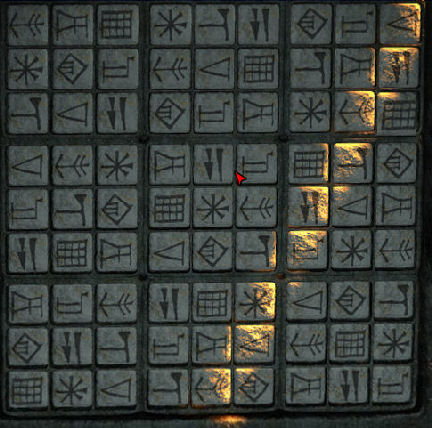
I started with: the bottom row of the middle column,
top row of the middle column, center big square, 4th row from the top,
middle row of right column row, middle row of left column and did the corner
squares last.See the solution below:
When correctly done, see that the prison is a
sarcophagus.
Hall of Truth: Look
around and see that you are behind the once closed door at the top of the
stairs. Take the trident off the statue of Ishtar. Look at the combined
bas relief on a stand, the different tile on the floor in front of the stand and the closed
door of the Gate of Truth.
Go out and down to where Kate is in the cage. Use the
trident on the lever holder behind the cage. Talk to Kate. Go back to the Hall
of Truth.
Bas relief – Kate states that 2 people are
needed to open the gate. One to stand on the tile in front of the bas relief and
one to push in the code to open the gate. Kate stands on the tile. There must be
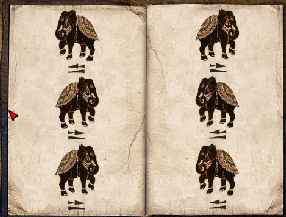
a clue somewhere for the code.Remember the elephant book seen on the top shelf
bookcase right of the entrance at the Hall of Glass. The elephants are
positioned in different directions.
Press the left, right, right, right, left and left
side of the bas relief. The Gate of Truth opens.
Grotto of Revelation: Pan left and
see the fresco. See a boat on top of a mountain and the 3 medallions. Talk to
Kate completely to learn about Noah’s Ark, Mesopotamia and the Sanskrit text
that is like a prophecy.
It talks about 3 chosen ones, guided by an old blind
man whose task is to watch over a sacred treasure. It mentions a dragon, who’s
the guardian of secrets and whose breath drives men mad… and of a betrayal
followed by a redemption.
Exit the grotto. Walk forward to the zeppelin.
Mesopotamia
Mt. Nisir: Talk to Kate.
Zirek – Climb up and see a man. Talk to Zirek, an herbalist. Kate will
translate the language. Learn that 2 foreigners wanted to profane the Temple of
Marduk and that only one man came out – a thin man with big boots and dark stare. Omarin, the old man told him about what happened. He talks about the Temple of
Marduk and the dragon. He makes an effective poultice for snake bites. Omarin,
hermit and wise man will come anytime he smells cooking on the fire. Trade the
pearl for a herb poultice.
Village: Climb up until the village through a
cliff pass that is protected by some broken wire fencing.
Jyan – Pan right and go to the first house on the right. Hear someone
crying inside the crate in front of the house. Go forward close to the next
house. See a broken cart. Take the iron bar from the left wheel. Take the
bucket by the right wheel.Go back to the crate by the first house and use the iron bar on the crate. Take
the smoker exposed by the crate.Talk to the young girl Jyan. Learn that his Uncle Samal left because of the
dragon’s breath that came down from the temple. She misses her uncle that goes
to the temple. The dragon is angry because of the 2 men. Her uncle cuts stone.
Talk to Omarin:
Cooking – Pan left and forward to the far end of the village
and talk to the woman by the fire oven. She talks about the dragon’s breath, the
foreigners that entered the temple, the others that left in the airship and Omarin. Omarin is blind. She will make bread to get Omarin to come here if you
get honey. Pick up the matches on the ground.Go to the next house with awning and see that it is locked. Take the wire
mesh on the wall. Look down and see a grid.Blackwood – Go to the last house on this side and take the hoe
leaning left of the closed door. Enter and see Blackwood. Talk to Blackwood and
see that he is caught with war memories.Turn around and take the sieve on the post and then the shears
from the other post. Exit the house, pan right and go forward up the mountain
path.Honey – Take the path right of the rounded stone fence and climb the
mountain. See a beehive.Bees’ puzzles – Use the matches with the smoker to get a smoker on.
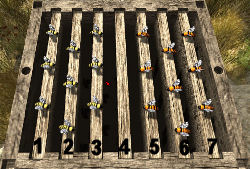
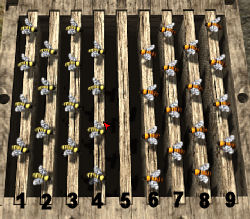
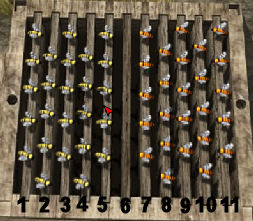
Use it on the hive to remove the flying bees. Click to open the hive.See the first of 3 bees’ puzzles. The aim of the puzzles is to get the yellow
bees to change places with the orange bees.Save game here. The puzzle resets when there’s no more possible move.
Use the smoker on bees
sitting on the frame numbered:5, 3, 2, 4, 6, 7, 5, 3, 1,
2, 4, 6, 5, 3 and 4.Place the smoker back in
inventory and click on the frame.
Use the smoker on bees
sitting on the frame numbered:4, 6, 7, 5, 3, 2, 4, 6, 8,
9, 7, 5, 3, 1,2, 4, 6, 8, 7, 5, 3, 4, 6
and 5.Place the smoker back in
inventory and click on the frame.
Use the smoker on bees
sitting on the frame numbered:5, 7, 8, 6, 4, 3, 5, 7, 9,
10, 8, 6, 4, 2, 1,3, 5, 7, 9, 11, 10, 8, 6,
4, 2,3, 5, 7, 9, 8, 6, 4, 5, 7
and 6.Place the smoker back in
inventory and click on the frame.Take the middle frame
full of honey.Go back to the woman by
the fire oven at the far end of the village. Give her the frame full of honey.
Wait a bit and see Omarin arrive and get a piece of bread. He sits down to enjoy
his food.
Talk to Omarin. Indeed,
you’re the one we’ve been waiting for after 1000 years. Marduk is watching over
you and the object you have with you.
Then show him the
medallion. He goes into a trance and talks about you and the other holder of the
medallions as the heirs of Atlantis. In your veins flow the blood of Atlantis;
the bearers of the bronze, pewter and orichalcus. Before, the mission of the
heirs was to keep watch, now it is to reveal the hidden knowledge on. You will
be faced with unscrupulous men. Marduk knows about Blackwood and he will need
help to find his way to the path of wisdom.
The Indian prophecy
comes true. You would need the Atlantean crystal. -The crystal is sleeping. You
have to coax the dragon to allow you to get the crystal. He gives back the
medallion. Being an heir doesn’t make you superior to any other being.
Talk to him again and he
doesn’t remember what he said previously. To help Blackwood from his illness, he
would need aloe leaves.
Jyan’s doll – See
Jyan call for help because her doll fell in the water. Go back to the cliff path
going down the mountain one click left of the rounded stone fence. Look for the broken
wire fence. Use the shears to cut a piece of metal wire.In inventory, combine
the twisted metal wire with the bucket to get a bucket with handle.
Go back to the well. Use the bucket with handle on the hook above the well. Use
the well handle on the right and automatically get the doll. Take the doll
and give it to Jyan.Talk to her about her
uncle’s locked door. She says the key is under a wood by his house.
Dragon of Marduk: Climb up the mountain
path outside the village. Go pass the beehive and up to the
temple.
Go inside the temple and
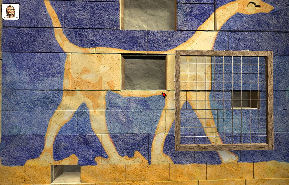
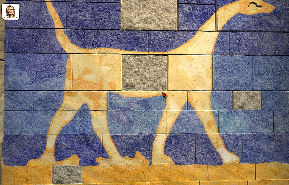
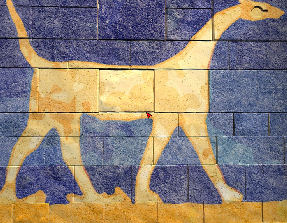
look around. See the blue bas relief of the dragon of Marduk. After the prophecy
about the blind man, we now see the dragon.Measure – Take
note that there are blocks of stone missing from the bas relief. This must be
the ones Jyan’s uncle is fixing. Take note of the sizes of the 4 missing blocks
by clicking the wire frame over the holes on the bas relief.NGZAng-there-s-a-6×6-4×5-andZGNThere’s a 6×6, 4×5 and
two 2×3 blocks missing. The eye is also missing.
Go outside and pick up 4 pieces of stones.
Pan left and see a plant. Use the hoe to get the red roots.Cut the stones to
size – Go back to Jyan’s Uncle Samal’s house. Take the key mentioned
by Jyan under the wood on the ground left of the locked door. Use the key on the
door and then turn it.Look around and pick up
the stonecutter’s tools from the window sill. Go back outside and place a stone on the grid.Cut the stone by
clicking the stonecutter tools on the stone until you get the size you need.6×6 block – click the
stone 2 times to get cut stone.4×5 block – click the
stone 4 times to get cut stone.2×3 block – click the
stone 7 times. Do another 2×3 block to get 2 more cut stones.Fit the blocks –
Go back to the temple and insert the 4 blocks made. If some do not fit, make a
new one. Take a new stone from the pile outside the temple.
Color – If
they all fit, see that it needs coloring. The top one needs dark blue. The body
needs light yellow. The right side block needs light blue and the bottom one
needs an orange yellow color.Make paints – Go
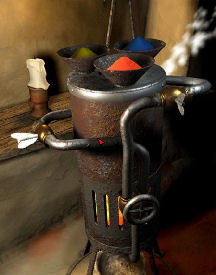
back to the stonecutter’s house. Look at the paint maker ensemble at the right
of the window.Red pigment –
Click on the empty funnel on top of the machine. It needs red paint. Lucky for
us we dug the red roots already outside the temple.Look down left of the
machine and see a mortar and pestle. Take the pestle and then place the red root
on the mortar. Use the pestle to grind the red roots to get crushed red roots.Place the sieve on the
wire stand right of the mortar. Take the red dye and place on sieve. Click to
shake the sieve. Take the bowl of red dye on a bowl under the
wire stand.Place the red pigment on
the empty funnel on top of the machine.
Machine – See
that the machine has 2 stopcocks on tubes, one leading right and the other one
leading left. The one to the right leads to the blue pigment and the one to the
left leads to the yellow pigment.There is a wheel that
releases the paint to a bowl at the bottom. A small furnace is at bottom of
machine. To the right is a sink full of water for discarded bowls.Use match on furnace to
get a fire.Dark blue paint – If not
yet done, turn
the stopcock on both right and left tubes to the close position (vertical).
Closed for blue and yellow pigment. Turn the wheel at the bottom to get dark
blue paint.Light blue paint – Turn
the stopcock open (horizontal) for the right tube and close (vertical) for the
left tube. Blue pigment is open and yellow closed. Turn the wheel at the bottom to
get light blue paint.Yellow-orange paint –
Turn the stopcock on both right and left tubes to the open position
(horizontal). Both yellow and blue pigments are open. Turn the wheel at the bottom
to get yellow-orange paint.Yellow paint – Turn the
stopcock open (horizontal) for the left tube and close (vertical) for the right
tube. Yellow pigment is open and blue is closed. Turn the wheel at the bottom to
get yellow paint.Paint the blocks
– Go back to the temple and the dragon bas-relief.Use the dark blue paint
on the top block.Use the light blue paint
on the small block on the right.Use the yellow paint on
the body of the dragon.Use the yellow-orange
paint on the small block at bottom left.Atlantean Crystal
– That looks good! Now, place the medallion on the eye of the dragon to finish
the bas relief.See the water on the
pool recede and Howard takes the Atlantean crystal. Take the medallion
back.
Blackwood cure:
Aloe leaves – Go
back to the herbalist Zirek via the path going down at the cliff side. Ask him
about aloe plants. He says that there some by the beehives.Go to the beehive at the
path going up the mountain. Turn around from the beehives and see a plant at the
corner. Take leaves from the aloe plant. Oh! No! Foresight in getting
that snake bite herb poultice. It works!Omarin’s remedy –
Go back to Omarin who is still enjoying his bread. Give him the aloe leaves.
Talk to him and he gives the Omarin’s remedy.Go to Blackwood at the
first house. Give him Omarin’s remedy. Talk to Blackwood completely. Learn
about what happened to him and Elliot. They opened a secret door to a long
corridor to the Medallion room. Elliot disabled the trap door. One of the
medallions melted and green clouds covered the room. The green cloud also spread
out to the village. He knows he is one of the Heirs and he meant to destroy the
secret of Atlantis.Woman by the fire pit
– Go back to the woman that baked the bread. Omarin is gone. She says that
Omarin mutters – ‘the three are reunited’, ‘way can be revealed’ and ‘the south,
to the south’.
Open the door to the
inner chamber: Go back to the temple. Blackwood says that you need to turn the
trident to the pointing downward. Go to the mandala at opposite wall from the dragon. Click
the medallion on the trident glyph. Turn it to the bottom. The wall opens to a
puzzle.
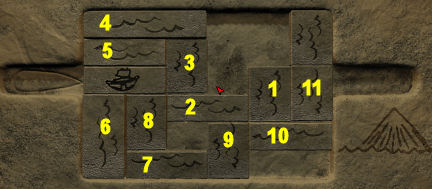
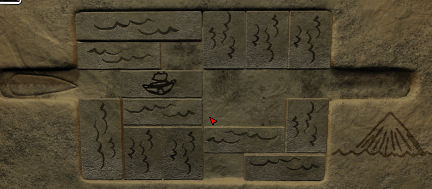
Ship puzzle – The
object of the puzzle is to move the blocks to make way for the block with the
ship painted on it to go to the right hole.
The puzzle reset is to place
the Atlantean crystal on the slot on the left.Click the
left-right side or the top-bottom part of the brick to move it one space
to that direction. Click brick number:1 up 2xs, 2
right once, 3 down 2xs, 4 right once, 5 right 2xs, boat right 2xs, 6, up
3xs, 7 left once, 3 down once, 8 up 2xs, 2 left 3xs, 3 up once, 9 up
once, 7 right 4xs, 3 down once, 9 down once, 2 right 2xs, 6 down 3xs, 8
down 3xs, 4 left once, 5 left once, boat left once, 2 left once, 9 up
4xs, 10, left once and 11 down once. Click boat to the right slot. Door
opens.
Medallion room:
The heirs walked a corridor and into the medallion room. Look around and see
that Elliot is not here. Look inside the bag Elliot left on the floor. Read a
page taken from Howard’s father’s journal. He must still be alive to write this
in 1921.
"In my dream, I see the
Queen of Atlantis climb nine steps and sit on her throne. She turns her eyes
towards me. She says she will free me from the shadows that imprison me.Three times, she turns a
bronze serpent that adorns her finger.Then in her gaze appear
fantastic images.I see precious stones
that light the way to truth…I see a flaming
pentacle, the symbol of a benign sun…I see a trident of
orichalcus…And lastly a big ship,
the sole vestige of a forgotten past.In the grip of these
visions, I in my turn climb the nine steps. The Queen stands and smiles on me. I
am free".
Take note to see if what
is in the text can be seen around here. There are 8 torches that lead to the
stand across the room and 4 bull heads on the posts.
Go forward to the stand
at the far end. Take the fake bronze medallion melted at the bottom. Put the
medallion it its place. The door opens.
What else – who else!
Elliot pops out of hiding and jumps to catch a bull’s horn. The trap door is
sprung and the Heirs fall into a prison.
Escape the prison:
Talk to Kate and then Blackwood. He mentions that the mechanism
is by the bull’s head by the door.
Look around the room. It
is empty except for a torch and a ring. Click on torch and then talk to Kate to
get her scarf. Use the scarf on the torch. Then use the match to light
the torch. See that the ring below is an entwined serpent. Howard remembers what
his father wrote on the page.Click-turn the serpent
ring 3 times. Turn around and see a block of stone rise up. In front of the
stone is a dark tile. There are 8 other holes similarly position across from left to right on this
side of the room. Hmm…There were 4 fantastic
images of bulls upstairs – press the 4th dark tile counting from left to right.
See some block of stones rise and some drop down.There were 8 torches
that looks like precious stones that light the way to the truth (stand) – press the 8th
tile counting from left to right. See some block of stones rise and some drop
down.A flaming pentacle has 5
sides – press the 5th dark tile counting from left to right. See some block of
stones rise and some drop down.A trident of orichalcus
has 3 points – press the 3rd dark tile counting from left to right. See some
block of stones rise and some drop down.A big ship is singular –
press the first dark tile counting from left to right. See the blocks make steps
to go up to the top.Climb up the steps. At
the top, use the iron bar on the tip of the right ear of the bull on the post above.
The Sanctuary of the Ark:
Go out through the opened door and see the Atlantean Ark.
Look to the left and see
a high rock with a broken bridge. Elliot is there in front of a big red
crystal and a control panel.
Walk to the ark and see a
giant globe on the left and a big green crystal in front of it. To the right is
another control panel
Control panel –
Go to the right and see the control panel.Place the Atlantean
crystal on the indent on top of the panel. This activated the systems in the ark.
That includes Elliot’s control panel that is red. Yours is blue.Find the route to
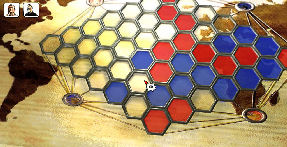
Atlantis – Study the puzzle and see 2 blue end circles and 2 red circles.The aim is to make a
blue path from top right to bottom left. This is a random puzzle and no saves
can be done after the completion of the puzzle. If you fail, another chance to
replay can be done by clicking the continue red arrow on the screen.Each click to make a
blue hexagon is countered by a red hexagon made by Elliot.One tactic is to not
necessarily make blue adjacent hexagons but skip one or 2 to divert the red
hexagons. Be sure that a path can be made from one to next blue tile later or
the skipped hexagons can be clicked on later.This is an example –
take note that the cursor is about to fill in a skipped hexagon that is not the
end one to the blue circle.
After completing the
puzzle, see that the big globe starts to show the path to get to Atlantis. See
it go out of northeast of North America to Europe to South America and to
Africa.
Elliot tries to see the
rotating globe and gets hit by a rock to fall off into the abyss.
Watch the cave in before
Kate finishes copying the map.
Watch Kate, Howard and
Blackwood meet with Foster in New York. Howard thinks about his father
that might still be alive. All is not lost, Foster notices the similarity of
Kate’s partial map to a drawing in a book he has in his collection.
The Adventure has only
just began…
This document may not be
distributed without express written permission of the author and the content
may not be altered in any way.
For Questions or Comments
on this Walkthrough, please write to:MaGtRo
Copyright © 12/2006MaGtRo
View this guide raw, exactly as the archive holds it