The Secrets of Atlantis: The Sacred Legacy
The
Secrets of Atlantis: The Sacred Legacy
by
Nobilis & Atlantis Interactive Entertainment
Walkthrough by
MaGtRo December 2006
GamePlay:
This is a first person, point and click mouse driven game. The main menu has
new game, load game, quit Atlantis and credits. During gameplay, the menu is
accessed by the ESC key. The gameplay menu has save game, graphic options (quality and screen size selections), sound options (master sound volume, music,
voice
and FX adjustments), game options (crosshair, inverted mouse and subtitles selections), quit game and back to game.
The inventory bar is
seen at
the bottom of the screen when the mouse is right clicked. An item is picked up and it attaches to the cursor.
Right click of mouse places it in inventory. To combine items, left click one
item in inventory and left click it on another item. To look at some documents,
right click on the document to see a close up. The items that can be looked up
this way have a cross at bottom right of the inventory square.
To talk to another
character, click on the character and a set of graphic topic selections is seen.
Click the graphic to select that dialogue. Click outside the selection to end
the conversation.
There are 9 saved game
slots.
Howard Brooks is on his
way home to New York from a meeting in Germany. He is aboard the Hindenburg
zeppelin that he helped build as an engineer. The zeppelin stalls and all
passengers are asked to go to their cabins. Howard looks through the window to
see if the engines are going. 2 men accost him.
Howard wakes up. You
play as Howard Brooks.
Zeppelin
Find out what
happened:
Top level – Look
around and realize that no one is around. Enter the dining area. Take the
crab pincer on the middle table close to the wall and a coin from the
pile on the table across this one. Pan left and go forward.
Pan right and take the ashtray at the corner. Go to the corner by the
window. Turn right and see the ‘for emergency only case’. Use the ashtray to
break the glass and take the glass breaker.Go to the right hallway
and look around at the other hallways. All the cabins are inaccessible. Go down the stairs.Bottom level –
Turn left, forward and look outside to see that the engine is not moving. Turn left and enter
the radio room.Radio room – Look around
and see that someone sabotaged the radios. Open the drawer at the corner and take
the nuts and bolts. Exit the room.Turn right, forward and
take the ladder on the wall. Go forward to the end of hallway and enter the doorway on the left.Steam room:
Talk to Lou Garetti. Click on 3 dialogue selections. Learn that he was
following-protecting you by order of his boss. Learn about the 2 men that
sabotage the zeppelin and broke his legs. They escaped using the emergency
biplane. They are interested in something
Howard inherited from his father. He states that the crew is fixing
the outer skin and the hydrogen tanks of the zeppelin. The passengers are all in their cabins.
To help fix the airship, he mentioned to turn around.
Fix the leaks:
Gas valves – Turn
around and go forward to the end. See 4 red valves, 3 of which is leaking steam.
Turn the top left, left and middle red control valves.Leak – Turn right, left
and forward to the end of the ramp. Turn right, forward and turn left. Look up
and read the gauge. There’s still a leak somewhere.Go back to the middle
ramp. Go forward and turn left on the tank just before Garetti. Place the ladder
to lean on the tank. Climb up. Look at the pipe above the gauges. There’s a
crack on the pipe and the gauges are on the red area.Go down and go back to
the gas valves you turned. Use the crab pincer on the bolts at lower left of the
left gas valve. This takes the L-shaped pipe.Go back to the top of
the tank. Pull the lever to the left to stop the flow of steam. Use the crab
pincers on the bolts above the gauges. Use the glass breaker to remove the
broken pipe. Place the L-shaped pipe as replacement.
Use the nuts and bolts on the holes.Go back down to the gas
valves at the corner. Turn the middle and the right gas valves to allow the
steam to flow to that tank. Go back to the top of the tank. Turn the lever and
see that the gauge is on the green area. Tada!Talk to Garetti again
and he says to look for the pump.
Fix the pump:
Turn left, forward to
end and then right again. Look left and up to the gauge that is now on the green
area. Turn the lever on the lever on the right of the gauge. Look down and see
that the belt broke.Go back and talk to
Garetti. He gives his belt.Go back to the pump.
Turn the lever above to stop the pump. Place the belt at the pump on the floor. Turn
the lever back on and see that the belt holds.
Telex machine:
Go back to Garetti and
he now asks that you send a telex to his boss. The message is ‘The package is
intact. Please confirm delivery point’.Radio room – Go
back to the radio room by exiting the steam engine room, right, forward and left to the
end of the hallway. Look out the window and see that the propeller is turning now.
Turn left and enter the radio room. Look at the 2 sparking broken wires on the
wall. That has got to be fixed. Exit the room.Phone – Go up to
the upper level, go forward to the back hallway and right-forward to the phone
on the wall.Use the coin on the
screw holding the wire. Do this to the other screw to get 2 wires. Go
back down to the radio room.Fix the wires –
Click on the bolts holding the wires above the telex machine (looks like a
typewriter). The 2 bolts dropped on the table. Do this to the other set of broken
wires attached to the machine on the right. Place the wires from the telephone
on the telex machine. The wires are automatically connected from the telex machine to the
machine on the right.Message and reply –
Click on the keys of the telex machine to automatically type the message. An
answer is sent back. Take the telex ribbon
left side of the telex machine.Go back to Garetti. Give
him the telex ribbon. He said that Mr. Foster has asked the captain to land on top of the Empire State Building. Mr. Foster is on the 14th floor.
New
York
Watch the trip to New
York and see the Empire State Building ahead.
Get to the ground
floor:
Talk to Elmer, the
bellhop wearing a red uniform and learn that the elevators are having technical
difficulties and access to the fire stairs are for emergency only. You need to get a
badge at the ground floor to move freely in the building. There’s no way to go
down the stairs or the elevators – what to do?Emergency procedure
– Pan left, forward, left to water cooler and left again to see mailboxes on the
left. Look at the emergency procedure posters on the wall left of the mailboxes.
It states that in case of fire, the bellhop will tell which stairs to use.
Look down and take papers from the trash can.Mailboxes – Look
at all the active mailboxes that can be open. Open the middle bottom mailbox
labeled Elmer Mitchel. Take the letter. See that the letter in inventory
has a cross at bottom right. Right click to see a close up of the letter. Read
that Elmer – the bellhop is warned about security breach that could lead to
suspension.Force Elmer to allow us access to the fire stairs –
Pan-go
right to end of hallway and then go left. Enter the small cafe on the right. Go
behind the counter and take the wastebasket.Exit the cafe and go
right. Open the drawer of the small table left of the fire extinguisher. Take
the lighter.Go back to Elmer the bellhop and give him his
letter-service note. Now, he will follow the safety procedures in case of fires.From
Elmer, turn left and left again towards the water cooler. Face the hallway with
the mailboxes. In inventory, combine the wastebasket with the papers to get
full wastebasket. Place the full wastebasket on the floor. Use the lighter
on the waste can.
Talk to Elmer who is now
directing as emergency protocol states and he tells to use the stairs.
Get a badge:
Jack Murray – At
Ground Floor, pan around and talk to the Jack Murray, the journalist who is leaning on the
wall. He’s been
waiting for one of the biggest star to come down. He has a badge.Receptionist –
Pan around and talk to the receptionist. Learn about Mr. Foster. She cannot give
you a badge to use the elevators. Greta Garbo is in the building and there was
an incident – a bellhop, maybe Harry Mitchel lost her luggage.Harry – Pan left
and go to the corner. Go right to the elevators and talk to the bellhop
wearing green. When the Greta dialogue comes up, select green uniformed
bellhop-Harry. Then on the next selection choose the red bellhop – Elmer. If you
make a mistake and get thrown out, the game will let you start from the
beginning at ground floor. Harry says that Greta Garbo will come down in an
hour.Jack Murray – Go
back to the journalist and talk to him about the badge. After giving him the
scoop on Greta, he gives the access badge.Harry – Go back
to Harry by the open elevator. Show him the access badge.
Find what is going on with the elevators:
18th floor – Exit
to the 18th floor as seen on the number at far end of the elevator wall. Pan
left, forward, right, forward to end and right again. Go forward, pan right and take the
magnifying glass in the open file cabinet. Enter the door across the filing
cabinets. Look at the name plate to know her name and then talk to Ellen O’Connor.
Learn about Miss Hatchet and talk about her hair down. Exit the room.Go left, right, forward
to end of hallway and right to other hallway. Pan right and take the inventory register
on
top of the first filing cabinet. Look at it inventory and see that it is the
approved materials for the Equipment Services at the 5th floor.Pan left, forward to end of hallway and
enter the door on the left. Talk to Ms. Hatchet. Learn that Mr. Foster has his
museum on the 14th floor. Exit the room.Go left to the hallway
and enter the open emergency fire stairs on the right just pass the elevator hallway. Be
at 19th floor.19th floor – Go
forward to end of hallway and talk to the receptionist of CineWorld. Talk to her
about Ellen O’Connor. She mentions the magazine with latest hair fashion. Pan around and take the CineWorld magazine from the
counter.Turn around
and then talk to Greta Garbo’s bodyguard. Learn that he’s interested in the
ground floor receptionist and wants to know her first name.18th floor – Go to the stairs and be down to
the 18th floor. Go to the outer hallway and give the CineWorld magazine to Ellen
O’Connor Talk to Ellen twice. Howard has a date with Ellen now with her hair down. Take the hairpin
on the desk.Ground floor – Go to and take the 18th floor elevator down
to the ground floor. Go around to the front and talk to the receptionist. Learn
that her name is Julia.Go back up the elevator
to the 18th floor, climb the stairs to the 19th floor and talk to the bodyguard.
After telling him Julia’s name, he mentions that there where suspicious men on
the 12th floor looking for a ‘Lansky’.Go to the 19th floor elevators and see that 2
elevators are open at far
end on the left. The #4 at right goes to the -2nd floor at the basement. Take the #3
at left to get to the 12th floor.12th floor – Talk to the
woman taking her break on the couch by the window. She says that Lansky spies on
his employees and that his office is across the bulletin board. Go right and the
right again to the outer hallway. Look at the bulletin board and see that employees work from 9 to 6
o’clock. Turn around and see that Lansky’s door is locked.Lansky’s Office – Use Ellen’s hairpin on the
door and then enter the office. Search the coat hanging left of the door and see
a paper. Read it in inventory and see – to check with Elliot: Maintenance
crew uniforms, map of the 14th floor antiques room, elevator electricity plan.
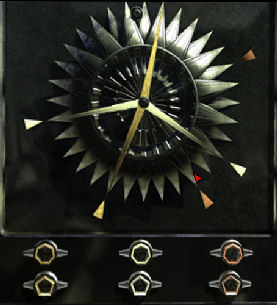
Sounds like the elevator sabotage starts here.Go left and forward to a safe with 6 dials at the
bottom and hands on the top.Safe – Save game here. There are arrow hands on the
clock looking safe door face. 2 of each are colored similarly: yellow, white and
pink. There are arrow
points on the outside of the face that also color coded.There are 2 rows of 3 dials. The top and bottom dials
on the left are yellow colored, the middle ones are white and the right ones are pink
colored. Each dials when clicked on the right side turns the corresponding
colored arrow above clockwise, while clicking on the left turn the arrows
counterclockwise. The top dials turns the arrows 7 spaces while the bottom
arrows turns it 5 spaces. There is a block close to the top position that stops
the arrows from moving to a full circle.The aim is to position the colored arrow hands to
point at the matching colored arrow points.From saved game that has not touched the puzzle:
1. Yellow – The arrow hands are one away from the
corresponding arrow points.Turn top right once, bottom left once, top right once,
bottom left once, top right once and bottom left twice. The arrows hands are in
position.2. White – The arrow hands are 11 spaces away from the
corresponding arrow points.Turn top right once, bottom left once, top right once,
bottom left once and top right once. The arrows hands are in position.3. Pink – The arrow hands are 6 spaces away from the
corresponding arrow points.Turn top right twice, bottom left once, top right once
and bottom left twice. The arrows hands are in position.Safe opens with a tada sound. Take the heavy metal key.
Go the painting at the corner of the room left of the
safe. Click the painting to reveal a grate that Lansky used to spy on his employees.
Hear
them say something about layout of the floor, numbers and a broad. Howard writes down on the scribbled note:
-2, 8, 13, 7 and 14. Exit the room.Go left, forward and look at the poster on the left. It must
have been taken during the inauguration of the Empire State Building but the
date is fuzzy. Use the magnifying lens on the poster to read it as the first of
May, 1931. Go back to the elevator.
Get to the 14th floor:
18th floor – Take the elevator to the 19th floor and
down the stairs to the 18th.Go to Miss Hatchet’s office and see it ransacked. She
is unconscious on the floor. Go to Ellen’s office at the other hallway and tell
her about Miss Hatchet. Talk to Ellen again.Locked box – Go back to Miss Hatchet’s office
and see a notepad on the floor. Read it in inventory.Look at the locked box on the chair. It needs 5
digits. The notebook’s 5 items are all numbers. Hmmm…Elevator doors – There are 8 elevator doors in each
floor.Maintenance floor – Go to Ellen and ask her about the
maintenance floor. She says it is on the 4th floor.Employee’s arrival time – The bulletin board states
the working hours are 9 – 6 o’clock.Empire State Building inauguration – The poster states
first of May, 1931.Equipment services – The inventory register picked up
on this floor states it is on the 5th floor.Enter on the locked box, from left to right: 8 4 9 1
5. Take the security key.Exit the room and go to the fire emergency stairs. Go
up to the 19th floor. Take the #4 elevator to the -2 basement.-2nd floor – Pan
to the right, forward and see a man enter a metal door. Go forward and see that
the door cannot be opened. Pan left and take the fire extinguisher.Turn around, forward and look at the locked metal door
on the right. Use the heavy metal key from the safe on the door. Tada.
Elevator engine room – Look left at the destroyed wires on the elevator
electrical panel. Turn around and go forward to the padlocked cabinet on the
opposite wall. Use the fire extinguisher on the padlock. Take the jump leads.Sabotaged electrical panel – Go back to the
elevator electrical panel. Look down and place the jump leads on the shelf.Study the panel and see that there are panels for
elevators 1 -4 with floors -2 to 14.Using the numbers mentioned by the thugs and written
in the scribbled note – -2, 8, 13, 7 and 14, we know where to place the leads.To know if it works, look down and insert the security
key on the black box above the shelf with the jump leads. Click the key to turn
it on.Elevator 1 – place jump lead on floor -2 and 8. See
the green light show that elevator 1 is functional.Elevator 2 – place jump lead on floor 8 and 13. See
the green light show that elevator 2 is functional.Elevator 3 – place jump lead on floor 13 and 7. See
the green light show that elevator 3 is functional.Elevator 4 – place jump lead on floor 7 and 14. See
the green light show that elevator 4 is functional.Tada – all 4 elevators are now working.
Go back to the elevator and enter. Automatically exit
to the 14th floor.
Mr. Foster:
Wow! Go forward to the end and talk to Miss
Pennington, the secretary. The door to Mr. Foster’s office is opened.
Double wow! Enter and go forward to talk to Mr.
Charles Randolph Foster. Before he talks to you, he wants you to play his
recently acquired game.
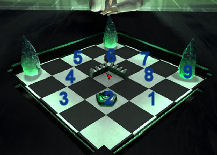
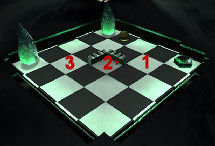
Jade stones and scarab game – The object of the
game is to move the pawn to land on the places where the 3 stones are located
without being caught by the scarab. Click and drop the pawn on the next diagonal
white square.
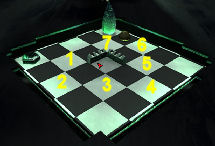
After completing the puzzle talk to Mr. Foster. He gives Howard his father’s medallion. Learn
about Elliot and the Thule group, connection to Atlantis and the race to get
there. Elliot stole a copy of the medallion. There are 3 medallions that make
up a key to an ancient relic hidden in a sanctuary. The other 2 keys are held by
an archeologist and a former army officer. Foster wants to use it to help
humanity but the Thule group, who thinks they are the rightful heirs to Atlantis
wants to use it for nefarious deeds. Elliot is a treasure hunter. Howard agrees.
Miss Pennington will give the particulars.
Exit and talk to Miss Pennington. Miss Sullivan, a
historian and archeologist has one of the medallions and is in Macao. The other
medallion is held by Captain Nathaniel Blackwood, a former Intelligence officer
in the army. His whereabouts are unknown. The Hindenburg will bring Howard to
Macao.
Exit the museum and watch the zeppelin cross the
United States and Pacific Ocean to land in Macao, China.
Macao
Look for information about Miss Sullivan:
Go forward to the Chinese junk casino. Talk to the Chinese in blue – Li Tang. He’s the bouncer. You can
talk to the bartender and the hospitality hostess at the corner.
Gambler: Talk to the man in white shirt and he asks that you
bet for him on the rat race. He is banned from betting. He gives gambler’s
bet (money). Go to the corner left of the stairs and hear that the betting booth is manned
by a snoring man. Go to the other side of the stairs and see a curtain with a
dragon motif. The door to the betting office is locked by a slider puzzle.
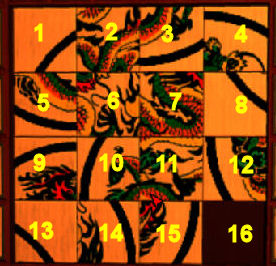
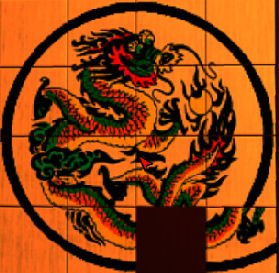
Dragon slider puzzle – Save game here. The motif for the slider
puzzle is the dragon shown on the curtain. Do the puzzle but Li Tang, the
bouncer will keep an eye on you. Immediately, turn around and go forward to the race table.
Then go back and continue the puzzle. If he catches you, the pattern of the
puzzle might be different when you go back.
Row 1 = 15, 14, 13, 9, 5, 6, 10, 14, 13, 9, 5, 6, 10, 14,
15, 11, 7, 6, 10, 11, 12, 8, 7, 3, 2, 6, 7, 3, 4, 8.Row 2 = 7, 6, 10,
9, 5, 6, 10, 14, 15, 16, 12, 11, 10, 14, 15, 16, 12, 8, 7, 11, 12, 8, 7,
6, 5, 9.Row 3-4 = 10, 11, 15, 14, 13, 9, 10, 11, 15, 16, 12, 11, 15, 14, 13, 9,
10, 11, 15, 14, 13, 9, 10, 14, 15, 11, 10, 14, 15, 16.Door opens.
After completing the puzzle, enter inside and wake up
the man. Give him the gambler’s bet. He registers the bet. Talk to him again and
he gives the receipt.
Go back out and give the white shirted man the
receipt. The race starts and #6 wins. Talk to him again and he gives Howard
small sum of money. He says that Ishtar might know Miss Sullivan, the
archeologist. She will be here since she likes to bet on rat races too. Ishtar
arrives.
Ishtar: Talk to Ishtar. She
will help you get in touch with her friend Miss Sullivan if you can sabotage the
generator as a nudge for rat race.
Generator – Talk to the barman. Learn that the
junk casino has the generator at the back of the bar and that he likes the lady
in red sitting by the bar. Talk to the lady in red. Talk to the barman again to
buy a drink for the lady in red. Talk to Chun Ying, the lady in red again –
twice to ask her help with the barman. Give the small sum of money to the barman
and see that he places a bottle on the bar. Watch and wait – the barman falls
asleep. Talk to Chun Ying again.Go behind the bar now. Enter the panel on the wall and
check the generator. Pan right and see a hole in the wall which is a handy place
to hide in. Pull the lever of the generator and then immediately hide in the
dark hole in the wall. See the hand of Li Tang pull the lever again to turn the
lights on. Exit the generator room.
Talk to Ishtar and she was successful in winning in the rat race. Learn that she
is Kate Sullivan, the archeologist and that she has the pewter medallion. She is
following half a bas-relief that was found here in Macao. It is essential for
the search for the relic. You need to be at the poker game since the bas-relief
is to be a bet in the game. She gives large sum of money.
Get to join the poker game at upper deck: Talk to the bouncer,
Li Tang. Show him the money. You need a password.
Password – Enter the betting room. The man is still asleep. Take and read
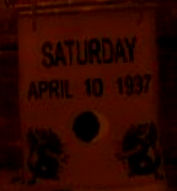
the paper on the table by him. Pan left and look at the calendar. Click on it
for Howard to say the date – Saturday, April 10, 1937. There’s a full moon
depicted under it.
A paper entitled "Password",
with a list of words that corresponds to dates:Spring: Tiger
Summer: Dragon
Autumn: Monkey
Winter: Dog
New moon: Four of a kind
First quarter: Three of a kind
Full moon: Two Pairs
Last quarter: Pair
Monday: Jack
Tuesday: Queen
Thursday: King
Saturday: Ace
Talk to Li Tang again. He asks who will win tonight. Select Tiger for
spring –
April, then select 2 pairs of kings for full moon and ace of clubs for Saturday.
He gives winch code to lower the sails.
Talk to Ishtar and you will automatically be up on the deck at the back of the
junk.
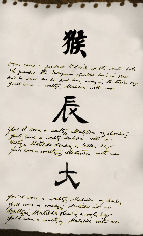
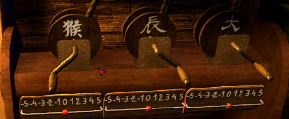
Raising the sails – Check the winch code given by Li Tang. Remember that
starboard is the right side of the ship and port is the left side. You are
facing the back of the junk. So the left ideogram is the top one on the winch
code. It is tricksy because the clues are only on the number written not the
position of where the number is located.Three Chinese ideograms with a short sentence opposite
each symbols:One turn less than the second halyard to starboard
Two times more turns that the third halyard to port
On turn less than the first halyard to starboard.
While facing the winches, turn the left to +3, the middle to -4 and the right to
+2.
Poker game: Enter on the exposed doorway to the right.
Talk to Ishtar-Miss Sullivan. Talk to Elliot, Master Yu and the rat race
gambler.
Play Poker – Texas-Holdem – You can review the rules in the manual.
5 cards to win from 7 cards dealt. 2 cards are held hidden by player. 5
cards are on the
table. 2 cards on the table are exposed after the first betting and a card after
subsequent betting.Cards to win: a pair, 2 pairs, 3 of a kind, full house made up of 3 of a kind
and a pair and 4 of a kind.Good luck in winning the bas relief.
After winning the bas relief from Master Yu, Elliot holds
a knife on Miss Sullivan throat and takes the bas relief. Talk to Master Yu and
the gambler.
Exit the junk. Go forward and talk to the man on the
right. Captain Nathaniel Blackwood, the owner of the third medallion has joined
the team. He has a medallion made up of oricalchus. Elliot and Kate went to the
palace at the Sahyadri Mts in India where the other half of the bas relief is
located.
India
Zeppelin: Pan right and talk
to Capt. Blackwood. Learn about his connection with Howard’s father. They served
in the same company during the Great War. Howard’s father kept a journal that is
supposedly never found after his death in the battlefield.
Exit and go to the radio room at the lower level. See
that nothing was changed from the last time you were here. Take the fine paper
and the lead pencil from the table.
Go to the steam engine room and look down where Garetti was
sitting. Take the zeppelin knife. Exit to the right and take the stairs
going
down.
Sahyadri Mts: Talk to Kate
kept in a cage. Learn that the bas relief is needed to open the Gate of Truth.
The Gate is
the way to the Grotto of Revelation which has the exact location of the
Atlantean relic. The rays of the sun will play a role in finding the bas relief.
The bas relief is hidden in the Great Hall of Glass. Walk forward and down the
stairs to the Hall of Glass.
Hall of Glass:
Bookcases: Look at the
bookcase left of the entrance. Take the Kama Sutra at 3rd shelf from top.
Check the bookcase on the right of the entrance and
Capt. Blackwood says he’ll do some reading. Look at the Gem Book on the third
shelf from top. It states the most beautiful gems reflect light like suns: ruby,
emerald, sapphire… Read the book from the top shelf that shows elephants
facing in different directions.
Wall inscription: Look around
and then climb the stairs. The big door is locked. Elliot might be in there.
Look at the inscriptions below the god on the left of the door. In inventory,
combine the paper and lead pencil. Use the combined paper-pencil on the
inscription.
Go down and out to the bridge. Talk to Kate. Give her
the inscription and she will translate it as:
He who seeks after Truth must take the path of
Enlightenment whose place of departure is Balance.When he opens the Seventh Book of Knowledge, the
ignorant one will be blessed with Wisdom.This understanding will give him strength he needs to
attain Purity. Only then will the truth be revealed to him.
Gems: Go back to the Hall of
Glass.
Book of Enlightenment – Look at left end of the
top shelf of the bookcase left of the entrance. Take the Book of Enlightenment
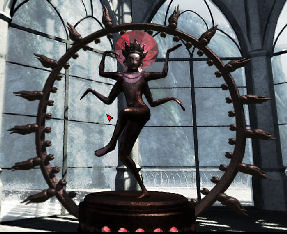
and get a sapphire. Tada!Kali Goddess statue – Go across to the statue
by the left set of windows by the other stairway. Study the statue and see a ruby as its halo. Look
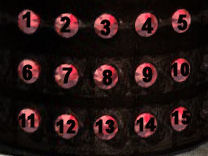
down and do the ruby puzzle.Ruby puzzle – The aim here is to turn off all
the lights of the rubies.
Click on rubies numbered: 1, 12, 9, 4, 10 and
5. Take the ruby.Elephant – Go to the elephant on a stand behind the table at the center
of the hall. Use the knife to take the pearl at tip of its trunk.Chest – Go to the chairs on the right set of
windows. See a chest with a depiction of Kali, like the statue at the other end
of the hall.Goddess puzzle – Arrange the arms and hands by
clicking on them to show the position of the statue that had the ruby.
The chest opens. Take the emerald.
Talk to Captain Blackwood about everything. Show him
the gems and he gives the meaning. Emerald represents balance, ruby symbolizes
power, sapphire brings wisdom and pearl is purity. He gives a moonstone
similar in symbolism as the pearl.
Light and stand: Look around
and see a beam of light striking a stand close to the far bookcase.
Gem placements – Go to the ivy covered stand
close to the bookcase just right of the stairs on the left. Use the knife to
remove the invasive ivies.As stated by the translation of the encryption done by
Kate: place the emerald – balance on the stand as the point of departure of the
path of enlightenment. See the light beam to the next stand.Go to the next stand and use the knife to remove the
ivies. The translation states wisdom, so place the sapphire on the stand.Go to the next stand where the light beam passes
through. Use the knife to remove the ivies. Place the ruby symbolizing power or
strength on the stand.See the light beam to the door on top of the stairs.
Climb there and place the pearl for purity. That doesn’t work. Use the moonstone
given by Blackwood.The light beams to a post at the bottom of the right
stairs. Go down and click on the panel. Howard takes the bas relief. That
was a short lived acquirement.
Prison: Listen to Elliot
welcome the new member of his team. You see them through slits in your prison.
Do the glyph-sudoku puzzle below.
Sudoku puzzle – Click-cycle through any of the
blank squares. Note that there are 9 different glyphs for the 9×9 grid. There
are 9 big squares in the puzzle. Each square are made up of 9 little squares.
Some glyphs are already in place and cannot be changed.The object of this puzzle is to place 9 different
glyphs in each big square as well as 9 differing glyphs on each row and on each
column.A tactic is to start filling in the big square that
has the fewest blank squares. Be sure to check the horizontal as well as the
vertical in selecting the glyph to be placed.
View this guide raw, exactly as the archive holds it