Riddle of the Sphinx II: The Omega Stone – By Omni Adventures
Celtic Compound
Go to Cemetery gate, turn left and
look up at the lamp. Its reflection is a mazelike spiral. Hmm! Take the sundial
taken from the center of the maze from inventory and place it at the center of
the gate. This is another dark and gloomy place with lots of dead trees. There
are tent frame wood structures. Go forward towards the full moon. See an arch
with 3 skulls embedded on the side stones. The lantern also shines a maze
reflection.
Trees and Pond – There are 6 trees surrounding a
pond. Each tree has a depiction of St. George slaying the dragon and a Celtic
cross. Above it is the sign of the skull inside the tree. Under the plaque is a
keyhole surrounded with 3 holed skulls similar to the skull turner taken from
the room behind the clock in the manor. Between each tree is a path that goes
somewhere.
Trees – Use the skull turner on the skull
hole. Go up the ladder and see a tied up, hooked up imprisoned skeleton. Take
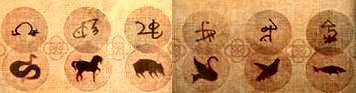
the skull. Collect all the skulls from the trees. The skulls have the gold
on blue depiction of bird, fish, horse, swan and boar. The skeleton on
tree to the right of the arch is missing his skull.
Hut – Go forward to the path
left of the tree in front of you, with the arch path behind you. Go forward and
see a hut and a kiln. Inside the hut is a fire at the center of the room. Behind
it a circular tree trunk grill with 6 holders surrounding it. Click the
collected skulls on the holders and they will automatically go to their correct
holder when the skulls are moved around the holders. The missing skull should
have a snake glyph on it. If you do not have all of them they go back to the
inventory.
Exit the hut. The end of path to the right of the hut
when you exit the hut has 4 line-marked standing stones with4 round rock and a
center rock in front of them.
Go back towards the hut. Take the path on the other
side of the hut and forward. Find 7 line-marked standing stones with round
rocks in between them. Go back to center of pond.
Go to the path at right of arch. See 3 line-marked
standing stones with 4 round rocks in front of them. Go back to the
pond.
Go to path at left of arch and between the trees. Go
forward and see 7 lined-marked standing stones in a circle. In front of each
stone is a round rock with indentation. Go back to pond.
Go to the path 2 away from the arch and to the right
of the far tower. Go forward and see 5 line-marked standing stones with
assorted numbers of round rocks in front of them. Go back to the
pond.
Go to the path towards the tower. The path splits to
a set of standing stones to the left and forward the tower. There are 3
lined-marked standing stones in a row with 4 round rocks in
between.
Tower: Go to left side of the
Tower and see a locked cemetery with a spiral drawing on the wall. Go back, take
the footbridge, climb ladder and enter tower by clicking on door handle.
First floor entryway – Note the lit alcove
with a cross-shaped hole surrounded by 7 birds similar to the SS insignia.
Look down and see a lit basement
Second floor storage room – Climb the stairs and then
climb the next ladder going up left of the exit on the floor.
Third floor Prayer room – There is a Celtic cross on
top of the window with 2 candles on right and 3 on the left. Look down and see
a kneeling pad and a book. Click down and kneel – best pray that we can finish
this game! Turn around and go up the next ladder.
Fourth floor storage room. Climb the ladder again.
Fifth floor dining room – I think someone left
their dinner in a hurry. Check the table with the spiral-maze seen on the
lamps. Take a look at the scroll by the cup with signs like that of the gold
tree skulls and the SS insignia. Ahh, another climb up the stairs.
Sixth floor Alchemy room – Look at the work
table and see various powders in bowls. Take the measuring tool and find out
in inventory that you picked up the one scruple and the one dram
measuring tools. Climb the ladder again. I’m tired – How about
you?
Top Floor room – Knock several times on the
peephole on the hatch. Ooops! The Celtic priest says Begone! Run or feel
the claws of doom! Leave! Okay, let’s leave.
Go back out of the compound gate
and go forward. The helicopter will drop a ladder and off you go back to the
Manor. Do a turn around and give the map and membership card to Hump again to go
back to the Celtic compound. Enter the compound again using the sundial. Go back
to the tower.
Celtic Priest’s
bedroom: Climb back to the top floor and see that the
hatch is open. Look through the telescope and see the gate, hut frame and the
Celtic priest looking back at you. He is hiding behind on of the skeleton prison
tree by the path to the hut. Turn left and take the key on a string
hanging on the bedpost. Go to the table and open the drawer. Take the one
pinch measuring tool. Make a separate Save game here to facilitate
going back to study the book if unable to get the priest away from his bedroom
again. Study the red formula book. Pull the bell rope and look through the
telescope to see an agitated Celtic priest. Exit the tower and then go around to
the locked gate of the cemetery.
Cemetery:
Use the key taken from the bedpost on the gate lock. Read the name on the
gravestones. They are the Developer Team of The Omega Stone. Take the Celtic
Cross atop the SS monument. Go back to the tower.
Tower: Go to
the alcove at the first floor entryway. Use the Celtic Cross from the cemetery
on the cross on the wall. The stairs moved back to reveal an opening to the
lower floor. Climb down.
Secret
Room: There are 6 stone slabs. Each one has a sword and
all have a red book except one. The cover of the books has the depiction seen on
the skulls taken from the trees – bird, fish, horse, swan and boar. The books
have the layout of the standing stones, round rocks and some of them have the
tree skull signs noted in the scroll at the dining table. In one page in each
book, all of the standing stones depict tree skull icons. Better make a note of
that stone formation and from what book. Take the sword from the stone
slab missing a book. Time to solve the case of the missing snake skull and snake
book. Where did we see a snake prominently displayed and didn’t we see the snake
book under the stairs? Climb up. Take back the Celtic Cross inserted in
the alcove. Go back outside to Hump and go to the Mansion.
Mansion: Go back to the
cellar and look again at the red book under the stairs. It does have the
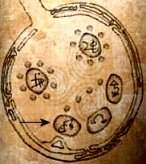
snake symbol – the missing book. Note the layout that has 4 stones and 4 rocks
in a cross layout. They all have one of the signs of the tree skulls. Make
special note of where the snake sign is positioned in the layout. Exit the
cellar and go to the maze.
Maze: Go
through the maze. Stop at the statue noted earlier on the long outer path at
right edge of the maze. The statue is at the X in the graphic above. The statue
seems to be missing something. Place the sword on his right hand. The statue
gets stabbed by the sword and moves back. Go forward to an enclosed lawn. Click
on handle of the door of a marbled covered shed. Enter and go forward to a
makeshift altar. Take the snake skull. Look at the scroll. It shows how
to use the grate in the hut at the Celtic compound. It has the name of the
ancestor of the eccentric Lloyd Bathelwaite, H .Ian Bathelwaite III. Exit the
enclosed lawn and automatically take the sword back. Go back to the
Celtic compound.
Hut: Go to
the hut at the second path on the left from the archway. Place the gold marked
skulls collected in this area on the stand behind the fire on a tree trunk
grate. L-R: bird, horse, snake, boar, swan and fish. Click on the blue circle on
each head and see different powders. Exit and hear the bell sound 3
times.
Alchemy
Puzzle: The object of the puzzle is to place specific
amount of powder from the skull on the grate to make the Stonehenge disk. The
horse skull does not have any powder.
1. Learn the different icons
associated with the skull. This can be found in the scroll at the dining table
of the Celtic priest.
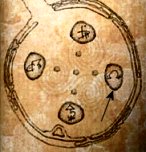
2. Study the red books associated
with this skull signs at the secret room at the basement of the tower. From
each book, select the standing stone formations that contains the skull icons.
All the stones must contain the skull icons except for 7 standing stones which
has an additional icon. If you missed checking the snake book, go back to Lord
Bathelwaite’s cellar and study it.
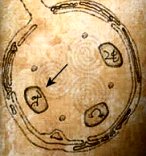
3. Go to each of the standing
stone formation outside the tower. Select the stone in that formation that
corresponds to the icon of that skull book. Write down the number and position
of the line marks on that specific stone.
Bird
Book
Horse
Book
Snake
Book
Boar
Book
Swan
Book
Fish
Book
4. Study the book in the bedroom
of the Celtic priest. You might need to go back to that saved game I
mentioned. The bottom left is the line mark of the stones. At top right is the
material associated with those line marks. The center icons are the amount
needed for the material. Look for the stone drawing that are similar to that
of the selected stones outside. Note the material and amount for selected
stones. Make a note of the icon for crystal when checking the horse
skull.
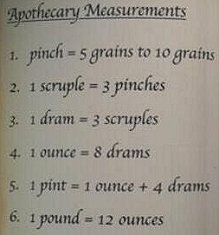
Measurements – From the
book in Lord Bathewaite’s study, the icons representing the different weights
and the materials are seen; as well as, the measurements.
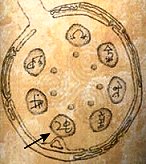
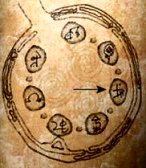
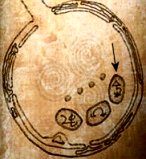
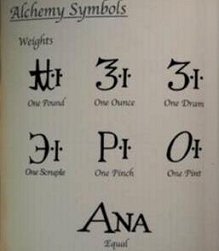
| bird | horse | snake | boar | swan | fish | |
| lines | L-2 | L-4 | L-1 | L-3 | L-3 | L-4 |
| R-3,4,3 | R-1,2,5 | R-5,1,2 | R- 2,4,3 | R-3,2,1 | R- 2,2,1 | |
| material | cinder | crystal | cinnabar | sulfur | sea salt | mercury |
| amount | 1ounce, 4 drams (1pint), 3 pinches | 2 scruples, 1 ounce | 4 drams, 2 pinches | 1 pinch, 1 dram | 14 ounces (1 pound + 2 ounces) | 4 scruples, 1ounce, 4 drams |
5. Go to the hut and the grill with the skulls. The
making of the disk is seen on the scroll found at shed at the enclosed lawn at
the Manor. Save your game!
1. Measure the correct amount of the chemicals and
place them on the grill using the deduced amount shown above. The powders
are taken from the skull except for the horse powder (crystal) that is found
at the alchemy table. It is on a bowl in front of the tripod with its icon
label. This will take 2 trips to bring to the hut. Be careful not to move
the lever when measuring the materials on the grill. They will be dumped,
unless you made a mistake in measurement and want to start over. Be sure to
check that you have something in the scoop part of the tool and also that it
is empty after clicking on the grill.
2. When all the materials have been added to the
grill, turn around and get a flaming log from the fire. Light the
grill with the measured materials. If incorrectly done, you will be
incinerated. If correctly done – Whew! You have the Stonehenge
disk.
Go back outside the compound, click forward to the
hillside and arrive at the Manor. Give the Stonehenge pass card to Hump and from
Stonehenge we better check Giza.
Giza:
Tent – Read Gil’s ever-present confidential letter. Do hurry up The
Omega Stone has us in view! Take the pass card to Santorini Island.
Go back to Hump and give him the pass card to Santorini.
Santorini
Island
Go to the back and read Gil’s
letter lying on the dropdown table. But for now, you have seen what I needed
you to see. You now know what needs to be done! Turn around and don the
diving outfit at bottom left of the shelving unit. Get out from the
seaplane and dive down to the pyramid.
Crystal Power
House: See the imposing tip of a giant pyramid with a gold
capstone. In front of the pyramid is a circular structure. Enter and see a vat
full of crystals. The ceiling is open. Exit and climb the pyramid to the top.
Underwater
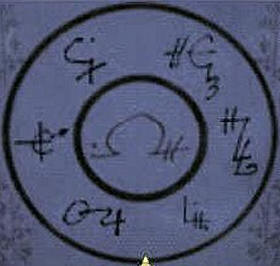
Pyramid: On the wall is an enlargement of the glyphs seen on the
circular structure at the center.
Omega disk end puzzle –
Place the disks collected on the proper slots as seen from the enlargement on
the wall. To know where the different disks goes, check the scrolls collected
throughout your travels. Match the glyphs of a scroll to the chart on the wall
and insert the disk at its correct place. Starting from one o’clock position
going clockwise – Atlantis disk, Stonehenge disk, Giza disk, Chitzen Itza
disk, Easter Island disk and Devil’s Island disk. Take the Omega Sun
Disk.
Crystal Power
House: Go down to the crystal power house. As soon as you
enter, look down at the vat and insert the Omega Sun disk at the Omega insignia
at the side of the vat. The crystals lights up but subsided.
Hear Gil say that it needs a power
boost from the ultimate source and brought in the Ark of the Covenant on a
copter. A bright stream of light shoots out from the Crystal Power House into
the sky.
Listen to Jeff, er I mean Gil talks
about the finding that brings credence to Edgar Cayce’s prediction – the other
cut stone slab at the Chamber of Ages leads to the Hall of Records in pristine
condition. He discusses the Atlantean civilization is made up of different
tribes that has offshoots all over the world. How the small Omega stone made up
of 2 comets destroyed Santorini. The similarity in architectural structures
found in the different places visited. No one place is Atlantis.
Work is still to be done. The
scrolls mention ancient civilizations still to be investigated in the
East.
The End
This document may not
be distributed without express written permission of the author and the content
may not be altered in any way.
For Questions or
Comments on this Walkthrough, Please write to: MaGtRo or NKuderna
Copyright © 3/2003
MaGtRo & NKuderna
<IMG height=10