Riddle of the Sphinx II: The Omega Stone Walkthrough
By Omni
Adventures
Walkthrough by MaGtRo
& N. Kuderna March, 2003
Gameplay: You can do a
full install (2.68 GB) that eliminates the need for the CDs in the drive. After
installation, a choice of configuration of render mode and CD access modes can
be accessed. The game is mouse driven. Right click of mouse accesses the pot
with the scroll for main menu, knapsack for inventory and camera at bottom left
of screen. The pot with scroll accesses the main menu where you can save, save
as and quit the game. There are 2 ways to save games. When you click the scroll
pot and it becomes the larger graphic, click on it again to show the main menu.
Here you can choose ‘save game’ – which will overwrite the previously saved game
you gave a label to and ‘save as…’ – which will make a new saved game frame
that can have a new label. You can also access Help and the panning speed, clue
cursor, warp cursor, fixed or free cursor movements, change the gender of the
main-your character in the game and volume control. When an inventory is taken,
it hangs on the cursor and when they are moved to an active spot to use the
inventory on – the cursor disappears and the inventory becomes the cursor.
Pressing the space bar skips the cutscenes and introduction. The saved games
square seen at bottom of screen can be loaded when the cursor is placed at the
center of the square, overwritten when the O at bottom left is clicked and
deleted when the X is selected.
To save a headache, be sure that
you have right clicked anywhere to remove the bottom inventory bar before
panning. You can die, so save often. Having a lot of saved games,
pictures taken by the camera and a full save may cause you to run out of
memory.
A heartfelt Thank You to
those who helped with clues: acornia, Mordack and Bill.
The second scroll was interpreted
by Sir Geoffrey. Warning is stated about a very specific devastating past event
linked to dire future – present time. The ancients knew the date and time.
He will still decipher the date of the dire event. Hump Allen will be the pilot,
driver, all around help to get you all around the globe and privy to sensitive
knowledge. Your quest is to find the other Omega disks.
Egypt
At the Chamber of Ages, Gil talks
about 2 additional precisely cut stone blocks found on both sides of the Ark of
the Covenant. One was pried open but the other is still sealed. The Omega disk
found in the other chamber cannot be removed but is referenced together as one
of 6 disks on the second scroll. The others have to be found and all are
connected to the winged Solar disk. All the texts referenced to the stone, The
Omega Stone.
If you want, you can check the Ark
of the Covenant. In inventory are the Official Site Entrance Passes to the
different locations: Easter Island, Devil’s Triangle, Chichen Itza, Stonehenge,
Giza Plateau. Note the date of the passes: 2-14-2012.
Skull Pyramid Chamber:
Enter the crawlspace at left of the ark. Go right at end of passage and enter a
chamber with a skull laden pyramid at the center. Look close at the Giza Omega
disk at top of pyramid. Click to open the center base of the pyramid and see a
scroll.
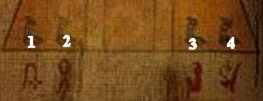
Cobra puzzle – To
take the Giza Omega disk, a code must be entered on the cobra heads at the
base of the pyramid. Study the scroll to get the code. Take note of the icons
associated with the cobras at bottom of the pyramid. Look at the hieroglyphs
on the left side. Starting at left column going right – Note the numbers of
times the 4 cobra glyphs are seen and their sequence. Click on the cobras in
the sequence noted.
Numbering the cobra and glyphs as
1-4 from left to right: Press cobra heads 1 3 3 3 4 4 4 4 3 3 3 2 1 4 4 3 2 3
3 3 3 1 1 1 1 3 3 3 3 4 1 2 2 2. Hear a click, look up and take the Giza
Omega disk.
Pull back and look down right to a
box with the familiar hexagon. Open the box, look at scroll and click the
knapsack on the Giza scroll #1 to place it in inventory. On the left side
of the pyramid is another box. Open, look at scroll and click the knapsack again
to take the Giza scroll #2.
Exit the Chamber of Ages, up the
Sphinx and out to the camp site. Go to the Helicopter and give one of the pass
to Hump, preferably the Easter Island. He will take you there.
Easter
Island
Tent: You
arrive on a motorized rubber raft on Anakena beach. Look around and then go to
the tent. Check the books on the bedroll at right corner. Read the background
for Easter Island quest. The Moai are the large stone statues. Learn about the
‘talking boards’ that record ‘lost history’ of the ancient people fleeing the
great city. The Angelic Archeology talks about the references to different
‘winged angels found in Egypt, birdman in Easter Island, feathered serpent in
Maya, etc. Note the picture of the birdman.
Table
- Go to table on the left and read the letters. Gil’s confidential letter states
about a possible sacred chamber that looks like hollow lava tubes as seen by
satellite imaging leading away from the AHU on Anakena beach. It is not known
which Moai guards the entrance. Have you inferred that Gil wants you to be
destructive? Take the memory card attached to the letter. (If you have
the DVR-AGPS already, insert the memory card and listen to Gil’s additional clue
about the Mask. If not, it will not affect gameplay). Gil’s proposed destructive
method of removal of the Moais gets letters of disagreement. Look at the
topographical map of the area. To view the entire map, click-hold and move the
map.
Mask
- Turn around facing the tent opening and go to the left corner. Read the 2
rolled letters from Yoppie about the black sky Moai, warning about death and the
mask that will awaken the Moai to show where to find the Moai of Death. Take the
black mask.
Plastic
Explosive – Go to the right side of the tent and pick up the plastic
explosive with computer board imbedded in it. DO NOT TOUCH the box
with the red button (detonator) or you die!
AHU – Moai
Guards: Exit the tent and let’s start looking for
the Moai that guards the caves of the sacred Moai. Go to the AHU – Moais on the
stone fence.
Stand in front of the Moais who
are facing inland. Take the black mask from inventory, automatically see
though its eyes and look at the Moais. Right click to remove inventory bar to
facilitate panning. Note that the second from left has shining eyes. To take
off the mask, open inventory and click on mask again. Go to the second from
the left Moai and click the plastic explosive on the Moai with bright eyes.
The explosive is laid on its feet. Go back to the tent and press the red
button of the detonator. Feel and hear the earth shake.
Shaft-tube
Maze: Go back to the Ahu. Enter the shaft opened
when the Moai was destroyed.
Moai clue room – Forward
3xs, reach a right-left path, pan left and forward. See 3 Moai on either side
of room. Use mask to see – left side: the middle and farthest Moai have
shining eyes. On right side: the closest Moai has lit eyes. Remove mask by
clicking on mask in inventory.Easter Island scroll #1
– Turn around, forward once, pan
left and forward. See right-left path, pan right, forward 2xs, another
right left path, pan left and forward. Go forward to cache at the end of the
passage. Open the box and place Easter Island scroll #1 in inventory
(click knapsack).Easter Island scroll #2 – Turn around, Forward
2xs, pan right, forward 2xs, pan right, forward, right-left path, pan
left, forwards 2xs and look close at another box. Take Easter Island scroll
#2. Turn around, forward 2xs, pan left, forward and go down until the end
(F 5xs).
Lava pool puzzle – Note
the 3 statues on either side of the lava pool, positioned just like the first
room we entered in. Turn to right and left wall and see 3 wooden assembly
inserted on the wall that will turn the head of each of the Moai. Based on the
first room Moais, we know which statue’s head needs to be moved. Turn right
and click on top wooden assembly. Turn left and click on middle and bottom
wooden assembly. The Moais that had their heads turned fall forward forming a
walkway to the Black Moai of Death at far end. Cross and take Easter Island
Omega disk.
Exit by turning around and forward
8xs. Pan little to the left, forward 5xs and look up to the shaft opening. Exit
and go to the motorized rubber boat. Click on motor to go back to Hump at the
sailboat. Let’s go to the Mayas.
Chichen
Itza
Base Camp: Go to the
hut and check the map on table (click-hold to move the map) and barbecue grill.
Later we can have a picnic. Remember the locations of the structures that will
help orient yourself later during your spelunking – the ruins at the top of map,
Sacred Way, 2 buildings in front of El Castillo and the Temple of the Warriors
at right of map.
Tent: Go to the main tent on
the right. Zoom in on the bench and read Gil’s confidential letter and the
reference books. There’s a mention of the artifact in the inner pyramid of El
Castillo. Read and note the Mayan Astronomy and Mathematics – you will
definitely need the knowledge later. Exit the tent.
Humvee: Go to the back
of the Humvee and click the tail gate. Take the crowbar and the
grapple and rope. If not picked up now, a glitch happens that the grapple
will appear automatically later when needed.
You can check out the Ballcourt,
north of the camp or go directly to Castillo at right of camp.
Castillo: The access
up El Castillo is by the left stairs that has rope to help the climb or the
North stairs. Find a padlocked grate at south side. Use the crowbar on the
padlock, go down, forward to another ladder and enter the storage room. See a
reclining statue and at far end, see a stand with 6 hooks and a hammer. Look
close and remember the glyphs on the base of the stand (graphics later). There’s
nothing to place here yet. Go back up and down the pyramid. Gil said something
about the Sacred Cenote up north. Hmm.
Sacred Cenote: Go
north of Castillo to a Sacred Cenote and the ruins. From Castillo’s north
stairs, go forward, pass the structure on the left and take the Sacred Way going
north. Find a cenote – A water-filled limestone sinkhole of the Yucatán. Turn
around and click on wall of ruins with grapple and rope. The grapple catches on
wall and we can now go down. Use back cursor to go down the pond until an
opening on wall above water level.
Hint: Start looking
everywhere – ceiling, ground or water for anything that can be picked up or
accessed.
Click
here for Map, Graphics and Inventory Locations of the
Underground Maze!
Underground: Enter the
opening. Click at water below to automatically go down a long way using log
steps. Raise computer’s brightness here. Go to right side and then forward while
walking on shallow water and underground path. At the end of the path, a chamber
on the left and stairs on the right are seen. Let’s look at the chamber first.
Underwater Chamber:
Enter, go left and up the stones steps. Enter the alcove, right and see a wall
mural. Go out and down the water again. Go around the broken stele-wall that is
in the water. On right side of broken wall, look down on water and pick up the
Atlantis skull #1. Now go up to the middle steps behind the wall
structure that is in the water. Enter the middle alcove, pan down and pick up
skull with a Moai from Easter Island #1 and a glyph found on the scroll.
Turn around, exit chamber, forward
and then turn left, forward, go up, forward a long way and into a chamber with
side halls.
Chamber with Side
Halls: The chamber has 2 side aisles, an access underground on the
left side and exit on the other side. Forward and look at carving on side walls.
Forward once again and turn left.
Left Passage – Go forward
into passage that goes down. At the very end of the passage, pick up
Devil’s triangle skull #1. Turn around and go forward 3xs.Secret Room – Look up and
climb up to a secret room. The room has murals depicting men blowing horns. Go
to left wall and look down at the plate. Pick up #3 bell. Go down and
continue back to the chamber.
At main chamber hall, turn to face
the opening not entered yet. Turn right and pan down, pick up Stonehenge
skull #1 by the pillar engraving.
Exit chamber, forward and up the
long passageway (check your progress once in a while – it’s easy to get turned
around here). Go forward 15xs to enter a cavern area.
Cavern area:
Forward 3xs and pan right. You will see a triangular opening that will lead
ultimately to the Skull Chamber – we will get back to this area later. Pan left
again, forward 3xs (out of chamber now), forward 5xs to enter the Inner
Chamber.
El Castillo
Inner Chamber: Go forward
once, turn left to the stone structure and pick up the Maya skull #1. Go
forward once to the entrance you came in, turn right to go behind the pillars,
forward and turn corner. Pick up the barbed rope on floor. The chamber
has 9 pillars in each 4 sides, some have panels on them. The stepped
roof has an opening at the center. Go back to the platform at center of the
chamber and study the glyphs.
Exit the chamber on the other side.
Go forward through the long vaulted passageway and turn the corner to another
cave passage. Move forward 5xs, look down and pan right and pick up Easter
Island skull #2. Go forward to Glyphs stone. Take note or picture of
the glyphs, the number that goes with the glyph and its position in the sequence
(graphics below).
Ruined
room: Go forward to another room. As soon as you enter,
pan right and down, pick up Atlantis skull #2. There are 2 other exits to
this room – one across and one on the left that is a break in the wall. Exit to
the left.
Left
passage: This is a zigzagged passage – be sure to pan to
go forward. Go forward 3xs and pick up Devil’s Triangle skull #2.
Pan left and go forward until you see the Bell Numbers Stone. It is
marked with the Mayan number – 5, 3, 1, 2, 6, 4. Go forward until you reach the
luminous pool.
Luminous Pool: A
circular pool lit by an opening on the cave ceiling has a ledge on the left. Go
left and forward 2xs to go down the pool. The pool has a shallow ledge
underwater that goes around the rim of the central very deep area. Go to
right shallow area 4xs. Pan down and see a cave opening underwater. Click to go
to the underwater cave (if you turn around you will see the deeper part of the
pool).
Underwater cave – Go
forward. Enter the opening on the right and go forward until a wide dead
end area. Pick up a #2 bell by cliff side and #6 bell partially
hidden by the big boulder one step before the dead end area. Turn around and
go forward until the deep part of the pool.Deep part of pool – Look
around to pick up Stonehenge skull #3 and #5 ball from skull eye
socket by the wood and rocks area. Turn right, forward and pick up
Giza skull #1 and #1 bell (side area). Look up and click until
you are above water and click to the entrance on cave wall.
Go back to the ruined room. It is
time to check where the other door leads to. Go to door on the left, go forward
to a dead end, back up and then turn to a side passage.
Skewered Skeletons
room: So this is where the prisoners are dropped from the ceiling to
die. Pick up Stonehenge skull #2 on the floor.
We will now go to the Skull room at
the side passage at the cavern area. Go back a long way, pass the ruined room,
pass the Castillo’s inner chamber and to the cavern area (Forward 6xs from inner
chamber). Once in the cavern area, go forward 3xs and then turn left to the side
opening. Just before you enter the side opening, pan down to the right and pick
up Giza skull #2. Go forward and enter the Brown mural room.
Brown Mural Room: As
soon you enter pan back, click at scroll on floor and take a look (or a picture
using the camera) at the skull scroll (graphics later). Turn around, exit
the room and go forward on a curving path (with a weird stone structure in the
middle of the path) until the Skull Room.
14 Skulls Room: As
soon as you enter, turn right, take box, open it and take the Maya
scroll. Go forward once, turn left and pick up Giza skull #3 from
bottom shelf. Go to the opposite wall and pick up Easter Island skull #3.
Look at the skull puzzle at middle wall.
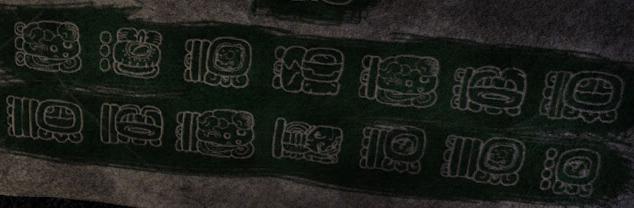
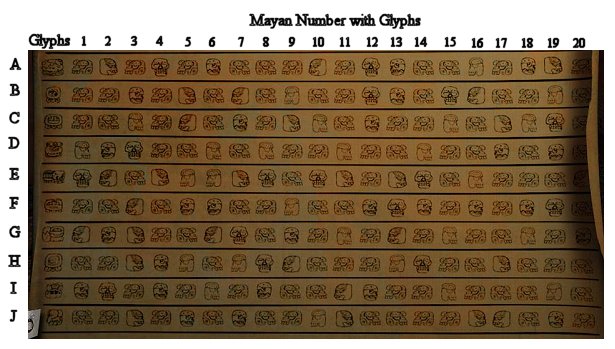
14 Skulls Puzzle – Based
on the skull glyphs stone and the skull scroll in the brown mural room, deduce
the head orientation of the 14 skulls. Click the skulls to place them facing
left, right or center. Position skulls as shown on graph below.
This is described in the book in
the tent. Each glyph is made up of a Mayan number and a glyph. Study the
glyphs individually and use the chart below to see what head orientation is
associated with that glyph. For example: the top first glyph has the Mayan
number 1 and the glyph attached is the one depicted in row A. The skull
orientation of A1 is facing left. Do the rest.
Top Row
|
Glyph |
A |
D |
H |
G |
A |
F |
C |
|
Number |
1 |
3 |
12 |
2 |
7 |
6 |
11 |
|
Position |
Left |
Center |
Left |
Left |
Right |
Left |
Right |
Bottom Row
|
Glyph |
C |
F |
A |
E |
B |
H |
B |
|
Number |
19 |
10 |
12 |
5 |
14 |
16 |
4 |
|
Position |
Center |
Right |
Center |
Left |
Right |
Right |
Left |
The skulls move to make an opening.
Enter through the opening. Pick up Atlantis skull #3. Look close at the
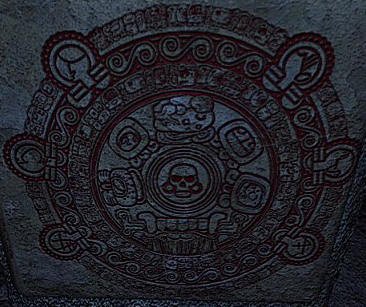
circular carving with a skull at the center. Looks familiar! Zoom in on the gold
glyphs at its round points, from bottom left to bottom right: Stonehenge,
Atlantis, Maya, Devil’s Triangle, Giza and Easter Island. Exit the room. Go back
to the Chamber with side halls via brown mural room and left on cavern
area.
Chamber with Side
Halls: Go to the side hall opposite the side hall
that opens to a path and the ceiling secret room and see an etched carving. Look
down and see a slab cleared of debris and has a crack. Use the crowbar on the
slab. Go down the long stairs that was uncovered and enter a chamber.
Secret Chamber – Go
forward and check the place out. See a statue with outstretched hands and a
square for a chest at the center of the chamber. Check the 3 etched slabs on
each wall. Go to the back and look at the table. See magnificent intact
potteries and beautiful jade necklace. Look close at the bluish green small
tray. Pick up the Mayan skull #2. Pick up #4 bell from the pot
full of nuts.Statue – Go back to the
statue. Click on his right hand. I don’t think he likes us – he puts his
hooked tongue out. Use the barbed rope on his right hand. OOPS, we broke
something back there. The rope tied his hand to his hooked tongue. Let’s see
what damage we did. Go back to the left rear dark area. The stone slab fell
down and revealed an opening on the wall. Go down the steps.Sarcophagus – Click to
open the ornate sarcophagus. (Glitch here causes you to get the mask before
opening the lid). The lid moves back. Take the jade mask. Click on the
other end and take Devil’s Triangle skull #3.
Go all the way back to El Castillo.
The grapple is automatically placed in inventory.
El Castillo: Go
to the opened grate at south atop of Castillo. Go down the ladder, go forward to
another ladder and enter the storage room. Go pass the reclining statue and look
close at stand with 6 hooks and a hammer.
Bell puzzle – Click the 6
bells collected on the hooks and they will automatically be attached. Click on
hammer and then take hammer from inventory. Use the hammer to strike the bell
in the order seen at the Bell Number Stone in the tunnels – 5, 3, 1, 2, 6,
4. Automatically pan to see reclining statue. Glyphs flashes at the
statue’s stomach. They are the glyphs at the platform at El Castillo Inner
Chamber – remember the order of the glyphs.
Go back to the El Castillo Inner
Chamber’s platform. It’s going to be another long trek.
El Castillo
Inner Chamber Platform
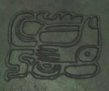
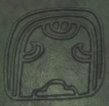
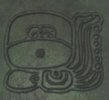
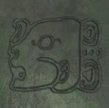
Puzzle – Go to platform and look down at 4 glyphs. Based on the clues seen
on the reclining statue after doing the Bell Puzzle, press once on S, E, W and
N. Zoom out and the stand rises to the opening in the ceiling. South,
depicted with 3 lines off center, east is depicted with 2 hooks at center, west
looks like a face with a puckered mouth and north is a side view open mouthed
face.
 |
 |
 |
 |
| South | East | West | North |
Ceiling complex – The area
is made up of hallways on all 4 sides with 2 side dark alcoves. At the opposite
hallway from the chamber’s platform you arrived on is an entryway flanked by 2
jaguar heads. Inside are also 2 side alcoves and on the inner room is a huge
familiar jade and gold round slab.
Gold 6 Skull
Puzzle: This jade and gold round slab is also
represented at the base of the Bell Puzzle seen at the storage room at El
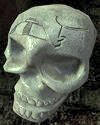
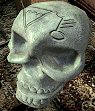
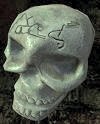
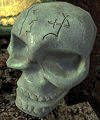
Castillo and behind the 14 skull puzzle. The 17 skulls collected have 2 marks
on them – a location and a glyph. The depiction behind the 14
skulls puzzle shows what location skull is to be placed where. Since
you have more than one skull from each place, the depiction shown at the base
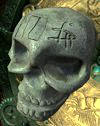
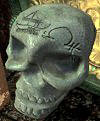
of the bell puzzle in Castillo shows what glyph to use.The placement of the skulls by
location, from bottom left to bottom right – Stonehenge, Atlantis, Maya,
Devil’s Triangle, Giza and Easter Island.
The glyph to select which skull
from a specific location is shown below.
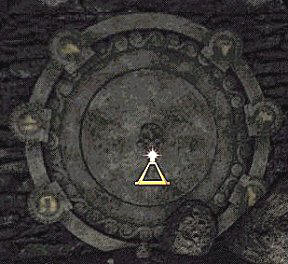
Place the 6 jade skulls shown
above from L-R at their correct place. Place the jade mask from the
sarcophagus over the jade skull at the center. The circular panel opens, enter and a small gold El
Castillo rises up. Click on top of the pyramid to get the Maya Omega
disk.
Now, we have all these excess jade
skulls for our skull collection. Go back down by clicking on the edge of the
square that took you up here. Exit the underground and cenote. Take the
grapple when you leave. Go to Hump at the camp site and give him the
Stonehenge pass card. That’s it for Chichen Itza. Thank goodness!
Stonehenge
Recreational
Vehicle: While still sitting at the passenger seat, turn to the
right and read the 2 letters that should be on the shelf or armrest. If still
cannot find the letters, go to some other part of the world and then come back.
Hint: If you have
already exhausted all possible clues in a certain area – go to another part of
the globe and then comeback. New clues might surface – like the appearance of
the letters here.
I visited Easter Island and
saw letters about the destruction done to the Moai. The Archeological academia
is shocked by those actions and Gil is compared to the Taliban.
Gil’s Stonehenge letter talks about
Christian, the former student here at Stonehenge and Cornelius Snelling. Take
the key. The other letter is from Cornelius Snelling, who is suspiciously
eager to get in the site. Go to the worktable behind Hump.
Desk – Read the letter in
the brown envelope concerning the wireframe models sent to Christian. Open top
drawer. Note Christian’s discoveries on Grid D of Celtic warrior and
artifacts. Open middle drawer and study the DVR-AGPS. Roll out and study the
map of Stonehenge. Open the bottom drawer and read about Stone-In
2012.Sink Area – Look close at
the coffee – we might just need a cup of Midnight Oil – Mission Possible
Coffee. Check the skull.Bathroom – Enter and check
the newspaper article about Gil. Look close at the paper in the toilet –
Sheley’s been abducted? Enter the shower and turn the left faucet for a hot
steamy bath. Read the words on the door – The stones multiplied. Hmmm!
Exit and enter the bedroom.Bedroom: Left
shelves – Pan left and look close at the GGAI hat. Take the canister
with ancient coins labeled for L.S. found in sqr D-A3 (the Celtic
warrior’s dig area as seen from Christian’s drawing of the dig site). Look at
the shelf below the hat and see a depiction of 2 stones from the Stonehenge
complex – remember what they look like.Bed – Read the book on the bed. It mentions
Shelly (of the paper in the toilet fame) leaning on her favorite Trilithon –
the westernmost Trilithon.Right shelves – Note Troy’s medications sent
by his mother, a necklace and also beer bottle.Desk – Read the flier about Pagan
Playground, the proposed theme park here.Drawer – Open top drawer and read the
letter of Troy Christian’s’ mother and all the letters of Snelling. That
rat! And he is supposed to be Gil’s friend. The coins we just took must be
what he wanted.Stonehenge musical box –
Look close at the Stonehenge replica. Zoom in on key at left and then click
on key at left side to start the music box. Insert the key from Gil’s letter
on keyhole at right. Place key back in inventory. Click the area between the
2 keys around the plaque to open the secret compartment. Take the Omni
DVR-AGPS (the how to of this is at second drawer at the desk behind
Hump). Pull back and open inventory.DVR-AGPS – Click on DVR,
insert the memory card found on the secret compartment together with
DVR at right side. Press the top right button to listen. Hear Gil talk about
– Trust no one. Cryptic clues were left before Giza to help break the
code. He also mentions ‘Wet behind the ears (we already took a hot
shower) and factoring Shelly’s stone will prove essential.
Exit the bedroom and look again at
Stonehenge map at middle drawer of desk. The stones in the inner horseshoe are
called Trilithons and the westernmost are #s 57 and 58. Those were Shelly’s (of
the book on the bed) favorite Trilithon (stone). Exit the MARV.
Outside, turn right and climb the
ladder of the RV. See a beeping device. What is it?
Stonehenge
area: Look at the signs on the gate. Enter the area and
follow the road to the end. Hear the beeping device.
Bunker: Go
down the walkway ramp to the metal green door. Read signs. The EAT protest
signs are everywhere. Look down and notice 3 empty medicine bottles of Troy’s
and lots of empty beer bottles. Read the notes of Troy. February 9 – He sees
something that he wants down. February 12 – They are watching him by the Heel
Stone and he threw the shovel at them. The brush offs by LS (Snelling), Black
Ops and the farewell notes. Go back to the road and out the gate. Let’s see if
the shovel is still where he left it. On the way back, go to the Stonehenge main
area and hear that beeping sound.
Road: Go out of the
gate, forward to main road, turn right and forward to the Heel stone, the large
stone by the fence. Turn left by the Heel stone and go to the side of the road.
Pick up the shovel. Walk back to the parking area, look around and see
another bunker. This is where the green door leads to.
Parking
lot: Go back to the gate and to the MARV. Climb to the
roof of the RV again and press the button of the disk to turn the beeping sound
off. (Possible glitch here, if you still hear a beeping sound. It will stop
beeping if you quit and load the game again). Is this a spy mechanism or
something to drive one nuts? It’s time to check Stonehenge
proper.
Stonehenge Area:
Go to the center of the complex, face the 6 standing stones on the Sarsen Circle
with 3 dolmens (slabs) connecting 4 of them and the single standing stone with a
knob on top on your back. Now, you are facing due north. Let’s see where
Shelly’s Trilithons are located. Turn left to look west. There they are #58 and
#57 stones – just like the bank giveaway. Turn around and see a similar 2 stone
structure – #53 and #54. Go around the other side of these stones and see a
broken ladder. Look up to see something sticking on top of the dolmen. Use the
grapple (taken from the Humvee in Chitzen Itza) on the slab. Climb and check
Troy’s briefcase.
Troy’s
briefcase: Take the key. Read Troy’s journal. He
wears the Trilithon necklace given by Gil. He writes about meeting with
Snelling, Gil’s actions on the scans he’s taken, the find at A3 and his dreams.
He rants about your imminent arrival, his flushing the vital clue that Gil wants
you to know (Shelly was abducted) and Mayan and Egyptian potteries found.
He started digging on another site known only to him. His tone has changed from
eagerness, professionalism, to anger and finally the nightmares. Pull back and
look around – see the Heel stone to the North by the road, the buildings across,
bunkers, RV at parking lot and a fenced in building. Go down and let’s check the
fenced in building south of here.
Troy’s Dig
site:
Electrified fence – Read
the Warning sign. DO NOT TOUCH the fence area or you die! Look close at the
green box by fence gate.1. Use Troy’s key from his briefcase on the keyhole
to open the green box.2. It asks for a card. Take your Stonehenge pass card
from inventory and swipe it on panel. Return pass card to inventory.3. It now asks for a 4 digit code. This must be the
information Gil wants Troy to give you and he flushed it down the toilet. Hmm!
Shelly was abducted. The stones multiplied from the shower
stall. Shelly’s favorite Trilithons are 58 and 57. 58×57= 3306. Enter 3306 on
keypad. Enter the siteD-A site – Click on the Celtic
warrior’s skeleton to go down, go to A-1 (top left) and use shovel at A-2 area
(top middle grid). Take Stonehenge scroll.
Go back to the MARV. Give Hump a
pass card to go to another place in the globe and then later comeback here.
Devil’s
Triangle
Finally- Sunshine! Look close at
the table and read the letter. Take the memory card. Take the DVR in
inventory and insert memory card at right side of DVR. Listen to Gil talk about
a find of an ancient shipwreck. The items on the floor are in a shape of a hull
at 44 N, 18 W. Comet!
Diving: Look
close at the map. Move cursor to close to bottom right to read 64-44 and 32-18
and then click. Hump moves the boat to those coordinates. Go outside, wear the
diving gear and go in the water. As soon as you get underwater, go forward to
the shipwreck 2xs. Pan slightly right, forward 1x, pan little to the left
towards the pots and forward once. Take the Devil’s Triangle Omega disk
from one of the potteries close to the tip of the so called hull.
If you go to other coordinates, you
will see wrecked ships, remnant of the fabled WWII airplanes, other potteries,
etc. Have fun diving anywhere if you want to.
Go back to the boat. Enter the
cabin and automatically remove the diving gear. Give Hump the pass card to
Stonehenge.
Stonehenge
Revisited
A new letter is by the passenger’s
chair. Read Gil’s letter about his friend, Lord Lloyd Bathelwaite II.
Bathelwaite can help you on your quest. There is a map enclosed that Hump will
find useful. Another letter appears – In Gil’s letter to Bathelwaite, find out
that he is also an acquaintance of Snelling. It is signed – Your SS brother.
Place this letter and map in inventory. Now, take the letter and map from
inventory and click on reliable Hump.
Manor House of Lord
Bathelwaite
Exit the Mercedes Benz limousine by
clicking on door and then try alternating repeated knocking on door or pressing
the buzzer. Well! After waiting for an answer, being scolded and asked to come
in, Lord Bathelwaite asks that you have to find the door key yourself to prove
how good you are. He issued you challenge! Turn left and go around the house
passing a padlocked cellar door. The manor’s glass door is also locked. Turn
left and see a maze. The entrance is flanked by spear carrying
warriors.
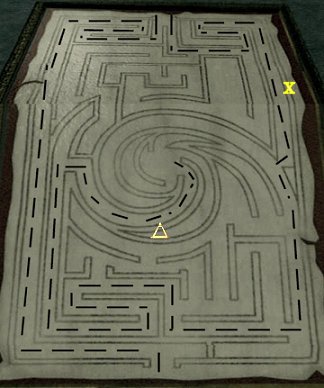
Hedge Maze:
Enter, turn left, forward up to
the end and follow the path until you see the Conservatory. Enter the
Conservatory and see fountain at the center. Wrapped around the fountain’s
base is a snake. Look at snake’s head.Go back to the maze and enter
through the left side now. F, L, F to end, L, F to end, L, F, R, F, R, F, R,
long F (take a look at the statue on the left midway this long passage –
remember where it is), R, little F, L, long F, R at the second to last one, F
to end, R, F to end, L, F to end, L, F, L, F, R, F, R, F, R, long F, R at
first R, curve around to center of maze.Pick up sundial and turn
the tap. Exit the maze to go to the hothouse. Exit using the path to the right
of the bench (that has both left and right path on each side) to curve around,
L, long F, L, long F, L, F, R, F, R, F to end ,R, F to end, L, F to end, L, F,
R (at first R), Little F, L, Long F, L, F, L, F, L, F, R, F, R at second
right, F, R, F and out to Conservatory.Conservatory: Enter
the conservatory. Go around the fountain and look at the now open snake’s
mouth. Take key. Now go to manor house via the hedge maze again.Enter the right side of the maze
now and just follow the path to the exit.
Cellar: Go to the padlocked cellar door on
side of the house. Use the snake’s key on padlock. Enter the cellar. Go to
center of room, turn left and see crates with GGAI Artifacts written on them.
Use crowbar on top crate. Read Gil’s letter to Lord Bathelwaite. It states
about a Santorini dig that produced a case and the Crete dig produced a disk.
The signature seen earlier on the letter with the map means that Gil is one of
the Sacred Seven Sect, an offshoot of the Knights of the Temple. The Omega Stone
has a smaller twin. The prevention of total annihilation of mankind depends on
your solving the final pieces of the mystery. Hall of Records was found under
the Sphinx. Talk of Snelling’s interference and the possibility of his working
for a world leader. Take and open the box. Pick up Atlantis red scroll
and the Atlantis disk at the corner of the crate.
Go towards the stairs, then go to
the shelves under the stairs and look close. Take the ornate measuring
tool. Flip through the large red book. Go upstairs.
Living room: Turn left and go to the
living room. Look close at table by the glass doors. Read the journal. Lord
Bathelwaite writes about Gil, the history of the Ark of the Covenant when it was
place in King Solomon’s Temple in 955 BC by the Knights Templars, the mystery of
the appearance of the Ark in the Sphinx at 2500 BC when it was last seen at the
Temple of Solomon and other discoveries of the Templars. The scrolls that detail
the Atlantean civilization, of the building of the Chamber of Ages by the
Atlanteans and mention about the Omega disc unlocking the power of the Omega
Stone – the stone of end times. Take the SS membership card similar to
the markings on the spy disc on top of the MARV – 7 birds around an SS. Very
Interesting!!! What have you gotten into?
Upstairs:
Check the picture of the maze on right hallway. Go back down the stairs and
forward to the closed double doors at the end.
Study: Enter
and talk to Lord Lloyd Bathelwaite. He talks about collecting books for your use
concerning the Celts based on your task. He continues on and discusses
Stonehenge’s history, that it’s 1 millennium older than the Druids, 2007 BC,
about the connections of the Chichen Itza, Sphinx, Aegean and Stonehenge and the
significance of 2012. It is the end of the calendar for the Mayans and how
Stonehenge calculated misalignment is important. The others forewarned of the
event that will happen in 2012. Like the builders of Stonehenge misaligned the
stones but the inner stone circle will come aligned this year -2012. The danger
sounds celestial. Have a look around. When done, be on your way. This time use
the front door.
Turn left, climb the ladder and
read 2 books about the Celts and Alchemy. In one book, note that the measuring
tool you took from the shelf in the cellar has the one dram icon. Note also the
markings for other weights. Go to the other side of the room. Look at the
maps on the table. Place in inventory a map.
Go towards the Grandfather clock.
Lord Bathelwaite will give another hint – The important date connected to the
Ark of the Covenant is when it was moved to King Solomon’s temple. We already
know from reading Lord Bathelwhaite’s journal in the living room that it is 955
BC.
Clock Puzzle – Look close at the clock. Set
the clock to 9:55. Click the minute hand, move it around to 11 and click on it
again to release the hand from the cursor. Now, click the hour hand, turn it
close to10 and click it to release it from the cursor. The clock moves and
reveals a secret staircase.
Click on staircase to climb down to
a storage room. Go to the corner and take the familiar box from atop a barrel.
Place the Stonehenge scroll in inventory. Turn around and pick up the
skull turner atop the crate.
Exit the storage room and the manor
(through the front door, of course). Enter the car and give the map taken from
the study to Hump. He says not to pay attention to Bathelwaite. He would not
take the map. Give him then the SS membership taken from the journal in the
living room. Now, he will take as somewhere. If you just click on him – he would
say ‘do you have anything to show me’? If you come from the manor and click the
SS membership card alone – he will also not budge. It is necessary to first show
the place – map and then give him the secret code approval to take you there –
the SS bookmark. Getting quite covert now.