Syberia II Walkthrough by MaGtRo
Syberia 2
by Benoit Sokal and
Microids
Walkthrough by MaGtRo April 2004
Gameplay:
This point and click game installs on 2 CDs. CD1 in the drive is needed for
gameplay. The main menu has the new game, load game, cinematics, credits,
options, quit game and the Syberia recap. The options menu has the selections
for subtitles, detail level, anti-aliasing, control mode (mouse or keyboard),
sound and music volume.
The Syberia Recap has the
synopsis of the first part of the story.
Press ESC to access the in-game
panel that shows menu (back to game, load, save, options and main menu),
inventory, dialogue notebook, cell phone and documents. Right click of mouse
closes it again.
To use the telephone, click on
the telephone in inventory and dial the number. There are several numbers in
memory that can be scroll through using the arrows. Press enter to place the
call.
To access documents, click on
the document icon and then the document desired. Use the eye icon to read or the
hand icon to take the document.
The space bar pauses the game.
Double clicking makes Kate run. Check the different icons on the manual.
The saved games are located at
the ‘My Documents’ folder. In the save games panel, click on new frame for new
save or click on old one to overwrite that saved game with a new one.
Exhaust all dialogues until
they are not listed on the notebook anymore. Talk again to different
characters in case new dialogue selections appear. The correct dialogues are
needed for further advancement in the game. Right click of mouse skips
dialogues.
In every location, roam around
and see the different special effects and graphics. The sequence of this
walkthrough is just one way. There can be other sequences that can lead to the
same point in the game.
A sick Hans recounts
Syberia for Kate. Hans asks Kate to get him to Syberia. Marson, Kate’s former
Boss wants her back home. Kate promises to take Hans to Syberia.
Romansbourg
Turn around to the next room
and see Hans’ cylinder machine at center pedestal and Hans’ mammoth doll at side
table.
Enter the bedroom and talk to
Hans. My dreams are now your dreams, Kate
Walker.
Time to wind
the train
Go to the train exit door.
Before exiting the train, a phone call from Oscar informs Kate that they are now
at Romansbourg. Check the cell phone to see that there is speed dial for
Oscar, mom and the New York Office. Enter the door before the exit and see the
bathroom.
Exit the train and meet Retired
Colonel Emeliov Goupatchev, guardian of the Imperial Marches and General Store
Manager, opening the lock of the General Store. Romansbourg is the last town
before the vast wild glacial waste of the Tundra.
Go to exit at bottom of screen
twice and talk to Oscar. Oscar wants you to talk to Hans.
About Hans – While his passion is strong, his
wheelwork is worn, Kate Walker. About Oscar – My
place is here in my place. Note the monastery looming in the
background.
Go to train winder metal box at
the background and turn the wheel. Then pull the lever on the left. The train is
now wound. Turn wheel again. Talk to Oscar and he wants you to fill the coal car
before you can depart.
Fix the coal
dispenser
Coal Dispenser – Check
the next building that has the coal dispenser and a lever on a panel. Note that
there is a child below the rail tracks. Pull the lever and see that no coal is
released. The child is gone.
Gate – Go to the far end
of the ramp and see a lever on the ramp and a closed gate. Click on keyhole –
nothing I can do. Pull back.
General Store – Enter
the store that the Colonel went in to. Check the candy machine by the door. Talk
to Colonel Emeliov, in charge of administration of this jurisdiction. (If you
came here earlier, he’s would be working on something on the bench). He says
that there’s a coal dispenser outside and you can fill the train for free.
Maintenance doesn’t come too often. Lowdown is lowdown,
Highup is highup. People like you, Miss
Walker, never end up going home. After this
stop, there’s nowhere to go.
So, we need to fix the coal
dispenser, find the key to the gate and look around the place.
Candy machine – Look on
the other counter that the Colonel was bend over on earlier. The broken candy
machine has the label – Candyroff 625-122. Take the small key. Try
calling the Candyroff number and learn about their candy selection.
Go to candy machine by door and
use the small key on bottom drawer locks of the 3 candy machine. The right candy
machine has coins. Take the coins.
Get coins from inventory.
Insert the 5th from the left coin on left machine’s top coin slot, then turn the
knob and take sugar candy from the cup. Insert the second coin from the
left, turn knob and take fish candy from the cup. Take the key from the
now stuck drawer and use it on the first 2 machine’s bottom drawer to get the
coins back. The drawer of the third machine is stuck.
Coal dispenser and gate
key – Exit the store and go to the screen below at the coal dispenser panel.
Talk to Malka, the young girl below the bridge. Malka wants katalas – candies.
Throw down sugar candy (fish candy is yuck) to Malka. She lets go of the balloon
with the key. Kate takes the gate key from the balloon.
Gate – Go to the gate
and use the gate key on the lock. Go down.
Nick Cantin, a detective was
asked by Kate’s boss in New York to look for Kate.
Down Below – Go to right
under the rail tracks and see a weird vehicle hanging under the rails. Go to
left screen and talk to Malka. Cirkos takes care of Malka. The Bourgoff brothers
are liars and thieves. As you like, Kate
Walker.
Coal dispenser engine –
Go to left screen. It is under the coal dispenser. Look at the petrol driven
generator. Press the red button. It is out of gas. Take the empty red
can.
Cirkos Cabaret – Enter
Cirkos Cabaret, the building on the right with a sign and look at the horses on
stage. Talk to Cirkos. Hans is his friend. Cirkos wants Hans to check his
horses.
Bourgoff Brothers – Go
left and follow the wood fence with Cirkos posters. Go to the gate on the left
and Kate will pull the bell rope. The small Bourgoff brother comes to the gate.
Talk to Ivan. He sniggers and doesn’t want to help.
Continue left by the fence.
Look close at last Cirkos poster. Click on upper left of poster and Kate rips it
off the fence revealing a break in the fence.
Get gas: Enter, go to crate at center of compound and
see a youki inside the crate. Release the latch and the youki runs away and the
obnoxious little man runs after it. Click on black stove – this machinery
stinks. Go to canopied area and see Igor, the big brother snoring. Take the
red jerry can on top of the barrel before entering the canopied area.
Kate replaces it with the empty jerry can. Talk to Igor. Later, Ivan will come
back and Kate sneaks out. Exit the compound through the break in the fence.
Go left and see a dispenser
that needs a token. Go across the bridge to the path towards the monastery.
We’ll come back here later. Go back under the rail tracks.
Coal dispenser engine –
Use the jerry can on the petrol driven generator. Press the red button. Now,
it’s going. Talk to Malka on your way upstairs.
Coal dispenser panel –
Upstairs, pull the lever on the coal dispenser panel. We have coal!
Hans
Delirium
Oscar is excited. Hans
disappeared. Talk to the Colonel at the store. Go to lower town under the tracks
and talk to Malka.
Cirkos Cabaret – Enter
Cirkos Cabaret, the building on the right with a sign.
Hans has a fit about Mammoth
and Syberia.
Hans is in bed on the train.
Talk to Hans and see that he is delirious. Talk to Oscar.
Go to lower town below the
tracks and talk to Malka. Learn about the monastery, her mother and the stern
Patriarch. Enter the Cabaret and talk to Cirkos behind the bar. Learn about
Malka’s mother, monks at the monastery and about shroud. Malka is in charged of
the shroud dispenser. He doesn’t have any warm clothes but the store has
some.
Talk to Malka again. She gives
you the token for the shroud dispenser and how to use the shroud.
Monastery
Get in the
Monastery
Shroud – Go to other end
of tracks and pass the Bourgoff brother’s fence (break in fence is barricaded)
to the dispenser before the bridge. Insert the token on the coin slot and pull
the lever. Take a shroud. Back out and go back to Hans in bed on the
train. Use the shroud on Hans to get Hans’ shroud.
Winter clothes to keep Kate
warm – Talk to the Colonel at the store. He will lower the attic ladder.
Climb the ladder and take the winter clothes on top of the crate. Go back
to train and enter the bathroom. Finally, a new wardrobe for Kate! Exit train
and talk to Oscar at front of train. Talk to him completely. Talk to the Colonel
at the store for impartial clothes critique.
Monastery Gate –
Go under the tracks, pass the Brothers’ compound and pass the bridge to the
monastery. Kate wears goggles. Pull the bell rope. The monk up the tower would
not let Kate in.
Laundry monk – Take the
path to the right and talk to the monk doing the laundry. Talk to the monk
completely to learn about the Merula Alba – the White Raven. He gets distracted
by the sound of the White Raven singing. Through great interrogation technique
by the lawyer, the monk is made to reveal that women are not worthy to enter the
monastery.
Go back to talk to Colonel
Emeliov and get gold birdcall, silver birdcall, and black
birdcall.
Go back to the laundry monk by
the monastery pool, give the monk the silver birdcall and he uses it. The
birdcall was answered and away the monk goes. The Merula Alba
is calling to me…. calling to me…. Take the monk’s
habit. Kate automatically wears it and er.. a new wardrobe for Kate.
Monastery Gate Tower –
Pull the bell rope and the elevator goes down. Climb in and enter the
Monastery.
Talk to the monk. Vow of
silence? Look at the stove on the left. Take the box of matches from the
stove on the left.
Monastery ramp – Exit at
lower screen. See a wheelbarrow on the right. Walk the path to an open courtyard
with meditating monks. Enter the chapel using the exit at top left when the view
is of the buildings on the left of screen.
Chapel – See a
locked grilled door on the right of the door. Look at murals of Saints at either
side of the aisle. Go forward and the Patriarch comes out. Talk to him. He’s
very ‘righteous’. He finally gets convinced to see Hans.
Cantin reports to Marson
that after talking to the hotel guy at Aralbad, Kate is acting differently. The
monks bring Hans to the Monastery.
Clues to cure
Hans
The Holier than thou Patriarch
will not cure Hans. He states Hans is dying. You can call Oscar anytime here at
the monastery to keep him updated.
Hans’ room – Go see Hans
at the far right room inside the building. Talk to Hans. Hans wants Alexei
Toukianov, a monk who lived with Youkols. He can cure Hans. The laundry monk was
eavesdropping. Continue talking to Hans. Exit the room.
Laundry monk gives clues
– Talk to laundry monk completely. He gives a scroll and a
stainglass mammoth. Read the scroll in inventory. Right click, click on
documents, click on eye and then click on documents. The laundry monk’s letter
tells of Alexei, Youkol people and the stories of the great mammoth. The key is in the light of the mammoth’s eye. Look at the
stainglass mammoth also.
Go outside through exit on the
left. Take the brush beside the bucket.
Chapel – Go back to the
Patriarch at the chapel – the exit is at far left of the building complex. Talk
to him and the high and mighty Patriarch finally irritated Kate.
Clues for the stainglass
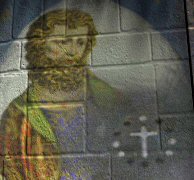
mammoth – Go to the Saint mural on the left. Use the brush on the book he is
holding. Note the location of white circles – one at tip of cross and 2 at each
side with 3 black dots in between. Exit the chapel to the courtyard.
Find the
key
Library – Go to left
screen and enter the door beside the cemetery. Walk down the circular ramp until
the floor of the reading area.
Stainglass mammoth
puzzle:
Take the long hook hanging at
right side of the room. Pull down the lamps in the position shown by the white
dots of the mural.
Pull down the lamp by the exit
door and 2 lamps under each arm of the cross (with 3 unlit lamps in
between).
A porthole cover is opened.
Climb the ramp to top left. At
the end see the open porthole. Look out see a view of Romansbourg. Note the
train, the Bourgoff brother’s compound and the forest.
Place the stainglass mammoth
on the hole.
Pull back and click the 4
leaves-parts of the cover until the shutter closes to the smallest slit. Each
leaf based on the sun depicted on it open or closes the shutter. The right
leaf closes the shutter and the left leaf opens the shutter.
Start at bottom, left, top
and right leaf. The sun ray is focused to the other side of the chamber making
a mammoth.
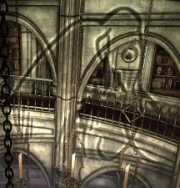
Brother Alexei’s notes –
Walk to the other side and see the shape of the mammoth with the eye centered on
another circle on the wall. Look close and click on the center of the rosette. A
wall opens to reveal a secret closet. Take Brother Alexei’s book
– notes and sketches of Alexei Toukianov from the Frozen North.
Read the notes. During his
travels he used youkis to pull his sled. The youki gorges on orange salmon.
Learn about the Youkols and the shaman’s sacred harfang that loves lemmings.
Their connection to the mammoths and how the Youkols has gone underground. Learn
about the legend of live mammoths in an island called Syberia. The blue grass
has an odor that can awaken hibernating youki. The Scarlet bramble mixed with
walrus blubber or tallow’s fume has healing properties. The plant grows only on
tomb of one soul that is at peace. Read about the Legend of Syberia and the ark
that is encased in ice. Take the Youkol relic that was behind the
book.
Exit the building and go down
the ramp. Look close at the wheelbarrow and take the shears.
Brother Alexei at the
Cemetery – Go to the cemetery left of the library. See a monk digging a hole
and a coffin. Look close at the break on the wall just above the coffin and Kate
mentions about sliding down. Look at coffin. Hmm.
Go to the right and look close
at a headstone covered with sacred bramble. Use the shears on the sacred bramble
on the headstone. It is Alexei Toukionov 1895-1996. Pick up the herbs and
brambles cut from the headstone.
Monastery Gate tower –
Look close at the stove on the left. If you haven’t picked up the matches, do so
now.
Prepare Hans cure –
Brother Alexei said in his notes that Scarlet bramble mixed with walrus
blubber or tallow’s fume has healing properties.
1. Pull handle on left to start
fire.
2. Place the herbs and brambles
in the pot.
3. Open the mold at base of
cup.
4. Take a wick from the broom
like thing hanging on the left. The wick is automatically placed on mold.
5. Close mold.
6. Open the tap.
7. Open mold and take herbal
candle.
Hans’ room – Place the
Youkol relic on table. Place herbal candle on youkol relic. Use the matches to
light candle. See mammoth shadows reflected from the rotating candle holder.
Hans starts coughing and recovers. Talk to Hans.
Find a way to
get out of the monastery
Remember the break in the wall
and coffin at the cemetery. The monk is still there.
Get the monk out of the way
to freedom – Go to the Chapel. The patriarch is gone from the Main Altar.
Enter the inner sanctum and take the ornate key from the altar.
Use the ornate key on the
grilled locked door by the entrance. Pull the bell rope at right. The bell
called the monks especially the one at the cemetery to go back to the
monastery.
Prepare the getaway at the
Cemetery – Look at the break on the wall – kinda steep
but with a sled I can slide down the slope. Pull the coffin. Now,
that’s the idea.
Hans’ room – Talk to
Hans. Let’s go. We must be quick! See the patriarch coming.
The Patriarch and other monks
try to stop Hans and Kate.
Wowee! That was some ride, ha
Hans!
Clockwork heart
for the cabaret horses
Talk to Hans. He asked that
Kate fit the mechanical heart for the cabaret horses. Talk to Hans again.
Exit the room – did Kate just trip on the doorstop by the central table?
Talk to the Colonel at the
store. Go to lower town below the tracks. Talk to Malka and learn about the
youki that Cirkos is trying to train.
Cabaret – Enter the
Cabaret and see Cirkos try to train the youki. Talk to Cirkos.
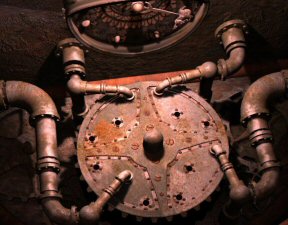
Click on the lid edge of the
stage to open the mechanism.
Place the mechanical heart on
the knob at center.
Turn the heart by pressing the
button so that the horse pointer is at extreme right.
Click the 4 inner screws to
connect the pipes to the heart.
Click the middle hole at
bottom left quadrant to attach first horse.
Click the rightmost hole at
top left quadrant to attach second horse.
Click the leftmost hole at
top right quadrant to attach third horse.
Click the rightmost hole at
bottom right quadrant to attach the fourth horse.
Click on central knob and watch
the fun.
OH NO!!! The
train left without Kate!
Use the cell phone in
inventory. Press the up arrow once and press send to call Oscar. Oscar says that
Ivan and Igor have kidnapped the train, Oscar and Hans. Try to call again and
Oscar will not answer.
Pull the lever on the right and
the rail flips over to get the weird machine cart on the rail tracks. Click on
it and Kate drives to just the other end of the station. We need power. Talk to
Colonel at store until a half completed idea for the gangcar happens.
Go below the tracks and talk to
Malka several times until the idea of using the youki is said. Talk to Cirkos at
the cabaret to ask to ‘borrow’ the youki.
Bourgoff brothers’ compound
– Find the youki crying by the stove. Look on the table and read the
newspaper that has news about Helena and ivory – the white gold. Now how
do we get the youki to come? Brother Alexei’s book states, youki loves orange
salmon. Give the youki fish candy and it will follow you anywhere.
Go to the gangcar and click on
it. Kate calls the youki and the chase is on…
Frozen North
The chase heats up when Ivan
sees Kate. The bridge collapses. A crevice separates Kate and the train.
The only inventory items are
the documents and the matches. Go to right screen and watch Ivan snigger again.
So that’s what they hijacked the train for – the ivory, white gold.
Go to next right exit (glowing
icon) and see a sacred harfang on the tree limb. Right across the bird is a
cairn with a frozen fish.
Distract the youki –
Take the frozen river path far as you could go. The youki chases the beaver.
Where is a dog training school when you need it? Try to control the youki and no
go. Remember, he followed Kate when given fish candy.
Go back to main path and
continue to top of screen. See a house at bottom of falls. Take branches
by the rocks at the middle of the small clearing. Go back to the frozen fish
cairn. Place the branches in front of the cairn. Use the matches on the
branches. Take the fish offering.
Go back to the youki and give
him the fish offering to get him away from the beaver.
A tree has fallen to make a
bridge across the rapids. Cross the river. Go to right screen.
Cantin, now at Romansbourg
reports to Marson about Kate.
Get the bear
out of the way
Broken bridge – The path
splits to right and forward. The right path is blocked. Continue forward
and see a broken bridge. Check the ropes. Go to right screen and go to the
lodge.
Lodge – A call from mom
happens. Enter the lodge. Check the fireplace mantel. Take the Russian
doll and the hatchet. Take the fisherman guide about orange
salmon.
Exit through the main door and
eeeek! – a bear blocks the way. Look through the window on the left. The bear
paces.
Go to the kitchen, left of the
back door. Take fish tank-basket from counter. Exit through the back
door.
Dock – Go down to the
dock. Remember what Brother Andrei’s book stated – bears and youki loves orange
salmon. Read the fisherman’s guide and note that orange salmon “is fairly
selective about the color of its prey. However, its preferred food remains green
frogs”.
Let’s go fishing: We
need orange salmon for the bear. Orange salmon likes green frogs.
Click on fishing pole. Kate
puts the fish basket down.
Click on lure box in front of
Kate. I used the top right lure.
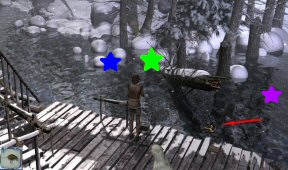
There are 4 spots to cast the
rod. Left water area by rocks has the blue salmons. Pool behind dead tree has
the green salmons. Right water area has the violet salmon.
The area to click on for
orange salmon is right of Kate and close to the dock (see orange arrow
on graphics).
Test the caught salmons on the
bear by throwing the fish out the window of the lodge. The bear is a picky
eater – he only wants an orange salmon.
Give the fish filled-fish
basket to the youki until you catch an orange salmon.
Bet you
couldn’t wait to get your chops around that boy, hah.
Go back to the window in the
lodge and throw the orange salmon to the bear. The bear is in youki heaven and
moves away. Exit the lodge and go to where the bear was. Take the
fishbone (you can get another fishbone further on in the game). Exit the
lodge and go back to the broken bridge.
Catch a
train
Getting across the chasm –
Use the hatchet on the rope to get a rope with plate. Throw the rope
with plate on the leaning tree. Tarzan, eat your heart out.
Go forward and watch the youki
chase a sacred harfang. Follow the youki and watch out! The brothers from Hell
throw boulders from top of the cliff. A plane crashes above the cliff.
Climb the cliff wall – Use the
hatchet on cliff wall to get the first foot hold.
Up – 3xs. R – 2xs. Up – 4xs.
Left – 4xs. Up – 2xs. Right – 2xs. Up – 2xs. Right – 2xs. Up – 4xs.
Listen to Cantin talking to
Marson while in Romansbourg.
The Russian Red
Baron
Radar Tower – Go to
bottom of screen and then go to bottom of screen again. Watch the brothers from
hell try to run over Kate on a snowbike. They have Hans with them. See the train
far across below through the trees. Turn around and follow the tracks at bottom
screen.
Check the radar tower and the
shed. Climb the tower and see that it can be turned. The shed has a radar
detection screen and a callbox setup. The radio-callbox setup has places for 4
numbers.
Go back 2 screens bottom right
and then turn left diagonal from the tracks on the snow.
Crash site – Go forward
2xs and talk to the suspended pilot. He can not hear because he has his
earphones on.
Wakey wakey for
Boris: Hey, it’s our old friend from Komkolzgrad –
Boris Charov! Wonder if he got to the moon.
We need to wake Boris up by
finding his radio call frequency, so we can talk to him through his earphones.
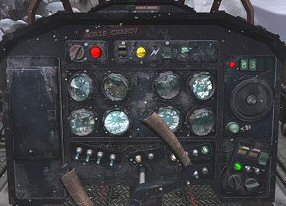
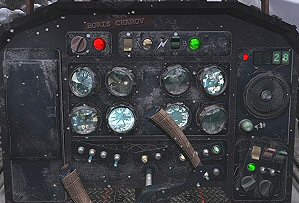
Enter the crashed plane and see the cockpit instrument panel.
1. First turn on the power
using the top left switch. Now, we have red light on for power, yellow light
for A and green light for B.
2. Let’s work on A first. Flip
B switch down – the green light goes off.
3. Flip the metal middle switch
(between light and another metal switch) at bottom right to get the green
light on. The red light at top right beside the number squares is on.
4. Now, play with the 3
switches above the green light at bottom right until you get a number at top
right. Flip the left yellow and middle switch red up while the right blue
switch is down. The number square shows – 03.
5. Now, let’s do B. Flip A down
and B up. The green light should be on now.
6. Play with the 3 switches
above the green light at bottom right until you get a number at top right.
Flip the left yellow switch down, middle red and the right blue switch up The
number square shows – 28.
The frequency number is
0328.
Radar Tower – Go to the
shed and flip the red switch on the radio box on top. Cycle the 4 top buttons to
show 0328. Press the button on the microphone. Listen to Kate trying to wake up
Boris.
Drop in on the
train
Crash site – Talk to
Boris leaning on his broken plane. He suggests that you use the co-pilot ejector
seat to get to the train below. Enter the plane, flip any number on the left
panel and Boris will go Nyet, Nyet, Nyet! Exit
out of cockpit and talk to Boris again to help you use the ejector seat.
Coordinates for train:
Find the exact direction of the train and enter the coordinate in the system.
Coordinates – radar – right!
Radar Tower – Go to
radar tower. Flip the red switch at bottom right of the radar screen. Nothing
is seen at top left quadrant.
Go out and climb the ladder to
top of the tower. Where is the train situated from here? The snowmobile tracks
lead from here towards the train at the basin below. So we turn it the
opposite direction.
Turn the handle twice pointing
to B. Go down and back to the shed.
Look close at the Radar monitor
and note that the blip is at intersection of 80 vertical and 20 horizontal.
Cockpit – Enter the
cockpit and enter 80 on the left squares and 20 on the right squares. Press
the button below. Bang on target, Kate Walker.
Wheeeeeeeeeeeeeeeeeeeee!
Waaaaaahhhhhhh!
Caught up with the train, Kate
is happily greeted by the youki.
Where is Oscar? –
Go towards the engineer car on the left. Get a call from Colonel Emeliov and he
informs Kate about the American detective’s asking questions about her and Hans.
While Kate talks on the phone, the youki checks up something on the snow. Hmmm.
Check it out. Pull on the frozen… arm of Oscar.
Loosen Oscar – Talk to
Oscar. The cold has paralyzed his wheelwork. Enter the passenger car. Look
around and see a round metal plate that was under the central stand. Go to
bedroom. Pick up the plan of the train from the floor. Pick the
oilcan from the floor by Hans’ workbench. Go back to Oscar and give him
the oilcan to loosen him up. Oscar checks if all his hinges works.
Unhook the passenger car
– Go to the passenger car and call Oscar on the phone. The train doesn’t
move. Go to engineer cab and talk to Oscar. There’s an uncoupling system
on the passenger car. You are instructed to call Oscar when Kate finds it so
that he can open the panel. Then activate the mechanism to unhitch the car.
Go back to the round metal
plate at middle room of the passenger car.
Activate the unhitch
mechanism –
Call Oscar on the phone to open
the plate.
5 rods are shown in connect
position. The rods need to be all retracted.
Play around with possible
combinations to retract the rods.
Click on knobs 1, 3 and 5 in no
particular order.
The passenger car falls down and Kate jumps to get to the engineer car.
Listen in on Cantin reporting from the broken bridge. ….That Kate Walker is
dead.
Youkol Village
The youki runs away.
Get
to the mammoth statue
Go towards the giant
mammoth statue. Get a phone call from Oscar about the sound. Look at the
snowbike and the side bag on back end. Take the gauze blanket. Look at
the giant wood bird. Place the gauze blanket on its mouth. That stopped the
howling sound.
Turn around and go
to the other side of the train. Go right of screen and talk to Igor. He was
hearing the wind sound from the statue and thought the evil spirits got him.
Igor leaves on the snowbike.
Go back to where the
snowbike was. Click on the spikes left by the snowbike. Kate wears it on
her shoes. Look at the sacred harfang on the wood structure to the right. Climb
the ice ramp.
Ivan the
Sniggerer – Ivan has Kate cornered. He has been collecting ivories as seen
on the sled at top left. Move Kate anywhere and Ivan pushes her back. Call Oscar
on the phone. Oscar blows the horn of the train. Ivan gets distracted and turns
around. Look at the sled. Take the ivory knife and cut the rope holding
the sled.
Kate falls
through the ice floor. Marson talks to Mrs. Walker.
Find
Hans
Kate wakes up inside
a hut. Look out the window. Exit the house. Talk to the Youkol chief standing by
the door. Hans is with the spirit woman. Follow the
drums. Turn around and take the reindeer antlers from the
pot.
Hint – It is
best to look around the village first to orient yourself and see the legendary
frozen mammoth ark encased in ice and other marvels.
Getting to spirit
woman’s abode – Go to right screen and to where the drums are. Try to click
Kate across the drumstick-drumlog by clicking ahead but Kate can’t do it. Let’s
find another way. Why does Kate keep on looking to the left?
Turn around and look
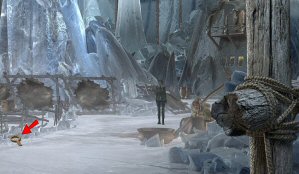
at the sacred harfang on the stand. Look at the perch. Go to right bottom corner
exit. Continue down the ice path. Look close at active spot right across the
youkol stirring a pot. Take leather strap. In inventory, the antler and
strap combined to make a slingshot.
Go back to the
drums. The drum setup is powered by water flow. Look at where Kate is staring at
– the second icicle away from the left banner. It is swinging. Click the
slingshot on the icicle. Kate picks up a stone from the ground and breaks the
icicle. It blocked the waterwheel.
Get
fruit of the spirit door
Spirit Woman
– Enter the spirit woman’s abode. Look at suspended Hans. Talk to spirit woman.
Hans is in dreamworld. Kate will need to journey to the corridor of dreams to
bring Hans back. To get there, the fruit of the laughing tree (spirit door) is
needed. Harfang has been following Kate and she can call them with music. Go to
right wall and take smiling youkol mask. Go to left screen and take the
prayer wheel from the table. Go to the door and check the dreamcatcher on
the right.
Water collection
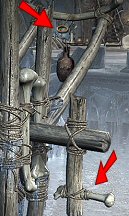
– Exit and take the bottom exit 3xs. See a set up to collect water between
large jars. Take the cork bung from floor and the empty flask
hanging on right post of the contraption. Attach the flask to top bar of the
contraption. Turn the bone handle on the right twice. Take the flask full of
water.
Youki pen –
Take the bottom exit and find the youki in a pen with the other youkis. Look
close at the gate. Take the fishbone if you have not done so by the lodge
at the frozen north chapter.
Cave – Take
the right exit from youki pen, forward and across the bone bridge. Enter the
cave flanked by torches. Enter and see frozen mammoths encased in ice walls. Go
left and see a harfang perch in front of the tree. Look close at bottom right
holes and see a lemming running around.
Fruit of the
scared door puzzle:
See the red fruit
behind the ice wall and a lemming walking across the floor.
The object of the
puzzle is to get the lemming to pick up fruits behind the ice wall by guiding
him through the ice tunnel.
Study the layout of
the tunnel. The fruits available are at top tunnel.
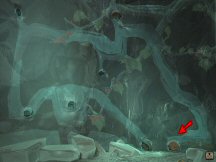
1. Use the cork bung
at right bottom hole to have just have the left bottom hole available to the
lemming. Pull back.
2. Look close at
harfang perch. Hang the prayer wheel on the horizontal bone. Based on Brother
Andrei’s book lemmings are favorite food of harfangs – so the lemming will be
scared. Turn the prayer wheel to call the harfang. The harfang flies in and
scares the lemming.
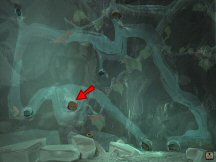
3. Back at the ice
tunnel, watch the shaking lemming climb left hole to the first leg of the
tunnel.
4. Take the cork
bung from the right bottom hole and place it on hole beside the lemming. This
gets the lemming to cross the gap and move to left hole.
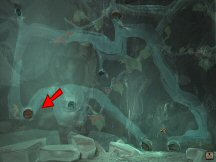
5. Take the cork
bung from the middle bottom hole and place it on the bottom leftmost hole.
Then click the flask full of water on top left hole to get that vertical
tunnel filled.
6. The lemming
floats up, stuff his mouth full of fruits and goes to the right. Now it needs
to go up.
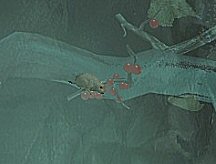
7. Insert the
fishbone on top hole to make a ladder for the lemming. Watch it climb up and
falls on the right tunnel, dislodging what is in his mouth. Take the dream
fruit.
step 1
step 4
step 5
step 6
step
7
In case you need to
call the bird again, pick up the prayer wheel from the harfang
perch. Go back to spirit woman by exiting the cave, go to bottom screen,
right through the bridge, left at split path, down, left pass the youkis
and right by the water contraption, right and see the drum area.
View this guide raw, exactly as the archive holds it