Still Life
Chapter 6: The Scream
Prague – Gus
Police station: Watch Gus beat up Skalnic. Go down and enter the door across the
stairs to see the jail cells. Exit the police station and meet Stasek. There’s
been another murder. The body is at the Old Lavatory. You can’t get there because
the bridge is out. Gus asks a last favor from Stasek – 5 minutes of time.
Shore: Go down the steps, left and forward
under the bridge. Get on boat. Automatically, Gus rows to the waterwheel. The
boat goes under the waterwheel and stops its rotation.
Old Lavatory: Check the door and
find it locked. Climb the waterwheel. Look at the water reservoir.
Walk to bottom of screen
and then go to the red draped body at other end of the reservoir. Look close at Apolina’s corpse beside the reservoir. A recently
made spiked ring is taken.
Skalnic shoots at Gus. Inadvertently the padlock on the door was
shot off by Skalnic. Gus opens the door. The other door is locked. Go down the
other ladder.
Drain the reservoir
– Look at the water reservoir pump at left. Remember what the crowman-coachman
said – we need to drain the
reservoir to get to the sewers.Look at chart. The
water tank’s volume is 5 units. The object of the puzzle is to fill the water
tank with 4 units of water to get the power going as shown by the light bulb.Take the 3 units bucket and it automatically goes under the
water tank.Click on red faucet at top pipe. It fills the tank with 5
units water.Click on red faucet under the tank and it automatically fills
the 3 units bucket leaving 2 units in the tank.Click the drain in front of the sink and the
bucket is emptied.Click on red faucet under the tank to empty the tank and place
2 units of water in the bucket.Click the red faucet at top pipe to fill the tank with 5 units
again.Click the red faucet at bottom of tank to drain 1 unit of
water from the tank and filling the 3 units bucket – leaving 4 units in the
tank.Press the red button leading to the light bulb at top of
chart.
Exit the shed and go to the waterwheel side of the reservoir.
Climb down and automatically open the manhole.
Sewer
Maze:
Go to the entryway. See a dark screen. A top view of
Gus is seen at bottom left. You want to eventually reach the top lit door. At bottom right
are arrows to click to get Gus from bottom left to middle top of the screen.
The 6th ring – Move up, left, up, right, short up, right, up, right pass 1
side path, down, right, down, left, up, left to another mutilated body. Click
on body to get the 6th spiked ring. Exit.To go back to beginning: R, D, R, U, L, U, L pass 1
side path,
D, L, short D, L, D, R, D to start of maze.End of the maze
– Right, pass one side path, up, left and up until the end, right
to stairs.Ring puzzle – The
object of the puzzle is to place all the rings from top row in the slots below. Rings numbered from left to right as 1-6.
Ring 1 Ring 2 Ring 3 Ring 4 Ring 5 Ring 6 Ring 3 turned 5xs
leftRing 1 turned 1x
leftRing 4 turned 5xs
rightRing 2 turned 3xs
rightRing 6 turned 1x
rightRing 5 turned 3xs
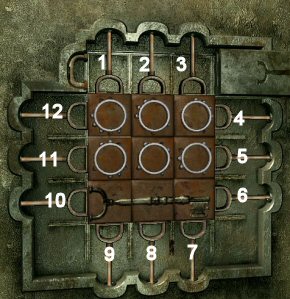
rightKey Puzzle – Save
the game since the puzzle does not reset. The object of this slider puzzle is to
place the key on the top row and then slide it to the right to open the door.Labeling the metal rods
around the squares 1- 12 in clockwise direction starting at left to right at
top row, click once the rods unless specified to move it one space.
Click rod once to move
it one space unless
specified: 3, 5, 7 (twice), 6, 3, 11, 10 (twice), 9, 6, 17, 11, 8, 10, 9, 2, 1, 5
(twice), 6 (twice), 8, 11, 2, 3, 10, 9, 11, 1, 5,
9, 8, 7, 1 (twice), 2 (twice), and 3 (twice).To insert key, click on metal left of key.
Watch the cutscene of Gus, Ida and Mark.
That is shocking and sad!
Chapter 7: Death Do Us Part
Chicago – Victoria
Richard’s Gallery:
Listen to Richard express his interpretation of Mark Ackerman’s
paintings. Read the Journal.
Talk to Mia. The victims
– Cynthia and Stephanie, as well as Mia worked at the Club. Learn about the 4
Queens. Mia was Lady Temptation, Steph was Baroness of Blood and Cynthia was
Mistress of Pain. The Queen of Secrets is an unknown woman and she hosts the
special guests at the 4 statues room. She then knows the identity of the guests.
Exit to left screen three times.
Talk to Richard about
Mark. Go back to center aisle, right and go between the 2 paintings to
the fountain. Click on the book behind the fountain. Check documents to see
Book of Mark Ackerman’s paintings. Exit the building.
Office:
Before entering the elevator, take the
fire extinguisher on post left of the elevator. Enter elevator and
automatically be at the office. Claire catches Victoria trying to access her
computer. Talk to Claire. Todd is the only one that has access 4 clearance. The
janitor has the keys to Todd’s locked office.
Distract the janitor – Go to the coffee dispenser at end of the
hall and take napkins. Place napkins on coffee dispenser and press button. The
coffee spills on the floor. Go back to office and talk to Janitor about the
coffee mess.Take janitor keys and screwdriver
from Janitor’s cart.
Todd’s office: Use the janitor keys on locked door. Get taser
from left table. Look close at Todd’s computer. Click on computer and realize
that it password locked. You need to go to the archives downstairs. Look close
at the safe at right wall. Click on the blue button. It has a print scanner. You
need a fingerprint of Todd’s. Now that you have a reason, take the coffee mug from
desk. Exit and go to Claire’s workbench.
Lift fingerprint from Todd’s coffee mug – Open the can of gray
powder, take brush, click on powder and click on bottle. Click on roll of tape
to see a floating tape. Turn mug to look for a good print. Click the
magnifying lens icon on different prints until Victoria says ‘This will do
nicely’. The tape automatically lifts the fingerprint to get Todd’s fingerprints.
Go back to Todd’s office and look close at the print scanner of
the wall safe. Use Todd’s fingerprint. Click on handle to open the safe. Take
the security key for the elevator.
Enter the elevator. Use the security key on bottom gold keyhole
of the elevator (B3). Press the lit B3 button.
B3 hallway:
Click on door at end of hallway. The Archive’s room corridor door is locked.
Bomb squad room:
Click on the metal door on the right. It is the Bomb squad room.
Open bomb squad room
– Look close at the grilled vent right of the Bomb squad room. Use screwdriver
on screws of the grill. Wires are now exposed. Use the taser on the wires. The door
opens. Enter. Look at rifles.
Open Archives room
door or Robot at Archives room corridor – Look close at vent right
of the file cabinet. Use screwdriver on the 2 screws of the vent.Look at the computer.
Take and read in document, the Lombartech Remote Bomb
Disposal Unit Manual left of the computer-robot control console.Press the red release button
of the robot control console to get a
robot. Press left arrow to get the robot into the vent and into the Archives room
corridor.Once in the corridor, use the arrows at bottom right to move
the robot to open the door. No matter where it faces, the top arrow moves the
robot forward and the right-left arrow turns it. The arrows are based on the
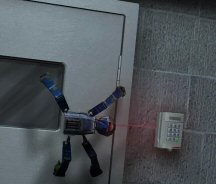
robots, left, right, forward and back. The head of the robot is dark colored.Manipulate the robot to go to the door. It will climb up the
door and automatically, fire at the door code panel.
Archives Room
Hallway: Enter the door at end of hallway. Try to go
forward and Victoria will refuse because of the lasers. Use the fire
extinguisher to see the lasers moving around the room.
Go back to the Bomb
squad room and sit in front of the robot control console.
Open the Archives
room door or Robot at Laser room: Press the red release button
of the robot control console to get a
robot. Press left arrow to get the robot into the vent and the Laser room.Manipulate the robot
around the room to end up at the door control located at bottom of the right
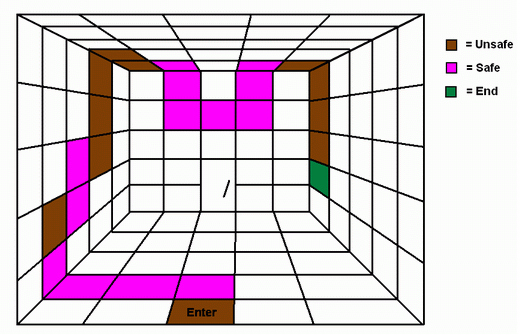
wall close to the back wall.The robot manipulation
arrows at lower right are based on the robot’s forward, right, left and back.
Robot moves one tile per click.Dennis says – the trick
to getting through the lasers is to enter a square about a second after the
laser enters the same square. This way the robot is in the middle when the
laser is just exiting the square. Thanks, Dennis for the graphic and the tip.
Archives:
Exit the bomb squad room and enter the door at end of hall. Go forward and
enter the archives. Click on computer. See the result of the Ackerman and
Perlovka Ripper catalogue search. Note that all of the August, 1932 files are
not found and erased. Gus was there on July 4, 1932. Good that Gus got the
information before somebody erased them.
Talk to Todd and
eventually quit with a threat to exposing Todd’s membership at a certain S & M
Club. Leave the office.
Pat’s home:
Time to look for the files Gus took from the archives. Go to the study at end of
the hall at second floor. Look close at the painting above the computer, turn it
around and use the eye icon when the painting’s back is seen – a lump is seen.
Go to the Jacuzzi room
just before the kitchen. Click on the lower part of tool box to get Exacto
knife.
Go back to study, look
close at painting and use the knife. Watch to see what happened to Gus, Milena,
Vladanna and Roman. Gus and Milena hid in the tramway at the junkyard. They left
Prague on a small boat and eventually took a train to Le Havre in France. The
four sailed to New York. After contacting the Chicago authorities about the
series of murders, the authorities confronted Herbert Ackerman. Mark was
confined to a mental institution and the authorities’ silence was bought. Gus
took documents to protect himself. This includes a signed confession by
Ambassador Ackerman concerning his son. Gus was contacted by an LA cop about
similar serial killings. He was interested more on the former ambassador – now
the governor of LA. Gus sent him the FBI files that he took. Gus married Milena
and settled in Chicago.
Mark is still in the
institution and unless there’s a ‘pupil’ that is doing the murders, Mark is out
of the picture.
Exit the study and get a
phone call from Claire. Vaclav heard a woman scream at his neighbor’s apartment.
Victoria plans to go to LA afterwards.
Campus:
Climb to the second floor. Automatically enter Mia’s room. Watch the
confrontation with the killer. The Killer’s mask was removed and Victoria
fainted. Vaclav is killed. Victoria takes a gun from Mia’s purse.
Richard’s Gallery:
We’re looking for a possible place where the killer took Mia. Look at the
different paintings. Learn about the copy killings in Chicago and Prague.
Find where the
killer took Mia:Study the paintings to
find a clue – The clue word on some paintings is seen briefly at top right of the
screen: Los Angeles from painting of patient in straitjacket. Mental
Institution from the nurse painting. Doctor from the doctor painting. Chicago
from the boat picture. Prague from the building painting. The painting showing
a picture not used by the killer yet has a bridge behind a black haired woman.
Click on painting and the word bridge is seen at top right – Charles Bridge.
Sewers at the one depicting Natalie Kentworth.Do a correlative
search on the computer – Go to Robert’s computer and look close to use it. The
words seen while looking at the paintings are on the right bar. Click on a
word and then the magnifying lens. The computer will do a search. To refine
search, click on more than one word.Click on bridge +
Chicago + Prague. Read the newspaper report on Charles’ Bridge donated by
Vladanna Tominova. Victoria will say ‘that’s it’.
Tominova (Charles’)
Bridge: See the fight… and also the credits, other paintings
of events after the fight and the ending cutscene.
I wonder why Victoria fainted
when she saw the face of the killer in Mia’s apartment. Maybe because the Pupil is…
This
document may not be distributed without express written permission of the author
and the content may not be altered in any way.
For
Questions or Comments on this Walkthrough,
Please write to:
MaGtRo
Copyright ©
4/2005
MaGtRo
View this guide raw, exactly as the archive holds it