Still Life Walkthrough by MaGtRo

by Microids
Walkthrough by MaGtRo
April, 2005
The game contains profanity, violent
gory scenes and nudity.
Gameplay: After installation, a
‘Protection System’ is automatically installed that requires the computer to be
rebooted. The main menu has new, load, options, cinematic viewer (shows cutscenes
already viewed during gameplay), credits and quit game. The options menu
has sound, graphics and control choices. Anti aliasing, detail level, subtitles,
gamma, choice of keyboard or mouse control and volume. CD2 must be on the CD
drive to play the game even on full install.
During gameplay, the cursor changes when dialogue, different
actions or zoom in are possible. The star cursor activates the navigation map
that enables leaving the area and go to another. There are information icons
that show new data in the journal or map and also when a document is obtained.
The pause menu accessed by right click of mouse during gameplay is where the
save, load, options and main menu can be accessed. To prevent overwriting an old
saved game select new save game at the saved game feature (disk icon).
Click on curve arrow icon to go back to screen.
The inventory is accessed by right click of mouse or by pressing
the I key on the keyboard. Items in inventory can be taken by highlighting the
item in inventory, click ‘use’ closed fist icon, move the cursor to game screen and click on the
area the item is to be used. To combine items in inventory, highlight first
item, click on combine button at top left of screen and then click on the item
you want to combine with. The eye icon in inventory is used to examine the items
closer. Additional info about the item might be seen at bottom right of the
examine window.
When talking to a character, the left mouse click is used to
talk about relevant information. The right mouse click activates off topic or
chitchat type of dialogue. It is used for game flavor only and not necessary for
the completion of the game. The curved arrow icon is seen at right of the screen
when enough relevant information is gathered from the conversation.
Press the space bar to skip dialogues. Double click to make the
characters run.
Thanks, Dennis for
the help!
Victoria McPherson, an FBI agent is the granddaughter of Gus
McPherson (Post Mortem fame). While visiting her father, she learns of criminal cases
in Europe and Chicago investigated by her grandfather 75 years ago. The cases
are similar to the serial murder she is investigating.
Chapter 1: The Anatomy Lesson
Chicago – Victoria
5th Murder Scene:
Right click to get the pause frame. Read the
Document (folder icon) to learn about the
first 4 victims and the Journal.
Victoria exits her car outside a Chicago apartment. Talk to
Officer Tate, the
guard at the entrance. Left click and exhaust dialogue until a
curved arrow is seen at bottom right of screen. Right click to listen to
miscellaneous dialogues. When the dialogues are finished, the guard moves aside
to let you through.
Second floor hallway: Climb stairs. Go
top right of screen to Miller by refrigerator. Talk to Miller by left click of
mouse
and he will give the camera. Click to go back to game screen. Continue to
talk to Miller by right click of mouse. Enter the room.
Crime apartment: Go to the hallway at top right and forward once. Talk to Claire in the bathroom. She will give
instructions for you to collect evidence. Take a picture of and then
collect evidence using items from Claire’s briefcase.
Kitchen: Go to the room across the
bathroom and click on Claire’s briefcase. Click to take
Forensic swabs, tweezers, film, luminol and black
light filter. Left click to go back to game screen. Right
click to learn more about the items in inventory and what they are for. In
inventory, combine film and camera by: click on film, click on top left combine
icon and then click on camera to get camera loaded with film. Exit to the
hall and go to the front room.
Front Room:
Blood sample
collection – Take a picture of the blood stain
on the floor by first clicking on blood stain, click the camera in inventory,
click on closed fist use icon, then go to game screen and click on blood stain
to get blood sample. Then
take sample of blood stain by clicking on blood stain, click on swab in
inventory and then click the closed fist use icon.Wall examination
– Use black light filter on
forensic lamp. Look at wall. Use luminol on wall showing that it is written in
blood. See SANCTUARY written on wall. Take picture of the word on the
wall. Take the black filter from forensic lamp.
First room on the right:
Look at blood stain on the floor. Take picture
using camera and get sample using swab of the blood stain on the floor to get
blood sample. Use black light filter on forensic lamp. Use luminol on wall
by doorway. See DISTURBED written on wall. Take picture of the word on the wall.
Take the black filter from forensic lamp. Look close on the graffiti (skull) on
left wall.
Hallway: Go down the hall and look at the floor between the second and
third room to see ‘faint traces of a blood trail’.
Second room on the right: Look close on
piece of wood (makeshift coat hanger) nailed on the wall left of doorway to the
hall. Use camera on the hair and fiber stuck on the right nail. Use tweezers to
take the hair and fiber sample. Click on the hanging dolls – uhm… Christmas
decorations.
Kitchen: Click on the briefcase and
automatically the samples are placed in briefcase and removed from inventory.
Bathroom: Talk to Claire in the
bathroom completely. Cutscenes of the victim is seen. Talk to Claire again
exhaustively. You can examine the body closer if you like and Victoria will
comment on stab wounds, tattoo and being badly beaten. Exit the apartment.
Second floor hallway: See a cutscene of
the stairs falling off. Go left of the hallway and see a boarded up door and an
exposed area to the right. Go back and talk to Miller and then to the front room
of the apartment. Take the lead pipe off the radiator at bottom right of
the room. Go back to boarded door and use the lead pipe on the boards. Ooops!
That’s a great karate kick.
Fire escape: Click on metal ladder and
see it falls off to the ground. Click on snow covered large garbage container on
the ground. Victoria jumps on it and walks to front of the building.
Watch Miller hobble to his patrol car. Automatically talk to
Officer Tate. Click on the truck at right. Click office location on map.
Office:
Arrive at the basement
parking lot of the Office building. Go
to right screen and click on B1 elevator. Click on 8 lit button.
8th Floor Office: Enter the office on
the left. Talk to Miller working on his computer. He needs Claire’s preliminary report
and for you to drop the camera on the evidence chute. Look around Claire’s
workbench on the wall
that has the fingerprint lifter, plastifier and paper cutter. Check the locked
boss’ office door. Go to Victoria’s desk at bottom screen.
Victoria’s desk: Click on flashing red
button of the phone to listen to message by Todd Browning, the boss. Take Dad’s
Christmas present and security card for morgue access from desk.
You can look if you want at pictures of the murder victims by
clicking on the folder organizer on the desk. Read the security card memo in the
Document and the updates in the Journal.
Hallway: Exit the office. Look close at the chute just across the office
doorway. Place the camera in the chute. You can check the coffee machine at end
of hall and the interrogation room right of the vending machine. The boss’ cup
is on the table. Exit, click on elevator and talk to Officer Tate. Click B2
button in elevator
B2: You
can check the monitor room on the left. See the reanimator on left desk, trash
can by door and the bottom right monitor from center of the wall. Exit. Go down
the hall to the bathroom, water fountain and look at the tack board.
Morgue: Click on the Morgue door
and find out that the access code doesn’t work.
Morgue code –
Look close at the security card in inventory using the eye icon, turn it over
and see NO: VODKA 5.8.3. If you haven’t yet, read the security card memo in
Documents.Look close at Lombartech
magnetic/code reader. Swipe the security card taken from Victoria’s desk and
immediately enter the code by pressing the number buttons.Using the letters
below the numbers, enter VODKA or click on 86352 and then click on the OK
button. If correct, the green light lights up.
Enter the door on the left and talk to Claire. The preliminary
report is given by Claire with accompanying cutscene. Talk to Claire completely.
Take Claire’s report from the autopsy table. You can read it under Documents.
Exit the morgue area and get a phone call from Dad. Enter the
elevator. Click on 8 button.
Office: Click on Miller and
automatically give him Claire’s report. Talk to Officer Tate.
Enter elevator, press B1 button, left and enter truck. Select
Pat’s house in the map.
Pat’s House:
Watch the
exchange of gifts between Victoria and Pat McPherson, her dad. Victoria’s gift is Milena’s necklace. Look close at the
arrangement of the diamonds and the hearts on the necklace. Talk to Dad and hear
about Grandpa Gus, Prague and grandma. Go to the stairs at right of
screen. Take the umbrella from the coat stand.
Study: Climb stairs, look at the painting on the hallway and enter the
room at the end of the hall. Look at the painting above the computer.
Victoria’s bedroom: Exit the room and enter the bedroom on
the right. Check Teddy at foot of the bed. Enter the closet.
Attic: Use the
umbrella on the attic door. Climb up and click on light bulb at left ceiling.
Chest puzzle – Look close at chest under the
window. Open the chest by arranging the tumblers with diamonds and hearts
similar to that of Milena’s necklace. The red button is the reset button.Click on the tumblers to
show, from L-R: diamond, diamond, heart,
diamond, diamond.Click from L-R 1-5 tumblers: 2 (3xs), 3 (1x), 4 (3xs), 5 (3xs).
Then click the red button.If done correctly, watch a cutscene of Victoria reading Gus’
journal.
Chapter 2: The Persistence of Memory
Prague – Gus
Shore: Talk to Investigator Skalnic
and learn about the victims. Emile Korona is the coroner and he can be found at Old Chapel. Read the
Journal and Document in the pause frame and learn about Ida. Exit to the right
of screen.
Talk to Kazimir Stasek
and learn about his black eye and the crimes. Go right to the women by the waterwheel. Talk
to Ida, the love of Gus’ life. Gus is hired to find the women’ killer. Talk
to Milena. Learn about the Frantiska the latest victim, the missing Anezka and Apolina
at the park.
Climb the stairs and learn about Ida. Talk to Ida and get a
map. Move cursor to right screen to get the exit star icon and see the map. Click on Old Chapel.
Lingerie: Watch
a cutscene of Otokar Kubina, the
neighborhood pimp orders Peter, his muscle to rough up Gus when he sees him.
Roman, Peter’s brother is in jail. Click on
grill gate at right to continue walking to Old Chapel.
Old Chapel: Click on
left arched entryway of the Old Chapel. Click on the covered bodies and Gus
makes the Sign of the Cross on each of them. Go down the screen. Talk to
Mr. Corona. Check the shelf by window and take the piece of paper with 74821536
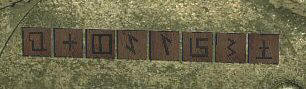
written on it from the second from top left shelf. Note the glyphs-numbers on
the clock. Go to the altar and look
close at the safe (previously the tabernacle).
Safe puzzle –
The object of the puzzle is to place the bottom iconed
cubes on the square slots above in the order of the numbers seen on the paper
taken from the shelf – 74821536.Derive the numbers
from the similarity in shape to the numeral equivalent or based on the number
of lines present on the icons (shown by the clock). Click on a cube and then click on an empty slot above the
icons. Then click on handle.
If done correctly, the picture of the park crime scene
and coroner report are taken.
Read the coroner report in documents. Exit the chapel and
meet Otokar’s muscle. Poor, poor Gus! Go down the stairs and click Park on map.
Park:
Talk to Apolina. Enter the park.
Gus gets a vision.
Park – Picture correlation –
Inside the park, use the picture of the park and
compare it to the actual park. Look for something unusual.Click on picture of
park crime in inventory, click the use icon and see the
enlarged picture. Click on the eye icon and blank card to toggle the picture
and the real park screen. Look for differences. Click on a spot on the picture and
Gus will check that spot out in real park time. Repeat the procedure until you find the
‘unusual’ difference.Click on the hand on the ground
between the statue and the lamppost. Read the
written words left by the killer. ‘The whore wasn’t worthy of my devotion, so
I proposed to the angel.’Based on the written clue, click on angel on top of the
pillar. Click on the ring on her finger.See a cutscene of Gus climbing to the angel, take the ring and
a crow swoops down taking the ring. The bird flies away and delivers the ring to a man. Gus
runs to follow the bird to a new place in the map.
Crowman at Burnt Neighborhood: Click
on door and Gus will kick it open. Talk to man. He is a coachman. Learn about
Vladanna and the sewers, the only way a man can travel unseen in the city. Right
click to continue the dialogue. Hmmm… He’s from London (Jack, maybe). Left click again and get the
spiked metallic ring.
Talk to the coachman again.
Exit the building and
Ida comes to talk to Gus. Ida tells Gus about a possible survivor hiding in the scrap
yard. Exit to the right foreground where Ida went to. Gus gets another vision.
Exit at bottom of screen twice.
Junk Yard: Click on junk yard in the
map. See a car at bottom right. Go to top left screen and see Peter the goon at the
gate. He’s guarding the junk yard. Exit at bottom left.
Lingerie: Go to Lingerie and knock on
door to talk to Kubina. In exchange for getting the goon off Gus, Gus has to get
Roman out of jail. Learn that it is Vladanna that is guarded at the junk yard.
Police Station: Look at the fountain.
Enter the police station. Check the book on the table and take the newspaper
clipping from the tack board. Read about the bravery of Stasek. Talk to
Stasek at the counter about his shiner and his indiscretion. To free Roman, Stasek asks that Gus gets his medal from
Apolina.
Park: Talk to Apolina. Apolina
gives the medal after a lively discussion. Talk to Milena.
Police Station: Talk to Stasek and meet Roman.
Leave the police station to go to Lingerie.
Lingerie: Talk to Kubina. Kubina gives Gus
a
lock picking kit.
Junkyard: Talk to Peter, Roman’s brother. That’s
some show of gratitude for you! Peter does his – ‘He only likes raw meat’ trick with the Doberman and it failed,
the chain snaps.
Crane room – On
the roof of the building, enter the crane room. Move the levers on the console and find out
it is locked.
Look at the chart on the wall. Exit and go outside behind the crane room. Take the
cutter from the ground. Look down from this side of the platform and see the
junkyard. Vladanna must be in one of the tramways-boxcars.
Crane power puzzle
– Look at the box on the wall of the crane room. The puzzle is based on a
slider puzzle. Review the chart inside the crane room and see the correct
position of knobs.Click on a handle to
highlight it and then click on place you want to move the handle to. Save game
before touching the puzzle since there is no reset button.Move the handles to
place 1 2 3 on top row and 4 5 6 at bottom row.Move 2 to middle left,
6 down and above 1, 2 to top left, 6 to middle left, 1 to top middle, 3 up
below 1, 6 to bottom right, 3 to middle left, 1 to bottom center, 4 down above
1, 3 to top right, 4 to middle left, 1 to top center, 4 to bottom center, 1 to
middle left, 2 down above 4, 1 to top left, 2 to top center, 4 up below 2, 5
to middle left, 4 to bottom left and 5 to bottom center. If done correctly the
crane power turns on.Moving crates puzzle
– Click on the console
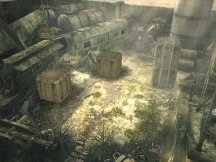
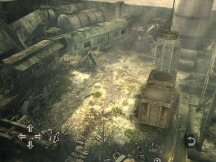
inside the crane room. See the junkyard layout. The object of the puzzle is to move
the crates to get to the bottom left tramway-boxcar from the platform-roof on the right.
Click on the lever to pick up and lower crates and the arrows to move them in
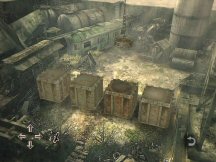
position.Arrange the 2 single crates close to the right platform. Go
outside and jump on the crates to get to the chained double stacked crates.
Use cutter on chains. Go back to crane console and now arrange the crates to
make a single row from the platform to bottom left tramway-boxcar.
Once done, go outside to back of crane room, walk to tramway-boxcar on the
left and click on ladder of tramway. See a cutscene of Gus on the roof enter the top of the green tramway.
Chapter 3: Orphan Man with Top Hat
Chicago – Victoria
Pat’s House: Victoria gets a phone call from Claire. Claire wants Victoria to
come to the morgue. Read the journal to find out about Samantha, Claire’s
daughter. Go to the attic and look inside the chest to see Gus’ suit and hat and
Milena’s red dress. Go down and talk to Pat, Victoria’s father. ‘Some things are better
kept buried’. Leave the house and go
to the office.
Morgue: Go to right screen, elevator
and press button B2. Click on Morgue door and see a caped person with a top hat.
How did he get here?
Automatically be inside the morgue. Claire says to check the monitor. Exit
through the Morgue door, enter the room opposite the elevator and click on the
bottom monitor right of center. Watch the chase scene. That was well done! Great
character movements! The killer hesitated in killing Victoria.
Back
at the Office, go to the morgue and talk to Claire. The stranger left another
photo of a woman with ‘next’ written at the back of the picture. The others knew since Todd answered
the phone when Claire reported it. – So Todd is here during the chase scene.
Office: Go to the elevator and press 8.
Upon exiting the elevator, Richard calls and talks about new exhibit and Mark
Ackerman. Hmm… Mark Ackerman is from LA and originally from Chicago.
Enter office on the left and listen to the boss. To get coffee, exit
the office, go down the hall and look close at coffee dispenser. There are no
cups. Enter the interrogation room on the right and take Todd’s coffee mug. Look
close at coffee dispenser and use Todd’s coffee mug on dispenser. Press the
button on the right. Take mug with coffee.
Go back to office. Talk to
Todd and get reamed. Victoria is now on probation. Talk to Miller and learn that Vaclav Kolar is a common denominator with victims 4 and 5. Look at Victoria’s
desk and take the pictures of the fifth crime scene. Go to the parking garage at
B1.
Campus: Use the truck and click on Campus.
Enter the building and climb stairs. Click on room 11, first room on the left.
Talk to Kolar and learn about his relations with the victims. He was Natalie’s
tutor and Cynthia is Mia’s friend. Learn also that
his thesis is the Perlovka case. Hmm… Gus’ Prague case. While Kolar leaves the
room, take a beer bottle on the floor by the chair that can be used to
lift prints. Read the thesis given by Kolar in documents and learn
about the 1931 Chicago serial killings and that Ida was the last Prague victim.
Go down the stairs and get a call from Miller. Go back to the office.
Office: Go to the morgue and talk to Claire
about the fingerprint on the bottle. She wants you to lift the fingerprints
first. Go to 8th floor and enter office. Look close at Claire’s workbench by the
wall.
Lift fingerprints
– After Claire’s explanation
on how to lift prints, the bottle is automatically placed on the close up view
of the work bench. Open the can of gray powder, take brush, click on powder to
dip brush
and then click on beer bottle.Click on roll of tape to see a floating tape. Turn bottle
to look for a good print. Click the magnifying lens icon on different prints
until Victoria says ‘This will do nicely’. The tape automatically lifts the
fingerprint to get Kolar fingerprints.
Morgue: Talk to Claire and automatically leave
the bottle and prints. Go back to Pat’s house.
Pat’s house: Time to make the cookies.
Go to kitchen, the room above the billiard room.
Make Cookies – Look close at ingredients on central island. Read the recipe book about Gingerbread Man.
1 cup of love
1/2 cup of generosity
2 cups of commitment
1 cup of sweetness
1/2 cup of integrity
1 tablespoon of romance
1 teaspoon of sensuality
1 common sense
In a bowl, cream together generosity, sweetness and love to
give your man a sweetheart.To give him devotion, sift together commitment, sensuality and
romance. Blend devotion to his sweetheart.Finally, add intelligence, a mix of common sense and integrity
and beat it with the rest to make your perfect man.Give him a form and place in the oven. Remember not to overcook.
Place in mixer bowl: 1/2 cup butter
(generosity), 1 cup of brown sugar (sweetness) and 1 cup
of milk (love). Click round button to mix-cream.Add to bowl: 2 cups flour
(commitment), 1 teaspoon cinnamon (sensuality) and 1 tablespoon
of ginger (romance). Click round button to mix-blend.Add to bowl: 1 egg
(intelligence) and 1/2 cup molasses (integrity). Click round button to
mix-beat.Click on oven.
If correctly done, Victoria will say ‘This tastes right!’
Check the dining room to the right.
Look at one of the chair and Victoria’s picture by the hutch. Exit kitchen,
check the Jacuzzi room across the pool table and talk to dad about the cookies. Go upstairs,
enter Victoria’s bedroom and click journal on bed.
Chapter 4: Jack the Ripper’s Bedroom
Prague – Gus
Junkyard: A sketch of the killer is
given by Vladanna. Talk to Vladanna Tominova and learn about the description of the
killer and about her client, Mark, the artist. The killer wears top hat and
silver mask. Skalnic and Mark had an argument. Exit the tramway-boxcar. Talk to Roman working on the
crate by the door about his ambition. Exit at bottom of screen. Look at some of the junks in the
area. Exit to right screen. Talk to Peter. Exit junkyard and go to Mark’s place.
Mark’s place: Click on door left of Gus. Gus
gets another vision. Click on door. Talk to Mark Ackerman. He grew up in
England, where Daddy is the ambassador. Skalnic accused him of being the serial
killer (like Jack the Ripper). Apolina is posing for
Mark. Exit Mark’s place and see a policeman across the canal.
Police Station: Talk to Stasek. Go behind the
counter and turn right. Check the jail by entering the door across the stairs.
Exit and go up the stairs. Enter Skalnic’s office. Talk to Skalnic about
Mark. He is definitely not cooperative. Watch Skalnic leave in his black car. Talk to Stasek again and he tells
you that the workers on the side of the building might help Gus get in Skalnic’s
office. Exit building.
Getting inside
Skalnic’s office – Go to open
gate on the left. Click on the rope on the scaffolding. The rope drops on
the ground
and is now in inventory. Take wood piece from right of gate. Combine rope
and wood piece to get homemade grappling hook. Click on scaffolding and
use the grappling hook. Automatically, Gus is in the office.
Take keys from Skalnic’s desk. Click on file cabinet and use
keys. New items in inventory: another spiked ring found in sewers of burnt
neighborhood and 2 crime scene photos – near bridge and burnt
neighborhood. Skalnic returns and Gus automatically exits the office through
the window.
Read the 3 new police and coroner reports on the victims. The
first victim’s ring was lost by a local jeweler. The burnt neighborhood was once
an orphanage. Talk to Stasek and leave the area. Look close at ring from
burnt neighborhood.
Bridge: Go to the new location – bridge. Go
down the steps and another vision occurs. Ida arrives driven here by the Crowman
and tells Gus that she is pregnant. Really! They will get married in New York
where Gus’ friends and family can help them get started.
Picture Correlation with Crime scene
– Use picture of crime near bridge. See an enlarge picture on the screen. Click
the eye at bottom right to toggle between the actual scene and the picture. Look
for difference. Click on spot in picture and Gus will check on it.Click on bench on the
picture. ‘It seems that the benches have been changed. Where are the old ones?’
Junkyard: Talk to Peter and ask about the
benches. Peter shows you where the old benches are. Look close at benches. Take
the spiked ring from one of the benches. Talk to
Peter again.
Burnt Neighborhood: Go right and see the
crime scene with Milena talking to Skalnic.
Picture Correlation
with Crime scene – Use
picture of burnt neighborhood crime scene. See an enlarge picture on the screen.
Click the eye at bottom right to toggle between the actual scene and the
picture. Look for difference. Click on spot in picture and Gus will check on it.Click on bath-trough.
The bath was empty at that time. The water is drained. Read the words carved on
bottom of bath.
Park: Talk to Milena about the
burnt
neighborhood crime scene. Milena said that Skalnic threw something into the
sewers.
Burnt Neighborhood: Click on manhole cover.
Go down the manhole and take the spiked ring from ground at right of screen.
Look at the grilled door and note that the lock is new. Exit
the area. Milena asks Gus to check Apolina at Mark’s place.
Mark’s place: Gus knocks on door. ‘I think
I’ll let myself in’.
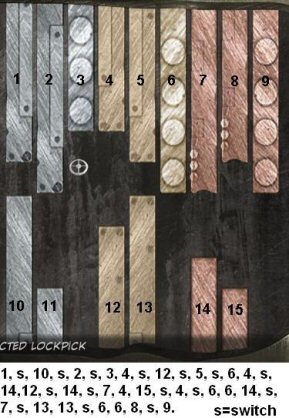
Lock picking puzzle: Click on door. Use lock
picking tools in inventory. Read locking guide.The object of the puzzle is to move the bars up
or down using the lock pick until they audibly click-lock in place. Right
click on one of the lock pick on the right to select it. Exit the puzzle to
reset it.Below is Dennis’
graphic solution. Thanks Dennis!
Look around at all the portraits on the wall. From left to
right: unidentified, Ida, Frantiska, Unidentified, Vladanna and Apolina. Take
the Book on Occultism on the table at left wall. Read it in documents.
Go to right screen and look at the couch. Blood, recent too.
Take Bell’s telegram from the ladder leaning by table on the right and
read it in documents. Now we know…
Park: Talk to Milena.
Police Station: Stasek is not behind the
counter. Go up to Skalnic’s office. Listen to an American ambassador’s
assistant paying off Skalnic
and hear Skalnic say ‘I have the perfect man to take the fall’.
Chapter 5: The Garden of Earthly Delights
Chicago – Victoria
Victoria’s bedroom: Miller
after being surprised on the look of Victoria’s bedroom says that Kolar’s
prints match the partials from the crime scene 99%. They will pick him up.
Campus: Enter building and climb to second
floor. Talk to Miller. Automatically enter the room after the Clockwork
Nightmare talk. Enter the room on the left. After the cutscene, check the bed
and the pictures on left wall. Look close on back wall to see various pictures
of serial killer victims and check the clippings above the door.
Exit the apartment and
meet Mia. Talk to Mia and she gives her business card. Victoria will meet Miller
there. Talk to Mia some more. Before Victoria leaves, Officer Tate arrives to
guard the door.
Red Lantern: Miller says he threw his weight
around trying to get inside the establishment. Victoria has an idea to get in. Enter
the building by clicking on door. The elevator goes up. Talk to the bouncer. You
need a pass.
Campus: Talk to Officer Tate. Go to last door
on the left at second floor. Mia is called downstairs. Go to bedroom on the
left. Click and look close at photo album on the bed. Click on picture at bottom
left. The girl pictured is the one that was supposed to be the next victim. Note
a piece of paper under the picture taken. Talk
to Mia and learn Steph’s name and the studio’s address 4455 Beauregard.
Richard’s Gallery: Talk to Richard
to open the gate to get into one of the studios. See Stephanie’s body on a platform. Mia
who opened one of the rollup doors saw the body also. Mia runs away.
Richard followed Mia.
Studio:
Click on elevator on the right. Pick up Stephanie’s Red
Lantern ID pass. Note a silver rose stuck under the elevator. Go to the
bloody platform. Read the words ‘A Sinner’s Pardon’ and take the picture of
Mia at a party. Look at the picture in inventory and turn it around. ‘She’s
next’ is written in the back of the picture. Go to the rollup garage door and
click on chain. It falls off. Take the chains.
Silver rose – Go back to the elevator to get the rose. Enter elevator to the
top. Click on hook across the ramp. Use chains on hook. Automatically,
Victoria slides down. Pick up silver rose.
Go back to the platform. Todd Browning arrives and
in typical Todd way tells Victoria that Kolar is at the office. Claire is busy. Exit the area and go
to the front of the Gallery.
Enter the Gallery and talk to Richard. Look close at Richard’s
desk. See the different paintings scrolling on the monitor. They look familiar,
don’t they. Take Victoria’s picture from the desk.
Pat’s house:
Enter the Jacuzzi room, just before the kitchen. Go to Jacuzzi at right screen
and talk to Pat about the cookies and her bedroom. Note the tool box by the
Jacuzzi. Go to the dining room off the
kitchen and if you have not taken Victoria’s picture from Richard’s desk, you
can now take Victoria’s picture beside the hutch.
Office:
Punch the 8th floor button. Miller calls out to the Interrogation Room.
Interrogate Kolar. When Kolar starts talking about a special room at the club and
important people, Todd appears and lets Kolar go. Victoria leaves the
interrogation room while Miller expresses his feelings to Todd Browning.
Red Lantern pass
- Go to the office and look close at the paper cutter. Use Victoria’s picture
taken from the Dad’s dining room or from Richard’s desk. Use Stephanie’s ID pass
and it will also be cut. The ID card is now unplasticized (sic) Combine
Victoria’s cut picture to Stephanie’s ID card.Look close at plastifier
at end of bench. Use the Red Lantern ID with Victoria’s picture on plastifier to
get Victoria’s ID pass.
Red Lantern:
Use fake pass on bouncer. Go to
door at middle of screen. Read the words inscribed. This must be the special room that Kolar
mentioned.
Paintings and numbers:
Go to room at right screen. Check the paintings on the wall: Perfect Love (Ace of hearts and
6 of spades) and For Better or Worse (sword, III and V).
Go to room above this atrium. Look close at weapons on wall – A
dagger has 3 and 6 engraved on it. Take the silver mask and silver nail
from wall. Look at painting on right wall – Dark Wedding (I and V).
Go back and enter the other side of the pool. Look at painting
on wall – Reminder (IV and II).
Special room: Go back to the foyer and look at the door.
Open the special room
door – Based on the paintings title and
numbers, derive the code to press in order to open the door.The words are:
in my memoirs – Reminder IV II
you shall find the instrument of my suffering – dagger 3 6
with which we celebrate our vows.
– Dark Wedding I VClick on buttons 423615 on right
panel.
Enter and look around.
Look
close at the 4 statues. Take the
bottom half of a silver apple from fruit bow at center of the bar. ‘The
other half of this is at Mia’s apartment.’
Richard’s Gallery: Talk to Mia. Mia tells you
how the statues work – use a specific object for each statue. She gives
her apartment keys. Talk to Richard about Mia. You can also look around the gallery
and see the paintings.
Studios:
Exit and go to left screen. Enter gate and forward to the crime scene in the
studio. Talk to Claire and learn about the new victim. There’s a new twist about
this murder. He changed MO. Victoria fess up on taking some evidence, as well as
telling Claire about Gus’ cases. The copycat killing and about Victoria’s
involvement were discussed.
Campus: Use the keys on Mia’s door. Go to the
bedroom and look close at the picture album on the bed. Take Mia’s notes.
Read it under documents. Take the top half of a silver apple from
the foreground shelf. In inventory, combine the 2 apple halves to make a
silver apple. Check the phone and the floor mat by the door.
Red Lantern:
Talk to the bouncer. Go to the special room.
Statues puzzle
– Give me what I desire most? Place the
appropriate object on statues in the sequence clued in by Mia’s note from the
album in the apartment.Mia’s note: Let us be behind a veil,
left to our secret designs. Then present me with the object of your desire and
I will show you the meaning of temptation. Be ready, because our passion will
flow like blood that runs through your veins and at the end you will be ready
to welcome the blissful pain that will open to you, A new world.If the correct object is placed and the correct sequence, the
statue moves.1. I am the Queen of Secrets. Use the silver mask on statue’s
face. The hand moves. Let us be behind a veil, left to
our secret designs.2. I am Lady Temptation. Use the silver apple on the snake’s
mouth. The snake’s mouth closes. Then present me with the
object of your desire and I will show you the meaning of temptation.
3. I am the Baroness of Blood. Use the silver rose on the
statue’s mouth. Be ready, because our passion will flow
like blood that runs through your veins.4. I am the Mistress of Pain. Use the silver nail on statues
hand. And at the end,
you will be ready to welcome the blissful pain that will open to you, A new
world.When correctly done, the floor opens and a stairs is seen.
Victoria goes to the hidden chamber.
Underground Secret Room: Look up at the glass
dome.
First room – Go to room closest to the stairs. Go to the fireplace. Look close to the
fireplace mantle. Take key tip and tile puzzle piece from mantel.
See a keyhole for fireplace control at left. Look at and remember the picture
above the fireplace.
Grilled room –
Exit and look at the grilled room between the 2 open rooms. There’s a book that
you need to get to.
Second room – Go
to the next room. Look close at picture above the fireplace.
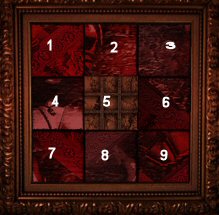
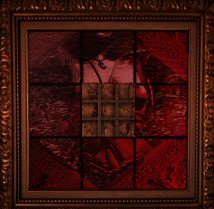
Picture slider puzzle
– Move the tiles to show the painting seen in the
other room.Numbering the tiles left to right and top to bottom: 1-3, 4-6
and 7-9.Move: Tiles 8, 9, 6, 3, 2, 5, 4, 7, 8, 9, 6, 5, 4, 1, 2, 5,
6, 3, 2, 5, 4, 7, 8, 5, 4, 1, 2, 3, 6, 9, 8, 5, 6, 3, 2, 1, 4 and 5. Use puzzle piece at center of the puzzle.
If correctly done the picture flips up. Take the key handle.
First room – Go to the other room. Combine the key tip and the key handle in
inventory to make a fireplace key. Use the key on the keyhole in the
fireplace.
Enter the fireplace. Go to the grilled room. Look at the book and see Mark Ackerman’s
name. Other familiar name is Todd Browning. So that is why Kolar was released as
soon as the special room was discussed in interrogation.
View this guide raw, exactly as the archive holds it