Sherlock Holmes: Nemesis Walkthrough
The Golden Lion
Pub: Go back to the pub and talk to the
barman.Learn that his
bouncer, Big Bruiser is a member of Luigi’s gang that is looking for Rumpkin.
Striped scarf and long knives are the identifying signs of Luigi’s gang.Striped
scarf:Take the knife and bottle of wine
from the end of the bar. Take the rag-cloth right of the woman at
the bar.Go to the
bouncer sleeping at the table. Look at the striped scarf on the table.
It is soaked in wine.In inventory,
combine bottle of wine with rag to get cloth soaked in wine.Use
cloth soaked in wine on the scarf on the table to get colorful scarf.Miss Fleming’s
boarding house: Go back to the left rear room at the
boarding house.Get rid of
Rumpkin: In inventory, combine long knife and
colorful scarf to get Luigi’s mark.Use Luigi’s mark
on the door.Search the
room: Pick up the paper by the door. It has
X215 Mayet written on it,.Check the sacks
left of the window. It is the loot.Pick up the
pieces of painted wood behind the logs right of the fireplace.Baker St:
Holmes talks to Watson about the robbery and loot.Pieces of painted
wood puzzle: Place the pieces of painted wood on Holmes’
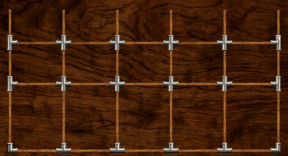
work table.Connect the wood
pieces. Click and drop the pieces in place.Place the sticks with
3 way connectors at the edges.Place the long
horizontal sticks at the bottom layer and the shorter horizontal sticks on the
next top 2 layers.A small cage is made.
Buckingham Palace
July 18, 1895
White Room:
Go to the first door on the right. Talk to the Prime Minister. Her Majesty is
in a miserable mood.Learn that Robilar,
Leomunda’s dog has the run of the palace. Watson is sent to do errands.Take the eyeglasses
on the table in the White room. Exit the room.
Find out what is
causing Her Majesty’s bad mood:
Kitchen:
Go to the room across the hall from the White room.Talk to Chauncey. After
the pep talk, learn about the doll house gift given to Leomunda, the Queen’s
companion.Robilar’s
breakfast: The maid arrives and states that Lord Robilar
refuses his breakfast too.The rest of the meal
was thrown in the trash. Learn that it has chocolate.Go to the table at the
corner left of the white kitchen door.Take and read the
Milord’s meal – dog food recipe from the tray. Take the chocolate from the same tray as
the recipe.Turn around and go to
the cabinet at other end. Take the woodland strawberry jam and
prepared mustard from the wall cabinet.Take the anchovy
extract from the table below wall cabinet. Take the pickle tongs from
the jar at left of the table.Milord’s meal:
1. Weigh the
ingredients: 10%, woodland strawberry, 40% anchovy extract and 50% mustard.Go to the scale on the
center table. Click on scale to automatically place all the collected
ingredients on the table.a. Find out how much
mustard makes 50%.Weigh anchovies in one
pan and mustard on another until they are even.4 anchovies = 3
mustard. Empty pans by taking item and right click on empty space.b. Find out the weight
relation of strawberries and anchovies.Weigh strawberries in
one pan and anchovies on another until they are even.2 anchovies = 3 strawberries
So multiply the
anchovies 4 times to get 4 times more than the strawberries (4:1).8 or 16 anchovies + 3 or 6 strawberries = 50%
c. Weigh 50 % of 4:1
of anchovies : strawberries on one pan and add the mustard on the other pan
until even.Solution:
Place 16 anchovies and 6 strawberries on one pan and 15
mustards on the other pan.Place the correctly
weighed anchovies, strawberries and mustard on the plate at right to get
bowl of sauce. Elementary!2. Add in reasonable
quantities of the usual components.Find the usual
components: Open the trash bin on the floor left of the
pickle jar where Chauncey threw the old preparation of dog food.Use the magnifying
lens on the left side of the trash bin. Need a better magnification to
determine the composition of the mixture at left.Click the magnifying
lens on the PM’s eyeglasses. Use the combined lenses on the left side the
trash bin.Click on large pieces (yellow and brown items) and they will be identified: sausages and bananas.
Take sausages
on the table left of the trash bin and bananas at center table.In inventory, add
bananas, sausages and chocolate to the bowl of sauce to get dog food.
Lady Leomunda and Lord Robilar:
Exit the kitchen and go to the second door on the right.
Knock on the door and
see that both Lady Leomunda and Lord Robilar are not in the mood for company.Use the dog food on
the door and Lord Robilar will smell it and you can enter the room.Talk to Lady Leomunda.
Learn about the doll house and the missing 4 male dolls. There will be a
handsome reward when they are found.Search for the 4
male dolls: Note that Robilar follows Holmes about in
his investigation.Kitchen: Now that Leomunda
mentioned her, talk to Deirdre about the dollsThe missing dolls have ginger hairs.
White room:
Go to the White Room and talk to the Prime Minister and Chauncey.Learn the
reason for the change in attitude of Lord Robilar. It is due to the visit of
the redheaded (ginger-haired) nephew of Leomunda.First doll:
Exit the White room.Talk to the 2 guards
by the door. Holmes gains the help of the 2 guards only after mentioning
Leomunda’s gratitude. Learn about the suit of armor.Hidden doll: Turn right and check
out the suit of armor. Take the pike.Go to the left side of
the base of the suit or armor’s stand. See a hole. It’s dark in the hole.Go to Leomunda’s room
and the doll house. Take a candle from inside the doll house.Go back to the hole. Use the candle on the hole at
the base of the armor. The hole is deep. Use
the pike on the hole-candle. See a doll. Now we
need a hook.With the pike showing at top right of screen, go to the White room
and talk to Chauncey. Learn about the bathtub pipes in Leomunda’s room. It is
plugged. Robilar was in the
scene of that crime too. After the talk, get a clip.Go back to the hole.
In inventory, combine the pike and the clip to get a twisted pike.Crouch down and use the twisted pike
in the hole to get the first doll.Second doll:
Go to the kitchen and talk to Deidre.Dirty snout: Learn about cleaning
Robilar after seeing his snout full of soot at the White room.Go to White room’s
fireplace. Look close at the fireplace and see a doll at the side.Use the pickle tongs
taken from the kitchen on the fireplace. Get the second doll.Third doll:
Go to the kitchen and talk to Deidre.Clear Leomunda’s pipes: Deidre cleans the
second doll and leaves a bucket beside the barrel. Take bucket.Go to Leomunda’s room
and check out the basin behind the curtained cover.Use the bucket on the
basin to get bucket of water. Look in the basin’s hole. There is something here.Go back to the kitchen
and empty the bucket of water in the barrel. All of Leomunda’s bath water is in the
barrel. Try to pick the barrel of water. It is far too heavy.Talk to the guards by
the door. The barrel of water in the kitchen sink is poured in the sink to clear the
pipes. Elementary.Go back to the basin
in Leomunda’s room. Take the third doll.Fourth doll:
Talk to Leomunda about Robilar’s behavior.Learn about the garment chest that has a security
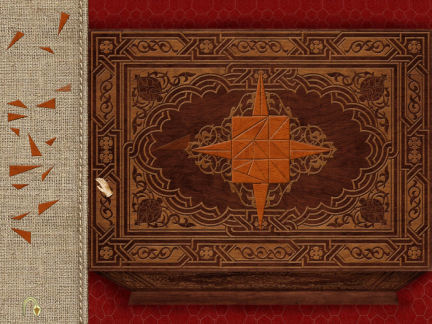
lock.Star puzzle: Look at the
chest right of the bath basin. Holmes says to insert a star to unlock the
mechanism.Turn around and look
close at the picture of the King on the wall.Take the wooden
star-crown from the painting.Use the wooden star on
the chest.Assemble the pieces to
form the star on the chest. The star mold-shape is under the ornate curlicue
molding. That will be the guide to the correct wood to be placed.Click the wood and it will be automatically be
placed over the chest.There are more wood than needed; so select the
correct ones and place them on the mold or place all the wood and take off the
ones that are out of place.Click on the
improperly placed wood and they will be returned to the left side.The chest opens. Take
the fourth doll.
Talk to Leomunda.
The Gift:
Later…
On the way to the
White room to talk to the Prime Minister, look at-click on the wet spots on the carpet
in front of the white room door.Talk to the Leomunda
and then Chauncey. Learn about a wet gift that was given to the Queen.Talk to Leomunda about
the gift and learn about it falling in the moat.Learn about being told
by an antiquarian about the ‘masterpiece’. The gift is a French Grandfather
clock.Quiz:
What name is Sherlock thinking of? The clue here is the paper taken from the
boarding house. Select Mayet. Click on check mark.Watch the stealing of
"something that money can’t buy from someone that is
also his ally".You and I, Lupin.
Cellar: Look around in the
Queen’s bedchamber.
Turn around from the window and go to the
candleholder on the wall left of the wardrobe.Pull the candleholder. Enter the wardrobe and go
down to the cellar of the palace.Gifts storage room: Look
around and check all the items collected as gifts to the royalty.Open the locked door: Check all the grilled door. See that the grilled door on left wall (between candles) is locked by Lupin.
Check the organ between the 2 other grilled doors.
The steel tubes are not damaged.Check the wooden elephant. Check the floor in front
of the exit door and see that it is slightly slopedTake the metal tubes on the left part of the
organ. Take the rest of the metal tubes on the right part of the metal
pipes.Place metal tubes on the slope on the floor. Place
the other metal tubes in front of the elephant.Push the wooden elephant. See it roll to the grilled
door. Go through the opened door.
You and I, Lupin.Hunting trophy room: See
Lupin exit through the far door.Check the second far grilled door where Lupin passed
through. See that the lock is sophisticated.Look down and pick up the metal rods on the
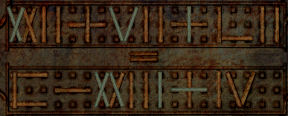
floor in front of the locked grilled door.Metal rods puzzle: Look
close at the sophisticated lock.See the metal rods picked off the floor at bottom of
the puzzle.The aim of the puzzle is to arrange the rods on the
lock to form Roman numerals that will result in an answer that is the same for
the top and the bottom mathematical processes.Highlight the selected rod. Arrange the rods by
click-hold-drop rods in place. Right click to turn the rods.The rods are already arranged at the bottom by sets
based on how many rods per number to place on the top puzzle.The solution to get is 81. XXII + VII + LII =
C – XXIII + IV Open!
Norman era room: Go down
the hall.Head bop: Pull the lever left of the door to open the grilled
door. Look around and see the trap door on the floor.Lupin must have gone through the closed trap door.
Look around for things to get the trap door open.Go to the back wall and take the hanging piece of chain. Take the other
hanging piece of chain.In inventory combine the 2 pieces of chains to get chain.
Use chain on the teeth of Norman bow of a ship (looks like a wooden
serpent’s head).Look up at the ceiling. Use the chain on the hook on the ceiling above the
trap door.Then use the chain on the top of the raised grill door. Now use the lever right of the
open grilled door to drop the grill down. See the head above the trap
door.Go to the end of the chain attached to the grilled door. Take it off to drop
the head over the trap door. Yeehah!Go down the metal rungs.
Costume room: There is no way back up and Holmes must
find a way out.Look around. Take the bagpipes from the kilted mannequin on the right.
Take the darts from the bag hanging on the side of the Tarzan costume.
North American Indian room: Go to the next room.
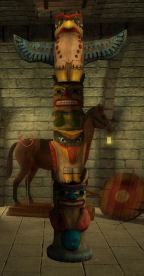
Totem pole: Look up and see a trap door in the ceiling. Look around the room for something
to get us up there.Go around the room and pick up pieces of Indian totem.
There are 2 pieces of totems by the teepee on the right wall. There is one
piece of Indian totem on the left wall in front of the canoe. There is one
piece of the Indian totem in front of the wooden horse.Look down at center of room and see footprints. Place the 4 pieces of Indian
totem on the floor below the trap door. Arrange them in particular order.Climb up to the trap door.
Game room: The grill door behind you is locked.
Look around the room. Check out the puppet show booth. Click to push it aside.
Mirror room: Enter the next room and look around.
This is the room we saw while in the hunting trophy room.Mirror climb: Look up and see another trap door in the ceiling under the big broken mirror
of the dresser at center of the room.The big broken mirror seesaws.
Take the coffin (chest) by grilled door. Take the (glass wooden)
crate by the entryway.Take the only intact mirror in the room that is on the crate left of the
grilled door to the hunting trophy room.Face the big broken mirror at center of room. Place the chest on the mirror
and it will support the bottom of the mirror. Place the wooden crate on the
bottom of the mirror and it will hold the mirror at that angle.Climb the mirror and see that it is a grate. Turn around and see that it has a
hook to lock it.Turn around again and prop the mirror on the grate. Move the mirror to see how
the rope-grate is attached.See a chain that holds the grate to the rope.
In inventory, combine the bagpipe with the darts to get bagpipe with darts.
Take the bagpipe with darts from inventory. Look at the mirror again and see a
crosshair that is used to aim the darts and bagpipe. Aim on knot at top of the
rope and fire. Open!Turn around and use the handle of the grate.
Weapons room: Look around.
Take and read Lupin’s letter from the table. He will be at the place
that first entered by wooden walls and then stone walls.
Baker St.: The Prime Minister is in Baker St.
The Prime Minister asks Watson where the last theft site
will be. Select the east side
of Map of London. Then click on Tower of London.The Prime Minister says that is already a place that
has had a theft. He then agrees to Watson’s deduction of the last riddle – Big
Ben.Holmes stays behind from the party going to Watson’s
deduced place.
Tower of London July 18-19, 1895
There are matches in inventory.
Byward Tower (Entrance): Go forward.
See the 3 watchers inside Big Ben counting their glories to come.
Schick: Go through the gate and see a fallen warder. He was given a sedative.
Go close and take the cartridges beside the sleeping warder.
Click on him again and find out that his name is Schick and has a thick
moustache. He must not use a razor.Check the rifle. It is unusable.
Search for Warders:
Go to Weapons room. It is closed.
Go down the stairs and forward. Go left at the first archway.
Wakefield Tower: See a rope that runs across from the
window of Jewel House at Wakefield Tower and the ramparts.Holmes says to prevent him from using the rope.
Scaffold site: Jump to Scaffold site.
Kirkpatrick: Turn around and see another fallen warder. Check the sleeping warder and find
out that his name is Kirkpatrick.Look close and use magnifying lens on Kirkpatrick’s right hand. It has green
paint.Storeroom: Walk towards the storeroom.
Chief Warder Smith: See a
hat on the lawn across the storeroom door.Click on the lawn and then click on the hat to find
out that it is Chief Warder’s hat.Note that there are drag marks on the path to the
storeroom.The storeroom is closed.
Queen’s House or Bloody Tower: Go around the corner
to the end close to the dormitory blue door.Unnamed warder: Check the
fallen warder.Talk to the warder completely and learn that Chief
Warder went with the doctor to the storeroom.Smith and the cook have keys to storeroom. Fatty Johnson has a duplicate that
he stole.
Dormitory: Enter the dormitory.
Take the letter from R. Moore to Sarah from the table at first cubicle.
Take the handbill about 2 hot air balloons.Go to the second cubicle and see roller skates on the open trunk at bottom of
bed. The uniform on the bed is small. Take the lampshade that has a funny
shape.Take the key to the cloakroom from the table.
The bed in the third cubicle is dusty and unoccupied for some time.
Take the book about Charges and Calibers of Cannons from the desk at
the end of the room.Exit dormitory.
Get the key to the storeroom:
Cloakroom: Use the key taken from dormitory to the
door beside the dormitory.Enter and check the bulletin board. Take the guard’s rotation.
Right click and see a map-puzzle to determine which warder goes with which
locker.Right click to get out of the map of the cloakroom.
Clues from cloakroom: Go around and check the cloakroom.
#1 – See that the locker has a note from Warder Schick to the Sergeant.
He is 2 lockers away from Summerbee and that they are not on the same shift.
Bell’s locker is close to the locker of Schick. #1 is the Sergeant’s.Meanwhile: The 3 watchers at Big Ben are getting on each
others nerves.#6 – Look on the floor in front of the locker. Use magnifying lens to see
freshly combed mustache hair. So this locker is Schick’s, the warder at the
gate.#12 – See that there is green paint on the locker door. So this must be
Kirkpatrick’s, the warder by Scaffold site.#15 – See a Scottish plaid sticking out of locker door 15.
#16 – See a step stool in front of #16. The warder possibly is short and needs
help reaching the high parts.Go back and talk to the guard lying at the corner. He finally falls asleep.
Information gathered from sleeping guard:
Johnson’s locker is in the rear from his locker.
His locker is framed by Bell and the new warder.
Willoughby’s locker is closer to entrance.
Dirty Flint is at rear of the room.
Read the letter from R. Moore taken from the dormitory:
R. Moore is the new guy. His locker is then close to the sleeping guard
outside the dormitory.Moore rotates with Law, the only Scotsman in the group. #15 is Law’s.
March’s and Ludlow’s lockers are close together.
Jones is the short one. #16 is Jones’.
The Viking’s locker is across Moore’s. Mortensen’s locker is across Moore’s.
O’Shea is the sergeant. His locker is #1.
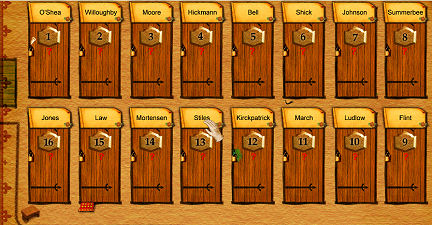
Locker Puzzle: Open the cloakroom map.
Click-hold-drop a name tag and place it on the tag above the locker.
From above clues, place the name tags: O’Shea is #1, Schick is #6, Kirkpatrick is #12, Law is
#15 and Jones is #16.Sleeping guard is framed by Moore and Bell. The
lockers have to
be 3 in a row.. Willoughby is closer to entrance than sleeping guard.
So, place Willoughby as #2, Moore is #3 with an available locker across him, Hickman the sleeping guard is #4 and Bell is #5.The only locker available across Moore should be
Mortensen’s #14.Summerbee is 2 lockers away from Schick; so place him in #8.
March and Ludlow are together but before Stinky Flint who should be #9.
March is ahead of Ludlow because he is protective of Ludlow. March is #11 and
Ludlow is #12.Johnson’s locker is rear of Kirkpatrick so place him at #7.
This leaves #13 as Stiles’.
Blow up the locker of Johnson to open it.
Cook’s apartment: Go to the cook’s apartment left of
the Storeroom.Take small cake mould and nutcracker from the table. Take the
string from the chair.Take the waxed doily from table right of fireplace.
Johnson’s locker: Go back to the cloakroom and locker
#7 of Johnson’s.In inventory, combine nutcracker and cartridges to get gunpowder.
Combine gunpowder and string to get a bomb.
Place bomb on locker #7’s padlock. Use matches on padlock covered by bomb.
Open locker and take the key to the storeroom. Take the haggis
also.
Get Chief Warder Smith out of the storeroom:
Storeroom: Go to the storeroom and use the key on the
door.Go to the locked cold room.
Chief Warder Smith is unconscious inside the cold room.
Take the bucket of water left of door. Use the bucket of water on
Smith.The hit on the head got him unconscious; he is not
drugged like the others.Learn that the rest of the warders got sick because of the tomatoes (remember
the drops of
tomatoes on the shelf) and they were treated with injection by the doctor.
Quiz: What clue does Dr. Paul Sernine’s calling card
reveal? Type in Arsene Lupin. Click on check mark.Get a 4 oz flask and the key to the weapons room.
Weapons room: Jump to Bloody Tower. Go forward and
down the stairs.Turn right and forward under the archway.
Go right and climb the first stairs on the wall.
Use the key on the door.
Enter the door at end of left wall.
Go to the door of Jewel House and hear Lupin working inside.
Go down the steps and check on the sleeping guard, Summerbee. Take the key
beside Summerbee.Go back to weapons room and to the worktable.
Use the key taken from the warder on the locked box. Take the screwdriver
and the file.Take the oil flask and dish from the table also.
Take the helmet stand from the middle suit of armor by the wall.
Go to left side of fireplace and pick up some small dry pieces of wood.
Go to the cannon at the back wall. Look at the cannon to find out that the
interior diameter of the cannon is 2.5 inches.
Storeroom: Jump to storeroom.
Give the file to Smith. Smith says that to enter the locked Jewel House will
take a cannon.The munitions are in the armoury at White Tower. Holmes asks for the scarf.
Block Lupin’s retreat:
Lupin’s retreat is the rope spanned across the road from the rampart to the
window of the Wakefield Tower.Hot air balloon: Remember the handbill that shows the 2 balloons tied together. Let’s make one.
In inventory, combine helmet stand with haggis to get hot air balloon.
Combine lampshade with waxed doily to get another hot air balloon.
Then combine dish with string to get bowl with string.
Combine cake mould with string to get cake mould with a
string.Combine bowl with string with the hot air balloon made from lampshade to get
hot air balloon with basket.Combine cake mould with a string with hot air balloon made from haggis to get
hot air balloon with basket.Place small pieces of wood on each of the hot air balloon with basket
to get 2 hot air balloons with splint.Use the oil on each of the 2 hot air balloon with splint to get 2
hot air balloons ready to use.Use scarf on each of the 2 hot air balloon ready to use to get 2 hot air
balloons with a scarf.Combine the 2 hot air balloon with a scarf to get hot air balloons attached
by a scarf.Jump to Tower Green. Turn around and exit through the archway.
Go right and see the rope strung across the path.
Use the hot air balloons attached by a scarf on the rope.
The rope is weakened by the fire carried by the hot air balloons.
Prepare the cannon.
White Tower arsenal: Jump to White Tower.
Climb the stairs and talk to Chief Warder Smith. But what are they doing
there?Enter the arsenal.
Meanwhile: Watch what is happening to the 3 watchers at Big
Ben.Back at the arsenal, go to the wall under the windows. Take the lid of the
crate.Go to the first table and take the 0.44 pt billycan and the 2.8 oz
glass.Go the back wall. Look at each stack of cannonballs. Take a 2.5 diameter cannonball. It is the second from right stack.
Go left and take a small barrel of powder from the powder barrels at
the corner left of the back door.
Dormitory: Jump to Queen’s House. Enter the
dormitory.Go to the open chest. Use the screwdriver on the roller skates to get
wheels and screw.
Weapons room: Jump to weapons room.
Move the cannon: Go to the cannon at the back wall. Take the cannon cartridge bag right
of the cannon.Click on the middle of the cannon. Holmes will say it needs
to be moved.Then in inventory, combine the wheels and screw
from the skates on the lid of the crate to get board on wheels.Use board on wheels on middle of cannon.
Stand at the back of the wheeled cannon and push the cannon until the
bottom of the stairs.Use the screwdriver on the 2 hinges of the door beside the sleeping warder.
Climb up to middle of the stairs and then click to place the door on the
stairs. Elementary!Push the cannon up the stairs. There, now I am in firing position.
Load the cannon:
In documents, read the Correspondence of Charges and Calibres for Cannons. It
states that 2.5 calibres need 478 cc of charge.Charge puzzle: Click the cannon to get the charge puzzle.
See the 3 collected receptacles: 250 cc, 80 cc and 12 cc. The bag to hold the
measured powder is at left and the powder barrel is at right.The funnel on top of the barrel is for pouring
wrongly measured powder.Take a container, click it on the tap-cork of powder barrel and it will get filled.
Use the powder filled container on the bag at left.
Measure a total of 478 cc of powder into the bag.
A solution is to place 19 measures of 12 cc and 1 of
250 cc.When the bag is filled correctly, Holmes will say Elementary!
Alternative solution by Merlin:
A.Add 250cc of powder to bag.B. Fill up 250cc container again.
Pour from 250cc container into
80cc container.Empty 80cc container.
Pour again from 250cc container
into 80cc container.*Empty 80cc container.
Pour remaining 90cc of powder into
bag.Repeat B (*no need to empty 80cc
container the 4th time).C. Add 4 lots of 12cc to bag.
Kaboom!
Use the full cannon cartridge bag on the cannon.
Use the 2.5 diameter cannonball on the cannon.
Use the matches on the cannon.
Watch the finale of the chess match!
Stalemate.
What do you say, Watson?
This document may not
be distributed without express written permission of the author and the
content may not be altered in any way.
For Questions or
Comments on this Walkthrough, please write to:MaGtRo
Copyright © 10/2007MaGtRo