Sherlock Holmes: Nemesis Walkthrough
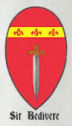
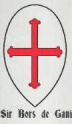
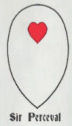
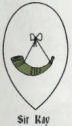
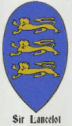
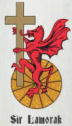
| Shield |
|
|
|
|
|
|
|
Knight |
Bedivere |
Bors |
Percival |
Kay |
Lancelot |
Lamorak |
|
Weapon |
bardiche |
spear (glaive) |
crow’s beak |
partisan |
sword |
Morning Star |
|
Order placed |
|
|
|
|
|
|
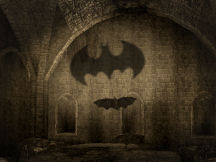
Bird in the
secret room: Go through the entryway.See that it is a
bat. It needs to be stunned.Jump to the
Queen’s House. Enter the dormitory.Take the flash
camera on the table beside the third bed.Jump to Wakefield
Tower. Use the camera on the bat. Give it to Sergeant Wayne!Take the
illegible piece of message.
Bird on the
rampart: Jump to the ramparts.Click the
sunflower seeds taken from the storeroom on the parrot on the roof.
Your name: She
played you a trick… German bird or eagle, one and the same.Quiz:
What is the name of the parrot? Type in Irene Adler. Click on check mark.Take the
illegible piece of message.White Tower: It is now dawn.
Look up to the
bird on the window of the White Tower.Use the telescope
to identify the bird. It is a lammergeier. Hahahahah! What a story!
Play as Watson:
Use the London map. Open the west area map and click on top left – Baker St. Go
up to the apartment.
Hunt for
sovereigns: Find at least 10 sovereigns.Go to right side of
the desk left of the door. Crouch down (Ctrl key) and take coin from 4th drawer.Go to the left side
of the desk left of the door. Take coin from third drawer.Go to small drawers
at left corner. Take coin from second drawer right side.Go to work table.
Take coin from under microscope.Go to fireplace:
Take coin from under mug at left mantle.Look down on table
left of fireplace. Take coin from under paper.Go to the coat rack
on wall right of door. Take coin from middle hook.Go to Holmes’
bedroom.Go to right side
table. Take coin from under the small cup right of lamp.Go to dressing
table. Take coin from bottom drawer under the wig.Go to book case at
corner. Take coin from under 4th book from left.Go to left side
table. Take coin from drawer.Golden Lion Pub:
Jump to and enter the pub. Enter the backroom.Talk to the man and
give him 10 sovereigns.Take Ginger, competition turtle #2. Tracy is
not for sale.Jump to Tower of
London.
Play as Holmes:
He wants a net.
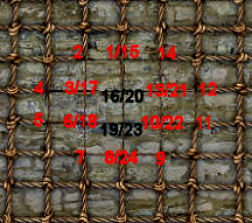
Net puzzle:
Jump to weapons room. Try to take the net at the back wall.Use the string taken
from the storeroom on the net.Click on the corner or
intersecting points
where the string should be placed to make a good weave.Automatically get
fishing
net.
Bird at White Tower:
Watson comes back with the turtle. Jump to White Tower.Place the turtle on
the brown twigs on the brick path. Ginger will never
forgive me. Of course, of course!Use the fishing net on the
bird. Automatically get the last note.Baker St.:
Use the 6 illegible pieces of message on the lamp at Holmes’ worktable and get
Six Birds Poem.National Gallery:
Jump to National Gallery using the middle area of the London map.Talk to the Gallery
Director.4 paintings of St
Catherine mentioned in the Six Birds poem: Look for 4
paintings of St. Catherine all over the gallery.Raphael – Jump to
Italian Gallery. Click on St. Catherine of Alexandria by Raphael, second on the left
of the entryway to the next gallery.Solario – Click on St.
Catherine of Alexandria by Solario right of the wood door at Italian Gallery.Crivelli – Click on
the small painting of St. Catherine of Alexandria by Crivelli, third right of the
entryway to the next gallery.Lochner – Jump to
German Gallery. Click on St. Catherine of Alexandria by Lochner second to last on the south wall.Holmes says to go back
to Baker St. Open the west area of the London map. Jump to Baker St. at top
left.
Play as Watson:
Watson got money from the bank.
Golden Lion Pub:
Enter the pub and the back room. It is closed. Talk to the
bartender and drunken man.Exit the pub. Talk to
Piers waiting outside the pub. Piers will recover the medal using Watson’s
money.Go back to Baker St.
Quiz:
To which treaty does the "Six Birds" poem refer? Type in Alexandria. Click on
check mark.
What is to be stolen next?
Play as Holmes:
Barnes Book Store: Jump to the bookstore.
Get the book on the
wall facing the left bookcases with the candelabra on the table.Read about the
Rosetta Stone used by Champollion to decode hieroglyphs. The stone is now at
the British Museum.Baker St.:
Talk to the
Constable Rufles. Listen to the message.Go up to the
apartment. Enter Watson’s room.Use the central area
of the London map. Jump to the British Museum at top left of the map.
British Museum July
16, 1895
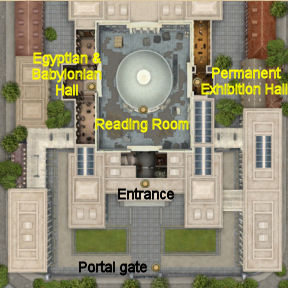
Listen to the
discussion of the Prime Minister and Holmes. Lestrade gives a map of
the museum.
Entrance to Museum:
Enter the museum. Meet Barncow, the librarian (guard) with the architect
beside him.Egyptian and
Babylonian Halls: See the Rosetta Stone.Inner Courtyard: Talk to Lestrade at
the inner courtyard by the entrance building. Get there by exiting the Hall and go
right to the next entryway. The police are now in place.
Play as Watson:
Watson is hungry. Lestrade says to ask the guards outside if there’s any leftover from the mess.
Outside gate-portal:
Jump to or go forward inside the entrance building and go out through the double doors.Talk to any of the
guard. There may be a bun or two in the bread bag by the portal.Turn left and forward
to or jump to the outside grilled gate.Check the bag on the
ground beside a trash can.Talk to Piers, the journalist. Piers is calling in
his markers. The thing is to find the key to open the gate and get the guards
out of the way.Maintenance room – Go inside the building.
Enter the door at right. Look around.
Take the hammer
from the table.Library (Reading Room):
Enter the building at the center of the inner courtyard.Talk to Barncow about
the keys, curator and office.Curator’s (Director) office:
Go to the entrance building and enter the room on the left.Desk: Check
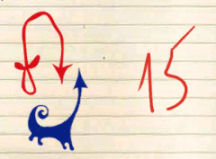
the desk and take the paper with red and blue doodling. It has a red 15, red
clockwise arrow and a blue counterclockwise arrow.
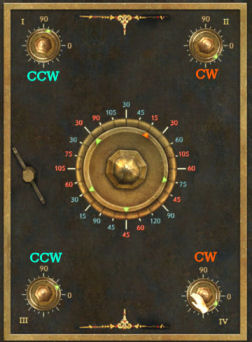
Safe: Go to
the safe.Central dial –
The central dial has red and blue colored numbers.Based on the Curator’s
paper, move the central dial’s red arrow to red 15.This action points
the green arrows to: blue 75, red 45, blue 30 and red 30.Corner dials –
Pull back resets the puzzle.See that the safe has 4
dials at each corner and has 0 and 90 marks.The 0 and 90 marks show the
degree of the angle of the dial’s markings. Each of the lines is a 15 degree
mark.The paper showed that
red is to be clockwise and the blue is to be counterclockwise.I – Right click to turn the dial counterclockwise to
75 (5th line above zero).II – Left click to turn the dial clockwise to 45
(3rd line below zero).III – Right click to turn the dial counterclockwise
to 30 (second line above zero).IV – Left click to turn the dial clockwise to 30
(second line below zero).Safe opens. Take the key.
The architect arrives and talks about his worries.
He mentions that one lion’s base at the entrance is crumbling.Lion at entrance to
stairs: Exit the office and go across the lobby to the
stairs.
Get guards out of the way:
Check the lion’s base at right.Use the hammer taken from the maintenance room on
the top of the crumbling pedestal.Go outside and talk to
the guard about the lion.Go to the gate and
give Piers the key now that the guards are gone.Go back inside the
building and meet Holmes and Lestrade.
Night July 16-17,
1895
Listen to the
preparation done by Lestrade. The architect arrives stating that the iron bars
were removed. Talk to architect.
Play as Holmes:
Maintenance room:
At the maintenance room, look around. Talk to architect.Note by use of eye icon that a rope from the table,
one of the pulleys from the wall and a soap bar are missing.Inner courtyard:
Go outside, right to the pit and canvas covered bricks. Look close
and note that tarpaulin is gone from the middle pile of bricks.Go to the top left
side of the courtyard and enter the shed. Look and see that 2 bags of cement
were taken.Curator’s office:
Talk to the architect and ask about the missing objects. Barncow arrives and
states that the rubble at the lion’s base was removed.Lion’s base:
Go across to the crumbled lion’s base.Look close at the
footprint. Use the magnifying lens and measure the footprints. They are
Lupin’s.The architect explains how a pulley can be used
with the missing items. The weight is based on the counter weight. So that is
why the heavy rubble is gone.Inner courtyard:
Hear Watson. Run outside and left.Watch the theft and the escape.
Read the new clues
thrown by Lupin.
What is to be stolen next? Take the time to check
everything in both halls. This will familiarize you to the clues given by
Lupin.
First Poem: Read the first
clue about beasts at the entrance.Go to the entrance of the museum.
Go to the lion fountain on the left of the double
doors. Take and read the new message.Veronese Lovers:
The clue mentions about the Englishman who wrote about Veronese lovers.Go to the reading room. Talk to Barncow completely
and learn how to find a book in the library.Use the library’s card catalogue:
Look close at any one of the machines around the perimeter of the first
level of the library.Type in a keyword and then press the handle on the
right.The card catalogue will show the page, book,
author and where to find the book by area, row and column.The areas are labeled by letters on signs that
separate bookcases or on top of the shelves.Each level has 6 rows of books and there are 12
columns of books per area or letter.Second clue keyword: Type
in either Romeo or Juliet. Pull the handle. It is at G-8-4.It is in row 8, so that is second floor. Go up the
stairs. Go to Area G, to the 4th column of books and second from bottom
row.Take the book and get a new clue.
Bronze Door: The clue
mentions a red copper or bronze door that leads to nowhere.Go to the Egyptian and Babylonian Hall. Turn right
and go to the door at the end of the hall.Count off the 4th row from bottom.
Count the men in that row = 41 soldiers.Count off from top down to 7th row. Count the horses
on the left door = 9 horses x 4 = 36 legs.41 x 36 = 1476. Thanks to this door, I should know
which book to find.Jump to Reading room. Use the card catalogue. Enter
1476. Pull handle.Look for Hindu Enchantment at (D-14-7), at Area D, 2nd row
at third level and column 7.Search through the different pages for a clue. Go to
page 41 and 36 and see a statue of Kali.Jump to Permanent Exhibition Halls. Go left and look
at the Indian statues on the table on the left.Move the middle statue and take the next clue.
Three Brothers:
The clue talks about 3 similar brothers.Go to the Egyptian and Babylonian Hall. Turn right
and go to the left aisle.Look close at first stele showing the 3 figures of Bes holding swords. Use the lens
on the right deity’s right ear. See a plug
under the ear.Click and automatically get the message.
Drink or Run: You must
choose.Jump to Reading room. Use the card catalogue. Enter
Drink. Pull handle.Look for Drink or be Drunk at Area E, 6th row at
second level and 3rd column.Read a note about a receptacle.
Drink or be Drunk:
Read the description of a receptacle with geese handles.Jump to Permanent Exhibition Halls. Go left and
look at the vase at the end of the hall.Take the message under the left head of
the geese.Two Monkeys:
First paragraph: Read
about 2 monkeys and a man.Go to the Egyptian and Babylonian Hall. Turn
right and go to the right aisle.Look close at the last stele on right wall.
See 2 men; one has 2 monkeys.Look close and trace an invisible line down to the third row from
that fingernail. Then move cursor to 5th cuneiform to the right and then click.
Holmes will copy the cuneiform.
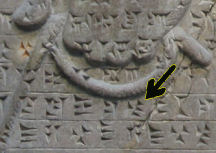
Decode the cuneiform by using the sidebar.
Click on a letter at left and select the cuneiform you
think it represents on the pop up menu.The letter will automatically replace the
cuneiform on the message at right.The last cuneiform in the picture below is Y.
Second paragraph: Jump to the Reading room. Use the card
catalogue. Enter sea rocks forest. Pull handle.Look for Nightmare in the Seas, Rocks and
Forests by Oliver Lavisheart (80 Days) at Area C, 4th row and 5th column.Measure the books: Get (click-hold-drop) the 3
books (forest, rocks and sea on the title) and stack them on bottom shelf.
Use the tape to measure from top to bottom. The 3 books are 17.20 cm in
height.Third paragraph: The
clue talks about a round picture good for eating; 2 young girls and an
olive tree.Jump to Permanent Exhibition Hall. Go left and
to the end.Face the plate displays and click on the shelf
to get a zoom puzzle screen.Use the tape on the plate on top left (one elder
woman, 2 young girls and olive tree). It is 52 cm in diameter.Fourth paragraph:
Calculate using the measurements taken.17.20 x 100 = 1720. 52 x10 = 520. 1720 minus 520
= 1200.Book: Jump to the Reading room. Use the card
catalogue. Enter 1200. Pull handle.It is French Cuisine at Area J, 3rd row at
second level and 3rd column.See illustrated pages. Use the lens to look for
the next clue at middle bottom of left page. See Lupin holding a Koala.
Click on the picture of Lupin.
Koala: Jump to
Permanent Exhibition Hall. Go left to the animal display on the right
just behind the penguin on the floor. Click on the koala to get the next
clue.Koala: Read a
description of a fake jug with yellow, brown and black colors.Go to the left end of the Permanent Exhibition
Hall and see jugs, vases and other potteries.Take the fifth from bottom left vase. Holmes
breaks it.Vase puzzle – Put the pieces together.
Click-hold-drop the pieces from left to the
right working area. Right click to turn the pieces.Read the message printed on the vase.
Shedu Poem: Read about
bull, lion, guardian and demon.Jump to the Egyptian and Babylonian Hall.
Go to
the right Shedu statue just ahead to the side of the archway and behind
the broken pieces of glass on the floor.Look close and take the next message between its
clawed feet.Read the message about Kings.
Kings’ Message: Pull back
resets the puzzle.Jump to the Permanent Exhibition Hall. Go to the
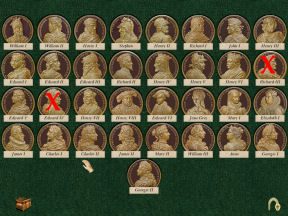
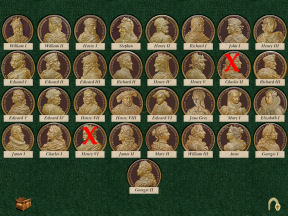
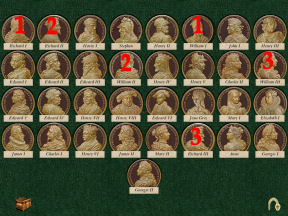
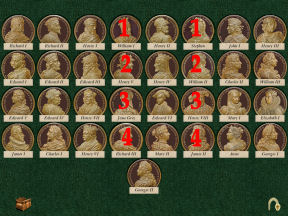
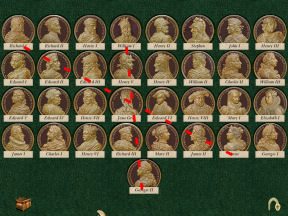
first case at the middle of the hall. Look at the Medals.See a close up of the monarchs’ commemorative
medals.First paragraph: The youngest Henry
is Henry VIII and half is IV. Then find Edward IV.Replace Edward IV with Richard III (IV less
Charles I). Perfect, now on to the next step!
Second paragraph: John
I + James I + a Christian name + 3 = 6. The Christian name that is common
on the diagonal is Henry. Replace-exchange Henry VI with Charles II.
Perfect, now on to the next step!
Third paragraph:
Replace-exchange the Richards with the Williams of the same number.
Exchange William I with Richard I, William II with Richard II and William
III with Richard III. Perfect, now on to the next step!
Fourth paragraph:
Replace-exchange the fourth column medals with the 6th column medals (row
1 with row 1 medal on 4th and 6th column, row 2 with row 2 medal on 4th
and 6th column and so on…). Perfect, now on to the next step!
Fifth Paragraph: Think
of an invisible line from William I (earliest monarch) with Georges II
(latest).Then think of an invisible line between Anne
with Richard I (the lion hearted).
The medal that is intersected by those 2
invisible lines is Jane Grey medal. Get Jane Grey medal.Go to the Director’s Office and talk to the
architect.Go to the maintenance room and talk to Watson.
Get the hammer.In inventory, combine (click-hold-drop) the Jane Grey medal and
the hammer to get the next clue.Egyptian Stela:
Jump to the Egyptian and Babylonian Hall. Go
left to the end of the right aisle.Look close at the Egyptian stela and use the
lens. See a
letter E. It is at the 8th row and 9th column.Jump to Reading room and look for the book in
Area E, 2nd row at second level and 9th column next to the stairs.Take a musical score.
Musical Score:
Talk to Barncow at the center of the room. He
can’t read music. He needs to listen to the music.Take the Stradivarius violin on the musical instrument
case at the Permanent Exhibition Hall.Go back to Barncow and click the violin on him.
Return, return , return… The title is Return by The Scarabs.Jump to the Egyptian and Babylonian Hall. Go
left to giant stone scarab beetle at the end of the hall.Go to the front of the giant scarab beetle and
take the message.Sun: The clue talks
about sun and its court.First paragraph: Go to
the Permanent Exhibition Hall. Look close at the solar system machine on
the second table at the center of the hall.Second paragraph: Click
on the solar system icon at bottom left and see all of the planets rotate
around the sun. Click on a planet and then the planetary rotation icon at
bottom left. See that planet alone rotate around the sun.Do this to all the planets and the moon to get
the number of turns of each planet and the moon around the sun.Mercury (gray) = 6; Venus (pink) = 5; Earth
(blue) = 3; Moon (little white one) = 13 + 3 (additional turns due to 2
way rotation) = 16; Mars (red) = 4; Jupiter (orange) = 2; Saturn
(green) = 1.Third Paragraph: 6 + 5
+ 3 + 16 + 4 + 2 + 1 = 37.Earth’s rotation is 3. Square of 3 = 9 x 2 = 18.
Fourth Paragraph: 37 x
18 = 666 + 1000 = 1666.Jump to the Reading room. Use the card
catalogue. Enter 1666. Pull handle.Look for the book Necronomicon at Area I, 1st
row at third level on the 12th column.Crouch down by clicking on the Ctrl key. Take
the message.
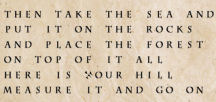
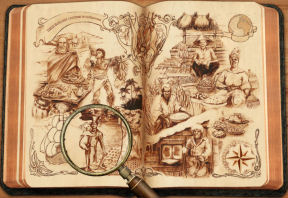
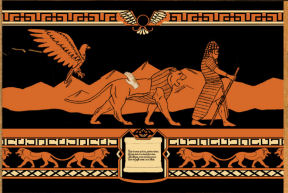
What is to be stolen next?
Read Lupin’s letter to Holmes. He is to steal
something that money can’t buy from someone that is also his ally.Talk to Barncow, the one that whistles. See a
picture of Queen Victoria.July 17, 1895
Bakers St.:
Apartment: Watson confesses and shows Piers’ card to
Holmes.Quiz: What clue does
Piers’ calling card reveal? Based on the name Piers U. Alenn, type in
Arsene Lupin. Click on check mark.Holmes deduced that Lupin has a hideout around
here. To find out information at The Golden Lion, Holmes wears a disguise.
Exit the apartment.Street: To test the
disguise,
talk to the policeman, Sergeant Rufles. Hear about the robbery at
Sir Grimble’s house.
The Golden Lion Pub: Enter the pub at the corner. Talk
to barman, drunk and the woman. The woman says that he thinks that Piers
has a room at Miss Fleming’s.
Miss Fleming’s boarding house: Exit the pub and
go right to the house with flowers at both sides of the entrance pass the
boxes and crates.Enter the boarding house.
Check if there are occupants in the rooms: See
sand or soil strewn all over the hall.Look close at the soil on the floor in front of
each door. Use the magnifying lens and measuring tape on footprints seen.The right front door’s footprints are that of a
size 5 from a young girl.The left front door’s footprints are from a size
9.5 work boots.The back right door’s footprints are from a
slaughterhouse worker with a size 8 feet.The rear left door footprints are size 9 but not from a
workbooks.
Left rear room: Open the door and talk to a
masked man. "The barkeep said that the room was emptied an hour ago."
Rumpkin, the famous burglar said to tell Eddie, the barkeep that the take
was twice as he thought and needs new fence or helpers. (Ah – that must be
the Sir Grimble’s robbery.)