Sherlock Holmes Nemesis Sherlock Holmes Versus Arsene Lupin

by MaGtRo about 60 minutes to read


Sherlock Holmes: Nemesis (Sherlock Holmes versus Arsene Lupin)


by Frogwares


Walkthrough by MaGtRo   October 2007

Gameplay:    This is a first
person point and click game. The main menu has new game, load, save, return,
options, control, credits and exit game selections.

Access of the main menu from the gameplay screen is by
pressing the ESC key. To save a game, select an empty box and then confirm the
save done. The saved game can be overwritten. There are unlimited saved game
slots. They are found in My Documents, Games and title of the game folder.

The options menu has display options, video settings,
audio menu and preferences. The video options are resolution, color depth,
vertical synchronization, antialiasing, anisotropy and gamma selections. The
graphics setting selections are graphical detail, texture quality, mapping
quality, water quality, water reflection, shadows, depth and bloom. The sound
setup has master volume, voice, music, effects and ambiance volume selections. The
game setup has subtitles, mouse sensitivity, camera sensitivity, invert camera
and aim selections.

The control menu is where you can configure the keys.

To move the characters, click-hold the mouse and point
it to where you want to go. To interact, left click on characters or items.
Right click to access inventory, archives, dialogues, documents, notes and map.
Right click or toggle it to close the opened pages. Check the manual installed
with the game.

Double click makes the character run.


July 14, 1895:    A walking tour
of Glentworth
St, Melcombe St and 221b Baker St. is seen.

Sherlock Holmes and Doctor Watson discuss the news
about the French cat burglar, Arsene Lupin. A cat burglar has gotten Dr.
Watson’s tongue. Take the letter from the tray. It is from Arsene Lupin; issuing
a challenge to the famous Sherlock Holmes who has French ancestry. He left clues
for tonight’s target. Review the clues in documents.

Who is Arsene Lupin?


Play as Watson

Barnes Bookstore:    Exit the
apartment and go down to Baker St. Go left, right to Melcombe St. and left to
Glentworth St.

Enter the first door on the left. Look for Barnes.
It seems like Barnes has let his store become messy.

At the back of the store, he is reading-practicing
the forbidden book seen on Holmes’ previous adventure – The Awakened. (That’s
a no-no, Barnes.) Talk to Barnes.

Go to the rightmost group of bookcases. Pick up
The Great English Seamen book at bottom shelf at right.

Read the book in documents. Take note of the painting and read
about Horatio Nelson. He had one arm amputated and lost the sight of one eye
as stated by the clue.

Go back to Baker St. using the jump to map or walk
there.

Baker St:    Talk to Holmes by
the fireplace.

Quiz:     Who is Arseno Lotinho? Select the
letters that form: Horatio Nelson. Use the space icon at right to make a space
and use the arrow to back space in case of error. Then click the check icon
when done.

Horatio Nelson’s Column is at Trafalgar Square. And
sitting by his feet means the location is close by.

Where is the theft to be done?   Go
to the desk left of the door and pick up the red book, Map of London.

Right click to bring up the gameplay menu. Select
the map and then select the map of London on the left.

Select the center square area and click to see the
map of that area. Click on Trafalgar Square at bottom left of the map. See
that the National Gallery of Painting is located there.

Hansom:    Go down to the
street and talk to Lamb, the hansom driver.


National Gallery of Painting:    

July 14, 1895

What is to be stolen?

Entrance:    Pan right and talk
to Palinor, the apprentice-archivist about the Director and Ledger. Sir Poynter, the Director is talking to an insistent artist. Palinor lost the
ledger.

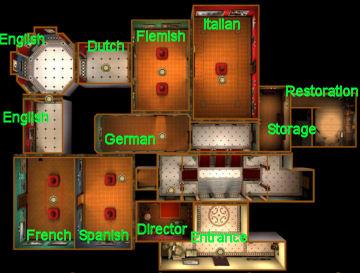
Missing ledger:    Get a
blueprint (map) of the Museum. Check the in game menu and study the map of the
Museum. You can use the jump to on the map or walk there to familiarize yourself
with the museum.

Go up the main stairs and then the left stairs. Go forward
to the Spanish Gallery.

Go forward to the French Painters Gallery. Go to the
chair by the entryway to the English Gallery.

Take the blue register-ledger from the floor
beside the chair.

Go back to Palinor and give him the ledger. Talk to
him. Holmes asks about
any painting concerning the Battle of Trafalgar.

Quiz:    What does the painting based
on the Battle of Trafalgar depict?

Look at or remember the painting in the book from
Barnes bookstore above the name of Horatio Nelson.

Click on the letters that form: ship or boat. Click on
the check mark.

The Fighting Temeraire by Turner:    
Take note of the information that matched the clues in Lupin’s poem: It was the
ship of Admiral Nelson at Battle of Trafalgar, it has a French name and Victory
is the flagship of Admiral Nelson. This is the symbol of English victory over
the French fleet.

English Gallery:    Jump to or go up the
stairs, take the left stairs and go forward pass the Spanish and French Gallery.

Go to the English gallery. Look close and click at the
painting that is second from the last on the left wall.

Museum Director’s Office:    Go
back to the landing by the main stairs. Enter the door on the right at top of
landing.

Horace Velmont, the French artist leaves. Watch
the conversation in front of the painting.


Play as Inspector Lestrade:
   
Check the museum. 

At the entrance, go to the crates at left. Look around
and see a big unlocked crate and small boxes. Check the main door.

Go up the stairs, take the right stairs and then left.
Open the first door at right to see a dark storage room.

Go to through the left door to the Restoration room.
Look up and see the glass roof. Click on glass roof.

Exit the room and go through the Italian Gallery,
Flemish Gallery, Dutch Gallery and the octagonal English Gallery.

Go left to the other English Gallery and to the door at
the French Gallery. Click on the wood door.

Go left through the Spanish Gallery and left to the
German Gallery.

Go to the Director’s Office and talk to him.

Watch the instructions by Inspector Lestrade.

Watch the burglary. The toy train by the painting, the
toy balloon at Restoration room and Lupin.

July 15, 1895

Holmes and Watson’s presence are required immediately.
The game is afoot!

Play as Watson:    Go down and
talk to Piers Urquhart Alenn, a journalist. He gives his calling card.
Click on the hansom.

Play as Holmes:    Back at the
Gallery, talk to Lestrade completely. The painting was stolen. Various paintings were
placed in the Director’s office and replaced by the French artist’s painting.
There were 2 men, one already inside and one came through the roof. They both
left through the roof.

Entrance:    Look at the
combination lock of the crate left of the entrance.

Footprints:    Go to the right
side of the assistant’s stand. Look on the floor in front of the crown jewel
painting and study the footprints.

Stairs:    Follow the footsteps
to the main stairs.

Footprints:    Look at
footprints on right side of the stairs.

Use the magnifying glass on all 4 footprints: one is
pressed and one is light.

Measure the footprints by using the tape on the one
end of the footprint to the other end. It is size 10.

Follow the footprints to the right side stairs and to
the Restoration room.

Restoration room:    Enter the
Restoration room.

Footprints1:    Check the footprint before the paint spill. Use the
magnifying glass and then the measuring tape. They are size 10 common work boots.

Holmes looks at the glass roof.

Footprints2:    Look close at
the footprints after the paint spill. Use the magnifying glass and then the
measuring tape. They are French shoes and are size 9.

Look at the rug on the floor to catch someone jumping
from the skylight. Look around and see water pitcher and restoration tools on the 2
tables.

Galleries:    Go to the
different galleries and see the paintings that have replaced the original
masterpieces. What horrors!


Take the time to check everything in all galleries.
This will familiarize you to the clues given by Lupin.

Italian Gallery:    See red
lines on the floor.

English Gallery:    Go to the
original place where the Fighting Temeraire was hung.

Examine the floor below the missing painting wall. Use
the magnifying lens on all 4 rubber marks on the floor. A trace of black
rubber.

Look up at the ceiling and see a something strange. Holmes
needs a ladder.

   Director’s Office:  Go to the
Director’s office.

Outside the director’s office:    Go
to the soil spilled by the broken potted plant.

Footprints:    Use the magnifying glass and then the measuring tape.
They are French shoes and are that of the French painter Horace Velmont. They
are size 9. Velmont is Lupin.

Office:    Go inside the office
and talk to the director about the theft and Velmont.

A guard (can be inside the office or just outside)
informs Holmes that the ladder is now here.

Exit the office and take the ladder to the
missing painting’s site and the rubber marks on the floor.

English Gallery:    Place the
ladder where the rubber marks are found.

Lupin’s riddle:    Climb up and
take Lupin’s letter. Read the riddle.

The next target’s clues are left all over the museum.
Click the bottom of the ladder to go down.

4 Paintings:    Based on the clues,
Holmes states to look for 4 paintings. Go around and look for the paintings
described in the riddle.

Venus and Mars wrapped in White arrival’s clue:   
Go to the Italian Gallery by walking or jump to using the map.

Pan left of the double doors and look close Venus and
Mars painted by Botticelli exhibited for the first time here in 1874.

Tired Horseman with White Horse painted when clue:   
Go to the Flemish Gallery next to Italian Gallery.

Look at the small painting at the corner left of
German entrance, White Horse
Standing by a Sleeping Man by Verbeek derived from a print in 1652 by Potter.

Hendrick’s Skaters and his age clue:   
Go to the Dutch Gallery.

Look close at the circular painting second one of
those on the wall, A Winter Scene near a Castle by Avercamp, 1585-1634. He lived
for 49 years.

Fish and cabbage, young boy and angel and year of
purchase clue:
    Go to the German Gallery.

Look close at the painting left of the entryway to the
Flemish Gallery and see Tobias and the Archangel Raphael acquired 1894.

Calculation of the numbers acquired:   
1874 less 1652 = 222 x 49 = 10879 less 1894 = 8984.

Entrance to Museum:    Go to the
entrance of the museum.

Padlock:    Go to the big crate
right of the door.

Enter 8984 on the padlock. Click on the button at
right part of lock and Holmes will say ‘open’. Pull back and click on the padlock or latch.

Crate:    Look inside the crate
and see champagne, wig and cushion. Click the portrait of Napoleon done by
Holmes’ great uncle. Read the paper; the next clue that is automatically
taken.

Velmont’s portrait:    Jump to
the French Gallery.

Turn around and look at Velmont’s self portrait second left of door.

Click on the painting and Holmes says that it is oil base
but fine coat of water paint.

Director:    Go to the director
and ask about restoration.

Restoration room:    Go to
Restoration room and pick up the pitcher of water and restoration
tools
from the 2 tables by the wall.

Letter clues:    

Self portrait:    Jump to French
Gallery. Look close at the portrait.

In inventory, use the brush on pitcher of water until
the pitcher disappears. Click-hold-wipe or click the wet brush on the shaded
part of the portrait.

Then use the sponge to uncover the new self portrait.

Click on the paper in his pocket. It has the
letter C.

Red surrounding the green clue:    Jump to the
octagonal English Gallery.

Look close at the round green portrait of a face. Use the magnifying lens on the portrait. Move the lens
to NE position and see a note.

Click on the paper or frame. Read the note;
letter O.

Count 6 from northern air clue:   
The clue is here in this same gallery.

Go to the wall right of this green painting; which
would be the northern wall.

Count off 6 sides of the room clockwise; including the
entryways. Go to the
other recessed wall at right with a what horrors painting.

Look close at the lamp on
the left. Click on lamp and get the next note. Read the note: letter R.

Somber corner under white cloth clue:   
Go to the dark storage room right of the restoration room.

Go to the Director’s
office. Take the lamp on his desk.

Go back to the storage room. Place the lamp on the
table.

Pan left and see a bucket with white cloth. Click on
the cloth on the bucket twice.

Automatically take and read the note: letter O. Take the lamp.

Bouquet of lilies clue:    Jump to
Flemish Gallery.

Go to the painting of the director sleeping at north
wall.

Click and automatically turn it counterclockwise
(younger) 90 degrees (quarter of an hour).

See the letter N. Pick up the note that dropped
on the floor.

Great Uncle Horace Vernet clue:    Jump to
French Gallery.

Go to east corner and see 2 paintings that are similar
to each other.

Now, look close to see which one is the fake. Click on
both paintings until Holmes says they are identical.

Use the magnifying lens on both. See that the painting
on the left has a picture of Lupin standing on the balcony holding a painting
that is on fire (or on the shore at bottom left in far view).

Use the lamp on the left painting. See the letter I.

Nice paintings with common theme clue:   
Go around the different galleries and pick up paintings with similar theme and
colors.

French Gallery:    Take the painting
3rd from the entryway to the Spanish Gallery.

English Gallery:    Take the painting
right of the ladder.

Octagonal English Gallery:    
Take the painting from the wall between the 2 entryways.

Dutch Gallery:    Take the painting
right of the entryway to the Flemish Gallery.

Flemish Gallery:    Take the painting
second from right of the entryway to the Dutch Gallery. Take the painting right of the entryway to the German
Gallery.

German Gallery:    Take the painting at
end of left wall.

Spanish Gallery:    Take the painting
at corner second from left of the entryway to the French Gallery.

Italian Gallery:    Take the
painting
second
from right of the double doors.

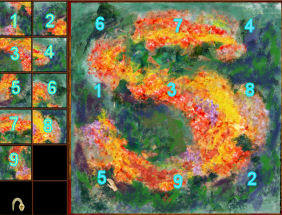
Painting puzzle: Click at the center of the
floor with red lines at the Italian Gallery.

Place the paintings on the frame at right to form a letter. Form
the letter S.

Each painting can be left click-hold, right click to
turn and move to selected empty frame at right.

What is to be stolen next?

Director’s Office:     Go to
Director’s office and talk to director.

Quiz:    What word did Sherlock
Homes find? Based on all the letters in each clue, type CORONIS. Click on the
check mark.

Painting:    Holmes studies the
1617 painting of Apollo using an arrow to slay his lover, Coronis.

Next clue:    Watson brings the
letter with the next clue. It states a black shadow and 6 more missing.

Map:    Look at Map of London.
Click on the East (EC) area. Click on the closer view of the map at The Tower of
London at bottom right.

Tower of London:     July 15-16, 1895
Entrance to Tower of London:    Holmes talks to the warder.

Graffiti:    The Tower warder states to not deface the
wall.

Go close to the entrance and turn right.

Look at and study the graffiti etched on the walls that was done by prisoners
during the 1800’s.

Chief Warder Smith:    Talk to Chief Warder.

The ravens were replaced. The legend states that the
removal of the Tower of London’s ravens means the downfall of kingdom.

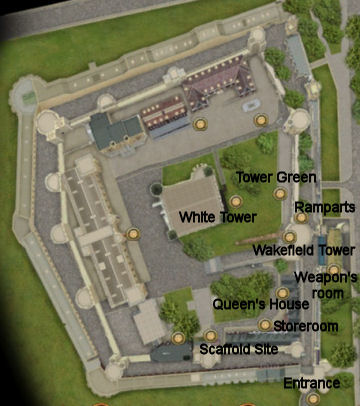
The black envelope contained the Tower’s clues. Get a lantern
and
map of the Tower of London
.

Go to the left side of the green and see seed husks on the lawn. That is the way
the birds were lured.

Chase 6 birds:    Study the map of the Tower of London and note that you are
standing to the right of the green lawn.

Listen and note the bird sounds seen during the check of the different areas.

Tower Green (White Tower):    Go forward to the White
Tower and trees ahead.

Hear a bird up the tree. Look up at the left tree. Holmes
has to attract it.

The gray bird flies to the right tree. A feather dropped down.
Go to right tree and pick up the feather on the ground. It is dyed black.

Map:    Look around the area first. From the ladder of the
White Tower go right and around
the perimeter close to the buildings. The different places and several jump
points will be entered in
the map.

Scaffold site:    Hear cracks alternating with smooth
notes coming from shrubs. We will check it later.

Storeroom:    Go forward and check the place with sacks.
Look at the ground in front of
the storeroom’s wooden door.

Flour footprints:    Use the magnifying lens and measuring tape
on the footprints. They are that of Lupin’s and size 9.

The Chief Warder arrives. Talk to him completely. Pitt, the cook placed a combination lock on the grill door
of the cooler. The code to the combination lock is based on the ancestor of the cook. The
key
to the cook’s flat is given and the storeroom is unlocked.

Cook’s flat:    Enter the blue door with private lodging
plaque right of the storeroom.
Use the key on the door at right.

Look around and take the Cook’s menu from July 17-19 from the table.

Read the letter from the cook’s Gran Nudra that mentions about a trace of the
ancestor’s arrival at Tower of London.

Look at the picture and note that it is of the Mac Adam’s family.

Jump to the entrance (Byward Tower).

Graffiti:    Study the Graffiti on the right wall again
and look for Mac Adams. It is at bottom left of the graffiti.

Using the magnifying lens, note that the date under Mac Adams is 21.8.1632.

Storeroom:   
Jump back to the Storeroom. Enter the storeroom now that the Chief Warder opened
it.

Take a Faience blue plate from the hutch.

Turn right and take string
from the shelf.
Take note of the red drops from the jar of tomatoes. Take the canvas bag
under the shelves.

Take sunflower seeds from pail on the floor at
middle aisle.
Look at the boxes on the free standing shelves with stamp of Royal Coat of Arms.

Bird in Storeroom:   

Grill door:    Go to the grilled
door at the back of the room. Look
close at the padlock.

Based on the clues from the cook’s room and the graffiti, enter 2181632. Click
on button at right part of lock.

Enter the cold room. Turn right and go to the stone shelf behind the hanging
carcasses.

Open the covered jar and see a black chicken and a note. Take the illegible piece of message.
Exit the Storeroom.

Dormitory (Queen’s House):    Let us continue our check of
the area.

Turn right from the storeroom and go around to the far blue door. Enter the dormitory.

Look around. Take the dirty blue sox from the second bed.

Note an old flash camera on the bed stand of the third cubicle.

Read-take the red book from top bookshelf at end of the room. Take note that
the Blue Bird of Paradise has a blue color obsession. Take note of the bird prints.

Exit the dormitory, go right, down the stairs by the
wall and under the archway. Go right and forward to
another archway. Go right, forward and left to the first set of stairs on the
left wall.

Weapons room (St Thomas Tower):    Climb up the stairs. Enter the weapons room.

Look around. Take the blue box of munitions
from the table. Note the armors, the
shields with coat of arms, net and cannon around the room.

Take the telescope from navy table at far wall. Take coal from
fireplace.

Take note of the bird call tray at center of the room. There is an impressive
collection of weapons right of fireplace.

Bird in tree by White Tower:     Jump to White Tower.

Use the telescope taken from weapon room on the gray bird at top of the right
tree.

Look at the book taken from the dormitory in documents.
Identify it as a Rock
Partridge, a cousin to the Corsican red legged partridge. Their habitat
is the Sardinian forests.

Jump to the weapon room and take the female wood partridge bird call from
Sardinia at top left.

Jump to the White Tower and go to the right tree.

Use the female wood (grey) partridge bird call on the Rock Partridge up the tree. Take
the illegible piece of message.

Bird by shrubs at Scaffold site:    Jump to Scaffold site.

Look close at prints on the stone path very close to the shrub.

Meet a guard and learn about the black bird that took his tobacco with bright
blue pack.

Look close at the tracks using the magnifying lens. Study the book taken
from the dormitory in
documents and identify it as a Blue Bird of Paradise.

Place the dirty blue sock, blue munitions box and blue plate on the ground by
the shrub.

Use the canvas bag on the bird. Take the illegible piece of message.

Ramparts by Wakefield Tower:    Jump to Tower Green, turn
left and go
to the brown wood door at the corner of the wall. Hear a bird.

Open the brown door and climb up to the top passing the locked Jewel House room.

Exit through the brown door to the rampart. Turn around and see a bird on the
roof.
It’s trying to say something.

Wakefield Tower Dungeon:    Go down the stairs passing 2
doors and down to the ornate door at the end of the stairs.

Chief Warder Smith opens the dungeon.

Plaque and coat of arms:    Look around. Click on the brown plaque with Latin inscription and unidentified
shield.

There are 6 heraldic shields on the wall. Under each heraldic
shield is a nook for something.

Take a look at the hole on the wall left of the plaque. The screech is heard
from the room behind the wall.

Latin inscription:   
Use the coal taken from the weapon’s room fireplace on the plaque.

Chief Warder Smith recognizes the shield above the Latin inscriptions and
mentions Brigadier Metcalf.

Look close at the shield on the plaque and see that it
has 3 crowns.

Jump to weapons room and go close to the shields on the wall. Click to take the
3 crowns in blue shield. You might need to be at a correct position to do
so.

Jump to Queen’s House and talk to Metcalf standing right of the Dormitory door.
The shield taken from the weapons room is the coat of arms of the Round Table.

Jump back to Wakefield Tower. Holmes asks Watson to get a book about the
shields on the Knights of the Round Table.

Play as Watson:   

Barnes Book Store:    Go forward to the door. Find out
that Barnes is not home. Talk to Piers the journalist. Watson promises a scoop.

Golden Lion Pub:    Piers clears Watson’s entry to the
pub.

Talk to the bartender and then talk to the drunken customer. Try to open the door
right of the bar. Uh Oh!

Go towards the other door. Talk to the crying woman that came out of the left door. She needs a fix.

Jump to Baker St.

Baker St:    Enter the apartment.

Holmes bedroom:    Enter the room right of the fireplace.
Look around and search the room.

Go to right side of the bed and click on the

knob of the right top bedpost. Take Sherlock’s vial.

Golden Lion Pub:    Jump to and enter the pub.

Give the woman Sherlock’s vial.

Enter the back room (right of bar). See a turtle race going on.
Tracy, #1 turtle won.

Talk to Barnes who lost his money on Ginger, #2 turtle. He needs money to pay
off the debt.

Watch the sinister character and Piers talk. The goon
will accept jewelry or something similar.

Baker St:    Jump to and enter apartment.

Search Holmes bedroom again. Go to the bookcase-writing table at the corner.

Open the box. Scandal in Bohemia is Holmes first adventure.

See a picture of Irene Adler, possibly Holmes love. Take the Order of the
Legion Honor medal
.

Golden Lion Pub:    Jump to and enter the pub. Enter the
backroom. Automatically, give the medal.

Barnes Book Store:   

Go to middle book alcove in the backroom.

Turn right and take the Chivalry
and Spiritualism book
from middle shelf. See that it has the coat of arms of
the Knights of the Round Table. Barnes even made a profit. 🙂

Use the London map, East side area and jump to Tower of London.

Play as Holmes:

Wakefield Tower Dungeon:    Holmes translated the Latin
Inscription of the plaque.

Knights of the Round Table coat of Arms puzzle:   
Study Holmes translation in Documents.

Identify all the coat of arms on the wall using the book.

Pick up the weapon of each knight from the weapon’s room rack.

Identify the weapons:

Jump to Weapon’s room and talk to the guard.

Click each spear on the rack right of the fireplace. You can take only one
weapon at
a time.

He identifies all of them (left to right):    man catcher,
Lucerne hammer, halberd, gisarme (resemble a porchard), partisan, bardiche,
crow’s beak and spear (glaive).

Go to the suit of armors on the other wall. Click on the weapon held by the left
suit of armor; it is a morning star. The right suit of armor holds a sword.

Place the weapons in the order shown by the translated
plaque under the identified coat of arms at the Wakefield Tower.

In the order deduced: pick one weapon, jump to Wakefield Tower, place the weapon
on the slot and go back for the next one. Elementary!

Shield

Knight

Bedivere

Bors

Percival

Kay

Lancelot

Lamorak

Weapon

bardiche

spear (glaive)

crow’s beak

partisan

sword

Morning Star

Order placed


4


2


3


5


6


1

Bird in the
secret room
:    Go through the entryway.

See that it is a
bat. It needs to be stunned.

Jump to the
Queen’s House. Enter the dormitory.

Take the flash
camera
on the table beside the third bed.

Jump to Wakefield
Tower. Use the camera on the bat. Give it to Sergeant Wayne!

Take the
illegible piece of message
.

Bird on the
rampart:
   Jump to the ramparts.

Click the
sunflower seeds taken from the storeroom on the parrot on the roof.
Your name: She
played you a trick… German bird or eagle, one and the same.

Quiz:   
What is the name of the parrot? Type in Irene Adler. Click on check mark.

Take the
illegible piece of message
.

White Tower:    It is now dawn.

Look up to the
bird on the window of the White Tower.

Use the telescope
to identify the bird. It is a lammergeier. Hahahahah! What a story!

Play as Watson:   
Use the London map. Open the west area map and click on top left – Baker St. Go
up to the apartment.

Hunt for
sovereigns:
    Find at least 10 sovereigns.

Go to right side of
the desk left of the door. Crouch down (Ctrl key) and take coin from 4th drawer.

Go to the left side
of the desk left of the door. Take coin from third drawer.

Go to small drawers
at left corner. Take coin from second drawer right side.

Go to work table.
Take coin from under microscope.

Go to fireplace:
Take coin from under mug at left mantle.

Look down on table
left of fireplace. Take coin from under paper.

Go to the coat rack
on wall right of door. Take coin from middle hook.

Go to Holmes’
bedroom.

Go to right side
table. Take coin from under the small cup right of lamp.

Go to dressing
table. Take coin from bottom drawer under the wig.

Go to book case at
corner. Take coin from under 4th book from left.

Go to left side
table. Take coin from drawer.

Golden Lion Pub:
   Jump to and enter the pub. Enter the backroom.

Talk to the man and
give him 10 sovereigns.

Take Ginger, competition turtle #2. Tracy is
not for sale.

Jump to Tower of
London.

Play as Holmes:   
He wants a net.

Net puzzle:   
Jump to weapons room. Try to take the net at the back wall.

Use the string taken
from the storeroom on the net.

Click on the corner or
intersecting points
where the string should be placed to make a good weave.

Automatically get
fishing
net
.

Bird at White Tower:   
Watson comes back with the turtle. Jump to White Tower.

Place the turtle on
the brown twigs on the brick path. Ginger will never
forgive me. Of course, of course!

Use the fishing net on the
bird. Automatically get the last note.

Baker St.:   
Use the 6 illegible pieces of message on the lamp at Holmes’ worktable and get
Six Birds Poem.

National Gallery:   
Jump to National Gallery using the middle area of the London map.

Talk to the Gallery
Director.

4 paintings of St
Catherine mentioned in the Six Birds poem:
    Look for 4
paintings of St. Catherine all over the gallery.

Raphael – Jump to
Italian Gallery. Click on St. Catherine of Alexandria by Raphael, second on the left
of the entryway to the next gallery.

Solario – Click on St.
Catherine of Alexandria by Solario right of the wood door at Italian Gallery.

Crivelli – Click on
the small painting of St. Catherine of Alexandria by Crivelli, third right of the
entryway to the next gallery.

Lochner – Jump to
German Gallery. Click on St. Catherine of Alexandria by Lochner second to last on the south wall.

Holmes says to go back
to Baker St. Open the west area of the London map. Jump to Baker St. at top
left.

Play as Watson:   
Watson got money from the bank.

Golden Lion Pub:
   Enter the pub and the back room. It is closed. Talk to the
bartender and drunken man.

Exit the pub. Talk to
Piers waiting outside the pub. Piers will recover the medal using Watson’s
money.

Go back to Baker St.

Quiz:   
To which treaty does the "Six Birds" poem refer? Type in Alexandria. Click on
check mark.


What is to be stolen next?


Play as Holmes
:   

Barnes Book Store:    Jump to the bookstore.

Get the book on the
wall facing the left bookcases with the candelabra on the table.

Read about the
Rosetta Stone used by Champollion to decode hieroglyphs. The stone is now at
the British Museum.

Baker St.:   

Talk to the
Constable Rufles. Listen to the message.

Go up to the
apartment. Enter Watson’s room.

Use the central area
of the London map. Jump to the British Museum at top left of the map.

British Museum July
16, 1895

Listen to the
discussion of the Prime Minister and Holmes. Lestrade gives a map of
the museum.

Entrance to Museum:   
Enter the museum. Meet Barncow, the librarian (guard) with the architect
beside him.

Egyptian and
Babylonian Halls
:    See the Rosetta Stone.

Inner Courtyard:    Talk to Lestrade at
the inner courtyard by the entrance building. Get there by exiting the Hall and go
right to the next entryway. The police are now in place.

Play as Watson:   
Watson is hungry. Lestrade says to ask the guards outside if there’s any leftover from the mess.

Outside gate-portal:   
Jump to or go forward inside the entrance building and go out through the double doors.

Talk to any of the
guard. There may be a bun or two in the bread bag by the portal.

Turn left and forward
to or jump to the outside grilled gate.

Check the bag on the
ground beside a trash can.

Talk to Piers, the journalist. Piers is calling in
his markers. The thing is to find the key to open the gate and get the guards
out of the way.

Maintenance room – Go inside the building.

Enter the door at right. Look around.

Take the hammer
from the table.

Library (Reading Room):   
Enter the building at the center of the inner courtyard.

Talk to Barncow about
the keys, curator and office.

Curator’s (Director) office:   
Go to the entrance building and enter the room on the left.

Desk:     Check
the desk and take the paper with red and blue doodling. It has a red 15, red
clockwise arrow and a blue counterclockwise arrow.

Safe:     Go to
the safe.

Central dial
The central dial has red and blue colored numbers.

Based on the Curator’s
paper, move the central dial’s red arrow to red 15.

This action points
the green arrows to: blue 75, red 45, blue 30 and red 30.

Corner dials
Pull back resets the puzzle.

See that the safe has 4
dials at each corner and has 0 and 90 marks.

The 0 and 90 marks show the
degree of the angle of the dial’s markings. Each of the lines is a 15 degree
mark.

The paper showed that
red is to be clockwise and the blue is to be counterclockwise.

I – Right click to turn the dial counterclockwise to
75 (5th line above zero).

II – Left click to turn the dial clockwise to 45
(3rd line below zero).

III – Right click to turn the dial counterclockwise
to 30 (second line above zero).

IV – Left click to turn the dial clockwise to 30
(second line below zero).

Safe opens. Take the key.

The architect arrives and talks about his worries.
He mentions that one lion’s base at the entrance is crumbling.

Lion at entrance to
stairs
:    Exit the office and go across the lobby to the
stairs.


Get guards out of the way:   

Check the lion’s base at right.

Use the hammer taken from the maintenance room on
the top of the crumbling pedestal.

Go outside and talk to
the guard about the lion.

Go to the gate and
give Piers the key now that the guards are gone.

Go back inside the
building and meet Holmes and Lestrade.

Night July 16-17,
1895

Listen to the
preparation done by Lestrade. The architect arrives stating that the iron bars
were removed. Talk to architect.

Play as Holmes:   

Maintenance room:    
At the maintenance room, look around. Talk to architect.

Note by use of eye icon that a rope from the table,
one of the pulleys from the wall and a soap bar are missing.

Inner courtyard:    
Go outside, right to the pit and canvas covered bricks. Look close
and note that tarpaulin is gone from the middle pile of bricks.

Go to the top left
side of the courtyard and enter the shed. Look and see that 2 bags of cement
were taken.

Curator’s office:   
Talk to the architect and ask about the missing objects. Barncow arrives and
states that the rubble at the lion’s base was removed.

Lion’s base:    
Go across to the crumbled lion’s base.

Look close at the
footprint. Use the magnifying lens and measure the footprints. They are
Lupin’s.

The architect explains how a pulley can be used
with the missing items. The weight is based on the counter weight. So that is
why the heavy rubble is gone.

Inner courtyard:    
Hear Watson. Run outside and left.

Watch the theft and the escape.

Read the new clues
thrown by Lupin.


What is to be stolen next?
    Take the time to check
everything in both halls. This will familiarize you to the clues given by
Lupin.

First Poem:    Read the first
clue about beasts at the entrance.

Go to the entrance of the museum.

Go to the lion fountain on the left of the double
doors. Take and read the new message.

Veronese Lovers:   
The clue mentions about the Englishman who wrote about Veronese lovers.

Go to the reading room. Talk to Barncow completely
and learn how to find a book in the library.

Use the library’s card catalogue:   
Look close at any one of the machines around the perimeter of the first
level of the library.

Type in a keyword and then press the handle on the
right.

The card catalogue will show the page, book,
author and where to find the book by area, row and column.

The areas are labeled by letters on signs that
separate bookcases or on top of the shelves.

Each level has 6 rows of books and there are 12
columns of books per area or letter.

Second clue keyword:    Type
in either Romeo or Juliet. Pull the handle. It is at G-8-4.

It is in row 8, so that is second floor. Go up the
stairs. Go to Area G, to the 4th column of books and second from bottom
row.

Take the book and get a new clue.

Bronze Door:    The clue
mentions a red copper or bronze door that leads to nowhere.

Go to the Egyptian and Babylonian Hall. Turn right
and go to the door at the end of the hall.

Count off the 4th row from bottom.
Count the men in that row = 41 soldiers.

Count off from top down to 7th row. Count the horses
on the left door = 9 horses x 4 = 36 legs.

41 x 36 = 1476. Thanks to this door, I should know
which book to find.

Jump to Reading room. Use the card catalogue. Enter
1476. Pull handle.

Look for Hindu Enchantment at (D-14-7), at Area D, 2nd row
at third level and column 7.

Search through the different pages for a clue. Go to
page 41 and 36 and see a statue of Kali.

Jump to Permanent Exhibition Halls. Go left and look
at the Indian statues on the table on the left.

Move the middle statue and take the next clue.

Three Brothers:   
The clue talks about 3 similar brothers.

Go to the Egyptian and Babylonian Hall. Turn right
and go to the left aisle.

Look close at first stele showing the 3 figures of Bes holding swords. Use the lens
on the right deity’s right ear. See a plug
under the ear.

Click and automatically get the message.

Drink or Run:    You must
choose.

Jump to Reading room. Use the card catalogue. Enter
Drink. Pull handle.

Look for Drink or be Drunk at Area E, 6th row at
second level and 3rd column.

Read a note about a receptacle.

Drink or be Drunk:   
Read the description of a receptacle with geese handles.

Jump to Permanent Exhibition Halls. Go left and
look at the vase at the end of the hall.

Take the message under the left head of
the geese.

Two Monkeys:    

First paragraph:    Read
about 2 monkeys and a man.

Go to the Egyptian and Babylonian Hall. Turn
right and go to the right aisle.

Look close at the last stele on right wall.
See 2 men; one has 2 monkeys.

Look close and trace an invisible line down to the third row from
that fingernail. Then move cursor to 5th cuneiform to the right and then click.

Holmes will copy the cuneiform.

Decode the cuneiform by using the sidebar.

Click on a letter at left and select the cuneiform you
think it represents on the pop up menu.

The letter will automatically replace the
cuneiform on the message at right.

The last cuneiform in the picture below is Y.

Second paragraph:    Jump to the Reading room. Use the card
catalogue. Enter sea rocks forest. Pull handle.

Look for Nightmare in the Seas, Rocks and
Forests by Oliver Lavisheart (80 Days) at Area C, 4th row and 5th column.

Measure the books: Get (click-hold-drop) the 3
books (forest, rocks and sea on the title) and stack them on bottom shelf.
Use the tape to measure from top to bottom. The 3 books are 17.20 cm in
height.

Third paragraph:    The
clue talks about a round picture good for eating; 2 young girls and an
olive tree.

Jump to Permanent Exhibition Hall. Go left and
to the end.

Face the plate displays and click on the shelf
to get a zoom puzzle screen.

Use the tape on the plate on top left (one elder
woman, 2 young girls and olive tree). It is 52 cm in diameter.

Fourth paragraph:   
Calculate using the measurements taken.

17.20 x 100 = 1720. 52 x10 = 520. 1720 minus 520
= 1200.

Book:    Jump to the Reading room. Use the card
catalogue. Enter 1200. Pull handle.

It is French Cuisine at Area J, 3rd row at
second level and 3rd column.

See illustrated pages. Use the lens to look for
the next clue at middle bottom of left page. See Lupin holding a Koala.
Click on the picture of Lupin.

Koala:    Jump to
Permanent Exhibition Hall. Go left to the animal display on the right
just behind the penguin on the floor. Click on the koala to get the next
clue.

Koala:    Read a
description of a fake jug with yellow, brown and black colors.

Go to the left end of the Permanent Exhibition
Hall and see jugs, vases and other potteries.

Take the fifth from bottom left vase. Holmes
breaks it.

Vase puzzle – Put the pieces together.

Click-hold-drop the pieces from left to the
right working area. Right click to turn the pieces.

Read the message printed on the vase.

Shedu Poem:    Read about
bull, lion, guardian and demon.

Jump to the Egyptian and Babylonian Hall.

Go to
the right Shedu statue just ahead to the side of the archway and behind
the broken pieces of glass on the floor.

Look close and take the next message between its
clawed feet.

Read the message about Kings.

Kings’ Message:    Pull back
resets the puzzle.

Jump to the Permanent Exhibition Hall. Go to the
first case at the middle of the hall. Look at the Medals.

See a close up of the monarchs’ commemorative
medals.

First paragraph:    The youngest Henry
is Henry VIII and half is IV. Then find Edward IV.

Replace Edward IV with Richard III (IV less
Charles I). Perfect, now on to the next step!

Second paragraph:    John
I + James I + a Christian name + 3 = 6. The Christian name that is common
on the diagonal is Henry. Replace-exchange Henry VI with Charles II.
Perfect, now on to the next step
!

Third paragraph:   
Replace-exchange the Richards with the Williams of the same number.
Exchange William I with Richard I, William II with Richard II and William
III with Richard III. Perfect, now on to the next step!

Fourth paragraph:   
Replace-exchange the fourth column medals with the 6th column medals (row
1 with row 1 medal on 4th and 6th column, row 2 with row 2 medal on 4th
and 6th column and so on…). Perfect, now on to the next step!

Fifth Paragraph:    Think
of an invisible line from William I (earliest monarch) with Georges II
(latest).

Then think of an invisible line between Anne
with Richard I (the lion hearted).

The medal that is intersected by those 2
invisible lines is Jane Grey medal. Get Jane Grey medal.

Go to the Director’s Office and talk to the
architect.

Go to the maintenance room and talk to Watson.
Get the hammer.

In inventory, combine (click-hold-drop) the Jane Grey medal and
the hammer to get the next clue.

Egyptian Stela:   

Jump to the Egyptian and Babylonian Hall. Go
left to the end of the right aisle.

Look close at the Egyptian stela and use the
lens. See a
letter E. It is at the 8th row and 9th column.

Jump to Reading room and look for the book in
Area E, 2nd row at second level and 9th column next to the stairs.

Take a musical score.

Musical Score:

Talk to Barncow at the center of the room. He
can’t read music. He needs to listen to the music.

Take the Stradivarius violin on the musical instrument
case at the Permanent Exhibition Hall.

Go back to Barncow and click the violin on him.
Return, return , return… The title is Return by The Scarabs.

Jump to the Egyptian and Babylonian Hall. Go
left to giant stone scarab beetle at the end of the hall.

Go to the front of the giant scarab beetle and
take the message.

Sun:    The clue talks
about sun and its court.

First paragraph:    Go to
the Permanent Exhibition Hall. Look close at the solar system machine on
the second table at the center of the hall.

Second paragraph:    Click
on the solar system icon at bottom left and see all of the planets rotate
around the sun. Click on a planet and then the planetary rotation icon at
bottom left. See that planet alone rotate around the sun.

Do this to all the planets and the moon to get
the number of turns of each planet and the moon around the sun.

Mercury (gray) = 6; Venus (pink) = 5; Earth
(blue) = 3; Moon (little white one) = 13 + 3 (additional turns due to 2
way rotation) = 16; Mars (red) = 4; Jupiter (orange) = 2; Saturn
(green) = 1.

Third Paragraph:    6 + 5
+ 3 + 16 + 4 + 2 + 1 = 37.

Earth’s rotation is 3. Square of 3 = 9 x 2 = 18.

Fourth Paragraph:    37 x
18 = 666 + 1000 = 1666.

Jump to the Reading room. Use the card
catalogue. Enter 1666. Pull handle.

Look for the book Necronomicon at Area I, 1st
row at third level  on the 12th column.

Crouch down by clicking on the Ctrl key. Take
the message.


What is to be stolen next?

Read Lupin’s letter to Holmes. He is to steal
something that money can’t buy from someone that is also his ally.

Talk to Barncow, the one that whistles. See a
picture of Queen Victoria
.

July 17, 1895

Bakers St.:

Apartment:    Watson confesses and shows Piers’ card to
Holmes.

Quiz:    What clue does
Piers’ calling card reveal? Based on the name Piers U. Alenn, type in
Arsene Lupin. Click on check mark.

Holmes deduced that Lupin has a hideout around
here. To find out information at The Golden Lion, Holmes wears a disguise.
Exit the apartment.

Street:    To test the
disguise,
talk to the policeman, Sergeant Rufles. Hear about the robbery at
Sir Grimble’s house.

The Golden Lion Pub:    Enter the pub at the corner. Talk
to barman, drunk and the woman. The woman says that he thinks that Piers
has a room at Miss Fleming’s.

Miss Fleming’s boarding house:    Exit the pub and
go right to the house with flowers at both sides of the entrance pass the
boxes and crates.

Enter the boarding house.

Check if there are occupants in the rooms:    See
sand or soil strewn all over the hall.

Look close at the soil on the floor in front of
each door. Use the magnifying lens and measuring tape on footprints seen.

The right front door’s footprints are that of a
size 5 from a young girl.

The left front door’s footprints are from a size
9.5 work boots.

The back right door’s footprints are from a
slaughterhouse worker with a size 8 feet.

The rear left door footprints are size 9 but not from a
workbooks.

Left rear room:    Open the door and talk to a
masked man. "The barkeep said that the room was emptied an hour ago."

Rumpkin, the famous burglar said to tell Eddie, the barkeep that the take
was twice as he thought and needs new fence or helpers. (Ah – that must be
the Sir Grimble’s robbery.)

The Golden Lion
Pub:    
Go back to the pub and talk to the
barman.

Learn that his
bouncer, Big Bruiser is a member of Luigi’s gang that is looking for Rumpkin.
Striped scarf and long knives are the identifying signs of Luigi’s gang.

Striped
scarf:
   

Take the knife and bottle of wine
from the end of the bar. Take the rag-cloth right of the woman at
the bar.

Go to the
bouncer sleeping at the table. Look at the striped scarf on the table.
It is soaked in wine.

In inventory,
combine bottle of wine with rag to get cloth soaked in wine.

Use
cloth soaked in wine on the scarf on the table to get colorful scarf.

Miss Fleming’s
boarding house:
    Go back to the left rear room at the
boarding house.

Get rid of
Rumpkin:
    In inventory, combine long knife and
colorful scarf to get Luigi’s mark.

Use Luigi’s mark
on the door.

Search the
room:
    Pick up the paper by the door. It has
X215 Mayet written on it,.

Check the sacks
left of the window. It is the loot.

Pick up the
pieces of painted wood
behind the logs right of the fireplace.

Baker St:   
Holmes talks to Watson about the robbery and loot.

Pieces of painted
wood puzzle:
    Place the pieces of painted wood on Holmes’
work table.

Connect the wood
pieces. Click and drop the pieces in place.

Place the sticks with
3 way connectors at the edges.

Place the long
horizontal sticks at the bottom layer and the shorter horizontal sticks on the
next top 2 layers.

A small cage is made.

Buckingham Palace
July 18, 1895

White Room:   
Go to the first door on the right. Talk to the Prime Minister. Her Majesty is
in a miserable mood.

Learn that Robilar,
Leomunda’s dog has the run of the palace. Watson is sent to do errands.

Take the eyeglasses
on the table in the White room. Exit the room.

Find out what is
causing Her Majesty’s bad mood:

Kitchen:   
Go to the room across the hall from the White room.

Talk to Chauncey. After
the pep talk, learn about the doll house gift given to Leomunda, the Queen’s
companion.

Robilar’s
breakfast:
    The maid arrives and states that Lord Robilar
refuses his breakfast too.

The rest of the meal
was thrown in the trash. Learn that it has chocolate.

Go to the table at the
corner left of the white kitchen door.

Take and read the
Milord’s meal
– dog food recipe from the tray. Take the chocolate from the same tray as
the recipe.

Turn around and go to
the cabinet at other end. Take the woodland strawberry jam and
prepared mustard
from the wall cabinet.

Take the anchovy
extract
from the table below wall cabinet. Take the pickle tongs from
the jar at left of the table.

Milord’s meal:

1. Weigh the
ingredients: 10%, woodland strawberry, 40% anchovy extract and 50% mustard.

Go to the scale on the
center table. Click on scale to automatically place all the collected
ingredients on the table.

a. Find out how much
mustard makes 50%.

Weigh anchovies in one
pan and mustard on another until they are even.

4 anchovies = 3
mustard. Empty pans by taking item and right click on empty space.

b. Find out the weight
relation of strawberries and anchovies.

Weigh strawberries in
one pan and anchovies on another until they are even.

2 anchovies = 3 strawberries

So multiply the
anchovies 4 times to get 4 times more than the strawberries (4:1).

8 or 16 anchovies + 3 or 6 strawberries = 50%

c. Weigh 50 % of 4:1
of anchovies : strawberries on one pan and add the mustard on the other pan
until even.

Solution:   
Place 16 anchovies and 6 strawberries on one pan and 15
mustards on the other pan.

Place the correctly
weighed anchovies, strawberries and mustard on the plate at right to get
bowl of sauce
. Elementary!

2. Add in reasonable
quantities of the usual components.

Find the usual
components:
   Open the trash bin on the floor left of the
pickle jar where Chauncey threw the old preparation of dog food.

Use the magnifying
lens on the left side of the trash bin. Need a better magnification to
determine the composition of the mixture at left.

Click the magnifying
lens on the PM’s eyeglasses. Use the combined lenses on the left side the
trash bin.

Click on large pieces (yellow and brown items) and they will be identified: sausages and bananas.

Take sausages
on the table left of the trash bin and bananas at center table.

In inventory, add
bananas, sausages and chocolate to the bowl of sauce to get dog food.

Lady Leomunda and Lord Robilar:   
Exit the kitchen and go to the second door on the right.

Knock on the door and
see that both Lady Leomunda and Lord Robilar are not in the mood for company.

Use the dog food on
the door and Lord Robilar will smell it and you can enter the room.

Talk to Lady Leomunda.
Learn about the doll house and the missing 4 male dolls. There will be a
handsome reward when they are found.

Search for the 4
male dolls:   
Note that Robilar follows Holmes about in
his investigation.

Kitchen:     Now that Leomunda
mentioned her, talk to Deirdre about the dolls

The missing dolls have ginger hairs.

White room:   
Go to the White Room and talk to the Prime Minister and Chauncey.

Learn the
reason for the change in attitude of Lord Robilar. It is due to the visit of
the redheaded (ginger-haired) nephew of Leomunda.

First doll:   
Exit the White room.

Talk to the 2 guards
by the door. Holmes gains the help of the 2 guards only after mentioning
Leomunda’s gratitude. Learn about the suit of armor.

Hidden doll:    Turn right and check
out the suit of armor. Take the pike.

Go to the left side of
the base of the suit or armor’s stand. See a hole. It’s dark in the hole.

Go to Leomunda’s room
and the doll house. Take a candle from inside the doll house.

Go back to the hole. Use the candle on the hole at
the base of the armor. The hole is deep. Use
the pike on the hole-candle. See a doll. Now we
need a hook.

With the pike showing at top right of screen, go to the White room
and talk to Chauncey. Learn about the bathtub pipes in Leomunda’s room. It is
plugged. Robilar was in the
scene of that crime too. After the talk, get a clip.

Go back to the hole.
In inventory, combine the pike and the clip to get a twisted pike.

Crouch down and use the twisted pike
in the hole to get the first doll.

Second doll:   
Go to the kitchen and talk to Deidre.

Dirty snout:    Learn about cleaning
Robilar after seeing his snout full of soot at the White room.

Go to White room’s
fireplace. Look close at the fireplace and see a doll at the side.

Use the pickle tongs
taken from the kitchen on the fireplace. Get the second doll.

Third doll:   
Go to the kitchen and talk to Deidre.

Clear Leomunda’s pipes:    Deidre cleans the
second doll and leaves a bucket beside the barrel. Take bucket.

Go to Leomunda’s room
and check out the basin behind the curtained cover.

Use the bucket on the
basin to get bucket of water. Look in the basin’s hole. There is something here.

Go back to the kitchen
and empty the bucket of water in the barrel. All of Leomunda’s bath water is in the
barrel. Try to pick the barrel of water. It is far too heavy.

Talk to the guards by
the door. The barrel of water in the kitchen sink is poured in the sink to clear the
pipes. Elementary.

Go back to the basin
in Leomunda’s room. Take the third doll.

Fourth doll:   
Talk to Leomunda about Robilar’s behavior.

Learn about the garment chest that has a security
lock.

Star puzzle:    Look at the
chest right of the bath basin. Holmes says to insert a star to unlock the
mechanism.

Turn around and look
close at the picture of the King on the wall.

Take the wooden
star-crown
from the painting.

Use the wooden star on
the chest.

Assemble the pieces to
form the star on the chest. The star mold-shape is under the ornate curlicue
molding. That will be the guide to the correct wood to be placed.

Click the wood and it will be automatically be
placed over the chest.

There are more wood than needed; so select the
correct ones and place them on the mold or place all the wood and take off the
ones that are out of place.

Click on the
improperly placed wood and they will be returned to the left side.

The chest opens. Take
the fourth doll.

Talk to Leomunda.

The Gift:   
Later…

On the way to the
White room to talk to the Prime Minister, look at-click on the wet spots on the carpet
in front of the white room door.

Talk to the Leomunda
and then Chauncey. Learn about a wet gift that was given to the Queen.

Talk to Leomunda about
the gift and learn about it falling in the moat.

Learn about being told
by an antiquarian about the ‘masterpiece’. The gift is a French Grandfather
clock.

Quiz:   
What name is Sherlock thinking of? The clue here is the paper taken from the
boarding house. Select Mayet. Click on check mark.

Watch the stealing of
"something that money can’t buy from someone that is
also his ally".

You and I, Lupin.

Cellar:    Look around in the
Queen’s bedchamber.

Turn around from the window and go to the
candleholder on the wall left of the wardrobe.

Pull the candleholder. Enter the wardrobe and go
down to the cellar of the palace.

Gifts storage room:    Look
around and check all the items collected as gifts to the royalty.

Open the locked door:    Check all the grilled door. See that the grilled door on left wall (between candles) is locked by Lupin.

Check the organ between the 2 other grilled doors.
The steel tubes are not damaged.

Check the wooden elephant. Check the floor in front
of the exit door and see that it is slightly sloped

Take the metal tubes on the left part of the
organ. Take the rest of the metal tubes on the right part of the metal
pipes.

Place metal tubes on the slope on the floor. Place
the other metal tubes in front of the elephant.

Push the wooden elephant. See it roll to the grilled
door. Go through the opened door.
You and I, Lupin.

Hunting trophy room:    See
Lupin exit through the far door.

Check the second far grilled door where Lupin passed
through. See that the lock is sophisticated.

Look down and pick up the metal rods on the
floor in front of the locked grilled door.

Metal rods puzzle:    Look
close at the sophisticated lock.

See the metal rods picked off the floor at bottom of
the puzzle.

The aim of the puzzle is to arrange the rods on the
lock to form Roman numerals that will result in an answer that is the same for
the top and the bottom mathematical processes.

Highlight the selected rod. Arrange the rods by
click-hold-drop rods in place. Right click to turn the rods.

The rods are already arranged at the bottom by sets
based on how many rods per number to place on the top puzzle.

The solution  to get is 81. XXII + VII + LII =
C – XXIII + IV Open!

Norman era room:    Go down
the hall.

Head bop:    Pull the lever left of the door to open the grilled
door. Look around and see the trap door on the floor.

Lupin must have gone through the closed trap door.
Look around for things to get the trap door open.

Go to the back wall and take the hanging piece of chain. Take the other
hanging piece of chain.

In inventory combine the 2 pieces of chains to get chain.

Use chain on the teeth of Norman bow of a ship (looks like a wooden
serpent’s head).

Look up at the ceiling. Use the chain on the hook on the ceiling above the
trap door.

Then use the chain on the top of the raised grill door. Now use the lever right of the
open grilled door to drop the grill down. See the head above the trap
door.

Go to the end of the chain attached to the grilled door. Take it off to drop
the head over the trap door. Yeehah!

Go down the metal rungs.

Costume room:    There is no way back up and Holmes must
find a way out.

Look around. Take the bagpipes from the kilted mannequin on the right.

Take the darts from the bag hanging on the side of the Tarzan costume.

North American Indian room:    Go to the next room.

Totem pole:    Look up and see a trap door in the ceiling. Look around the room for something
to get us up there.

Go around the room and pick up pieces of Indian totem.

There are 2 pieces of totems by the teepee on the right wall. There is one
piece of Indian totem on the left wall in front of the canoe. There is one
piece of the Indian totem in front of the wooden horse.

Look down at center of room and see footprints. Place the 4 pieces of Indian
totem on the floor below the trap door. Arrange them in particular order.

Climb up to the trap door.

Game room:    The grill door behind you is locked.

Look around the room. Check out the puppet show booth. Click to push it aside.

Mirror room:    Enter the next room and look around.
This is the room we saw while in the hunting trophy room.

Mirror climb:    Look up and see another trap door in the ceiling under the big broken mirror
of the dresser at center of the room.

The big broken mirror seesaws.

Take the coffin (chest) by grilled door. Take the (glass wooden)
crate
by the entryway.

Take the only intact mirror in the room that is on the crate left of the
grilled door to the hunting trophy room.

Face the big broken mirror at center of room. Place the chest on the mirror
and it will support the bottom of the mirror. Place the wooden crate on the
bottom of the mirror and it will hold the mirror at that angle.

Climb the mirror and see that it is a grate. Turn around and see that it has a
hook to lock it.

Turn around again and prop the mirror on the grate. Move the mirror to see how
the rope-grate is attached.

See a chain that holds the grate to the rope.

In inventory, combine the bagpipe with the darts to get bagpipe with darts.

Take the bagpipe with darts from inventory. Look at the mirror again and see a
crosshair that is used to aim the darts and bagpipe. Aim on knot at top of the
rope and fire. Open!

Turn around and use the handle of the grate.

Weapons room:    Look around.

Take and read Lupin’s letter from the table. He will be at the place
that first entered by wooden walls and then stone walls.

Baker St.:    The Prime Minister is in Baker St.

The Prime Minister asks Watson where the last theft site
will be. Select the east side
of Map of London. Then click on Tower of London.

The Prime Minister says that is already a place that
has had a theft. He then agrees to Watson’s deduction of the last riddle – Big
Ben.

Holmes stays behind from the party going to Watson’s
deduced place.

Tower of London July 18-19, 1895

There are matches in inventory.

Byward Tower (Entrance):    Go forward.

See the 3 watchers inside Big Ben counting their glories to come.

Schick:    Go through the gate and see a fallen warder. He was given a sedative.

Go close and take the cartridges beside the sleeping warder.

Click on him again and find out that his name is Schick and has a thick
moustache. He must not use a razor.

Check the rifle. It is unusable.

Search for Warders:   

Go to Weapons room. It is closed.

Go down the stairs and forward. Go left at the first archway.

Wakefield Tower:    See a rope that runs across from the
window of Jewel House at Wakefield Tower and the ramparts.

Holmes says to prevent him from using the rope.

Scaffold site:    Jump to Scaffold site.

Kirkpatrick:    Turn around and see another fallen warder. Check the sleeping warder and find
out that his name is Kirkpatrick.

Look close and use magnifying lens on Kirkpatrick’s right hand. It has green
paint.

Storeroom:    Walk towards the storeroom.

Chief Warder Smith:    See a
hat on the lawn across the storeroom door.

Click on the lawn and then click on the hat to find
out that it is Chief Warder’s hat.

Note that there are drag marks on the path to the
storeroom.

The storeroom is closed.

Queen’s House or Bloody Tower:    Go around the corner
to the end close to the dormitory blue door.

Unnamed warder:    Check the
fallen warder.

Talk to the warder completely and learn that Chief
Warder went with the doctor to the storeroom.

Smith and the cook have keys to storeroom. Fatty Johnson has a duplicate that
he stole.

Dormitory:    Enter the dormitory.

Take the letter from R. Moore to Sarah from the table at first cubicle.
Take the handbill about 2 hot air balloons.

Go to the second cubicle and see roller skates on the open trunk at bottom of
bed. The uniform on the bed is small. Take the lampshade that has a funny
shape.

Take the key to the cloakroom from the table.

The bed in the third cubicle is dusty and unoccupied for some time.

Take the book about Charges and Calibers of Cannons from the desk at
the end of the room.

Exit dormitory.

Get the key to the storeroom:

Cloakroom:    Use the key taken from dormitory to the
door beside the dormitory.

Enter and check the bulletin board. Take the guard’s rotation.

Right click and see a map-puzzle to determine which warder goes with which
locker.

Right click to get out of the map of the cloakroom.

Clues from cloakroom: Go around and check the cloakroom.

#1 –  See that the locker has a note from Warder Schick to the Sergeant.
He is 2 lockers away from Summerbee and that they are not on the same shift.
Bell’s locker is close to the locker of Schick. #1 is the Sergeant’s.

Meanwhile:    The 3 watchers at Big Ben are getting on each
others nerves.

#6 – Look on the floor in front of the locker. Use magnifying lens to see
freshly combed mustache hair. So this locker is Schick’s, the warder at the
gate.

#12 – See that there is green paint on the locker door. So this must be
Kirkpatrick’s, the warder by Scaffold site.

#15 – See a Scottish plaid sticking out of locker door 15.

#16 – See a step stool in front of #16. The warder possibly is short and needs
help reaching the high parts.

Go back and talk to the guard lying at the corner. He finally falls asleep.

Information gathered from sleeping guard:

Johnson’s locker is in the rear from his locker.

His locker is framed by Bell and the new warder.

Willoughby’s locker is closer to entrance.

Dirty Flint is at rear of the room.

Read the letter from R. Moore taken from the dormitory:

R. Moore is the new guy. His locker is then close to the sleeping guard
outside the dormitory.

Moore rotates with Law, the only Scotsman in the group. #15 is Law’s.

March’s and Ludlow’s lockers are close together.

Jones is the short one. #16 is Jones’.

The Viking’s locker is across Moore’s. Mortensen’s locker is across Moore’s.

O’Shea is the sergeant. His locker is #1.

Locker Puzzle:    Open the cloakroom map.

Click-hold-drop a name tag and place it on the tag above the locker.

From above clues, place the name tags: O’Shea is #1, Schick is #6, Kirkpatrick is #12, Law is
#15 and Jones is #16.

Sleeping guard is framed by Moore and Bell. The
lockers have to
be 3 in a row.. Willoughby is closer to entrance than sleeping guard.
So, place Willoughby as #2, Moore is #3 with an available locker across him, Hickman the sleeping guard is #4 and Bell is #5.

The only locker available across Moore should be
Mortensen’s #14.

Summerbee is 2 lockers away from Schick; so place him in #8.

March and Ludlow are together but before Stinky Flint who should be #9.

March is ahead of Ludlow because he is protective of Ludlow. March is #11 and
Ludlow is #12.

Johnson’s locker is rear of Kirkpatrick so place him at #7.

This leaves #13 as Stiles’.

Blow up the locker of Johnson to open it.

Cook’s apartment:    Go to the cook’s apartment left of
the Storeroom.

Take small cake mould and nutcracker from the table. Take the
string
from the chair.

Take the waxed doily from table right of fireplace.

Johnson’s locker:    Go back to the cloakroom and locker
#7 of Johnson’s.

In inventory, combine nutcracker and cartridges to get gunpowder.

Combine gunpowder and string to get a bomb.

Place bomb on locker #7’s padlock. Use matches on padlock covered by bomb.

Open locker and take the key to the storeroom. Take the haggis
also.

Get Chief Warder Smith out of the storeroom:

Storeroom:    Go to the storeroom and use the key on the
door.

Go to the locked cold room.

Chief Warder Smith is unconscious inside the cold room.

Take the bucket of water left of door. Use the bucket of water on
Smith.

The hit on the head got him unconscious; he is not
drugged like the others.

Learn that the rest of the warders got sick because of the tomatoes (remember
the drops of
tomatoes on the shelf) and they were treated with injection by the doctor.

Quiz:    What clue does Dr. Paul Sernine’s calling card
reveal? Type in Arsene Lupin. Click on check mark.

Get a 4 oz flask and the key to the weapons room.

Weapons room:    Jump to Bloody Tower. Go forward and
down the stairs.

Turn right and forward under the archway.

Go right and climb the first stairs on the wall.

Use the key on the door.

Enter the door at end of left wall.

Go to the door of Jewel House and hear Lupin working inside.

Go down the steps and check on the sleeping guard, Summerbee. Take the key
beside Summerbee.

Go back to weapons room and to the worktable.

Use the key taken from the warder on the locked box. Take the screwdriver
and the file.

Take the oil flask and dish from the table also.

Take the helmet stand from the middle suit of armor by the wall.

Go to left side of fireplace and pick up some small dry pieces of wood.

Go to the cannon at the back wall. Look at the cannon to find out that the
interior diameter of the cannon is 2.5 inches.

Storeroom:    Jump to storeroom.

Give the file to Smith. Smith says that to enter the locked Jewel House will
take a cannon.

The munitions are in the armoury at White Tower. Holmes asks for the scarf.

Block Lupin’s retreat:

Lupin’s retreat is the rope spanned across the road from the rampart to the
window of the Wakefield Tower.

Hot air balloon:    Remember the handbill that shows the 2 balloons tied together. Let’s make one.

In inventory, combine helmet stand with haggis to get hot air balloon.

Combine lampshade with waxed doily to get another hot air balloon.

Then combine dish with string to get bowl with string.

Combine cake mould with string to get cake mould with a
string
.

Combine bowl with string with the hot air balloon made from lampshade to get
hot air balloon with basket.

Combine cake mould with a string with hot air balloon made from haggis to get
hot air balloon with basket.

Place small pieces of wood on each of the hot air balloon with basket
to get 2 hot air balloons with splint.

Use the oil on each of the 2 hot air balloon with splint to get 2
hot air balloons ready to use
.

Use scarf on each of the 2 hot air balloon ready to use to get 2 hot air
balloons with a scarf
.

Combine the 2 hot air balloon with a scarf to get hot air balloons attached
by a scarf
.

Jump to Tower Green. Turn around and exit through the archway.

Go right and see the rope strung across the path.

Use the hot air balloons attached by a scarf on the rope.

The rope is weakened by the fire carried by the hot air balloons.

Prepare the cannon.

White Tower arsenal:    Jump to White Tower.

Climb the stairs and talk to Chief Warder Smith. But what are they doing
there?

Enter the arsenal.

Meanwhile:    Watch what is happening to the 3 watchers at Big
Ben.

Back at the arsenal, go to the wall under the windows. Take the lid of the
crate
.

Go to the first table and take the 0.44 pt billycan and the 2.8 oz
glass
.

Go the back wall. Look at each stack of cannonballs. Take a 2.5 diameter cannonball. It is the second from right stack.

Go left and take a small barrel of powder from the powder barrels at
the corner left of the back door.

Dormitory:    Jump to Queen’s House. Enter the
dormitory.

Go to the open chest. Use the screwdriver on the roller skates to get
wheels and screw
.

Weapons room:    Jump to weapons room.

Move the cannon:    Go to the cannon at the back wall. Take the cannon cartridge bag right
of the cannon.

Click on the middle of the cannon. Holmes will say it needs
to be moved.

Then in inventory, combine the wheels and screw
from the skates on the lid of the crate to get board on wheels.

Use board on wheels on middle of cannon.

Stand at the back of the wheeled cannon and push the cannon until the
bottom of the stairs.

Use the screwdriver on the 2 hinges of the door beside the sleeping warder.

Climb up to middle of the stairs and then click to place the door on the
stairs. Elementary!

Push the cannon up the stairs. There, now I am in firing position.

Load the cannon:

In documents, read the Correspondence of Charges and Calibres for Cannons. It
states that 2.5 calibres need 478 cc of charge.

Charge puzzle:    Click the cannon to get the charge puzzle.

See the 3 collected receptacles: 250 cc, 80 cc and 12 cc. The bag to hold the
measured powder is at left and the powder barrel is at right.

The funnel on top of the barrel is for pouring
wrongly measured powder.

Take a container, click it on the tap-cork of powder barrel and it will get filled.

Use the powder filled container on the bag at left.

Measure a total of 478 cc of powder into the bag.

A solution is to place 19 measures of 12 cc and 1 of
250 cc.

When the bag is filled correctly, Holmes will say Elementary!

Alternative solution by Merlin:
A.Add 250cc of powder to bag.

B. Fill up 250cc container again.

Pour from 250cc container into
80cc container.

Empty 80cc container.

Pour again from 250cc container
into 80cc container.

*Empty 80cc container.

Pour remaining 90cc of powder into
bag.

Repeat B (*no need to empty 80cc
container the 4th time).

C. Add 4 lots of 12cc to bag.

Kaboom!

Use the full cannon cartridge bag on the cannon.

Use the 2.5 diameter cannonball on the cannon.

Use the matches on the cannon.

Watch the finale of the chess match!

Stalemate.

What do you say, Watson?


This document may not
be distributed without express written permission of the author and the
content may not be altered in any way.


For Questions or
Comments on this Walkthrough, please write to:

MaGtRo


Copyright © 10/2007   

MaGtRo