Scratches
Scratches
(A Walkthrough by
Zurreen Zubairie)
Copyright
© 2007. All rights reserved.
(Please,
note that this walkthrough is copyrighted. Hence, any attempt to
reproduce anything from this walkthrough will be severely
punished to the maximum extent of the law.)
Introduction
Although I
have been playing computer games for over five years now, I started writing
walkthroughs only about a month ago, and only because of the encouragement by a
dear friend. In fact, this is only the second walkthrough that I have
written. [My first one was on Midnight Nowhere, a game that was
nowhere as clean and intriguing as, but certainly a lot more
difficult and complicated than, this one.]
Unlike my
first walkthrough, however, this one has no graphics (i.e., screenshots). That
was not by my choice. The developers of the game appear to have used a
platform that was either so sophisticated that it blocks any attempts to
take screenshot, or not sophisticated enough to allow them. Whatever
the reason, I personally found it to be rather unfortunate, because I really
believe that a picture does speak a thousand words. I have tried to
compensate for the problem by providing as much detail as possible, hoping to
ensure that anyone would be able to enjoy the game, regardless of their
particular level of expertise in game-playing. I have also supplemented my
efforts to illustrate by using diagrams, wherever possible. Please, note,
however, that these diagrams are by no means "to scale." As I
indicated, their sole purpose is to provide the quickest and the simplest
means of finding your way around the house as well as in its environment.
For your reassurance, please note [Warning! Spoiler] that you will find
the "actual" blueprints of the house at least, somewhere in the
middle of the game.
Once again,
I am still only a "beginner" when it comes to writing walkthroughs. Hence,
any encouragement (as well as comments and questions, of course) will be
greatly appreciated. Please, direct all of these to .
Thank you.
About the Game
This is
undoubtedly one of the best games that I have ever played. Please, note,
however, that it can be extremely scary. Hence, I would strongly
advise players under the age of eighteen (and even older, if you
happen to have an incredibly strong imagination and/or something of a sensitive
heart) against playing this game.
Please,
note also that there is at least one technical bug in the game, which
can be rather irritating if you happen to be somewhat compulsive like me, who
likes to replay a conversation or dialogue just to be able to hear a particular
segment or phrase, while skipping the rest. Thus, if you use the ESC
key once too often (say, when you are on the phone with someone), you are often
likely to get a "Breakpoint" error message. The game would hang, and
nothing will seem to help. Don’t Worry and Don’t Panic. Just click OK on the error
message. Then, press CTRL+ALT+DEL, all together. A Task Manager window will
pop up. Press the "End Task" button in the lower part of that
window. Another window will then pop up, warning you not to continue or you
will lose unsaved data, etc. Don’t pay any attention to this message, because
you have actually lost any such data already. So, just press the "End
Now" choice on this particular window, and WAIT. Soon enough (might well
take a minute or so), you will be brought back to your Desktop. The Task
Manager window might still be open, however. Try to close it, but its buttons
to do so ["X" or Close] might be grayed out. In that case, just
right-click on the little green box, at the lower-left corner of the screen
(next to the Time/Date spot), and click on Close in the menu that pops up.
When all else fails, just switch off the computer, of course.
The Walkthrough
Generally
The Icons: There are only three icons in this game.
The Open Hand indicates action — for example, opening the door, picking up an
object, etc. Click on the open hand every time you are told to perform an
action in this walkthrough. Clicking on the icon with the hand pointing sideways,
will allow you to step out of a close up, etc. Finally, the hand with
the finger pointing straight ahead, indicates that you can go in that direction.
The Inventory: Right-click to open the inventory. Click on
the item you want, and then right-click again to close the inventory. You will
see the item out on the screen now. Apply it to where you think it should go.
If you are right, the item will brighten up. Click on the spot where it does and
a cut scene will usually do the rest.
The Slideshow: You will find this feature in the Setup. Turning
it OFF allows you to explore your surroundings in the normal way. However,
using this mode also has two disadvantages. First, you are likely to miss a
critical clue as your cursor speeds right past it. Also, it might make you rather
dizzy, especially if you happen to have a mouse with the tracking ball on top,
which tends to make things move really fast on the screen. Thus, your eyes
might actually "appreciate" it if you turn the "slideshow"
ON. You can then examine your surroundings more carefully, on a frame-by-frame
basis; and the chances of missing a pertinent clue are also less. The downside
of it, of course, is that it does tend to be a bit more laborious than the
natural mode.
Saturday,
October 12th (Day One):
You arrive
at the Blackwood Manor and are automatically brought out of the car. Turn to
your left though, and click on the car door to open it and get back inside.
Now open the glove compartment and retrieve the car keys. Step out of the
close up, and then click on the door to get out of the car again.
Step directly towards the mansion now. You will have to go
around the fountain to do so. As you reach the front door, open your
inventory and bring out the large key. Place it on the door handle and click to
unlock the door. Click on the door handle itself then to open the door and
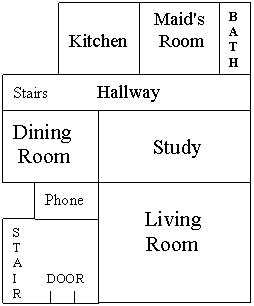
enter. You will find yourself in a small hall, with the stairs to your left
and a small room in the front. (See diagram below)
Remember,
you are lugging around two rather large cases, so it would be best to take the
load off first. So go directly up the stairs. [Notice the silent
remark at the bottom of your screen just as you reach the top of the
stairs. It is important to pay attention to these remarks, because they will
often give you some clues.]
Enter the
first room on your right. This is your bedroom. Turn around and try to flip
the light switch next to the door. It is not working, however, as the comment
at the bottom will also confirm. Move towards the large desk across the room.
Open the inventory to bring out the second case, and place it on the
desk. Open the case. Now click on the papers inside, to see them automatically
come out and neatly placed on the right side of the desk. Now click on the type
writer, to see it also come out and be placed in the center of the desk. Click
on the case twice then, to close it and then to put it away.
Step out of this close up and approach the small table to
the left of the desk. Bring out your suitcase from the inventory this
time, and place it on this table. Open the suitcase. Click on the pen, then on
the matches (between the pair of shoes), to deposit them both in your
inventory. Next, click on the battered little brown notebook that was under
the pen. Click on it again to open it and reveal your secretary’s phone
number. Click on it yet again, to put the notebook away. Now click on the
business card, in the center of the suitcase, to reveal the phone number of
your friend, Jerry. [Now that you have seen the numbers, you can call either
of these people whenever you consider it appropriate to do so.] Click on the envelope
to the right in the suitcase, open it and then click on to read the four pages
inside. Click on the blue hard cover book to see the hero’s latest work in
print.
Step out of this close up. Now click on the top drawer.
Click on the papers inside, and repeatedly to see that they are all drawings
and sketches on human anatomy. Close this drawer and open the next one, to
find some bottles inside. Close this drawer also and open the last one at the
bottom. It is empty. Close this drawer too and go to the right of the desk.
Close up on the wastebasket on the floor, and pick up the piece of paper lying
inside. Read it. Step out of this close up then. Click on the two shelves of
the bookcase to your right, to find nothing of interest to the hero. So move
towards the fireplace now, on the other side of the bed. Close up on the
little black bag, sitting on the floor, to the right of the fireplace. Open it
and pick up the stethoscope. Click on the papers, and "flip" through
them as well by clicking repeatedly, to find more drawings on anatomy. Step
out of this close up. You might want to look at the doctor’s certificate up on
the wall to the left of the fireplace, indicating that this had been the
doctor’s bedroom as well, and explaining all those drawings and sketches on
anatomy. Close up and click on the fireplace itself, to find "remnants of
a previous fire."
You are done in this room for now, so come downstairs
again. The phone should be ringing in the Phone Room. [Refer to the earlier
diagram.] If not, give it a few seconds. As it starts ringing then, close up
on it and answer it.
It is a
call from Jerry. The conversation will continue without your having to do
anything further. As the other guy hangs up, your hero will do the same. Now
call your secretary, Barbara. [As you pick up the phone, three choices will
appear at the bottom of the screen. Just click on the second choice,
with her name in it.] This conversation will be just cheerful and casual, and
the only important thing you will learn is that she is studying
"tongues," i.e., different languages. Step out of the close up, and towards
the front door. Click on the door handle to open the door and step outside.
As you come out, the comment at the bottom of the screen will indicate that
someone has been at the "front gates." Go to the main gate (where
your car is parked) and close up on the little black mailbox situated to the left
of the barred gate. Click on the mailbox to open it and then on the yellow
note inside to pick it up and read it. [Note: the note disappears altogether
once you step out of this close up so either save your game on this note or
read it as carefully as you would like the very first time!] You learn that
you have missed a visit from the electrician.
Step out of
the close up and return to the house. Go to the phone and call Jerry (just
click on the first choice, the one with his name in it, at the bottom of your
screen). Again, the conversation will carry on and conclude without your
having to do anything at all. As the two guys hang up, step out of the close
up and move towards the door on the other side of this room. Click on its
handle to enter the Dining Room. Turn left and click on the cabinet to your
left. The only clickable area is the top shelf, filled with bottles. There is
only one bottle at the very back (second from the left actually) in the top
shelf where you get a message at the bottom of the screen that is different
from the ones you get by clicking on the other bottles: about J.B., etc. [But
there is no significance to this. Perhaps the game designers intended to use
this for some purpose, and either forgot to do so or decided to drop the idea
altogether.]
Go around
the dining table. Click on the two pots by the window, to find that the plants
have long died because they had not been watered. Move to your right, still
around the dining table, and click on the objects on the small table. It’s
"useless junk." Click on the drawer of a larger table to the right.
Click on its contents and you will find that it is full of napkins, etc.,
nothing of use to the hero. Come around the dining table now and move towards the
double doors in front of you. Click on either door handle to enter the Study.
Move towards the large desk right in front of you, across
the room, and come around it. Close up on the desk, then on the red
journal lying on the top, and read it (flipping the pages by clicking on the
page to the right until you have reached the blank page at the end).
Click on the last page then to close and put the journal away. Step out of the
close up on the journal now and click on the top drawer, on the left
side of the desk, to open it. There is nothing "clickable" there,
meaning nothing of interest. So close it and click to open the second
drawer from the top. Click on the white envelope to deposit it in your
inventory. Close this drawer also and open the one right under it. Click on
the "boring" (i.e., piercing) tool, to deposit it in your inventory
as well. Close this drawer as well. Click to open the bottom drawer now, and
again there is nothing clickable, i.e., of interest. So close this too and now
try to open the top drawer on the right side of the desk. It is
locked. Step out of the close up on the desk.
Go to the fireplace to your left and close up on it. Click
on it, to find the remnants of another old fire. Feel free to click on objects
on the mantel, and then move towards the door to your right. Click on
the small table to the right of the door, to find that the little drawer would not
open. You are done in this room now, so click on the handle to the door on
your left, to enter the Living Room.
Go to the
left, to the coffee table in front of the fireplace. Close up on the coffee
table, and then on the dark red journal lying on top, on the edge of the
table closest to you. Again, read it, flipping the pages by clicking on the right
page until you reach the blank page at the end of this journal too. Click
on this last page then, to close the journal and put it away. Step out of the
close up and turn around to face the fireplace. Close up and click on it to
find that there is "a generous amount of wood" there that you can use
to light up a fire should you need one. You are done in this room also, for
now, so leave the room and head back for the Dining Room, through the Phone
Room again.
Go straight forward to the door on the opposite side of
this room, and click on its handle, to enter the Hallway. Step towards the
table to the right of the door in front of you. Click on the two drawer
handles on either side to find that the drawer is "stuck beyond
hope." Move towards the door on your left now, click on its handle, and
enter the Kitchen. Move to the sink on the opposite side of the wall. Close
up on the sink and click on the taps to see that there is no water. Step out
of the close up and click on the cabinet, to the left of the sink, to
open it. Click on the top drawer inside, to find it empty. Close it and then
click to open the drawer under it. Click on the large knife, on your lower
right, to deposit it in your inventory. Step out of this close up now and move
towards the green door to the right of the refrigerator. Click on its
door handle to enter the Maid’s room.
Go to the
desk to the right of the wall across the room. Close up on the top of the desk
and then click on the papers there, to remove the topmost sheet from the pile. Step
out of this close up and click on the top drawer to your right to open it.
Click on the pencil in the lower left side of the drawer, to deposit it in your
inventory. Now open your inventory, pick up the pencil and put it on the sheet
of the paper, to reveal a letter written in Italian. [Note for those who may
not be familiar with this old technique: whenever we write on the top sheet of
a writing tablet, we leave an imprint of our writing on the page right
under the one we use. By using the edge of the lead of a dark colored pencil,
you can gently shade across the page and a white image of the writing
will appear against the gray shading we etched, revealing everything that was
scribbled on the page above. Thus, the game designers have actually erred by
showing a dark writing against a white page in the inventory,
because in reality it would be the opposite. Nevertheless, the idea is that
this is how the hero gets his hands on what had been written on the topmost
sheet now obviously removed. The problem now, however, is to get the message translated
so that we can understand what had been written on the missing page.]
Step out of the inventory and close up on the
black-and-white photograph that is lying under some writing tablet that was
under the pencil you just picked. As you get the close up, click on the
picture again and read the comment at the bottom of the screen indicating that
it was an old picture of the kitchen you just left. Notice the large key
hanging on the wall to the left of the door you had used to enter the kitchen.
There is a large urn right under the key in this picture. However, neither the
key nor the urn is in that place in the kitchen now. [The clue here is that
the key had fallen in the urn that has apparently been removed. So you must
now find the urn, in order to find the key.]
Step out of
the close up on the desk now and move towards the large chest of drawers against
the wall on your left. There are two small drawers at the top and two large
ones under them. Open each of them, click on the contents, and then close to
do the same with the rest of the drawers. There is nothing of interest in any
of these drawers, however, except that the contents of the small drawer on the
left indicate that the room had been used by someone quite interested in
photography.
Turn to the door on your right now and click on its handle,
to enter the bathroom. Turn around and close up on the sink to your left.
Click on the taps, to find that there is no water running here either. You are
done with this room, as well as in the maid’s room (for now). So return to the
Hallway through the Kitchen.
Go to the corner on the other side of the stairs and
to the right of the door to the Dining Room. You will see three urns
placed under the window there. Click on the drapes to open them. Now close up
on the little urn on the left. You see a key lying inside. Click on it, to
deposit it in the inventory. Step out of this close up and return to the
Kitchen. Head directly for the gray door to your right. Open the
inventory and pick up the "golden key" you just retrieved from the
urn out in the Hallway. Close the inventory, and place the key on the
keyhole. Click on the key to unlock the door. Now click on the door handle to
enter the Basement.
Go down the
stairs. Turn left and you will see the top half of a rusted fuse box up on the
wall in front of you. Click on the box to open it. Click on the
magnifying-glass icon on each of the handles inside, and the comment at the
bottom will indicate that there seems to be nothing wrong with the fuses.
Click on the two handles anyway and nothing will happen. Close the fuse box.
You are actually done in the Basement for now but feel free to explore. Move
towards the furnace on your right, and click on it to read the comment at the
bottom of the screen about its size. Move a step further right and close up on
the furnace’s little door. Click on the door to open it, and then click on the
dark interior to read the hero’s comment at the bottom of the screen. Step out
of this close up and look to your right. Close up either on the valve on the
wall or the drain cover on the ground, and you will get a close up both. Clicking
on the drain cover, however, will do nothing but to give you a message at the
bottom of the screen that it is a drain cover. Click on the Open Hand icon on
the valve, to find that it does not budge. Click on it again, to learn that
the hero cannot move it with his bare hands.
Spend some more time clicking on boxes under the stairs and
in the center of the Basement, until your hero reports feeling a sudden breeze
on his neck. Step out of the basement then and make your way back to the Phone
Room. Call Jerry first. Again, you don’t have to do anything further but to
listen to the conversation. When the two men hang up, pick up the phone again
and call Barbara, the secretary, now. Again, listen to the conversation, as the
hero asks her to translate a letter written in Italian and she tells him to
send it to her. As the conversation ends, step out of the close up and open your
inventory. Pick up the letter you had found in the maid’s room. Place it on
the envelope you had retrieved from the study, to seal the letter. Now put
your pen on the envelope, to write the address on it. The letter is all set to
be mailed. So step out of the house, and head for the main gates. Close up on
the mailbox to the left of the main gates. Click on it to open it, bring out
your sealed letter from the inventory and place it inside the mailbox. Close
the box again, step out of the close up, and return to the house.
In the last conversation with Jerry, he had told the hero
to find some candles around the house. We have already searched and found none
on the ground floor. So go upstairs now. (See the diagram below.)
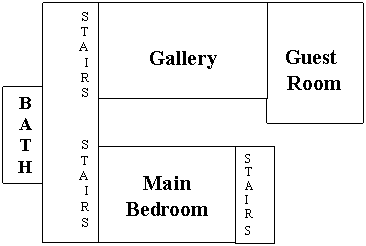
We had
already searched the guest room also. So as you reach the top of the stairs, turn
to your left this time. Move forward and click on the handle of the door to
your left, to enter the Main Bedroom. As you enter, go straight forward and
turn left to face the chest of drawers. Click on the Open Hand icon to open
each drawer, check out its contents, close it and move on to the next one, until
you have searched all four drawers. You find nothing of interest here. So turn
around and try to click on the dresser drawers to your right. But the hero
doesn’t even want to open these, expecting them to be filled with just trinkets
and perfumes. Step further right, turn around, and try clicking on the dresser
drawers on that side; but you will get the same response from the hero. So
return to the door and step to the right side of the room now.
Turn around (away from the bed) and close up on the little
oval mirror sitting on the table to the right of the bed. Click on it and it
will change its angle a little bit. Step out of the close up and look to the
right of the large mirror at the wall. There is a picture of a woman holding
some kind of a crystal ball. Close up on the picture and then click on the
Open Hand icon that now appears around the crystal ball in the woman’s
hands. The picture will fling to your left, and reveal a hidden safe behind it.
Click on the safe and read the hero’s comment at the bottom of the screen, about
not knowing the combination or anything about cracking safes. You are done in
this room for now, so exit and click on either handle of the double doors
immediately in front of you, to enter the Gallery.
Turn left
and step to the little table in the corner. Close up on the top of the table.
Click on the piece of paper almost hidden behind the hat, to pick it up and
read a letter by a museum director. Step out of the close up and turn to your
right. Step forward towards the window in front, turn to your left and close
up on the upper part of a large glass display. Click on it to learn that the
display is one of a pair of huge carved tusks. Step out of this close up and
click on the brass handle right under the glass part of the display. The
comment at the bottom of the screen indicates that the display does not move.
Close up at the base of the display then, and click on the magnifying glass
icon on the thin panel strip running along the length of the base,
stopping just short of the very corner at the left end. [Note: You can confirm
that it is the right spot by referring to the comment, at the bottom of the
screen, about the bottom of the case having some kind of a panel.] After
having clicked on it once, an Open Hand icon will appear on that strip. Click
on it but the panel appears to be stuck in place. Bring out the large knife
from your inventory, place it on the strip, and click to remove it from the display.
Click on the little wheels now revealed at either end of the display, to read
the comment at the bottom of the screen that the panel had been hiding these
wheels. [Hint: The display can be moved.]
Step out of the close up and look at the display to your
right now. Feel free to look closely at the four objects on display here,
clicking on the magnifying glass icon to get a close up of each. You don’t get
any comments at the bottom of the screen, however, indicating that there is
nothing of interest. So step out of the close up, head back towards the door,
and step towards the window on the right side of the room now. Turn
right to see yet another display, this one of some exotic masks. Close up on
the mask on the extreme left, and click on it to read the hero’s comment about
it. There seems to be a mask missing to the right of this one. So step out of
this close up and close up on the third mask from the left, and then on the
fourth one right next to it. Step out of this close up and turn around. Step
towards the door and close up on the necklace you see on a display to the left
of the door. Click on the large, white, claw-like object hanging from the
center of the necklace, and read the comment at the bottom of the screen, about
something like a lion‘s claw having been firmly attached to the
necklace. You are done in this room, for now, so exit.
As you step out of the room, move to your right, and click
on the handle of the door at that end of the corridor, to enter the bathroom.
Close up on the sink to your left, and click on the two taps to find that there
is no water here either. Step out of the close up. There are three small
drawers on either side, under the sink, and one large drawer in the middle at
the very bottom. Search all of these drawers. [Note: all you have to do is
open one drawer and then click on the Open Hand icon on the other one, to automatically
close the first one before the second one is opened for you.] Click on the
white piece of cloth you find in the large middle drawer at the bottom, to
deposit it in your inventory. You are done in this room now, so exit.
Step
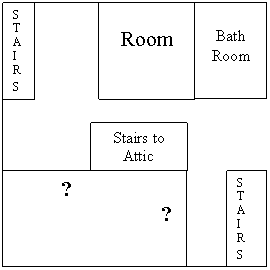
forward, turn to your left, and go upstairs to the next floor. (See diagram
below.)
As you come
upstairs, move up to and click the handle to the door right in front of you, to
enter the bathroom on this floor. The room seems to have been under
construction, however, and is therefore not really a finished room. There are
bricks and wooden planks everywhere. Just as you enter, turn right and click
on the magnifying glass icon on the bricks there on the ground. You will get a
close up of a brick, with a small metal rod sticking in the center. Click on
the rod to deposit it in your inventory. You are done in this room now, so
step forward and click on the handle to the door on your left, to enter the
adjacent room.
This room
seems to have been under construction as well, with bricks and all kinds of
"trash" around. Step forward, turn to your right, and click on the small
stove sitting on a plank that has been placed as a makeshift wooden bench. The
close up of the stove will show you a metal rod on its left side, but merely a
hole on the right. Bring out of your inventory the small metal rod you just
picked from the adjacent bathroom, place it on the hole on the right side of
the stove, and click to see it fit into place. You are done in this room also,
at least for now. So step out of the close up, turn around and exit through
the door to your right, to get back in the hallway on this floor.
The stairs
to the attic are immediately to your right. Step forward, however, and try to
open the door to your right (the one marked with a "?" in the
diagram, appearing to the left of the stairs you had used to come up to
this floor). The comment at the bottom of the screen indicates, however, that
the door seems to be stuck. So come around the stairs to the attic and
try to open the door to your left (the other door marked with a
"?" in the diagram). The comment at the bottom of the screen tells
you that the door is locked but that the hero can see a key, on the other
side of the door, in the keyhole. Turn to your left then, and click on the
newspaper on the ground, to deposit it in your inventory. Bring the newspaper
out of your inventory and place it under the door. Now bring the
"boring tool" out of your inventory, place it on the keyhole, and
click to read the comment at the bottom of the screen that the key has been
knocked down (and has thus landed onto the newspaper). So pick up the
newspaper from the floor, only to read the comment at the bottom of the screen
that the key got stuck on the other side of the door. Click on the door handle
to find that there is no way to get the key now.
So come
around to the stairs to the attic, and go up the stairs to the attic
now. Open the door and step towards the wall in front of you. There is a pile
of newspapers on the ground, right under a small circular window. Click to get
a close up of the newspapers, and then try to pick one up, only to find (from
the comment at the bottom of the screen) that the pile of newspapers is too
huge and that you would need a specific date to find a particular newspaper. Click
on the little green chest, to the right of the newspaper pile, to get
its close up. Once you get this close up, click to open the chest. Click to
pick up the lantern on the left side of the chest, to deposit it in your
inventory. Now click on the papers in the left side of the chest and, as you
get a close up of them, click repeatedly to see them one by one. Click on the
papers in the right side of the chest then, and similarly look at them one by
one as well. Step out of the close up and click on the magnifying icon on the
right and left sides of the room, and read the comments at the bottom of the
screen to find either nothing of interest or the hero getting eerie impressions.
You are done in the attic, for now, so exit and head back for the Phone Room.
Call Jerry
now, and listen to the conversation between the two men. Since the hero
couldn’t find any candles in the house, he must now drive over to town and buy
some. So, as the two men hang up, step out of the house through the front door
and head for your car standing by the main gates. Get in the car, bring out
your car keys from the inventory and place them on the "car starter,"
i.e., the ignition (in the little white circle, right under the red one, on the
right side of the steering wheel). Click to place the key in the ignition, and
then again to try to start the car. The engine purrs a little and dies out, as
the red bulb above the car starter starts flashing. The comment at the bottom
of the screen indicates that the hero had left the lights on when he had first
gotten out of the car. Click on the ignition again, and the comment at the
bottom of the screen will tell you that the car battery is dead. So step out
of the car and return to the house, to call Jerry again.
Jerry will
tell you now to go to sleep, but the hero won’t be "allowed" to do so
(by the game designers) until he does three more things, two of these being to
call Jerry again. So as the two men hang up the first time, call Jerry again.
You will have a choice of two topics, as indicated at the bottom of the screen:
the previous inhabitants of the house and the safe. Click on the first topic.
Jerry will tell you then about a murder that took place in the house back in
May, 1963. As the two men hang up again, call Jerry once more. This time, you
won’t be given any choices at the bottom of the screen, as the hero will
automatically start talking about the safe. As it will turn out, Jerry does
have the information but not readily available, so he will end the conversation
promising to give the information tomorrow. [Note: the reason that the two men
keep hanging up is that the game is designed so that you can call Jerry up as
soon as you discover something that you can relate to him in order to receive some
information from him in return. Rather than running back and forth to and from
the phone, however, we are taking care of a few things at the same time. The
downside, of course, is that we need to keep calling Jerry until all the
necessary information has been exchanged between the two men.]
As this last conversation ends, go back up to the attic and
try to pick up a newspaper. A single choice will appear at the bottom of the
screen, relating to a news story in the date of May, 1963. Click on this
choice and you will get a close up of a news page detailing the account of the
murder Jerry had mentioned. You are done for the day now. So go to your room
downstairs and towards the bed. As you see the Open Hand icon on the bed, the
comment at the bottom of the screen will confirm that it is time to go to
sleep.
While the
day may be over, however, the night is not – as the hero wakes up, in the
middle of the night, by the sounds of a hammer "banging away" . . .
Try to open
the inventory, but you will not be able to do so. So step out of the room,
walk down the corridor and enter the Gallery. Look on the left side of the
room, where that large glass cabinet, with the huge carved tusks, stood. You
had not been able to move the cabinet earlier that day, but it is not there
anymore. Instead, you see a boarded-up door that might have been behind the
display all along. Move towards that door, look down and close up on the
hammer lying in front of you. Pick it up and . . . you will find yourself back
in your room.
Apparently,
you had just been having a dream (or a nightmare). But you are up now, and out
of the bed. It is still night time, and you have apparently been awakened by some
other strange sounds – this time, more like that of scratching – coming from
somewhere. Go to the fireplace. As you approach it, the comment at the bottom
of the screen tells you that the sounds have grown louder. Close up on the
fireplace, and place your stethoscope inside. Yes, the sounds seem to be
coming from there. But you are still not sure of the source; and you won’t be
able to go back to sleep until you do. So go down to the Living Room now, and
close up on the fireplace there. Put your stethoscope, not on the logs
but on the piece of the wall right above them. Yes, the sounds must be coming
from below . . .
Return to
your room now and, just as you enter, the comment at the bottom of the screen will
inform you that the scratching sounds have now stopped. So go back to sleep
now.
Sunday,
October 13th (Day Two):
You wake up
to find the rain pouring down. Go downstairs and wait for the phone to
ring. It’s Jerry. The plans are changed, of course, because of the rain.
Although he can’t come any time soon, he does give you the combination for the
safe. No need to make a note of the combination, however. Just go up to the
main bedroom, move the picture frame, and click on the safe, to see it open.
Inside you will find a key and a construction contract. Pick up the key, and
read the contract.
Go upstairs
now to the door behind the stairs to the attic (where you had knocked off and
tried to retrieve the key with the newspaper). Bring out the key you just
found in the safe, place it on the keyhole and click. Enter the room. This
appears to be some kind of a studio. Examine the paintings, and then move
towards the table, to your right, on the other side of the room. Turn to your
left and pick up the hammer from the stool. Now close up on the table, and click
twice on the center of the table. The first time, you will pick up a
silver key, and the second time a lid of one of the small paint cans you see in
front of you. Close up on the blueprints lying on the left side of the table.
Click on the right side to flip through and examine all three pages.
When you are looking at the layout of the second floor, however, be sure
to click on the block representing a small room to the left of the main
bedroom. Read the comment at the bottom of the screen, indicating you had not
seen this room.
Step out of
the close ups and go to the other room, through the door on your left. You see
a rope hanging from the ceiling (to your right, in front of you) and a ladder
behind it. Go to the ladder, move up one step and you will be able to
see the beam where the rope has been tied. Use your knife right where the
magnifying glass icon appears (on the loop of the rope close to the knot), to
cut down the rope. Go up further then, to find a number of cans sitting on a
shelf. Pick up the lubricating can, sitting next to a large dirty square can
to the left. Next, click on that square can. The comment at the bottom of the
screen will call it dirty as well. [Note: While almost all of the other cans
will be said to be "dusty," this is the only can that you click on
that will be said to be "dirty."] Use the white cloth in your
inventory to clean the can, to reveal the words "Motor Oil." Now use
the "boring tool" to pierce a hole in the side of the can facing you.
Next, put your lantern on that hole to fill it up with oil. Come down the
ladder then and move back towards the door you had used to enter this room. Instead
of trying to leave, however, turn around and pick up the rope (you had cut)
from the floor. Move to the door, to your left, on the other side of the
room. Click on its door handle, thus managing to open it from this
side, to return to the hallway.
Come
downstairs and approach the door of the main bedroom. A magnifying glass icon
now appears to the left of the door. As you click on it, the comment at the
bottom of the screen indicates that there should be a door there, according to
the blueprints you had just seen upstairs. Use your knife to scratch off some
of the paper from the wall, to reveal a bricked up doorway. You need to
find another way to enter this room.
Go back
upstairs, past the studio room, and to the stairs on your right. Go up a step,
turn to your left, and open the window on that landing. Go further up, to
reach the top of the stairs. You will find a large dark crack in the wall in front
of you. Use your hammer on it and you will see a hole has been made in the
wall, with a beam of light coming through. Now bring out your rope and put it
on the "old, rusty lamp" right above the crack. Click on the end of
the rope lying on the ground, and it will be slipped through the hole in the
wall for you. Come down to the first landing and close up on the window you
had just opened, by clicking on the magnifying glass icon, and you will be able
to see just a tiny piece of the rope arched at the upper right corner
of the window. Click on it and the rest of the rope will be brought into view,
with a directional icon allowing you to go through. You will have to click on
this icon three times though before the hero will start to climb down the rope.
You will have to take four steps before you find the hero in front of a
window. Click on the window to open it, and then enter the mysterious room.
It appears
to be a nursery. Turn to your right and look down on the blocks on the
floor. Close up and see that four blocks have been set apart: O, B, I, N. Notice the numbers that are
under each letter: 9, 0, 9, 7
(respectively). Step out of the close up. [Note: you will save
yourself a second trip to this room later if you close up on the blocks piled
up on the little cart and note that R
(appearing right behind the red handle of another toy) has the number 5 under it. (To be explained later in the
game.) Step out of this close up also.]
Now move
forward in the room, turn to your left and open the top drawer. Close up on
the birth certificate, lying in the left side of the drawer. Read the document
and notice the birth date: August 7, 1961. Step out of the close up. You are
done in this room now, so head back through the window you had used to come
in. Go to the attic now and click on the newspapers. You will have a second
choice at the bottom of the screen now, for the date of August 1961. Click on
this choice to read about the childbirth.
Go
downstairs and try to call Jerry, only to find that the phone lines are
apparently down. So come back upstairs and enter the Gallery. Go to the
display with the carved tusks, close up on and remove the thin panel at the
base. [All you have to do is click on the Open Hand icon, this time.] Use the
lubricating can to oil the two wheels, one by one, on either side. Press the
handle then, to move the display aside. Turn around to find that the display
had been hiding a boarded up door, just like the one you had seen in your
dream. Step towards this door, and use your hammer on the planks to remove
them. Now click on the door handle, to enter.
It is pitch dark inside, so open your inventory and place
the matches on the lantern, to light it up. Bring the lantern out of the
inventory and just click in front of you, to illuminate what turns out to be a
closet. Click on the mask sitting right in front of you. Turn to your right then
and click on the row of bamboos, to move them and reveal a little window
behind. With enough light coming through that window, the hero will
automatically put the lantern away, to conserve the little oil in it. Turn to
your left now and close up on the little box on the ground, with an old lamp
and two separate sets of documents sitting on top. Pick up and read through
the pages in each set. You are done in the closet, for now, so head for the
phone room next.
Call Jerry (the
phone is working again!). Listen to the conversation and as the two men hang
up, go to your room. It is a bit early to go to sleep though. So close up on
your desk and click on the typewriter twice – first to put some paper in, and
then to start the typing itself. As the typing stops, click on the typewriter
again to bring up the page and see what the hero has written. Click on the
paper then to put it away, step out of the close up and go to bed.
Again, the day
may be over, but the night is not … This time, however, the hero wakes up in
the middle of the night, not by any strange sounds, but by a strange
feeling …
Step out of
your room and go into the Gallery. Go to the newly discovered closet on your
left and enter, to find that the mask you had seen there earlier in the day is
no longer there … Open the door to leave the closet, only to (see something) …
Once again,
you will find yourself back in your room and out of the bed. Apparently, what
you just saw was only a "bizarre dream," but the scratching sounds
you hear are definitely quite real. So leave your room, and go down to the
basement. But it is pitch dark in there. So once you enter, open your
inventory, and use the matches on the lantern to light it up. Bring the
lantern out of the inventory then and just click in the darkness to illuminate
your way.
Come down
the stairs and approach the furnace door to your right. Open the door and, now
that the lantern is lighting your way, a directional arrow will allow you to go
in. Get in and keep going forward (four steps actually) until you reach the
very end of the shaft. Wait a few seconds and then, a very short cut scene
will frighten the hero. [Note: It happens very fast so it would be a good idea
to save the game just before the hero reaches the very end, in
order to be able to replay and see exactly what the hero sees …]
Turn around
and head back out of the shaft. [Note: it will be three steps after you turn
around that everything will go completely dark, as you hear the scratching
sounds rather loudly in the background. This is apparently a "special
effect." The controls will then be returned to you, and it will be three
steps after that then that you will then be able to get out of the shaft and return
to the basement. Leave the basement. The lantern will go out just as soon as you
enter the kitchen. But that’s okay, there is enough light to help you get back
to your room. Once there, go back to bed.
Monday,
October 14th (Day Three):
The rain
has stopped. Go downstairs and the comment at the bottom of the screen will
indicate that it is very cold. So go in the living room, close up on its
fireplace, and use your matches on the logs to light up a nice warm fire.
Go to the
phone room now. Try to call the secretary, but only to realize that it is her
day off. So call Jerry now, and listen to the conversation. As the two men
hang up, get ready to make another call. Remember the contract that you had
found in the safe the day before? Well, if you had looked closely, there was a
"contact number" (i.e., phone number) for the National Bank of
Northumberland, at the very bottom of the page: 01912-94144. If you had tried to call this number the day
before, it would not have worked because it was Sunday and the bank was
closed. So call this number now, by clicking on the third choice at the
bottom of the screen ("I dialed another number") and then clicking
the above numbers on the phone dial that will be presented to you. Someone by the
name of Robert Blake will answer the phone.
Note:
You will get only one chance to obtain any information from this person,
because he will threaten to call the authorities, if you call a second time;
and the hero won’t even try to "push his luck" a third time. So be
sure to save your game just before you make the call. When Blake
answers, you will be given a choice of two topics: to ask him about Dr.
Christopher Milton or James Blackwood. If you ask
about the doctor, you will learn something but the conversation would end right
there. So I suggest, you listen to this information and then reload the
game to begin a conversation with Blake as if you were calling for the first
time. This time, ask for information on Blackwood. Blake will be reluctant to
divulge any information about a customer, of course, and you will get a choice
to pretend to be either Dr. Milton or Chief
William Bailey (the police officer who had investigated the murder
several years ago). Pretend to be the chief, and the conversation would be
real short. So reload the game, and go through the above steps related
to the inquiry about Blackwood again. This time, however, pretend to be the
doctor and you will get a choice of two topics again: to ask the man about the
construction during the 60’s or the recent activities.
Try the first topic, and then reload the game and repeat the above steps
until you reach the choice of "recent activities." Ask Blake about
this topic, and listen to what he says. In short, try out all these different
possibilities, to learn (for yourself) different pieces of information.
Now that it
has stopped raining, it is time to take care of a few things outside. (See
diagram below.)
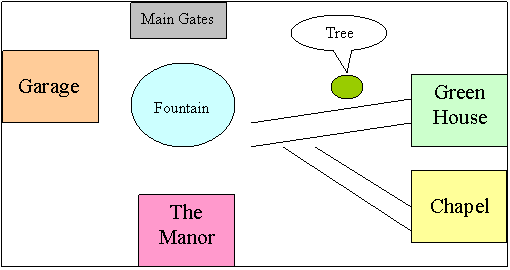
Step out of
the front door, go down the stairs, and take two steps to the left
of the fountain (towards the main gates). Turn to your left, and you will see
the Garage building. Go to the garage, and bring out the silver key you had
found in the studio the day before. Use it to unlock the padlock on the garage
door, and then click on the door handles to enter. You will see a work bench
to your left. Go straight forward and pick up the crowbar leaning against the right
edge of the work bench from the floor. Now turn left and close up on that part
of the work bench. Next, close up on the tool box. Pick up the screwdriver,
then the pair of pliers, to deposit them in your inventory. You are done in
the garage, for now, so come out and return to the house.
Instead of
going up the stairs, however, go around the fountain to your right this
time, and turn to the path leading further down to your right. As you take one
step down this path, and then look to your right, you will see another path
shooting off in that direction from the path you are on. Continue on the path
you are on, however, until you arrive at the Green House door. Try to open it,
but the hinges are too rusty. So use your lubricating can (anywhere on the
door), and then click on the handle, to enter the Green House.
You will
see a large dead tree, in the center of the greenhouse, in front of you. You
will also see something shining, at the base of the tree, but outside its
planter and beneath the grating. Take a step toward the tree, look down, and
click on that object. The magnifying glass icon will turn into an Open Hand
icon. Try to pick up the object, but you won’t be able to do so.
Take two steps around the dead tree, moving right,
look down and close up on the tap below. Click on it to find that there is no
water here either. Step out of the close up and go up the metallic stairway to
your right. Step forward and look to your left. There is a shovel in the
planter to your right and a hose lying on the ground below. Click on the
shovel, but it is stuck in the soil. Now click on the end of the hose close to
the planter, and it will be slipped into the planter. Click on the other
end then, and it will be slipped over the railing.
Turn to
your right now, step forward, and close up on the desk you see on your left.
You will see two drawers on either side of the desk. Open the one on the left,
click on the papers inside, and read through the pages. Close this drawer
then, and open the drawer on the right now. Pick up the large pair of shears.
Close this drawer as well. Now click on the bright plant, sitting in a pot, on
top of the desk, to your left. The comment at the bottom of the screen will indicate
that it is a "strangely attractive" plant. Use the shears you just
picked up, on this plant, to take a few of its leaves.
Step out of
the greenhouse and take two steps back towards the manor. Turn
right, and see the directional arrow allowing you to go off further in that
direction. Take two steps to your right then (i.e., follow the directional
arrow to the right), to come up against a large grey tree. If you click
on the tree, you will get its description. Click on a dark triangular hole at
it base, and the comment at the bottom of the screen will inform you that the
tree had a little hole in its base which allowed some water to pass through.
Close up under that hole, and then click under what looks like a
cake of dirt, to find that there was a small pool of water below the arching
tree. Step out of the close up now, and go back to the main path to return to
the manor.
Go down
into the basement then, and close up on the valve to your right. Place the
crowbar you got from the garage, on the valve. Use the hammer on the crowbar
then, to turn the valve around. Pick up your crowbar now. Click on the valve,
just to make sure you are done, and the comment at the bottom of the screen
will indicate that there is no need to fiddle further with the valve. Come
back up to the kitchen and try the taps in the sink again. The water is
running now, but not coming out of the taps. Go back to the greenhouse, and
around the dead tree, and close up on the tap below. Right next to the tap, to
the left, you will find the end of the hose you had slipped down the railing
earlier. Click at that end of the hose, and see it attach itself to the tap. Turn
on the tap now, to hear the sound of water going through. Go up the metal
stairway then, and pick up the shovel from the planter. Come down to the tap
again, and remove the hose, letting the water drain into the grating. Come
around to where you had seen the shiny object. You might have to wait a few
seconds, until you hear a tiny jingling sound, and then the shiny object would
be gone.
[Note:
The idea is to flush that shiny object out into that "small pool of
water" under the grey arching tree. But if you were to go back to the
tree right now, you will not find it there yet. The problem is that there is
an obstruction – right here in the greenhouse – that is preventing the shiny
object from making its way back to the tree.]
Take one
step to your right, and look down to find a pot knocked over on the ground.
Close up on it and use your pair of shears on the stem of the bush growing out
of that pot. [You have now removed the aforementioned obstruction.] Go over
to that grey tree now, close up on the hole at the base, and you will see the
shiny object at the base of the tree trunk (i.e., under the cake of dirt and
in the lower center of your screen). Pick up that object – it is a
small key. Step out of the close up, and return to the greenhouse. Turn off
the tap. You are now done in the greenhouse, as well as with that grey tree.
So, head back for the manor now.
Go up to
the main bedroom and to that little oval mirror on the table to the right of
the bed. We had already tilted it to look up, on the first day. So now just
use your screwdriver to remove it from its holder and deposit it in your
inventory. Go down to the kitchen and use the back door to step out of the
house. Go down the stairs, turn right, and keep on moving forward until you
arrive at the Crypt. There is a strip of wire tied to the handles to secure
the door. Use your pair of pliers to cut the wire and deposit it in your
inventory. Click on the handles, to open the door and enter.
There are
two coffins sitting at two levels in front of you. Step forward towards them, close
up on the one at the top, and open it – to find it empty. Click inside for a
comment at the bottom of the screen. Step out of this close up and close up on
the coffin below. Open it, and find that this one has a body in it. Click on the
body, again for a comment at the bottom of the screen. Step out of this close
up also and then close up on the two plaques, placed side by side, under the
coffin at the bottom. Click on the two plaques, one by one. Pick up the round
rock, lying just in front of the plaque to your right. Step out of the close
up.
Go down the
stairs now and look to your left, to see a very small coffin placed on the
upper level. Click on the plaque under the little coffin, but it is too dark
to be able to read what it says. So come back upstairs and, as you stand with
your back to the door, look up at the ceiling. You will see a glass pane, in
the form of a top half of a circle, through which the sunlight is coming into
the room. Bring out the rock from your inventory and throw it at that pane.
You will miss the first time, but don’t worry. Just go down the stairs and
look in the very left corner of the landing, to see and recover your round
rock. Come back up and take another shot, and you will see a crack appear in
the pane, along with the sound of breaking glass.
Turn to
your left and you will see a beam of light now hitting a candleholder on the
wall facing the descent of stairs. Open your inventory, pick up the wire you
had cut off from the door handles, and place it on the mirror to attach the
two. Now bring out this mirror, with the attached wire, and place it on the candleholder
receiving the beam of light. Thus, the light will now be redirected down the flight
of stairs. Go down again and look at the plaque under the little coffin to
your left, to find the letter ‘R’ now clearly visible at the far left of the
inscription. Click on the plaque, to read the comment at the bottom of the
screen.
You are
done in the crypt now, so step out in the clearing and be sure to read the
comment at the bottom of the screen just as you step outside. Go back to the
house and call Jerry. You will now have another date: June, 1963. So go up to
the attic and read the story in the newspaper for that date. Make a note of
the Police Chief Bailey’s phone number, scribbled by hand, at the end of the
news story: 01665-65217. Now go
downstairs again and call Bailey at this number (once again, by clicking on the
choice "I dialed another number" at the bottom of the screen, and
then clicking the numbers on the phone dial then presented to you). Listen to
the conversation and as the two men hang up, step outside the house and go to
the main gates.
Check your
mailbox, to find a letter containing your secretary’s translation of the
Italian letter you had found in the maid’s room. Read the letter through, and
then go to the maid’s room. As you enter, turn left and step towards the bed.
There is a small table to the left of the bed. Close up on the floor right under
that table. Click on the Open Hand icon on the floor, to remove the loose
board; and then, click again to see the picture hidden there. [Note the shadow
of the tower at the bottom of the picture, and the location of the critical
"subjects."]
However, it
is much too early to do anything about that. Instead, go to the study and come
around the large desk. Use the key you retrieved from the tree by the
greenhouse, on the locked drawer on the right, to open it. Read the
yellow-colored letter placed in the right side of the drawer. Now pick up the
fine-looking case on your left, and close up on the five-digit combination.
Recall the blocks we had seen on the floor in the nursery: O, B, I, N. Recall
also that each letter was accompanied by a number: 9, 0, 9, 7
(respectively). Recall also the first letter of the inscription under the
little coffin in the crypt: R. Now recall that the number accompanying
the block labeled R was 5. Thus, we have the name of the child: ROBIN, and the combination for the case is
59097. So, click in these
numbers and you will hear the sound of the lock opening, as you are brought out
of the close up on the combination. Click on the Open Hand icon now appearing
on the metal part with the combination, and the case will open.
There seems
to be nothing inside, however. But this is actually just another
"security measure." Note the central divider, and a square movable
part in the middle of it. Note also two small squares, on either side of the
case inside. Now click once on the little movable part, so that it
turns in the form of a backslash (). Click on the little square on the left
side of the case, to press it down. Next, click twice on the
movable part, and it will first straighten out in its starting position and
then turn in the form of a slash (/). Click on the little square on the right
side of the case, to press it down as well. Now click in the empty space to
the right of the central divider, to remove the bottom and reveal the
compartment underneath. Click on the bright brass key (with a cross on the
top) inside, to deposit it in your inventory. Step out of all the close ups. You
are done in the study now, so leave the house through the front door.
Come down
the stairs and go on the path that had taken you to the greenhouse earlier. This
time, however, as you take a step forward on this path, turn to your right and take
the path that shoots off (further to the right) from the path you
are on. Keep on going forward and you will arrive at the Chapel. Use the brass
key you just found in the study, on the keyhole under the right door
handle, to unlock the door. Then click on either door handle to enter.
Go up the
winding stairs to your right. Close up on the wooden cabinet that is sitting
on the floor in front of you. Open it and then open the drawer at its very
top. Click on the Bible, to bring it out of the drawer, and then click on the
pages to the right (to flip them one by one) until you find the carved out space
holding a large nail inside. Remove the nail, to deposit it in your inventory,
and come back down the stairs.
You will see a large table across the aisle, with a statue
of Christ on the wall right behind the table. Go down the aisle, then to your
left, and then turn right to see the floor just behind the table. You will see
a small metal ring, sticking out of a floor tile, on the platform in front of
you. Use your crowbar on this ring, and the tile would be moved aside, to
reveal the fact that the ring is attached to a chain going through a slit in
the ground. Step up on the platform now, and turn left to face the statue of
Christ on the wall. Look at the feet and you will see a large hole right where
the feet overlap. Put in that hole the nail you just found upstairs in the
Bible. Now look up and at the INRI sign to the left of and behind
Christ’s head. Use your crowbar to straighten the sign, and a cut-scene will
show the statue lowering and indicate that the hero is stepping back off the
platform. As the cut scene ends, you will find the directional arrow in front
of you now pointing under the table rather than straight ahead. Step in
that direction, and you will find yourself looking down a dark opening under
the table.
Go down the
opening, but it is pitch dark below. Turn right and use your matches on a bronze
candle holder, to light the candle in that holder. Look back to your left and
close up on the table in front of you. Pick up the branch (sitting to the left
of the coffee mug and the pipe) from the center of the table. Then read the
two documents (a letter and a journal entry) to the left of where the branch
had been sitting. You know what you need to do now. You are also done in the
chapel, so go back to the house.
Call Jerry
now. As the two men hang up, step outside the front door, and read the comment
at the bottom of the screen. Go to the main gates and open the mailbox, to
find a white piece of paper rolled up and placed above the earlier letter from
your secretary. Pick up that paper and read it, to realize a sudden change of
plans.
Close up on
the back (the "boot") of your car, and then click on the Open Hand
icon to open the "boot" and reveal your car battery inside. Pick up
the battery and go to the garage. As you enter, you will find a bicycle to
your left. There is a device on the bicycle so that when you turn the pedal, a
light comes out of a headlight placed on the handle bar. Place the car battery
on the small crate on the ground, next to the back wheel of the bicycle. Click
on the Open Hand icon on the upper part of this back wheel, where the device is
located, to attach the wires of the device to the car battery. Now click on
the pedal of the bicycle, to provide a little charge to the battery. Pick up
the battery then, return to your car, and put the battery back in the boot of
the car. Get in your car now. Click on the starter, and read the comment at
the bottom of the screen, as a sad music comes on in the background. You can’t
leave just yet.
Go to the
path that leads towards the greenhouse, but turn right to the one that shoots
off in the direction of the chapel. Take only one step in this
direction, however, and then look to your left to see the shadow of the
tower over the grounds. Yes, this is the right time (4-o’clock) as well as the
right place. So bring out your shovel, place it at the top dome-like
part of the shadow (right around the area where you had seen the "critical
subjects" in the picture hidden in the maid’s room), and click to start
digging. If you have the right spot, another sad tune will start playing in
the background and the digging will reveal a body. Read the comment at the
bottom of the screen, and click twice to read some more. Click at the mouth of
the body, to read another comment at the bottom of the screen. Now bring out your
pair of pliers, place them on the mouth and click, to retrieve a tooth. Now
step out of the close up, to see the body covered back up with dirt again, as
another comment appears at the bottom of the screen.
Return to the house now and go upstairs to the Gallery. Close
up on the necklace on display to the right of the door. Use your pair of
pliers to remove what appears to be a lion’s claw from the necklace. Go down
to the kitchen now and towards the sink, but turn around and close up on the
little old-fashioned grinder on the table. Open the lid, and put in the lion’s
claw. Close the lid again, and then click on the handle at the top of the lid,
to start grinding. Then, open the little drawer at the base of the grinder,
and click inside to deposit the powder in your inventory. Similarly, grind the
tooth you had retrieved from the body outside, and retrieve its powder as well
from the grinder drawer.
Go all the
way up to the third floor now and into the room with the stove. Close up on
the stove, and place at the top the lid you had retrieved from the studio the
day before. Open the inventory. Place the powder from the lion’s claw on the
powder from the tooth, to combine the two. Place this mixture of powders on
the leaves from the attractive plant in the greenhouse. Now bring this
combination out of the inventory and place it on the lid you had placed at the
top of the stove. Use your last match now on the stove to light it up. A cut
scene will show the combination melting and then apparently cooling off to form
a stone. Pick up this stone, to deposit it in your inventory. Open the
inventory then, pick up the stone and place it on the branch you had gotten
from the secret room in the chapel. Your amulet is now complete.
Go down to
the Gallery and into the closet. Click on the mask sitting in front of you,
and read the comment at the bottom of the screen. Then, bring out your amulet,
place it on the mask, and click. Read the comment at the bottom of the screen.
You are done in the Gallery now, so come out and go downstairs, using the
stairs next to your room. Just as you step off the stairs, however, you will
have a surprise. Go to the living room, and close up on the fireplace. The
fire is out and the logs are used up, revealing some kind of a cover
underneath. Click on the cover, to remove it and reveal a dark passage inside.
Go downstairs,
to find yourself in yet another secret part of the manor. Move to your right
and turn left to face an old door. Click on the door latch, to unlatch the
door; and then, click again, to open the door and enter. Move to the wall on your
left and close up on the teddy bear on the floor. Click on the bear, to read a
comment at the bottom of the screen. Now move to the wall on your right and
close up on the raw meat on the floor, right under the grating up in the wall.
Click on the meat, to read another comment at the bottom of the screen. Move further
right along this wall to the part where a number of bricks seem to have been
removed, leaving a large gaping hole in the wall. Click twice on the
magnifying glass icon on the darkness inside, and then sit back and "enjoy"
the ending.
* * * * * * * * * * * * * * * * * * * * * * * * * * * * * *
* * * * * * * * * * * * * *
About the Ending (Warning: Spoiler)
It seems
quite certain that James Blackwood did die, although it might not necessarily
have been due to a heart attack as the public was led to believe. Again, it
seems quite certain that the doctor is still alive and is the one who
has been "taking care" of the creature, dropping off food from the
grating down into the lair, etc. The doctor was no doubt also the man whose
silhouette Arthate saw, the second night, from the furnace shaft in the
cellar. What is not so clear, however, and yet most intriguing is the
identity of the creature itself.
I must
confess that the first time I played this game, I was quite certain that the
creature was none other than a member of the tribe who used to guard the mask –
someone who might have followed Blackwood (after he stole the mask), trying to
get it back. But then, I had a good friend of mine play the game and her initial
impression was that the creature might have been Blackwood’s own child. In
fact, I actually convinced her to my point of view. But having replayed the
game, in order to write this walkthrough, I am inclined to agree with her now.
My biggest objection to her theory had been the age of the child. But I
noticed, this second time that I played the game, that the child had been born
in 1961 and that Jerry’s letter in Arthate’s suitcase shows that it is now
1976. Hence, if the child is alive, he would be fifteen years old now;
and I think, the creature we see in the end might well "pass" for a
fifteen-year old, albeit a very strong and massive one at that.
Indeed, assuming
that the creature is the Blackwood child, helps explain a number of
things – for instance, the free "room and board" given to the
creature; the apparent disgust and disappointment with which the nursery seems
to have been all sealed up (showing that the couple didn’t seem to want to even
try having another baby); how Catherine managed to get her throat ripped
out (she might have just wanted to see the child, out of pure maternal love,
and was no doubt taken by a complete surprise by the creature’s violent
reaction); why James could not bring himself to kill the creature (since
he was after all its father), and wanted the doctor to do it instead; and why
the doctor himself had difficulty carrying out Blackwood’s wishes (being a
loyal friend of the family, as well as the doctor who had helped in the
delivery of the child, in the first place), in spite of the fact that the
creature had so violently killed a woman he obviously cared for deeply (as
evidenced by the letter in the locked study drawer).
Finally,
there is a question if there ever even was any "real" evil in
the house. Personally, I think, there was. As the various journal entries
indicated, the evil was supposed to have been trapped in the mask. It was kept
at bay only by the rituals that the tribe used to perform on the mask. These
rituals could not be continued, of course, when the mask was stolen by
Blackwood. Thus, the evil was "released," so to speak, and was no
doubt what caused whatever the tragedy was involving the childbirth. But
again, if the creature was the Blackwood child, then it might well have
been that the Evil had permeated the child before it was even born.
At any
rate, this is my personal take on the story, at least up to this point.
Please, feel free to disagree or just discuss any and all aspects of the story
or the game.
Meanwhile,
Hope you all had a great Christmas and a very happy New Year
too.
* * * * * * * * * * * * * * * * * * * * * * * * * * * * * *
* * * * * * * * * * * * * *
View this guide raw, exactly as the archive holds it