Sanitarium
THE HIVE
Max is now playing as the four-armed Cyclops. Immediately, click on the dead bug in front of you that you just killed; this will give you it’s harness. If you don’t do this, you will not be able to get past the scanner that’s in front of you to the right. Then, continue down the path, and where it first branches, go to the left side of the screen; you will see a purple spot on the ground, and a small yellow orb on the wall next to a door. Click on the orb, and then enter the cave. Inside, talk to the other cyclops that you see on the right-hand side; you will receive the password for his hut. Then, head deeper into the cave, and then on the upper right-hand side of the wall of the cave, take the insectoid pincer off of the wall into your Inventory. Then, come back towards the entrance, and talk to the bug technician working on the alien child; go through all dialogue choices. You’ll find out that you’ll have to come back later with proper authorization to get upgraded. Then, exit this cave.
Go back to the center of the path, but then go down to the far right end to the last hut; this will be Gravin’s Pod. Click on the orange orb; you will then speak the password into it. Inside, take the sledgehammer on the left into your Inventory; also take the tools further up on the left into your Inventory. Then, go over to the right and click on one of the three red buttons; watch the video sequence. Then exit the hut/ pod. Head back up towards the center of the path, but then veer of f to the right.
Click on the yellow orb that you will see here and enter the Furnace room. Inside, go over to the right and notice that the pipe sticking out of the furnace has been repaired recently. Go into your Inventory and get the sledgehammer and click it onto this repaired pipe. Then, go even further to the right, and pump on those bellows ( the two cranks/ handles ) that the creatures have abandoned. This will kill the bug that was operating the control panel. Head over to the left to that control panel, but on the way, get the mechanized arm that you see lying on the ground in front of you. Then, click on the control panel to bring up the puzzle interface. The object here is to close off the furnace by manipulating the bug’s wings that you see; as you make progress, you will see the aperture of the furnace to the right getting smaller and smaller as it closes. First, see picture below:
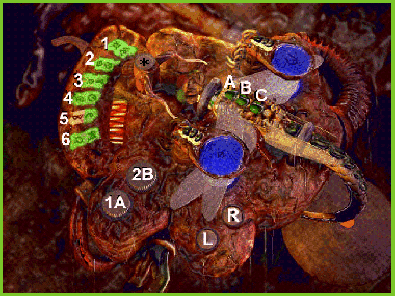
Click on wing buttons A & B.
Click on lever position #5.
Click on the R button.
Click on wing buttons B & C.
Click on lever position #6.
Click on the L button.
Click on wing buttons A & B.
Click on lever position #1.
Click on both the L & R buttons.
Now reset the machine by pushing the button ( marked by asterisk in picture above * ) at the top of the dragonfly’s head.
Then click on dials 1A & 2B so that both wing lights are green.
Click on wing buttons A & B.
Click on lever position #5.
Click on the L button.
Click on wing buttons B & C.
Click on lever position #3.
Click on both the L & R buttons.
Click on wing buttons A & B.
Click on lever position #4.
Click on the R button.
Click on the reset button once more above the dragonfly’s head.
Click on dials 1A & 2B until the wing lights are both blue.
Click on wing buttons A & B.
Click on lever position #2.
Click on both the L & R buttons.
Click on wing buttons B & C.
Click on lever position #6.
Click on the R button.
Click on wing buttons A & B.
Click on lever position #4.
Click on the L button.
This will now shut down the furnace. Exit the furnace room and then go back down the path to Gravin’s hut on the far right end.
Speak with Gravin; go through all dialogue choices. Now go back to the cave/ hut where you first met Gravin, and go to the bug technician there; talk to him. Choose dialogue, Upgrade. Then, go to the limb scanner at the upper left. Then, get the mechanical limb out of your Inventory and click this onto the scanner; watch video sequence. Then exit here, go back out to the center path, but then make a left and head back up towards where you originally came in, but on your way, look towards the right, and see the purple colored scanner on the wall; click on this to enter the Queen’s chambers.
Click on the cyclops babies you see hanging from the ceiling; watch the video sequence. Then, talk with the cyclops-bug; go through all dialogue choices. Then, go into your Inventory, and get the insectoid pincer, and use this to cut down one of the bottles that has the cyclops baby inside of it. Now return to Gravin’s hut at the far right end of the path (you now have "proof" to show him).
Inside his hut, click the bottle from your Inventory onto Gravin. Then in dialogue, choose Proof. He will then take you to Gromma’s hut; follow him. Outside of the hut, talk to Gravin, and choose dialogue choice Team, and Code. You will then find out about the "Great Machine". After Gravin leaves, look at the chalkboard on the upper-right. Then go over to the left-hand side of the hut, and click on the pillow that you see lying on the cot; move it to reveal a key; take the key into your Inventory. Then notice above your head by the cot a locked cabinet. Use the key from your Inventory on this locked cabinet; then take the control device into your Inventory. Then exit here, and return to the Queen’s chambers.
Once inside, go to the far right-hand side. Notice the transport tube oozing out the green fluid. In your Inventory, get the sound generator, and click it onto the transport tube; watch the video sequence. Then, listen to the "tune" that you hear when he enters the door in the video sequence. Then talk to the cyclops-bug; go through all dialogue choices. Then click on the children/ clones that you see in the cages beneath you; click on them with the talking icon to listen to their "song". Then, go over to the left to the door that is covered with the tentacles, then click on the object above your head; it’s a control panel of sorts, a console. Number the grubs 1 through 5 going in a clockwise order, with number 1 being at the 12 o’clock position. Then click on them in this order: 5, 2, 2, 4, 1, 3. This will open the door to the elevator and take you to the next level.
Go around to the right-hand side and talk to the female cyclops-bug; go through all dialogue choices. Then go into your Inventory and get Gravin’s tools; click them onto the machine at your left that you see with the piston pumping up and down at the top. Then afterwards, click on the machine again to get a piece of that machinery. Then go back over to the left and stand over that porthole that you came up in inside the elevator, and then click on the yellowish-green orb that you see to go back down the elevator. Down below, go back to the right-hand side, then go into your Inventory and get the sound generator, and click this on the "bowels of the monster", the transport tube. Then exit the Queen’s chamber.
Go back out to the center path, but then veer off to the left, and start heading towards the "Great Machine". But as you approach, the "bridge" that connects you to it will dissolve and disappear. Then gointo your Inventory, click on the piece of machinery, and then click it onto the cyclops that you see over by the "Great Machine" (you will throw it to him). Then watch the video sequence. Afterwards, choose dialogue choices Purpose, Portal, and Where. Then go back to the Queen’s chamber, use your sound generator on the transport tube, then over to the left and click on the sound console (you don’t have to do the puzzle this time, it’s automatic), up the elevator, over to the right, and talk to the female cyclops-bug again; choose dialogue choice, Machine. Then, go all the way around to the left, past the elevator porthole, and then click on the rope twice that you see hanging from above on the left so that you may climb to the next level.
Listen to the cyclops make his speech. Afterwards, directly in front of you and above your head, click on the next machine part; you will pry it off and jump through the portal. Then watch the video sequence. Then after this, there should be a CD change to CD number 3.
THE MORGUE AND CEMETERY
Click on the woman’s corpse that you see lying on the table in front of you. Then, try to walk past
her, but she will sit up and start talking to you; then go through all dialogue choices. Then, click on the vault door in front of you to bring up the puzzle interface.
Click on the wheel in the upper right-hand corner 3 times.
Then pull the lever below this wheel to the left.
Repeat this twice more.
Then, still with the wheel in the upper right-hand corner, click on it 3 times.
But then pull the lever below it to the right.
Repeat this twice more.
Then, turn the wheel in the middle of the door counterclockwise.
The door will now open and Max will go through.
Then, make a right, and enter Morgan’s office, but then watch the video sequence. Then head over to the left in Morgan’s office, and click on the papers that you see on the fallen bookshelf; these will be a clue later on for a puzzle. Behind you, click on the book of matches on the desk to take them into your Inventory. Also click on the iron bust of Dr. Morgan to take that into your Inventory. Then, go to the back left-hand corner of the room and click on the brass urn to take that into your Inventory. Then, look at the wall behind the fallen bookshelf. In your Inventory, get the iron bust of Morgan and click it onto this wall. Then, pick up the iron bust off of the fallen bookcase, and click it onto the wall again. Then in front of you, click on the U pipe joint to take it into your Inventory. And then click on the pipe valve in front of you to turn it. Then, go back through the hole in the wall, and exit Morgan’s office.
Head straight, and then click on the two pipes that you see to the right on the wall to feel that one is warm and one is cold. Then back up and go through the center doorway into the boiler room. Go to the upper right-hand corner and take the tools that you see on the floor there into your Inventory. Then exit the boiler room and go back to those two pipes and use the monkey wrench from your Inventory on them. Then get the U joint pipe from your Inventory and click this on to the two pipes. Then go back into the boiler room and work the controls on the right-hand side of the furnace to fire it up. Then click on the furnace door to open it. Then go over to the left side of the room to where you see the bodies hanging on the wall. Click on the third body from the left, # 7; Max will put it into the furnace. Then, open the furnace door back up and you will see the ashes lying on the slab. Then go into your Inventory and get the empty brass urn and click this onto the ashes. Then, click onto the slab again, and you will see a glass eye; take this into your Inventory. Then go back and open the main vault door from where you originally started.
In here, open the top right-hand drawer; talk to the old man and go through all dialogue choices. Make note of what he says about scratching coming from another drawer. Then go over and open drawer #7; after it’s open, click up inside of it to have a look around; Max will notice some scratches but it is too dark. Then, go into your Inventory, click on the matches, and then click these up inside of the drawer; this will bring up a puzzle interface. When inside of the puzzle interface, right-click on your mouse; select the glass eye in your Inventory. Then use this glass eye to read the scratched message from top to bottom. Then right-click on your mouse again to get out of this puzzle interface. Exit the main vault and then go to the left and go outside.
Outside, go to the right and go over to the tree that you see "blinking it’s eyes". Click on the tree and talk to it; go through all dialogue choices. Now you must find out "the Name" of the creator. Go over to the far left and find the fallen tombstone, the one that is crumbled. Click on it; there is writing on it but it cannot be read. So go into your Inventory and click on the brass urn with the ashes in it; then click this onto the fallen tombstone. Then click onto the tombstone again to read a name; Paul Stark. Then, go back over to the talking tree and click on it to talk to it again and select the name, Paul Stark. After the tree moves, click on the glowing green orb; it’s a prism, and you will take it into your Inventory. Then start heading back over toward the left to the center where the round building is; look for the "nice warm beam of light". Go into your Inventory and get the prism and click this onto the beam of light; this will open the door in the round building. Enter the doorway of the round building. Morgan is here but will quickly vanish.
Inside of here, click on the piece of paper that is on the desk in the upper corner. Notice the Aztec warrior statue on the right; also notice the globe on the left. Then, click on the Aztec Calender Machine that you see at the rear of the room; this will bring up the puzzle interface. Then, going from left to right:
In the first panel, click on the buttons until you get the Sun Coming Up over the Twin Peaks.
In the second panel, click on the buttons until you get the Rising Sun.
In the third panel, click on the buttons until you get the Sun with the Semi-Circle around it.
In the fourth panel, click on the buttons until you get the Eye.
In the fifth panel, click on the buttons until you get the Triangle.
When you get all five correctly, you will be "transported".
THE LOST VILLAGE
Max is now playing as an Aztec warrior. Talk to the old woman waving the fans whose "magic has
summoned you"; go through all dialogue choices. Then leave this area by going all the way over to the far left. Now, when you are in the village, you will see ghosts pop up from time to time; make sure you talk to all of them. Come across the stone bridge in front of you; if you see a ghost standing to the right by the waterfall, talk to him. Always go through all dialogue choices with all of the ghosts. Also, when conversing with the ghosts, pay attention to what "age" they say they are; things like: "Younger brother of…", "Eldest warrior…", and so on. So after crossing the stone bridge, go to the left; you might then see another ghost standing by the water’s edge near the lava pit; talk to him. Then, keep heading left, go past the sacrificial alter, and up the steps to Quetzalcoatl. Stop when you get to the first landing; speak to Quetzalcoatl from there. Then, from the landing that you are on, turn to the right and click on the statue that you see above the lava; the statue is unstable, so click on it again to knock it into the lava. This has now created a bridge to the Water temple. Cross this bridge to the Water Temple and then you should see a ghost standing out on the water itself; talk to him. Cross back over the bridge from the Water Temple, and head towards the center of the village, passing by the large statue of Quetzalcoatl. Keep heading straight down the path and head for the totem pole. Talk to the ghost that you see guarding the totem pole; this ghost will mention a test, a way to "prove" yourself. Then head over to the area on the right where the straw huts are.
Talk to the old woman you see sitting in front of you mixing something in a pot. Then, at the upper left-hand corner of that square well of water you see in front of you, take the empty copper bowl into your Inventory. Then, walk through the doorway that is straight in front of you. Talk to the worker that you see hammering the wall; go through all dialogue choices and you will find out about the necklace. Then, go to the doorway on the left and talk to the woman in there. You will find out that the wife thinks that the daughter may still be alive. Then continue through the doorway to the left, and talk to the woman in there.Listen to the "Fisherman’s Creed" that she will tell you; this is a clue for a puzzle at the Water Temple. Now exit the hut area, and go and talk to the ghost again who guards in front of the totem pole; tell him about the necklace. He will then disappear to let you through; click on the totem to knock it over. Cross over to the other side; go up to the Wind Temple. Click on the boulders blocking the doorway to move them; enter the Temple. Watch the video sequence. Afterwards, go to the first room of the hut area past the square well of water. Inside you will find the daughter; talk to her. You will find out about the gongs and the music. Then, go back and cross over the fallen totem pole to the Wind Temple; enter the Temple.
Inside the Wind Temple, click on the crystal enclosure that you see in front of you. Then notice to the left the set of gongs. You will have to click on these gongs in order from largest to smallest in order to shatter the crystal enclosure. The largest gong is in the center, and then the one smaller than that is directly across from it to the left. Then the top right-hand corner, then the bottom right-hand corner; then the top left-hand corner, and then the bottom left-hand corner. See picture:
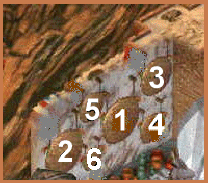
Click on the gongs in the numbered ordered sequence that you see in the picture.
After clicking on the gongs in the correct sequence, the crystal enclosure will shatter; you may now take the Wind totem into your Inventory. Now exit the Wind temple and go all the way back to the Water Temple.
At the Water temple, click on the panels that you see at the side of the building facing you; you use the "Fisherman’s Creed" to solve this puzzle. Numbering the panels from left to right from 1 to 6, click on the panels in this order: 5, 3, 1, 2, 6, & 4. Then walk around to the front door of the Water Temple and enter. In the center of the Temple, take the Water totem into your Inventory. Then exit the Temple, cross back over the bridge, and head towards the center of the village.
To the left of the center of the village, you will find the Jaguar Temple; but for now, find the path that leads behind the Jaguar Temple. Find the small hut behind the Jaguar Temple; talk to the man that you see kneeling in front of the small hut going through all dialogue choices. You will find out that the stone mason knows about the "Rite of the Warrior". (Reminder: if on the way back to the small hut behind the Jaguar Temple you came across a ghost, remember to speak with him.) Now, go back to the straw hut area and speak with the stone mason/ worker again; ask him about, Warrior. Then choose, Names. You must then name them in order of youngest to eldest. If you’ve talked to all of the ghosts at this point, and paid attention to what "age" they said they were, then click on the names in the following order:
1. Xilonen
2. Ometoch
3. Tepictoc
4. Centeotl
5. Huitzilop
6. Mixcoatl
Then watch the video sequence. Then, after you have appeared at the end of that little stone bridge, head over to the lake of lava across from the Water Temple. Then walk across the lake of lava to retrieve thePot of Might from the tree. Then, go back behind the Jaguar Temple to that little hut, and give the Pot of Might to the old man kneeling there. Watch the video sequence. Afterwards, you will end up at the foot of the sacrificial alter, in front of the old man’s slain corpse. But, he’s not quite dead yet, so talk to him once more about, Sacrifice. Then ask about, Mask. Then, go past the center of the village where you see the statue of Quetzalcoatl, and the go over to the left and head up the steps to the top of the Jaguar Temple. When you get to the top, the jaguar Temple will "speak" to you, and you will find out that you need "blood from a holy heart" and a "heart that does not bleed". Then, go back to the foot of the sacrificial alter where the slain corpse of the old man is, and go into your Inventory and get the empty copper bowl; click this onto the blood of the old man to collect it. Then, head back behind the Jaguar Temple to the hut; enter the hut. In the center of the candles that you see in front of you, click on the crystal heart that you see to take it into your Inventory. Exit the hut, and then head back around front to the Jaguar Temple.
Climb the steps to the top of the Temple, but then immediately go back down; from this view at the bottom, look at the steps to the Temple. On the left-hand side of the steps, notice those dark symbols; they are in order: Bull’s head; Crescent moon; Figure 8/ Infinity sign; Face; Star; Fish; Circle w/cross hairs. Then climb the steps once more to the top of the Temple. From your Inventory, get the copper bowl of blood and click it onto the statue’s bowl on the left. Then, get the crystal heart from your Inventory and click this onto the statue’s bowl on your right; the door to the Jaguar’s Temple now opens and you may enter. In order to get the Jaguar totem in the center, you must solve the puzzle in the rear of the room. You have to click on the wheels in the back of the room and put them in the order that you saw outside on the steps leading up to the Temple. Again, that order is: Bull’s head – Crescent moon – Figure 8/ Infinity sign – Face – Star – Fish -Circle w/cross hairs. After you have them all in order, you may now take the Jaguar totem. Then watch the beam of light and the video sequence. The beam of light will shatter the statue of Quetzalcoatl in the center of the village. Exit the Jaguar Temple and then head toward the spot where the statue of Quetzalcoatl had once stood but is now destroyed. You will see a rectangular platform with three holes in it. Then go into your Inventory and get the Jaguar totem and place that in the left-hand side hole of the platform. Then place the Water totem in the upper right-hand corner hole. And then place the Wind totem in the bottom right-hand corner hole; you will automatically go down into the pit. Watch the video sequence.
THE MAZE
First off, you have to avoid letting that "pink electricity" touch you. It always moves in the same
repeating pattern; so just look for the pattern, and then step where the pink electricity is not. So, from the way you are facing, look for the pattern, and when the timing is appropriate, step all the way forward to the end. Then start going towards the left a little, but then go down those set of steps in the middle. Then, move to the right a little bit, and go down the next set of steps. At the bottom of these set of steps, move to the left a little bit, and then go behind the set of steps. Behind the set of steps, then you go to the right, come forward a little bit, right again, and then left and then go up the short flight of steps. Once you get up that short flight of steps, you will see a control panel in front of you with three gold-colored jewels; it is actually a "release" switch. Of these three gold-colored jewels, from left to right, press numbers 1 & 3; after that, press that blue panel to the right. Then off to your left, you will see a huge stone be lifted out of your way by a chain; and a small bridge will also raise up into place.
Now from where you’re standing in front of this control panel, trace the path backwards that you took to get here and go back to your original starting point. From the original starting point, go towards the right so that you are standing in front of a statue with it’s arms raised that will be directly beneath you. Click on this statue with the raised arms and another stone will be lifted out of your way by a chain. From where you are standing now behind the statue, go towards the left. You are going to come across some more of the pink electricity. Again, look for the pattern, time your moves, and keep going all the way to the left. When you get to the end, make a left and go down that set of stairs; actually, your character will automatically go down two flights of stairs. When you reach the bottom, you will automatically be facing towards the rear; keep heading in this direction. You will come to the main widest pillar and you will see a lever in front of you on it’s wall; click on the lever to pull it. You will see a gate lower in front of you up above a little to the right. Then go up those steps that are directly to the left; at the top of the steps, make a quick right and thengo back down the other set of steps. When you get down the bottom of that set of steps, click the lever that you see there that is on the warrior’s right-hand side; this will lock the gate in place. Then go forward through that short tunnel and through the gate on the other side. Then, enter that "big mouth" you see in front of you. Inside, take the Death Mask of Quetzalcoatl. Watch the video sequence.
THE GAUNTLET
Now, in this chapter, notice something right away: Click on yourself to bring up your Inventory; you will see Sarah’s doll, which, if you click on it, will turn you into Sarah. The Aztec statue, which if you click on that, will turn you into the Aztec warrior. And the Grimwall comic book, which if you click on that, will turn you into the four-armed cyclops creature. You will need to change into each of these throughout this chapter in order to traverse certain environments.
Cross over the wooded bridge in front of you to the other side. To the left, click on the tombstones and read them. When you read Jeddah Driscoll’s tombstone, his ghost will appear out of the ground; take note that it is headless. Then, turn around and look behind you, behind the pumpkins that you see. You will see children in a circle with a revolving skull in the middle; this skull belongs to the headless corpse/ ghost. Now go intro your Inventory, and click on the Aztec warrior to become him. Then, walk over to those pumpkins. You will hear them play a tune and light up at the same time. Repeat this sequence. If the twelve pumpkins are numbered thus:
1 4 7 10
2 5 8 11
3 6 9 12
Then click on them in this order: 8, 6, 7, 4, 5, & 9. When the pumpkins disappear, go through and get the skull revolving in mid-air. Come back out and approach the headless corpse/ ghost; then go into your Inventory, get the human skull, and click it onto the ghost. A stone crypt will then come up out of the ground; you will not be able to open it as they Aztec warrior, so go to your Inventory and click on the comic book to become the four-armed cyclops. Then click on the stone crypt to open it; inside, get the head of the angelic statue. Then, change back into the Aztec warrior. Then go to the right and cross the thorny path onto the wooden platform.
Change back into the four-armed cyclops. To the left, click on the game of strength; when you do, note above your head, the color sequence. It will be, Red, Yellow, Green, Blue. Doing this will cause the big clown head to the left to be lit with fire and the teeth start to flashing. Then change back into the Aztec warrior. Then move to the left and get in front of the flaming clown’s mouth. Then click onto the flashing teeth in the order of, Red, Yellow, Green, and Blue. When you get the order correct, the clown’s nose will pop out revealing a small hole. Go into your Inventory and click on the doll to change into Sarah. Then, click on the small hole where the clown’s nose had been; click on it twice for Sarah to climb up there. When she comes out the other side, get the angelic statue’s left wing. Then go back inside the clown’s head and come out the nose hole. Then go back around to the right, along the wooden pathway, down into the stone tower area.
Climb up the flight of steps in the stone tower area, and then to the right cross over that spider web (you still have to be Sarah to do this). Then change back into the Aztec warrior. Notice the "plates" on the floor in front of you; from left to right, click on the plates in this order: 2nd, 5th, 3rd, 1st, & 4th. Then, click on the impaled Aztec warriors and notice that they are screaming. Then change into the four-armed cyclops and push the big stone head that you see in front of you all the way to the rear. Then a huge crystal monolith will pop up behind you where the giant head was. Then in order to shatter this crystal monolith, you have to click on each of the Aztec warrior’s impaled bodies to impale them further upon the stakes. When all six of their screams build to a crescendo, this will shatter the crystal monolith. You may now get the right wing of theangelic statue. Change back into Sarah, and cross back over the spider web. Go back down the stone steps; at the bottom, cross over to the right.
Go all the way over to the right and enter the hut/ honeycomb. Walk over the maggots and go over to the honeycomb on the left. Keep clicking on this honeycomb until you tear your way through so that you can get the insect mandible that’s on the inside; take this into your Inventory. Then cross over to the machinery that is on the right-hand side. Change back into the four-armed cyclops. Then, click on the machinery to operate it. The cyclops will automatically use a device to make the maggots move away from a grate on the floor. Click on the grate twice to remove it from the floor. Change back into Sarah and then jump down into this hole. Change into the Aztec warrior and climb up that thorny path on the right-hand side. Then make your way a little to the left where you see a hole and a cord hanging down into it. Go into your Inventory and get the insect mandible and use this to cut the cord. Then, go back down the thorny path, change back into Sarah, and jump down the hole. Then, get the torso of the angelic statue that will be right in front of you when you climb out of the hole. Then, exit the hut/ honeycomb. Go back over to the left into the stone tower area.
Approach the empty pedestal on the left-hand side of the stone tower area. Here, piece by piece, assemble the angel statue. Do this by getting the individual pieces and clicking them one at a time onto the pedestal. When you’ve completed the statue, watch the portal appear. Then, climb the stone steps, go through the now open gate, and pass through the portal. Watch the video sequence.
MORGAN’S LAST GAME
The object here in the last puzzle is to once more look for a repeating pattern on the floor of the
black, oily substance. Time your moves so that you are standing where the oil is not on a given square. ( This is similar to the part in "The Maze" where you had to avoid the pink electricity. ) The object here is to make your way around to the-left hand side where you see the statues holding the orbs. When you successfully make your way to the left-hand side, Max will automatically grab the orb and smash it to the ground. Then you must do this 3 more times. Keep looking for the patterns in the black, oily substance. This puzzle is also a sort of "timed" puzzle, in that if you take too long, the screen will go black, and you will hear a high-pitched tone as in when someone "flat-lines" on a heart monitor. But not to worry, just like the other "combat" sequences in the game, you don’t "lose" anything if you take too much time and fail. If you take too much time and the screen goes black, the screen will just "come back up" in a moment and you can continue. This puzzle may seem a little difficult at first, but just memorize the repeating patterns in the black, oily substance and you should get through it.
After you have successfully smashed all of the orbs, watch the end video sequence.
View this guide raw, exactly as the archive holds it