Sanitarium Walkthrough by P. Hart

A Walkthrough
by
P. Hart
Sanitarium is a game in which most of the puzzles are a matter of collecting items into your inventory, and then using these items elsewhere to enable you to get yet further inventory items. Also, there are some “typical” puzzles in the game, puzzles involving wheels, dials, switches, etc. When you come across an item in the game that can be accessed by your cursor, your cursor of the Magnifying Glass will sway back and forth from left to right. Click on the item to examine it and you will hear a “comment” about it. If the item can then be either taken into your inventory or manipulated in some way, your cursor will then turn into the Grasping Hand icon. In order to access your inventory, click on “yourself”. Then click on the item that you want and it will then become your cursor. When interacting and conversing with other characters in the game, always go through all dialogue choices. Don’t worry, you can’t make a “wrong” choice and be penalized for it. And, in the few times throughout the game when your character is forced into some form of combat, don’t worry about being “killed”; any progress that you made up to the point of being killed will be saved, you won’t be penalized here either. Now, on with the Game.
THE TOWER CELLS
After the opening movie sequence, begin to explore your area. Your character is the one standing next to the bed/cot. Come out of your cell, and immediately go to the room that is to the right of it and enter it. Notice the towel that is lying on the end of the bed; take it into your inventory. You may have noticed in the background sounds an alarm going off; if you want, after you’ve gotten the towel, come out of this cell and go down to the far left-end of this walkway. You’ll notice a flashing light on the wall; click on it, and then you’ll be able to click on the switch next to it to turn off the alarm. Then, go to the right end of this walkway and climb up the set of stairs. Notice the angel statue by clicking on it. Also notice by clicking on it the gold-colored locking mechanism at the base of the statue. Then, go all the way around to your left, past the man banging his head against the wall, to the person standing at the end of the walkway. Talk to that person and go through all dialogue choices. Then after the conversation is over, go all the way back around to your right, past the angel statue; but as you pass it, it will light up. As you go past the angel statue, go down the set of steps. At the bottom of the set of steps, go into the doorway on your right; talk to the person in there, going through all dialogue choices. Then, come out of that room, come forward, and talk to the person sitting huddled on the floor. Then, come down that short little flight of steps in front of you, and watch the patient take a “dive”. Then, notice the control tower across from you to your left; but you can’t get there because there is a walkway missing. Then, turn around, go back up the short flight of steps, and then up the long flight of steps, to the top level. On the top level, go all the way around to the far right end, and notice the power cable over your head. Then, go into your Inventory, and get the towel. Click the towel onto the power cable; you will slide down to the control tower. Immediately, click on the red button to your right. Then, turn around and click on the door to the control tower; enter.
Notice that there is a safe on the wall and a file cabinet right beneath it; but they are both locked fornow. To your right, click on the monitor that you see on the desk; clicking on this will bring up the VCR control panel. Then, plug in the cables thus: Red, Yellow, then Black. Then, click on the Power button which is on the far right above the Black cable. Then, click on the Play button, which is the button with the arrowhead pointing to the right ( > ). Watch the video sequence. After the video sequence, click on the file cabinet drawer; then read about the Memo, Key, and Escape. Then, above the file cabinet, take the key you see inside the safe. Then, exit the control tower, and go across the walkway that is now extended. Then, go back up to the top level where the statue of the angel is. Then take the key from your Inventory and click it at the base of the angel statue. Watch the video sequence.
THE INNOCENT ABANDONED
After the video sequence, walk out of the little archway that is in front of the angel statue. Then talk to the little boy and girl drawing on the ground in front of you. For now, they won’t have much to say to you, being you don’t know your name. Then, go to your left, and talk to the girl jumping rope; you will now find out that your name is Max. Then, go through all dialogue choices. You can now go back to the two children drawing on the ground and tell them your name. If you want, you can play a game of Tic-Tac-Toe with the little girl; remember, the best chance you have of winning a game of Tic-Tac-Toe is to always start with your mark in the center: this way, it will either come out to a tie, or you will win. Then, go over to your left to the church. Click on the sign in front of the church; remember the Psalm number: 451. Notice the bell on top of the church. Then open the church doors, and see a short video sequence; then enter. Immediately upon entering, go to the left-rear of the church where you’ll see a podium with some files on top of it; click on them and read about: the Preacher, and Death. That’s all for the church for now.
After coming out of the church, veer to your left (to the left side of the little pool), and go into the Town Hall between the pillars. Once inside, go to your left over to the file cabinets; click on them and read about: Comet, Pumpkin, and the Path.
Come out of the Town Hall and go to your right, and then head up to the top of the screen, up the path, past the children on the swing set. When on the bridge, notice the metallic cross that is in the water to your left. Then cross the bridge, make a right, and then enter that house that you see at the top. Once inside, notice the diary sticking out of the drawer; click on it and read about: Mommy, Accident, Rock, and Prayed. Then, click on the newspaper article that’s above the diary; read the obituary. Exit this house, come back down the bridge, and then take the path going to the right; you will see a little boy bouncing a red ball in front of one of the houses. Go up and talk to the little boy. Then, come off of the porch, and notice the duck, the pig, and the horse mounted on springs. You can ride the duck and the horse if you like, but when you ride the pig, it will break. But then, take the pig into your Inventory. Then, cross the street in front of you, and enter the archway into the Cemetery.
Once inside the archway, talk to the little boy just inside the gate to the right. After this, there are four more children in this cemetery to talk to; talk to each of them in turn, going through all dialogue choices. You will eventually find out from your conversations that you have to ask Dennis (the first boy you talked to) to play a game of Hide-&-Seek. After talking to all of the children, go over and open the shed doors next to the bench; enter the shed and pick up the crowbar that you see inside. Then go back and talk to Dennis who is by the front entrance gate. On your way, make note of the headstone that says, “C. Driscoll”. Then, talk to Dennis O’Toole again and ask about the Cemetery; this will lead to other dialogue choices. So eventually, ask to play a game of Hide-&-Seek.
Now, to find the children: Exit the Cemetery and go to the left. Keep going left around that little building that has the weather vane on the roof with the rooster on it and a red fish. Around the other side of this building, you’ll notice barrels; one of the children is hidden in one of these. When you click on the barrel, the child will automatically go to the center of the Village where the angel statue is. Then, directly across from this building to the left, find the boarded-up door to the elementary school. Take the crowbar from your Inventory, and click it on the boarded-up doors of the school. Enter the school and you will find one of the children hiding in here to the right. Exit the school and head back to the church. Enter the church, go upto the front, and you will find another one of the children hiding behind a pew on the right. Exit the church, and then go behind the church on that little path that is between it and the Town Hall. Go all the way back to the tree that you will see; you will also see a pair of legs dangling from the tree. Click on the legs, another one of the children is hiding here. Come back out to the main road, and head up over across the bridge, then make a right and enter that house again; look underneath of the bed, another one of the children is hiding here. This will be the last one. Then head back to the center of the town where the angel statue is.
Find Dennis O’Toole and talk to him again. You will find out about Carol; she is the one buried underneath of that headstone in the Cemetery that said “C. Driscoll”. But in order to dig her up, you’ll need a shovel. Enter the archway where the angel statue is and talk to Eileen about the “Secret Weapon”. Then, click on the shovel in front of Eileen to borrow it from her. Then, head back to the Cemetery, and get the shovel from your Inventory and click it onto the headstone marked “C. Driscoll”. Then, go back and talk to Dennis O’Toole again about the “Secret Weapon”. You will now receive the Key. Then, head over towards your right to where you saw the little boy bouncing the red rubber ball on the porch. This is the Store. The Key you have in your Inventory will also open the door over to the left, but there is nothing in here except empty cardboard boxes.
Use the key to open the door where the boy is with the red rubber ball. Inside, click on the files that you find on the counter; read about: Comet, Mayor, and Abuse. Then, click on the empty gas can you see on the counter over to the right to take it into your Inventory. Then exit here and then head over to the right where you will see that a bridge is out where it crosses the water. In your Inventory, get the Spring Pig and click this in the gap of the bridge where the water is; you now cross over to the other side. Go over and talk to the little girl you see standing by the pumpkins; go through all dialogue choices. Then, click on the gate to the pumpkin patch. The combination for the lock is the Psalm number you saw on the sign in front of the church: 451. When the gate opens, head immediately over to the left to the tractor; then, click on the scythe that you see lying by the front left wheel of the tractor. Once you pick up the scythe, this will initiate a combat sequence; you will hear your heart beating. The object here is to follow the path but to beware of the black birds that will dive-bomb you. The way to kill them is to wait until they actually dive at your head, and then click on them. But if the birds start pecking at you, and make direct hits, you’ll hear your heart begin to beat faster and faster. If they do “kill” you, then you just go back to the beginning of the path. But, one good thing is, any of the birds that you have killed stay dead. Then, once all the birds are dead, go all the way to the top of the path, and the scarecrow will come down and try to attack you. But before you can kill him, you have to go where all of those pumpkins are where he was perched and puncture all seven of those pumpkins. So in order to do this, just keep moving and weaving away from the scarecrow as he chases you, and keep puncturing the pumpkins. Once all seven pumpkins have been punctured, then kill the scarecrow.
Then once you have killed the scarecrow, go over and open the gate that you see by the glowing green orb. Click on the glowing, green, metallic orb. Then, head around that path towards the barn doors, but before you reach there, notice the generator. Then go over to the red tractor that you see in front of the barn and click on the hatch that covers the engine. After the hatch is open, click on the red jumper cables that you find inside to take them into your Inventory. Then, go over to the barn doors and open them; time to meet Mother. Click on Mother and talk to her; go through all dialogue choices. After Mother kicks you out, click on the wrench that you see in the doorway of the barn to take it into your Inventory. Then, come around the other side of that tractor to that little creek of water that you see, and click on the wooden plank that’s on the right; then use this to cross over to the other side.
Once back in the village proper, head down to where the elementary school is. But when you get near the school, go past it, down towards the bottom-left of the screen, and down that little path to the beach. Click on and talk to the little boy that you see fishing from a rock; go through all dialogue choices. Notice what he says about the “call to mass” not having been made in a long time. Evidentially, the rope is broken that rings the bell. Then, notice the car wreck to the left in the water. You can open the gas tank lid, but now you’ll need something to siphon the gas out. And also, remember the metallic cross that you saw in the water? Max said he needed something to “fish it out” with. So you’ll need to get the boy’s fishing rod away from him. So for now, head back up towards the church area.
Right past the church is that little pool in the ground; and, right next to that is a rubber hose lying on the ground. In your Inventory, get the wrench and use it on the hose to take it into your Inventory. Then, head over towards the church. You now need to make the “call to mass”, but remember, the rope is broken. But in front of the church on the left-hand side in front of the stain-glassed windows, click on one of the rocks to take it into your Inventory. Then, use this rock from your Inventory and click it onto the bell that ‘s on the roof of the church. When the boy comes up and enters the church, go back down to the beach.
At the beach, get his fishing rod from the rock. Then, go over to the car wreck on the left (making sure the gas tank lid is open), and go into your Inventory and get the rubber hose; click this onto the gas tank lid opening. Then go into your Inventory and get the empty gas can and click this onto the rubber hose to fill the gas can. Then, go all the way back up to that bridge where you saw the metallic cross in the water. Get the fishing rod from your Inventory and click it onto the cross to bring it into your Inventory. Then go back around to where you had knocked that plank down so that you may cross back over that little creek.
Then go over to where the generator and the glowing green metallic orb are. Now, follow this order: 1) From your Inventory, get the cross and click it onto the glowing green orb/rock. 2) Then get the jumper cables from your Inventory and click them onto the generator. 3) Then, click the jumper cables onto the metallic cross. 4) Then, take the full gas can from your Inventory, and click it down towards the lower-left front of the generator to fill it. 5) Then, click on the switch on the generator to turn it on and “fry” Mother.
Afterward, use the knocked-down plank to cross back over to the village proper. Then immediately head up to the bridge (where you had gotten the metallic cross from). Then, head right into the glowing white light that you see there where the little girl is floating above it.
THE COURTYARD AND CHAPEL
Go over to the left and talk to the man wearing the bearfeet slippers. Then, go down the steps, and talk to the old man wearing a tutu sitting on the bench. Then, go to the right and talk to one of the guards. Then, continue around to the right, and talk to another guard. Then, continuing around to the far right, go up that set of steps, and talk to the man/ patient in the far right corner with the fish in his lap. Then, to the left on that small building, notice the control box. Then, go over to the door, open it, and enter. Go over to the old phonograph player on the right and click on it to turn it off. Then, pick up the other two records you see lying nearby. If you want, you can go over to the radio that is on the desk and turn it on. Then, go over and talk to Dr. Morgan. While talking with the Doctor, make note of what he says about the different types of music and what effect it has on the patients. Then, exit this building, and go up the little set of steps on the left onto the next level.
If you want, you can talk to more of the guards up here, but they won’t really tell you much more. And if you want, you can go over and talk to the woman with the pigtails. Then, go over and talk to the woman who is sitting in front of the set of big doors ( Here is where Max gets some of his memory back and he remembers that he is a doctor ). After your conversation with the woman is over, she will move from in front of the doors. You may now go up and open the doors. Upon entering, you may notice that the pews are populated by mannequins. Then, click on the man who is scuttling back and forth in front of the preacher; talk to him. Then, talk to Preacher Bob. Afterwards, go back to Dr. Morgan’s little office building, and inside, go up to the record player. If you want, you can try playing all of the various records that you have in your Inventory to see the different reactions you’ll get from the various patients. But, the record that will “do the trick” for you is, “Bella Donna in A Flat”; click it onto the phonograph player. You will then see the old man in the tutu stand up and dance; he will reveal something he had been sitting on, on the bench. Go over to that bench and retrieve the Holy symbol that Preacher Bob had lost. Go back to the church on the upper level and return the Holy symbol to Preacher Bob; he will give you something for your efforts. Now go back to Dr. Morgan’s little office building.
Go up to the Control box that you had noticed earlier outside of Dr. Morgan’s office building. In your Inventory, get the old broom that preacher Bob had given you, and use it to pry open the Control box. After the Control box door has opened, click on the “confusing mess” to bring up the puzzle interface. This puzzle has a bunch of interconnecting water pipes. You will notice that at the pipe’s junctions that there are little silver switches; some are shaped like little letter L’s, some like the letter T, and there is one near the far right that is a straight line. See picture below:
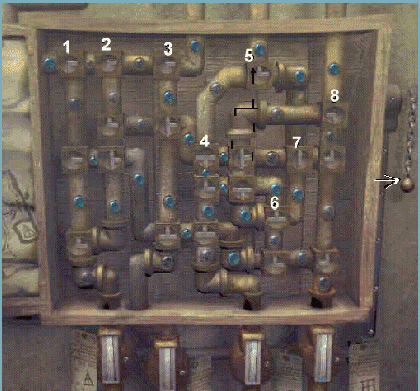
Counting from left to right, from the picture above, see that there are 8 (eight) vertical rows of pipes ( Row number 5 has one at the top separated slightly from the two below it, and row number 7 has just one switch in it, that being the vertical line one ). Now, going from left to right, do this:
Row one: top switch, make it look like the number 7.
Middle switch, make it look like the letter L.
Third switch, make it look like the letter L.
Row two: top switch, make it look like a backwards number 7.
Middle switch, make it look like the letter L.
Third switch, make it look like an upside-down letter T.
Row three: top switch, make it look like a backwards number 7.
Middle switch, make it look like the letter T lying on its left side |–
Third switch, make it look like an upside down letter T.
Row four: top switch, make it look like an upside down letter T.
Middle switch, make it look like the letter L.
Third switch, make it look like the letter T lying on its right side –|
Row five: top switch, make it look like a backwards letter L. _|
Middle switch, make it look like the letter T lying on its right side –|
Third switch, make it look like an upside down letter T.
Row six: (Just 2 switches)
Top switch, make it look like the letter T lying on its right side –|
Bottom switch, make it look like a backwards letter L. _|
Row seven: (Just the 1 switch)
Make it look like a straight line going across horizontally.
Row eight: (Last row)
Make all of these switches look like backward letter L’s. _|
When all of the switches have been set, pull the big chain on the right-hand side. You will then see the pool being filled with water on the upper level. Climb the steps to the upper level, and go up to the now filled pool. Click on the water in the pool; then click on the moving reflection. After the video sequence, there should be a CD change to CD number 2.
THE CIRCUS OF FOOLS
The character of Max has now changed into Sarah. Click on the man with the tophat that you see sleeping in front of you; go through all dialogue choices. If you want, turn around behind you, and click on the binoculars so that you may see the house. Then, go across the little wooden bridge and immediately down the wooden path. At the first intersection, go to the left, and up the wooden ramp to the red shack. Open the door and enter the tattoo shack. Talk to the tattoo man; go through all dialogue choices. Then, click on and notice the bottle of rubbing alcohol on the desk, and the needles (but do not try to take the needle for now). Exit the tattoo shack and head back down to the main wooden path. go to the right, keep heading straight – going past the three carnival tents on your left – and go right up to the man at the Squid Squash Game; talk to him and go through all dialogue choices. After you have played the Squid Squash Game, you will now have three tickets. Then, go to the left to the Knock Down tent (the purplish-bluish colored tent) and play that game (you may not win on the first try, but keep playing till you win; you will get more tickets). When you have knocked down the pins, pick up the pin that has fallen down outside of the booth to the right. Then, go back and play the Squid Squash Game again; just keep playing. You will eventually need a total of somewhere around 12 to 15 tickets. Then, keep heading down straight on the path that you’re on, going around behind the man from the Squid Squash Game.
Cross over the little wooden plank bridge and then go over and talk to the little boy you see lying on the ground to the left a little; go through all dialogue choices. Then, go to the left of and a little behind the boy, and get the oil can on the ground. Then go over and talk to the little boy’s parents who are warming their hands over the barrel. Then, cross over that wooden plank bridge to the left, and go over and talk to the big clown popping balloons over his head. Now, if this clown moves and can get out of your way, then you can go past him, and then make your way around front to the entrance of the main circus tent. If not, and the clown won’t move out of your way, then you’ll have to cross over both little plank bridges and make your way all the way around to the front entrance of the main circus tent (the main tent is just behind and above the three little tents where you played the knockdown game).
Once you’ve entered the main tent, go to the right and talk to the clown juggling the balls; go through all dialogue choices. By the end of the conversation, he will have exchanged one of his red juggling balls for that pin that you got from knocking it down in that game that you played. Then go to the upper right and talk to the strong man lifting weights; go through all dialogue choices. Then, go down and to the left to the woman by the fire barrel; talk to her going through all dialogue choices. Then, if you want, you can go over to the center and talk to Mr. Baldini, the ringmaster. And also, if you want, you can talk to the three different clowns that you see sitting up on the benches. Then, exit the main tent, and then make your way back to the tattoo shack.
Talk to the man giving the tattoo, and ask for the fuel. And while you’re there – and he’s not looking since he’s being distracted giving the tattoo – click on the needle you see lying on the desk to take it into your Inventory; it’ll come in handy later. Go back to the main circus tent and talk to Inferno; choose the dialogue choices of Tattoo and Fuel. Then, exit the main tent, and make your way all the way back down to the Squid Squash Game, but when you get there, make a right and go down those set of steps that you see there to the beach.
When you get down to the bottom of the steps, if you want, you can talk to that clown standing there. Then, go over to the left where the merry-go-round is; try pulling the lever in front of it. The lever will be stuck, so go into your Inventory and get the oil can, and then click this onto the lever, and then pull the lever again. After you’ve pulled the lever, go over to the merry-go-round and click on that itself to get it moving; go for a ride. After the ride has stopped, go over to the left and up the little ramp and stand in front of the clown; click on it. Then, go over to the left and talk to the man standing at the entrance. Then, go back over and stand in front of the clown, and then get the red rubber ball from your Inventory and click it onto the clown. Then, go back over to the man at the entrance and talk to him, and choose the dialogue choice of Tickets. Then go into your Inventory and get the tickets and then click these onto the man. Then, go up the ramp and click on the doors, and then enter the Fun House. After the Fun House video sequence is over, you will now have a broken piece of mirror in your Inventory. Upon exiting the Fun House, go down the ramp, and if you want, you can talk to the clown there. Then, go to the left, and make your way up those set of steps, and enter the next tent. Then go over and talk to the fortune teller behind the crystal ball. After your conversation with her, you will realize that you already have the wand, the flask, and the reflection. The wand you got from Inferno, the flask you got from the tattoo shack, and the reflection you got from the Fun House (the piece of mirror). Then, you will be “zapped” and reappear in front of the circus tent. Then, make your way all the way around to those steps to the beach again.
On the beach, go over to the right, and talk to the man standing behind the rope next to the wagon; go through all dialogue choices. Then, go into your Inventory and get the tickets and then click these onto the man. Then, enter the Freak Beach. Immediately upon entering, go directly to your left to the first wagon and talk to Pretzool. Then, go a little to the right to the next wagon, and talk to Timber; go through all dialogue choices. Then, go into your Inventory and get the needle and click this onto the bars of Timber’s cage; he will run off to the right. Exit Freak beach. If you want, when you exit, you can go to the wagon on the right and talk to the Siamese twins. Then, go back up the steps and then go to the right, cross the wooden bridge, and you’ll notice past the boy that you talked to earlier, that there is a hole in the ground. Click on the hole for a video sequence, then click on the hole again to jump in.
THE CAVE
You will see a pile of dried twigs in front of you; in your Inventory, get the piece of broken mirror and click this onto the pile of twigs to start a fire. Then, go into your Inventory again, and click on the baton, and then click this onto the fire; this will start a combat sequence. Look out for the falling rocks that will drop into the water. You will see some crumbs start to come from the ceiling right before they fall; this will act as a warning to get out of the way. Also, click on the tentacles that will come at you just before they touch you. And, stay towards the top of the screen; the bottom path leads nowhere. At the far left end, you will come upon the Squid monster. Look for the timing of his pattern when he breathes his “fire”. Just stay a little towards his right, and then, right after he “breathes”, run up and click your baton on him so that you may breathe your fire on him. Then back off, and then keep repeating this process until you defeat him. When you’ve defeated him, climb up out of the water.
THE MANSION
Climb up the set of steps; watch the ghost video sequence. Then enter the open doorway. Enter the kitchen area and go towards the right and watch another ghost video sequence. Make note of the time that the mother mentions; 6 o’clock, and that the father will be in the study. Exit the kitchen to the right, and thenmake a left and head up towards the grandfather clock. Click on the grandfather clock and then try to open it; it will be locked. Then, walk up the set of stairs to your left.
At the top of the stairs, veer over to the top right and open that door and enter into the livingroom area. Go around to the front of the sofa by the coffee table; watch another ghost video sequence. Then, go to the top of this room, and open the door there. Upon entering this bedroom, immediately turn to your right and take the brass key off of the bureau top. Then make your way all the way back downstairs to the grandfather clock again. Take the brass key from your Inventory and click it onto the grandfather clock. Then, click the big hand onto the numeral 12, to set the clock to 6 O’clock; watch the ghost video sequence of the father leaving his study. Then, go around behind the grandfather clock, and veer over towards your left, and enter the study. Next to the armchair, take the silver key. Then, to the left, on the bookshelf, take the videotape. Then exit the study, go back upstairs to the next floor, into the livingroom, and then take the videotape out of your Inventory and click it onto the VCR that is to the bottom-left of the TV set. Watch the video sequence. Then come out of the livingroom, go over to the left, and then go up that long hallway on your left, and at that door, take the silver key from your Inventory and click it onto that door; go through and up the steps to the attic.
Go over to the big Teddy bear right in front of you and click on it; you will then get a gold key. Then, go over to the left and click on the round trampoline. After Sarah sets it in place, click on the trampoline again; this will enable her to jump over the boxes. Then, notice the chest to the left. Get the gold key from your Inventory and click it onto the chest. When the chest opens, you will get the dolly, Mr. Clown, and then you will also see a ghost appear. Then, click up towards the top of the chest, and you will climb back up over the boxes. Go back down the stairs where the ghost went.
You will keep seeing the ghost appear, calling you forward. When you come back down that long hallway after exiting the attic, go around the set of steps, and then click on the door that you see at the bottom right-hand corner of the screen; the ghosts will appear again. Enter the room, and then go up to the ghostly form that you see in the bed. In your Inventory, get the dolly and click it onto the little girl/ ghost in the bed. Watch the video sequence.
THE LABORATORY
Go up the set of steps. And then, follow the path around to the right. Click on the doors there and then enter. Inside, if you want, you can click on the radio to the right. Then, go over to the left and click on the painting; watch the video sequence. Then, click on the pipe valve where the painting was; the valve goes into your Inventory. Then exit here, and make your way all the way over to the left. On your way, you’ll pass a gate on the right; this is locked for now. Go up the steps on the far left.
At the top of the steps, keep going forward to the far right end; you will find a “hexagonal hole” at a pipe junction. Then take the pipe valve from your Inventory and click it on here. After it is attached, click on it again to turn it; this will power up the machine. Then, go over to the machine to the left, and click on the part where you see the little light bulbs glowing on the top. The object of this puzzle is to get the stone/rock to drop into the hole. When the puzzle interface comes up, the first thing you do is to pull the lever on the far right side. Then, click on the right-hand side of that wheel four times; then, pull the lever on the right-hand side once more. Then, click on the right-hand side of the wheel once; and then pull the lever on the right-hand side one more time. Then click on the right-hand side of the wheel four more times; and then click on the lever on the right-hand side one more time. Then click on the right-hand side of the wheel once; and then click on the lever on the right-hand side one more time. Then click on the right-hand side of the wheel four more times; and then click on the lever on the right-hand side one more time. Click on the right-hand side of the wheel one time; and then click on the lever on the right-hand side one more time. Click on the right-hand side of the wheel four more times; and then click on the lever on the right-hand side a final time: The stone will drop. You will then see the cage door open up below you. Go down the stairs and then make a left at the intersection and enter the center door which had just opened for you. Watch the video sequence.
Inside the lab, head around to the right to the desk; click on the taperecorder that you see there to play it. Notice that on the tape, Dr. Morgan mentions about the chalkboards having an encrypted message on them. Then notice the three green chalkboards to the left. Approach the green chalkboard on the far left and click on it; when Dr. Morgans voice-over is done reading this, you then click on the first letter at the beginning of each sentence. For example, click on the letter “I” at the sentence, “I stand at a crossroads…”, and then “Shall” at “Shall I venture forth…”, and so on, etc. You will then see these letters appearing at the bottom of the screen. When you have them all, click on then and rearrange them to form the word: SALVATION. Then, go to the chalkboard to the right, and follow the same procedure here; rearrange these letters to form the two words: THE YOUTH. Then go over to the far right and click on the third chalkboard and do it once more; unscramble these letters to form the three words: KEY HIDES TO. Then go to the door that you see on the far right by that round cage.
To the left of this door will be a voice lock; click on it. By clicking on it you will be “talking” to it. From the words that you got from the chalkboards, click on the words in this order: YOUTH HIDES THE KEY TO SALVATION. When you hear the lock click, click onto the door. Watch the video sequence.
View this guide raw, exactly as the archive holds it