Just Adventure original
Nocturne Walkthrough
If
you like Nocturne, take a look at these:
The
Blair Witch Volume 1: Rustin Parr
Dracula
Resurrection
The 10 Scariest
Games of All Time
Warning: This
game contains scenes of animated violence, adult language and some nudity. Suitable
for mature audiences only.
This walkthrough is not a step by step
walkthrough due to the various and multiple ways in which the game may be played.
It is, however, a guide that you may use to explore each area of the game.
Installation
Installation
of this game requires that both CD-ROM disks be inserted when asked. The installation
process takes a rather lengthy time but is well worth it. When I installed the
game, I used the recommended installation choice of typical installation.
Upon completion of the installation, and the opening of the game, you will be
asked to turn off your lights in the room where your computer is, and adjustments
should be made to the contrast, and brightness on the monitor. I did not adjust
my monitor settings, as I preferred not to readjust what I felt was appropriate
for my monitor. The game played fine and I was able to see clearly throughout
the game. When the game begins, you should see a black screen, and hear eerie
music in the background. Click on the keyboard Enter key or the spacebar
to move to the Main Menu.
Cheat Codes
During
gameplay, press F10, type any of the following commands and then press enter:
| Command | Effect |
|
godgames |
God Mode All Weapons and Ammo Gives Skeleton Key Gives More Ammo Toggles Gratuitous Dismemberment Gives Flaming Tip Arrows Rains Outside Snows Outside Big Head Mode Restores Health Gives 500 Silver Bullets Gives 500 Aqua Vampire Bullets Gives 500 Mercury Bullets Stranger Wears Alternate Hat Toggles Enemy Freezing Gas Mask for Stranger Renew Battery |
Table
of Contents
Volume 1: Dark Reign of the Vampire
King
The Graveyard
The
Forest
The Castle
The
Dungeon
Volume 2: Tomb of the Underground
God
The Train
The
Town
The Mine
The
Green Slime Pit
Mystical Stones
Volume
3: Windy City Massacre
The Pier
Vendome’s Bar
Finding
a Way into the Theatre
Waterworks
Co.
Manhole Key
Sewer
Theatre
Warehouse
Factory 1
Factory
2–Blowing it Up!
Volume 4: The House
at the Edge of Hell
Level 1–Mission
Assignment
Graveyard
Moloch’s
Amulet and the Castle!
THE GAME
Volume
1: Dark Reign of the Vampire King
Follow the man through the door and
down towards the sealed door. Go forward towards the sealed door and you will
enter. Again, follow him through the next room and move towards the vampire sitting
down. Watch and listen to the story of the Vampires of the Holy Grail. Move towards
the man sitting down at the desk (Hiram).
Walk to the single door on the
top of the screen and move right. Stranger, your character, will speak with the
woman doing the autopsy. Pick up the items she gives you. Pick up the three different
items, the silver bullets on the counter and few other items.
Exit the room
and speak with the man. Leave and go to the elevator. Push the button and enter.
Graveyard
Speak
with the man from the graveyard. Go down the hill from the cemetery to the right
of the closed gate. Get the key from the ground and check the box. Go back up
the hill to the cemetery and to the crypt. Use the key from your inventory (cycle
through the "[" and "]" keys on your keyboard), use the key
on the crypt door. Draw your weapons (D on your keyboard). Use these weapons on
the vampire monster. Walk around to the side and fight another monster.
Then
go up the stairs to the right and threw the door (monster is behind you!). Leave
forward and go down the steps. Kill one more Sentinel then the Vampiress appears.
Open the gate and then turn and search the area. Find the closed "church
door" and then turn towards the opposite doors to the far corner. Kill another
Sentinel and then watch the cut scene with the Major opening the doors. Return
and chat with him. Follow him to the corner. Use the Enter key on your keyboard.
Walk
around outside the church area and go up the stairs. Find the man standing in
the corner outside the door. Click on the spacebar several times to hear what
he says, then open the box on the floor and get more ammo.
Forest
Exit
the village and go up the path. Turn right and go under the log. Find the knocked-over
wagon and the doctor’s bag between the front and rear wheels. Click on the horse.
Follow the trail to the vampire with the stake. Pick up the wooden stake in front
of the dead vampire. Turn around and head towards the way you came. At the "intersection"
just beyond the dead vampire, turn right and follow that path to the cabin. Check
out the fireplace and get the Restorative Tonic on the floor just to the left
of the fireplace. Exit the cabin and follow around to the right of the cabin,
and across the bridge (another cabin on the left). Go down the steps on the left
(use the "jump" key = G), look around, try the door and then leave this
area. Find the path to the right side of the cabin, but not directly on the side
of this cabin. Follow that path and kill all the werewolves along the way. Go
to the werewolf’s body closest to the spiked log that comes down from the trees.
Get the chunk of werewolf meat by the side of his body. Stranger will carry the
meat with him, leaving a trail of blood as he goes. Draw the meat (D on your keyboard)
in your hands.
Walk to the large cross in the open field area. Turn left
in front of the cross and draw your guns (drop the meat). Be ready for another
werewolf. Make your way around this path and to another cabin. Nothing is in there
of use to you, so leave and go left of the cabin, or away from the cabin back
the way you came. Try another path and you’ll find the broken bridge. The Vampiress
says it is not safe to cross this bridge. Turn around and move down the stone
path to the left of the bridge. The Vampiress jumps over the huge gully, but you
have to return to the bridge. Draw your guns and kill two or three more werewolves.
Then reach the bridge.
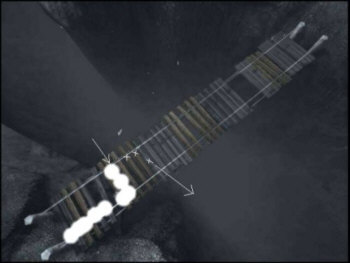
Getting
Across the Bridge
1) Walk on the lower side (closest to the bottom of
the bridge/screen) over the first eight boards.
2) On the eighth board,
move to the top of that board on the bridge. Hit the "G" one time and
hurry to the grey boards. (Save your game here: F6 = Quicksave.)
3) Move
across the grey boards, and move to the backside of the grey boards (closest to
the beginning of the bridge).
4) Hold down the Left Shift key, and use
your "G" key repeatedly as you move with the Up arrow the rest of the
way across the bridge.
The Castle
Find
your way through the Castle and up to the tower (killing tons of monsters along
the way). Enter the tower on the right and get the key at the top. Then enter
the tower on the left and find another key to the Bell Tower. Go down the path
between the two towers and up on top. Make your way up the stairs and see the
Vampiress (she’s changed, hasn’t she?) Then talk with the old man.
Enter
the Bell Tower with the key from the lower tower on the left. Be sure to have
your guns drawn as you walk in. I used godmode (code: godgames) so as not to die
here! Shoot and kill all Sentinels. Go to the right corner of the Bell Tower and
get the Special Book. Go all the way down the Bell Tower and to the main doors
of the Castle. When you exit through the main doors, turn right. Go all the way
to the end (careful not to fall off). Turn right again and come down towards the
bottom of the screen. Draw your guns! Shoot Sentinels and get 80 wooden stakes
and a crossbow from the small room. Re-enter the Main Castle area and find the
room with the large dining table where you had visited before. There will be many
dead creatures there from your previous visit. Turn right and walk towards and
up the brick steps. Two statue gargoyles will attack you. Kill those and enter
through the center door on the top ledge. There will be a huge wooden table in
a room with a blue tile floor. There is a door to the far right but it is locked.
Go through the open archway. Draw your wooden stacks, as a vampire woman comes
to attack you. After killing her, enter the room she came from and open the box.
Take the 100 Blessed Crossbow Bows. Exit the room and enter the room on the other
side of the hall. Shoot out the mirror on the far wall. Draw your guns because
the minute you approach the door on the opposite wall, you will be attacked from
behind. Open the door, draw your weapons again and kill the critter! Turn towards
the left (away from the door on the right) and walk off the screen. Carefully
climb the huge board and jump (G) from the board to the small platform. Again,
jump over the end platform (Left-Shift + G + Up arrow). Walk to the hole in the
wall and down inside the Library. Find the Library key on the shelf on the right
side. Pick it up. Place the Special Book on the podium in the Library, which reveals
a secret room. Save game here.
Enter the Secret Room, turn and kill
the monster. Walk to the round table and take the Dungeon Key. Go behind the pinkish
tapestry and into the room. Go up the steps on the right. Pull the lever in the
corner. Walk back down and go behind the other tapestry closest to the round table.
Get the Doctor’s bag and 80 Crossbow weapons. Leave the Library area using the
key you found earlier and the door to the right of the Secret Room entrance. Go
back to the Twin Towers. At the bottom of the screen, walk through the doorway
(hard to see, and to me it looks like a wall). Follow the tile hallway, go through
the huge archway opening and follow that hallway, shooting your way past all sorts
of vampires, and monsters. Turn around as if to leave, going back through the
huge opening. Go past the doorway where the vampire woman came out of earlier.
Follow the hallway, enter the rooms and get the items from the boxes on the floor.
There is one room opposite the huge painting on the wall. This room locks shut
once you enter. Sentinels attack you. The only way out of this room is to shoot
all of the Sentinels and then find the lever in the lower right corner of your
screen. This releases the gate/door so you can exit. There is a box in the lower
left corner with Restorative Tonic. Get that before leaving.
Leave this
area, go all the way out of the Castle. Once outside, turn right, follow carefully
outside the castle, as not to fall off into oblivion, and then turn left when
you see the Church Windows. From inside the Church, push the statue in front of
you into the middle of the tile floor. This reveals the Holy Relic beneath
the metal floor. Get this Holy Relic. When you pick it up, the Dungeon door opens
from inside the castle. Return to the "cot room" and go down the steps.
No need for guns here.
Dungeon
Follow
your way along the steps and pathway through the first door. Then go up the steps
and enter the door on the left. Creep along the steps and passageways down and
into the dark room. Shoot and kill all the monsters and bats. Get the key on the
table down below and the Ordinary Bullets on the floor just beneath the key table.
Restorative Tonic is also there, so get that too. Exit this area and use the key
on the other door on the right. Enter, turn around and shoot the monster. Move
up the steps and to the door/gate. You’ll see it lower and spikes come up from
the floor and down from the ceiling. You’ll need to back up so the door opens
again. Then hold down the Left-Shift key and the Up arrow and run straight across
the room to the wall. Immediately get the key, draw your guns, turn around and
shoot/kill the monster. (The floor and ceiling will stay down while you’re busy.)
After you’ve killed the monster, hold down the Left-Shift key and use the arrow
key. Run. The floor will rise. Turn and exit this area.
Kill a ton of monsters
on your way further into the Dungeon. You will need to jump across areas with
water down below (there is a way out if you fall into the water, just make sure
you’re seeing the "overhead" view to find the steps). Eventually, you’ll
end up in a room with a swinging blade and a door on the right side, guarded by
two gargoyle statues. The door is sealed for now, so walk (run, actually!) past
the swinging blade and make your way across some stones suspended/raised from
the floor and a long, long drop to your death if you fall! There are also swinging
blades from side to side as you attempt to jump from one circular platform to
the next. Be careful, and I recommend saving your game each time you cross over
onto one of the circular platforms. On the other side is a room with coffins,
vampires and monsters placed there to protect the Precious Gem. Get that gem after
killing the vampires. Exit this area and now you must return past the stones and
swinging blades.
Once across (good luck!), go back past the single swinging
blade and door on the side. Enter this room and head back the way you came. On
the opposite wall from where the two gargoyle statues protect the sealed door
is another doorway, or entrance. Go down there, step onto the center platform
and place the Precious Gem on the pedestal. Use the "[" or "]"
keys on your keyboard to cycle through the items in your inventory until you come
to the Precious Gem. Then use the Enter key to place it (or is it the spacebar?).
A Secret Panel opens. Save game.
Walk down into the passage, through
the short opening and stop. Turn right and walk slowly against the wall through
two viewing screens. Then cross the bridge. Load up on ammo (F10 + silver as many
times as you want, or type ammo for more ordinary bullets, or mercury for mercury
bullets, etc., as many times as necessary to "stock up!") Get ready
to face the Count. Shoot him continuously for what will seem like a bazillion
times. As he flies around as a huge bat-like creature, you will see a life-energy
indicator bar for him on the bottom left of your screen. Pay attention to this
indicator bar. As his life-energy is slowly drained, he will lower himself down
onto the platform and appear to be hovering there. Use the Holy Relic on him several
times to finish him off! Save game here if you’d like.
When he dies,
he will drop a key and the Holy Relic. Get the key to the Sanctum and the Holy
Relic. Leave via the bridge you entered through. Return to the same room with
the single swinging blade, and use the Sanctum key on the door guarded by the
two gargoyles. Enter this room carefully and kill all the vampires that will attack
you. Move to the portrait tapestry in the middle of the rear wall. You will see
feet on the floor, indicating someone is hiding behind the tapestry. Move the
tapestry and talk with the Bride. Svetlana will appear as normal. You will talk
with the Mayor and discover that he is truly the Lord of the Castle and his son,
the Count, betrayed him. Now that the Yathgy is in place where it belongs, the
Castle and the village people can return to their "normal routine."
Mission complete.
Volume 2: Tomb of the Underground
God
First Level–Train
On the train,
you’ll talk with your boss. He will tell you about a Texas town where zombies
and monsters are taking over. He will also mention that he has had a feeling that
something or someone has been watching him … and suddenly he is swooped out
of the train window and disappears. You’re left in the train by yourself, except
for two people on the opposite of the train. They will turn into werewolves, so
be prepared to kill them. This is a good time to load up on ammo again and make
yourself into Godmode (F10, type in godgames). Stranger will make a comment as
you walk towards the bottom of the screen about better weapons and information
in his luggage. Make your way up the train car in front of you and go all
the way to the front/engine of the train. Pick up the red axe on your way
to the engine room, on the coal car. When you’re at the engine room/front of the
train, click on the fire. Stranger will say that there is no way to stop the train.
Turn around and return to the baggage car just before reaching the coal car. You
will kill two werewolves chomping down on meat. Continue back to the first baggage
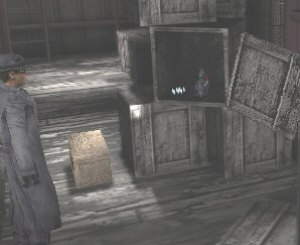
car, and go down inside that car. Pick up the light brown crate and place it in
front of the dark grey crate with just a tiny bit of light reflecting on it (see
graphic below). Jump up and hit the Enter key and Stranger will say: "This
is Hiram’s trunk!" Use the axe from the coal car and chop open the crate.
Get the two items inside. Stranger will then say: "I will avenge your death,
Hiram." Get the Medical Kit as well.
After
getting the two items inside Hiram’s crate, leave the baggage car and move on
the top of the train sections/cars. Move towards the engine car.
Jump to the top of the Engine car, search the dead body.
Go all the way
to the passenger car where you started this level, by jumping onto the roofs of
the baggage cars, fighting and killing werewolves along the way. On top of the
passenger you rode in, you’ll speak with Alpha, from the Hokkendire Tribe. He
will run off. After he leaves, go down inside this car. Kill a few more werewolves
as you watch them turn from humans to werewolves! Then use the key from the Conductor’s
body on the locked door. Kill more werewolves. This is the private car for the
Alpha werewolf. As you approach the rear of this car, you will need to use your
Axe two times on the door in order to open it/knock it off its hinges. Climb up
on top of this car and meet up with Alpha. Continuously shoot him until he dies.
(I backed up shooting him constantly as he approached me, and was able to keep
him within range of my guns). When you’ve killed him, the train will stop automatically
as the Engine explodes.
Town–Redeye
You
will be met at the train station by the Reverend. He will tell you that Scat has
been killed. Zombies are running all over town. When you reach the Church with
the Reverend, you will see Scat’s body on the floor. Click on him. Then leave
the Church, walk down the path (kill a zombie or two!) towards town. When you
reach the corner of the fence, turn right. Find the Saloon (to the right). Get
the rum off the bar and return to the Church. Use the rum on Scat and the Cigar
in your inventory. Scat will be revived after you’ve talked with the Zombie leader.
Leave the Church, and head for town again. Find the train station depot
(to the left), and the Southwestern Lime and Pole Telegraph Office. Enter here
and find the Doctor’s bag on the counter. Exit and continue down the tracks to
the right past the Southwestern Rail Lines building. Turn and go up the
screen, then to the right. Follow the pale grey path, shooting zombies along the
way. Take the rightmost pathway up to the first house. Shoot the zombie
dog as he approaches you. Enter the house. Check all the rooms downstairs and
in the cellar as well. Open the door in the kitchen that goes outside and shoot/kill
the zombie cow. Go upstairs and find the Smiths still alive. They will follow
you back to the Church. Grab the Doctor’s bag before leaving. As you go back downstairs,
kill the zombie coming up. If you go into the basement of this house, and use
the spacebar on the woman as she follows you down, she will say something. An
Easter Egg is the response that the old man says! Cracked me up! Once outside
the house, if you run down the pathway back to the main road area, and
turn towards the Jenkins’ house (at the top of the screen), the old woman will
say: "Heck, Sonny, slow down. We can’t keep up with you!" (Easter Egg?
Hilarious, nonetheless!). When you reach the Jenkins’ house, turn right and
head for the barn. Shoot the zombie cows and the old cattleman. Watch his head
blow off (gross!). Turn and go around the barn off to the right side of
the screen. Follow around the backside of the barn until you reach the cellar
at the rear of the house. Check the door. It’s locked and you can’t break it down.
Exit the cellar and walk around the rest of the house. Instead of entering through
the front door, go between the house and the barn. Watch a zombie crawl out of
the ground. Kill him … then head for the side door to the house. Notice the
zombie on the roof and someone moving about inside the house.
Enter the
house and find the box in the bedroom. Get 50 ordinary bullets and the 20 shotgun
shells on the dresser. As you leave the house, the old woman will approach you
and say: "Do you even care if we make it to the Church alive?" Stranger
responds with: "Marginally!" As you return to Redeye (the town), stop
at the outhouse and collect another human man to tag along. Enter the Sheriff’s
Office and talk with the one-armed man in the jail cell. He will tell you that
the Sheriff has the key, and he’s gone to the Saloon to investigate screaming
noises. Get the Doctor’s bag on the shelf in the Sheriff’s Office and the 80 ordinary
bullets in the box on the floor. Click on Ma (the old woman) while in the Sheriff’s
Office and listen to what she says. You can also click on the man in the cell
and he will tell you that the Sheriff has the key. Exit the Sheriff’s Office and
go to the Saloon. Shoot and kill the Sheriff, then examine his corpse for the
key to the jail cell. Return to the Sheriff’s Office, use the key on the door,
enter the cell, get the shotgun from the one-armed man and the shotgun shells
from the box on the floor. You’ve just rescued the Deputy (or so you think!).
When you reach the Church, the old woman will tell you that the children
were left in the cellar of the Jenkins’ home. It will take a special "knock"
before they will open the door. For some real gore and fun, instead of returning
directly to the cellar at the Jenkins, turn outside the Church and go to the rear
section of the Cemetery. Blast away a few more zombies as they are "fresh
meat!" Walk all the way around the Church from left to right, killing zombies
as you go.
As you head back to town, go straight down the path from the
Church to the Town. Do not turn to the right at the fence corner.
Once in Town, be sure to go up the steps and into the Whorehouse (or through the
Saloon and up the stairs). You’ll rescue a whore there. Take her with you to the
cellar at the Jenkins’. Knock on the door and the two children will let you in
the cellar. You must talk with the girl, or click on her so that she tells you
her name and asks you yours. If you don’t, she won’t follow you back to the Church
and you’ll have failed your mission! Take them back to the Church (three of them).
Exit the Church and talk to Scat. Then re-enter the Church and talk to Ma/Pa and
the little boy. He will tell you that there is an old abandoned Mine entrance
that he believes is the "hole" the devils come out of. He will take
you there because the mine is sealed but he knows of a secret way inside and will
let you in.
Body count for my game was 125.
The
Mine
Inside the Mine is a good time to save your game again. Enter the
Mine, guns drawn and in Godmode (I always started my games that way …),
and shoot your way past a dozen or so zombies. Take and follow the right-most
Mine tracks. You will eventually come to Tunnel C. Follow Tunnel C all the way
in and across the bridge. Just on the other side, turn left and follow
the steps to the Powerhouse of the Mine. Walk into the Powerhouse backwards,
with your guns drawn, or a zombie will get you right away. After killing this
zombie, get the battery, gas mask, bundle of dynamite and 80 shotgun shells from
the box on the floor. Turn and look at the Mine Map. Turn on the lights
for each section. Head back in the direction you came from and go into Tunnel
A and find the Green Gas room (on the left side). Put on the gas mask before entering
this room. Find and open both boxes on the floor and get shotgun shells from both.
Leave this room and find Tunnel D. Find the Dynamite Storage area and go all the
way to the right side, once you’re in the Storage area. You will see a few boxes
of dynamite. Pick one up and place it on the lift. Pull the lever against the
wall to raise the box of dynamite to the Transfer Room. Exit the Dynamite Storage
area and find the huge gap in the tracks between the upper level and the lower
level of the Tunnels. You will need to jump over this gap. Back up a little
ways, and use your guns as an aiming device. Run (Left-Shift + Up arrow)
and jump (G) over the gap. Once on the other side, save your game. Enter
the Transfer Room, shooting a few zombies while you’re at it, and find the box
of dynamite on the left. Pick it up and take it to the far right side. Place the
box of dynamite on the other lift (goes to the Central Work Area) and pull the
lever. Exit the Transfer Room and head back to the Bridge (Tunnel C) and the Foreman’s
Shed. You will see the dynamite box on the small lift to the right of the shed.
Pick it up, cross the crossover and turn left. Walk up the tracks and place the
box of dynamite on the ground just in front of the rocks that block the rest of
the Tunnel. Back up just a little, aim your guns down (A on the keyboard)
and shoot the box of dynamite. This blows up the rocks and allows you passage
to the blocked Tunnel.
Once across the other side of where the rocks were,
draw your guns and be ready to shoot these green, sliming little critters. Shoot
your way past them all and eventually you will see a fork in the tracks. Take
the left tracks. Follow these left tracks around.
Body count in my game:
66
The Green Slime Pit!
Kill all the green
slime pods as you work your way around and to another level.
Body count
in my game: 10
Mystical Stones
You’ll
enter a tomb-like passageway. Get the Doctor’s bag and the shotgun shells from
the box on the floor by the dead zombie woman. Also pick up and take the Mystical
Stone off the pedestal near where you entered this level. Note the symbol on this
Stone. Go past the dead woman, down the hallway and past the fire. Follow the
hallway around, killing green slimy critters along the way. When you reach the
bottom, move left/forward, away from the center of this room. Find the spot where
the Mystical Stone should go and place it there. Watch the light reflections.
Continue in this direction, following the hallway all the way down until you see
a lift with a lever. Hop on the lift, pull the lever and raise yourself up a few
levels. Get off the lift, and walk down the hallway until you come to another
Mystical Stone. Save your game here. Before taking the Mystical Stone from
its resting place, be sure to note the symbols on the floor. Once you remove this
stone, the floor surrounding the Mystical Stones disappears and you are left with
only the symbols to jump to and from. Be careful!
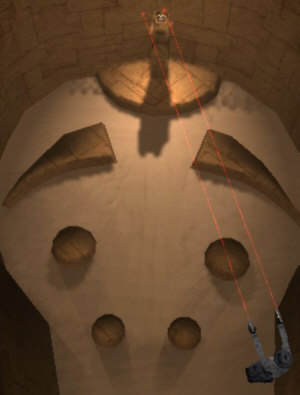
To
return, jump onto the left eyebrow symbol, then onto the circle and then
run/jump to the ledge. Once across, carefully return to the lift. Go down, and
return to the Central Mystical Area. Place the second Mystical Stone in the appropriate
pedestal. A door opens. Enter this door, and note the symbols/holes on the floor.
Shoot and kill the green slimy critters and then take the third Mystical Stone.
As soon as you pick up the stone, and step off the ramp, the floor will rise.
Be careful, and I recommend moving to the exact center of the ramp where you lifted
the stone, then turn and face the exit. Run to the exit as the floor rises!
Whew … safety again! Feel better now? Return to the Central Mystical Area and
place the domino-looking Mystical Stone in the appropriate pedestal. Yet another
door opens. Enter this room, kill a few more critters and green slimy ones too,
jump onto a few rocks/boulders that allow you passage further down the hall and
eventually you’ll enter another room with the fourth Mystical Stone. Jump onto
the far left rock, then to the bigger one just above it, and finally to
the platform that holds the fourth Mystical Stone. When you take the Mystical
Stone and step off the platform, swinging blades will pierce and spin from beneath
you, and between the rocks. You should move to the far left and jump onto that
rock (the same direction as before).
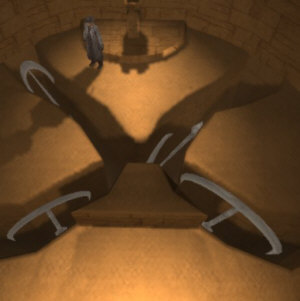
And
then run/jump to the ledge. Not too tough, huh? Return by jumping over the rocks/boulders
to the Central Mystical Area. Place the fourth Mystical Stone in the appropriate
pedestal. Another door will open. This is the final Mystical Stone. … Follow
the path/hallway to the end and you’ll see the Mystical Stone in the corner. Opposite
the corner is a lever. Note the formations/walkways around the room.
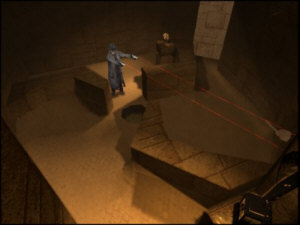
When
you remove the fifth Mystical Stone, water will fill the room and if you are not
in godmode … good luck! Otherwise, swing/jump over to the lever on the opposite
side of the room, and pull it. The water will drain and you will see another door
open. Enter this doorway and note the design on the floor for the fifth Mystical
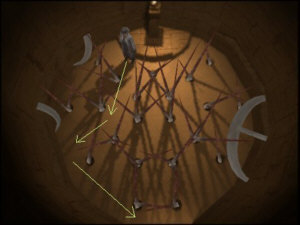
Stone. Beware that when you take the fifth Mystical Stone, spikes will come up
from the floor in different directions, and blades swing from the sides.
Most difficult to get out … I used the pathway below in the graphic picture,
but I was also in godmode! Chicken, I know! Oh, well … at least I made it out
alive!
Return
to and place the fifth Mystical Stone in the Central Mystical Area. A door will
open to your immediate right. Enter this hall and go all the way until you are
facing the Father Creature! And boy, is he one big mean Papa! Walk across the
bridge carefully, and down the hallway. Take the last Mystical Stone and
watch the action. Run out of the room as fast as you can and down the hallway.
End of this Level.
Volume 3: Windy City Massacre
Level
3 begins with the Colonel describing the Mafia using the undead to do their bidding.
They are recycling the dead. Loathring is bring back the dead. Icepick, an undercover
agent, claims to have discovered what Capone is up to. General Briggs becomes
the man to contact if Stranger needs an army to attack.
When you exit the
room, turn and face the file cabinets. Turn right and head down the hallway, push
the elevator button and enter.
Mission Begins: Chicago
You find yourself on the pier. Go up the ramp and turn to the right.
Walk towards the hut on the pier. Icepick will come out and talk with you. He
tells you that he has an informant behind the bar, Vendome, and that once inside,
you will meet up with a reporter who claims to have information for you. He tells
you to use his pass to enter the bar. Icepick also informs you to stay clear of
the streets, to use the alleyways whenever possible, as the Mafia is patrolling
the streets. Once inside Vendomes, order a Manhattan from the bartender. The reporter
will find you.
Turn and walk all the way around the pier, past the pier
59 sign. Once you’re in town cars will drive by shooting at you. Kill as many
of the Mafia undead as you can, picking up the Tommyguns each time. Duck into
the thin alleyways whenever possible and to escape fire. You eventually duck into
an alley with two double doors that are locked. Remember this location, as you
will need to return here later. Around the corner is the Police Station. Open
the door, kill two undead Mafia men and get their Tommyguns. Exit and go around
the street, past Vanessa’s Hotel and the Mattress Shop on the left to the Pet
Shop. Duck into the alley by the Pet Shop and click on the man. He’ll ask to see
your pass.
Body count = 32
Vendome’s Bar
The
level begins with your entry into the bar. You’re fascinated with the female singer,
but move to the bar. There’s business to attend to! Move to the bartender and
click on him. Order the drink, and speak to the reporter. Follow him and listen
to what he tells you. He says that a colleague of his had taken film of the Frankenstein’s
Monsters, but it was discovered by the Mafia and is now inside the Theater. Shoot
all the Mafia monsters as they enter and attack. Pick up eight Tommyguns before
leaving the bar.
Body count = 8
Finding
a Way into the Theatre
Work your way through the alleys and streets
to the Shipping and Receiving Warehouse. Get the Doctor’s bag from the open crate
and always get the Tommyguns after killing the Mafia monsters. Go to Slaughterhouse
Sammy’s, and up the ladder. Get the Doctor’s bag, after jumping over the rail.
You can go back down the ladder, and up the ramp in front. Open the garage door,
shoot and kill two men and then watch the barrels explode (this is just for grins!).
Walk back to the Shipping and Receiving area and go directly across the street
from these doors. You’ll see the Cresce Theatre. The doors are locked, so go past
the Besson’s Coffin Co. on the left side of the Theatre and to the next building
with the white door. Enter and get the Doctor’s bag behind the shelf. Exit this
building, go around the corner and into the door by the red car. There is another
Doctor’s bag behind the shelf. Run all the way back to the pier and you’ll eventually
run into Icepick. You will need to find another way into the Theatre, and he bends
some bars open so you can go through the sewer system. However, you’ll need to
get a manhole key in order to lift the grate. Icepick will follow you and help
you kill some of the Mafia monsters on your way to the Waterworks Co. Run all
the way down the pier, and down the main street. Turn up the street at the end
(where you can’t go any farther) and you’ll go right into the alley that leads
to the Waterworks Co. Click on those double doors that are locked and Icepick
will knock it down for you.
Body count = 63
Waterworks
Co.
As soon as you enter the Waterworks door, two men will be shooting
at you and Icepick. Kill them using their own weapon, the Tommygun, then pick
up their guns. There’s a third man shooting at you from up on top, but to get
to him, you must first climb on some crates to the right. There is a certain angle
from which you can see the man through the window. Just shoot that guy and go
about your business! Walk down the steps and to the door. Icepick will open it
for you by knocking it down. Kill three Mafia zombies, get their Tommyguns and
go down the passageway into the room. Open the cabinet and get the Manhole Key
and a Doctor’s bag. As you go up the steps, three or four more Mobsters will shoot
at you. Kill them, too, and don’t forget the Tommyguns.
Body count = 10
Manhole
Key
Run all the way back to the bars on the pier. If you run all the
way, Icepick will be behind you too far, and you’ll have to go back and find him
in the city streets! He’s too slow! Enter the bars on the pier, and Stranger uses
the Manhole Key to open the Sewers. Icepick can’t go down the hole, so he says
he’ll find another way into the Theatre.
Body count = 12
Sewer
System–Theatre
Walk towards the light and through the opening. You’ll
hear music and see a ladder. Climb the ladder and get the Doctor’s bag in the
corner. Go through the opening (hard to find), and follow the tunnel/passageway
down a long, narrow hallway. Eventually you’ll climb a ladder two times to the
rear of the Theatre, where you’ll see the footage taken by the Reporter. Go around
through the curtain and then through a second curtain. You’ll be in the Theatre.
Shoot the Mafia undead. Exit the Theatre and shoot two more men. Leave through
the curtain to the Lobby and talk with Mo. Shoot the monster Mafia guys, get their
Tommyguns, and turn as if to exit the front doors. You’ll see another room. Enter
and get the bottle of scotch off the shelf. Now go up the steps in the main Lobby
and to the Balcony South area. Follow the seats to the door up at the top. Enter.
Shoot a mobster, open a door, get the film off the projector. Open another door,
shoot another mobster or two. Go through this door and down the steps. Get the
key off the floor. Leave and go across the projector room. Ah … another door.
Open and kill the mobster. Go down the steps, but go to the opposite direction,
and you’ll end up checking out the Men’s Restroom, the Ladies Restroom, a broom
closet with a Doctor’s bag and another door. Ah … that’s what that key was for.
I quick-saved here.
Return to the room where you shot and killed the two
men, off to the left of the bottom section of the main floor. Pull the floor lever
by the dead mobster. A secret room is revealed behind a shelf with film rolls.
Shoot and kill another mobster undead. Enter the secret room and go all the way
to the iron gate. Open it and get the roll of Frankenmobster Film off the floor
in the back room. Exit and go to the Projection Room. Play the Frankenmobster
Film on the projector and watch the video sequence that follows. Use your Tommygun
on Smiley and the other mobsters. Also use the Elephant Gun Shells on Smiley to
finish him off. Icepick will join you and help you a little. When Icepick comes
down and helps, he tells you about the Factory where they make the monsters. There’s
a manhole underground beside the Theatre that leads to the Factory.
Once
you have control of your actions again, open the door, enter, open the other door
(quick-save here = F6). Climb down the ladder and get the Doctor’s bag and go
up the other ladder. Then walk the plank to another ladder, turn around and go
up the next ladder. Move to the door. …
Body count = 28
Theatre
Roof to Manhole
From the Rooftop of the Theatre, turn and run between
the roof vent and the water tank. Jump onto the other building (I hit the
ladder on the other building until I realized I wasn’t dead!). Go down to the
alley and turn the corner into the alley. Meet up with Icepick. He gives you a
flamethrower.
Warehouse
Enter through
the sewers and kill two mobsters. Grab their Tommyguns or use your cheatcode,
moreammo, for Tommygun ammo. Work your way around the warehouse and kill off more
undead mobsters. Find the area with the Doctor’s bag and three batteries. Take
those. Now find your way into the corner around some crates and boxes and then
go up the ladder. Work your way down some steps and around this section of the
Warehouse. Find Tommyguns and 80 flamethrower cans in the room with the green
door.
On the truck by the door in the corner are 80 flamethrowers. Get those.
They’re by the driver’s door. On the ledge of the truck outside the bathroom is
another can of fuel for the flamethrower. Enter the Men’s Room and go through
the other door, but pick up the flamethrower fuel first. Shoot some more Mafia
Undead and blow up the barrels and boxes of dynamite along the way! Go up the
steps onto the platform. You’ll have to jump off the walkway onto some boxes and
then over the fence when you reach a break in the fence. Look for this area of
the Warehouse.
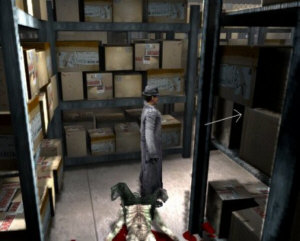
Once
on the other side of this area, get your guns ready and blow away a few more Mobsters.
Just on the other side of the recreation room have your flamethrower ready! Save
your game first. There’s an opening down the catwalk where the fence is broken.
Jump off there onto the boxes and then down to the floor. Walk around the office
then turn to leave this door (it’s locked). Smiley will bust down the Office door
and this is when you use your Flamethrower and the fuel cans you’ve collected
along the way! Enter the Office after killing him for good, and exit the door
to the Factory.
Factory
Head down the
walkway you’re facing at the beginning of this level. Go up the steps, shoot more
gangsters around the green tank mixture and go down the other set of stairs. Shoot
another two or three mobsters at the base of the stairs and get their Tommyguns.
Go around the two huge barrels at the base of the stairs, kill another mobster
hiding in the corner! Then go to the right of the stairs on the bottom and along
the fence. Save here. Shoot a ton of those nasty guys again, and more of
the recent reborn undead! Work your way around and up another green tank and conveyor
belt area. In the corner is a door. Open it.
Body count = 31
Factory
Area 2
Walk down the walkway, turn right and then right again at the
corner. All the way down at the end of this catwalk is a lever. Read the sign
(spacebar). Pull the lever. (Explosions will start, but you can still escape this
area–I used godmode and jumped down!) Turn and go all the way down the ramp then
up the steps and all the way down. Midway down the platform, you’ll see a break
in the railing. You’ll come back here and jump down to the Main Valve lever as
soon as you kill the guys at the other end of the platform! Save your game
here before pulling the main lever. Pull the Main Valve lever. After pulling
the Main Valve lever, turn and run (Left-Shift + Up arrow key) back through
the opening, through the other opening, and around up the long catwalk where you
started. Don’t bother stopping to shoot the mobsters (they’ll die anyway!). Avoid
the fires that start up all over the place. Hurry … don’t waste time,
or you’ll find a fire blocking your only exit. You’ll exit the same way
you came in!
When you reach the corner to turn and head to the Office door,
save your game. Load your game again, put yourself in godmode (godgames).
Use Autoaim (F10; type in autoaim). Use your Tommygun. Walk a few steps forward
towards the door. Smiley appears again. This time he’s not smiling! 🙂 So, as
soon as you regain control of your movements/actions, back up and shoot
at him continuously. He will fall off the walkway as it collapses and falls down
into the green mixture. After he dies, walk on the railing that remains there.
Enter the Office.
Body count = 208
Volume 4:
the House on the Edge of Hell
Level 1: The Mission
Speak
to the Secretary. Enter the Elevator, push the button and then exit. Look at the
picture on the wall (spacebar). Enter the door and speak with Svetlana and Icepick.
Turn and enter the Colonel’s Office. Listen to the Colonel and General Briggs
and learn of your new Mission. The Colonel tells you about Hamilton Killian and
a Graveyard "problem" he currently has. Exit the Office, go the Morgue/Autopsy
Room. Get the Ordinary bullets, the shotgun, and 80 shotgun shells. Speak to Doctor
Holliday and then pick up only the Doctor’s bag on the cabinet counter.
Exit
the Autopsy room again and speak with Svetlana and Icepick. They will talk about
Molock Enter the elevator and the next level begins.
Graveyard
Outside
the Graveyard, you will speak with Killian. He will brief you on what has been
going on within the cemetery. When the conversation ends, turn right and walk
down the hill into the graveyard. This is a good time to save your game using
quicksave (F6) … just for good measure!
To the right of the entrance to
the graveyard is a cross with an oval-shaped top on the top of a grave. You will
need to get that. Once you locate it, take and place it at the foot of the stairs
leading up to the Temple on the right side of the Entrance. In the meantime, shoot
and kill a few little zombie miniatures! Get the keys from several of them! While
you’re hunting around the graveyard for the crosses, you’ll kill another little
zombie dude! Get his key, too. The Skeletons can easily be wiped out by using
the cheatcode (F10, then type winblows) for all weapons. Then use the Flamethrower
and watch the bones burn! One of the keys you pick up will open the Temple in
the center of the graveyard. There are a total of three Temples: one in the center,
one to the right and the third on the left. You need to find a cross (just to
the right of the entrance to the cemetery) and place that one in the Temple to
the left of the entrance. The other cross is oval-shaped at the top, and
it, too, can be found just to the right of the graveyard entrance. You will also
need to climb the ivy on the left side of the left Temple. Once
on top, there will be ivy growing down from the roof of this Temple. Click on
it and Stranger will pull it off. This allows light to pass through.
When
both crosses have been placed properly in the Temples to the left and right of
the three stone squares in the center of the graveyard, enter the Main Temple.
Go down the steps and look at (use the spacebar) the inscriptions on the wall
(one is closest to the symbol reflection on the far wall, and the other is four
slots down from the wall reflection). After reading these inscriptions, push the
first and third platform symbols so that they are directly in the light shining
into the room. The others will stay where they are. Move to the symbol on the
wall and push/pull the lever. You will hear something move/rise (sounds like a
stone base opening). Exit the basement of this Temple and you will see that the
three center square stones have risen.
When the three square stones rise,
re-enter the center Temple and pull the lever again. Three panels on the wall
to your right will open, revealing three different globes. From left to right,
they are Air, Fire and Water. Read the inscription on the wall again to become
familiar with what you must do. Take the Fire (center) globe and place it in the
middle of the pillar in the center just outside this center Temple. Go back down
into the basement area and take the Water (right globe). Carry this one outside
the Temple and place it on the left pillar. Grab the Fire and return it to the
center panel down in the basement. Pick up the Air globe and place it on the far
right pillar. Now return to the basement one last time and pick up the Fire globe
again. Return it to the center pillar outside the Temple. Watch the ending screen
shots of the cemetery. Turn and run out of the cemetery.
When you run up
the hill, turn to the left and follow the trail to meet up with Killian.
Body
count = 14
Moloch’s Amulet
Upon entering
this new level, shoot the monster that’s chained to the wall. Pick up the amulet
by the body and move to the top far left of the screen. Use the spacebar to open
the spiked door. Follow down the hallway into a huge room. Use the Amulet (Enter
key) on the center of the statue holding the Bladed Weapon and a sword. Take the
Bladed Weapon (on the left). Turn right and open the closed door (godmode would
be a real nice treat for yourself right about now!). Enter the room carefully;
open fire on all the zombies. When they are all dead, exit this room and enter
the open doorway slowly. Follow the steps on the graphic below in order to safely
make it across the electrified floor, or be sure you’re in godmode to make
it across.
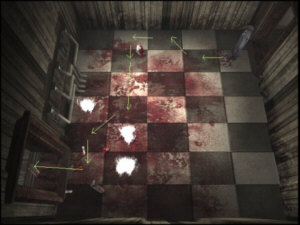
Run
across the room and through the open doorway. When you exit this room, turn
down the hallway. You’ll see five switches on the wall. Turn on only the
second switch from the closed door at the end. Turn and walk down the hallway.
Try to open the first door (you’ll need a key). Then the other doors open, but
reveal only a brick wall. The fifth door opens, but leads only to an elevator
that will drop you to your death! Don’t enter that elevator. Exit and open the
sixth door. Kill a green slimy critter. Exit and enter the next door with the
red carpet etched with a symbol on it. Enter the torture room, and open the spiked
door. Follow the hallway, kill two more zombies, and then open the last door on
the left (all others are brick walls!). Turn left and kill the monster. Open the
first panel on the right. Enter the room carefully or you could fall off a huge
cliff and die. Go down the ladder and into the next floor. Follow the long, winding
hallway around corners until you reach the huge room with the elevator and the
statue. Get the Doctor’s bag next to the statue. Just on the other side of the
statue is a hallway. Follow that hallway, turn into the first opened door on the
left. You’ve just entered the Grand Entry balcony area. Turn left and follow the
balcony around, collecting 40 Silver Bullets in the box on the floor next to the
chairs. Go down the stairs, shoot some vampires and get the 20 Silver Bullets
from the chest to the left of the big double doors (don’t bother trying to get
out … they don’t open!). Continue around under the stairs and enter the opening
to a hallway. Follow this hallway (don’t bother with the doors, they’re locked).
Go back down to the main floor and up the stairs. As you enter this room with
the statue again, there’s a hallway to the right of the elevator. This leads to
the Pantry. It’s locked for now, so return to the big room with the statue. Follow
your path all the way outside, up the ladder, through the room at the end of the
hall and back to the hallway with the panels on the wall. Go to the end and turn
left, there are stairs that lead to nowhere.
Make your way back to the ladder
outside. Go down the ladder, and enter the opening. Follow the hallway around
to the right and turn left at the "intersection." Open the door directly
in front of you and enter. You’ve found the Library. Killian will speak with you
and ask you about Houdini. After he leaves, look at the chess puzzle. Turn towards
the bottom of the screen and move to the bookshelves on the left. Draw your weapon
and shoot/kill the werewolf. Exit the Library, go all the way down to the end
of that long hallway and around the elevator to the Pantry room. Move to the end
of that small hallway and click on the Houdini portrait. A Secret Panel opens.
Turn right and shoot the green slimy critter. Look through the small opening on
the right side of the wall. There are three openings that you can see through.
Each one shows a different room in the Hotel. The middle room shows a woman tied
up on the bed. Now open the door at the end of the hallway. Save your game
here! Do not step on the small square carpet, or you’ll die. Back up
a few steps, use your gun as an "aiming tool" and then run (Left-Shift
key + Up arrow) and jump (G) over the carpet onto the other side. This is the
Music Room. Enter the Music Room, listen to Killian talk about the traps he’s
set for you all over the Castle. Move to the old Victrola and play the record.
Then pick up the Book of Chess off the floor. Exit via the door (unless you just
feel like jumping back over that death-carpet!), and head back to the Library.
Use the Book of Chess on the bookshelf by the window and enter through Secret
Panel. Find the two boxes, get a pistol and some bullets. Go down the spiral stairs
and click on the bookshelf at the bottom of the spiral steps. Get the Symphony
of the Werewolf book and the Servant’s Key. Go back up the spiral stairs, exit
the Library and go to the Pantry. Get in the elevator and go down (left side)
or up (right side of the elevator). Ride the elevator up one floor. Enter the
door opposite the blue statues. Follow this entry to the "Star symbol"
area. Open the doors. Explore this area, but have your weapons ready! Save before
exploring more of the rooms! Get back in the elevator, go down to the Pantry,
down to the Kitchen, and down to the Basement. Work your way around the bloody
cobblestone walkway to the entrance off to the left. If you pull the lever on
the floor by the gated opening, a swarm of killer beetles will attack you. If
you leave the lever alone, there’s no need to worry about them (like the gate
will keep those little critters away from you or something!). Kill the two or
three huge werewolves. Get the Warden’s Key in the corner of this room. Turn to
the right after picking up the Warden’s Key and enter the Laboratory. Again,
Killian speaks to you for a brief moment. Get the Bedroom Key (for the woman tied
to the bed upstairs) and the Doctor’s Bag. Also notice the Gate on the left wall
in the Laboratory. You’ll need the right key! Go up the elevator two times to
the Pantry. Follow the hall around to the second door in the room with the statue.
Open the door, move around the bed and an automatic scene occurs where the Stranger
feeds the woman and then unties her. Kill the vampire! Get the Control Panel device
off the dresser. Exit the room, go to the elevator and place the Control Panel
device on the elevator wall. After putting the Control Panel on the elevator,
make sure your gun is loaded and has plenty of ammo. … Push the elevator button,
immediately back off and then run and jump all the way over the
elevator into the other room. Killian will speak to you again, and you will soon
be attacked by a number of vampires and other zombies. Kill them all! Go to the
corner and get the crossbow off the wall, the shotgun, and 40 Ordinary Bullets.
Move to the curtain/drape that is blocking the elevator on that side of the room,
and push it out of the way. You should also open the other doors in the room and
step into the hallway just to get your bearings and to see where you are in relation
to the hallway. It makes it much easier to access these rooms later on. Now get
in the elevator and pull the lever closest to the elevator door. Immediately pull
out your gun/weapon and kill the werewolf. Exit to his cage, open the gate. Climb
down the ladder, open the freezer door, shoot two more zombies. Open the door
to get your bearings again. Walk around the tile hallway to the Kitchen. Shoot
a dude in the corner, get the Doctor’s bag. On the left of the bar opposite the
cutting board are the bars that prevented you from using the Pantry Dumbwaiter
to enter the kitchen. Lift those bars. Exit the door to the left of the stove.
Get 30 Ordinary Bullets from the box on the floor. Open the door up from the box.
To cross this room, you must go on top of the table. If you walk on the
floor, you’ll die. Then carefully exit the open doorway. Shoot two or three
more gargoyle critters and two or three werewolves in this room. Get the Clock
Room Key off the fireplace mantle (this is hard to see, so make sure you don’t
leave this room without it!). Save your game.
Now make your way to
the door with the two blue statues on either side of it. (Remember, this room
is on the wooden floor level … use the Dumbwaiter in the pantry to go up one
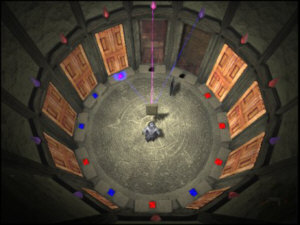
flight!). Save your game before entering this room. Enter the Clock Room.
Move to the center of the room and use the Enter key on the keyboard to grab a
hold of the prism. Move in a counter-clockwise rotation around the room, holding
the prism. A full revolution around the room changes the color of the prism
light beam. The object of this "puzzle" is to open the door at the 12:00
position, the purple door. Turn and open the door at the 7:00 position by shining
the beam on that color at the base of the door. Turn two times all the way around,
counter-clockwise and open the 8:00 door. Turn one time around and open the 2:00
door. A half turn will open the 9:00 door, and a half turn will open the 10:00
door. One and one-half turns counter-clockwise will open the 1:00 door (a prism
appears from the door). Turn and open the 11:00 door (if the 1:00 door closes,
just reopen it again). Another prism will appear from the 11:00 door. Fine-tune
the reflected blue and red lights on the two prisms until you get a purple beam
on the purple light at 12:00. The door will open. Save your game.
Enter
the doorway at 12:00. Listen to Killian, then immediately run to the lever on
the wall at the bottom of the screen. Pull that lever. Turn and run and
jump up on the bottom floor level that extends. Move (run, actually) to the right
side and pull the middle lever on the right. Another floor level from the wall
will extend. Jump up there and run to the left side. Pull the lever marked #2
according to the diagram below.
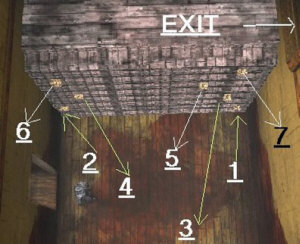
Again,
another level of the wall extends. Jump up there, run to the right side, and pull
the lever marked #3. Jump up another level, run to the left once again, and pull
lever #4. Jump up, run to the right, and pull lever #5. Again, run to the left
after jumping up on top of the new level and pull #6. One last time, jump up on
this level, run to the right and pull lever #7. Jump up on that level and then
on top of the wall. The wall will stop when it crashes into the wall where the
first lever was located. Move to and either jump through the opening (that’s the
chicken way out of the room … and the route I took!) or climb down and
use the ladder (I didn’t want to take any chances that the wall would again start
crushing me!). Once safely outside this room, save your game.
In
the Fire Floor room, look at the grated floor and notice that there are gaps between
where the sporadic flames pop up from the floor. Move left, then forward, then
right and forward towards the top of the screen, then left again, and right and
up … you’ll be safely off the Fire Floor. Save your game again. You cannot
walk right over and pick up the key on the carpet, or you’ll fall through and
die! So, go get a piece of the body laying on the floor and chunk it at the carpet.
The key will fall down below, through a glass ceiling and on the floor of the
room opposite the long dinning table. You’ll get that in a few minutes. Turn around
and go through the doorway on the far right. Enter there, get the Dungeon Key
off the floor, and the Shotgun shells from the box. Move just beneath the bottom
of the carpet on the floor, face the carpet, and use the spacebar to open it.
Climb down the ladder and you’ll be in the hallway on the second floor.
Head back to the hallway area where the bedroom door is and the statue opposite
that door, and the elevator that you jumped across earlier. Go around the statue
and down the hallway to the huge set of stairs that lead down to the Grand Entry.
Work your way down the hallway to the room with the Demon Room Key. Get the key
after killing tons of vampires. Again, save your game.
Head back
up the banister and find the portrait at the end of that winding hallway. Carefully
turn left and walk up the steps and then outside the Castle, and up the
ladder. Work your way around the winding hallways/doorways, past the huge paintings
on the wall and all the way back to the Electrified Floor room. Stop before going
into that room. Turn and enter the second door on the left (not the one by the
electric switches). Be careful not to step on the trap door, if it hasn’t already
been "sprung!" Walk around that. Make your way into the hallway with
the huge Star on the wall. Turn and walk down towards the bottom of the screen.
Open the door with the red Star on it. Load your weapon and step carefully into
the room (be ready to back up!). Shoot and kill all the laughing miniature zombies
and then get the box of matches in the corner. Exit this room, and you’ll still
hear laughter from several miniature zombies. Walk down towards the bottom of
the screen in the hallway and through the last door. Walk down below the blue
statue room (Clock Room) and through that doorway. Shoot two more miniature zombies.
Use the Dumbwaiter to lower yourself down into the Dungeon area (three times down).
As
you exit the Dumbwaiter, get the Doctor’s bag in the lower left corner, just outside
the Dumbwaiter. Turn and head for the main "grinder" room. Be ready
to shoot and fight off tons of zombies, big ones and small ones. Enter the room
off to the right and use the Dungeon Key to enter the Dungeon Room. This is another
good time to save your game! When you enter the Dungeon Room, you’ll have to look
really hard for the levers between each of the six cages. Pull one of the levers,
shoot the monster as it comes out, then pull another lever, shoot another monster,
and so forth until all of them are dead. Exit the Dungeon area and go back to
the huge castle gate just outside the Dumbwaiter. Get your Flamethrower handy.
Open the gate and fire up the gun. Shoot and burn those little beetles that crawl/race
towards you. Enter this area and use dynamite to blast the underwater green slimeballs!
I used my flame thrower for all the ones around the green pool, and then used
dynamite for the several that were underwater. There’s one cage in the
actual Dungeon that has a wall of ice. Push on the loose bricks and it
collapses, revealing another room. Enter the room. Listen to Moloch and the conversation.
Then walk to the right of Moloch, closest to the bottom of the screen and a candle.
Use the spacebar to free him!
Exit his room and go to the area with the
iron bed. Use the spacebar as you’re standing in the middle of the side of the
bed. A fire will light. Moloch will climb in! He tells you that he needs food
to regain his full strength to avenge Hamilton Killian. Exit this room, and be
sure to let Moloch follow you. Head towards the Dumbwaiter and he will stop and
munch down on some of those green slimy critters you blasted away earlier, regaining
his full strength! Moloch tells you that it’s time to avenge Killian, and to meet
him on the third floor, in Killian’s Control Room. He leaves via the elevator
shaft!
Get back in the Dumbwaiter, and go up three times. Exit the Dumbwaiter,
load your weapon and blast away a few little critters! Then make your way along
the hallways and rooms to the hallway with the Huge Red Star Tapestry on the wall.
Enter the room on the left, closest to the Tapestry (w/the lever and the steel
door). Use the lever, open the steel door, climb the ladder and jump into
the Control Room. Everything else from here is a short video sequence between
you, Killian and Moloch.
Body count = 119
Listen to and watch the
video sequence between the Colonel and Stranger.
Mission complete.
Total
body count = 142
End of game!
Great game, huh? Leaves room for a sequel!
I like that! Stranger as a villain? Ouch!
This document may be freely distributed
by any means as long as the context is not altered in any way and reference/links
are provided to Linda’s site. Copyright 11/05/99, Linda Shaw. Updated: 11/16/99.
To visit Linda’s Home Page, click here.