Just Adventure original
Nocturne Walkthrough
Warehouse
Enter through
the sewers and kill two mobsters. Grab their Tommyguns or use your cheatcode,
moreammo, for Tommygun ammo. Work your way around the warehouse and kill off more
undead mobsters. Find the area with the Doctor’s bag and three batteries. Take
those. Now find your way into the corner around some crates and boxes and then
go up the ladder. Work your way down some steps and around this section of the
Warehouse. Find Tommyguns and 80 flamethrower cans in the room with the green
door.
On the truck by the door in the corner are 80 flamethrowers. Get those.
They’re by the driver’s door. On the ledge of the truck outside the bathroom is
another can of fuel for the flamethrower. Enter the Men’s Room and go through
the other door, but pick up the flamethrower fuel first. Shoot some more Mafia
Undead and blow up the barrels and boxes of dynamite along the way! Go up the
steps onto the platform. You’ll have to jump off the walkway onto some boxes and
then over the fence when you reach a break in the fence. Look for this area of
the Warehouse.
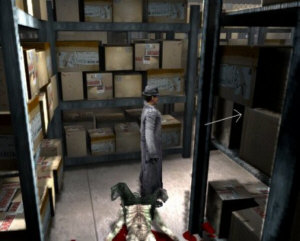
Once
on the other side of this area, get your guns ready and blow away a few more Mobsters.
Just on the other side of the recreation room have your flamethrower ready! Save
your game first. There’s an opening down the catwalk where the fence is broken.
Jump off there onto the boxes and then down to the floor. Walk around the office
then turn to leave this door (it’s locked). Smiley will bust down the Office door
and this is when you use your Flamethrower and the fuel cans you’ve collected
along the way! Enter the Office after killing him for good, and exit the door
to the Factory.
Factory
Head down the
walkway you’re facing at the beginning of this level. Go up the steps, shoot more
gangsters around the green tank mixture and go down the other set of stairs. Shoot
another two or three mobsters at the base of the stairs and get their Tommyguns.
Go around the two huge barrels at the base of the stairs, kill another mobster
hiding in the corner! Then go to the right of the stairs on the bottom and along
the fence. Save here. Shoot a ton of those nasty guys again, and more of
the recent reborn undead! Work your way around and up another green tank and conveyor
belt area. In the corner is a door. Open it.
Body count = 31
Factory
Area 2
Walk down the walkway, turn right and then right again at the
corner. All the way down at the end of this catwalk is a lever. Read the sign
(spacebar). Pull the lever. (Explosions will start, but you can still escape this
area–I used godmode and jumped down!) Turn and go all the way down the ramp then
up the steps and all the way down. Midway down the platform, you’ll see a break
in the railing. You’ll come back here and jump down to the Main Valve lever as
soon as you kill the guys at the other end of the platform! Save your game
here before pulling the main lever. Pull the Main Valve lever. After pulling
the Main Valve lever, turn and run (Left-Shift + Up arrow key) back through
the opening, through the other opening, and around up the long catwalk where you
started. Don’t bother stopping to shoot the mobsters (they’ll die anyway!). Avoid
the fires that start up all over the place. Hurry … don’t waste time,
or you’ll find a fire blocking your only exit. You’ll exit the same way
you came in!
When you reach the corner to turn and head to the Office door,
save your game. Load your game again, put yourself in godmode (godgames).
Use Autoaim (F10; type in autoaim). Use your Tommygun. Walk a few steps forward
towards the door. Smiley appears again. This time he’s not smiling! 🙂 So, as
soon as you regain control of your movements/actions, back up and shoot
at him continuously. He will fall off the walkway as it collapses and falls down
into the green mixture. After he dies, walk on the railing that remains there.
Enter the Office.
Body count = 208
Volume 4:
the House on the Edge of Hell
Level 1: The Mission
Speak
to the Secretary. Enter the Elevator, push the button and then exit. Look at the
picture on the wall (spacebar). Enter the door and speak with Svetlana and Icepick.
Turn and enter the Colonel’s Office. Listen to the Colonel and General Briggs
and learn of your new Mission. The Colonel tells you about Hamilton Killian and
a Graveyard "problem" he currently has. Exit the Office, go the Morgue/Autopsy
Room. Get the Ordinary bullets, the shotgun, and 80 shotgun shells. Speak to Doctor
Holliday and then pick up only the Doctor’s bag on the cabinet counter.
Exit
the Autopsy room again and speak with Svetlana and Icepick. They will talk about
Molock Enter the elevator and the next level begins.
Graveyard
Outside
the Graveyard, you will speak with Killian. He will brief you on what has been
going on within the cemetery. When the conversation ends, turn right and walk
down the hill into the graveyard. This is a good time to save your game using
quicksave (F6) … just for good measure!
To the right of the entrance to
the graveyard is a cross with an oval-shaped top on the top of a grave. You will
need to get that. Once you locate it, take and place it at the foot of the stairs
leading up to the Temple on the right side of the Entrance. In the meantime, shoot
and kill a few little zombie miniatures! Get the keys from several of them! While
you’re hunting around the graveyard for the crosses, you’ll kill another little
zombie dude! Get his key, too. The Skeletons can easily be wiped out by using
the cheatcode (F10, then type winblows) for all weapons. Then use the Flamethrower
and watch the bones burn! One of the keys you pick up will open the Temple in
the center of the graveyard. There are a total of three Temples: one in the center,
one to the right and the third on the left. You need to find a cross (just to
the right of the entrance to the cemetery) and place that one in the Temple to
the left of the entrance. The other cross is oval-shaped at the top, and
it, too, can be found just to the right of the graveyard entrance. You will also
need to climb the ivy on the left side of the left Temple. Once
on top, there will be ivy growing down from the roof of this Temple. Click on
it and Stranger will pull it off. This allows light to pass through.
When
both crosses have been placed properly in the Temples to the left and right of
the three stone squares in the center of the graveyard, enter the Main Temple.
Go down the steps and look at (use the spacebar) the inscriptions on the wall
(one is closest to the symbol reflection on the far wall, and the other is four
slots down from the wall reflection). After reading these inscriptions, push the
first and third platform symbols so that they are directly in the light shining
into the room. The others will stay where they are. Move to the symbol on the
wall and push/pull the lever. You will hear something move/rise (sounds like a
stone base opening). Exit the basement of this Temple and you will see that the
three center square stones have risen.
When the three square stones rise,
re-enter the center Temple and pull the lever again. Three panels on the wall
to your right will open, revealing three different globes. From left to right,
they are Air, Fire and Water. Read the inscription on the wall again to become
familiar with what you must do. Take the Fire (center) globe and place it in the
middle of the pillar in the center just outside this center Temple. Go back down
into the basement area and take the Water (right globe). Carry this one outside
the Temple and place it on the left pillar. Grab the Fire and return it to the
center panel down in the basement. Pick up the Air globe and place it on the far
right pillar. Now return to the basement one last time and pick up the Fire globe
again. Return it to the center pillar outside the Temple. Watch the ending screen
shots of the cemetery. Turn and run out of the cemetery.
When you run up
the hill, turn to the left and follow the trail to meet up with Killian.
Body
count = 14
Moloch’s Amulet
Upon entering
this new level, shoot the monster that’s chained to the wall. Pick up the amulet
by the body and move to the top far left of the screen. Use the spacebar to open
the spiked door. Follow down the hallway into a huge room. Use the Amulet (Enter
key) on the center of the statue holding the Bladed Weapon and a sword. Take the
Bladed Weapon (on the left). Turn right and open the closed door (godmode would
be a real nice treat for yourself right about now!). Enter the room carefully;
open fire on all the zombies. When they are all dead, exit this room and enter
the open doorway slowly. Follow the steps on the graphic below in order to safely
make it across the electrified floor, or be sure you’re in godmode to make
it across.
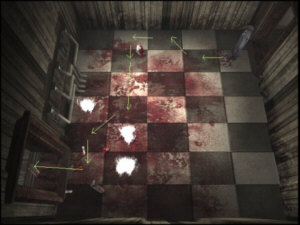
Run
across the room and through the open doorway. When you exit this room, turn
down the hallway. You’ll see five switches on the wall. Turn on only the
second switch from the closed door at the end. Turn and walk down the hallway.
Try to open the first door (you’ll need a key). Then the other doors open, but
reveal only a brick wall. The fifth door opens, but leads only to an elevator
that will drop you to your death! Don’t enter that elevator. Exit and open the
sixth door. Kill a green slimy critter. Exit and enter the next door with the
red carpet etched with a symbol on it. Enter the torture room, and open the spiked
door. Follow the hallway, kill two more zombies, and then open the last door on
the left (all others are brick walls!). Turn left and kill the monster. Open the
first panel on the right. Enter the room carefully or you could fall off a huge
cliff and die. Go down the ladder and into the next floor. Follow the long, winding
hallway around corners until you reach the huge room with the elevator and the
statue. Get the Doctor’s bag next to the statue. Just on the other side of the
statue is a hallway. Follow that hallway, turn into the first opened door on the
left. You’ve just entered the Grand Entry balcony area. Turn left and follow the
balcony around, collecting 40 Silver Bullets in the box on the floor next to the
chairs. Go down the stairs, shoot some vampires and get the 20 Silver Bullets
from the chest to the left of the big double doors (don’t bother trying to get
out … they don’t open!). Continue around under the stairs and enter the opening
to a hallway. Follow this hallway (don’t bother with the doors, they’re locked).
Go back down to the main floor and up the stairs. As you enter this room with
the statue again, there’s a hallway to the right of the elevator. This leads to
the Pantry. It’s locked for now, so return to the big room with the statue. Follow
your path all the way outside, up the ladder, through the room at the end of the
hall and back to the hallway with the panels on the wall. Go to the end and turn
left, there are stairs that lead to nowhere.
Make your way back to the ladder
outside. Go down the ladder, and enter the opening. Follow the hallway around
to the right and turn left at the "intersection." Open the door directly
in front of you and enter. You’ve found the Library. Killian will speak with you
and ask you about Houdini. After he leaves, look at the chess puzzle. Turn towards
the bottom of the screen and move to the bookshelves on the left. Draw your weapon
and shoot/kill the werewolf. Exit the Library, go all the way down to the end
of that long hallway and around the elevator to the Pantry room. Move to the end
of that small hallway and click on the Houdini portrait. A Secret Panel opens.
Turn right and shoot the green slimy critter. Look through the small opening on
the right side of the wall. There are three openings that you can see through.
Each one shows a different room in the Hotel. The middle room shows a woman tied
up on the bed. Now open the door at the end of the hallway. Save your game
here! Do not step on the small square carpet, or you’ll die. Back up
a few steps, use your gun as an "aiming tool" and then run (Left-Shift
key + Up arrow) and jump (G) over the carpet onto the other side. This is the
Music Room. Enter the Music Room, listen to Killian talk about the traps he’s
set for you all over the Castle. Move to the old Victrola and play the record.
Then pick up the Book of Chess off the floor. Exit via the door (unless you just
feel like jumping back over that death-carpet!), and head back to the Library.
Use the Book of Chess on the bookshelf by the window and enter through Secret
Panel. Find the two boxes, get a pistol and some bullets. Go down the spiral stairs
and click on the bookshelf at the bottom of the spiral steps. Get the Symphony
of the Werewolf book and the Servant’s Key. Go back up the spiral stairs, exit
the Library and go to the Pantry. Get in the elevator and go down (left side)
or up (right side of the elevator). Ride the elevator up one floor. Enter the
door opposite the blue statues. Follow this entry to the "Star symbol"
area. Open the doors. Explore this area, but have your weapons ready! Save before
exploring more of the rooms! Get back in the elevator, go down to the Pantry,
down to the Kitchen, and down to the Basement. Work your way around the bloody
cobblestone walkway to the entrance off to the left. If you pull the lever on
the floor by the gated opening, a swarm of killer beetles will attack you. If
you leave the lever alone, there’s no need to worry about them (like the gate
will keep those little critters away from you or something!). Kill the two or
three huge werewolves. Get the Warden’s Key in the corner of this room. Turn to
the right after picking up the Warden’s Key and enter the Laboratory. Again,
Killian speaks to you for a brief moment. Get the Bedroom Key (for the woman tied
to the bed upstairs) and the Doctor’s Bag. Also notice the Gate on the left wall
in the Laboratory. You’ll need the right key! Go up the elevator two times to
the Pantry. Follow the hall around to the second door in the room with the statue.
Open the door, move around the bed and an automatic scene occurs where the Stranger
feeds the woman and then unties her. Kill the vampire! Get the Control Panel device
off the dresser. Exit the room, go to the elevator and place the Control Panel
device on the elevator wall. After putting the Control Panel on the elevator,
make sure your gun is loaded and has plenty of ammo. … Push the elevator button,
immediately back off and then run and jump all the way over the
elevator into the other room. Killian will speak to you again, and you will soon
be attacked by a number of vampires and other zombies. Kill them all! Go to the
corner and get the crossbow off the wall, the shotgun, and 40 Ordinary Bullets.
Move to the curtain/drape that is blocking the elevator on that side of the room,
and push it out of the way. You should also open the other doors in the room and
step into the hallway just to get your bearings and to see where you are in relation
to the hallway. It makes it much easier to access these rooms later on. Now get
in the elevator and pull the lever closest to the elevator door. Immediately pull
out your gun/weapon and kill the werewolf. Exit to his cage, open the gate. Climb
down the ladder, open the freezer door, shoot two more zombies. Open the door
to get your bearings again. Walk around the tile hallway to the Kitchen. Shoot
a dude in the corner, get the Doctor’s bag. On the left of the bar opposite the
cutting board are the bars that prevented you from using the Pantry Dumbwaiter
to enter the kitchen. Lift those bars. Exit the door to the left of the stove.
Get 30 Ordinary Bullets from the box on the floor. Open the door up from the box.
To cross this room, you must go on top of the table. If you walk on the
floor, you’ll die. Then carefully exit the open doorway. Shoot two or three
more gargoyle critters and two or three werewolves in this room. Get the Clock
Room Key off the fireplace mantle (this is hard to see, so make sure you don’t
leave this room without it!). Save your game.
Now make your way to
the door with the two blue statues on either side of it. (Remember, this room
is on the wooden floor level … use the Dumbwaiter in the pantry to go up one
flight!). Save your game before entering this room. Enter the Clock Room.
Move to the center of the room and use the Enter key on the keyboard to grab a
hold of the prism. Move in a counter-clockwise rotation around the room, holding
the prism. A full revolution around the room changes the color of the prism
light beam. The object of this "puzzle" is to open the door at the 12:00
position, the purple door. Turn and open the door at the 7:00 position by shining
the beam on that color at the base of the door. Turn two times all the way around,
counter-clockwise and open the 8:00 door. Turn one time around and open the 2:00
door. A half turn will open the 9:00 door, and a half turn will open the 10:00
door. One and one-half turns counter-clockwise will open the 1:00 door (a prism
appears from the door). Turn and open the 11:00 door (if the 1:00 door closes,
just reopen it again). Another prism will appear from the 11:00 door. Fine-tune
the reflected blue and red lights on the two prisms until you get a purple beam
on the purple light at 12:00. The door will open. Save your game.
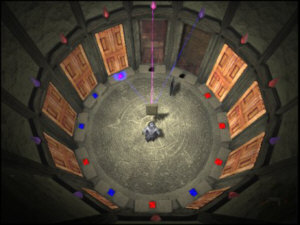
Enter
the doorway at 12:00. Listen to Killian, then immediately run to the lever on
the wall at the bottom of the screen. Pull that lever. Turn and run and
jump up on the bottom floor level that extends. Move (run, actually) to the right
side and pull the middle lever on the right. Another floor level from the wall
will extend. Jump up there and run to the left side. Pull the lever marked #2
according to the diagram below.
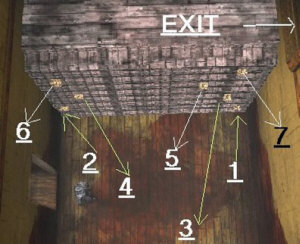
Again,
another level of the wall extends. Jump up there, run to the right side, and pull
the lever marked #3. Jump up another level, run to the left once again, and pull
lever #4. Jump up, run to the right, and pull lever #5. Again, run to the left
after jumping up on top of the new level and pull #6. One last time, jump up on
this level, run to the right and pull lever #7. Jump up on that level and then
on top of the wall. The wall will stop when it crashes into the wall where the
first lever was located. Move to and either jump through the opening (that’s the
chicken way out of the room … and the route I took!) or climb down and
use the ladder (I didn’t want to take any chances that the wall would again start
crushing me!). Once safely outside this room, save your game.
In
the Fire Floor room, look at the grated floor and notice that there are gaps between
where the sporadic flames pop up from the floor. Move left, then forward, then
right and forward towards the top of the screen, then left again, and right and
up … you’ll be safely off the Fire Floor. Save your game again. You cannot
walk right over and pick up the key on the carpet, or you’ll fall through and
die! So, go get a piece of the body laying on the floor and chunk it at the carpet.
The key will fall down below, through a glass ceiling and on the floor of the
room opposite the long dinning table. You’ll get that in a few minutes. Turn around
and go through the doorway on the far right. Enter there, get the Dungeon Key
off the floor, and the Shotgun shells from the box. Move just beneath the bottom
of the carpet on the floor, face the carpet, and use the spacebar to open it.
Climb down the ladder and you’ll be in the hallway on the second floor.
Head back to the hallway area where the bedroom door is and the statue opposite
that door, and the elevator that you jumped across earlier. Go around the statue
and down the hallway to the huge set of stairs that lead down to the Grand Entry.
Work your way down the hallway to the room with the Demon Room Key. Get the key
after killing tons of vampires. Again, save your game.
Head back
up the banister and find the portrait at the end of that winding hallway. Carefully
turn left and walk up the steps and then outside the Castle, and up the
ladder. Work your way around the winding hallways/doorways, past the huge paintings
on the wall and all the way back to the Electrified Floor room. Stop before going
into that room. Turn and enter the second door on the left (not the one by the
electric switches). Be careful not to step on the trap door, if it hasn’t already
been "sprung!" Walk around that. Make your way into the hallway with
the huge Star on the wall. Turn and walk down towards the bottom of the screen.
Open the door with the red Star on it. Load your weapon and step carefully into
the room (be ready to back up!). Shoot and kill all the laughing miniature zombies
and then get the box of matches in the corner. Exit this room, and you’ll still
hear laughter from several miniature zombies. Walk down towards the bottom of
the screen in the hallway and through the last door. Walk down below the blue
statue room (Clock Room) and through that doorway. Shoot two more miniature zombies.
Use the Dumbwaiter to lower yourself down into the Dungeon area (three times down).
As
you exit the Dumbwaiter, get the Doctor’s bag in the lower left corner, just outside
the Dumbwaiter. Turn and head for the main "grinder" room. Be ready
to shoot and fight off tons of zombies, big ones and small ones. Enter the room
off to the right and use the Dungeon Key to enter the Dungeon Room. This is another
good time to save your game! When you enter the Dungeon Room, you’ll have to look
really hard for the levers between each of the six cages. Pull one of the levers,
shoot the monster as it comes out, then pull another lever, shoot another monster,
and so forth until all of them are dead. Exit the Dungeon area and go back to
the huge castle gate just outside the Dumbwaiter. Get your Flamethrower handy.
Open the gate and fire up the gun. Shoot and burn those little beetles that crawl/race
towards you. Enter this area and use dynamite to blast the underwater green slimeballs!
I used my flame thrower for all the ones around the green pool, and then used
dynamite for the several that were underwater. There’s one cage in the
actual Dungeon that has a wall of ice. Push on the loose bricks and it
collapses, revealing another room. Enter the room. Listen to Moloch and the conversation.
Then walk to the right of Moloch, closest to the bottom of the screen and a candle.
Use the spacebar to free him!
Exit his room and go to the area with the
iron bed. Use the spacebar as you’re standing in the middle of the side of the
bed. A fire will light. Moloch will climb in! He tells you that he needs food
to regain his full strength to avenge Hamilton Killian. Exit this room, and be
sure to let Moloch follow you. Head towards the Dumbwaiter and he will stop and
munch down on some of those green slimy critters you blasted away earlier, regaining
his full strength! Moloch tells you that it’s time to avenge Killian, and to meet
him on the third floor, in Killian’s Control Room. He leaves via the elevator
shaft!
Get back in the Dumbwaiter, and go up three times. Exit the Dumbwaiter,
load your weapon and blast away a few little critters! Then make your way along
the hallways and rooms to the hallway with the Huge Red Star Tapestry on the wall.
Enter the room on the left, closest to the Tapestry (w/the lever and the steel
door). Use the lever, open the steel door, climb the ladder and jump into
the Control Room. Everything else from here is a short video sequence between
you, Killian and Moloch.
Body count = 119
Listen to and watch the
video sequence between the Colonel and Stranger.
Mission complete.
Total
body count = 142
End of game!
Great game, huh? Leaves room for a sequel!
I like that! Stranger as a villain? Ouch!
This document may be freely distributed
by any means as long as the context is not altered in any way and reference/links
are provided to Linda’s site. Copyright 11/05/99, Linda Shaw. Updated: 11/16/99.
To visit Linda’s Home Page, click here.