Nightlong: Union City Conspiracy – Nightlong Walkthrough
Nightlong Walkthrough
ON THE ROOF
STARTING INVENTORY: Credit Notes, Minicom, Elevator Card, Magnetic Pen and Small Key
Pick up the Foil Paper between the two aircars.
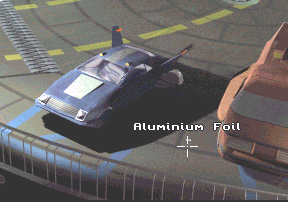
Open the door to the building and
enter the APARTMENT BUILDING.
APARTMENT BUILDING
Press the elevator button –
the fuse inside the panel blows. Remove the Fuse (blown) and wrap the Foil Paper around it. Replace the Fuse (working) in the panel to repair the elevator button. Press
the button to open the elevator. Slide the Elevator Card through the slot inside the elevator. Take
the elevator to Simon Ruby’s apartment.
Examine the door to his apartment
(on the left of the elevator) – [17 – S. RUBY]. This
activates the ‘letterbox for number 17’ in the foyer.
Return to the foyer.
Open the ‘letterbox for
number 17’ with the Small Key –
get a Letter
(with signature) from inside.
Go back to the apartment.
Put the Letter (with signature) on the pen pad on the door. Now use the Magnetic Pen on the pen pad to open the door. Enter the
apartment.
INSIDE THE APARTMENT
Take the Note Paper from the table in the living room. It has
a message [ROTMALL 17 11.30 PM] on it – this activates the
map in the SUBWAY (see later). Take the Photo from on top of the refrigerator. Open the
refrigerator and look inside. Take the Bottle (of Vodka) from the refrigerator. Go to the bedroom.
There are two switches next to the
window that lower or raise the shutter. Press the bottom switch
to lower the shutter. Now open the window to reveal a piece of
sticky tape. Remove the Key from the
tape. Open the wardrobe and move the clothes aside to find the
safe. Unlock the safe with the Key.
Inside the safe are a Pistol, a Tube (of acid) and Ruby’s Report (to Hugh).
APARTMENT BUILDING
Insert the Credit Notes into the vending machine (outside
Ruby’s apartment) – it dispenses a Can (of beer). Check the coin return and get Coin (change). Go to the ROOF.
ON THE ROOF
Melt the barrier (next to the rail
on the bridge) with the Tube (of acid).
Take the Bar.
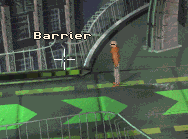
Return to the foyer inside the APARTMENT
BUILDING.
APARTMENT BUILDING
Examine the map on the wall –
this activates the SUBWAY option in the elevator. Take the
elevator to the SUBWAY.
THE SUBWAY
Examine the map above the ticket
machine – this activates the ticket machine for use. Insert
the Coin
(change) into the ticket
machine. Place your thumb on the scanner and go through the
access gate.
Talk to the Bum at Rotmall 17.
Give him the
Bottle (of Vodka), then show
him the Photo. He will still be ‘thirsty’, so
give him the Can
(of beer) as well – he is
now prepared to sell the Skate. To buy the
Skate select the [I feel for the guy, what the
hell…] option. Go
up the escalator to get to the SQUARE.
THE SQUARE
The Doorman outside the FREE
CLIMAX tells you that you need a membership card to get inside.
You must have spoken to him in order to activate the topic of the
membership card with the Storekeeper. Enter the LIQUOR STORE.
Take note that the
Storekeeper’s Wife is afraid of rats. Examine the Membership Card on the shelf behind the Storekeeper. Try
to take the Membership
Card – this activates the
topic with the Storekeeper. Talk to him and select the [Ask him about the
membership card]
option. He tells you that he is prepared to swap it for a bottle
of Chateau Lafitte ’85. Climb over the railings to get to
the alley between the LIQUOR STORE and the FREE CLIMAX.
Open the manhole with the Bar. Go down the open manhole to the UNDERGROUND
TUNNEL. Pick up the Rat near the
grating at the far end. Return to the alley.
Use the Tube (of acid) to melt the padlock on the trapdoor. Open
the trapdoor and go down to the STOREROOM. Attach the Rat to the Skate, and then
roll the Rat
(on the Skate) towards the
Storekeeper’s Wife. When she runs away – open the case
on the floor and take out the Bottle (of Chateau Lafitte ’85). Go back to the LIQUOR STORE.
Give the Bottle (of Chateau Lafitte
’85) to the Storekeeper
– he gives you the Membership Card
in return.
Show the Membership Card to the Doorman outside the FREE CLIMAX
– he will now allow you access. Enter the FREE CLIMAX and
have a conversation with Eva. Return to the SUBWAY.
THE SUBWAY
Use the Minicom to contact Hugh Martens (this is the only
place it will work). The fax machine needs to be fixed in order
for Hugh to transmit a map. Pick up the Plastic Plate (on the floor under the graffiti). Attach
the Plastic
Plate to the fax machine on
the left – you now have a fax number to give to Hugh
(PK64768). Use the Minicom to
contact Hugh Martens again. Take the Map from
the fax machine – this activates the grating in the
UNDERGROUND TUNNEL (down the open manhole). Go to the UNDERGROUND
TUNNEL.
THE UNDERGROUND TUNNEL
Open the grating at the far end of
the tunnel. Go through the grating to get to the PLATFORMS.
THE PLATFORMS
Use the Pistol to shoot the lock on the door leading to the
MAINTENANCE ROOM. Open the door and enter.
Inside the middle cabinet is a bag
containing various tools. Open the middle cabinet and remove the Leads, Screwdriver and Tool (Socket Spanner) from the bag.
Unscrew the logo on the
advertisement board with the Screwdriver. The
logo is a Metal
‘S’ – which you
attach to the chain lying next to the pipe near the door. You now
have a makeshift grapple. Throw the makeshift grapple onto the
overhead pipe (above the tracks). Cross the platform to the other
side.
Open the panel next to the
magnetic field with the Tool (Socket Spanner). Attach the Leads to the
contacts, and then pull the lever to turn the current on. Apply
the other end of the Leads to the
magnetic field – this will short-circuit and deactivate the
magnetic field. You are now able to pass through.
At the extreme left of the
DESERTED PLATFORM is a shed. Take the Pliers that are inside. Use the Bar to knock the loudspeaker off the wall – a Magnet falls onto the floor. Pick up the Magnet. Note: By going down the trapdoor inside the
shed; the door leading to the BOOKSTORE will be visible on
the other side of the chasm.
Climb onto the BRIDGE. There is a
sign suspended by a cable over the rubble on the tracks. Cut the
cable with the Pliers – the sign drops down and forms a
passage allowing you to cross over to the ZOO.
THE ZOO
Open the curtain in the BAR. Take
the Broom and the Cylinder (of gas). There is a Small can (of oil)
on the counter, which you take. Take the Can (empty) from the table. Go to the SPHINX.
Try to enter the SPHINX – the
recorded message gives the access codes for the 3 WHEELS:
"…under
the supreme eye of the father of the gods…"
"…sits
the solar protector of all men…"
"…to
the right of he who delights in the eternal
becoming of his being…"
This activates the Book in the BOOKSTORE. Return to the MAINTENANCE
ROOM on the PLATFORMS.
ON THE PLATFORMS
In order to cross back over the
tracks you need to reach the chain (attached to the overhead
pipe). Use the Magnet on the Bar to
make a
Magnetic Bar. Use the Magnetic Bar to ‘attract’ the chain and cross
the tracks.
Open the extreme right cabinet in
the MAINTENANCE ROOM. Take the Key from
inside. Pour the oil from the Small can (of oil) onto the hasp of the door in the MAINTENANCE ROOM.
Now turn the hasp and open the door to enter the STOREROOM.
The STOREROOM is in darkness.
Press the switch (to try turning the lights on) in the STOREROOM.
Examine the bulb – it’s not working. Open the trapdoor
(on the floor as you enter). Go down the trapdoor to get to the UNDERGROUND
PASSAGEWAY.
UNDERGROUND PASSAGEWAY
Unlock the door at the end of the
passage with the Key. Open the
door and enter the BOOKSTORE.
THE BOOKSTORE
Remove the Book from the middle shelf (immediately to the left of
the well as you face it). Read the Book, it
contains clues to the access code of the 3 WHEELS.
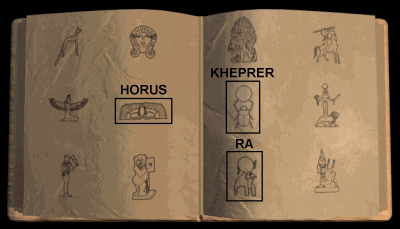
RA (TOP) = Head of all Egyptian
Gods
KHEPRER (LEFT) = Image of God
always becoming in his continuous cycle of dying and rising again
HORUS (RIGHT) = Protector from all
sickness that afflicts mankind
Remove the Bulb (working) from the light on the desk. Climb down the
well to return to the UNDERGROUND PASSAGE. Go to the
STOREROOM.
ON THE PLATFORMS
Remove the Bulb (faulty) from the light socket (in the STOREROOM),
and replace it with the Bulb (working).
Press the switch to turn the lights on. Take the Three-way Adapter from the shelf. Make your way back to the
SPHINX at the ZOO.
THE ZOO
Turn the 3 WHEELS to the correct
settings:
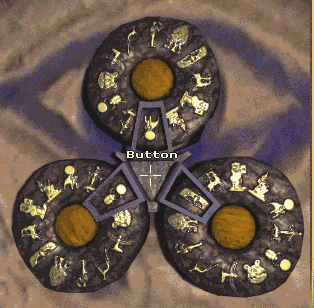
Press the button in the centre of
the 3 WHEELS to gain access to the CONTROL ROOM.
The red buttons on the panels
indicate that the barriers are active. Press the red button (2nd
from the left) to deactivate the barrier at the GODDESS (the
button turns green). Press the red button (extreme right) to also
deactivate the barrier at the FISSURE (again the button turns
green). Take the Gun from the
shelf. Go to the FISSURE.
Try crossing the footbridge –
a dinosaur appears. Shoot the dinosaur with the Gun. Now cross the footbridge and enter the CAVE.
Take the Flare from the table. Examine the key on the wall next to
the cage and note that it has a ‘Xame Electronics’
cell. Go to the GODDESS.
Move the bush to reveal a faucet.
Turn the faucet once to extinguish the fire in the brazier. Turn
it again and the brazier fills up with fuel. Fill the Can (empty) with fuel from the brazier – you have
a Can (of
fuel). Go to the POND.
Open the machinery panel –
the tank opens and the Kid (on the other side) falls down. Pour
the fuel from the Can (of fuel)
into the tank. Note that you are left with 2 Cans (empty). Also pour the gas from the Cylinder (of gas) into the tank. Finally, throw the Flare into the tank – the resultant explosion opens
the sluice gate. Note what happens to the Minicom, i.e. the sparks! Cross the bridge to get
to the Kid. Search the Kid and get the Remote Control. Examine the Remote Control and note that it is also a ‘Xame
Electronics’ gadget (the same as the key in the CAVE).
Return to the CAVE.
Activate the key with the Remote Control to open the elevator. Take the elevator to
the WAREHOUSE.
THE WAREHOUSE
Search the open crate (on the
extreme left) and get the Pincers. Search
the same crate a second time to get the Projector. Take the elevator (on the far right) to
get to the metal walkway above. Press the push-buttons to open
the trapdoor. Climb up the staircase to the ROOF.
Note that the trapdoor is sealed
shut. Use the Magnetic
Bar to open the door that
leads to the MACHINERY ROOM. Enter the MACHINERY ROOM.
Note the two canisters filled with
gas. Pull the lever (above and to the right of the mixer faucet)
to turn the gas off. Loosen the pipe by cutting it with the Pliers. Now bend the pipe upwards so that it is visible
(and accessible) through the window.
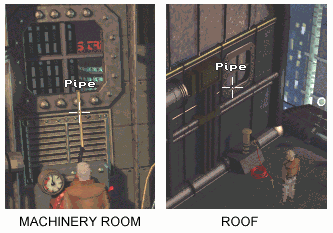
Turn the gas supply on again by
pulling the lever. Go back to the ROOF.
Place the Minicom on the lock on the sealed trapdoor.
Disconnect the hose from the faucet and attach it to the pipe
(visible and accessible through the window) – see picture
above. Use the hose to get gas onto the Minicom and ignite the sparks. The trapdoor will
be blown open.
Note:
1. the fire alarm goes off
2. the previously hidden
passageway where the Guard comes from
3. how he deactivates the alarm
4. he drops a match
Return to the ground level of the
WAREHOUSE.
Pick up the Match dropped by the Guard. Open the panel (in which the
alarm is housed). Unscrew the cover with the Screwdriver. Disconnect the earth (middle) wire and
join it to the negative (right) wire.
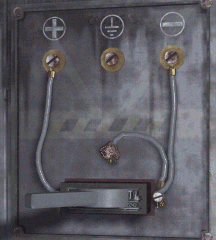
Replace the cover – the booby
trap is now ready. Go back up to the metal walkway.
Light the Broom with the Match to make a Torch. Touch the sensor (near the push-buttons) with the Torch to set the alarm off again. The Guard will come
investigate and gets electrocuted when he switches it off. Go to
the HIDEOUT through the passageway.
THE HIDEOUT
Insert the Three-way Adapter into the socket (on the lower part of the
wall near the entrance). Plug the Projector
into the Three-way
Adapter. Switch on the Projector to activate the hologram. After
overpowering the Terrorist, search him and get a Laser and a Key. Take the
elevator to the DESERTED ROOM above.
Unlock the left desk drawer with
the Key. Search the drawer to find a (Security) Card. Move the picture on the wall to reveal a Piece of Paper. Take the Piece of Paper – it gives a clue to the correct sequence in
which to press the buttons on the security system (downstairs).
Note that the colours range from ‘white’ to
‘black’ in gradual shades. The sequence to follow
begins with ‘white’ and ends with ‘black’.
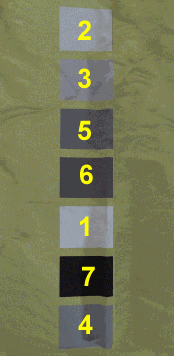
Return downstairs.
Fire the Laser at the panel to open it and reveal the security
system. Insert the (Security) Card
to activate the system. In order to deactivate the retina
scanners (upstairs); press the buttons in the correct sequence.
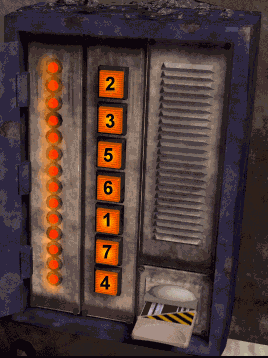
Remove the (Security) Card and go back to the DESERTED ROOM.
Look through the spy hole in the
door to the right – the room behind it is empty. Open the
door and enter the MEDICAL ROOM. Press the panel on the partition
wall to open the partition. Open the panel inside the partition
wall to get a Stethoscope, a Syringe and Simon
Ruby’s (Medical)
Report. Return to the DESERTED
ROOM.
Look through the spy hole in the
door to the left – there are two people (Al and Eva) in the
room behind it. Use the Stethoscope to
listen to Al and Eva through the door. Select all the
‘talk’ options to get the full story line as well as a
clue to the mirror (see later) being non-reflective.
THE AMUSEMENT PARK
ONLY INVENTORY ITEM: Positioner
Enter THE LABYRINTH.
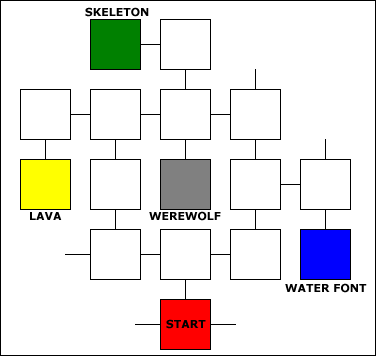
NOTE: DIRECTIONS ARE WITH
JOSHUA’S BACK TO WHERE HE ENTERED
Take the Coin out of the water font. Take the Cloth that the skeleton is holding. Go to the cablecar
area in the AMUSEMENT PARK.
Pick up the hammer and hit the
drum with it – part of the hammer breaks off. Take the Hammer. Enter the hut through the door. Open the left
drawer of the ticket office and search inside it to get a Match. Go downstairs to the boiler room. Shut down the
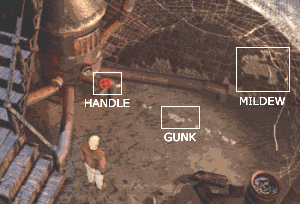
boiler by turning the handle with the Cloth. The spider leaves – revealing gunk (on the
floor) and mildew (on the wall). Take the Mud (gunk) and Saltpetre
(mildew).
Go to the slot machine. Hit the
spider (on the slot machine) with the Hammer – it’s leg holds one of the
‘skulls’ on the slot machine in a fixed position.
Insert the Coin
into the slot and then play
the slot machine. Remove the Coins you
win. Go to the shooting range.
Slow down the targets by throwing
the Mud on the runners. Insert the Coins (you retain one) into the slot. Fire the gun and
win a prize. Take the prize – a Puppet (with a Remote Control). Return to the hut near the cablecar.
Open the right-hand drawer of the
ticket office and put the Puppet inside
– you are left with the Remote Control.
Get into the cablecar cage and then press the button on the Remote Control to get the Puppet to
start the cablecar.
THE CASTLE
Go to the CHURCH. Break off the Torch (on Joshua’s left as he enters). Pick up the Skull from the centre of the pentacle. Note that there is
a hole in the cranium. Open the brazier and remove the Charcoal Slack. Go to the ALCHEMIST’S STUDY.
Read the book on the podium –
it contains two clues on werewolves:
1. …kill a werewolf with a silver
bullet…
2. …werewolves’ blood
corrodes metal…
Pick up the Parchment on the left (on the table) – it
contains instructions for making gunpowder:
…make
gunpowder from saltpetre, charcoal and sulphur…
Read the parchment on the right
(on the table) – it contains a clue to the mirror puzzle:
…the
mirror is enveloped by the mists of the waters of the Styx…
Take the Small Bag from the shelf and examine it – the Small Bag contains papaverine, a sleeping drug. Take
the Jar from the shelf and examine it –
it’s filled with sulphate. Put your foot on the tile (under
the water vessel) and note that the flow of water stops. Put the Skull on the tile to stop the water flow. Insert the Torch into the Skull, and then
light it with the Match. Kick the Torch off the tile to start the flow of water again –
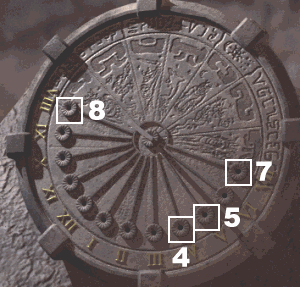
the mirror mists up and the numbers 7 8 4 5 are visible.
Take the Shaft that’s standing next to the vessel.
Go to the TOWER.
Insert the Shaft into the meridian circle. Next fill those numbered
holes (with the Shaft) in the
same sequence as the numbers visible in the mirror, 7 8 4
5.
You find Moreau’s diary and
are transported to HUGH’S OFFICE.
HUGH’S OFFICES
Study the picture behind the
Secretary – it’s the 1st clue to the access
code to Hugh’s computer. Empty the Small Bag (of papaverine) into the chocolates on the
Secretary’s desk. She eats a chocolate and falls asleep.
Press the button on her desk to open the door to the Meeting
Room. Enter the Meeting Room.
Open the showcase and remove the Pistol and 2 Iron Balls.
Take the Club from the Suit of Armour. Examine the door
to the right and note that it has a metal lock. Use the Positioner to go back to the cablecar area in THE
AMUSEMENT PARK.
THE AMUSEMENT PARK
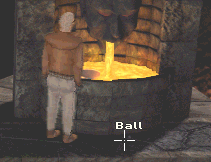
Hit the drum with the Club – the Bell falls to the
ground. Pick up the Bell. Go to the
lava in THE LABYRINTH.
Put the Bell on top the lava. Next put one Iron Ball on the Bell,
which is now floating in the lava. Also put the remaining Coin on the Bell. The Coin melts and the Ball becomes
silver-coated. Remove the Bell with the Cloth – the Ball (silver)
falls on the floor. Pick up the Ball (silver).
Go the Werewolf in THE LABYRINTH.
Mix the Saltpetre with the Charcoal Slack to make a Powder. Now mix
this Powder with the Jar
(containing Sulphur) to make the final Powder (gunpowder) solution. Note that you are left with
an empty Jar. Load the Powder
into the Pistol, then insert the Ball (silver) into the Pistol.
Fire the Pistol at the Werewolf – the ‘silver
bullet’ kills it. Take the Blood
from the Werewolf by putting it into the empty Jar – you now
have a Jar (of blood). Return to the Meeting Room in HUGH’S
OFFICES.
HUGH’S OFFICES
Pour the Blood (in the Jar) onto the lock on the door to the right – it
melts, allowing the door to be opened. Enter Hugh’s Office.
Open the drawer in Hugh’s desk and remove the Slide. Insert the Slide into the projector (in the
Meeting Room) to get the 2nd clue to the access code
to Hugh’s computer.
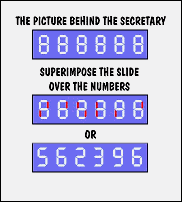
Switch on the computer and enter
the access code 5 6 2 3 9 6. You learn the truth about
Martens. You go to ROCAS PERDIDA with Al and Eva.
ROCAS PERDIDA
ADDITIONAL INVENTORY ITEMS: Laser, Wrist-comm and Parallel Cutter
Take note of the turtle walking
into the ocean as you arrive.
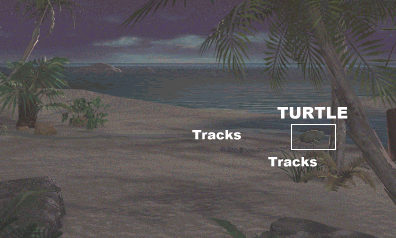
Sift through the tracks (those
nearest to you) left by the turtle – you find an Egg. Go to the FENCE.
Throw the Egg towards the Snake – it
comes closer. Shoot the Snake with the Laser, then use the Pincers to pick
it up. Go to the CONDUIT.
Open the grating by shooting the
padlock with the Laser. Throw the Snake into the pond to feed and distract the piranhas.
Climb through the grating to enter the LAUNDRY.
INSIDE THE PRISON
Move the sheets to reveal the Detergent. Take the Detergent and empty it into the bucket. Pour the contents of
the bucket down the conduit to make it slippery. Close the
grating that you entered through. Put the 2 Cans (empty) into the washing machine on the right and
switch it on – the guard hears the noise and comes to
investigate. The guard falls through the grating. Take the Keys that the guard left in the door.
Unlock the red door with the Keys and enter the ISOLATION WARD. Open the window on
the door to the 2nd cell on the left and talk to
Moreau. He tells you that the fence has 100000 volts. Select the
following options:
[ask him how
to open his cell door]
– he tells you about the door to the prison governor’s
office
[ask him
where the laboratory is] – he tells you that he can recognise the
sounds of the keypad
Take the MDVD from the desk at the SENTRY’S POST. Film the
audio and visual of the keypad on the wall with the MDVD. Take the MDVD and give it
to Moreau through the window – he tells you that the code is
446677.
Enter the code into the keypad and
enter the LABORATORY. Take the Tester, Tubes (containing poison) and the Gloves. Look at the blackboard – it has sketched
formulae and calculations on it that are clues to opening the
door to the Governor’s Office (see later).
Unscrew the panel along the wall
at the SENTRY’S POST with the Screwdriver. Examine the box with the Tester – there are 3 identical wires. Cut the correct
wire (the box) with the Parallel Cutter.
Eva and Al will be able to get past the fence. Eva finds a code,
but is captured. Al is killed.
Unlock the door to the INFIRMARY
with the Keys. Search the coat (through the reinforced
bars) – you get Floss and a Thermometer. Inflate the Gloves
with gas from the cylinder (also through the reinforced bars).
Look out of the window – the windows of the prison cells are
visible. Call Eva – she is in the 1st cell, i.e.
the one closest to you. Fill the Syringe
with the poison from the Tubes. Tie the Floss to the Syringe, then
attach the Syringe to the inflated Gloves. Float the Gloves across to the window of
Eva’s cell – she now has a weapon to use to overpower
the guard.
Unlock the red door with the Keys (again) and enter the ISOLATION WARD. Take the Laser from the guard on the floor. Open the window to
Eva’s cell – she gives you the Paper (code) she found.
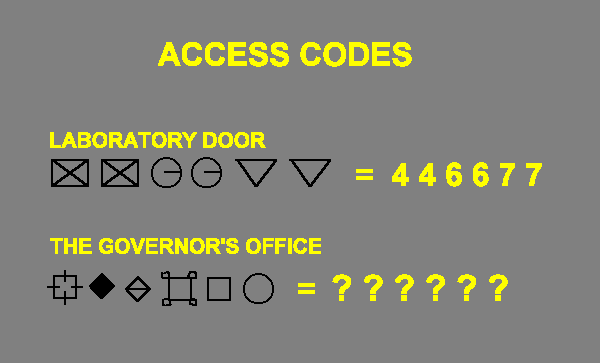
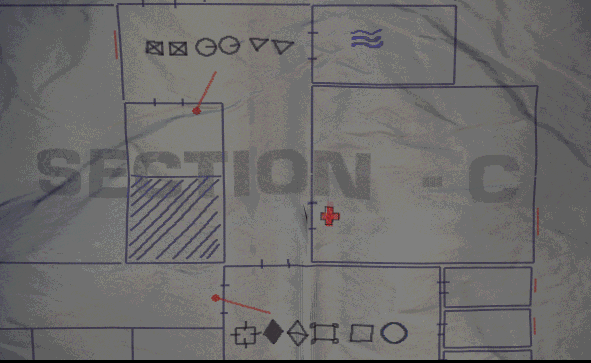
THE GOVERNOR’S OFFICE
ACCESS CODE
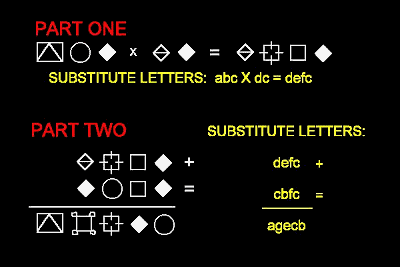
Information Known:
(1) The laboratory door access
code is 446677
(2) The symbols for this code
don’t appear on the equations on the blackboard
(3) Therefore the numbers 4, 6 and
7 are excluded from the equations
Reasoning:
The equation can be divided into
two parts:
PART ONE: abc x dc =
defc
PART TWO: defc + cbfc
= agecb
From PART TWO:
defc + cbfc = agecb
agecb is a number in the
"ten thousands"
but agecb cannot be 20 000
or greater
so agecb must be a number
between 10 000 and 20 000
therefore a = 1
From PART ONE:
abc x dc = defc
c is the last digit in all
the numbers
so c x c = c
(or a number ending in c)
so c can only be 0,1,5
or 6
but c cannot be 1 (a
= 1) nor 6 (excluded)
therefore c
can only be 0 or 5
Back to PART TWO:
defc + cbfc = agecb
again look at the last digit in
the numbers
so c + c = b
(or a number ending in b)
but c cannot be 0 (0
+ 0 = 0 doesn’t fit)
therefore c = 5
also: if 5 + 5 = 10
(c + c = b)
then b = 0
Staying with PART TWO:
defc + cbfc = agecb
(def5 + 50f5 = 1ge50)
look at the last two digits in the
numbers
so f5 + f5 = 50
(or a number ending in 50)
therefore f
can only be 2 or 7
but f cannot be 7
(excluded)
therefore f = 2
What do you know so far?
a = 1, b = 0, c =
5, f = 2
missing letters are d, e
and g
missing numbers are 3, 8
and 9
From PART ONE:
abc x dc = defc
(105 x d5 = de25)
using "trial and error":
if d is 3: 105
x 35 = 3e25
but 105 x 35 = 3675,
therefore d cannot be 3
if d is 9: 105
x 95 = 9e25
but 105 x 95 = 9975,
therefore d cannot be 9
if d is 8: 105
x 85 = 8e25
and 105 x 85 = 8925,
therefore d can only be 8
therefore d
= 8 and e = 9
also by process of elimination g
= 3
The governor’s door access code
– as on the Paper from Eva is
e c d g f b
Therefore the code is 9 5 8
3 2 0.
Enter the number
9 5 8 3 2 0 on the keypad.
CONGRATULATIONS!
A Walkthrough by Malcolm Schmidt
View this guide raw, exactly as the archive holds it