Nibiru: Age of Secrets – Graphic #1
“Nibiru” (& GENERAL):-SOLVING3x3SLIDER-PUZZLES
Len Green 6th January
2006
FOREWORD
{A} Many Adventure players have serious troubles with slider
puzzles, not infrequently to the point of requesting save-games in order to by
pass them.
The
following is an attempt to remedy this, by illustrating that solving a slider
puzzle should not be a daunting prospect in any way!
{B} There is a very a suitable standard ‘square’ 3×3 slider
puzzle in the Quest/Adventure “Nibiru” which I shall use, merely as a typical
example.
{C} With many sliders (but not all), a graphic picture is
provided showing the final objective.Generally this graphic is not available during the solving process
itself, and hence needs to be memorized, copied in some way, or printed
out.In at least one game however, the
full final graphic is visible the whole time … which naturally is a great help!
[[[ In the particular case of “Nibiru”,
the final solution is also available the whole time, but in a rather unusual
way.The individual final positions of
the 8 tiles is revealed after ‘clearing’ the center square, and then placing an
amulet (from inventory) upon a button there.This is described in the full “Nibiru” walkthroughs.
Alternatively, the Graphic
#2 here can be
memorized or copied! ]]]
{D} If ANY slider puzzles are generated completely
randomly, exactly 50% will be insoluble.In the case of “Nibiru” however, the Developers have seen to it
that every one of the huge number of randomly generated sliders belongs to the
50% of puzzles which CAN ALWAYS be solved.
{E} A basically similar procedure to that described below
can be used to solve ALL standard (regular, square) slider-puzzles i.e. 4×4,
5×5, 6×6, etc.However the larger they
are, the more complicated they become (and hence on the average will take
longer to solve).
{F}ALL these ‘square’ sliders
however, no matter how large or small, have one thing in common!The bottom 2 rows are always the trickiest …
whilst those above are relatively easy to arrange.
In the case of the
3×3 slider as opposed to its larger brethren, there is only one row
above these bottom 2 rows (and it consists of only 3 tiles).Hence the 3×3’s are particularly
easy to solve!
But in ALL cases, the
row or rows above these bottom 2 are ALWAYSrelatively easy to manipulate into the correct orientation(s) since no
attention whatsoever has to be paid to the bottom 2 rows whilst doing so!
Also, once the top
row (or 2 rows, or 3 rows, or 4 rows, etc.) are correctly placed THEY MUST NOT
BE TOUCHED FOR THE REMAINDER OF THE PUZZLE … ONLY THE BOTTOM 2 ROWS HAVE TO BE
MANEUVERED INTO THEIR CORRECT POSITIONS.
{G} All these puzzles are soluble using the same method.However, the degree of complexity depends
largely upon the initial randomly generated configuration.
I have deliberately
chosen a random start which is not the easiest I have come across, but not the
most difficult either.(This particular
one can be solved with 20 moves).
It’s worth mentioning
that each of these puzzles can always be solved in a number of different ways,
some utilizing more or less slides than others.
{H} The general METHOD for solving these puzzles
is the same for all … and I shall attempt to explain it as best I can.However, it is very difficult to do so
without listing the moves for one particular individual randomly generated
example.
These
are completely different for every one of the enormous number of cases and
hence are only an individual explanatory example and CANNOT apply to anybody
else’s actual case.
(((Hence
ALL these unique moves/slides are displayed below in the following [ smaller,
sea-green ] format.This is to
differentiate them from general principles.Hopefully, this will be clear !?! )))
(GENERAL)SOLUTION
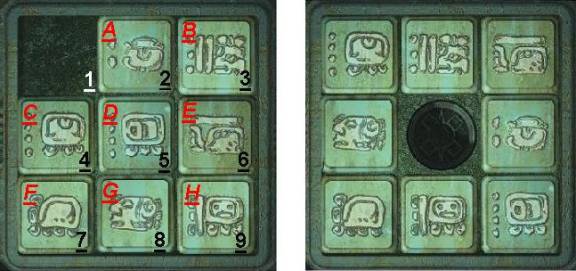
Graphic #1Graphic
#2
Graphic #1
This
is a typical randomly generated “Nibiru” 3×3 slider puzzle … just one of very
many thousands I believe … and hence only used as an example of
the general procedure for solving.
The
letters in red from A
thro’ H at the top left corner
of each tile represent that actual tile itself (which can be slid once only
each move, to an adjacent EMPTY space, whenever/wherever that space is
above, below, to the right or to the left of the particular tile).
The
numbers in black from 1 thro’ 9 at the bottom right corner of each square represent each FIXED
SQUARE itself.
Graphic #2
This is the
final solution (… obviously for EVERYrandomly generated start configuration!).
PROCEDURE
Solving these
puzzles (and by extrapolation, the larger conventional square 4×4’s, 5×5’s,
6×6’s, etc.) can be expedited in 3 stages.
The 3rd stage
should be trivial … and sometimes is not even necessary, since by happenstance
the final tiles sometimes are in place ‘automatically’ (an example of both
these situations is outlined below)!
Stage-1 can be either easy or less
so.The same applies to Stage-2.It all depends upon the random initial
distribution.Obviously if/when both
stages happen to be very easy, the slider-puzzle can be solved EXTREMELY
rapidly … and vice-versa if both stages are difficult!
But in the very worst case
scenario, once you get the hang of the SYSTEM, the solution for a 3×3 puzzle
should take FAR less than 3 minutes.
STAGE-1
In the above typical example, you have to get tile C to its final position in square 1, tile B
ditto to square 2, and tile E ditto to square 3.
((( For this case ONLY, you must make the
following ‘slides’ :-
In sequence, move
(generally, left-mouse-click on) tiles which (temporarily) reside
upon the squares4;5;2;3;6.
This just happens to be a particularly easy (random)
performance, and produces the situation shown in Graphic #3.)))
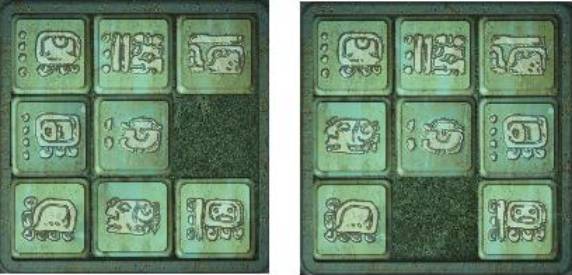
Graphic
#3Graphic #4
Generally your start configuration
will be far more bothersome than the above random example.But do not worry, you will ALWAYS be able to
achieve this final correct top row … albeit frequently involving more than the
above 5 moves.The reason behind your
guaranteed success in stage-1 is due to the fact that you don’t pay any
attention whatsoever throughout this stage to what’s happening to the bottom 2
rows … and hence you have complete flexibility.
WHENYOUHAVESUCCESFULLYCOMPLETEDSTAGE-1,DONOTTOUCHANYOFTHETILESINTHETOPROWAGAIN DURINGTHE REMAINDER OF THE PUZZLE!!
STAGE-2
In this
particular case, stage-2 happens to be more difficult and hence entails more
moves than the previous one … it all depends upon the random initialization!
In this stage,
you only deal with tiles in the bottom 2 rows (without of course disturbing the
previously fixed final top row).
You can perform this stage in
somewhat different ways of which the following is possibly the easiest.
In the specific
case used as an example here, nearly all of the ‘work’ is simply to maneuver
tile F into its final position
in square 7, whilst simultaneously
moving tile G into
its final position in square 4.Youdo this without paying any attention whatsoever to any of the other
tiles in the 2 bottom rows … and of course without touching any tiles in the
top line!
( N.B.
Alternatively any ADJACENT pair of tiles can be used in a
similar way … instead of the pair chosen above, i.e. FandGwhich were chosenfairly arbitrarily as
possibly being the ‘easiest’ to describe ).
There is a
GENERAL foolproof method of doing this.View the tiles in the bottom 2 rows CLOCKWISE starting from the bottom
row right hand corner … i.e. concentrate on the 6 squares clockwise from 9thro’ 7thro’ 4thro’ 6.
All you have
to do is to arrange these tiles so that (whether on
the middle or bottom rows) you get the F tile immediately before and touching the G tile.After that. It’s
child’s play!
(((In this case
ONLY, one method is to make the following ‘slides’ :-
In sequence, move
(generally, left-mouse-click on) tiles which (temporarily) reside
upon the squares 5;8;7;4;5;6;9;8;7;4;5;8;9;6;5;4;7;8.
This is about
90% of the procedure.In this example,
it produces the situation shown in Graphic #4. )))
STAGE-3
Once stage-2 has been accomplished,
all that remains is to rotate the only remaining 3 tiles into their correct
positions.This will often take only 3
moves … or at the most 6 moves.
If this cannot be done without
touching ANYTHING ELSE, the random
generator has produced an insoluble puzzle!
((( In this
specific case ONLY move (generally, left-mouse-click on) tiles which
(temporarily) reside upon the
squares9;6;5. )))
***************
As mentioned
previously, these puzzles can always be solved
in a number of different ways, some involving more or less slides than others.
Not infrequently,
stage-3 is completely redundant.
Incidentally, in
this particular example, I only included stage-3 at all for the sake of
‘generality’ since it so happens that this one can be
solved without it.It can actually be
completed with 6 slides less than the above and without having to resort to
stage-3 at all … not that this is of any importance!
((( In this case (only of course),
starting from Graphic #3, make the following ‘slides’ :-
In sequence, move
(generally, left-mouse-click on) tiles which (temporarily) reside
upon the squares5;8;9;6;5;4;7;8;5;6. … See Graphic
#5. )))
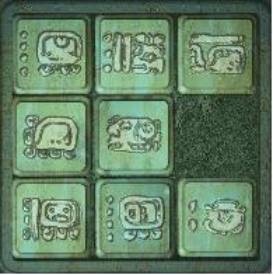
Graphic
#5
(((And
finally, slide…9;8;7;4;5.
This solves
the above (individual) puzzle without having to use stage-3 at all. )))
View this guide raw, exactly as the archive holds it