Nibiru: Age of Secrets
Ni Bi Ru Age of Secrets
By Future Games
Walkthrough by MaGtRo September 2005
version 1.02
Colored Ball Solution by drdel
Gameplay: This point and click game
comes in 2 CDs and can be played without CD on the drive after installation. The
main menu has New game, Save game, Load game, Options, Credits and Quit. The
Options menu has selection for antialiasing, shadows, volume and subtitles. The
volume and subtitle selections can be adjusted by clicking on the red circle to
select it and moving the cursor to the position wanted.
To access the main menu during gameplay, move the cursor to
top right of screen and click on cogwheels. To save a game, click on an empty
frame to save a new one or on an already saved game to overwrite that old one.
Click on the balls to scroll the frames. There are 100 slots for saved games. To
load, select the frame wanted.
The inventory bar is at the bottom of the screen. The scroll
icons are balls at either end of the bar. Items can be combined by selecting one
item and clicking it over another.
Right click on all active items to get more
information or to do additional actions. Press the spacebar to skip the intro.
Double click on exits to hasten the transition. The cursor is red on active
items and will flash on items when an action can be done with an item is on the
cursor.
Francois calls Martin Holan and talks about a German mine
excavated in Western Bohemia. Professor Francois de Vilde, Martin’s uncle talks
about NiBiRu – the 12th planet and the German’s belief in it and
extraterrestrial existence. The contact in Prague is Barbora and she is waiting
for Martin at Charles Bridge.
Prague
Bridge: At Charles Bridge in Prague, a painter and a
tourist is there but no Barbora. Inventory has wallet with money and
cell phone.
Find Barbora – Talk to painter.
While waiting for the painter, look at the statue. Talk to the painter twice.
After telling you about the stranger, his painting and St. Thomas statue, the
portrait of the man is now in inventory. Look close – right click at
man’s portrait in inventory. Go back to St. Thomas statue and look close
at pedestal of the statue. Right click on pedestal to get the paper slid under
the label of the pedestal. Read the message from Barbora in inventory.
Right click the cell phone and talk to Francois. Barbora Kanska lives at
Cechovni 52.
Barbora’s
Apartment: At Cechovni St., try to enter the brown
door. It’s locked. Click again and click on B. Kanska’s buzzer twice.
Enter building – Buzz other
tenants and see if you can find somebody to let you in. After trying 5 buzzers,
someone in #12 will let you in.
Find what floor Barbora is on –
Read-right click on the bulletin board. Right click the mailboxes on the left.
Ah, Barbora is at flat 17, 5th floor. Take elevator.
Enter Barbora’s apartment – Ring
doorbell on door at end of hall. Apartment lights are turned off. Knock on door
twice. Try climbing up to the attic. Go down and right click the bulletin board.
Read a missed message about where the attic key is located. Go back up to 5th
floor and click on sign beside the fire extinguisher to get the attic
key.
Go up to the attic. Click on the light switch right of the
door. Pick up the rag at bottom shelf by door. Take the rope by
stove. Pick up the brick supporting the wardrobe to expose the window. Martin
noted that something rolled on the hole on the floor. Take marble from
hole on the floor.
Use the rag on the window twice – first to break and then to
remove the remaining pieces of glass. Use rope on the beam at center of room.
Automatically, go out the window and enter Barbora’s apartment. Bonk! Wake up
2.5 hrs later.
Check everything in the ransacked room. Take the
purse from the floor. Right click the purse in inventory to get
Barbora’s ID card – ID 87 Central City Archive. Look at the computer. It
needs a password.
Enter the bathroom door right of screen. See a dead Barbora.
Click on her bloody hand. Check the sink. Check the cat on the hamper. Right
click the cat to read his collar as Felix. Exit Bathroom.
Go to computer, type in the password – felix (small case) on
your own keyboard and press enter. Automatically, access the file about the
mine. Police siren is heard. The phone rings. Talk with Uncle Francois. Exit the
building.
Center City
Archive: Automatically call a worried Francois. You
need the report of discovery to get a permission to enter the mines. Then bring
that report to the State Institute of Care of Historic Monument to get
permission.
Click on door of the building to get closer to the building.
Then talk to the pensioner feeding the pigeons. Enter the building and talk to
the guard. He won’t let you in.
Enter the archive – Exit the
building and the park. See a closed Bureau building and a sleeping beggar.
Go left to the kiosk. Go to the subway exit left of kiosk
and a child drops a firecracker. Talk to the child and later give her the marble
in exchange for the firecrackers. Buy matches from the kiosk.
Go back and talk to the now awakened beggar. Buy
cigarettes from the kiosk and give it to the beggar.
Go back to the pensioner in the park. Click the firecrackers
on the pensioner. Talk to the pensioner. He wants a bottle of wine to help you
enter the building.
Go back to the kiosk and buy wine. You get a boxed
wine but the pensioner wants bottled wine. Talk to the beggar and take the
rightmost bottle on the ledge behind him. In inventory, combine the
bottle and the boxed wine to get bottled wine.
Go back to the pensioner and talk to him about the bottle of
wine or click wine on him. He gives his old employee ID. Enter the
building and talk to the guard. Show him the old employee’s ID card. Barbora’s
office is at the basement #24. Go to bottom screen.
Barbora’s office – Go by elevator. There’s a tube
post beside the elevators. Use Barbora’s ID card on the card reader of the door
on the left.
Notepad – Check everything. Look
close on her desk. Right click on the notepad. Take a pencil beside the
Black Mirror game box. Ooh, a plug! Look at and move (right click) the upside
down picture of Felix. Take pencil sharpener. Combine pencil and pencil
sharpener to get sharpened pencil. Use sharpened pencil on notepad and
get the paper. Right click the paper in inventory to read D3 –
7422.
Locked drawer – The drawer is
locked. Pull back and right click the flower by the small file drawers to get
key. Use key on locked drawer. Take the archive stamp. Pull
back.
Computer password – The computer
needs a password. Felix doesn’t work but remember that Felix’ picture is upside
down. Enter xilef and press enter. Peter Nedole is the contact at State
Institute. Automatically, print the copy of the report by Barbora. Take
the printed report from the printer. In inventory, use the stamp with the report
to get stamped report.
Tube post – Exit the office and go
to the tube post by elevator. Click Barbora’s ID on the tube post screen and
immediately while the green light is on – click the paper with numbers on the
tube post. Take the German NiBiRu 1943 documentation. Read – right click
the German document in inventory. Learn about the extraterrestrial entities,
connection with Mayan and Sumerian civilizations, new metals found in Mexico and
new weapon technologies. Exit the building, the park and then leave
area.
Bureau Building:
Enter the building beside the guitar playing beggar. Talk to the secretary twice
and get her call card. She won’t let you in through the President’s door.
Talk to her again.
Get the secretary out of the way –
After talking to the secretary 3 times, go outside and ask the beggar about the
secretary. She drives a silver Mercedes. Go to the car by the main road. The
license plate is A7 15 37. Click the call card on the cell phone and find out
how Martin got the secretary out of the way.
Enter the building and go through the President’s door. Talk
to the President. Watch. He wants a direct report when you’re finished at the
site. Get the permission automatically.
German Mine in Western Bohemia
Camp: You are
not allowed into the mine and there’s a ‘colleague’ in the camp. After some
talking, look around. Talk to the Major and learn about the mine. Try to look at
the plans of the mine he’s working on. Go farther into the camp. Note the
mushroom at start of bridge. Talk to Petr Stasek, civilian-historian at the
trailer. Check the locked cabin behind the trailer. Go right of trailer and
talk to the soldier guarding the mine 3 times. Go back and talk to Stasek about
everything. He gets nervous about the cabin talk. Click on Stasek again and see
resemblance to picture. Talk to the soldiers by the gate several times again.
Talk to Stasek again about the mine and his plan to get both of them in the
mine.
Feed the soldier – It’s midnight.
Go inside the trailer. Look around. Right click the raincoat in the corner and
get a paper with D2 82. Take 2 cans of beans from the counter.
Take the can opener on the table. Go outside and talk to the soldier by
the gate. Learn about the lights and the cabin. Talk to him twice until he asks
for food. He’s hungry. Now you can take the mushroom by the bridge. Go to
the trailer. Click the can opener on the can of beans to get opened can of
beans. Click the mushroom on can of beans to get canned beans with
mushroom. Use match on stove. Place opened can of beans with mushroom on
stove. Give the heated food to the soldier by the gate.
Enter the tent – Go back to the
trailer area and then go back to the soldier by the gate. He calls you over. Uh
Oh. The food you gave him made him sick. He leaves you to guard the gate. Enter
the tent. Right click the major’s uniform and get keys. Take radio
from table at right.
Cabin behind trailer – Use the
keys on the cabin door. Look around. Take rope from shelf. Take
hammer and tool box from right workbench. Open the tool box in
inventory and get hand oiler, string, screwdriver,
flashlight and wrench. Use screwdriver on the lid of generator. A
phone is ringing. Go to the locked locker and use the hammer on the padlock of
the locker. Look inside the locker and see body of man. Click on him again.
Right click and see that the ID is Petr Stasek. We now know who the murderer is
– the impostor. Go back to the opened generator and click on it twice to turn
off the outside lights.
Exit and see the soldier by the mine come to check. Martin
hides under the trailer. Automatically enter the mine. The lights come back
on.
Mine:
Entrance of mine – Look around.
Look at a rod sticking out of the drum on the right by the sign. Click on it
twice until you realize you can’t pull it with your hands. Use wrench to get
iron rod. The path goes forward or left corridor.
First left corridor – Take the
left corridor and see barrel and netting on the ceiling. This ends in a cave in.
Look at the cave in and then use the iron bar on the boards holding the cave in.
Look at the crevice made. It’s dark in there. Use flashlight on the crevice and
see a body of a dead soldier. Take the pin on his shirt. Click on his
pocket and right click to get small set of keys. Go back to main
corridor.
Main corridor – Take the forward
corridor. Look and click twice to get the cramp stuck on left of the
beam. Here, the corridor again splits to left, forward and right pass the
cogwheel.
Second left corridor – Take the
left corridor by the location where you got the cramp. See that it ends on a
hanging load over a closed lid. Look right from load and see a small opening on
the metal wall. It looks like something is missing here. The heap of earth under
the opening is now active after seeing the opening. Click on heap of earth and
use the cramp to dig on it. Get a valve control wheel. Wow, Martin just
placed that wheel in his pocket! Use valve control wheel on opening above dirt.
Click on wheel to turn it. The load is lowered to the closed lid. Take the
hook holding the load. Go back to main corridor.
Right corridor – Take the right
corridor pass the cogwheel. See a flooded corridor with soaked boxes in murky
water. Use flashlight on the murky water and see a can full of oil. Combine hook
and rope in inventory to get anchor. Use anchor on can to get can with
oil. Go back to main corridor.
Go forward and see a metal door. Note the Nazi sign and
eagle symbol above the door. Note the vent on the left.
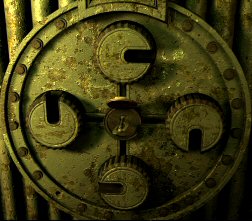
Round metal lock – Look close at the round metal
lock at the middle of the door.
Click on the center and see that it has a small opening
for a key. Use set of keys on the small opening.
Click on the 4 wheels to turn it. One is stuck. Use hand
oiler on the stuck wheel. Ugh. It’s empty. Combine empty hand oiler with can
of oil. Now, use the hand oiler on the stuck wheel.
Turn the wheel so that the lock opens but how? Remember
the Nazi insignia – turn the top to have opening to the right, turn the right
wheel to have the opening to the bottom, turn the bottom wheel to get opening
to the left and turn the left wheel to have the opening to face
top.
Secret
bunker: It’s dark in here and the flashlight
bulb gave out. Click twice on the light colored lamp on the left shelf. Use
matches on the oil lamp with kerosene.
Lights, please – Click on
generator and see engine and 2 valve controls. Turn the 2 valve controls. One is
stuck. Use hand oiler on stuck valve control. That doesn’t work, still stuck.
Use wrench on it and then turn it. Pull lever on left wall of the generator
above the engine. Great, it works. Go on through corridor.
Main Corridor – Read the sign on
right wall. Right wing – archive, left wing – stock room. Click twice on the
light switch on the left wall.
Archive – Take the right corridor
and see a locked steel door. Use the set of keys and it breaks. Now what?
Stock room – Repository – Take the
left corridor and see old crates and barrels. Use the set of keys taken from
dead soldier. Enter stock room. Look around at everything. Use cramp on the
crates on the right of the corridor. Take dynamite stick. Take test
tube (which is really a flask) from back wall. Check the old battery in
front of the tank and click twice to turn it over. Use flask, I mean, test tube
on battery to get acid. Enter alcove SA-44 with shelves on the right.
Take light bulb from box. Take a can of kerosene (right click to
check the can in inventory). Exit.
Archive – Use the battery
acid on the steel door with the broken key in the lock. Enter the war archives.
Look around. Click on the files on left wall for a closer
look. Look at paper taken from the coat pocket at the trailer – D2 – 82. Click
the paper with numbers on file drawer D2-82. Take the small metal case
between the folders. Right click on the box in inventory and get several
magnets.
Go to bottom of screen to archives. Read the sign by the
platform. Check the ladder beside it. Look close at the table. Take
magnifying glass from the red shelving, ruler and empty
box. Look at the yellow lamp at opposite wall. Right click to see that the
light bulb is missing. Use light bulb on lamp. Check the levers beside it.
Open the Secret door – Try to open
the metal cabinet right of lever. Click on groove on the floor by the left leg
of the cabinet. Now, click on the cabinet to move it and expose a secret wall.
The wall doesn’t have a lock. Use cramp on wall and a
crevice-crack is now seen. Use dynamite on crevice. Click the matches on
dynamite and see that the fuse is too short. Go back to stock room. Take
dynamite from the crate. In inventory, right click the dynamite to get
fuse. Go back to the dynamite on the wall at archives. Use fuse on
dynamite inserted on wall. Now that the fuse is longer, use matches on dynamite.
The crevice grew bigger but the charge was not sufficient.
Catch that rat – Go back to the
main corridor at the intersection. Click on rat hole under the sign and across
the light switch. In inventory, combine empty box and ruler to make rat
trap. That’s not enough. Open the can of beans with the can opener. Combine
the opened can of beans to the rat trap. Click rat trap with beans on rat
hole. Time to go somewhere – go to the stock room and get another
dynamite. Go back to main corridor and see a rat enter the trap.
Take trap with a rat inside it.
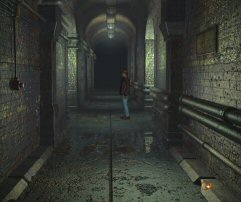
The rat hole is located where the cursor is
placed.
Live Charge – Right click the trap
in inventory to get rat. Go back to the hole in the crevice in archives.
Click the rat on the dynamite to make a live charge. Click the live
charge on the crevice. Martin automatically lights the dynamite and inserts the
live charge on the crevice hole.
Secret room – Enter the secret
room. Martin feels watched. Click on light switch by door. Look around and click
on Vitrola record player. Take the flat iron from the table. Look at the
iron cover on the wall behind the desk. There’s a small opening on the cover.
Take the journal of a scientist from the table. Read the journal in
inventory about the prototype, Mexico, Mayan Jaguar temple, energetic fusion and
signed, Dietrich Raumhart. Raumhart threw the key of the safe into the drain in
the lab. In inventory, use the magnifying lens on the journal and see something
suspicious on the last page of the journal.
Massive door to the lab – Go to the massive door at
the end of the main corridor. Look left on the panel.
Place the magnets taken from the box in archives on the
inverted triangle.
Click the magnet to select it. Right click to rotate
it.
Take the magnets out of the working area-triangle and to
see the different magnets.
Arrange the magnets to fit in the triangle.
Press
the red button when done
.
Laboratory – Enter the elevator
and the lab. Hear the report of one of the archeologist entering the mine. Look
around.
Journal code – Click twice on the
table on the left and get an unusual magnet. There’s Bunsen burner on the
table. Add kerosene to the Bunsen burner. Use match on filled Bunsen burner.
Place the flat iron on the burner. Wait a bit. Remember there was a suspicious
last page in the journal seen by the magnifying lens. Use heated iron on now
opened journal. See 47922.
Safe key – Look close at the drain
by elevator. It looks like a small key. In the inventory combine string with the
magnet to get magnet with string. Use magnet with string on drain to get
small key.
Safe in secret room – Go back to
the secret room. Use small key on iron cover behind the desk. Enter 47922. Left
click to move the dial clockwise (c) and right click to go counterclockwise
(cc). 4 c, 7 cc, 9 c, 2 cc and 2 c. Take the statue.
Meet
the impostor Stasek. As soon as the statue is thrown, click on the lever left of
the door. Watch!
France
Hotel:
The inventory has the wallet, pin, statue and
journal. Look around and then enter the hotel.
Get room at hotel – Ring the bell
on the counter. The receptionist says that all rooms are occupied. Talk to the
drunken guest who is waiting for Daniel Dobrovsky. Look at ashtray on counter to
get Hotel matches. Right click the matches in inventory and see the hotel
phone number 547 926 12.
Exit
the hotel and click on phone booth. Martin cancelled the reservation of
Dobrovsky. Go back to the hotel and get room 24’s key from receptionist
Martin asks the receptionist to look for the phone number of Professor Francois
de Vilde. Take the staircase to the rooms.
Enter
the first room on the left on the first floor. After resting, go down to the
reception desk and get informed of the Professor’s phone number. Use the hotel
phone and talk to Francois. Exit the hotel and go left to the docks. Talk to the
fisherman 3 times and finally, help or not help with the crates will get you on
the boat to the Mansion.
Mansion: After
telling the fisherman to wait, you will now face the mansion gate. Ring the
doorbell and enter the mansion. Talk to the Professor. He states that his
intention was to get real evidence of extraterrestrial life. He has a key taken
from the Temple of Stone. There are 3 keys in total. The last one is at the
Temple of Dawn. Martin is to go to Mexico with a letter for Francois’ good
friend in a junkyard in Tecolut. He gives an airline ticket together with the
letter. The 2 keys will be in his safe. The map will be given tomorrow when he
comes back. Right click the envelope with ticket to get flight ticket and
letter. Exit to the gate and to the pier.
Dock: A
surprise waits Martin at the fisherman warehouse. Meet the villains: Dietrich
Raumhart and his son, the impostor that you met in Bohemia. After waking up,
talk to Raumhart’s son. He throws a knife on the floor as an aid to free
yourself when he leaves.
Get free – This is a very
forgiving 1 minute timed puzzle. Take the knife on the floor. Use the
knife on the red button left of Martin. This opens the storage door and barrel
rolls out. The barrel hits the table that drops the container that will be fatal
to Martin. This stops the time count. Use the pin on the handcuff hidden behind
Martin. The door is locked. Climb the ladder on post at center of the
room.
Mansion: Find
out that the professor is dead. Talk to the detective. They think it is suicide
with an accompanying suicide note. Show the letter to the detective to prove
that it is not suicide.
Enter
the mansion. Take the pyramid on the table. Right click the pyramid to
note a small opening.
Go to
the bookcase. Look around. Check the phone in the corner. Click on red button to
play message from Piere and another from a familiar voice.
Map – Click on hourglass on the
bookshelf right of the fireplace. Wait a bit, look around and then click on
hourglass again to see a key inside the hourglass. In inventory, use
knife on hourglass to get key. Use key on pyramid to get old Mayan
map.
Safe – Click on the Tikal picture.
Click on bust on fireplace mantel. This opens the safe. What is the combination?
Let’s try TIKAL. Based on the letters of the phone dial buttons – click on
84525. Press the arrow to enter. The statues are gone!
Exit
the house and talk to Inspector Clouseau and then to the police at the
gate.
Hotel: Enter
the hotel and see the villain. They are staying in the same hotel at room 32.
Get inside the hotel – Exit the
hotel and go to the back of the hotel. Talk to old Iris. Look around and check
the fire escape ladder. It’s too high. Click on the walking stick hanging
on the garbage can beside Iris. Hmm… Talk to Iris about the walking stick.
After a lesson in manners, she wants a hot dog from the stand.
Hotdog – Exit the alley and go to
snack shop. Ask for and get a hotdog with mustard. Give the hotdog to
Iris. Oops. Get a hotdog with no mustard, just ketchup from the snack shop. You
end up with plain hotdog. Enter the hotel and take the ketchup
from the reception desk. In inventory, combine hotdog and ketchup to get
hotdog with ketchup. Give hotdog with ketchup to Iris. Take the
walking stick and use it on the fire escape.
Get the guests out of the way –
Take the stairs to lower floor. Click on door at end of hall. Talk to
repairman and learn that the room at end of hall is a service room. Go back to
your room. Unplug the cord from the outlet by the bed. Take the vase on
the table and click it on the outlet. Exit and talk to repairman. Take the
keys hanging on the ladder and use it on the service room at end of
hall.
Enter
the service room at end of hall. See a fire alarm on top of left wall. Take a
broom, diluter in red bottle and rag from floor by the
window. In inventory, combine broom with rag, then click it on diluter. Use
match on the combination. Automatically, Martin will place it close to the fire
alarm sensor.
Get the statues – Now that the
guests are evacuated, time to get the stolen keys. Go down to the reception desk
and click on the keys. Right click to take Room 32 key. Go up 2 flights
of stairs and use room 32 (villain’s) key on door right of the plant stand.
Enter and right click on the bed.
Numeric code lock – Click on each number to scroll
through all the numbers. Listen and stop on a cluck sound. Do this to all the
3 numbers. If the 3 different sounding numbers are selected, Martin talks
about taking the keys and leaving the hotel. This is a random puzzle. My code
was 371.
Mexico
Tecolut: After
a long flight and bus ride, Martin arrives in front of George’s shop in Tecolut.
Note the fountain. Look at the note on the note on George’s store – I went to
Rosie’s.
Enter Bar – Go on through the
street. See a man asleep on a bench. Talk to the bouncer of the bar. It’s poker
night. He will let you in the bar if you can get Isabella to see him.
Go to
the yellow house and talk to Isabella’s mother with Isa eavesdropping. Now she
wants you to bring her husband home. Go to the man-hobo sleeping on the bench.
Go back to the fountain. Take the bowl and use it on the fountain’s water
to get bowl with water in it. Use the bowl with water in it on sleeping
man-hobo. After getting nothing from him, talk to Isabella’s mother. After
taking Martin’s money, she said to tell Jose that Isabella will be there in an
hour. Talk to the bouncer. Now you need an admittance token chip. Talk to the
now awake man-hobo. The poker admittance token is in inventory
Enter
the pub. Talk to the bartender and then George.
George – At George’s place, Martin
rested for the night. Next morning, talk to George about Temple of Jaguar. The
map showed the flashing Temple of Jaguar. Ask about Temple of Dawn. A new place
in the map showed the Temple of Dawn. Look around the shop.
Exit
the shop and talk to the stall keeper under the red canopy. Martin buys a
stone statue.
Go back
inside George’s shop and ask about the jeep. Now you have transport. Click on
the yellow jeep.
Temple of
Dawn: Talk to tourist who asks for a picture
of the inside of the pyramid. The camera is in inventory.
Ruins – Enter the doorway on the
left to get inside the Ruins. Look at the opening on the floor. Martin threw a
rock to find out about water at the bottom of the well. Check the stone disc on
the wall. There are openings on both sides of the disc. Go outside and left to
the temple.
Temple of Dawn – Look at the
statues at both side of the entrance to the temple. One is missing something on
his nose and the other has a drum on its nose. Click again to try to pull it
out.
Enter
the temple and talk to the archeologist, Paul Vasquez. Listen to the
translation. Talk to Paul again and get his permission for the picture but he
wants stone scrap from the archeological site to compare to his work in the
temple. Look around the temple.
Archeological site – Exit the
temple, go to ruin and then go to the archeological site on the right. Talk to
the archeologist Piere and then ask about the scraps. Take the box of scraps
(fragments of clay) from the table with vases.
Talk to
Pedro, the fake archeologist on the left. Meet him tonight to get inside the
pyramid.
Temple of Dawn – Go back to the
temple and Paul. Give Paul the box of clay fragments. Take a picture of the
stone relief of a Mayan Sun King behind the stone pedestal. Talk to the tourist
and he gives the stone cylinder he picked up.
Go to
the temple and look at the 2 statues again: one with a drum as nose and the
other one without a nose. Try to pull the drum-nose on the left statue. It will
not get pulled. Place the stone statue bought from the stall keeper on the
statue with no nose. Then go back and pull the nose of the other one to get
stone cylinder.
Ruins – Go back to the ruins and
insert the stone cylinders on the openings at sides of the stone disc. Press the
stone disc. A platform rises from the opening on the floor.
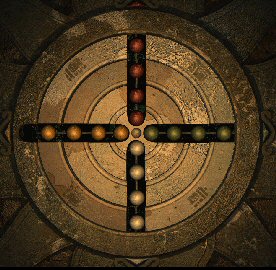
Colored balls puzzles – Look close at the colored
balls puzzle. Note the colors of the arrows at each end of the balls.
Arrange the balls according to the colors of the arrows.
Top is red, right is green, bottom is white and left is yellow. I did this by
arranging the inner colors first going outwards.
There’s an empty slot at the outer layer that you can
place ball on to make space for ball addition on that set of balls.
The
layers can be turned clockwise or counterclockwise by left or right click of
the mouse on the layers.
The
balls can be moved to an open space by clicking on it. It is touchy – so be
sure that the cursor is on the ball and not on the layer. Good
luck!
Save
Game here!
Solution by drdel:
At
the start of the puzzle, Save your game before you touch it.
In
the close up you’ll see the balls arranged in four radial arms at clock
positions: 12, 3, 6 and 9 o’clock. If you look at the little arrows at each
clock position, you’ll see which colors are to finally go on the arms: 12
o’clock = red; 3 o’clock =green; 6 o’clock =white; and 9 o’clock =
yellow.
When
you start, the balls are arranged from inside out on each arm as: white,
green, red and yellow. Obviously, you’re going to have to do some jiggling to
move the balls around so that there is one of each color in each ring in the
correct aspect to each other.
Keep
the relationship of the colors to each other in mind as you go, and think
Rubik’s cube! That’s what gave me a clue to finally solving this wretched
little monster!
You’ll see there are four rings, plus an outer ring with a
‘free’ spot, that you can temporarily park a ball on. I labeled mine from
center outward as 1R, 2R, 3R, 4R and OR (for outer ring). All the rings move
either clockwise or counter-clockwise with L or R mouse clicks. Clicking on a
ball will move it to an empty space. Clicking on the empty space just moves
that ring, so position your mouse carefully when you’re clicking.
Here
goes:
R
mouse click your OR to the 6 position. Click on each ball and move each one
outward. That leaves a slot on the 1R to move something into.
R
mouse click 1R. At 3 o’clock position move all the balls towards the center
R
mouse click OR to 3 position. Insert yellow ball into the 4R.
R
mouse click OR to 12 position. Move all balls outward.
R
mouse click 2R. At 12 position move red ball to center.
R
mouse click 3R. At 12 position move all the rest of the balls toward the
center.
R
mouse click OR to 9 position. Move all balls outward.
R
mouse click 2R. At 9 position move yellow ball toward center.
L
mouse click 2R. At 12 position move red ball toward center. Move yellow ball
down to 3 R.
L
mouse click OR. Move yellow ball in to 4R.
R
mouse click OR. At 9 position move all balls outward.
R
mouse click 3R. Move one yellow ball in.
R
mouse click 4R. Move remaining yellow and the green balls in.
R
mouse click OR to 6 position. Move all balls outward.
L
mouse click 2R. At 6 position move the white ball in toward center.
R
mouse click 2R.
R
mouse click 3R. At 3 position move the green ball toward center.
L
mouse click 3R. Move all white balls in toward center.
L mouse click OR to 9 position. Move green ball onto OR.
Also, move 3R yellow ball to 4R.
R mouse click 4R. Move 4R yellow ball to 3R then L click
4R.
You should now have all yellow and white balls in their
proper positions.
Now to fix red and green!
R mouse click 3R. At 12 position move 3R red ball to
4R.
L mouse click 3R. At 3 position move 2R green ball right
to 3R.
L mouse click 3R. At 3 position move 3R green ball to
2R.
R mouse click 3R.
R mouse click 4R. At 12 position move 4R red ball down to
3R.
L mouse click 4R
R mouse click OR x 2 and pop green ball onto it’s proper
arm.
If
done correctly, a panel opens on the side. Take the prism. Look at the
prism in inventory.
Archeological site – Go back to
the archeological site and talk to Piere. Ask about Pedro. Talk to Pedro and
meet him 3 hours later. Martin goes back to the village.
Tecolut: Martin is approached by a
boy with a message. He is supposed to go to Rosie’s Bar and meet someone. Go to
the bar. Talk to the bouncer. Enter the bar and see Raumhart, the old man. Hear
his request to find the White Bear, oldest of the Mayan and learn the path to
the Machine of Life. You must destroy the machine. A new place in the map is
shown. Click on the jeep and go to the new place.
Mayan Village: Meet White
Bear. Learn about the prophecy. You are the Messenger of the Gods. The one that
unites the long lost symbols of life and bring Annunaki back. You must obtain
the last one and unite the power.
Tecolut: Back at the village, enter
George’s shop and talk to George about equipment. After resting, pick up bag
from counter. Right click bag in inventory to get rope, lamp,
lighter and hammer. Click on jeep outside.
Temple of Dawn: Meet Pedro
and he pushes left stone statue that opens a squares on the floor.
Open the entrance to inner part of
temple – Take stone on floor by middle column. Place the pyramid on
the stone pedestal. Click on the opening in the middle of the Sun held by the
Mayan Sun God. Martin opens the cover and rays pass through the prism to shoot
out 3 rays on the squares on the floor. Pedro stands on one square. Place the
stone on one of the 2 squares. Now, step on the last square.
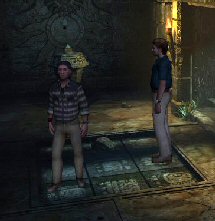
Deep part of Temple:
The stone panel on the left moves to show an opening on the floor. Click the
rope on the statue on the left. Climb down and see that the steps into an abyss.
In inventory combine lighter and lamp. Look at the panel on the wall.
Save
Game here!
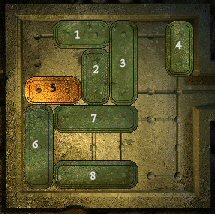
The aim is to get the gold bar #5 to the right to
the open mouth.
Left or right click to move the metal
bars.
7 right 2xs, 2 down 2xs, 5 right, 6 up 3xs,
8 right 2xs, 2down, 7 left 3xs, 4 down, 3 down,
1 right 3xs, 3 up, 7 right 3xs, 6 down 3xs,
5 left, 2 up 4xs, 5 right, 6 up 3xs, 7 left 3xs,
8 left 3xs, 3 down 3xs, 4 down 2xs, 5 right to exit.
Another set of stairs pushes
out.
Water God and Death God – Go down
deeper into the temple. Use lighter on torch on the right wall. Look at
everything. Check the God of Water and the opening left of the God of Water.
Check the sink twice that possibly held water and symbol. Check and right click
the stone plate – God of Death. How do I open this door, though?
Open the door or Pedro, Water! –
Go back to the rope and talk to Pedro. Ask for water. Take the bucket of
water. Use bucket of water on sink. Use hammer on opening left of the sink
full of water. Pull lever-hammer and see water spill from a crack. Click on the
crack to see where the water came out of.
Talk to
Pedro again for more water and then later plaster. Catch the can of
plaster and take the bucket of water. Right click the can in inventory to
get can with plaster. In inventory, click can with plaster on bucket of
water to get stirred plaster. Use stirred plaster on crack. Use bucket of
water on sink. Pull down the lever-hammer. Nothing happened.
Go to
Pedro for more water. Hahaha! Take the bucket of water. One more time,
place water on sink and pull lever. The water snake symbol lights up and the
door opens.
Third Statue of Life – Enter and
see a path lined with symbols that ends in an altar. Click on the symbols on the
side of the path.
Take
the artifacts from the altar. There’s the last statue, symbol of life. If
you take it now, you die from green poisoned gas emitted by the stone
heads.
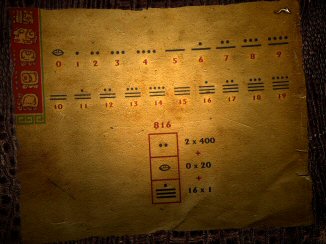
Look at
the symbols at the base of the altar. These resemble the one in the back
of the map. Look at the back of the map and hear the explanation. The
bottom square is for ones, the middle is for twenties and the top square is for
400s.
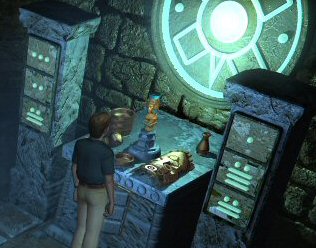
Look at
the numbers on the columns on the sides of the altar.
| Left + Right columns, top to bottom: | Based on map’s numeric system | Addition | Enter 2004: Top – one bar Middle – zero Bottom – 4 dots |
|
| 3 + 1 = 4 | 4 x 400 = 1600 | 1600 | ||
| 2 + 17 = 19 | 19 x 20 = 380 | 380 | ||
| 12 + 12 = 24 | 24 x 1 = 24 | 24 | ||
| ———- | ||||
| 2004 | ||||
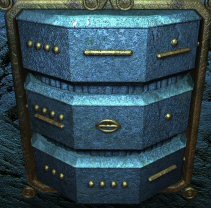
Hear
music and see the heads that spew poison turn. Take the gold statue –
last symbol of life.
Go back
to Pedro and ask for the rope. After giving the gold to Martin’s new friend, he
goes back to White Bear.
White Bear – White Bear adds the
location of the burial ground of the ancient kings. He gives the Amulet of
Kings. Martin drives to new location – the Lost Temple of Gods.
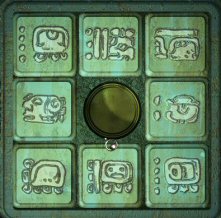
Lost Temple of the Gods: Climb up the
stairs of the temple and see the slider lock to the temple.
The
aim of the slider puzzle is to place the tiles with glyphs over the identical
glyphs hidden under the tiles.
Save
Game here! This is a random puzzle. The solution below might not be the same
as your puzzle.
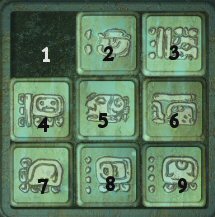
The numbers are the location of the tiles (not the
tiles).
Move 2, then 5. Place amulet.
Move:
8
9 6 3 2 5
4
1 2 3 6 5
4
7 8 9 6 5
4
1 2 3 6 5
2
1 4 5 6 9
8
5 4 7 8 5
Enter
the temple and see 3 monoliths around a central pedestal. Place the 3 statues on
the monoliths. The statues will flash on the correct monolith. Place the red
statue on the left monolith, the white statue at middle and the green statue on
the right monolith.
The
machine rises.
Oh! Uh Oh!
Rest in peace, my friend.
This document
may not be distributed without express written permission of the author and the
content may not be altered in any way.
For
Questions or Comments on this Walkthrough,
Please write to: MaGtRo
Copyright © 9/2005 MaGtRo

View this guide raw, exactly as the archive holds it