Mysterious Journey II Walkthrough
Mysterious Journey II: Chameleon
by
Detalion
Walkthrough by
MaGtRo December, 2003 version 1.1a
Gameplay:
Once installed, the game does not require a CD in CD drive. Mysterious Journey
II can either be keyboard controlled or mouse controlled. The Main
Menu has the New Game, Continue Game, Load, Settings, Credits and Quit. To go to
the In-Game Menu, press ESC. The In-Game Menu has Resume play, Save, Load,
Settings, Transcript, Leave Game and Quit.
The game navigation for
keyboard uses the W, A, S and D keys. The arrow keys moves the screen focus up
or down. The mouse game navigation uses the left mouse for direction
and by holding down the right mouse button for movement.
Pressing the space bar
or ESC will stop a cutscene. F1 will show the transcript of dialogues. There are 3 cursors: a white circle is for navigating and
no action, warp cursor (circles within circle) moves to the next area of gameplay and the use cursor (black circle) means there’s an action that can be
done.
The inventory is at
bottom bar and automatically appears when an item is picked up or when an
inventory item can be used at that spot. At Save game, a graphic and the
location of the save spot is seen. The label of the saved game can be changed.
Press save to enter the save spot. Press return without pressing saved game will
not save the game and return to gameplay. There are unlimited saves. There is an
automatic save at start of each segment of gameplay. In loading a game, select the
game spot and then press enter. Pressing return without loading a saved game will
return to the gameplay.
Space Station
Traitor’s Fate:
Sen Geder is awakened
from cryogenic sleep by a hologram of his supposedly old friend Tensa. Tensa
stated that Sen is responsible for the destruction of the planet Sarpendon below
the space station two hundred fourteen years ago. Only a single valley remains at the planet. The
space station will fall to the planet in 16 days and he is imprisoned here. It
is the first part of his punishment. All
non-essential machinery have been destroyed. Before the second part of his punishment can be stated, the hologram
is destroyed by a laser beam from the outside corridor. Sen does not have any
memory of his past.
Repairing Talen:
First time – Go
to the door and exit the room. Go forward to the large metal object, a Companion
that is in the corridor. The Companion asks for restore – help.
Go forward until the end
of the corridor, pass 2 destroyed large spider like machines attached to the wall and a
blocked side passage until you reach the metal door. On the left of the corridor is another broken
companion lying on its side. See a use cursor when placed on the companion, click and automatically a card
appears in inventory.
Go back to the first
Companion. Face the front of the companion and use the card on it. The
companion says that the upper promenade is now open and it wants more.. prion
generator..
Second time – Go
back to the corridor and turn left on the now accessible mesh bridge. Look left
when standing on the bridge and see another companion and a
stand at the far ramps. Go to the end and turn left. The right path is blocked
by an erratic laser beam. Go forward and left across the ramp. Take the
open passage seen at the right. The passage has 2 walkways on both sides that
ends on top of a ramp.
Rotating Corridor
puzzle – Ahead are eight tumbler ramps that should be reset to form a
corridor. In front is a stand that has 5 buttons. Each button rotates one to three tumbler ramps. Study which button rotates what ramp. Then press the buttons to
get all the gold knobs on top and make a corridor at the base.Save game. One
possible solution is – Press from
left to right (1-5): Buttons 5 4 1 2 4 5 2 5. Another solution is 1 1 2
2 4. If mistake is done go back to the
saved game.
Go forward on the
corridor. Go to the stand on the right ramp and raise the right bar to turn off
the power to the broken laser beam blocking the passage at the middle
level.
Go to the other side,
face the companion and click use. A cutscene occurs.
Access to shuttle bay:
Go to the end of the corridor and see a stand to the right of the
companion that is lying on its side.
Opening shuttle bay
door – The stand with 4 arrows is the control that moves the
4 bars on the other side of the shuttle door on the left. As Talen stated: Study the
relationship of the parts with its design.To find out what
happens when you change any arrow position, go to the mesh bridge, forward and
now that the beam is off, turn right to a ramp that goes up. Go forward andup the ramp. Look through the window and note of the position of the
bars above the shuttle door on the right.This is a random
puzzle. The object of the puzzle is to move the bars so that the space will be
centered on the center bolt.Take note where the
position of the space is on the different bars from top to bottom and how many position movements
are needed to
center the space the bars.This is the other side of the door – so note
that the position will be reversed on the other side where the control stand
is located.Go back to the stand
and move one arrow and see how it affects the bar on the other side.
The looking at the bars and changing the arrows on the control panel need to
be done several times. Good luck!
Shuttle Bay:
Enter the open access door and go forward. A warp cursor brings you to the
shuttle bay. Go forward and see a force field blocking entry to the shuttle.
Go back to the side
passage. Enter the elevator carriage on the right by the entryway. Walk the bridge and
look down. See roomful of pods and a single lamp on the right side close to an eyelike
lens on
the wall.
Go down to the main
level. Go forward to the third row of pods and turn right. Look at the
base of the lamp. Press the button and power starts humming.
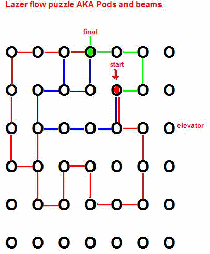
Laser flow
puzzle:
The object of the puzzle is to make a series of unbroken laser beams to the eyelike
lens on the wall.Each laser pod has
4 sides with openings and sealed walls. The openings have either a pipe like or a rounded
hole. The laser should come out of the protruding pipe end and received by a
rounded hole.Look at the pod behind
the lamp. There should be energy going out of it when the button was pressed. Go close to the pod behind
the lamp and use-turn it so that energy goes out though the 2 outlets to the next
pods. The 2 outlets should be away from the lamp: one to the left and one to
the back with the lamp on the right. Do not position a laser to the pod on
the wall or to the one facing the lamp.From here, follow the
path of the laser beams. Turn each pod so that
energy goes in and then goes out through the outlets not through the walls. Be
sure that the beams goes out from a protruding pipe like part and into a rounded
opening. Follow the laser beam and turn the pods until the diverter pod in
front of the eyelike structure.Remember that there
are 2 laser beams at the starting pod by the lamp, so follow that laser beam
path also. Double check all the
pods to see if the laser goes through the right way.By following the
continuous laser beams, you will find yourself in front of the eyelike thing
on the wall. Note that the light around the eye lens is bigger. Turn the pod in front of the eye to get
laser beams from 2 sides and shoots out a laser beam to the
eye lens. This triggers the removal of the force field. Good luck!
Thanks, Jenny100!
Watch the shuttle bay
door open and hear Talen call Sen. There are 2 tribes: Transai and Ansala. The Transais
believe in the old technology and believe science is the only answer for survival while
the Ansalas believe in love of nature and natural methods. Talen gives Sen flight
skills update and chameleon tech, so that Sen can be disguised as a nomad from
badlands. Watch the shuttle flies and crash lands on the planet.
The
Valley
Companion Beach:
Click use on the
Danoosha, a Companion at the beach. See the remains of the shuttle and an
inoperative companion on the left path. Go up to the path on either side of the
mountain wall.
Neutral Zone:
See two bridges that
need to be reset to cross. One is tech and the other natural.
Transai side:
Go down the left path and see a stand with a view of 4 columns of bridge
segments.
Tech Bridge – The object
of the puzzle is to raise the bridge even to the cable that is stretched out on
the gap.The stand has 4
finger like knobs on top. The knobs move the stand to face each of the 4
bridge segment columns. The red button shoots red energy that resets the puzzle.
The blue button shoots out blue energy that raises the columns.Throw blue energy
to any column(s) to see how much column height is raised by each balls. Note
that the height increases in relation to the sequence of the blue energy thrown
i.e. first blue energy thrown raises the column the least and the last energy
raises the column highest. Let us say, first blue energy thrown raises it one
step, the second thrown – 2 steps, third – 3 steps, etc. Reset the columns by
pressing the red button.Then check each column
to see how many steps are needed for it to reach the level of the cable. If it
goes over the cable, do 2 columns until you reach the correct level and note the
steps needed to reach that point. By process of elimination, I found that –
(L-R) Column 1 needs 12 steps, column 2 needs 11 steps, column 3 needs 12 steps
and column 4 needs 10 steps.Then find out one of the
possible sequence of energy thrown to all column to raise them to even height
level to the cable that spans the gap.When correctly done, the
close up view of the stand pulls back automatically.One possible solution
is: Labeling the columns
from left to right as 1, 2, 3, 4. Shoot blue energy to columns – 2 4 1 2 3 2 3 4
1. Another solution is 4 1 1 3 2 2 1 3 4.
Cross the Tech bridge
and meet some Transais. Jimi, a newly appointed team leader talks to Sen as
Jano, an engineer who has been missing for 2 years. They will secure the
shuttle and would meet you at Touchstone.
When they leave, try to
enter the force field but the sentry portal recognizes your chameleon
enhancement and will not let you through. Go back across the tech bridge.
Ansala side:
Go down the steps under the giant leaf. See a plant stand that has 3 buttons on top
and 4 colored buttons at the bottom. On the water are 3 plants.
Natural bridge –
The object of the puzzle is to raise the plants in the water so that the
segments will end up with leaves to create a continuous path to the other side.The 3 buttons on top of
the control plant target the plants in the water. The red button resets an
individual plant in the water. The blue button makes
three segments, the yellow – two and the green – one segment.This puzzle is played
against the computer. The computer randomly adds a certain number of segments to
what you add.The plant on the left
needs 9 segments, the middle needs 13 segments and the right plant needs 10
segments to get to full height. These are found out by shooting randomly to to
the top.One of the ways to trap
the computer is to leave segments for the computer that are divisible by 4, ex.
4, 8 or 12.Your color shot on the
plant always ends in a segment with leaves. The computer immediately adds its
segment that doesn’t end in leaves.Since the computer
segments are random:Shoot green on left
plant to have one segment, leaving 8 for the computer.The computer will then
add segment(s).Count the segments on
each plant and then add enough to leave a number divisible by 4.The last addition should
complete the height of that plant. Adjust the number to get the plant on the
left to 9 segments, the middle to 13 segments and the right plant to 10
segments.Shoot green on middle
plant to have one segment, leaving 12 for the computer. Follow as above.
Good luck!Shoot yellow on right
plant to have two segment, leaving 8 for the computer.Follow as above. Good
luck!
Cross the natural leaf
bridge and meet Saku. She is glad that you as Troga, an explorer came back from
the badlands. They want to meet you at Brada Coe. Try to go through the sentry
totem and find out it is not possible. Go back to companion beach.
Companion Beach: Watch the fight between the Ansalas and
the Transais. They destroyed the ship to prevent the enemy from taking it.
Click on Danoosha and
she said I have done all… Sen looks at the gelleas, the floating islands and thinks that
they are turned somehow. Go to the other companion, Wookash. He moves aside to
show a path in the mountain wall. Danoosha has given Sen an update on his
camouflage using missing members of the tribes.
Secret
Area: Enter the cave and come out to an area with
cables and fans blocking the way.
Fan-Cable puzzle –
The object of the puzzle is to lower all the fans to enable passage to the
other side. There are only 2 chances to do so.Go to the left path
and see that the fans are attached to 16 cables at the floor of the area. The
fans are blocking the path.Go back to the other
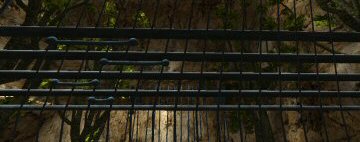
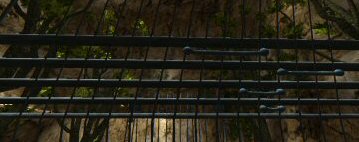
side and go down to the floor using the worn path before the console. See 4 horizontal bars that connect some
cables. The top bar connects 5 cables, second – 4 cables, third – 3 cables and the
bottom bar connects 2 cables. Each bar can lower only 2 cables as seen on the
end knobs.Go to the console
above and see that there are 16 settings that can be selected by
click-hold-move the arrow. The select button is at the center of the rosette
and a reset button is on the right. Play with the cables and realize you are
given only 2 chances to do the puzzle as shown by the 2 lit areas on the bar.Look across to the
fans and note that fans 3, 6, 9, 10, 14 and 15 are already moved away from the
path. So fans 1, 2, 4, 5, 7, 8, 11, 12, 13 and 16 need to be pull down.First step:
The object of this step is to pull blocking fans 1-7. This is done
by connecting cables 1-7 so that they can be pulled with one action.
Remember cables 3 and 6 are already off the path.
Go underneath the
cables again.Move the top bar to
connect cables 1-5. The knobs should be on 1 and 5.Move the second bar
to connect cables 4-7. The knobs should be on 4 and 7.Move the third bar
to connect cables 2-4. The knobs should be on 2 and 4.Move the bottom bar
to connect cables 4 and 5. The knobs should be on 4 and 5.These connect cables
1, 2, 4, 5 and 7.Go to console. Set the arrow to any position from 1-7 except 3 or 6
and press the center button.Second step:
Now, pull down fans 8-16. Remember that fans 9, 10, 14 and 15 are already
down.
Go underneath the
cables again.Move the top bar to
connect cables 8-12. The knobs should be on 8 and 12.Move the second bar
to connect cables 13-16. The knobs should be on 13 and 16.Move the third bar
to connect cables 11-13. The knobs should be on 11 and 13.Move the bottom bar
to connect cables 12 and 13. The knobs should be on 12 and 13.These connect cables
8, 11, 12, 13 and 16.Go to console. Set
the arrow to any position from 8-16 except 9, 10, 14 or 15 and press the
center button. Fans are all away from the path.
Go to the path and
enter Arko’s place.
Arko’s Hideout:
Arko states that gelleas (floating island) have been turned by the Ansalas. Arko tells the history of what happened to the planets and about Sen Geder. Sen was supposed to have a scientist companion. They were the
ones that contacted the alien ship. The alien machineries are the Companions
that are kept by the Transais. Sen is shown a door that has ancient
lock. Arko gives an ancient number of power – 36. Sen wants to go back to the space station to pick up things and to
find his companion, Chemay. Sen’s disguise is now stronger because of
Wookash and Daneesha.
Sen talks to Wookash
and the companion advises to check the Transai area first because they have
better kept shuttles and stronger Companions.
Transai Domain
Transai Portal: Go to the Transai sentry portal,
across the tech bridge. Sen is recognized by the sentry portal as Jano and
is allowed to go through. The sentry portal’s force field is removed.
Transai bridge
puzzle: The bridge are all misaligned and some have an
activated
force field. The object of the puzzle is to align the bridge
and deactivate the force fields.Turn around and go
to the stand close to the cliff edge.This is a random
puzzle. Look at the stand. The top buttons rotates 2 segments of the
bridges and bottom buttons deactivates the force field.Note which buttons
turn which segment of the bridge. Start by aligning the bridge segment that
is controlled by only one button – let’s call it segment A. Do not touch
that button again. Then find which button also moves the companion segment
(B) of segment A. Move that button until segment B is aligned. Find the
button that moves the companion of B, etc…. Continue from here. Good luck!
Halcyon Woods: Cross the bridge and
exit to a woody area. The force field is
activated behind you. Straight ahead is a round hovering companion. The
right path ends at a door with a puzzle. Go back to the other 2 paths to the
left of the force field.
Touchstone: Enter the door and Jano’s friend greets Sen.
Sen meets with Mokri and Usef, members of the council. The Oracle checks Sen
and he passes.
Look at the control
stand beside an airship. The second to the left is lit. This is where you
are now. Press any button to look around the area. The top right destination
has a set of ramps, one of which bridges to an opening blocked by 3 bars on
the other cliff. Only one place – second to the right button will have any
active areas to explore.
Transai Skyport:
See a fog covered platform on the left and a ramp on the
right.
Skyport maze
– Go down the ramp and look up. Map the maze and note the position of thestep before and after a turn based on the lamp on each side.
Go up, stand on the
start area and SAVE GAME! This will let you restart the maze that you
already mapped. The puzzle randomizes after a fall through the fog.The lamp on each
side is at the center point of each slab.Hints:
I used my mouse for control. I made a chart with the turn needed (L or R),
how many slabs to walk on and very important – the lamp position that I will
face when I do the turn. Remember that one click of the mouse or W key moves
to one slab, it takes 3 clicks to move to middle of second slab. Walk to the
end of the segment while cursor is centered on the lamp you need to go to.
Then check right or left to see if you are centered on the side lamps an d
that you are where you need to. Using the
chart and the constant check of the position of the lamp helped a lot.
Patience and Good
luck!
Go down the ramp and
meet Dari. She agrees to take you to the Companion ship, Lyra.
Lyra: See a snow covered land with a derelict
space ship. Inside the Companion ship, go across to the other side and enter
the corridor. Go forward, turn right, forward and left to the next corridor.
Enter the chamber
with plants. Dari and Carluen arrive to talk to Sen. Carluen introduces Sen
to Matsheck, a companion. When Carluen leaves, leave the room also. Take the corridor on the left and see a locked door with an intricate
puzzle.
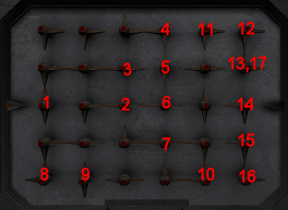
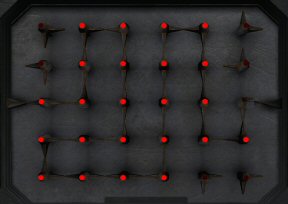
Door Puzzle –
The object of the puzzle is to make a continuous power connection from left
to right. Each knob when clicked turns the neighboring knobs.One way of solving
this puzzle is to:
Click 1, 2, 3, 4, 5,
and 6 once.Click 7 twice.
Click 8 3 times.
Click 9 twice.
Click 10 and 11 once.
Click 12 3 times.
Click 13 and 14 once.
Click 15 3 times.
Click 16 once.
Click 17 twice.
Enter the room and
look around. Go up the steps at the central platform. Sen sees a design on
the floor similar to Arko’s ancient door. Look around at the different
machineries until Carluen enters to greet you. He will leave later. Go back
to the chamber with plants and the companion after you have checked
all the room, corridors and the area where you first entered the ship. A cutscene should be seen and
Carluen will eventually enter. If you do not see the cutscene – explore both
the corridors and the locked room a bit before the final cutscene is
triggered. Carluen talks about the history of the planet
and about the Ansalas imprisoning Sen and Chenay. Dari calls Sen back to the
shuttle and they fly back to skyport.
Transai Skyport: Sen ponders about he should talk to
the Oracle, who he thinks is an ally of the Companions. Walk out to the
airship and press the second top left button.
Touchstone: Enter the council chambers through
the portal and talk to the Oracle. Sen believes that there is an Oracle at
the Ansala area that hid itself and is aiding the Ansalas. The council heads
arrive and advises Jano-Sen to wait a while before he reconnoiter.
Go outside through
the door and try to go out through the force field portal. The sentry portal
would not let Jano through. Turn around and talk to the floating Companion,
Thierry. It advises to try the portal again.
Ansala domain
Once through the
portal go to the neutral zone and cross the Ansala leaf bridge. See
that the Sentry Totem is inactivated. Go forward to the flower bridge.
Flower bridge:
See that the flower petals are drooping. Go to the left around the cliff
side. See the plant control stand for the flower bridge.
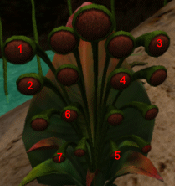
Flower bridge
puzzle – The object of the puzzle is to raise the petals of the
individual flowers.The plant control
panel has 16 small buttons and one top central reset button.Click on all the
buttons and note that some do not do anything.Reset the puzzle and
ignore the dud buttons. Process through the buttons to see which buttons
will successively raise the petals. After a known sequence is pressed and a
button that close the opened petals is reached, reset the puzzle and look
for the next button that will raise the petal. Continue until all the
petals are raised.Click on the shown
numbers in sequence.
Brada Coe: Cross the flower bridge and go
through the cave. The entry is now gone. Turn left and meet Saku and 2
children. The child wants Triga to make an amblates. Saku informs that
the Three wants to talk to Triga at the Great Pavilion.
Great Pavilion
– After the cutscene, turn to far left on the main road. At the end close to
a glowing plant-tree on the right, turn around and see a path that goes up.
Take the upper path and meet Rebus, Losan and Loreann. They excused Triga
from the convocation and has a place for him to rest.After the cutscene,
turn back to the right and go to the Great Pavilion again. Note a stretched
drum like colored skin hanging on one side. Click on the colors to hear
different sounds. Take note of the sounds.Turn around and go
forward. Climb the path and then turn around. Look at the sign on the
right side of the path. Note the number of symbols – there are 9. Go back to the
pavilion and take the path to the left.Middle level
– Follow the path going down to the middle level. Take note of the sign
on the right side of the path – there are 16 of these symbols. Go forward until the end and see a
sea shell on
the wall. Turn around and go back where you started when you first entered Brada Coe. See a path that goes down to a lower level.Lower level –
Go down the path and note the sign on the left of the path. There are
15 of this symbols. Go left and see a plant with colored symbols on it.Middle level
– Go back up to the middle level. Take the path straight ahead and see a
well lit area on the left.
Transport pod:
See a locked brightly colored pod. Sen states that he
should be looking for the Ansala’s shuttle. Look at the plant stand to the
right.
Symbol and sound
puzzle – The object of the puzzle is to open the door of the pod by selecting the appropriate symbols
and sounds based on the right colors.See a plant stand
that has symbols on ovals. The top stamens cycle the symbols, the middle
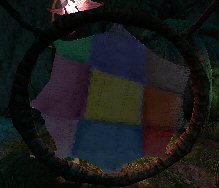
stamens select the sounds and the bottom stamens reproduce the sounds.Correct colors
– Note the colors on the archway in front of the brightly lit pod – purple,
indigo, red and blue.Correct symbols
– Check the plant with colored symbols at lower level to see which symbols
are colored purple, indigo, red and blue.
Correct sound
– Check the stretched drum at the Great Pavilion at upper level to check the
sound made by clicking on purple, indigo, red and blue.
Plant stand –
Rotate the top
stamens to enter the correct symbols for purple, indigo, red and blue.Select the sound
that is produced by a symbol by cycling the middle stamen below that symbol
and by clicking on bottom stamen of that symbol to listen to the different
sounds.When correctly done,
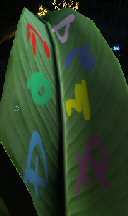
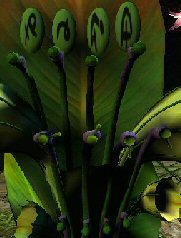
automatically pull out of the puzzle and the pod is opened.Top stamens:
Click from L-R, 6 times, 4 times, no click and 5 clicks. Check the graphic
below for the symbols.Middle stamens:
With all the knobs on top position, click from L-R, 3 times, once, 8
times and 7 times. Check the graphic below for the position of the knobs.
Enter the transport pod
and arrive underwater. Look left to a stand.
Ansala
Seagate: Look at the transport plant stand on the left
as you exit the pod.
Transport control
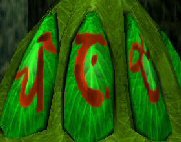
stand – The object of the puzzle is to enter the correct numbers to return the
pod above.The symbols on top are
similar to the ones seen on the signs above ground – at the top, middle and
lower level of Brada Coe.Under each symbols are
3 frames to enter the correct number for those symbols. Click on them and see
that they cycle 4 times showing a base 4 numbering system.
| Base 4 | 0 | 1 | 2 | 3 | 10 | 11 | 12 | 13 | 20 | 21 | 22 | 23 | 30 | 31 | 32 | 33 | 100 | 101 | 102 | 103 | 110 |
| Base 10 | 0 | 1 | 2 | 3 | 4 | 5 | 6 | 7 | 8 | 9 | 10 | 11 | 12 | 13 | 14 | 15 | 16 | 17 | 18 | 19 | 20 |
The left symbol is seen in the sign at middle level of Brada Coe. There
are 16 symbols on that sign. Enter 100 (base 4 value of base 10 16) by clicking the first knob on the left
and leave the other 2 at zero.The middle symbol is from the sign at lower level of Brada Coe. There are
15 symbols on that sign. Enter 33 (base 4 value of base 10 15) by clicking 3 times on the middle and right
knobs.The right symbol is from the sign at top level of Brada Coe. There are 9
symbols on that sign. Enter 21 (base 4 value of base 10 9) by clicking the middle knob 2 times and the
right knob once.
A cutscene shows Loreann and Barrack coming down on the pod. Loreann invites
Sen to go with them to the Gelleas wrecks.
Gelleas wreck: Look at the openings
on the left and see stacks of crates. There are 2 openings that have a control
panel to raise and lower the crates.
Crate puzzle – The object of the puzzle is to lower and raise the
crates to enable access to the openings on the other side.Press the buttons from L-R: 1 once, 2 once, 3 once and 4 three times. When
correctly done, automatically pull back from the control panel.
Enter through the middle opening and walk to the corridor on the opposite
side. Note a similar ancient sign on the wall. Meet Mistertuoa, a Companion.
Before Mistertuoa could talk further, 2 amblates appear and shroud the
companion preventing it from talking further. Loreann arrives and tells you that
Triga is needed above.
Brada Coe: The real Triga came
back and Sen is charged a traitor. He will be scanned and then later be
sent to the rendering chamber to be processed for the good of the tribe.
Holding Cell: Sen finds
out he is invisible due to his camouflage. Saku and the guard could not
see him and thought he escaped. Loreann states that the main lock is
disengaged to conserve energy but the internal synchronization lock is left.
Loreann gives Sen 2 rhymes to help him escape. Note that Loreann
called Sen – Sen not Triga.
|
Synchronization security riddle: |
Transportation riddle: |
| A museum is the place to be Where doors can hear and walls can see. If all your gates are closed together The path is clear and sure forever. |
|
Purple lock puzzle – The
object of the puzzle is to lock the 2 colored clips on each rope on the clamps
on the floor beside the purple bulbs.
There are 3 knotted rope on purple bulbs around the perimeter of the roomSave
Game here so that you can restart from beginning.
There are 3 ropes: Rope 1 is to the left of the door. Rope 2 is to the back
right while facing the door and rope 3 is to the extreme left while facing the
door.One
move of rope 1 moves rope 2 one knot also. One
move of rope 2 moves rope 3 by 2 knots.One
move of rope 3 moves rope 1 by 3 knots.
Arrange the knots so that one rope is locked and the other 2 can be locked in
one pull.Pull
rope 2 until there are 2 knotted lengths of rope between the clamp and the clips.Pull
rope 3 until there are 4 knotted lengths of rope between the clamp and the clips.Pull
rope 1 until it is clamped.Pull
rope 2 until it is clamped. This act also clamps rope 3. If mistake is made,
start from saved game.
Brada Coe:
See that the holding cell is the
end of the lower level of Brada Coe. Go left and ride the gondola.
Galleries of Heroes:
See several paths leading to the center around the perimeter of the park.
Path Puzzle – The object of
the puzzle is to pass through all paths once and not be blocked by a force
field or backtrack.The force field can be turned off
if necessary by bud switches on the frame of the force fields.Take the right path (not statue
path) from the gondola.Go around the perimeter. Sen notes
the ancient symbol at one of the perimeter node and ponders about the Oracle.
Note the concentric circles.Once you reach the statue, take the
inner right path and continue using the paths that are beside the circular
perimeter that was already walked on.After completing this second circuit
at the statue, take the
middle path.There is a side path that goes down to the central lower level Galleries of Heroes.
If you entered the middle path overhead, you can jump down to the lower middle
path.Walk
to the end of the gallery and then go back up.Turn right to the outer perimeter
node. A cutscene will show a gondola coming up.Turn right to the ancient sign node
and ride the gondola.
Oracle platform:
Go up the steps to the platform. An amblate, Janoosh arrives; advises to visit the water garden for making
most important journey and gives a
sea
shell. You can look around and go down the steps to take in the ocean view.
Then climb up and exit on the side of the wall to the gondola.
Arrive back at the Galleries of Heroes.
Take the other gondola at the node close to the statue. It will return to lower
level at Brada
Coe.
Brada Coe:
Climb the right ramp from lower level. Go to the sea shell
on the wall at the end of the middle level path of the village. The sea
shell in inventory comes up when facing the seashell on the wall. Use the
seashell and enter.
Windmill Bridge:
See all 5 segments of a bridge turning around indivually. Take the
right path to go to the base of the bridge’s pillar-tree trunks.
Windmill bridge puzzle – The
object of the puzzle is to synchronize the rotation of the bridge segments.Go to the farthest tree trunk. This
tree trunk will be the first segment if you are even with the bridge above. Note a
pink spine lever on its side. This lever stops and start the rotation of all the
segments.The spine-levers of the other 4 tree
trunks are for fast and slow rotation control of that particular bridge segment.Start the synchronization on the
second tree trunk after this one. Look up, study the rotation of this
segment and compare it with the one before it. Slow down the rotation, look up and when it is
close to being synchronized to the first one, click the lever to speed up.Once you think it matches in speed
and position, go to
the next one. Continue until all of them are synchronized and then stop the
rotation.You can check if they are
synchronized and even by stopping all of them using the spine-lever on the
first tree trunk. Look up to see if they are all aligned.If done correctly, go up and walk the bridge.
If not correct, you cannot walk on the bridge.
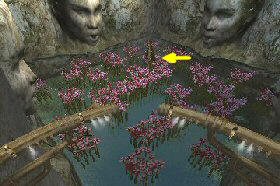
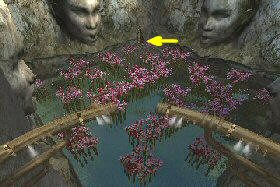
Water Garden:
Go forward, see 4 heads, a dock and a pond full of flowers. Go back and take
the elevator to the top. See that the flowers make a maze and there is a boat
on by the left head.
Water garden maze – The
object of the puzzle is to move the boat to the dock using the wind blown by
the 4 heads on the wall.There is a control panel that
manage the wind released by the heads. As seen on the controls, the left
(west) control has only one gust of wind available, the second (north) has 3
wind gusts available, the third (east) has 2 chances and the fourth
(south) has 2 wind gusts.There is a small flip knob to turn
the gust on and off and a lever at the end of the left bar to reset the
puzzle.
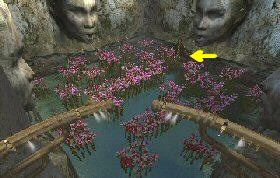
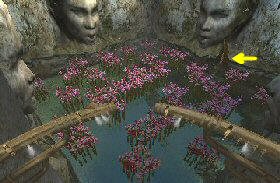
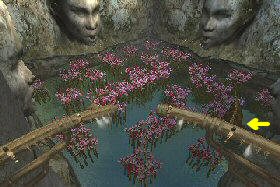
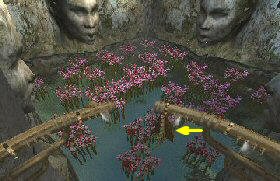
1. Turn wind on west and then north
heads.2. Turn south head on and turn off north. 3. Turn off south. Turn on east and
north.4. Turn off east. 5. Turn off west. Turn on east. 6. Turn off north. Turn on south. 7. Turn off south. Turn on
north.
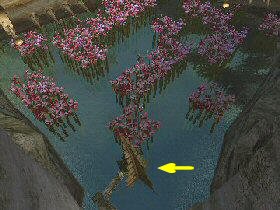
Go down and get on the docked flying boat. Watch Sen fly off and land at the Transai
skyport.
Transai Domain
Transai Skyport:
Exit the area and ride the airship.
Tour of Transai Domain: There
are 3 destinations that stops at a shell with a timer. Each of this shells will open one of the three sliding bars blocking the opening at the end of the
bridge we saw in our earlier tour.
The object of the puzzle is to remove
the sliding bars from the opening at the cliff across a series of ramps.There are 3 shells with timers that
slides the top, middle and bottom bars.The sequence that will stop the timer
and hold the bars in retract position is to retract the top bar first, then the
middle and lastly the bottom bar.The destination on the control panel
of the shells are bottom left for top bar, bottom right for middle bar and top
left for the bottom bar.After pressing the timer pads to
retract the bars, press top right destination on the
control panel to go to the set of ramps landing. Go up the ramp, go right
until the ramp that bridges the gap and turn right to the opening.
Enter the elevator. Go forward and
see a companion on the left. Talk to Sargash. He gives two filters for tower
security system: one shows the correct colors and the other shows them in
reverse. Observe all portals and go through the red halves. Only the red halves.
Go back to the elevator and ride the
airboat to the landing with the transfer portal to the council chambers. Use the
second left destination on the control panel. Go through the door out to
Halcyon woods.
Halcyon woods:
Go to the path left of the force field and see the
locked door of the tower.
Tower door puzzle – The object
of the puzzle is to make a continuous power connection from left to right
starting from the top knob. Each knob when clicked turns some neighboring knobs.
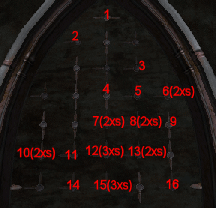
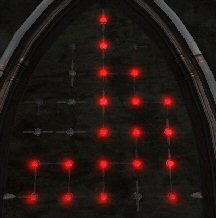
Do the adjustments by rows.Click on the knobs as shown on the
graphic. The door opens.
Grand Tower:
Go forward and see a tower with a circular ramp on top.