Midnight Nowhere
The Chief Officer’s Room
Thus, Whip’s plan fails and the following cut-scene shows the hero being
interrogated by the police. You get a choice of five answers. Feel
free to try them all out, one by one. But it is only when you click the
last response, about the hero not being in the mood to chat, that
the story proceeds forward. The lights in the office start to flicker,
the hero is sent to a punishment cell, and you see him standing there as some
commotion follows, ending up with his yelling for help before the controls are
finally returned to you again.
The Punishment Cell
Use the Action icon on the first-aid kit (lying on the other side
of the bars), to retrieve a pair of scissors and a roll of gauze. Use the
scissors on your mattress to retrieve a ball of cotton, but the scissors break
in the process. Open the inventory and use the Action icon on the broken
scissors to turn it into a kind of hook. Now Pick up this "hook"
and use the Action icon on the roll of gauze, to combine the two items into a
"fishing rod." Use this tool on the first-aid kit, to retrieve
a loaded gun from actually the officer’s body across the bars.
Next, use the Action icon on the
gray barrel you see to the left of the cell door. You will have to use
this icon twice on that barrel before the hero will pick it up and place
it under the vent. Use the Action icon on the barrel again to get the
hero to climb on it and look at the vent. Next, use the Action icon
twice on the vent to retrieve a glove filled with "red
liquid." Soak the cotton ball with this liquid, by picking up this
glove in your inventory and then using the Action icon on the cotton ball to
combine the two.
Step down from the barrel and place
the soaked cotton ball in the keyhole of the cell door. Now use the
loaded gun to shoot at the keyhole. The hole will explode, and the door
will open. Step out of the cell.
The Cell Corridor
You will find that there are three prison cells on the right side of the
corridor. (See the diagram below). The hero’s cell is the last one, at the
opposite end of the corridor, against the wall. The body of a police
officer is lying in front of this cell. Use the Action icon to
examine the remaining contents of the first-aid kit, retrieving only two items:
some "Dimedrol pills" and a vial of "liquid ammonia."
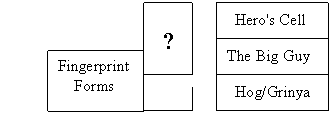
Enter the middle cell then, and you
will find the body of a big guy sprawled out on the bed to your left.
Pick up the cellular phone from his hand, to find that the phone battery is
discharged. Return to the corridor and enter the third cell, the one closest
to you, to find both Hog and Grinya dead. Pick up (i.e., out) the
knife from Grinya’s neck, and return to the corridor again. Pick up the
fire extinguisher from the wall across the corridor from the third cell.
Enter the passage right next to where the fire extinguisher was hanging.
The Fingerprint corridor
You will find yourself against a barred door, with a red button showing on the
other side. Use the fire extinguisher on this button, to short circuit it
and open the door. Enter, and you will find a stack of fingerprint forms
on a bench to your right. The ink placed next to the stack is dried
up. Pick up one of these forms. Now press the red button next to
the door on the opposite side of the room. The door will open and the hero
will enter the Pool Room.
The Pool Room
Pick up the cue stick from the pool table.
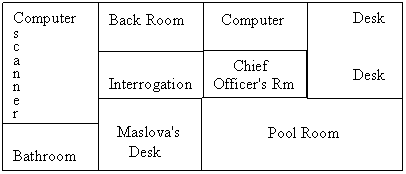
(See
the diagram below for directions from the pool room).
Maslova’s Office
Go straight forward (the directional arrow pointing up) and enter Maslova’s
office. Look at the name plate on his desk. Feel free to read the
two notes, but it is more important to look at his desk calendar. Once you
have a close up of the calendar, click on the left side of the calendar,
and the fifth/Notebook icon will flash green. Look up the notebook and
make note of the code: 8381. Now click on the right
side of the calendar, and the Notebook icon will flash again. Look up the
notebook and make note of the word: FLORALIFE.
Go to the bulletin board on the opposite wall and feel free to read the
different segments of the newspaper there. More importantly, however, pick
up the newspaper from the wall. (You will still be able to read its
stories, inside your inventory). Read the sign on the door to the
left of the bulletin board. This is the Interrogation Room. Place
the newspaper under that door and use the knife on the keyhole. The key
will then drop onto the newspaper, and the hero will retrieve and use it on the
door to open it, without your having to do anything at all.
The Interrogation and Back Room
Go past the interrogation room, directly into the room behind it. You
will find the Chief Officer’s body slumped on the floor, against the
wall. Use the Action icon on his body to retrieve a magnetic strip
card. You are done in these rooms now.
The Chief Officer’s Room
Return to the Pool Room and turn to your right, this time. You
will enter a room with two desks in front of you, and two doors on your
left. Use the magnetic strip card on the card-reader to the right of the first
of these two doors. Enter to find yourself in the room where the chief
officer had interrogated the hero earlier. Use the Action icon to open
the safe on your right, and feel free to look at each of the five folders
inside. These are police reports on the prisoners, including the
hero. Step out of this close up and into the one on the left
side of the desk. You will see an ink pad sitting at the upper right hand
corner of the desk. Use the Action icon on it and the fingerprint
form in your inventory will automatically appear on the upper right hand corner
of the screen, showing that the hero’s fingerprints have been taken. You
are done in this room also, so return to Maslova’s office and turn left of the
Interrogation Room this time (through the door with the light coming out).
The Computer/Scanner Room
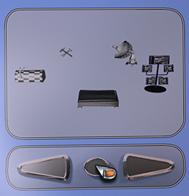
Move towards the computer. You will see a scanner sitting to the left of
the computer. Place the fingerprint form on the scanner. Close up
on the computer, and use the Action icon on the screen to turn it on. You
will see a circular arrangement of icons. Right under these, you will
find three buttons: a round one in the middle, with two directional arrow-like
buttons on either side. Use the left or the right "arrow" to
bring the figure of the dark, flat, rectangular icon right above the round button
and then press the round button to scan the fingerprint form. (See
picture below).
A "scanning…" message will momentarily appear, and a cut-scene will
show the scanner running. You will be brought back to the screen where
you will be given some details about the scanning. Make note of the file
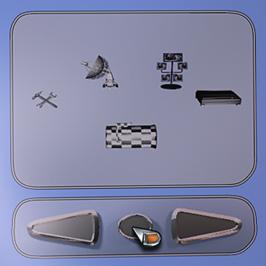
name: Scan 49. The main menu or desktop, with the circular
arrangement of icons, will then reappear. The preset icon above the round
button is a checkered rectangle. (See picture below). Press
the round button.
Click à "send message."
Click à "Scan 49."
Finally,
click à
"T.S. Maslova" as the recipient.
[Note: There is a bug here in the game,
since Maslova’s name first appears in the middle, but on the top when you
actually try to click. Clicking either the top or the middle name should
work perhaps; but click on the first name, just in case, which will then show Maslova’s
name as the one in highlight.] The message will be sent, and you are done
in this room. So return to Maslova’s office and enter the Bathroom now.
The Bathroom
Go behind the wash-basin (sink) area and to the stalls. You will find the
door to the third stall on your right is closed. Use the Action icon to
open it, and you will find an officer’s body inside. Use the Pick up icon
to retrieve a key from his right (appearing left from your
view) arm. You are done here as well, so head next for the Pool room.
The Special Door
As the hero appears in the Pool room, close up on the door to your left
this time. You will see that it is marked as a special entrance, and your
fifth/Notebook icon will start to flash green. Look in the notebook and
make note of the Special Door number: 30461. Step out of
the close up, turn to your right and head for the room with the two desks now.
The (other) Computer Room
Turn to the second
(the barred) door on your left. Close up on the keypad to the right of
the door. Click the code: 8381 (from Maslova’s desk
calendar). The light will flash green indicating success, but then the
keypad will short circuit and you will be brought out of the close up.
Across the bars, and to the left, you will see two small buttons under
the computer table. Use your cue stick on these buttons and the door will
open. Step inside the room and you will be given a close up of the
computer.
[Note: the parenthetical numbers are for reference only, and are given
here to avoid repeated description of certain steps that need to be performed
several times.]
(1) Use the Action icon on the screen and three names will
appear.
(2) Click à T. S. Maslova.
(3) Type personal password à FLORALIFE
(or floralife ) and press ENTER.
(4) Click à E-mail. (There will
be two e-mails).
(5)
Click à Incoming from OSM.
Read the e-mail, but especially
note the website www.garbage/ru/tomatoes.
(6) Click à OK.
(7) Click on the other e-mail now à Incoming from
Red_Corner: file SCAN49.
(8) Click à Save
attachment. (You will be brought back to the choice of e-mails).
(9) Click again on à Incoming from Red_Corner: file
SCAN49.
(10)
Click à Open attachment. (You will be shown a
fingerprint form.)
(11)
Click à OK.
(12)
Click à Back.
(13)
Click à Internet
(14)
Click à www.garbage/ru/tomatoes.
(15)
Click à News.
Read the first page, then scroll
down to the second one and your fifth/Notebook icon will start flashing
green. Click on the notebook and "flip" through the pages until
the notebook stops flashing and you find the notation: What is
"stuff"? Make note of the word stuff.
Step out of the close up on the notebook. Having opened the notebook,
however, you have apparently shut down the computer. So,
(16)
Repeat Steps 1 – 3, 13, and 14.
(17)
Click à Access for agents.
(18)
Click à Karasko.
(19) Type
registration number à 17653007 (written in
your notebook when you first got it). Press Enter.
(20)
Type personal password à stuff. Press
Enter.
(21)
Click à Fingerprint identification.
(22)
Click à Scan 49.
Your fifth/Notebook icon will start flashing green again. Click on the
notebook and "flip" through the pages until the notebook stops
flashing again and you find the name Gorin, as well as
his registration number: 17789006. Make a note of both the
name and the number, and step out of the close up on the notebook. Since
looking at the notebook has shut down your computer again,
(23)
Repeat Steps 1 – 3, 13, 14 and 17.
(24)
Click à Gorin.
(25)
Type à 17789006. Press Enter.
(26) Type personal
password à eldorado (written in your notebook when
you first got it). Press Enter.
(27)
Click à Special door opening.
(28)
Click à Black Lake.
(29)
Click à Police Department.
(30) Type
door code: 30461. Press Enter. (You will be told that
the door has been opened, and you will be returned to the menu of five clickable
choices at the beginning of Step 27.)
(31)
Click à Cellular communication.
(32)
Click à Roy Makarovich Golovan.
(33) Click à
Activate Subscriber. (You will be told that this subscriber is available
for cellular communication now.)
The last three steps were necessary to enable you to use the cellular phone you
are carrying because, apparently, in addition to the battery being discharged,
its service had been disconnected as well. Step out of the close up of
the computer. You are done in this room now, so head for the Special Door
in the Pool room next.
Beyond the Special Door
The door is unlocked, so just use the Action icon to go through. As you
enter, you will find Whip on the floor, next to the door. Ignore him for
now, and move to your left to go through the door on the opposite
side. You will come out next to some kind of a holding cell. There
are two dead bodies behind the bars, and a leather bag is lying between
them. Use the cue stick to drag the bag closer to the hero, and then use
the Action icon five times to rummage through its contents until
you retrieve a partially used up cigarette of sorts. The sixth attempt
will indicate that the bag is empty now. Enter the door to the hero’s
right.
You will find a body sprawled out in the center of the floor. Pick up the
piece of paper and the lighter (the same click picks up both objects) from the right
of the body, and a floppy disk from its left. Open your inventory,
look at the piece of paper, and make a note of the code written on it: GRDA25.
Now, enter the door to your left
and you will find yourself in a large and luxurious office. Up against
the wall in front of you, down on the floor, you will see a very large black
stereo or entertainment system. (See the Action icon in the
picture below)
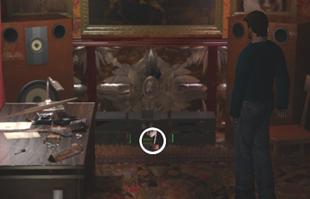
Use the Action key to
retrieve a CD from the center of that system. Move towards the desk to
your left then. Pick up a battery from a body in the chair behind this
desk. Now replace your phone battery (by opening your inventory and
picking up this battery, and then using the Action icon on the phone to combine
the two). The phone is now working.
Next, come down to a shredding
machine, to your left, and on your side of the room. Pick up the
partly shredded piece of paper. Now open the inventory, look at this
paper and make a note of the code written on it: Kay52. You
will see yet another body sprawled out on the floor to the right of the
shredding machine. Use the Action icon to get the hero to check
the time on the wrist watch on this man’s right arm. Make a note
of that number: 2308.
You are done in this room, so step
back out in the central room and enter the door on your right this
time. You will hear a phone ringing. Click the directional arrow pointing
down, to bring the hero around the partition rail in the middle of the
screen. Then click on the arrow pointing up, to take him towards the
ringing phone. Use the Action icon to answer it. You will hear some
officer trying to negotiate, but the hero will answer curtly and hang up.
You will have to use the Action icon four more times, however, since the
officer will keep calling back until the hero has answered five times in all
before the ringing will finally stop. Now step out of this close up, go
back around the partition rail, and enter the door on your left.
You will find yourself in a small hallway, with only two doors on your
left. Use the key you had found earlier, on the first door right
next to the hero, and enter the room. Pick up a packet of powder from a
stool against the wall in front of you. At the bottom of your screen, you
will see a desk in the relatively dark part of the room. On the upper
left side of this desk, there is an answering machine. Use the Action icon
on the machine four times to hear all the messages left by a
single caller.
You have everything you need to finally attend to Whip
now, so return to the corridor where he is still lying apparently
unconscious. Use the vial of liquid ammonia on him to bring him
around. He will talk for awhile but then start complaining of pain and
ask for some "downers." Give him the Dimedrol pills. He
will then ask you for some "grass." Give him the
cigarette. He will then ask you to light it up, so use the lighter to do
so. He will then ask you for some cocaine. Give him the packet of
powder you had just found. After all this, he will be able to talk at
some length, and die right after telling you to call someone nicknamed
"Stupor" and apparently jotting down a phone number in your
notebook. The fifth/Notebook icon will start flashing green, of course,
so look it up and "flip" through the pages until it stops
flashing. Make a note of Stupor’s phone number: 2-43-43.
Use the Action icon, first on the phone to bring it out of your inventory, and
then again on the numbers to dial 24343. After clicking the
numbers, click the blue dash under the mini-screen on the phone.
(See the Action icon in the picture below).
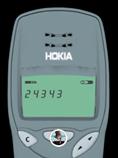
The conversation will carry forward without your having to do anything at
all. Then, as Stupor hangs up, step out of the close up of the phone and
return to the hallway with the two doors on your left. Approach the second
door, the one closest to you, this time. Close up on the yellow
sign on the door. It says, ""Lavatory out of order."
Use the Action icon to move the sign aside and expose a
keypad behind. Close up on this keypad and type (on your
keyboard): 2308 (the number from the dead man’s wristwatch in the
luxurious office). The green light will flash, as a clicking sound will
indicate that the door has been unlocked. You will then be brought out of
this close up automatically, but will still be in the one on the door.
Step out of this close up also, and use the Action icon to enter the room.
You will see a very large computer in front of you. Close up on it. You
will be asked to enter the operator password. Type: GRDA25
(from the paper in the central room). Next, you will be told to enter client
parameters. Click on: Sergey Sergeyevich Belov. You will
then be asked to enter the administrator password. Type in: Kay52
(from the shredded piece of paper). At this point, the computer will
indicate that the cartridge issue is confirmed, and display the message:
"Unfreezing confirmation password: 8032000." Your
fifth/Notebook icon will start flashing green. Click on it and
"flip" through the pages until the notebook stops flashing.
Make a note of this number. [Note, however: you will never need to use
this code. Thus, it might be something that is necessary to be automatically
used in the game, like the CD and the floppy disk you had found earlier but
never actually had to use at all.]
Step out of the close up of the
computer. You will see that one of the large drawers to your right is now
open. Pick up a cartridge from it. Open the inventory now and use
the Action icon, first to bring out the phone and then to dial 24343,
to call Stupor again. Tell him that you found the cartridge. He
won’t believe you, and ask you to describe it. Tell him that it is orange
with a yellow stripe. Stupor will then tell you that you would
have to make your own way out, but will also explain just how to do so.
Follow his instructions and go back out to the Cell Corridor and approach the left
door against the wall (the one marked with a "?" in the earlier
diagram). Use the Action icon on that door and the hero will automatically
knock the way Stupor had described. The watchman will let you in, and you
will find yourself in a room with apparently no other door.
Use the Mouth icon to speak to the
man, and the hero will tell him that he needs to use the underground
passage. You don’t have to do anything yourself as the conversation
carries forward, with the watchman first asking for a pass and then agreeing to
help if the hero would help him find the last word to complete a crossword
puzzle. Go to the small table on your left and close up on the one
magazine lying at the lower left corner of the table. (See the
close up icon in the picture below).
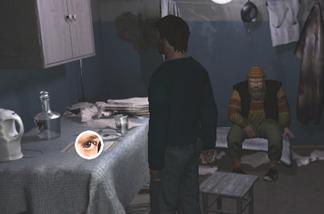
Close up on this magazine and see
that it has the picture of a rather dangerous-looking man on the cover.
Use the Action icon on this page to turn it to show the one with the
crossword puzzle itself. Now step out of the close ups, use the Mouth
icon to speak to the watchman again, and tell him that you have guessed the
word. He will find it hard to believe. Click on the fourth choice
then: NEBUCHADNEZZAR. The watchman will indicate that it is
the right answer. [Note: If you looked carefully at the crossword
yourself, however, you might have noticed that the number of empty spaces is less
than the number of letters in the above word. Moreover, the letters
in this word do not even correspond to the letters already filled
in. Nevertheless, the watchman will accept it as the correct
choice.]
You won’t have to do anything
yourself then as the watchman will then tell the hero to be on his way, and the
hero will start moving towards the other side of the room. A cut scene
will show the hero descending down a set of stairs and reappearing in some kind
of an underground passage. There will be only one directional arrow in
this area, appearing on a ladder in the center of the lighted passage in front
of you. Click on this arrow, the hero will move towards the ladder, and
then the last cut-scene will show the end of the story.
*
* * * * * * * * * * * *
* * * * * * * * * * * * * * * * * * * * * * *
* * * * * * * * * * * * * * * *
About the Ending (Spoiler):
The ending is rather vague, but here is my particular take on it.
Apparently, our hero is the ultimate villain, i.e., the Black
Lake Executioner. There are many clues throughout the game to support
this conclusion. For one thing, it explains the hero’s frequent callous
remarks. It also explains why everybody but the hero seems to get
killed off at both the hospital and the police station. It even explains
the hero’s sensational "confession" at the interrogation that he is
in fact the Executioner that everyone is looking for. After all, how
can a man seeking to avoid a dreaded punishment like the Deep Freeze,
even think about confessing to a series of crimes that would practically guarantee
his being placed in just that freeze — unless he was in fact crazy enough to
be the one committing all those crazy crimes, in the first place.
Again, there is no doubt that the "real" Belov was quite cruel
himself, as indicated by his own henchman’s remark at the end about their being
afraid that he might have "softened up" in the amount of time he had
spent in the freeze. But then, Belov turns to the hero and chastises him
of being the cruel one, indicating that the hero had even outdone him.
The most important clues to the hero’s being the real Executioner, however,
come from that "flashback," of course, when the hero is knocked out
by Belov’s men. Thus, you hear someone shouting in the background about
the fact that the Executioner was on the loose, just as the hero
is speaking to the doctor, telling him that the Feds were after him and that he
needed the doctor’s help to hide in the morgue, etc. Apparently, the
doctor had to give him some kind of a drug to make him look "dead
enough" to convince the Feds. (Remember the syringe on the desk in
the morgue?) Of course, the doctor might well have even tried to kill
him with a drug, knowing what a dangerous man he was. Whether the
doctor actually co-operated or in fact tried to take advantage of the situation
to kill and thus get rid of a dangerous man, however, the end result appears to
be that the drug causes the hero to lose his memory, even though it obviously
helped him escape the police as well.
Now one might wonder, of course, as
to who was doing the killing when the hero was unconscious in the morgue
or in jail. Very simply, it must have been Belov’s men. Remember, their
whole purpose was to see to it, and probably even help, Belov’s
"clone" in securing and delivering to them the cartridge that would
help "thaw out" Belov. They might even have been trying to
throw the suspicion off the hero to help him accomplish this task.
Indeed, recall that that was precisely why the officer did not
"buy" the hero’s "confession" at the interrogation.
Thus, the idea was to help the hero just long enough for him to deliver the
cartridge, and then Belov got rid of him himself because he was just way out of
control, attracting far too much attention from the police. He didn’t
actually kill the hero, however, probably just in case he might need him
again later. So, instead, he just put him in the Deep Freeze . . .
*
* * * * * * * * * * * *
* * * * * * * * * * * * * * * * * * * * * * *
* * * * * * * * * * * * * * * *
* * * * * * * * * * * *
* * * * * * * * * * * * * * * * * * * * * * * * * *