Midnight Nowhere Walkthrough
Midnight
Nowhere
(A Walkthrough by Zurreen Zubairie)
Copyright © 2006. All rights reserved.
WARNING
Please, note that this walkthrough is copyrighted. Hence, any
attempt to reproduce anything from this walkthrough will be severely
punished to the maximum extent of the law.
INTRODUCTION
I started playing computer games some five years ago, and have played several
since then. While I loved to take notes and even "preserve"
them for "later generations," the very idea of writing an actual
walkthrough for a game always seemed too daunting. Recently, however, a
friend suggested that I should be very good at writing a walkthrough, so I
decided to give it a try. Thus, this is my very first walkthrough.
If anything, I might have gone "overboard" in spelling out all the
details. That’s okay though, since nothing would please me more than to
be able to help out anyone, no matter how adept at game-playing they
might be. Any words of encouragement – as well as comments, questions,
and suggestions, of course – would be most welcome. [Please, direct all
of these to . Thank you.]
ABOUT
THE GAME ITSELF
I am sorry to say but this is really not the best game I have ever
played. Indeed, I would strongly advise players under the
age of 18 (and people with good taste generally) against playing
this game. In fact, the "good girl" that I have always been, I
was truly embarrassed by all the depiction of nudity, and offended by a lot of
the language. The fact that none of that was even "necessary"
in this particular game, made it all the more
offensive.
In all fairness, however, I have to say this: if you can somehow
overlook, ignore, and overall de-sensitize yourself to the
nudity, depictions of violence, and offensive language, you will find that the
game has been designed rather cleverly, involving interesting twists and
turns. My only recommendation to the designers and the developers would
be to just clean it up a little (actually quite a lot). And
I do so hope, they will take this advice in earnest,
because the real game behind all this unnecessary clutter is
really worth a good revision.
Finally, I would give two pieces of advice to those with the aforementioned good
taste who might still like to try playing this game.
(1)
DON’T LOOK AT ANY OF THE PICTURES. This means, all the posters on
the walls, the magazines on the tables, etc. Unfortunately, however,
there are two EXCEPTIONS to this "rule." [WARNING:
SPOILER COMING]. The first one is the card that you must
retrieve from a book in the Security Room. (See the section on that room
in the walkthrough.) You really can’t avoid seeing the picture on that
page but try, because it is rather revolting. Secondly, you would
have to see the pictures on those nine cards (but only on those nine
cards) to be able to answer Whip’s riddle in the jail cell. Again, focus
your attention on the questions itself and not on the irrelevant
pictures.
(2)
AVOID PAYING TOO MUCH ATTENTION TO THE HERO’S REMARKS. Don’t try
to turn off the volume, of course, because a lot of his comments are actually clues
as to what you are looking for, if you should either use a different icon or repeat
the use of the same one, etc. So I guess, the
real advice is just to ignore anything crude or callous that he (or some
other character) might say.
THE
WALKTHROUGH
Generally:
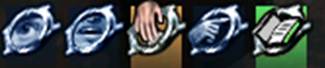
This is a point-and-click game. There are four icons for navigating
through the game, as shown below.

1
2
3
4
1.
The EYE icon = CLOSE UP, LOOK, EXAMINE. Be sure to keep this icon
highlighted wherever you go. It will "alert" you to all the
possible points. Also, it is often only after the hero
"sees" something and makes a comment, will you then be allowed to
pick up or interact with a critical object.
2.
The MOUTH icon = CONVERSATION. This is actually critical in only
one place in the entire game (to be noted later), although you can often click
on this icon to hear the hero make some wise crack at many spots.
3.
The HAND icon = PICK UP, RETRIEVE objects, for example, from a person,
safe, etc.
4.
The POINTING-FINGER icon = USE, ACTIVATE, COMBINE. This can be
used either to make some change in an item in the inventory, combine
two items in the inventory, as well as to interact with something in the
environment, for example, opening a door.
The
Hospital
The
Morgue
You step out of a body bag and find yourself in a morgue. Go to the
desk. Close up (i.e., click on the Eye icon). Read the two
notes. Pick up the microscope. (You will have to change the icon to
the Pick-Up icon yourself to do so). Step out of the close up, turn
right, and Use the microscope on the Fire-Axe case to break the glass
door. Retrieve the Fire Axe and a Large Piece of Glass lying at the
bottom of the case right under the axe.
Turn right to find three bodies, also in body bags, laid out on
stretchers. Close up on the body in the middle, that of a man. Look
at his arm, folded over on his stomach. The hero comments: An "Ariel"
tattoo. Make note of ARIEL.
Step out of that close up and into that on the body on the extreme right, also
of a man, a hospital worker (you can see the badge spread out on his
chest). Move his hand folded across his chest and the arm will fling
out. Use the axe on that hand to cut off (retrieve) a finger. (I
know, it’s nasty – but necessary, to proceed in the game).
Turn right, to face the two stretchers one of which you had previously
occupied. Make a note of the number of your "bed": 270871.
Move forward towards the freezer, to approach the control panel to its left.
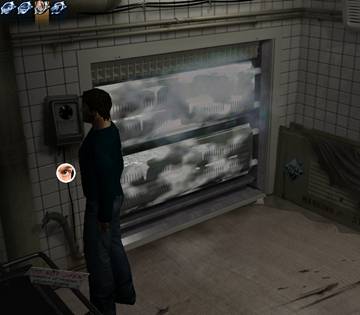
Use your axe to cut off/retrieve the piece of cable (right where the Eye icon
is showing) under that control box. Now open your inventory and Use the
piece of large glass on the cable, i.e., "combine" the two in the
inventory. The plastic has thus been stripped off the wire.
Now turn right and approach the door to find it
electronically shut off. Turn to the big control box, to the right of the
door. There is smoke coming out of it. Use your axe to take off the
cover of the control box. Use the Pick-Up icon to then remove
the burnt out fuse. (See picture below)
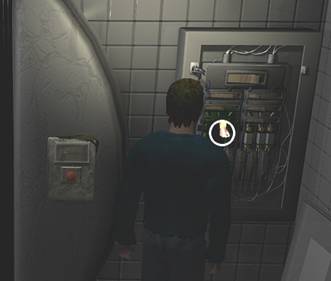
Pick up the stripped wire in your inventory and
put it in the place of the old fuse you just removed. The electronic controls
for the door come on. Before leaving the morgue, however, turn right and
come to the glass cabinet. Open the third door to the right, move the
photo stuck at the back of this glass door, and make note of the Emergency
Password: 654321.
Return to the door. Press (the Action
icon) the red button on the electronic control, to open the door. Exit
the Morgue. Move down to approach the elevator (which is to the left of
the door with the ladder sticking out). Press the call button to the left
of the elevator. Enter the elevator as it opens. There are only two
buttons on the panel. Press the upper one. The elevator moves up an
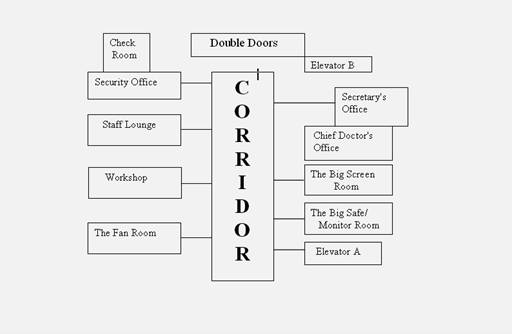
unknown number of levels. Step out to find yourself in a corridor with
offices on either side. (See map below – You entered through
"Elevator A.")
The Security Room
Go down to the Security Office. Use the finger in your inventory on the
finger-scanner to enter the office. Pick up a key (looks kind of bent)
from the visible crack in the floor. Pick up another
key (seems to have a tag with #1 on it) from the red lamp shade.
Close up on the desk now and will get a close-up of its drawer. Use your
axe to open the drawer and Look at the piece of paper inside. When you
step out of this close up, you will see a blue card showing under that
piece of paper. Pick it up. Next, look at the shelf on the wall.
Look at the second book from the left: The Encyclopedia of Calluses – Volume
1. Open it and tucked at the top, in the inner spine, you will find a
red card. Pick it up and step out of that office for now.
The Big Screen Room
With your back to the double doors you see at this end of the corridor, move
forward and use the Red card on the card-scanner on the first door to your
left. (Who knows what the sign on the door actually says, but the hero
reads it as "Entrance for terminators only.") The room is dark
inside but you can see the side of a large white screen on your left.
Close up on that screen where you will be asked to "enter
password." Type ARIEL (or ariel)
directly on the screen. (In other words, you will have to use your
own personal keyboard, because none appears in the game itself). Five
menu options will appear. Click on the one in the middle: "current
passwords." Again, you will be given a choice of five
items. Click on "checkroom." Make note of the
password it then gives you: 928374. Now step out of this
room for now.
The
checkroom
Return to the Security Room. Close up on the key pad to the left of the
door inside.
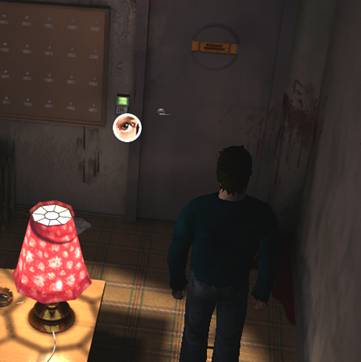
Click the numbers 928374. Enter this inner room
(which was referred to on the Big Screen as the "checkroom").
Use the Action icon to get the hero to lift a corner of the brown mat on the
floor right in front of the entrance. Next, use the Pick-up icon to
retrieve the key under the mat. (This key looks like an upside-down
L.) Next, Close up on the table against the wall
in front of you. Use the Pick-up icon first to move the green coffee mug,
and then again to pick up another key from under the mug. (This key looks
like an upside-down I.) Step out of the close-up.
There is a table, on your left, with a computer keyboard on it. Put the I-shaped
key in the box to the right, and the L-shaped key in the box to the
left, of that keyboard. The red lights on the two boxes will turn
green. Use the Action icon on the keyboard itself. Click on: Morgue.
Now click on: S. S. Belov. You will be asked to "enter
password." Type 270871 (your bed
number in the Morgue). Click File to get
some information about this person (apparently you?!). Now click
on the name (Belov) and type in the bed number (270871) again, to be able to
now click on "personal belongings." You will be told, "personal belongings issued." Click "ok"
or just step out of the close up. You will see a drawer has opened up,
behind the hero, in the light now showing behind him. Close up on the
items spread out on this "drawer." Pick up the notebook (looks
more like a PDR), and the pen will automatically be picked up as well. A fifth
icon will now appear to the right of the original four, looking like a notebook
and lit up in green.
1
2
3
4
5
You can either click on this notebook icon OR go in your inventory and use the
Eye icon to read what is in the notebook. Either way, as soon as you read
the new information that made the fifth icon light up green in the first place,
the green color will disappear and the notebook icon will return to its normal
non-green form.
Read the four news clippings also spread out on the table/drawer. You are
now all done with this room as well as the Security Room. So return to
the main corridor.
The Chief Doctor’s Office
Move the hero straight forward (that is, to the right on your screen).
There is apparently a corridor that you enter, and end up in what appears to be
a secretary’s office. Turn to the door on your right. It has the
sign "Chief Doctor" on it and is unlocked. So just use the
Action icon to open and enter. You will see a portion of a large desk to
the right of the hero. Move him straight forward instead (to the right on
your screen), on his side of the desk. Use the Eye icon to get a
close up of the fax machine, hidden in a corner on that side of the desk, right
up against the wall. Use the Action icon first to listen to one new
message and then to turn the fax on auto (so you will later be able to
automatically receive a fax there).
Now step out of the close up and go around the large desk to approach the
doctor’s body sitting upright in the chair. Use the Eye icon to read the
note on the desk. Then, use the Action icon first to make the body slump
over the desk, and then to retrieve a business card from its jacket. Open
the inventory and use the Eye icon to get a close up of the business
card. Make a note of the Fax number: 9-45-11. Return
to the main corridor.
The Workshop
Approach the Workshop and open the door (with the key that appears to have a
tag with number 1 on it) to enter. There is a light grey jacket hanging
in the large closet on the hero’s left. Use the Action icon at the cuff
of the jacket to remove a flashlight. Now move towards the work table on
the opposite side of the room. Use the Action icon to remove the cloth
from the safe under that table. Now open your inventory and use
the Action icon on the pen to turn it into some kind of a key. Use this
"key" on the safe to open it. Look inside the safe. Pick
up the piece of paper (right in front of you, but to the left of the bottles),
look at it in the inventory, and make note of the code: BYRGR.
Step out of this close up and Look at the top of the table. Pick up the
screw-driver. Step out of this close up also and come back, to the now left
side of the entrance. Read the note on yet another large cabinet.
Look at the horseshoe that is holding up the note against the steel cabinet
door. Pick up the horseshoe. You are done with this room, so step back
out in the corridor.
The Monitor Room
Go to the room immediately to your right and use what appears to be a bent
key in your inventory, to open the door and enter. There will be a large
safe on your right. Ignore it for now and come further down in the
room. You will see several monitor screens, and videocassette recorders
(VCRs) right under them, on the wall to your right. Use the Action icon
on the VCR at your extreme right, to remove a video cassette. Step out of
this room for now.
The Staff Lounge
Use the Blue card in your inventory to open the door and enter the Staff
Lounge. Use the Horseshoe on the ("Victoria Lollipop") calendar
on the wall (to the left of the entrance) to retrieve a magnetic key. Use
this key on the blue locker marked "Kolya," on your
left. Use the Action icon to open the box inside, and the Pick up icon to
retrieve the circuit-breaker from the box. Step out of the close-up.
Right in front of you, there is a
black leather armchair. Use the Pick-up icon to remove a remote control
from its seat. Now move to the right side of the room. There is
some kind of a digital clock sitting on a small table between some shelves on
your left and a shut-off television set on your right. Use the
screw-driver to remove a battery from this clock. Now Use the remote
control on the darkened screen to turn the television on. Next, move to
the shelves (with all kinds of knick-knacks) on your left, and place the
videocassette in the VCR on the third shelf from the top, on the left
side of the shelves. (See the Action icon in the picture below).
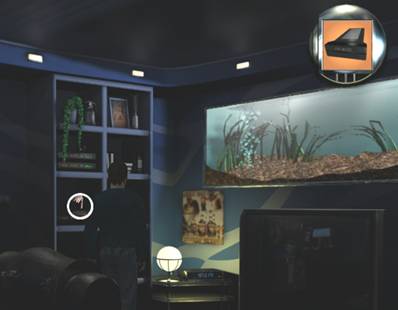
The hero will walk towards the screen as the tape starts playing. You
will see a nurse punch in the code in the keypad to open the double
doors. Make a note of the code: 260731. You then see
the security officer come and remove the circuit-breaker from the control
panel. As the video concludes, you are done for now. So return to
the main corridor and head for those double doors.
The Double Doors
Use the screw-driver on the cover of the control panel to the left of the Double
Doors. Next, put the circuit-breaker in the control panel. Now use
the Action icon to see the key pad on the left of the Double
Doors. (You might have to fumble a little bit, because the hero is
blocking your view). Click in the nurse’s code in the key pad: 260731.
Now use the Action icon to go through the Double Doors and come down one floor.
The Operating Room
Go past the room marked Cardiology; past the double glass doors; and arrive at
the other end of the hallway. Use the Action key on the first door to
your right, and enter what appears to be the Operating room. You see a
cadaver (apparently of the security officer you had seen removing the circuit
breaker in the video) on a stretcher. Move forward to him. Use the
Action icon to partly remove the sheet covering him. Pick up the scalpel
sticking out from his neck. Move further down the room to find a nurse’s
body on the floor. There seems to be a bug in the game here, so you will
have to alternate between the Action, the Eye and the Pick up icons, first to
remove the key (from apparently the upper pocket of her uniform), and
then to retrieve a condom from the hand folded on her stomach. You
are done in this room, so come out.
The Bathroom
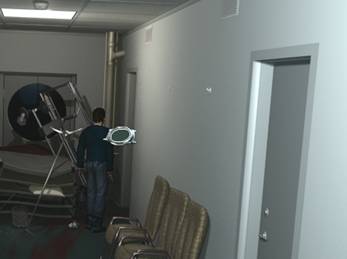
Turn to the hero’s right, and use the directional green arrow to go through a
second entrance down this same wall, to arrive in a bathroom. (See picture
below, although the green arrow failed to appear on the "dish"
you see on the hero’s right shoulder.)
Use the Action icon to open the tap in the left wash-basin (or sink). Now
Use the condom on the tap to fill it up with water. Turn the tap off with
the Action icon. You are done in the bathroom, so come out and return to
the upper floor, using the stairs that lead down from the Double Doors you had
used earlier to enter this floor.
The Fan Room
Use the scalpel on the door (to cut open the rope that had been tying it shut)
to open it and enter. Move forward and you will see the giant fan
whirling at the center of the floor. Across the floor, on the wall to the
right of a doorway there, you will see an exposed control panel.
Throw the condom (filled with water) at it. This will cause a short
circuit, of course, and the fan will stop. Move across the floor to enter
a room and find yet another body. Use the Action icon to slump the body
to the floor. Pick up the gun from his hand, and an ID card from his
jacket. You are done here, so return to the corridor.
The Staff Lounge (again)
Enter the Staff Lounge and use the nurse’s key to now open the blue locker
marked "Lara." Use the screwdriver on the red button at the
base of what looks like some kind of a vibrator, to open and show a
battery. Pick up the battery. Now open your inventory and load your
flashlight with the two batteries (by picking up one battery, at a time, and
then using the Action icon on the flashlight to combine the two).
The flashlight is working now and you are done in this room as well. So
head downstairs again, for the Cardiology Room.
The Cardiology Room
Enter the room, but it is too dark to see. So open your inventory and pick
up the flashlight, to produce a halo of light around you. Thus, locate
the light switch behind the hero. (See the Action icon in the picture
below).
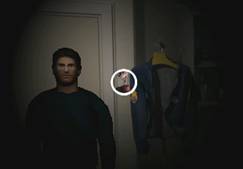
Turn on the switch, to see the
jacket hanging just to the hero’s right and yet another dead body on a bed in
front. Use the Action icon to examine one object after another in
the jacket’s pocket, although all that you actually retrieve is a big
key. Now move one step towards the body and use the Action icon
to retrieve a cartridge clip from his right hand. Load your gun
(by picking up the clip, in the inventory, and then using the Action icon on
the gun to combine the two). You are done with this room, so head
upstairs to the Monitor room.
The Monitor Room
Use the big key on the safe (to the hero’s left) to open it, and Pick up a
floppy disk from inside. You are done in this room also, so take the
floppy disk to the Big Screen room now.
The Big Screen Room
Close up under the big screen this time (somewhere close to the center
of the room) to see the floppy disk drive showing under the ashtray.
Place your floppy disk in this drive, step out of this close up and into
the one on the big screen. Type the password: ARIEL. Click
on "floppy drive access." Click on "fax." Now
type: 94511 (the fax number that you had gotten from the Chief
Doctor’s card). A message will pop up above the fax number box,
indicating that the "fax transmission interrupted. 48%
complete." That’s okay. You have what you needed. You
are also done in this room, so head for the Chief Doctor’s office now.
The Chief Doctor’s Office
Go to the Fax machine in the corner. Close up on the machine and then on the
fax you have received. Make note of the number for M. A. Katzman: 9994.
You are done in this room also, so head back downstairs now.
The Elevator Below
There is an elevator to the hero’s right that keeps opening and closing because
the body of a man is blocking its doorway. Use the Action icon on the
body and the hero will drag it out and into the bathroom across the
hallway. Press the call button, to enter the elevator. Close up on
the keypad and use (i.e., slide) the ID card you had gotten from
Katzman’s body in the Fan room. You will be asked to "enter personal
password." Click in: 9994 (the number you got from the
fax). A message will appear on the keypad that the institution is in a
state of emergency, and you will be asked to "enter emergency
password." Click in: 654321 (the number you got from
the back of the photo down in the Morgue). You will automatically be
brought out of the close up. The controls are working now. There
are only two floors that are accessible by this elevator, however. You
are presently at the second floor. So press 1, to go down.
Next, step out to enter the floor at the street level.
The Street Level
Here is the situation. The Street Exit (see the diagram below) is
electronically sealed and the control panel is locked. The key to that
lock is in a cabinet in the Bathroom, but this cabinet is also sealed — by a code
lock. The code is inscribed on the hand of a body in a bathtub on the
other side of the bathroom. But you cannot reach this body because a pipe
has burst, spewing out hot water, thus blocking your passage. The water
valve is in the Reception Area but is blocked by the bulky body of a man whose
head is caught in the Office window. So this is what you need to do, to
finally get out of the hospital.
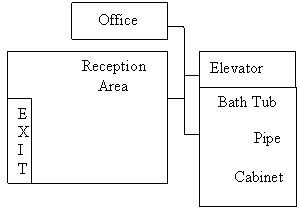
As you step out of the elevator, turn to the hero’s right (the green directional
arrow will be pointing up). You will see two doors. Use the loaded
gun to shoot open the lock of the very first door to your left.
Enter the office. Move forward and use the Action icon on the top pane to
drop the window on the body’s head. (Nasty, I know, but necessary to
proceed in the game.) Now step out of the office and back to the front of
the elevator again. Take the left this time and you will be in the
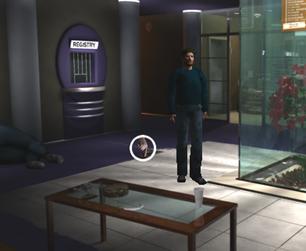
reception area. Use the Action icon (see picture below) to lift off the
lower-right corner of the carpet. Use the Action icon again to get the
hero to open some kind of a cover, and again to have him finally shut off the
valve.
Return to the corridor and turn to your right this time, to enter the
bathroom. Move left, to reach the bathtub. Close up on that body’s
hand. The Notebook icon will flash green. Click on it and
"flip through" the pages until the green light on that icon
disappears. Make note of the code: MM = 2000.
Return to the cabinet and Close up on its
keypad. Click the numbers 2000. You will
automatically be brought out of the close up to see that the cabinet door is
now open. Use the Action icon on the robe hanging inside, to
retrieve a key. You are done in this room now, so head back to the
Reception Area.
As you enter, move in further to the left this time, thus going past the
area with the water valve. Use your new-found key on the control panel
(appearing to the right of the Exit) to open it. Close up on the panel
and you will see five rows of five letters each. Click on the letters in
the following order, moving from TOP down, one letter at a time: BYRGR
(the code you had found in the Workshop’s safe). NOTE: You
may not even have to click all the letters. Each letter represents a
color and the pressing of a letter lights up that color in the box to the right
in that row. Thus, if a color is already lit up, there is really no need
to press its letter again. The boxes must thus be lit up in the following
order, top down: Blue, Yellow, Red, Green, and Red. Once this
order is achieved, the words "OPEN" will appear at the bottom of the
panel. Step out of the Close up and then use the Action icon on the doors
to leave the hospital.
The Police Station
As soon as the hero steps out of the hospital, three officers approach
him. It doesn’t really matter what answer you pick in response to their
question, until you finally click: "What business is it of yours?"
The hero will then be asked for his ID. Again, there is only one
"magic" answer: "I’m Katzman." The picture on
the ID card does not match the hero’s face, of course, so he is searched, and
the police recover suspicious items (microscope, axe, gun, etc.). The
hero is then arrested and carted off to jail.
The Jail
There are two men playing cards on the table, while a third one is sprawled out
on the top cot to the right. Use the Mouth icon to speak to the two
men. The big guy is called Hog, the skinny one Grinya, and the one lying
on the cot is Whip. Grinya will then tell you to pick a cot for
yourself. Turn around and Close up on the razor above the wash-basin
(sink). Use the Action icon on it to find that it has no blade. The
hero will automatically turn around then and ask the two men on the table for a
blade. They will tell him to speak to the guard and you will be brought
back to your close-up of the razor. Step out of this close-up and use the
Action icon to knock at the door and speak to the guard. He will refuse
to give you a razor, complaining about how the men had lost the last one he had
given them. Turn back towards the two men again, and use the green
directional arrow (pointing up) to move in closer to the cots. Use the
Action icon on the three empty cots, one by one, each time to be told by Hog
that it was his cot. [Note: There might be a bug in the game here,
but just try to get Hog to say this three times in a row, once for each
cot, without letting Grinya interrupt or even Hog say anything else.]
Step back again and ask Hog, which
cot was yours then. He will answer curtly and return to his game.
Address him again, saying, "It’s unfair." Again, he will answer
and turn away. Speak to him yet again, saying, "All the cots are
yours?" This will start a fight. The hero will punch out Hog,
but Grinya will pull out a knife. Whip will intervene then, and the
conversation will continue between him and the hero.
You will have to ask all the questions that appear on the screen, but this is
good, because it will help explain some things both about the story plot as
well as the situation in town. In the end, you will ask about what should
be done. Whip will then tell you about a plan to break out, but one of
the men would have to serve as bait. He suggests "casting
lots," but not including himself in the game. The game is as
follows: everyone would have to find at least three of the cards that Whip has
hidden and then give the correct answer to the riddle on each one. Hog
and Grinya have already found three cards each, but have not answered the
riddles yet. Now the hero has to beat them to it, in order to avoid
becoming the bait himself.
Move closer to the players again, following the green arrow pointing up.
Only this time, Close up on the radiator behind
Hog. Use the Action icon to remove the three pieces of wheat bread, one
by one, until you retrieve the blade from the toast on the far right. Step
out of this close up and into the one under the table. Close up on
the piece of paper stuck on that side of the table and use the razor to expose
a card hidden behind it. Pick it up. (This is the first
hidden card that you needed.) Step out of this close up and pick up, one
by one, each of the seven cards lying on the floor. You will actually be
able to pick up only one of these, the one that is closest to you.
(This is your second hidden card.) Now step out of this close up
also and into the one at the foot of the bed under Whip’s cot. Use the
Action icon, first to lift up the mattress and then to remove the wire wound on
the frame. Step out of this close up too and into the one on Whip’s
pillow. Use the Action icon to remove the black thread on the side of the
pillow towards you. Step out of this close up also and move back to your
starting position where you can talk to the three men (if you wanted to do so).
Next, open the inventory and use the Action icon on the wire you just removed
from under the mattress. It will turn in the shape of a hook. Pick
up the hook and use the Action icon on the thread, to combine the two in the
inventory. You now have a fishing hook of sorts. Now turn around
and close up on the faucets. Use the Pick up icon to remove the knob from
the right faucet. Place this knob on the left of the two pipes by the
commode, and use the Action key on the knob to turn off the water running in
the commode as well as from the right tap. Now pick up the knob and place
it on the right pipe, and then use the Action icon to turn off the water in the
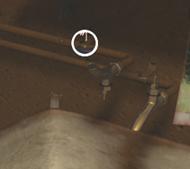
left tap as well. Use the Action icon to turn the left faucet
upside down. (See picture below) Now use your threaded hook to
"fish" out the card hidden inside that inverted faucet. (This
is your third hidden card.)
Step out of this close up and use
the Action icon on the tank of the toilet. It will give you a
close up of the inside of that tank. Now use the Action icon to press the
handle sticking out from the top (left) of the tank, to drain it of all
water. Use the Action icon on the center of the tank then to remove the
plastic tube (siphon) connected to the handle. Now use your threaded hook
on the hole at the bottom of the tank to "fish" out six cards at
once. Step out of this close up and turn to face the other men.
Look at the first card you had picked, the Ace of Diamonds. Look
further to read its riddle which is said to be "dedicated to
cinematography." Now pick up the card from the inventory and give it
to Whip. He will ask, "How much did it come out to be?"
Answer: 5 (five). Next, look at the third card you
had picked, the Eight of Clubs. Look further to read its
riddle, referring to "the headstone of someone named Viktor."
Now pick up and give this card to Whip. He will ask, "What’s the
date?" Answer: 44 (forty-four). Finally, look at
the second card you had picked, the Jack of Spades. Look
further but you will not be able to read its riddle, because the writing
is too blurred. So pick up this card, give it to Whip, and ask him for
his glasses. But Whip will refuse, because the hero is so rude. You
will see a thumbnail of the card in the upper-right hand corner of the screen,
indicating that you are still holding it. So just click on Whip again,
and you will be able to ask for the glasses more politely this time. Whip
will agree, but only if the hero will answer an extra riddle. The hero
agrees.
The thumbnail of the second card is still up on the screen. But
"turn it off" now by opening your inventory and looking at each
of the six cards that you had fished out of the toilet tank. Look
further to read the question on each of these cards, and you will see
that every answer provides you with a letter of the answer to Whip’s extra
riddle. Now pick up any one of the six cards and give it to
Whip. He will ask, "And who is this man?" Answer: Batman.
He will compliment you and lend you his glasses. You don’t actually
have to wear these glasses, however. Just look at the second card
again, i.e., the Jack of Spades. Look further to read its riddle,
relating to a statement about "a forty-year-old woman." Then,
pick up and give this card to Whip. He will ask, "Whose statement is
this?" Answer: Balzac.
Having now fulfilled all of Whip’s requirements, use the Mouth icon to speak to
him, asking, "Well, had enough games?" He will then compliment you
on winning his game and then explain his escape plan in greater detail, but
leave it to the hero to come up with a way to lure the guard into the
cell. So turn to the door now and use the Action icon to both
knock and speak to the guard. You will actually have to use this icon five
times and insult the guard, but it is only on the fifth insult that
the guard finally gets riled up. You still have to get the hero to knock
a sixth time, and then the hero will automatically step back as a
cloud of gas starts pouring into the cell from under the door.