Journey to the Center of the Earth
Journey
To The
Center of the Earth
by Frogwares
Walkthrough by MaGtRo October,
2003
Gameplay: This is a point and click game.
The main menu is seen in the Cabin. The chair is the new game selection. The
control panel is the continue playing selection. The gauge is the options menu
and the monitor is the Save/Load selection. The door is the exit selection. The
camera is the credits.
During
gameplay, pressing the ESC brings up the Main Menu Cabin. To save-load a game,
click on monitor, select an empty frame and then click save. The options menu
has the display, audio and preference selections.
Moving the
cursor to the bottom of the screen shows the inventory bar. Some inventory items
have a word in blue that you can click on to activate the action associated with
that item. The computer at left of the bottom bar is where you read all
documents, notes, etc. and analyze items. It also shows mail and photographs
automatically taken by Ariane. Click on the X at top right of the screen to
close the laptop screen, .
To make
Ariane run, double click on the footstep cursor. The game is linear and will not
let you proceed with gameplay if an action has not been done. Pressing the
spacebar skips the dialogues. Be sure to position Ariane on hotspots to get her
to a specific action. Since the hotspots are small areas, move Ariane or
the cursor around to find them.
Snaeffels Volcano
The
helicopter flies in and lands down in a clearing on top of a volcano. Ariane
starts using her camera when the rocks slide down and destroy the
helicopter.
Helicopter – Walk to the copter to check the state of the
pilot. The copter door is closed. Pick up the leftmost helicopter blade.
Use the copter blade on the closed door.
Enter the
copter and find that the pilot is gone. Take rope, knife,
computer and bag. Look inside the bag by clicking on
unpack. See screwdriver, warm gloves, lighter and empty
flask added to inventory.
Take the
screwdriver from inventory and click it on the first aid kit on the wall.
Unpack the first aid kit to get flask of clearing solution, adhesive
plaster, bandage and tube of aspirins.
Use the knife
on the electric wires left of the first aid kit to get some electric
wires. Click on arrow at top left to exit the copter.
Seaside – Go to the left screen and see a bare tree and a
seaside view.
To tell the
office about the accident, click on use of the computer and see the laptop
screen go to the left on the inventory bar. Click on computer monitor screen.
The computer has documents, encyclopedia, mail and photos. Click on mail and see
incoming and outgoing mail. Click on SOS to read the mail to be sent out and
then click on mail with green arrow to send the e-mail. Click the X at top right
of the laptop to close it.
Dark
passage – Walk back and right of the helicopter screen. See a passage
blocked by a boulder. Use the helicopter blade on boulder and the passage is
cleared.
After doing
everything at this clearing, go through the passage but it is dark. Use the
lighter to light it and then click the lighter icon on the dark passage.
Ahhhhh!
Underground at First Camp
Beach by
old mine entrance – Meet Adam Coverlier, the hermit who needs help. Ask him
all the dialogues. Help might be found at Askiam town through the old mine path.
He wants you to find a crystal at a cave by the camp for his wand. The crystal
has to be polished.
Pick up the
tip of bone by Ariane’s feet. Take the empty flask from inventory and
click it on lone rock by edge of beach and Ariane will fill the flask with
water.
Old
mine – Go to bottom of screen to the old mine. Pick up the giant
shell just left of the entrance to the mine. Enter and pick up the
seals on the ground by crate and the old chisel on top of a box on
right side of the screen. Exit the cave.
Other side
of beach by cave – Cross the planks to the other side of the beach. Pick up
the cloth at the foreground pile of debris and the fossilized wood
at left of screen.
Headstones – Look close at the 2 headstone. Ariane says to look at the
encyclopedia. Click on computer at left of bottom bar. Click the computer icon
on the left headstone. The monitor blinks. Check encyclopedia to read about Ivan
Platonov. It says he died of a drowning suicide at 1864 but the headstone states
he died 1872.
Clean
the other headstone – Look at the other headstone and you can barely read
the markings. Use the cleaning solution in inventory with the cloth to get
wet cloth. Use the wet cloth on the right headstone. Click the computer
on Armand Latifere. The encyclopedia states that he disappeared in Iceland in
1864 but he died in 1874.
Cave –
Enter the cave at left background by clicking on the net by waterfall and then
turn to the cave. Click on the crystal above the ladder.
To get
crystal – In inventory; use the gloves (one glove remains), combine the
old chisel with the fossilized wood and then click the combination on the
crystal.
Polish
the crystal – Go to the contraption on right wall. Place crystal on the
right stand. Click on bellows. Ariane needs something to polish it. Go outside
the cave and click the hand icon just above the ferns to get sand.
Place sand on the bottle of the contraption. Press bellows 4xs and the crystal
changes shape to make a piece of polished
crystal.
Old
Mine – Go back to the old mine. Walk to the far end but it is too dark.
Get
power/light – Go to big wheel on the left and look close at a power panel.
Wear gloves. Place the electric wires on the panel. Use adhesive tape on
exposed wires. Light comes on and the wheel turns.
Go to the
dark end of the mine and see a big circle. Ariane states ‘to use the seals in
certain order to open’. The wheel is planked by a statue that looks like Adam
and a giant.
Seal
Puzzle – Click on the writing above the seal puzzle. The Occident is the opposite of the Orient. Our story begins as the sun
rises. Nature and technology go their separate ways. First the ones whence we
come. Then the one that feeds us. Followed by the one we mine. Comes the time
of transformation And of famed energy. Finally those who guide us.
Look close
at wheel. Click on a seal and place the seal on a slot.
The clue
states that seals are in 2 different categories (Nature and Technology) and
that they are opposite. The ‘opposite’ here is done as far as placements of
the seals to statues.
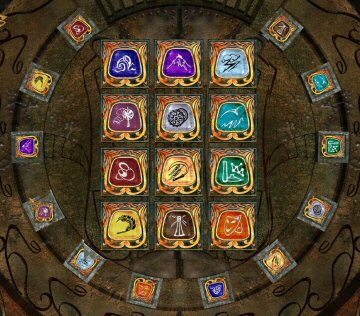
Orient (East-right of modern man) Nature | Occident (West -left of primitive Giant) Technology |
Mother – First the ones | Lighthouse – Finally |
Wheat – Then the one | Bird |
Mountain – Followed by | Chemistry icons – Comes |
Cloth and spinning tool | Gears – Followed by the |
Lightning | Sickle and Wheat – Then |
Theatrical Masks – Finally those who guide us | Sea |
Thanks,
Becky!
Underground Wild Places
Mushroom
Forest – Go forward to next screen.
Use the
computer on the giant mushroom. Hmm – unknown species. Use to the knife to
get little mushrooms (strange smell) on the ground. Go forward
until you see a hut on top of one giant mushroom. Climb the steps up.
Lookout
Station – Exhaust all dialogue with the Lieutenant Lenkoff. This is an Army
post and to get to town you have to cross the suspension bridge.
Heal the
broken leg – His companion broke his leg and needs to ease his pain. Go
down and continue to the right of the path until the suspension bridge. Look
close at the stump of a mushroom. Use the knife to get flat pieces of
mushroom. Go back to the Lieutenant at lookout station. Talk to him about
splint now that you have the flat pieces of mushroom and the bandages.
Fix the
horn – The conch used to call the pterodactyl is broken. We better make a
new horn. Use lighter to get a light. Use lighter on tip of bone to make
hard cranium. Use hard cranium on giant shell to make prepared
shell. Go back to the crystal cave to take (2 clicks on it) the
bellows (can’t be taken until the lieutenant asks you to repair the
horn). Go towards the giant conch. (Get an e-mail from your sister Eva and
find out that you can’t reply to any mails). Look closer on the giant conch
and place the prepared shell at the tip of the giant conch. Place the bellows
at the tip of the prepared shell. Talk to the lieutenant. Watch! I just saw a
Pterodactyl.
Lookout table – Check the table. Get the map and read it. The map is
entered in the computer. Take a closer look at the table. Pick up the black
powder pear, machete from table and slender vines from the
chair.
Go back to
suspension bridge. Cross the bridge and get an e-mail. Read the reply to your
SOS on your computer.
Adam’s hut
– Click the computer on the animal skulls on top of the pole. They are dated
1600-1650 AD. Talk to Adam in front of his hut about everything. Enter the
hut.
In the room
with the books on the floor, take the amulet hanging on the left post.
Go to inner
room on the left and note the eggs under the lamp. Take pieces of wood
and book from the table. The book is entered in the computer. Read about
Armand Latifere and his discoveries of a Forgotten World. Click on the bowl on
the table and throw the little mushrooms in it. See what happened to the pilot –
wow, magic mushrooms!
Tangram
puzzle – Combine the pieces of wood with the amulet in inventory. Fit the
wood pieces inside the X like indentation. To turn the wood pieces place it on
top of the arrow and then click. If done correctly, the amulet opens to be
a key.
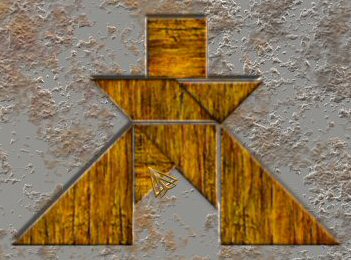
Exit at
bottom of screen and take colored pigment from table. Use the opened
amulet on the chest. Click the computer on bust and take the 2 rolled
letters. Look in computer about the Hardwigg who returned to surface by
being ejected by the volcano and the letter of Latifere and the Union letter.
Leave the hut
and go left to continue your journey. Cross another bridge and get a news
bulletin on the computer.
Fern
Jungle – Climb down the rope ladder at end of the
bridge. Walk to left of screen until blocked by giant ferns. Use machete on the
ferns. Take the large leaf.
Savannah
and Dinosaurs – Take photo of the T-Rex. Take the path right of the dead
tree limbs. You can not continue with the T- Rex around.
Get rid
of T- Rex – Look close at the hollow broken tree trunk aimed directly at
the dinosaur. Let us make some fireworks.
In order,
place: the large leaf on trunk, colored pigment, black powder pear and
then the slender vines. Use the lighter and then light your homemade
fireworks.
Continue
forward pass the dead dinosaur.
Power up
the rail car – See a railcar that resembles a hamster wheel cage that is
on the rails. See a teeny dinosaur trying to get a fruit. Poor guy. Take
fruits from the tree and then look close at the railcar. Get an e-mail
that states that the pilot is rescued. The teeny one follows you. Hmm. Open
the wheel cage door on the left side of the wheel. Place the fruits inside the
cage. Watch!
The
City – Askiam
Outside
the Gate – Read the latest news bulletin in the computer. Talk to the guard,
Ocine. Ariane gives the password to get to talk to the Chief Engineer. Ocine
wants you to fix his camera in the lab at the old tower. A key is placed
in inventory. War?
Tower
- Go to the left outside the city gates. Use the key to enter the tower. Click
the computer on camera to learn about the Ganz Lux 4. Look at the pictures of
Ariane on her travels. You are being watched.
Develop
a picture – Look at stand on table. Read the user guide to
developing films on the wall.
Take
photographic paper to be developed. Flip the switch on the left wall.
Place photographic paper on table. Click on enlarger, the tube above the table
and see images show up on photographic paper. Click the enlarger again.
Take paper
and place on left, then top and lastly, right tray.
Read the
photo and see it black and white in the computer. Exit the
tower.
Inside the
gate – Enter the gate and talk with Wallace, the Chief Engineer. I wish Ariane would stop cleaning her sleeves.
Tickets for the altimonorail and pass for the
archives are placed in inventory when the Academy archives and the Rector are
mentioned.
Click the
computer on poster and then read it. Walk to bottom of screen to enter the city
proper and read the new e-mail. Take the path to the left of screen and enter
the building.
Communication Center – Note the clock has stopped. Click on
the microphone on the desk and talk to Figaro. Look at the poster using the
computer. Go through door and enter the left door that is unlocked.
Communication room – Look at the posters of February and March, 2007 and a
cruiser advertisement. Go to left of screen and talk to Enrique, mailman and
projectionist. He gives you the key to the projection room and
reel #218.
Projection room – Go back out to the main hallway and use the key on the
ornate locked door. Read the note at bottom right shelf. Read the poster left of
the projector. Click reel 218 on the projector’s reel wheels and watch. Analyze
reel 218 and identified the movie as the world wars of the 20th century.
Scam?
Transport room – Go back to the Communication room and then forward to the
elevator at the center of the room. Talk to Figaro, the man in charge of the
Altimonorails and the power supply. The transmission coordinates have been
changed that is why there’s no energy being collected. He needs to have the
coordinates recalculated and entered in the machine.
Transmission coordinates puzzle – Let’s look for the
paper that has the coordinates. Go back down using the elevator. Take the
calculation sheet on desk at left by window. Click calculate and then
look in the computer. It shows the corrected coordinates.
Go back
up to Figaro and click on right side of the control panel. Enter 6283, 1667,
5483 and 2092. When correctly done, you backed out automatically from the
panel.
Talk to
Figaro about repaired. He gives a confirmation telegram that needs to be
sent. He allows your laptop to be recharged. Sabotage?
Go back to
Enrique and tell him about the telegram.
Crossroads – Leave the building, take the bottom path,
right and then top path.
While
standing by the crossroad, see a triceratops with a rider on the other street.
Pet the triceratops. Watch.
Talk to
Heracles, the man standing by the stained glass door. He is all out of eggs for
his customers. The next caravan to the diamond mines won’t leave for another 3
months.
Pet
Store – Enter the shop and check the counter. Take the
prescription codes book and blank punch cards. Read the book.
Press the button under the counter. This opens the door by the aquarium. Enter
the secret door.
Office – Well, lookee here – Adam! Take and read the note in front
of Adam about Heracles out of biocardamom. Talk to Adam. He needs Hanagra of Syl
prescription. Play with the triceratops hologram on the table by pressing the
square button and stop by pressing the single round button. Look on the left
shelf and take the needle by the half triceratops. Talk to Adam about the
hologram and learn about the telelogram.
Go back to
the main pet store and click the computer on the clock on top of the wall. It
says that the clock is 0.75 second faster for one minute. So that explains the
year 2007 but not the war. Exit the store and go back to the crossroad.
Take the left path.
Pharmacy – Talk to the Armanda Grunfeld, woman behind
the window. She is on to Adam’s tricks and would not give you the prescription.
Since you got Heracles note, talk to her about the biocardamom. She will get
some at the University and then give her your ticket.
Get
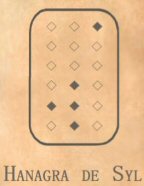
Adam’s Hanagra of Syl – In inventory, click the needle on the punch
cards. In zoom mode, punch the holes to make a prescription for Hanagra of Syl
based on the prescription code book.
When
Armanda leaves, insert the punch card on the slot under the window. You might
need to move Ariane to see the slot and the lever. Push the lever at left
center of wheel. Take the flask of Hanagra of Syl. Go back to pet store
and Adam.
Pet
store – Talk to Adam and give the potion. Adam gives you an aerial map to
find the giants. Read the fly map in the computer. Leave the
store.
Market
- Go to the crossroad again. This time go to bottom of screen.
Balloonist – Go left and talk to Gustav, the balloonist. His
balloon needs a few adjustments first before he can take you up. He needs
for you to go to the University to get helium and fix the leak on the main tube.
Stall – Go to that stall with a clock. Take grease and old
dinosaur skin from the table.
Altimonorail – Go to the right side on the rotunda and enter the building
to get to the altimonorail. Click on Academy. Take the pass on inventory and
click it on the destination you want to go to or click twice without the pass.
Click the pass on Academy.
Academy – Climb the stairs and enter the building.
Universal Research Laboratory – Go left and through the door. Talk to
Armanda and she will leave also. Leave the room, go outside and get another news
bulletin about the war in the surface. Go to the right and enter the door.
Archives – Talk to Wallace and Alexander, the Rector of the University.
Alexander warns you about Wallace. Stand in front of the open drawer of the
desk. Use computer on green book and the book at right top of
desk. Take the reel #254 from the desk. Read the 2 books about the
giants and perpetual light.
Look at the
machine on the right of the screen. Pull the lever on the left and take the
selection sheet. Read the selection sheet. Well, well, well, look at what
Wallace has been researching on.
Go back to
the Research lab where Armanda was – at opposite end from the Archives.
Research Lab – Armanda has left. Look close on desk and take file and
iron plate. Go to bottom screen and walk to the big door of the
contraption on the right – the hotspot is on the middle right of the floor. Move
Ariane a bit and take the helium bottle on the floor just close to the
door of the contraption. Go back to the altimonorail and click the pass on
Communication center.
Communication center – After getting off the altimonorail,
go right to the communication center. Go to the projector room and click the
reel #254 from the archive on the projector reel wheel. Oops, see Ariane
destroying the control panel – the machete on the fern film and the control
panel superimposed. Ariane is being framed.
Tower
outside the city – Leave the building, forward and take the left path. Go to
the tower outside the gate to fix the camera as promised.
Fix the
camera – In inventory, click the file on iron plate to get filed sheet
of iron. Click filed sheet of iron on camera. Grease the camera.
Go outside
and tell Ocine, the guard that the camera is repaired. He lets you leave the
city. Time to look for eggs for Heracles.
Dinosaur
Eggs for Heracles – Remember the eggs we saw at Adam’s hut. Let’s go there
then. Click on rail car (ignore the jumping dinosaurette), then walk pass the
ferns, up the rope ladder, cross the bridge and enter Adam’s hut. Take the
dinosaur eggs at the back room. Go back to the city. Go straight on main
road to Heracles at the pet store and give him the eggs. He tells you about
Gustav, the balloonist and about the giants.
Balloonist – Go to the marketplace by taking the bottom
path from the crossroad. Talk to Gustav again. He needs an aerial map to go to
the giant. Adam gave you an aerial fly map, remember.
Fix the
balloon – Click on balloon machine left of Gustav. See the hole on the
pipe. Use the old dinosaur skin on the hole and the helium bottle on the
protruding small pipe beside the gauge. Click the aerial map on the machine
square panel above the small levers. Watch the fascinating
scenery.
Giants
Talk to
Gustav. Check the computer about the latest news bulletin.
Clearing – Go to left screen and talk to Kanoul Pale,
keeper of the Mastodons. To get to the mines, you need to take a submarine from
port in the northern territory. Pick up mastodon hairs on the
ground in front of Kanoul. Go left to the village.
Village Gate – Go to the gate and find that you
can’t enter due to a force field. Go back to Kanou Pale. He gives you pipe
herbs. Talk to him about the gate and force field. Leave all sharp objects
at the gate. The force field is maintained in the Valley of the Spirit. Go back
to the gate of the village. Leave the knife and machete on the ground by the
gate and enter the open gate.
Matriarch – Talk to the Aira Mnude, the Matriarch of the
village at the hut. There’s a hole in the force field and she gives you
permission to enter at the Valley of the Spirits.
Gardener – Go right of hut and see a field of beautiful
flowers. Talk to the Tohu Malla, the gardener standing by the gate to jousting
area of the magicians. He needs a weather forecast for his fragile flowers. Take
the path left of the hut and then take the left way from the main
path.
Fisherman – Talk to the fisherman who wants tobacco. Payan
Ouva, fisherman and meteorologist talks to you after given tobacco. He needs the
right bait to catch big, meaty fish. He uses a rare heat-giving firefly placed
in a translucent shell as bait. Leave and talk to him again about the weather
forecast for the gardener. Fog!
Go back to
the gardener right of the hut. He asks that you ask the healer for protection
for his flowers. Take the path left of hut and then go north.
Healer
– Talk to Jahine Duubra, the healer treating a mastodon. She needs bitter
berries from the Valley of the Spirits. The berries are under one of the arches
on Initiation Lane and picked with hands that are clean and well protected. To
get into the jousting area during the day you will need a repellent stem
that she gives you. She places a protective spell on the gardener’s
seedlings. Look close on the shelf and take the empty shell from
top shelf at right.
Go back to
the gardener and tell him his seedlings are now protected. He gives you the
heat-giving firefly as thanks. Guess who wants the firefly. Go to the
fisherman and give him the firefly. He gives you a living shell.
Arena – Go back to the Arena gate behind the
gardener. Use the repellent stem on the gate to open it. Talk to Bares Mohul,
master of Recomposition. The Ball of Memory that preserves the memory of
everything can only be read by the Matriarch. He disappears.
Vegetable lens puzzle – (The clue to this puzzle is
found later in the game and placed here only for expediency and less hair
pulling.) Look at the bowl by the left giant face. Place the empty shell in
the water, then the living shell and then the mastodon hairs. See the mollusk
move from the living shell to the empty shell – it didn’t like the mastodon
hair. Click on the living shell when you see the tail of the mollusk appear.
This breaks the living shell. Take the clean vegetable
lens.
Fisherman – Ask the fisherman about the Alley of
Initiation. The magicians work on the 5 senses: smell, hearing sight, taste and
touch and then all 5 senses combined. Each arch marks a stage of
initiation.
Go to the
place close to the healer. Check a new e-mail.
Arches at
Initiation Lane – See a floating island above at
end of the lane.
Berries – When on close-up walking under the arches, note the berry plant
left of the middle left posts. Click for a closer look at the berry plant. and
use glove to pick the berries.
Healer – Give the berries to the healer. She gives you information on how to
get up to the floating garden. You need to produce a sequence of 6 sounds.
Each sound is produced by closing holes in 2 of the sacred posts. The
combination is obtained by reading the symbols on the arches in Initiation Lane
and follow them in strict order. The first arch indicates the first sound.
Arches – Go back to Initiation lane. There are 3 posts on each side of
the path. Walk under the arch and see that the first post is at the left side.
Remember the white lines on the posts. Go forward to the Valley of the
Spirits.
Valley of
the Spirits – Go around starting on the left fork
from the main path and find 6 holed stands with a leaf that can cover the holes.
Number the stands as stand 1 on the left of main path going clockwise to stand 6
at right of main path.
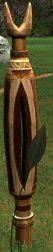
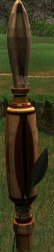

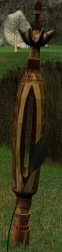
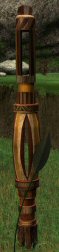
1
2
3
4
5
6
Get to
Floating island:
1. The
white line patterns on the posts at Initiation Lane are the sound diagrams.
See chart below. (Hint – These patterns are similar to the way
researchers write down whale sounds.)
2. Find 2
posts whose holes when covered by leaves will produce those sounds. See
columns 2 and 3 of chart below.
a. Cover
the holes of 2 stands with their leaves.
b. Pull
the tongue of the face on the rock to hear the sound
produced.
3. Then
reproduce those sounds in sequence by following the middle column in the chart
below. Saved Game here.
Sound | Cover | Sounds | |
Post 1 |  | 1 | rooh, |
Post 2 |  | 3 | eeeoeu, |
Post 3 |  | 4 | ohuh, |
Post 4 |  | 1 | dt, dt, |
Post 5 |  | 2 | wahuwah, wahuwah |
Post 6 |  | 1 | hmmmmmmmmm |
Floating
Garden – See the floating island go down.
Talk to Adam.
The breach in the barrier is in the garden. The spirits are divided. The haloes
are made visible by a vegetable lens made by a special mollusk. The submarine
outside the village will take you to the diamond mines. Hide in the hold of the
submarine and Adam will give you the code.
Use the ‘come
down’ dialogue, if you missed a clue and need to get off the island. Do what you
need to do, pull the tongue out again and the island will drop down.
Fix the
breach in the barrier – Go around the island and see a halo with dirty
lens at the right path 2 screens over from Adam. Place the clean vegetable
lens to replace the other one.
Talk to Adam
and then he will leave. Read the code that is in inventory.
Leave the
village and back to area of the keeper of the mastodons.
Submarine – Go right of screen (hotspot at middle of ground
area) back to the balloon. Go to the door on the rock cliff in the background.
Check another e-mail. Enter the ball door. The steps makes a sound when you step
on it. There’s a panel by the door that shows 17.
Enter the
submarine and get kicked off the sub by the captain. Yeah – how do we get in
without being detected.
Sneak in
submarine – Go out the ball door and note that the panel must be a counter
of the people coming in. The sounds the steps make is the counting.
Go back to
the village. Talk to the boy by the fisherman’s hut about seeing a submarine.
The boy follows you inside the ball door. The counter still reads 17 because
you and the boy entered together.
Talk to the
boy to get him to go home. Look at the counter now and it reads 16. Hopefully,
the captain will be tricked.
Go in the
sub and enter the door on the left. Go to the control panel and enter the code
given by Adam – 5731X. When you click the numbers in only a very slight sound
will be heard to show that it is entered. Fast ride!