Echo: Secrets of the Lost Cavern
ECHO: Secrets of the Lost Cavern
by
Kheops Studio, Totem Studio & Zone Studio
Walkthrough by MaGtRo July 2005
Gameplay:
This point and click game is played with CD2 in the CD-ROM drive. The Main
Menu has new game, load game, documentary database, credits, options and quit.
The documentary database has pertinent data on the background encountered during
gameplay. The options menu has hardware rendering, speed of camera rotation,
subtitles and volume control. The introduction, cutscene and dialogue can be
skipped by pressing the space bar.
When a new data is
available, a shell icon at top right of screen appears. The data can be then
access by clicking similar icon left of the inventory bar. A hand icon is also
seen to show the objectives during gameplay. The hand icon flashes at top right
of screen and can be accessed beside the database icon left of the inventory
bar. The X icon accesses the gameplay menu. The lens is used to see a close up view and purpose of the inventory item. The gameplay
menu has the save, load, options, return to game and quit game selection. The
saved games can be overwritten. The subselection pages have an X return icon at
bottom right of screen.
Be sure to check the
database and the objective when they light up at top right. They give hints and
great information about history and storyline.
You are Arok, a young
Cro-Magnon hunter stalking a stag. A lioness arrives; Arok seeks refuge in a
cave that invoked memories of an old teacher.
Trapped in Cave:
Look down on the ground
and pick up bundle of firewood. Turn around to the mouth of the cave
and pick up piece of hardwood. Look outside and see the lioness waiting
for you. Take the piece of ice at the mouth of the cave. Turn back to the
dark cave and move forward. Pick up the dry grass and piece of
softwood from the ground.
Build a fire –
Turn to the fire ring. Place firewood, dry grass and piece of
softwood on the fire ring. Click the piece of hardwood on the softwood and see
the friction method of making fire.
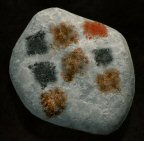
Look around and see wall paintings. Click on the colored squares and invoke the memory of Klem.
This is his
signature. Klem’s painted stone is now in inventory.
Colored squares on
wall – The stone colors does not match the wall colors. We need to paint it
correctly.Collect the colors –
Pick up the red pigment left of the stone below the colored squares. Turn
around and go left of the fire. Pick up the brown pigment on the
ground. Note a flat boulder with 3 tools also. Turn towards the left side of
the mouth of the cave and go forward. Take the black pigment from rock
and branches.Go back towards fire
and take the small strap from ground.Prepare the colors –
Go to colored squares painting. Place the red, brown and black pigment on
colored rock below the squares painting. Turn to fire. Place piece of ice on
shell left of fire to get melted ice. Click on water to get a drop and click
it on a pigment on the rock. Do this to all the pigments.Color the squares to
match Klem’s painted stone – Click on wet pigment and then click on the
appropriate squares on the wall.Top L-R:
Black, Brown, RedMiddle L-R:
Black, Brown, BlackBottom L-R:
Brown, none, BrownIf done, correctly, watch Klem’s
instruction.
You now have to look for the Klem’s path
through
the mountain but there’s a lioness outside the cave. Turn around and go forward
right of the fire to the painting on the wall.
Hunters and bison fresco – Look
close at a mammoth painting. Inside it see 3 hunters and
bison.The object of the puzzle is to kill
the animal. Clicking on the animal and the hunters animate them. Click on
puzzle to restart.Solution – Click on a spear and
click the spear on the hunter with the slingshot. The slingshot becomes a
spearthrower. Click on bison when the spear is now ready to be
thrown.
Scare lioness – Go back to
fire. Look up to ceiling above fire and click the branches on heated rock to
get burning branches. Go to mouth of cave and click the fire on lioness. Exit
the cave. pick up assagai (stick) and deer antler from ground.
Make a spearthrower – Go back inside and prepare a
spearthrower. Go to the
flat rock with tools at back right of cave. Study each tool – scraper, knapped
flint and awl and know what they are used for.Place deer antler on flat rock. Use
knapped flint-middle tool on the 3 tips of the antler. Right click to drop
tool. Use scraper-right tool on both ends of antler to make holes. Click
left tool-scraper on middle of antler. Click small strap on hole of finished spearthrower. Pick up spearthrower with assagai.
Get more branches from below
the bison-hunters puzzle. Light the branches on ceiling above fire. Go back to mouth
of cave and click the burning branches on lioness. Exit and see how you fare
with your first spear throwing. Born free!
Path through the
mountains:
Climb up the path and enter another
cave. Turn right and see an unlit fire ring. Go back to the other cave and get
more branches. Light branches, back to top cave and drop it on the fire ring.
This is Klem’s path through the mountains.
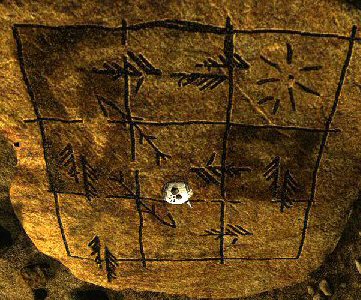
Cave maze – Note that there are 4
openings at the back of the cave. Each opening has a colored square – black,
clear, brown and red. There’s a flat rock with the path of the maze. Pick up
3 torches on the ground: one by fire and 2 by stone maze map.Note that the maze map is similar
to Klem’s painted stone. The end of the map is a starburst at one corner.
Comparing it to Klem’s stone, the starburst – end of the maze must be the red
square.Based on that comparison, the path
of the maze is: Brown – Black – Clear – Brown – Black – Brown – Black – Brown
– Red.
Light a torch on the fire. Follow
the maze path – Brown – Black – Clear – Brown – Black – Brown – Black – Brown
– Red. Note that it takes 8 clicks for the
torch to burn down. Go through the maze and at the 7th click, light another
torch.Step by step by looney4labs:
Pick up all the torches and light
1–then go to the cave entrance with the Brown Square on the Left and the Sun
drawing on the Right side.
1. You go into the the cave with the brown square — go 2 clicks.
2. Now you are in another big room. Pan Right and go in the cave with the
Black square by the entrance. Go 2 clicks.
3. Another room. Pan Left–there will be a cave with just the Square
outline–not colored in–go 1 click into there–then right click to bring up
your inventory–select a torch and then left click on the torch in the bottom
left of your screen to light a new torch–now go 1 more click.
4. Another room. Pan Left and go through the cave entrance with the Brown
square next to it. 2 clicks again.
5. These rooms are getting repetitive. You need to go through the cave
entrance with the Black square this time–I did this 2xs –once it was
directly ahead and the other time I had to pan to the right just a bit to find
it-2 clicks–
6. Here’s another room. Go straight to the cave entrance with the Brown
square. 2 clicks
7. Guess what–yep, that’s right–a room. Pan right just a bit and there is a
cave entrance with the Black square–go 1 click and then you have to relight
your torch-then 1 more click
8. Yep, you guessed it–another room—This time go Straight into the cave
entrance with the Brown square–2 clicks
9. Almost there–and yet another room. Pan Left and go into the cave
with the Red square–click click–and you should be in a room with a totally
different puzzle and on your way out.
Be careful that you are not picking a black thinking your are picking a brown
and vice versa.
At the end of the maze, is a cavern
with a handprints wall at far wall.
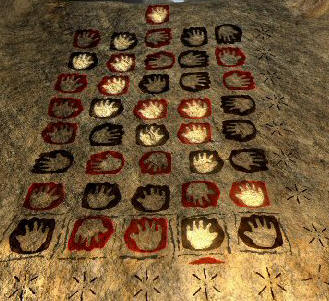
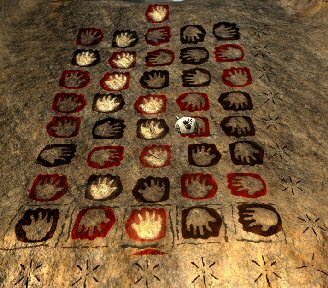
Handprints wall – The object of the
puzzle is to light up left and right hand prints to reach the top by arranging
the position of the hands.The handprints have starburst at
bottom and on right side. Clicking on them turns the column or the rows of the
handprints. Clicking on the bottommost handprints selects that handprint.I started at bottom and midway
checked the handprint from top going down. Looked for and selected left and right hands by
turning the rows going down. Watch the thumb position of the handprints.Hands light up when a possible
route up is made and all light up when done correctly. The reset starburst is
at bottom right corner.There are several possible solutions
to this puzzle.
When done correctly, watch the
climb up to the bear ledge.
Look around and see a bear fresco on
the left wall. Pick up the piece of leather on the ground. Note a flat
rock with a tool.
Bear – Go to other wall and
look down the ledge. Note a sleeping bear, with rocks overhead. Pan right and
see stalactites in the water cavern. Look down and see a piece of painted
rock. If you go down, the bear will waken and attack. Turn around and take a
clump of dry grass and drop it down. It takes 2 clumps of dry grass to soften your landing
and the bear will not waken. Take the rope uncovered under the dry
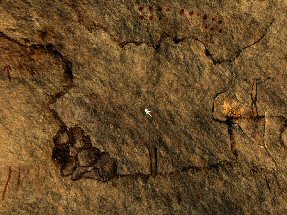
grass. Jump down and take the piece of the wall.Bear fresco – Place the piece of
the wall on the hole-black spot of the fresco. The object of the puzzle is to
get the bear out of the way.Note that this fresco is similar to
the situation of the actual bear at the ledge. The actual bear is sleeping in his den
with rocks above him.Click a stone and then click it on
the man. There are 4 active areas that the stone can be thrown at – the
stalactite, the rocks above, the indentation behind-above the bear and the bear itself. If
unsuccessful the bear will attack.Solution – To throw a rock, click a rock,
then click rock on man and then click on the place you want to throw the rock. Click on the indent above the bear. The bear wakens and
looks back. Immediately take another stone, click rock on man and throw it at same indent.
Eventually, after 2 stone throws on this spot a den will open and the bear goes in.
Immediately, throw a stone on the stalactite to get it out of the way. Follow
it with
another stone throw on the rocks above the bear to cause a rockslide and block
the bear inside the den.If correctly done, what happened on
the fresco happened with the real bear on the ledge.
Go to the ledge and see rocks
blocking the bear in his den. It is time to get across the water.
Make a slingshot – Following the
fresco clue, we can shoot down the stalactites. We need to make a slingshot.Go down to rockslide. Pick up
rope and 3 stones. Go back up to the flat rock with tool.Place piece of leather on rock.
Take the tool and click on leather to make holes. Click the 2 ropes on holed
leather and Voila! – take the slingshot with 3 stones.Path to center isle – Stand by edge
of top ledge and click the slingshot on the dark spots close to the ceiling of
the 3 stalactites. The stalactites drop to the water. Go down to the rockslide and get more rocks. Shoot at the
fourth stalactite from this spot. When done, a path of stepping stone is made.
Cross to the center isle, turn right
and forward to the other end. Note a fire pit on the right. Take the long
branch and the Auroch’s horn from the ground. Go back to the other
side and get embers from the lit fire pit by clicking the Auroch’s horn
on the fire. Go back to the center isle and oops! We’re not going back there
anytime soon. Click the embers on the unlit fire pit. WOW! look at those stags.
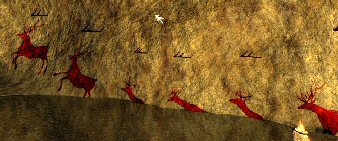
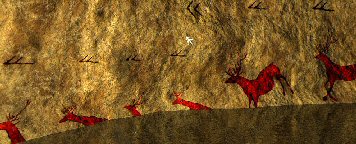
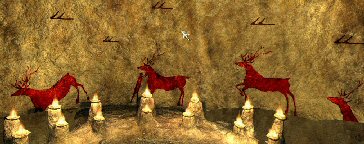
Stag fresco – The object of
the puzzle is to light the oil lamps and get the stag moving so that we can
get to the other side. There are 14 oil lamps in front of the fresco. The
fresco is made up stags of different colors going from right to left, in and
out of the water. At the center is a man that is beside one of the stags.Light the oil lamps – Arok
stated in objectives to light all the oil lamps to pay homage. Click the long
branch on the fire and then click the lit branch on the oil lamps. Note that
clicking on the lamps will light or unlit other lamps. All the lamps must be
lit.Solution – Numbering the lamps top
row, left to right: 1 to 7 and bottom row: 8 to 14. Light 14, 5, 10 and 1.Positioning of the stags – Arok
stated the stags might help him cross. You need one stag only but we need to
move that stag from right to left. To do so, make a pictorial of a single stag
going from right to left and going in and out of the water. Then
position the man to climb on the stag.1. Make the stags as a pictorial of
one stag by changing the colors of the stag to just one color – red, yellow or
black. Click on the stags to change the color.2. Then position the stag to run in
and out of the water. Click on the arrows above the stags to change the
position of the stags. Note that front hooves should be in the water when
entering the water and the back hooves should be in the water when exiting the water.
Also note the position of the heads while in the water – some are craning
forward, trying to be above water or getting ready to be out of water.To check the progress, click on the
double arrow above the the 3rd stag on the right wall. This will move the
stags until a wrong one. Then change the position as appropriate.3. Click man to same color as
the stags. Then position him to be ready to get on the stag.Click on the double arrows at right
wall and see if it is done correctly. If so – have a fun ride!
You are now standing at the other end
of the water cavern. Go forward to the valley.
Valley:
Arok is hungry. There are 2 paths
coming out of the cave. Take the left path. Take the worked stone from
the tree trunk.
Take the left path close to the
water. Pick up camomile, white flowers at left of path.
Take the left path close to the water
towards the weeping willow. Go forward again and see salmons swimming up the
river. Pick up the harpoon point beside 4 movable stones.
Continue to the left path beside the
water. Look down and pick up worked stone and shaft.
Continue to the left path beside the water
and reach a cliff with red signs. Look down and take knapped flint.
Take the right path going to a cliff
painting. Click on cliff painting. Look down and pick up worked stone and
tinder from the log.
Take the right path while facing the
cliff. Pick up branches from the ground. Take note of skins hanging
on the cliff wall. There’s a dwelling up there.
Fire pit – With your back on
the cliff wall, take the second from the right path. See a fire pit. Take the
strap and worked stone from the ground. Note the red signs on the
boulder. Go to flat rock by fire pit.
Make a harpoon – Time to catch some
salmon. Place the shaft on flat rock, harpoon point and strap to make a
harpoon.Catch salmon – Go forward to
water from fire pit area. Note a gap between the rocks in the water where the
salmon swims through.Block the gap using the 4 stones
around here. Start with the big leftmost rock and drop it on the gap. Turn
right and pick up the closer stone and drop it on the gap. Use the other 2
rocks on the gap.Watch the salmons jump over the
rocks but they stop for a while before the airborne antics. The running of the
salmon is delayed a bit.Use the harpoon and click on a
salmon. Yum!
Go back to fire pit by turning around
and facing the cliff. Go forward on left path where you see a man sitting down.
Talk to Toar, a carver and learn about the great gathering. He gives
Marcasite and a wooden recipient (bowl) for camomile tea.
Make fire at fire pit –
Place tinder, branches and then the marcasite on the fire pit. Use knapp flint
on marcasite.Tea time – Pick up the 3 small
rocks on the fire. Place the rocks in the fire. Go back to river and click the wooden recipient-bowl on
water. Go back to fire pit area and place the wooden bowl with water in front
of Toar. Click on stick on the ground and click the stick on rocks on fire pit.
The rocks are now on the ground. Try to pick one up and get burned. Ouch! Toar
gives a wooden spatula. Use the wooden spatula to place the 3 heated
rocks in the water bowl. The water should be boiling. Drop the camomile in the boiling water. Toar loves it.Cook the salmon – Use the
stick on large rock left of fire pit to place it on the fire. Later, use the
same stick to take it out of the fire. Place salmon on top of heated rock. Use
the paddle to turn the salmon
to cook the other side. It has to be cooked well, underdone or overdone – Toar
will make a comment. Take the grilled salmon and give it to Toar.
Dinnertime is over. Talk to Toar. He
will teach you how to blade knapp. Toar places his tools on the flat rock.
Blade knapping – Move the
cursor
on edge of the top 3 tools to learn what they do. L-R: Reindeer antler hammer for
refining, awl for piercing and stone hammer to chip flakes.Use the tools on the 3 test stones
at bottom row.Click the stone hammer at right on
the middle stone 3xs. Right click to drop tool.Click the deer antler at left on
the worked stone 2xs. Pick up the core flint.Give the core flint to Toar and get
a knife.
Talk to Toar again about the worked
stones you have found. He gives the 5th worked stone. They are musical stones.
The signs around can get you to the cliff dwelling.
Cliff dwelling:
From the fire pit turn around towards
the cliff and go forward to the cliff painting.
Musical stones – Click on the cliff
painting. The musical stones come up. The object of the puzzle is to hit the
correct stones in order that the wall signs changes to red.Use hammer on each stone and see
which mark is affected. Then hit the stones that affect the L-R signs order.From L-R: Using the hammer, click
on 4, 2, 5 and 1 stones.The bison painting moves and is replaced by
another red signs.
Turn left and take the path to the
other red sign on the cliff by the water edge. A new path is now accessible under the
overhang. Go
forward and up to the cliff dwelling.
Talk to Tika at the first cliff
recess-alcove
completely. She wants you to do the custom of telling the story of your adventure using
items around the area.
Collect items – Go to the entrance
of the dwelling and pick up stag antlers by the cliff edge.Go back to Tika’s alcove. Pick up
the engraving of fish and engraving of stag from lit shelf at
left. Take the pebble decorated with hand left of Tika. Go to the other
lit shelf and take the figurine of woman, bone engraved with lion
and the vertebra.Go outside to left side of the
dwelling and turn left to the next alcove. Take the animal fat from the
lit trough left of the alcove. Go to the flat rock at the center of the
area. Pick up the strap left of flat rock and stick with hole
engraved with a bear right of the flat rock.Go outside of alcove and left to
hanging skins. Take skin from post and bladder from ground.Arrange story icons – Go back to Tika’s alcove. Go to the left lit shelf with icons on the wall.
There are 11 icons on the wall.
Click to turn it red and hear a part of your adventure. Click again to turn
it to black. Arrange the icons in correct sequence of your adventure by
clicking an icon red and then move to the icon you want to replace it with and
get a spinning shell cursor. Click on that icon and the 2 will exchange
positions.If correctly done, Arok will say
so.
Arrange the story items – After
the story icons are arranged, click a story icon and place the appropriate
item on the shelf in front of the icon.Left to Right:
Stag antlers, bone engraved with lion, Klem’s painted stone, spearthrower,
rock with hand painted on it, stick with hole engraved with bear, engraving of
stag, harpoon, engraving of fish, knife and figurine of woman.
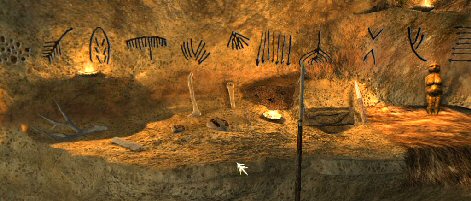
When done, talk to Tika about Klem
and being a painter. She says that there’s a fresco that needs to be restored at
the deepest part of the dwelling. There’s a rough draft or broken tablets for
the big fresco. Exit the alcove and go to the far end of the dwelling.
See a curtain blocked by giant
antlers. Click and drop the antlers on both sides of the curtain. Enter the
ceremonial hall. Look around and see animal heads covered with animal skins on
stands.
Go to the flat rock at right of hall.
Look to the left at the shelf close to the flat rock
and pick up black pigment, resin and piece of skin. Click
on flat rock and see that it shakes. How can I slide this slab? Place animal fat
on the stone under the slab right of the lamp and then at stone at other end of
the slab. That should do it. Click on slab to expose the broken tablets.
Reassemble broken tablets – Note
that there are 2 tablet pieces that are stationary. These are the core of the
2 tablets.Click to take a piece and see if
you can find a hotspot on either of the 2 stationary pieces The correct piece
will automatically turn to fit the other pieces. You might have to move the
cursor-pieces slowly around the stationary ones to find the hotspot.
White A and yellow B
are the stationary pieces. The colored numbered pieces are the ones go around
the same colored stationary piece.The tablets are still in pieces.
They need to be glued together. Go to the smoker-grill at middle
alcove and place resin on white stone in front of the grill. Take melted
resin. Go back to joined tablet pieces at
the ceremonial hall. Click melted resin on both tablets.
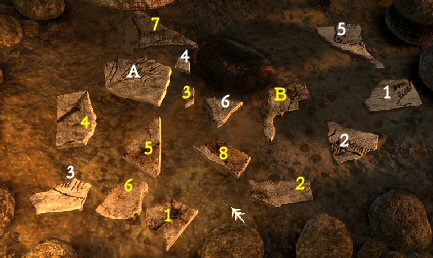
Go back to Tika. and tell her about
the tablets. Go back to ceremonial hall. Pick up the tablet with the hole and
move around the wall until Arok sees the stag wall painting through the hole and
say Now the stag appeared to me…
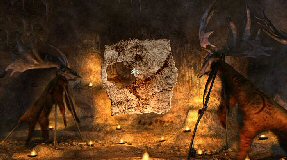
Go back to Tika and on the way, see
that water now flows on the trough at the middle alcove. Talk to Tika about the
water flowing – magic spring and Klem. She will help now. Talk to her again.
You have to clean the wall and then paint.
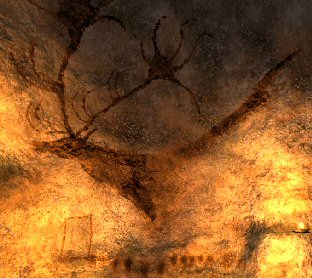
Stag Fresco – Go back to middle alcove and wet
the piece of skin on the water of the magic spring to get moist piece of skin.
(I think regular river water works also). Go back to ceremonial
hall and use the moist piece of skin on stag fresco 3-4 times until Arok says
the wall is clean enough.Go to the black pigment on the
rock shelf. Use moist piece of skin on black pigment to get wad of hide dipped in paint.Go back to stag fresco and use the
wad of hide dipped in paint on it 3xs on active spots.
Talk to Tika again and she asks that
you get a reed. Go back to the willow tree by river’s edge. Pull a reed-cattail.
Go back to Tika and give her the reed. She also asks that you make a waterskin
for the travel tonight.
Waterskin – Go to the flat rock at
middle alcove. Place the skin on flat rock. Place bladder over skin and the
vertebra on the bladder. Click the strap on needle and use the needle with
strap on the folded skin. Take waterskin.Finish the stag fresco – Go back to
ceremonial hall. Tika suddenly appears and gives the blowpipe. Look at the
left reconstructed tablet to get a clue on what to add to the painting. Turn
the left tablet over and see 13 black dots.Use the blowpipe with pigment in
front and after the black dots below the stag. Click 3 dots in front and 2 at
the end of the dots.Tika gives back the knife for you
to etch the last symbol. Click the knife on the line left of the dots twice to
make a square.If done correctly, the stag moves.
Tika stands by the river’s edge where
there’s a broken bridge. Click the waterskin on water to get full waterskin.
To make a makeshift bridge, try cutting the white barked tree right of the
bridge with your knife. You need a bigger tool. Go back to the fire pit and talk to Toar. You
can take the path close to the cliff and see him 3 clicks away. He gives an
axe. Use axe on tree by the broken bridge 3xs.
White Grotto:
It’s now night and they have traveled
hard. Tika wants you to get mint leaves and juniper berries.
Turn right and forward to the first
shrine. Note the shrine’s entry is blocked by sticks. Take juniper berries left of shrine and juniper twig right
of fenced shrine. Continue forward once to next clearing and pan left to
get spearmint. There’s a fallen dead tree on the other side of the path.
Go forward once to the entrance of
the White Grotto. Pick up the little stick on the ground and the piece
of bark on the stone. Forward once into the cave and look
down. Take the strap, black pigment and block of ochre pigment
from the rock shelf.
Go forward and talk to Lahrik. He
wants you to make a palette. Talk to him again. Turn left of Lahrik and take the tuft of hair.
Make a palette: Go back out to the fire
pit.On the flat rock by the fire, place
the tuft of hair, little stick and strap. Take the brush.Pan right and see a mortar and
pestle. Place the block of ochre pigment on mortar. Click the pestle on ochre
to get yellow pigment.To the side of the pestle, place
the piece of bark. On the bark, place the yellow pigment, black pigment,
brush, blowgun and piece of skin.Pan right and click to get a drop
of water from the waterflow. Click the water on the pigment. Do this again to the
other pigments. Take the palette.
Talk to and give the palette to
Lahrik. He mentions another color.
Go back and get another block
of ochre pigment from the shelf on the left. Place the block of ochre on the
fire. It turns red. Use the wooden spatula to get the block of red pigment.
Place the transformed pigment on the mortar. Use the pestle on it and get the
red pigment. Place the palette on the rock and add the red pigment to
it. Get another drop of water and moistened the red pigment.
Go back to Lahrik and show him the
palette. He added to the palette a black stone used to mark the edge of paintings. Glad he approved.
Enter the White Grotto. Look around
at the beautiful wall paintings. Talk to Klem and find out why you were chosen.
The cave itself chose you.
Talk to Lahrik completely to find out
what to do. He wants you find his bullroarer and he will give you something that
might help. Exit the cave and talk to Tika. Give her the juniper berries and the
spearmint. Talk to her again. Find out about where to look for the bullroarer.
Go back 3 clicks to the clearing from
the white grotto and see that the wolves are here. Find a way to climb the tree.
Stone stack puzzle – This is
similar to a Hanoi puzzle. There is a stack of stones on the right and one on
the left. The stones must be stacked from biggest to smallest at the middle
under the tree.Place left stone to middle. Place
right stone to left. Place middle stone to left. Place right stone to middle.Place left stone to right. Place
left stone to middle. Place right stone to middle.Place right stone to left. Place
middle stone to left. Place middle stone to right. Place left stone to right.
Place middle stone left. Place right stone to middle. Place right stone
to left. Place middle stone left.Place right largest stone middle.
Place left stone to right. Place left stone to middle. Place right stone to
middle. Place left stone to right. Place middle stone to left. Place middle
stone to right. Place left stone to right. Place left stone to middle.Place right stone to middle. Place
right stone to left. Place middle stone to left. Place right stone to middle.
Place left stone to right. Place left stone to middle. Place right stone to
middle.Climb tree. Take the bullroarer
and the pinecones and slingshot.The Wolves shooting gallery – Go down
and face the wolves. Use the pinecones and slingshot on the wolves. Just keep
on targeting and shooting and eventually they will all leave. The
ammo-pinecones will not run out. The music stops when all the wolves are gone.
Go back to the White Grotto. Talk to
Tika about the wolves. Give the bullroarer to Lahrik. He gives you a bull
figurine.
Enter the White Grotto and place the
figurine on the oil lamps on slab that is on the ground. See a bull shadow on
the wall. You can’t go up to reach the shadow. Talk to Lahrik again for help.
Look for a dead tree. Exit the cave and go back to where the spearmint was
taken. See a fallen dead tree. Use axe on the partially broken off branch. Use
axe on the limb on the ground twice. Pick up the gnarly tree cut on a slant.
Go back to the white grotto and learn
a new painting technique from Klem. Place the gnarly tree cut below the bull
shadow.
Bull shadow painting – The object
of the puzzle is to correctly paint the bull. The puzzle resets after 7 chances are used up.Use brush on black pigment. Click
the brush with black pigment on outline of the legs, face, horns and back of
the bull shadow.Use blowpipe on black pigment.
Click the blowpipe with black pigment on chest, left leg, above left leg,
stomach and jaw.If correctly done, see it separate
into 2 animals.Animate the Bull painting – Click
on bull again and this time the musical stones appear. The object of the
puzzle is to make the bull move.Click the hammer on each stone and
find out which leg the sound reacts to. Then make the bull move by hitting
the correct stones repeatedly until it moves.Musical stones left to right: 1
moves left front, 2 moves right front, 3 moves left rear and 5 moves the right
rear.Use the hammer on stones 1, 3, 2
and 5 until the bull walks.If done correctly, the bull walks
and another bull appears ahead of it.Animate second bull – Only 2
musical stones affect the legs of the second bull. Look for more stones. Go to Klem’s scaffold and pick up
2 more musical stones.Now click on the separated bull and
find out which stones affect which leg.Musical stones seen left to right: 1
moves left front, 2 moves right rear, 5 moves right front and 7 moves the left
rear.Use the hammer on stones 1, 7, 5
and 2 until the bull walks.
Talk to Klem and learn about the
prime spirit of the cavern and you must find out what you see in it. Learn about
the other grotto.
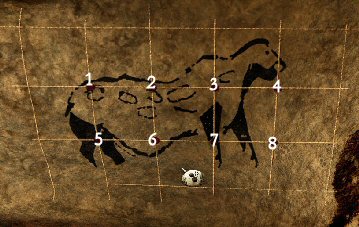
Cavern spirit slider puzzle –
Look at the drawing on the stretched skin leaning on the wall. It is the
pattern of the spirit of the cavern.Look
close at the outline of the painting beside Lahrik. Click on red and black
animal outlines to start the puzzle. A grid 5×3 grid is seen. The red dots
rotate the squares clockwise. Clicking on each square changes the color.Click on ALL the squares to make them all
black like the drawing on the stretched skin. There are 2 empty squares
that will show black lines and later 2 squares will still be blank.Then click on the red dots to
rotate the 4 squares around the dots clockwise. Move the squares to form
the drawing on the stretched skin.
This is just one way to do
the slider.Click: 3 – 1x, 4 – 1x.
Click: 1 – 1x, 2 – 1x.
Click: 5 – 1x, 1 – 3xs,
5 – 1x, 1 – 1x.Click: 8 – 1x, 6 – 2xs,
7 – 1x, 5 – 1x, 6 – 1x, 5 – 1x.Click: 8 – 2xs, 7 – 1x,
8 – 1x, 6 – 1x, 7 – 1x, 6 – 1x.Click: 8 – 3xs, 7 –
3xs, 8 – 1x.Once the puzzle is successfully
completed, the unicorn moves away.
Talk to Klem again. The cavern is now
alive. But the fresco is lacking a little life, a little color. Learn more about
Trajarh and the ceremony.
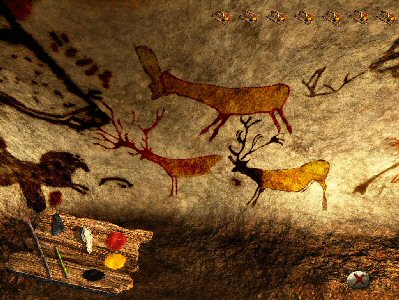
Finish the frescos – Get the gnarl
tree cut and place it at the other side below the unfinished drawing. Climb up
to look close at the outline of 3 stags. The necessary colors to use are shown
by the lines and dots beside the stags.Use the brush dipped in red pigment
to outline the stags at top and bottom left. Click the brush on the antlers
of bottom left stag and legs of these 2 stags.Use the brush dipped in black
pigment or the black chalk given by Lahrik to outline the bottom right stag.
Click on the legs and antler.Use the reed to color the body of
the stags. Use yellow pigment on reed for the body and black for the neck of
bottom right stag.Use the reed on yellow and red
pigments to make orange pigment. The orange pigment on reed is clicked on the
body of the top and bottom left stags.If done correctly, the stags will
move.
Talk to Klem again about the little
stags. He wants you to clear the passage in front of the other shrine and bring
back the headdress and beautiful oil lamp. Exit the cave and go to the first
shrine.
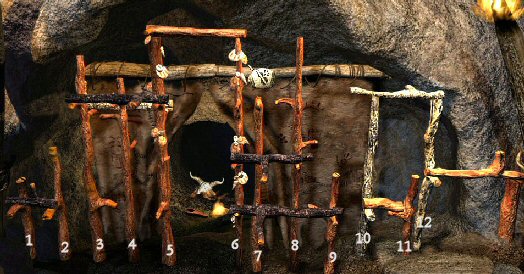
Remove sticks blocking the shrine –
Stick post and stick bars cover the entrance to the shrine. The object of the
puzzle is to move the post and bars to enable access to the curtain behind the
sticks.Each stick can be rotated and the
bars can be slid to the side. On the stone arch above the sticks are the
slider direction icons and the rotating icons.Solution: Number
the stick posts from left to right: # 1 – 12. Look at the graphic to check the
solution below.Click on a post or bar and it will
flash. Use the sliding or turning icons to turn the sticks.1. Turn post #1 to get the knob to
front. Turn leftmost black bar to get the black knob up and then slide it to
the left.2. Turn white post #12 to get the
knob to front. Turn rightmost top brown bar knob up and then slide it to the
right.3. Turn #11 brown post knob to the
left. Slide the short brown bar to the right.4. Turn the top right white bar
knob to the back and slide it to the right.5. Turn topmost middle brown bar
knob to front and slide left. Turn #7 post knob to the front. Turn #8 post
middle knob to the front. Turn #9 post knob to the front. Turn middle (second
from the left) black bar knob to front and slide to the right twice. Turn the
bottom black bar to front and slide to right.6. Turn #3 post top knob to front.
Turn #4 post top knob to front. Turn top black bar knob to front and slide it
to the left twice. Turn middle top white bar knob to the back and slide it to
the left.
The curtains open. Take the
sorcerer’s headdress and the oil lamp.
Go back to the white grotto. Place
the oil lamp and then the headdress in front of Klem. Klem wears the headdress.
Talk to Klem. Klem wants you to prepare the oil lamp.
Oil lamp – Place animal fat
on oil lamp. Then place the juniper twig on the fat. Turn around and pick up
the twig. Click twig on the lit lamp. Very slowly move the lit twig to the
made oil lamp. Click to light the oil lamp.
Drink the concoction made by Tika.
Learn about the musical stones. Now, play the music that awakens the spirits.
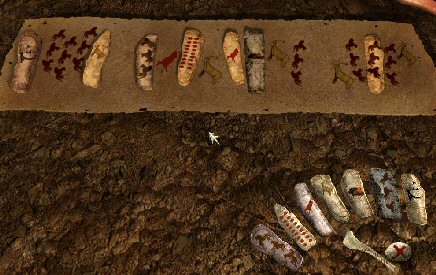
Spirit music puzzle – The
spirit engraved musical stones are placed on a skin on the ground. The object
of the puzzle is to play the music of the spirit to awaken them.Click on the stones to activate the
puzzle.First find out which of your
musical stone match the sound of the spirit stones. Click the hammer on a
stone at bottom right and find the matching sound on the spirit stones. Once a
match is found and the sound is made one after the other, the spirit image
will appear on the stone at bottom right. Do this for all 7 stones.Then play the music of the spirits
by following the images seen on the spirit stones and drawing on the skin.Click the stones to activate the
puzzle. Hit the stones with the hammer. Hit the stones one after another
(overlap the tones) with the 2 pauses in between.
Numbering the stones at bottom
right as 1-7: Hit with hammer 7, 6, 6, 6, 4, pause, 1, 3, 2, 4, 3, 5, 4,
6, pause, 4, 6, 6, 6, 4.Watch the spirits dance.
This
document may not be distributed without express written permission of the author
and the content may not be altered in any way.For
Questions or Comments on this Walkthrough,
Please write to:
MaGtRo
Copyright © 7/2005
MaGtRo
View this guide raw, exactly as the archive holds it