Destination Treasure Island
Remove the extension tube from the bellows.
Attached the strange device on the bellows.
Pull handle of the bellows and take the diving
apparatus.
Fort: Jump to fort.
Cannon – Place the cannonball in the prepared
cannon to get loaded cannon.Push the handspike to lean the cannon forward. Take
the handspike.Pull the knotted rope on the floor behind the cannon to open the
window and move the cannon forward.Pan left to the linstock with no wick on the post. Use the oakum
on the linstock to get an unlighted linstock.Use the lighter on linstock with wick. Use the lit
linstock on the cannon.Watch as Jim destroys his own ship.
Pistol – Take the empty powder horn from inventory
and use it on the gunpowder barrel to get a full powder horn.Combine bullets + full powder horn + unloaded pistol
= loaded pistol + empty powder horn.
Flowery Coast – Exit hut and climb down the rope
ladder.
Dive to the wreck – Go right to the beach and
look at the wreck. With
the diving apparatus already made, dive down to the wreck.Use knife on the sponge attached to the rock. Take
damp sponge.Pan right and see surgeon’s case inside a clam
shell. Use handspike on clam to stop the clam from closing. Take surgeon’s
case and the handspike.In inventory, disassemble the surgeon’s case to get
forceps and amputation saw.Turn around and pick up the cannonball.
Look at the numbers on the wood of the shipwreck =
IV, VIII, XV, XVI, XXIII, XLII. Wonder what that is all about.Pan up and rise to the surface.
Boat – Go to the boat. (Alternative path: The
pirates made a hole at the hull of the boat).Repair the boat. Pan left and see wood
planks attached to broken pole.Use the forceps to remove the planks. Use amputation
saw to cut the planks to size. Watch Jim place it on the hole of the boat.Use oakum on the new repair job. Watch Jim use the
caulking iron to tamp the oakum.Go back to the fire pit by the snake post. Use the
cold resin on fire.Go back to the boat and use the hot resin on the
oakum caulk. The boat is repaired.
Go to the waterfall: Enter
the boat and watch Jim row on the rapids to get to the River of Blood.
The enigma with dagger, you’ll soon seal its
fate,
Allowing you to traverse the watery gate.
Waterfall: Tie the boat to the ring on the rock wall. Use
Anchor
hitch knot to tie the rope. Select: bottom, bottom, top, 4 and 5. Exit the boat.
Look at the skeleton on the bank. The river is deadly
because of the piranhas.
Talk to the parrot left of the entrance. The pirates
are up there and it’s a trap.
Pirates: Ring the bell.
Negotiate with the pirates. They want ready money or treasure. A basket is
lowered down.You can or not give the cannonball to the pirates.
It doesn’t matter to the ending of the game.If you place the cannonball on the basket, the
pirates and Jim will have a long discussion about what the cannonball is made
up of. In the end, they throw the cannonball into the piranha filled water.To continue on, combine the open bottle of rum with
the cork. Place the bottle of rum in the basket.Listen to the argument that ensues. Dick was thrown
into the piranhas. Morgan shoots the other pirate.Twin daggers and wall: Talk
to the parrot again. The bird repeats the enigma and drops the twin daggers.
Pick up the twin daggers.Go the wall beside the boat. Use the twin daggers on
the hole on the cliff wall.Move one end to another hole until you get to the
top left of the wall.
Long John’s enigma is entirely solved.Snake Cave: Finally, talk to Long
John Silver. Look up and click on the snakes. They are deadly lanceheads.Morgan – Click on the steps and Long John
says it is a secret passage to his house.Jim climbs up. See Pepita and Morgan. Use the loaded
pistol on Morgan.See the gun misfires and Morgan shoots himself on the
foot. Long John hits Morgan with his crutch.Pepita wants the chains off. Morgan says that the
key is with Dick down in the river. But could be there’s another one… Talk
to Morgan.Take the mirror, slate and crayon from
the table. Take the bottle of rum from floor beside the dead pirate.
Disassemble the bottle of rum to get open bottle and cork.
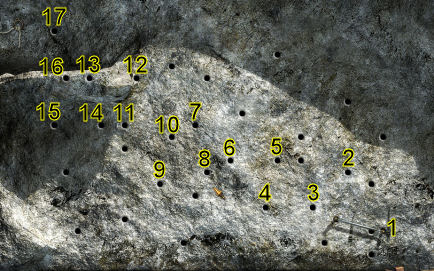
Find the key: Exit right of
Long John.
Trap – Ride the boat or jump to Snare Valley.
Go forward and go the Hollow Head. See a pirate in the path with a rifle. You
might have met him if you went to Hollow Head via the swamp. He will fire his
rifle at Jim at the swamp area.Go back to Snare’s Valley. Look at the torn net
hanging on the tree. Use
the netting needle on torn net. Jim resets the trap.Pirate – Go to Hollow Head using the left
path. If you haven’t taken the 2 wheels that opened Hollow Head, take them
now.Climb up the stairs to be inside Hollow Head. Look
down the mouth of Hollow Head. Use the megaphone on the mouth of the Head.The
pirate gets scared the same way Jim was frightened by Pepita. Watch as the
pirate is caught in the trap.Take the key from the pirate.
Waterfall: Jump to Waterfall
to get back to Long John and Pepita. Use the key on Pepita’s chain lock. Talk to Morgan and Long John.
Snake Cave: Long John
explains about the Maya Indians, emerald, Snake God and the new enigma.
Mayan Enigma
Let them answer all three beneath the
serpent’s gaze:
From south to white north, how many days?
From south to west, how many to count?
And from west to north, add what amount?
Look around. Check the Lunar symbol on the wall.
Calendar: Turn around and
look at the wheel slots on the wall and the dirty basin. Click on the glyph
under the round button. Long John says it is count of days or the march of time.
March of time – Place the large wheel and small
wheel taken from Hollow Head on the wheel slots on the wall.Pepita talks about the Mayan calendar. The year has
260 days. Each day is designated by a number and an image. The year begins on 1
crocodile and ends on 13 flower.A cardinal point is symbolized by a specific
day and by a color. Red is connected to east and green is to the center. The
fifth cardinal point is the center. Talk to Pepita again.Other errands:
Needle – Jump to Cape Fear. Disassemble the sailmakers’ kit to get needle and thread.
Use the needle on the lodestone to get magnetic
needle.Water – Jump to Mine and use empty helmet on
water trough to get helmet full of fresh water.Basin – Jump back to waterfall and go to the
Snake Cave.Use the damp sponge taken from the
wreck to clean the basin with inscription.Click on an image and Long John explains that they are
a series of dates but they do not follow chronologically.Find the cardinal points – Pour water using the
helmet filled with fresh water on the basin.In inventory, combine the magnetic needle and the cork
from the rum bottle to get compass.Place compass in the basin full of water.
Note the compass points: North is white 1
flint, East is red 13 water, South is yellow 1 rain and West is gray 7 monkey.Count the days –
From south to white north, how many days?Since south is 1 rain, place the south symbol on the 2
wheels: rain on the large wheel to abut or touch the 1 dot of the right wheel.
Press the button below the wheels to start the count.
Take note that the text at upper right of the screen
shows the start date – 1 rain; days counted and destination point.Press the button until the symbol for north (1 flint)
is shown on the wheels: flint on the large wheel is positioned abutting the 1
dot on the small wheel; as read on the destination point text at top right.There are 39 days counted.
From south to west, how many to count?Place the symbol of south (1 rain) on the 2 wheels:
rain on the large wheel to abut 1 dot on the small wheel.Press the button below the wheels to start the count.
Press the button until the symbol for west (7 monkey)
is shown on the wheels: monkey on the large wheel is positioned abutting the 7
(2 dots and 1 bar) on the small wheel; as read on the destination point text at
top right.There are 32 days counted.
And from west to north, add what amount?Place the symbol of west (7 monkey) on the 2 wheels:
monkey on the large wheel to abut 7 (2 dots and 1 bar) on the small wheel.Click the large wheel to change the start date to 7
monkey. Press the button below the wheels to start the count.Press the button until the symbol for north (1 flint)
is shown on the wheels: flint on the large wheel is positioned abutting the 1
dot on the small wheel; as read on the destination point text at top right.There are 7 days counted.
Answer the questions: Turn around to the big central table.
Colored numbers – Facing you are white numbers
(2 8 9 11 and 17), Long John faces blue numbers (1 3 9 12 and 19) and Pepita faces
yellow numbers (2 3 11 14 and 17).There are 3 rows of 3 different colors in each row at
the center of the table.So each color has to have only one number entered at
the centerSerpent’s head – Move the cursor over the serpent’s
head by Pepita. See that it is positioned to ask the questions and faces a row
of blocks.
From south to white north, how many days?From the calendar, we counted it to be 39 days.
Click on white 9 (4 dots, one bar), blue 19 (4 dots, 3
bars) and yellow 11 (one dot, 2 bars). See the numbers at the center of the
table.
From south to west, how many to count?Click on serpent’s head to move to the next question.
From the calendar, we counted it to be 32 days.
Click on white 9 (4 dots, one bar), blue 12 (2 dots, 2
bars) and yellow 11 (one dot, 2 bars). See the numbers at the center of the
table.
And from west to north, add what amount?Click on serpent’s head to move to the next question.
From the calendar, we counted it to be 7 days.
Click on white 2 (2 dots), blue 3 (3 dots) and yellow
2 (2 dots). See the numbers at the center of the table.See the center is replaced by the lunar symbol similar
to that on the wall.
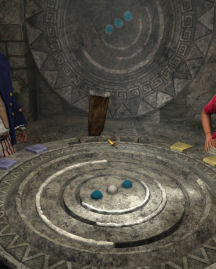
Lunar model:
When ‘twixt their arms the moon takes shape,
The dazzle of riches will leave all agape.The object of the puzzle is to reproduce an exact
copy of the lunar model on the wall at the center of the table.Save game here! This is to ensure that the solution
below works when done from the start configuration of the rings and colors of
balls.
Take note of the positions of the outer, middle and
inner rings; and the 3 blue balls at the center of the Lunar model on the wall.Take note also that:
Your left white pad when pressed moves the outside
ring and turns the left ball.Your right white pad when pressed moves the middle
ring and turns the middle ball.Using your (not Long John’s) left, the left blue pad
when pressed moves the outside ring and turns the right ball.Using your (not Long John’s) right, the right blue
pad when pressed moves the inner ring and turns the right ball.Using your (not Pepita’s) left, the left yellow pad
when pressed moves the inner ring and turns the middle ball.Using your (not Pepita’s) right, the right yellow
pad when pressed moves the middle ring and turns the left ball.Using the known actions of the pads, press the appropriate
pads to reproduce the lunar model on the table.This solution might be a long one and is but one of
other solutions:Press white left pad 2 times.
Press (using your left) left blue pad 2 times.
Press white left pad 1 time.
Press white right pad 2 times.
Press (using your left) left yellow pad 1 time.
Press (using your right) right blue pad 1 time.
Press (using your right) right yellow pad 2 times.
Press white right pad 1 time.
Press (using your right) right yellow pad 1 time.
Press (using your left) left yellow pad 1 time.
See the wall lunar model slide and reveals the
treasure.
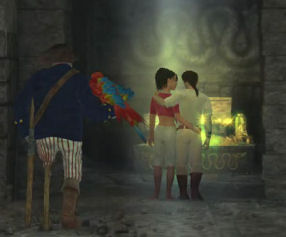
Snakes: The lancehead
snakes drop from the ceiling. One of them drops on Long John Silver.
Do something! Place the mirror on the floor where
the sun rays shine. Watch!
This document may not be distributed
without express written permission of the author and the content may not be
altered in any way.For Questions or Comments on this
Walkthrough,
Please write to:
MaGtRoCopyright © 3/2007
MaGtRo
View this guide raw, exactly as the archive holds it