Just Adventure original
Black Mirror II: Reigning Evil Walkthrough
Mosaic Piece 1
You can go after the first piece of the mosaic directly. The raven’s nest is atop the well near the stables. (You can reach this either by going left from the portico or out the kitchen door.) Take the ladder to the left of the stable door and use it on the well.
However, the raven’s going to fight off any attempt to get at its nest and you’ll have to distract it first.
Remember your conversation with Ralph. It likes shiny things. You don’t have anything shiny, but you can take a teaspoon from the counter in front of the cupboard at the right side the kitchen. (Use the right exit from the main hall.)
The spoon can’t be used directly on the raven. You’re going to have to secure it somewhere to keep the critter occupied while you retrieve the mosaic piece, and you don’t have anything suitable for this purpose.
Eleanor does. She was knitting before your earlier conversation. Either in the full-room scene or the closeup, simply left-click twice on the knitting basket at her feet to secure a bit of yarn (“thread”) with her blessing. Use the thread on the spoon and then the “Spoon on thread” on the stairs to the right of the big stable door. The bird flies down to grab at the spoon and Darren now can climb the ladder to the nest and mosaic piece without further obstruction.
Mosaic Piece 2
You’ll find the clue from Angelina’s note ( “Maximillian Mortimer Gordon”) engraved on the stone plate on the pedestal at the center of the main hall. Presumably the mosaic piece is behind it. But Darren doesn’t have the tools for this operation — you can try the knife from the lighthouse, but it’s not sturdy enough — and in any case he can’t go to work with the two old ladies in attendance.
Distraction? Distraction. Enter the kitchen . On the stove in the far corner, you’ll find a teapot. Left-click on it twice and, provided you’ve checked out the plaque in the main hall, Darren will suggest ringing for teatime. As you may have intuited from the tea table in the library (through the main hall’s left exit ), the ladies have their cup in there.
But a third left-click with a view to taking the pot is greeted with alarm by the maid Sally, who lets drop in the process that fact that Bates has gone into Willow Creek for some fresh tea. Darren won’t be able to claim the teapot until Sally is out of the kitchen.
Distraction? Distraction. If you’ve been upstairs, you doubtless noticed the highly polished bathroom floor. Look at it and Darren marvels at the work required. What if you were to get it dirty? Take the rubber boots beside the kitchen’s rear entrance and use them on the muddy patch beside the base of the ladder out at the stables. Then take the muddy boots upstairs and use them to foul the bathroom floor. Now tell Sally about it (via the “dirty bathroom” topic). She runs off and Darren can take the teapot. Drop the pot on the tea table at the left side of the library and Darren hatches a plot to venture into Willow Creek for some tea — first luring the Order to the hotel. Phones were notable in their absence from the castle in the original The Black Mirror, but now there are two — one on the right side of the library and the other on a bureau in the upstairs hall. Use either to call Murray with the news that Darren will be checking out.
Odds & ends: In the library, reached via the left exit from the main hall, take a picture of the Gordon family tree at the far right to unlock picture #12.
Then off to the village — both to spy on Bates and to collect the tea. The spying part is automatic. Darren arrives near the museum, spots Bates coming from the library — not exactly a likely source of fresh tea — and follows him to a rendezvous with Tom outside the Three Kegs Inn. Tom’s off to find Order leader Valley.
Which is convenient, because Darren now needs to get into Tom’s locked pub — the only place in town likely to have anything resembling tea. Use Tom’s own lockpick on the door — ah, the mocking laugh of fate! — just as you did on the lockboxes back at the hotel and take the tea from the table nearest the window. When you leave the building, you’ll jump straight back to the castle gate. Return to the library, use the tea on the tea table and, despite the reference to the missing hot water, pop back to the kitchen to ask Sally to announce that tea is served. When Darren returns to the main hall, he’ll find the ladies absent. Time to get to work.
You’ll quickly discover that, even with the old ladies off guzzling caffeine, you can’t do anything with the slab. It does seem as though the low fence around the globe must play some part — the cursor remains red even after you elicit its description — but no explicit hint is provided for your next step.
However, if you’ve already been meticulous in your inspection of the castle, it stands to reason that the hint will appear in connection with some new feature — i.e. something activated by Darren’s having distracted Sally.
That’d be in the bathroom. Left-click on the mirror for a vision of Samuel’s ghost and a second time after Darren smashes the mirror to verify that Samuel was holding a book and pointing at a particular tile on the opposite wall.
Darren can’t dislodge this tile on his own, and you’re going to have to go looking for tools. Bet you have an idea where to find them. On each of our visits to the stables, we’ve found Louis working under the car — presumably not entirely with his bare hands. Sure enough, just right of the rear of the car (and almost invisible in the rain) is a toolbox. Inspect it and Darren grabs a hammer. Use this on the tile and Darren knocks it out, automatically reaches into the gap behind it and pulls out a page of William Gordon’s diary with some annotations by his grandson Samuel.
Look at the page. The only part we can see is a drawing of six little pyramids — the second, fourth and fifth from the front crossed out. These correspond to the ornaments atop the little fence around the pedestal. Return there and click on the fence to discover that the pyramids can now be depressed. Darren automatically does this to the nearest one. That’s not among the ones pictured, so left-click on it to raise it again, depress the three crossed out on the diary page, activate the stone slab with a left-click to open it and reach inside to claim the second mosaic piece.
Mosaic Piece 3
The diary reports that Darren has no idea where the third piece is hidden.
But you do by now, don’t you? If you tried the locked double doors in the lower left-hand corner of the main hall while the ladies were present, Victoria warned you off. And if questioned about them, Sally reports that Bates angrily told her off when he caught her listening at there. Twenty-four years after the fire, this all speaks more to a hidden secret than an actual danger.
The diary pushes you toward Bates, who has retired to his room on Victoria’s instructions. You can question him and get a lot of good background info. But he’s loyal to a fault on the whole “fire damage” story and you’ll get only the party line.
Instead, just decoy him out of his room. Head for the bathroom, take the head of the mop Sally left behind, stuff it in the bathtub drain and turn on the water. Then tell Bates and Sally (in either order; it doesn’t matter) the bathroom is flooding and enter Bates’s room,
Left-click twice on the bedpost above the medical gear on the bed to extract a small key. Use it on the top drawer of the dresser in the corner. You’ll find a locked metal box that uses symbols in its combination lock, another photo of Darren’s mother outside Black Mirror’s gate (this one taken of a slim young woman in December 1969 — two months before Darren’s birth) and documents that include transfers matching the ones in Ms. Michaels’s bank book, Right-click on the documents to extract a four-part memory-aid for the combination to the box and again on the memory-aide to read it. It consists of four references that Bates used to remind himself of the correct symbols.
“The nymphs’ numbers:” We’ll start here because it’s where Darren starts after his exit from Bates’s room.
Voluptuous naked women make four appearances at Black Mirror and each is now numbered. The painting in the upstairs hallway is marked with the Roman numeral XVIII (18) while the three statues at the gate (from left to right) display numerals for 20, 19 and 1.
Once you’ve left-clicked on all four locations, Darren weighs the possibilities and finally translates the numbers into the letters A, R, S and T which, rearranged, spell out “Star.” (Shame we’re not allowed to do it ourselves.)
“On Sir Egmont’s portrait:” The “portrait” part is bound to confuse. The castle is full of pictures. But none of them have anything to so with an “Egmont.”
Sally, now back in the kitchen, is your contact on this one. But she won’t help you until “Inspector Falk” has helped her brother with his speeding tickets. Darren figures he can just pretend to help Rupert Wood and put one over on her.
It’s a little tricky. At this stage, a call to directory assistance (only available via the upstairs hall phone) will establish that there are 18 Rupert Woods in England. Naturally, you’ll want to narrow that down and here Bates is your man. He’s now on the sofa at the upper side of the main hall and, at one remove from the original question about Sir Egmont, it’s fine to talk to him on this topic. Ask him about “Speeding ticket” and he says Sally’s family has a farm in Sussex.
Armed with this info, use that upstairs phone to reach the Sussex Rupert directly. With a bit of deception, Darren establishes that his age is 34.
Back for another chat with Sally. Darren’s knowing Rupert’s address and age convinces her “Falk” has done as she asked and she reveals that Sir Egmont’s is a a brand of breakfast cereal — its emblem a small cross.
“The builder’s eldest sister:” Victoria can get you started on this. Go see her in the library and ask about “Builder.” She’ll offer that the builder most responsible for Black Mirror’s current appearance was Frederic Arthur Gordon. Then check the family tree on the room’s right side and left-click on the centrally-located pairing of Frederic Arthur and Andrea to learn that the oldest of Fred’s four sisters was named Rose.
“My Christian name:” Tough one. No one seems to know it — not Victoria, not Eleanor, not Sally. (She loathes Bates and suggests “Lucifer.”) Asking isn’t an option with Louis and of course you can’t ask Bates himself.
The diary suggests the name might be written down. Did you notice the mailbox between the two gates at the entrance? Empty before, it now contains a letter. The envelope is addressed simply to “Mr. Bates” but the contents — a bill for a gravestone (as the medical gear in his room suggests, Bates is dying) — reveal that his given name is “Edward Bartholomew.”
Darren’s unclear how that will translate itself into a symbol, but Victoria knows the story of the apostle St. Bartholomew — a martyr who was skinned alive and whose symbol is thus a knife.
With all four symbols now noted in the diary, get back up the Bates’s room, left-click on the box on the dresser and plug in the symbols — starting at the top with the cross and working clockwise with rose, knife and star. Inside, a key and half a locket containing a picture of Darren at 3 or 4. Only it’s marked “Adrian ” (of which “Darren” might be a glaringly imperfect anagram).
The large key opens the double doors in the lower left corner of the castle’s main hall. (Bates has vanished from the hall and seemingly from the game.) Darren enters automatically and follows the corridor beyond to a large disused room with a spooky mirror frame at the far end. A second left-click reveals a mechanism at the bottom that seems to want a small ball.
No such ball here. However, you can take a “wooden plate” from the floor beside the covered picture leaning against the right wall. When Darren picks it up, he suggests it goes with a game and reports that “Ralph” is written on the back.
Odds & ends: Take a picture of the mirror to unlock picture #11 — a shot of Darren and Samuel that appears nowhere in the game. (It was used in early promotional materials.)
Return to the Academy and talk to Ralph about the plate. He’ll turn over the rest of the game and say he received it from a “a nice lady.” “I couldn’t recognize her,” says Ralph, “but Mr. Bubby says she is ‘a holy one’.”
Odds & ends: “Couldn’t” being the operative word.
The game is unplayable in its broken condition, but use the plate on the sliding tile puzzle and it proves to be the missing piece. Darren automatically sets about solving it.
The Sliding-Tile Puzzle
This is a different type from the one that unlocked the roll-top desk back in Biddeford. No picture. And no randomness. Here you arrange 15 pieces — eight silver ram heads and seven golden lion heads — so that the designated numbers of silver pieces appear in each column and gold pieces in each row.
It’s actually quite simple and can be completed in three discrete steps. Part of the solution (the left column) is already in place at the start and the remaining portion of the puzzle can be solved by simply rotating the pieces counter-clockwise in ever-smaller formations.
1) The top row must be all silver heads. Simple rotate border of the the 4 x 3 array (i.e. the four right most out the golden heads here and bring in three silver heads — two from the rightmost column and one (when a vacant space appears above it) from the second row.
Afterwards, the puzzle should look like this:
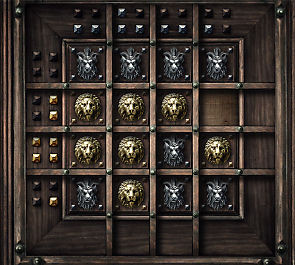
2) With the top row and left column now in place, you’ve solved almost half the puzzle. Now we’re just going to rotate counter-clockwise the pieces around the rim of the 3 x 3 unsolved region to complete the second row.
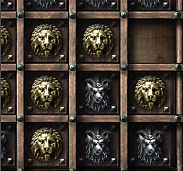
Stop when the puzzle looks like this:
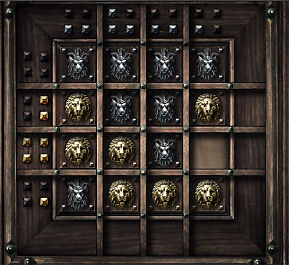
3) Finally, just rotate counter-clockwise these five pieces ….
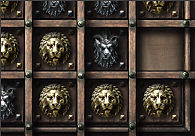
… until the puzzle looks like this: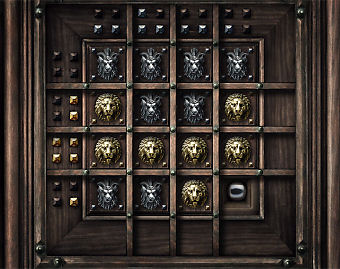
When you move the final gold head into the third row, you’ll see you’ve exposed a recess beneath the square in the lower-right corner. Within, a small steel ball. Take it, use it on the mirror in the castle old wing and left- or right-click on the mirror to kick off a second puzzle.
Ball Maze Puzzle
Here, you just have to enable the ball to reach the center of the five-ring maze by pressing the side buttons to lower the walls between rings at the appropriate times. This is beyond easy and gravity will do most of the work.
Press the round button at the lower left to release the ball. It’ll rotate clockwise between the two lowest openings between the fifth and fourth rings.
You want to break up this go-nowhere cycle, so, as the ball approaches the entrance to the fourth ring, press the uppermost button on the left side of the maze. This lower the third wall from the center and changes the ball’s course. It now goes over the top of the maze, down the right side and then toward the middle.
As the ball approaches the entrance to the innermost ring, press the lowest button on the right. The ball drops down the hole at the center and the mirror slides back to reveal an entrance.
Use it to enter what appears to be the well-kept up room of a young girl. Left-click on the left drawer of the desk at the right to retrieve a music box and the third mosaic piece.
Odds & ends: Take a picture of the music box to unlock the final mini-game (#4: “Turning Discs”).
Your natural inclination will be to return to the Academy and insert the mosaic pieces in the plinth — and you can’t. Try and Darren says “This room … it holds the answers:” Something remains undone. Left-click on the music box. Darren has a fit of some kind and falls into a restless sleep.
Chapter VI
Our hero comes to again for the big talk with his true mother, Cathrin, who explains a great deal — except the identity of the masked man who imprisoned Darren in the bunker (which will be revealed soon enough) — and a much shorter one with Bates in the main hall. The plan is to get Darren (now revealed as Cathrin and Samuel’s son Adrian and Angelina’s twin brother) back to the US — far away from Black Mirror and whoever killed Angelina. Bates tells Darren — we’ll stick with that name to avoid confusion — to see Louis for his tickets back to the US.
You can go see Louis, though it’s not necessary to the story. (Still under the car beside the stables, he professes to know nothing about tickets.) Or you can make straight for the bathroom, where you’ll find Sally’s body — its right hand seemingly pointing at something on the bathtub’s exterior wall.
Close the window and turn on the water to re-steam the bathroom and then look at the tile again to see a “B.” As in Bates. Darren immediately interprets this as a false clue inserted by Sally’s killer.
Odds & ends: But why offer a false clue and then have Darren interpret it as false himself? Wouldn’t it have been nice to allow us to sort that out on our own?
– Take a picture of Sally’s body to unlock picture #18.
When Darren tries to leave the bathroom, he’ll find the castle ablaze. Take a towel from the drawer at the left, wet it in the tub and head into the hall downstairs. (Alternate route: On the way out of the house, Darren can detour into Bates’s newly unlocked room, be overcome by the smoke and die.) In the hall, Darren watches tries to rouse the dying Bates and then steps outside.
And here begins the endgame. Darren is held at gunpoint by Louis, who confesses that he locked Darren in the bunker cell and started the fire, but asserts he’s “no murderer” (What does he imagine killed Bates and conceivably Victoria and Eleanor? And who else could have killed Sally?)
Then, in the manner of ’30s mobsters, he takes Darren for a little ride. At the Academy, out of the darkness steps the true nemesis: Angelina — not dead after all. Was anyone actually surprised by this?
Long explanations ensue — including the actual circumstances of Mrs. Michaels’s accident back in Biddeford, the identity of the corpse at the lighthouse (Miss Valley) and the focus of Angelina’s ambition: to harness Mordred’s power.
Odds & ends: Exactly how she plans to bring this off, she never says. In fact, this whole sequence raises about as many questions as it answers. Why didn’t Richard Gordon’s blood work? (Or William Gordon’s for that matter? Angelina took both from Richard’s ruined lab.)
The scene now moves to the antechamber where Darren found Angelina’s backpack in Chapter V. Do the following in any order: Use the three mosaic tiles on the stone plinth, take the candle to the right of the entrance and the lantern to the left of the plinth, use the candle on the lantern (or vice-versa) and then the lighted lantern on the plinth. The assembled mosaic focuses the lantern light on the symbol on the door. Darren then automatically cuts his hand on a built-in blade to the left of the door and places his hand on the symbol on the inner door. It opens . (Apparently this age-old facility includes a super-speedy DNA reader.)
The party enters automatically. Inside you’ll find a semi-circle of eight pressure-sensitive stone slabs. Clearly the eight Order members would stand on the slabs to open the great gate upscreen. But Darren is in a party of only four and he’ll have to figure out how the Order intended to work with less than a full house. There must be a way to lock out certain of the slabs.
Odds & ends: Take a picture of the closed gate to unlock picture #13 (evil Angelina, basically).
This involves rooms beyond the closed stone doors to the left and right. Your first task is getting them open. This requires two things: Test any of the slabs — Darren tries out the second slab from the right and steps back as a great weight plummets onto the platform — and collect the note at the right side of the big gate.
The spoken description of this “user manual” isn’t especially helpful in decoding which slabs are safe/unsafe — it has a different purpose, which we’ll get to in a moment — but a Darren thus informed is willing to experiment. And the experiments will go much faster if you inspect the note in the close-up view in the diary. (If you right-click on it in inventory, Darren describes it only in part.) Two of the slab icons are doors. The second from the left opens the left door and the third from the right.
Trouble is, Darren can’t explore beyond the doors without someone holding down the slab for him. So once you’ve tried the slab for the left door, talk to either Cathrin about “stone slab for left door.” (You can also try Angelina, but she’s only going to put forward Cathrin anyway.)
Open the left door first. Each of the four panels on the wall lays out a simple seasonal riddle. You need to sort out the answers and then adjust the central mechanism so the answers all appear at the same time.
The answers: flower for spring (either the full flower or the blossom will do), flame for summer, windmill for fall and snowflake for winter.
Adjusting the mechanism has an extra wrinkle. Three of the four control wheels change the answer for more than one season. Summer (the top one) also adjusts spring and winter, spring also adjusts winter and winter adjusts fall. (Fall adjusts only fall.) So you’ll want to start at the top, with summer (which isn’t effected by any other season) and work counter-clockwise.
When the answers are in place, four compartments open in the columns. Three (spring, summer and winter) contain staves.
You just know the missing fall one is going to be a problem.
When you return to the main room, you can use these staves in the slots that appear on four of the slabs. The yellow (spring) one goes in the slot on the near left slab, the summer one (green) in the fourth from the left and the winter one (blue) in the near right. In each case, you can then step on the relevant slab and discover the trap above has been locked out.
And fall? You’ll have to compensate for its absence in the control room through the right door. Open that now by talking to Cathrin about “Stone slab for right door” — first testing the third-from-the-right slab if you haven’t done so already — and enter to find Darren is now above the main room.
This will probably be confusing at first. Symbols. Rope. Traps. Chains. A panel at the upper right. What do you do with it all?
It’s tempting to over-think this segment. Don’t. It’s simple: You just need to drop a trap onto one of the slabs below by cutting one of the ropes arrayed about the chamber. You’ll determine the correct one — the third rope to the left of the panel — by decoding the symbols beside the ropes in what is effectively another mini-game. Call up the panel with two left-clicks. Make sure each of the five symbols appears in either the left or right bracket, that the color is correct and that the toggle in the middle is set to designate the appropriate bracket.
When you’re down, it should look like this:
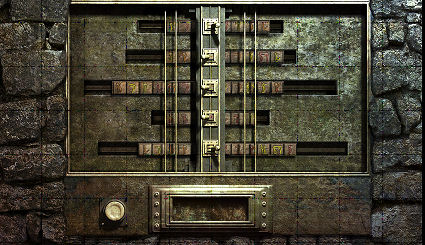
When you’re done, press the big button at the bottom left. The scene switches back to the full room and Darren confirms he’s found the correct rope.
But how to cut through it? Click on the rope and our boy suggests a knife.
And you’ve already heard about a knife. It’s one of the symbols on the “user’s manual” for the stone slabs. Step on the third slab from the the left — the one that shows a knife on the note — and, after Darren jumps back safely, look for a new hotspot at his feet. Take the knife — oddly, Angelina and Louis raise no objections– and you can cut the appropriate rope in the room above. Gears spin and when Darren returns to the main room, you’ll see a massive weight descend onto the slab beside Cathrin.
Odds & ends: “One more slip-up like that and our mother gets it!” bawls Angelina. I’m not sure why she is so ticked off. The weight didn’t come anywhere close to her or Louis. If it endangered anyone, it was Cathrin herself, so threatening Cathrin seems a bit bizarre. Perhaps, like the warning shot she fires a little later, this is just to show her emotionally heightened state.
Now talk to Angelina about “Louis” to set the wheels in motion. Darren assigns seats. Louis is suspicious, asks to swap places with Darren, steps on the un-staffed “fall” slab and instantly dies. Reverse psychology apparently works. But his weight nevertheless does the job and when Darren and Angelina take their places on the remaining slabs, the great central gate opens.
Left-click twice on the pedestal beside the gate. Angelina fires a warning shot and places the black sphere stolen from the museum atop this receptacle and a fiery portal opens in the “Demonic gate.” Darren automatically steps through into the hellish scene from the finale of The Black Mirror — seen from a slightly different angle than the 6 o’clock of the original game. Cathrin starts toward Angelina, is shot and yells to Darren to run. He does and you’ll find him back on the other side of the portal.
You can’t do anything meaningful in the slabs room. Darren can only retreat to the antechamber, where he’ll realize he’s now penned in by members of the Order and return automatically to the main room. Left-click on the portal. Darren here realizes he’s out of options and passes through the fiery circle a third time for the final scenes.
Odds & ends: Continuity issue: There’s a strange line here about Angelina getting into the “labyrinth.” Huh? The closest we’ve come to a maze in BM2 is the rolling-ball puzzle at the end of Chpater V. Presumably this is a reference to the small maze from the end of the original The Black Mirror. (This led to a different portal that zapped Samuel into the summoning chamber in a position immediately opposite the throne.)
Reunion with wounded mother, reappearance of Angelina from the left (i.e. not from the labyrnith at all), recitation of the words in the book on the central pedestal (with rather more feeling than appropriate for a purported nonbeliever) and a bloodletting. Cathrin sneaks up on Angelina and falls with her into the surrounding firepit. As Darren whirls about in despair, his blood stains the book. Wreathed in metaphorical flame, he undergoes a transformation.
Into what, we’ll find out in Black Mirror III.
Odds & ends: Once you’ve completed the game, you’ll find picture #20 has been automatically unlocked. It’s a cast shot — 15 characters arrayed about Biba’s Diner. That’s Samuel between Bobby and Tom at the back. And that appears to be Louis over at the jukebox.