Just Adventure original
Black Mirror II: Reigning Evil Walkthrough
Epilogue
The scene should shift automatically to Darren’s date at Biba’s Diner. (If it doesn’t, some task or tasks remain incomplete. Have you held off addressing Mom’s insurance business or held onto the blackmail money?)
Key event at dinner: Angelina opens the casket from Mom’s desk to find it contains a picture of Darren’s mother and a man that was shot outside Black Mirror castle. It’s dated October 1969. Darren suggests his mother doesn’t look five months pregnant.
Maybe she wasn’t?
Odds & ends: In the original The Black Mirror, the between-chapter dreams turned out to be windows into murders that were actually being committed by protagonist Samuel. Given that there’s going to be a murder overnight, that’s also a natural assumption here. However, in Black Mirror II, these are innocent images that seem to run the gamut from memories of actual events to anxiety-driven imagined ones.
Chapter II
Darren is awakened at his mother’s house by the doorbell. Captain Conley from the local PD reports that Fuller has been stabbed to death and that Angelina, caught literally red-handed at the scene, has been arrested. Darren offers such little exculpatory evidence as he possesses and is invited to come to the station and describe Mr. Mascara. When he leaves the house, he’ll reappear directly in Town Hall.
Run through the conversation with the police woman and you’ll find yourself in a mini-game. Called “Photofit” (after the facial composite system used in the United Kingdom), it’s always a blank slate at the start. Two leftward clicks on the hair, two rightward ones for the chin and one leftward one for the eyes and you’ve got it. Just save the portrait to exit. The final product should look like this:
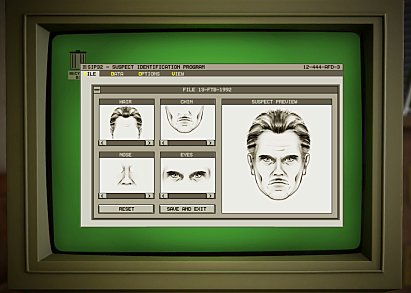
(Take pictures of the police woman and the “manhunt pictures” on the near wall of the captain’s office to unlock picture #4 and mini-game #1 (Photofit), respectively. Note that you must take the shot of the posters before you complete the mini-game.)
A brief exchange with Angelina (en route to the cells) and then the police woman, and Darren has his next goal: Obtain evidence of Fuller’s blackmail operation.
This has two stages: finding the material Fuller was using to blackmail Mrs. Biba and obtaining proof of the actual coercive act. — i.e. a statement along the lines of “You give me $1,500 or I’ll …” You can perform these tasks in either order.
Odds & ends: Once you’ve completed the description, you’ll find the composite in your inventory and posted to the right of the door to the souvenir shop and (after you’ve entered and exited Biba’s Diner) to the left of the diner door. You can also ask Mrs. Biba, Dr. Newhouse (at the diner), Eddie, the hotel owner/porter and Rosie whether they’ve seen the man, and Captain Conley and Sgt. Kinney (the police woman) whether he’s been picked up for questioning. (No and no.)
The Blackmail Letter
The easy part.
Simply visit Biba’s Diner. Outside, you’ll find Mrs. Biba dropping something in the dumpster over at the right — evidently something she couldn’t trust to the indoor trash can even on this rainy day. When she returns inside, open the bin to retrieve the pieces of a torn-up letter — evidently the one Darren delivered in Chapter I — and right-click on them in inventory to put them together in another mini-game.
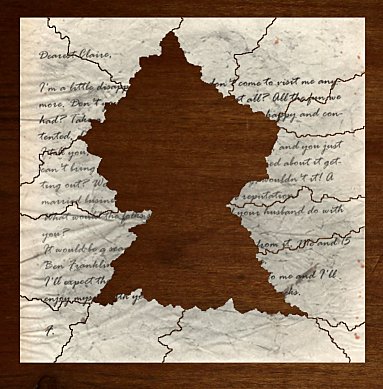
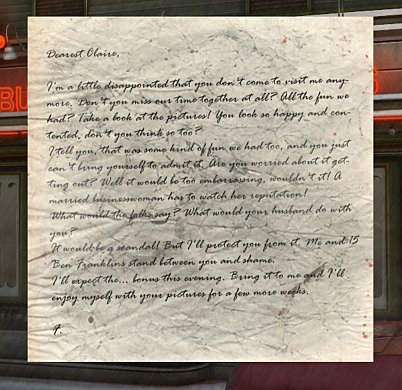
As puzzles go, this one is easy. Rotate each piece with right-clicks so it is in its proper orientation, then assemble the border on one side of the screen and fill in the interior.
What exactly passed between them? Fuller’s wording is sufficiently vague (“visit,” “our time together,” “fun”) to permit multiple interpretations. But the threat is clear enough: Fuller will expose Mrs. Biba unless she pays him off.
(Take a picture of the dumpster to unlock minigame #2: Letter.)
The Secret Room
The hard part.
Darren believes that whatever Fuller had on Mrs. Biba must be concealed in the secret room behind the photo backdrops in the cellar. But there are multiple barriers to entry. This will take a while.
The Photo Shop
Darren arrives back at the photo shop to find both doors blocked with yellow police tape. Suddenly respectful of authority, he won’t break the seals.
But the grate covering the well outside the basement window has no such seal. Perhaps the cops thought it impassable. With a little art, Darren can raise it.
The key is the grate’s proximity to an effectively immovable object — the grille over the window above the window well. Use the tow rope from the car hood at the left on either to connect the grate below to the grille above.
Now you need something durable with which to twist the rope. Try the fallen-down piece of the upper railing on the promenade outside the souvenir shop. (It’s on the ground outside the shop’s far-left corner.) Use it on the rope loop and Darren inserts the tube, twists it and pries up the grate.
In the cellar, you’ll find the photo backdrop has been lowered again. You’ll need to raise it to expose the door by pulling in a certain order the five control ropes in the backdrop’s upper-left corner. If only because this is an adventure game, you can be fairly sure that order must be noted down or encoded somewhere.
First step: Pull each of the ropes once. This changes their designations from numbers to place names. When you’re done, they should read (from left to right): Beach, Castle, Great Wall of China, Monument Valley and Sphinx. (This is not strictly required, but it will allow you to identify the ropes more readily in the sequence that follows. Hints to the proper order in which you’ll need to pull the ropes can be found upstairs, but they are keyed to the locations of the associated scenes rather than the rope numbers.)
Check Fuller’s office. There are two levels of clues here: the note on the right side of the map behind the desk (which provides positions for three ropes and a hint at a fourth) and the map itself. It’s visible only in part in the closeup, but Darren’s spoken description gives all five locations: Utah/Arizona, Hawaii, Egypt, China and Germany. This translates into Monument Valley on the Utah/Arizona line (rope #4), Beach (#1), Sphinx (#5), Great Wall of China (#3) and Castle (#2).
(And while you’re upstairs, pop into the dark room and take a picture of the chalk outline that marked the position of Fuller’s body. This unlocks picture #17.)
Pull the ropes in that order and the backdrops lift.
Now you have access to the door, but still need a code for the keypad to the left. Left-click on the door twice to learn this requires a search of Fuller’s belongings at the local morgue.
The Morgue
The morgue’s off the left side of the hospital waiting room. This can play out a couple of different ways, but they both work out the same in the end.
- Try to talk to the morgue guard (previously seen at the counter at Biba’s) and the nurse speaks up and shoos Darren away. Darren says to himself that he has to find some way to distract her. (See below. Once Darren has a delivery note, the nurse no longer intercedes.)
- This is a bit more direct: Try to enter the morgue. The guard stops you, asks if you’re making a delivery and, when Darren confirms, asks for his delivery note.
Needless to say, Darren doesn’t have one. And, just to cut to the chase, he’s also missing an actual parcel and a hospital ID badge. (You can acquire the delivery note and parcel without first talking to the guard, but you’ll need to talk to him with the first two in inventory to set up collection of the ID.)
- Delivery notes. They’re on the corner of the counter at the left side of the nurses station. Darren won’t take one with the nurse sitting here. You’ll have to distract her by unplugging the monitor in your Mom’s room — first left-clicking on the monitor itself and then on the cables. This sets off an alarm, the nurse comes running and Darren can use the interval to slip back out to the lobby to grab the note.
- Parcel. The parcel doesn’t have to be an actual parcel. The empty box on the floor at the near end of the shelves in the souvenir store will do just fine.
- ID card. With the slip and box in inventory, talk to the guard and discover you still need a visitor’s pass.
This is a bit more obscure. The nurse won’t provide one. (She knows you to be a family member of a patient and they don’t require passes.)
Maybe the doctor? He isn’t here — but you did run into him at Biba’s Diner in Chapter I. Check there. Yup: A badge-wearing Dr. Newhouse in his usual booth.
You need to get the doc to lose that coat. Its simple: Talk to Mrs. Biba, order coffee and use the cup on the doctor. He heads for the restroom to clean up and Mrs. Biba leaves his soiled coat on the end of the counter. Click on it twice to take the ID badge. Your way into the morgue is clear.
The top deck of the trolley in front of Darren has nine little containers for the belongings of the departed. You’ll have to examine with a left-click each of the six clipboards on the wall above to sort out what number has been assigned to Fuller’s belongings and then return to clipboard #448 at the lower left to ascertain that this is the right one. Then left-click twice on the boxes of personal effects below and once on the one at the back center to identify it as Fuller’s. Open it to take the keys — among them a hexagonal brass stick that might be used for winding.
(Also snap a picture of Fuller’s covered corpse at the rear. This unlocks picture #16.)
The Photo Shop II
The winder fits in the hole in the lower right corner of the cuckoo clock just inside the rear door. Examine the clock face in close-up and use the keys on the hexagonal hole. The clock clicks and chimes once, the doors at the top open and out pops a little box. Right-click on it to discover it contains four negatives — all with apparent defects in the form of bars or stripes.
Can you examine them in closeup? Head to the shop’s front room and use the negatives on the light box to the left of the register. The content is nondescript, but the bars could Rotate the top two and the one at the lower left so they are displayed in their real-world, right-side up orientation and the one at the lower-right (a shot of the hospital) so it’s upside-down. Now drag them on top of each other and the bars will spell out “2482.” Plug this into the keypad and hit the return key at the lower right to elicit a promising bright sound.
But the door remains shut. The code isn’t enough. Something is missing.
If you explored down here earlier in the game, you may have noticed a certain sponginess to the floor in front of the backdrop. Left-click on the floorboards now to find a scale concealed here. The weight on the scale must match Fuller’s weight to unlock the door, and Darren has no idea how much Fuller weighed.
Odds & ends: Unless he was willing to adjust the locking mechanism every few days, Fuller would have had to watch his weight assiduously!
Morgue II
But you’ve seen a scale under your mother’s hospital bed, right? Right. So it’s back to the hospital. You can take the scale and, irrespective of the absence of a box and delivery note, reenter the morgue without a hitch. But try to weigh Fuller’s body and Darren anticipates a “racket” and suggests distracting the guard first.
Actually, you’re going to try to drug him. Here the game harks back to a sanitarium sequence in the original The Black Mirror. Take the syringe from the lower shelf of the cart under which you placed your faux parcel upon first arriving in the morgue and the laxative from the bedside table in your Mom’s room, buy a soda from the machine outside the guard booth and, in any location save the hospital lobby, combine the syringe and laxative and then the loaded syringe and soda in inventory.
Drag and drop the laxative-laced soda onto the suspicious guard. (Don’t just talk about it; he won’t accept it that way.) Seconds later, he takes off — evidently not for the bathroom — and Darren’s free to weigh Fuller and his gurney and then the empty gurney in the foreground. Encounters with the lunatic guard and annoyed police captain follow swiftly — after which Darren is free to return to Fuller’s cellar.
Photo Shop III
Don’t worry about the math. Simply left-click on the scale in front of the door and Darren automatically assembles sufficient cellar junk to supplement his own weight. (Too bad about the “automatically” part. That might have been a fun puzzle.) Plug in the “2482” code again, the door clicks and you have only to activate it to enter Fuller’s hideaway.
The blackmail material is in the locker at the left. It’s unlocked using the hexagonal recess in the metal plate behind the curtain at the right. Simply take the brass ball off the lower left bedpost, use it on the recess, open the locker and take the compromising photos of Mrs. Biba within.
Odds & ends: Darren doesn’t speculate aloud what Fuller did down here, but the knockout drops on the table beside the bed are a dead giveaway.
Police Station
Enter the police station for a long sequence. Mr. Mascara appears, identifies himself as British private eye Reginald Borris, and asserts that Angelina did have a motive to kill Fuller: Fuller had photographed her. Darren thinks he’s framing Angelina for the murder and it does appear that way. Borris claims the photos he produces were received from Fuller, but Darren recognizes them as photos he took the previous day — meaning Borris must have stolen them from Angelina’s hotel room. After a quick chat with the police woman, that’s your next destination.
Odds & ends: Conley’s questioning of Borris takes no time at all. Having left the station, you can march right back in, talk to Conley about “Stranger” and learn he now smells a rat. However, you won’t get the full story on Fuller’s dungeon until after Darren completes his mission at the hotel.
Hotel
Darren arrives outside the Wild Coast to find the owner/porter screaming hysterically at the sea gulls on the left-hand porch. He’s not going to let Darren up to Angelina’s room so you’ll have to distract him, and what better way to the demonstrated one: Bring back the gulls. Gulls love bread and, as mentioned earlier (in context with grabbing the vinegar), you can find some on the counter at Biba’s Diner. The intact slices would draw down only one bird (or so Darren thinks) so right-click on the bread in inventory to crumble it and use the crumbs on the hotel veranda. The birds fly in, the shrieking owner/porter emerges to chase them away and, behind his back, Darren is free to step inside, grab the key from behind the desk and climb to Angelina’s room. (If you miss your window, you’ll have to retreat to Biba’s Diner and collect more bread.)
Left-click on the lamp beside the bed to discover a microphone and then twice on the ventilation grate above the dresser to find a transmitter. Right-click on the transmitter in inventory and Darren suggests checking with Eddie at the junk shop. (You’ll recall that it was the inquiry about his radio that got him to open up a bit.) Let yourself out for another display of hysterics by the owner/porter.
(Also use the camera on the wine glasses on the table for Darren to snap a picture and unlock picture #1 — a candid shot that appears nowhere in the game. Is that Angelina? You would think so, being that it’s her hotel room, But given the shadow on the back wall of a man preparing to strike a blow, I think it’s supposed to be Mrs. Biba.)
Odds & ends: Actually, even if he has completed this sequence, Darren can collect a second helping of bread from Biba’s, squish it down to crumbs again and take it all the way to England in Chapter III. But it never finds another use.
Junk Shop
Get back to Eddie and ask about the transmitter (or just use the transmitter on him). He reports that he picked up some Morse code the previous day from a stranger who transmitted that a certain girl is “now safe” (which could mean “locked in a cell”) and that he’d be in touch again at 6 p.m. today.
Eddie suggests you use directional antennas to locate Borris’s transmitter. Eddie has one and will build another for Darren if Darren collects the necessary raw materials: a metal bar, headphones, compass and a length of copper wire.
– Metal bar. Simply pop into Fuller’s back yard and disengage the piece of railing from the rope. (You can do this even before you get the antenna assignment from Eddie.)
– Headphones. To the right of the TV at Mom’s house.
– Compass. On Mom’s telescope.
– Copper wire. You can retrieve it from the same chain of lights where you earlier found the red light bulb, but you’ll need some way to cut off a section. Buy the wire cutter on the rack on the front of the junk-shop counter and use the cutter on the wire at Biba’s and then on the wire in inventory to strip off the plastic.
Odds & ends: Note that Eddie now gives Darren a 50-cent discount on the $2 he charges if Darren buys the wire cutter prior to the coin and cane favors. (Albeit a meaningless one — money being an intangible in BM2.)
– This is the last sequence where Darren has the run of Biddeford — once the antenna is assembled, you’ll be limited in the regions you can explore — so if there are people with whom you want to speak or locations to examine or shoot with the camera, now is the time.
In particular, ask both Captain Conley and the police woman about “Secret basement” to learn the police search of the dungeon has borne fruit. Conley now says “there’s a lot of people with reason to cut Fuller up.” And the police woman gives you a taste of Borris’s cover story: He’s supposed to working for an insurance company and watching Angelina over a matter of some stolen books.
– And what about that business with the late Carrie? The game lets it go once you’ve questioned everyone with a “Carrie” topic. Given the Fuller connection, the implication seems to be that she too was blackmailed over some prurient photos and took her life.
With all these components in inventory, drop back to Eddie’s shop and talk to him. He’ll give you instructions and Darren automatically removes to a spot outside the Wild Coast Hotel. Use the mouse to adjust the compass to 73 degrees and, with the gadget now beeping rapidly, press the red button at the lower right. Darren jumps back to the junk shop to plot the coordinates (again, automatic) and discover that Borris must be on a boat two miles offshore.
Borris’s Boat
It might have been fun getting out there, but that’s automatic, too — Eddie cashes in a favor with a fisherman — and you’ll suddenly find Darren at the aft end of Borris’s sailboat.
Let yourself into the cabin and left-click twice on the picture on the far wall to reveal a safe. The dial is similar to a compass and the combination consists of a sequence of six compass headings.
Is this written own somewhere? Not exactly. But the folder to the right of the laptop computer contains a transparency that fits over the map of Africa on the wall to the left. You want to align the transparency so its lines fill the gaps between similar lines on the map to complete a route around the southern tip of Africa.
That may give you some trouble. The lines don’t all sync properly. But the process can be simplified: Only one line needs to fit perfectly. Right-click twice on the transparency to rotate it so no line appears in its upper right-hand corner and then slide the foil so the line in its lower right corner completes the link between the line at the bottom of the map and the one above it and to the right. (The latter line ends in a circle.)
This completes a route, the view drops back to the cabin and Darren reads off the combination from the pictured directions: SW, S, SE, E, NE, NW. Plug this into the safe — as with the safe at Fuller’s shop, the direction in which you turn the dial first doesn’t matter — and liberate a ring bearing a tree symbol and a computer disk. Pop the latter into the laptop to discover the computer’s internal battery is dead and that the boat seems not to have electricity.
A generator can be found under the right-hand sofa. Naturally, the seat turns out to be locked down so you’ll need a key. It’s in the third drawer from the top beneath the laptop. And, naturally, the generator is almost out of fuel, so you’ll need gas. (You’ll have to try to start to generator in order to take the gas can.) It’s in the drawer under the left-hand bench up on deck. Start ‘er up and activate the laptop again for evidence that Darren’s mother wasn’t hurt in a car crash after all and that Fuller was killed by Mrs. Biba’s husband.
Naturally, this is where Borris shows up. Darren automatically clubs him with the bust but not hard enough and when he retreats to the deck the private detective is still at his heels.
Darren can die in this standoff — the first of several such encounters — and there’s only one way out: Within five seconds, try to conk Borris in the head with the sailboat’s boom. Darren then automatically wallops him with the oar and sends him overboard. (If you miss the window or click on anything else — Borris himself or the oar — Borris shoots Darren and you’ll have to replay the scene from the automatic save.)
Cut to a scene of Darren and Angelina on the rocks overlooking the Wild Coast — it’s established here that Angelina is returning to England without Darren to continue her investigations — and then Darren alone at Biba’s Diner a few days later. (No evidence of Mr. Biba in the kitchen; he’s evidently been arrested.) Mrs. Biba approaches and reports that the hospital has called looking for Darren. It’s the only place you can go — the Biddeford postcard is broken and all other exits are locked out — so enter the lobby and then Mom’s room to find the bed unoccupied and monitor off. The doctor enters and tells Darren that his mother’s heart gave out.
Darren dreams are followed by a real-world sequence — an alarming message from Angelina on Mom’s answering machine — and Darren’s flight to England.
Chapter III
Gordon’s Palace Hotel
We find Darren outside a hotel. This location will be familiar to those who’ve played the first game. (This is the Ashburry sanatorium from the original The Black Mirror.)
Enter. Darren automatically talks to proprietor Murray — again, a familiar name: he ran the Willow Creek pawn shop in the first game — and takes a room and and learns Angelina has the one next door. Use the double doors to the left and Darren automatically drops off his backpack. (This contains most of the leftovers from chapters I and II: the letter from his mother’s bankbook, the photo from the casket and the ring from Borris’s safe. They all vanish permanently from your inventory but you’ll nevertheless be able to raise questions about the ring a little down the road.)
First things first: You need to get into Angelina’s room to see what’s going on with her. Proprietor Murray won’t just give you the key — and you’ll have to ask him about Angelina and then her room key so he can say so — so you’ll have to create another diversion: a smoky little fire in the pile of leaves outside.
For this purpose, you’ll need the matches from the ashtray in the middle of the table in the lounge outside your room and, since the leaves are wet, some kind of kindling. The newspaper at the left edge of the table will do admirably. Place the paper in the leaves, use the matches on the leaves and then go back inside and tell Murray about “fire.” (This may feel like another timed sequence, but isn’t. Murray stays outside until Darren has the key.)
Use your new key on the door to Angelina’s room or simply try the door. Inside, you’ll find an oddity that seems designed to attract Darren’s attention: a framed picture of Angelina on the left wall. Take it down with two left-clicks and you’ll find two seemingly blank sheets of paper behind it. Darren speculates they contain a message written in invisible ink.
So they do. Angelina used lemon juice as her ink and the wood sliver on the table as a pen. You just have to make the message visible by oxidizing the ink. A little heat should do the trick — as you’ll learn if you use the matches on the paper — but the heat source will have to endure longer than your average match.
Take the Schnapps from the table in the hotel lobby, pull a woolen thread from the ratty blanket on the bed in in Angelina’s room and use both on the glass on the table beside the window in Angelina’s room. Then use the matches and finally the papers on the glass over on the table. Then right-click on Angelina’s singed message in inventory to read it. It’s series of short diary entries that sketch out a little about Willow Creek and Black Mirror castle, supplies details about the ring Darren recovered from Borris’s safe (evidently the symbol of a secret society that “wants to summon up dark powers”) and refers to Borris’s appearance at the hotel, Angelina’s desire to “investigate the passage” and her intention to “send off some insurance.”
Darren assumes that Angelina is being held prisoner by Borris — remember the answering-machine message — and suggests putting an ear to the ground in Willow Creek.
Willow Creek
Which you can now do. Take a postcard from the display in the lobby — this isn’t required, but, as in Biddeford, enables instant travel between previously-visited locations — and exit right from the hotel exterior to reach the village.
Odds & ends: There is one task you can still complete at the hotel — finding the entrance to Angelina’s passage — but it’ll keep. You can’t open that entrance until you locate Angelina’s “insurance.”
In Willow Creek, Darren almost runs into the town librarian, Miss Valley. She’ll give him an obligatory (and rather plodding) tour of the place to the tune of Darren’s conversation topics and finally bolt when he asks after the symbol on Borris’s ring and she discovers Darren is from Maine — as though she’d suddenly put 2 and 2 together and the answer frightened her.
Odds & ends: Talk to Tom at the chili stand about Miss Valley for a rather unsympathetic take on her sad history: She’s the sister of young Vic Valley — murdered by Samuel Gordon in the original The Black Mirror — and seems to have been almost as much a victim as her brother.
– And snap a picture of the street to the left of the central tower in Willow Creek. This unlocks picture #6.
That little freak-out sets your agenda. You want to learn more about The Order. You can do so at the museum. Enter, listen to the German tourist complain and then left-click on the display case initially just off-screen to the right and in the closeup read the Gordon Family Chronicle within. It supplies the rules of the Order, but not what the society is about. You’ll need to read the earlier pages to sort that out. A quick chat with guard Bobby establishes that he’s not permitted to remove the book from the locked case — but that he does have the key.
Distractions make Darren’s world go around and he needs to distract Bobby twice to steal his key. Bobby’s initial three topics don’t suggest avenues for distraction, but he grows additional topics as you examine locations around the museum: the broken display case to the left of the door (which quietly becomes relevant in Chapter VI) and, more importantly here, the “bubble mixture” on the front counter. Use the latter topic and it turns out Bobby is hungry and would accept something to eat.
Leave the museum, cross the canal to the chili stand and order a bowl from Tom. Give the bowl to Bobby or just talk to him about it. He’ll provide a sparkler in exchange and remove his jacket. However, he remains in his chair. To coax him out, talk to him again about the bubble mixture and Darren volunteers to refill the container with soapy water. Take it with you.
The soap can be found in the supply cupboard to the left of the display case. (Darren automatically squirts some into the bubble container.)
You’d think the water would be easy, being that there’s a river right in the middle of town, but the surface of the reveals no hotspots. The closest thing is the rope tied to the little pier off the left side of the waterway. Reel it in to find that there’s a bucket at the end and that, naturally, it’s full of water. Use the bubble mix container on the bucket and Darren’s work is done. Give the mix back to Bobby, who promptly stands up and starts blowing bubbles out the window. While his back in turned, left-click on his jacket to take the key.
Odds & ends: Check out the broken the display case to the left.This is explained in Chapter VI.
Also take a picture of Bobby when he’s blowing bubbles. This unlocks mini-game #5: BigHead Mode.
This is notably different from the other four mini-games, which simply enable the player to replay mini-games found in Black Mirror II. It activates this gag mode in the “Options” menu — including a sliding scale, initially set at the normal size, that allows you to control how huge or pinhead-sized the characters’ heads appear. (Try it; it’s funny for a while.)
Look at the display case in the close-up view and use the key on the lock at the top … only to learn the museum is closing for the evening. Browsing in the Chronicle will have to wait until Chapter IV. Darren leaves automatically for a run-in with a bedraggled man who calls him “Death” and refers to “the curse.”
You can now return to the hotel, where a new task awaits.
Odds & ends: However, you can also follow up with the bum, who has removed to the bench outside the pub on the left side of the canal, and now learn that Darren is the Antichrist.
– Moreover, the pub is now open and you can poke around a bit inside — albeit to no useful purpose. (Inside, snap a picture of the mugs in the foreground. This unlocks picture #7.) And note that the high-score on the pinball machine includes an entry for “Vic” — one of the murder victims in the original The Black Mirror.
Gordon’s Palace II
Outside the hotel, you’ll find an agitated Miss Valley. She doesn’t say much that is coherent — except to disclose that, every 12 years, something terrible happens here.
Inside, Darren finds Murray fiddling with a letter. Turns out its for Angelina. Could this be the “insurance” she mentioned in her diary? Naturally, Murray refuses to turn it over and, once again, you’ll have to find a way to get around him and into the lockboxes behind the central columns.
Darren automatically moves to the lounge outside the rooms. The next time he returns, he’ll find find Murray reading the paper and drinking tea.
If Darren could drug the tea, he’d have the run of the place. Happily, there is a sleep aid in the cabinet under the TV in Angelina’s room. Simply use it on the tea. No special stealth or prep work required. However obvious the maneuver, Darren automatically leaves again and returns to find Murray catching Zs. He’ll be out of commission until wakened by the tourists later in the chapter.
Left-click on the lockboxes to the right and you’ll learn Darren’s reluctant to risk waking Murray by searching his pockets for a key.
That leaves a lockpick. Who around here might have a lockpick? If you spoke to Bobby and Tom only on the necessary topics, you may be a little vague on that. But if you asked Bobby about himself and then Tom, it’ll be crystal clear: Tom is a burglar.
Return to Willow Creek. At the pub, talk to Tom and simply keep up the cycle of “shops” and “beer” topics until he’s sufficiently drunk to turn over the lockpicking tool.
Back at the hotel, use the lockpick on the lockboxes to start another mini-game. You’ll need to configure its shape so it simultaneously depresses the four tumblers to align the top of each with the central red line. The tumblers are set up randomly each time you play, so there’s no fixed solution. But, honestly, it’s pretty easy. Insert the pick, note which sections of the pick depress the respective tumblers and then configure each section — somehow, it’s as flexible as a pipe cleaner — to the right position. When you have it right, you’ll hear a click and the scene will switch back to the lobby. Open the lockbox, remove the letter and open it with a right-click.
As we guessed earlier, it’s the “insurance.” Angelina is scared of noises coming from a space beneath her floor and seems to be trying to smooth Darren’s path in that direction with an entry code should she disappear. “The solution was known by two story-telling brothers from Germany,” she writes. “GFT/62/17/1/25.”
Odds & ends: Isn’t it a little strange that Angelina knows the solution ? (If she’s scared of the sounds from down there, why was she opening the manhole?)
But let’s begin at the beginning. Where’s the entrance? If you played the original game, you probably have guessed: Angelina’s hotel room was James’s room at the asylum and there’s still a sewer-access hole under the bed. Just move the bed to expose the manhole — now equipped with a cover and an intricate locking mechanism.
However, you can’t inspect it in closeup until you decode Angelina’s clue. “GFT” has to be Grimm’s Fairy Tales. Sure enough, there’s a copy in the bookshelf out in the lounge and, sure enough, the four numbers in Angelina’s insurance correspond to page numbers in the table of contents — 62 to “The Queen Bee,” 17 to “The White Snake,” 1 to “The Frog King or Iron Henry” and 25 to “The Seven Ravens.”
And now for the puzzle. If need be, rotate the central circle so the four relevant numbers are adjacent to the four outer circles and then rotate those four circles so the appropriate pictures appear in the space adjacent to the related Table of Contents numbers. (The overall orientation of the numbers doesn’t matter; they ) The frog and raven are easy to identify, the snake and bee a bit harder. When the last circle is properly adjusted, you’ll hear a click and drop back to the view of Angelina’s room — now with a dark smelly hole.
Accent on dark. Darren won’t descend without a light source, But you’ll have to make him look down the hole twice in order to mention the darkness and thus set up the next task.
Darren needs a light. That may give you pause. The Schnapps ‘n’ thread candle on the desk has gone out and the game won’t let you waste a match on Bobby’s sparkler. But given that Willow Creek is pretty much shut down for the night and the rest of the map currently inaccessible, there are only so many places you can look. Check the lobby. The “soul keys” on display between the masks and the postcards — left-click three times on the souvenirs to take one — are supposed to light up.
Alas, they don’t come with batteries.
Odds & ends: After you’ve picked up a soul key, ask Murray about them to learn that the originals vanished with Samuel Gordon’s suicide at the end of The Black Mirror. I suspect the designers -meant- to have him say that the soul keys were never found. (How would anyone know they had vanished without entering the summoning chamber at the end of The Black Mirror? In fact, they’re still down there.)
– And after the German tourists have finished waking Murray and complaining about the stench from the open sewer, snap a photo of the hotel proprietor to unlock photo #8.
The clock atop the bookshelf in the lounge does contain batteries — and I’d venture that they’re probably dead, being that the clock is only right twice a day– but Darren can’t simply remove them, being that the clock is screwed to the shelf. No screwdrivers are in evidence so he’ll have to improvise, using the butter knife from the little table in the lobby. (Click on “Dishes” to take it.) Use the knife on the clock and the batteries on the soul key and drop down into the sewers.