Aura
Correlation of circles on the table and the mirrors on the wall:
Mirrors – See that there
are 4 mirrors on each corner of the room. When clicked each produces a
series of tones. Under each circle is a set of 4 bars that made the series of
tones. They can vary in length. Above the set of bars is a curve that shows
the position of the bars in the series of tones. The tones start at the wide
part of the curve.
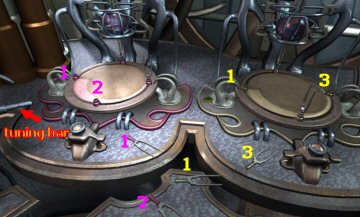
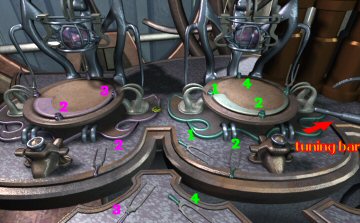
Tuning forks – On the
table are 4 circles that have holders for tuning forks. Each circle on the
table has that curve that shows the position of the tuning forks in the series
of tones produced. The curve and the tuning forks are colored. The curve
starts on the left and goes counterclockwise. Based on the clue in the drawing
found behind the table, the first tone-tuning fork is on the left, the second
on the front, the third on the right and the last at the back of the tuning
fork circles. Above each circle is a round crystal that when clicked produces
the sound of the set of tuning forks if they are inserted.
Note: If the active cursor
disappears, exit the game and replay from a saved game.
1. Find which tuning fork
circle matches which mirror. Click on the round crystal above the tuning fork
holders and match it to the sound a mirror makes.
The purple curved circle that
is at left end of the table corresponds to the mirror left of the
entrance.
The green curved circle to the
right of the purple one on the table corresponds to the mirror left of the
back door.
The pink curved circle on the
right side of the table corresponds to the mirror right of the back door.
The gold curved circle on the
right side of the table correspond to the mirror right of the entrance.
2. Check the position of the
bars under the mirrors and correlate it to the position on the tuning fork
holders on the table. This is based on the curve above the bars of the mirror.
The only mirror that is similar in position to the tuning fork curve is the
mirror on the right of the entrance. This mirror is the one that is matched to
the gold tuning fork circle. The rest of the mirrors are opposite of the
tuning fork circles on the table, so the placement of the tuning fork is
reversed.
Left side of
entrance
(Purple tuning
fork)
Right side of
entrance
(Gold tuning
fork)
Left side of
backdoor
Green tuning
fork)
Right side of the
backdoor
(Pink Tuning
fork)
3. Check the length of the bars
under the mirror to see where the low tones to the high tones are
positioned. Match the bars to the position of the tuning forks holders on the
small circles.
4. Then test the sound of the
tuning forks by clicking the tuning fork on the center bar while in close
ups.
5. Place the appropriate tuning
forks on the tuning fork holders. Start with the gold circle, then proceed
going to the left.
6. Press the button at the
center of the table.


The mirrors get activated and show the different world. To go to that world,
press the button in front of the tuning forks. Then go through the back door and
enter that world.
Astrology World: At the Mirror
house, press the button in front of the purple tuning fork circle (leftmost
circle on table) and then exit through the back door. Enter a desolate world
with a giant moon-planet on the right side and several towers. Go forward and
climb the ladder. Talk to the Astrologer. He says that you must first collect
all the artifacts of Na-Tiexu before you can find the Tetrahedron of Na-Tiexu.
He can help put together the Star Dust but first you must have the Grain of
Life found in the Spirit World before you can accomplish anything. Go back to
the Mirror house.
Spirit World: At the Mirror
house, press the button in front of the green tuning fork circle (second from
the left circle on table) and then exit through the back door. Go forward until
you reach an open hut, passing several statues holding a small replica of
themselves and side paths with more statues.
Talk to the Spirit Woman in black using a mortar and pestle. A Spirit
can help you find the Tetrahedron of Na-Tiexu. But first put together the 7 mood
figures and come back to her. Collect the 7 spirit statues from around
the area. Go back to the Spirit Woman and she tells Umang to take the Grail to
the Main Spirit. Pick up the Grail from the floor.
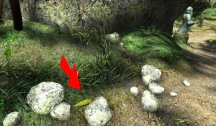
At the start of the path to the Main Spirit statue that is not holding a
small statue , pick up a leaf from the white rocks.
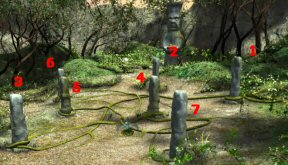
Spirit puzzle – Place the grail on the hands of the Angry Main
Spirit (with a small pond in front of it). Click on the pond and it will show
the sequence of the spirits. Turn around and look at the posts with vines
intertwined around them. Follow the start of the vine coming out of the hill
on the left while facing the posts. Place the first spirit statue on the first
post that is wrapped by the vine. Continue on until the last post right of the
post area. If correctly done, the Grail opens and fills up with Spirits. Take
the Grail with Spirit.

Grain of Life – Go back to Spirit Woman and ask about Grain of Life.
Talk to her young helper at the other platform. ‘There is a tree stump on top of
the hill and you will find the grain in its roots. The cave is dark and you need
the flower manna to light the way’. Turn around and take the pot with flower
manna in a small pot on the lower shelf.
Go to the statue accessed by going through a hole on the rocks. Stand
in front of it and turn around. Enter the cave. Place the pot of flower manna on
the table and see the manna touch the flowers to light the cave. Look up and see
a closed flower above the table. Clicking on it does nothing.
Go back and talk to the Spirit Woman’s Helper. She tells you to take the
poisonous smoke. Pick up the Vial of Smoke, the last jar on top shelf. Go
back to the cave and place the Vial of Smoke on the table. Click on lid to
release the smoke. The flower opens. Now, to do the one more step…
Go outside, climb the hill to the tree stump and shake-click on the tree by
the tree stump. It releases seeds that go through the tree stump. Go down to the
cave and pick up the Grain of Life within the shell.
Go back to the Mirror house and press the leftmost circle button to get to
the Astrology world. Exit through the backdoor.
Astrology World: Give the
Grain of Life to the Astrologer. The grain needs to be cleaned. Then place it on
the 5 dragon stand. When it glows it is ready to be transformed to Star
Dust.
Clean the grain – Turn around and go to the shelves across the room.
Take the vial of liquid on top right shelf. Take the pot with
plants at the middle bottom shelf and click on the book to find a clue.
The journal has the drawing now.
Go to the device right of the Astrologer. Place the grain on the center of
the top holed holder. Place the pot of plants on the table. Place the vial of
liquid on the top holder on the right. Click on the vial of liquid and watch
the grain gets cleaned. Take the Grain of Life without the shell.
5 dragon stand – Go to the table left of the Astrologer and take
2 Dragon statues. Go to the ornate 5 dragon stand. Place the 2 dragons
on the empty pedestal. Place the cleaned Grained of Life at the center of the
device. Watch the dragons charge the Grain of Life. Pick up the charged
Grain of Life.
Show the charged Grain of Life to the Astrologer. He says to align the
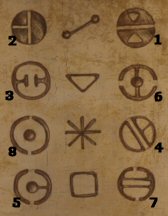
planets upstairs. Climb the spiral staircase. On the wall, see the 4 icons seen
in the journal drawing. When pressed, the dumbbell moves once from the start,
the square moves 2 spaces away from start, triangle moves 3 spaces away from
start and the asterisk is 4 spaces away. Go outside and look close at the Planet
puzzle.
Planet puzzle – Place
the Charged Grain of Life on the vase at top center of the puzzle. This
activates the puzzle. Watch.
The object of the puzzle is to
properly place the planet balls in the holders.
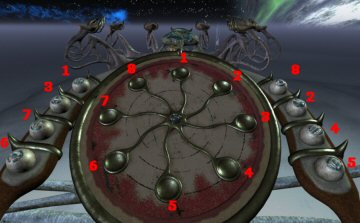
There are 3 balls that are
preset to be placed on specific slots. Based on the numbering on the graphic
below: Ball 1 can only be placed on slot 1, ball 6 can only be placed on slot
6 and ball 8 can only be placed on slot 8.
The clue on the journal shows
the matching pairs. The clue on the wall in the next room shows how far apart
the matching pairs are from each other. The dumbbell pair is one space apart,
the square pair is 2 spaces apart, the triangle pair is 3 spaces apart and the
asterisk pair are 4 spaces apart.
Dumbbell
pair: Preset placed ball 1 is one space away from its
matching ball 2 at slot 2.
Triangle
pair: Preset placed ball 6 is three spaces away from its
matching ball 3 at slot 3.
Asterisk
pair: Preset placed ball 8 is four spaces away from its
matching ball 4 at slot 4.
Square pair:
Ball 7 and 5 is 2 spaces away from each other. Placement was trial and
error.
Click on the central button and watch. Take the Star Dust. Go back
to the Mirror house.
Children’s World: At the Mirror
house, press the button on the rightmost gold circle and exit through the back
door.
Children: Go forward and enter the door on the left.
See some children’s drawing on the wall. Note the drawing left of the closed
door. It has a pinwheel of pink, green, red, blue and yellow colors. Take
the magical pyramid from the table on the left. See a baby’s bed. Take
glowing fang – yellow from one of the gold trays right side of the
room. Exit the house and continue our travels.
While strolling down the path, take the glowing fang – pink from the
pink lamp on the left, glowing fang – green from the green lamp on the
right, glowing fang – red from the red lamp on the left and glowing
fang – blue from the blue lamp on the right. Look close at the stand at the
end of the path with shimmering light above it.
Fang puzzle – Based on the children’s drawing inside the house place
the glowing fangs – starting from one o’clock position: pink, green, red, blue
and yellow fangs.
See the shimmer enter the cave. Enter the cave, go forward twice, pan left
and forward. Pick up the teddy bear. Go back to the children’s house.
Place the teddy bear on the empty baby’s bed. Exit the house and then go back
in.
Talk to the blond girl. Follow the girl through the door. Take the left path
and reach the water’s edge. Look around and see a hovering bird. Talk to the
children. The boy wants you to ask the bird to sing. Go to the bell and ring the
chimes to hear it.
Crystals: Go back through the tunnel passing the way
to the children’s house and forward until the green pool. The path goes left to
a bed of crystals and to the right to go around the pool.
Go left to the crystals and place the magical pyramid on the indentation on
the rock just below the crystals. Take-click on crystal left of the
pyramid. Take the magical pyramid again.
Take the right way from the main path, look down and see green sludge flow
like waterfall. Place the magical pyramid to block the flow and see the green
sludge rise close to 3 crystals across the pool. This act also lowered the green
pool and a bridge is now seen. Go back and cross the bridge. Go close to the 3
crystals and see pink stalactites above it. Turn right, forward and take the
magical pyramid that blocked the flow of the green sludge. This lowers the green
sludge from the crystals.
Go back to the crystals and see a small platform. Pan left from here and go
forward-down to 2 pumpkin-like things that plank a crystal. Place the crystal in
inventory on the crystal between the pumpkins. See the plant below revive. Take
magical branch from the plant.
Go back to the crystals under pink stalactites. Place magical branch on the
platform. Place the magical pyramid on the green waterfall to dam it again.
Watch the stalactites drop something on the magical branch covered by green
sludge. Take the magical pyramid again. Go back to the crystals and pick up the
magical dust from the platform. Dam the green flow with the magical
pyramid again and cross the bridge. The magical pyramid cannot be taken
anymore.
Go back to the children by the water’s edge. Across from the children is a
bed of blue plants. Place the magical dust on the plant. The plant grows and
throws dust to the sky. The bell starts to chime and supposedly the bird should
start to sing (I didn’t hear it). Go to the bell and click on it. It will
now be in inventory.
Go back to the Mirror house and go to the last world.
Magical World: At the
Mirror house, press the button on the second (pink) from the rightmost circle
and exit through the back door.
Go forward and take the left path (the right path gets you killed by
warriors). This path has a cave on the left, stone platform on the left and a
dried plant blocking the way at the end of the path.
Unblocking the way:
Go back and enter the cave on
the left. Go forward until the way is blocked by vines. Pan left and pick up
the stick.
Go out of the cave. Continue on
the left until a stone platform. See that the 3 middle stones on the post are
active. Use the stick on the stones. The platform falls down and the vines
blocking inside the cave disappears.
Go back to the cave and now the
path is cleared. Go forward until the waterfall which blocks the way. Click
the leaf on the waterfall to get leaf with water.
Go back to the dried plant
blocking the end of the main path. Use the leaf with water on the dried plant.
It revives to make a way to the top. Climb up.
Turn left and see a log. Click
on the stone holding the log on the left. See a cutscene of the log
tilting.
Teleportation-Gong Courtyard: Go back to the
cave and at the end the waterfall is not there. Go through and out to a
courtyard with intricate posts and a gong. Each post has a red holder at the
base. DO NOT HIT THE GONG – OR YOU DIE! Beside the gong is a set of drums 4 each
of 4 colors – blue, green, yellow and red. Click on them to hear the sound they
make.
Warriors teleported – In
front of the gong is a stand with gems at the base. Take the blue, green,
red and yellow teleportation crystals. Place the crystals on the red
holders at the base of each post. They will get clamped only on the posts that
need it – blue, red, green and yellow. Click the button on the teleportation
stand and see a teleportation bubble form. Hmm… Maybe we can get those pesky
warriors get transported somewhere else.
Hit the gong, turn around and
immediately press the button on the transportation stand – The warriors should
still be on the other path and have not reached the courtyard. I wonder
where they went to.
Drum-crystal puzzle – Go
forward and see a giant crystal with 4 sides. Each side has 4 circles. Click
on each circle and hear a sound. Look down and see a color at the base. Do
this to all the sides. Each side has the same sound but different colors.
Where did we hear that clunk sound?
Go back to the drums. Click on
each color and note which drums have the same clunk sound. Go back to the
crystal and click to highlight or remove the gray circle on each side.
Highlight or click only on the position shown by the drums that has the clunk
sound.
| Blue | Green | Yellow | Red | |
| 1 | clunk | clunk | ||
| 2 | clunk | clunk | ||
| 3 | clunk | |||
| 4 | clunk |
If done correctly, the crystal disappear to make the Symbol of the
Magical World.
Go back to the Mirror house. See that each mirror is now activated. Go back
out through the backdoor.
Assembling the Sacred Artifacts and the Sacred Rings-Tetrahedron:
Enter a chamber with 4 mirrors on the wall and a central one at
the end of the chamber. At the center are 4 holders.
Place the different Sacred
Symbols taken from the different worlds in specific order based on the
placement of the mirrors in the Mirror House with your back to the
entrance.
Facing the stairs on the
opposite side, with back to the exit door – Place Bell on the left and Star
Dust on the right.
With the stairs on your back
and facing the exit door – Place Magical world symbol on the left and Grail on
the right. Watch.
With your back to the steps
take the newly formed Sphere within the Tetrahedron.
Climb the steps and place the
Tetrahedron within the Rings on the stand to be combined with the sphere with
tetrahedron forming Assembled Rings.
Go back to the Mirror house and exit to go to the airship. Pull the lever and
fly to our final destination.
Island of Unity
Go forward, turn left and open
the dome. Click on the shimmering light and the bridge comes up.
Go forward and finally meet
Grifit.
Grifit tells you to go through
the latest gate found by the Clan Leaders. This will prevent Durad from getting
hold of the Combined Sacred Rings and Tetrahedron of Dragast and Na-Tiexu.
Watch Durad and Arkampus. Oh No!
They followed the travels of Umang through the unknown Amulet in inventory!
Watch the arrival of Durad and
the departure of Umang.
This document
may not be distributed without express written permission of the author and the
content may not be altered in any way.
For Questions
or Comments on this Walkthrough,
Write to: MaGtRo
Copyright ©
7/2004 MaGtRo
View this guide raw, exactly as the archive holds it