Aura Walkthrough by MaGtRo
Aura: Fate of the
Ages
by Streko Graphics
Walkthrough by MaGtRo July,
2004
Gameplay: This point and click game comes in 3 CDs
and CD1 is needed in the drive for gameplay and saving. The Main Menu has new
game, load, save, settings, credits and exit. Within the game, press ESC to
access the main menu. The setting options include video to change resolution and
color depth, audio to adjust music, sound and environment and subtitles. Press
ESC again will bring back the gameplay screen. There are ‘unlimited’ save game
slots. Press ESC, spacebar on enter skips the cutscenes.
Right click of mouse access the inventory bar. Click on an item from
inventory and the cursor will change to that item. Right click of mouse will
automatically open the inventory and return the item in inventory. At the right
end of the inventory bar is the journal. The journal stores information as shown
by a shimmering of the journal during gameplay.
Note: If the active spot disappears during gaming,
exit the game and replay from a saved game. You can die in one world but will be
given chances to redo the puzzle.
The Keepers have existed forever. They guard the secrets of the universe and
are the keepers of the Sacred Rings. They can go to parallel universe and create
new realities. When the Sacred Rings are combined, the holders of these rings
supposedly have great power and immortality but are never seen again.
You are Umang, the best student of Arakon, the Elder of the Clan of Keepers.
You are sent to Ademika to meet Grifit who will continue your training. You are
now ready to enter a new reality.
Ademika
Grifit’s House:
Enter the house and go to the book stand at the left side of the room. Read
Grifit’s note lying on the open book. He wants you to prepare the journey ship
that is inside the hidden tunnel for travel. ‘Do not forget to activate the
navigational map’. When you picked up the note, the journal shimmers indicating
information is placed in the journal. Right click and see the inventory bar.
Click on the journal at right end and see 5 drawings for this world is entered.
To turn the page, place-click the cursor at right side of the page.
Turn around, forward and pick up the charger from the bookstand right
of the entrance to the next room. It looks like the part that goes on top of the
machine in the drawings.
Globe – Turn right and see a globe. This looks like the globe in the
4th drawing in the journal. Click on the lamp on the left and then click on the
top knob of the globe. When the planets pass under the light of the lamp: the
large blue planet turns red; the medium red turns yellow, the ringed green
planet turns blue and the small yellow planet turns green.
Activate the charger:
Go to the table at far end of the room by the windows. Look close at scale at
the middle of the table and pick up the lighter in front of the scale and
the rectangular wood thermometer. Click on the scale to see it move. Back
up, turn right, look close and click on green gem to open the box. Automatically
get a green gem, red gem, blue gem, a J-shaped
stencil, a comma stencil, a V-shaped stencil and a
generator.
Go to the machine right of the
globe and click the lighter at the base of the pot looking machine. This
lights the flame to make steam.
Then go to the machine right of
the steam maker machine. Look close and press the round knob on the square to
start a pump. Click on the round knob again to move the steam to the next
machine.
Go to the machine right of the
pump machine and click the thermometer on the rod at right of machine. Slide
the knob at center of machine to one line before the end to heat up the steam
as shown by the change in color of the purple rod of the thermometer.
Go to the machine right of the
heat machine and see that it looks like the machine in the drawings. Insert
the charger on top and click on the 3 blue tubings on the right to charge the
charger. If completely charged, sparks are seen on the charger. Take the
charged charger (sic, er… sick).
Zodiac Room – Enter the next room and see zodiac signs on the floor
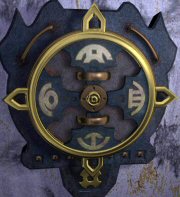
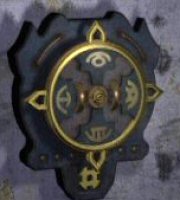
and the walls. Climb upstairs and look around on the 3 wall mounts with glyphs
that can be rotated. We need more information for this room aside for the items
being found in drawings 2 and 3 in the journal.
Go down, look right of the entrance and see a pentagonal panel on the wall.
Look close and press the 5 metal buttons starting from the top going clockwise.
See a contraption rise from the floor.
Click on the round dome of the contraption and it opens. Place the generator
on the holder. The dome closes. Rods around the base and a wall at right side
open. A flame starts on the left of the machine. Go to the opened wall, see a
door with a black circular lock, turn right and pick up the lever from
the left side on the entrance.
Note: The puzzles in this room and upstairs need more information. Let’s look
for more data. Exit the house.
Outside Grifit’s house:
Outside the house, pan right and go forward once. Here the path goes forward
and a path is seen on the left. Go forward once more and again the path goes
forward and another path to the left. Let’s go forward to the lit green
structure ahead.
Planets and colors structure: There are 4 curved
columns at the perimeter. At the base of each column is a dome stand. At the
base of each stand is a globe similar in size-shape to the planets seen around
the house globe. At the center of the structure, there are 4 small stands with 3
colored ovals around it.
Planets and colors puzzle –
The object of the puzzle is to correlate the dome stands globes with the
planet color seen inside the house. Then correlate the small stands at the
center of the structure to the color that the planets inside the house changed
to when the lamp is lit. This is explained by the fourth drawings in the
journal.
A: Arrange the dome stand planet colors to be
that of the house planet’s colors. Click to open the domes. Going from left to
right column:
1. Left dome
stand shows the smallest planet at the base. The smallest planet shown at the
globe inside the house is yellow. Open the dome, and see that yellow is
already at the foreground.
2. Next
stand shows a midsize planet. The midsize planet inside the house is red. Open
the dome and see that the red circle is already at the foreground.
3. The next
stand had the ringed planet at the base. The ringed planet in the globe inside
the house is green. Open the dome and click on the circles to place the green
at the foreground.
4. The last
stand has the largest planet. The largest planet inside the house is blue.
Open the dome and turn to place the blue circle at the foreground.
B:
Enter the central area and turn the small stands to have the appropriate
colors facing the dome stands. The correct colors are the ones the planets
inside the house changed to when the lamp was lit.
Left to
right:
1. Turn the
leftmost small stand to have the green oval facing the smallest planet dome
stand.
2. Turn the
next small stand to have the yellow oval face the medium planet dome
stand.
3. Turn the
next small stand to have the blue oval face the ringed planet dome stand.
4. Turn the
rightmost small planet to have the red oval face the largest planet dome
stand.
Watch the cutscene of lights shooting out and open the cover on the floor.
The navigational map automatically goes in inventory.
Exit the structure and take the first side path to the right. Go forward 4xs
over the bridge and turn right. Climb up to the bell structure.
Bell Structure: There is a pot stand in front of
each of 3 pillars. Each pillar has a glyph. Click each pot and see a glyph comes
out. Screen captures are shown later. Exit the bell structure and turn right at
the main bridge path. Go forward to the end.
3 Pointed Roof Structures: The path splits to 3 stairs
each ending at a colored pointed roof structure. To the right of these
pointed roof structures is another structure with 3 antennae. At the left is a
blue globe.
This is explained in the
drawings in the fifth drawing in the journal. Climb each steps, press the blue
button on the stand to open the door. Click twice on each small pink square
that is similar to the stencil glyphs taken at the house until a cutscene of
lights are activated in the structure with antennae.
The comma stencil at the
left blue roofed structure produced sparks at the left antenna.
The V stencil at the
middle red roofed structure produced sparks at the middle antenna.
The J stencil at the
right green roofed structure produced sparks at the right antenna.
See a cutscene of the antennae
folding down and opening of a domed roof.
Go to the blue globe at the
bottom of the steps. Look close, click on the wired top to raise it and take
the Zodiac triangle.
Go back to the main path via the bridge and turn right on the main path. Go
forward once and turn right. Go forward until the split of the path.
Green globe structure: Turn right to the green globe
structure. Look down and insert the lever on the round knob on the floor. Click
to turn the lever. These activates the green globe and in turn the opposite
structure. Take the lever from the knob on the floor. Go to the
opposite structure.
Cardinal points-Zodiac structure: This is explained
by the third drawing in the journal. Look down and use the lever on the round
knob on the floor. Click the lever to turn it. This activates the cardinal
points with zodiac signs puzzle.
Place the Zodiac triangle at the center. This opens the base of the zodiac
stand at the upstairs room in the house. It shows the South part of the
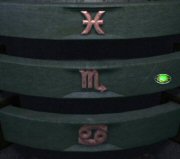
stand. Turn the Zodiac triangle to the south and note the Zodiac signs that
are pointed at by the Zodiac triangle.
Go back to the house since we collected the clues needed.
Zodiac Room: Go back to the contraption.
Opening the locked door
– The clue to this puzzle is seen on the 3 pointed roof puzzle.
Based on the color of the
pointed roofs – place the blue jewel on the left, the red jewel in the middle
and the green on the right.
Then insert the stencils on the
slots above the jewels: the comma stencil on the left above the blue jewel,
the V stencil above the middle red jewel and the J stencil above the right
green jewel.
Click on the recessed rods on
either side to close the machine.
See a light shoot out and hit
the black circle of the closed door. The black circular lock turns green (red
when done incorrectly).
Second floor of Zodiac room:
Upstairs wall glyphs
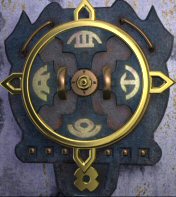
puzzle – This puzzle is explained by the second drawing in the
journal. Note the arrow pointing at the metal under the circle in the drawing
in the journal. The Glyph clues were shown by the puzzle at the Bell structure
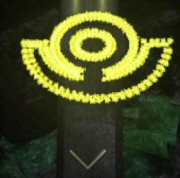
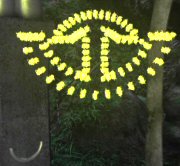
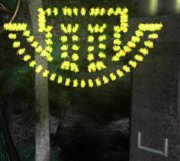
outside. Each smoky glyph corresponds to a shape on the pillar behind it.
Look close and note the notch
of each metal below the circle of each wall glyph. Rotate the circle to place
the glyph that corresponds to the notch of the metal below as shown by the
Bell structure’s smoky glyphs and posts.
Stairs Glyphs
Middle Glyphs
Right
Glyphs
When done correctly, a cutscene
of the small dome at the ceiling going down to the central zodiac stand is
seen.
Zodiac stand
puzzle – The clues to this puzzle was seen at the Zodiac structure.
Look close at the slot left of
the S on the base of the stand. Insert the charger -charged up on the
slot. Place the navigational chart on the clip of the dome that lowered down.
Look close at the Zodiac sign at the base and enter the Zodiac signs pointed
at by the Zodiac triangle at the Zodiac structure.
Click once on the right side of
the zodiac sign of the top ring, once on the left side of the zodiac sign of
the middle ring OR click 3xs on the left side of the zodiac sign of the
top ring, 3xs on the right side of the zodiac sign of the middle ring. Either
way, see a cutscene of the dome closing down and the navigational map will be
activated. Take the activated navigational map.
Go down the stairs to the door with the now green lock on the opened wall.
Enter and go through the tunnel.
Belik arrives to inform Umang that there is an uprising within the Clan.
Durad and his warriors want the control of the Sacred Rings and the
Tetrahedron. Arakon manages to retrieve the Sacred Ring from the keep. He wants
Umang to take the Sacred Ring, go to parallel universe, find Grifit and
get the Tetrahedron. Just be sure that the Sacred Rings and the Tetrahedron do
not fall into Durad’s hands.
Go forward to the ship. Insert the activated navigational map on the holder.
Click the lever on the right side of the deck. Watch the ship fly out of the
opening of the dome and arrive at another world.
Dragast
The airship lands on a snowy mountainous place connected by bridges. Exit the
ship and walk to the main bridge path. Turn left and enter the door of the tower
the airship is attached on. Talk to the man working on a jigsaw puzzle. He says
to talk to Armagast and find the tram which will lead to Armagast’s office. Exit
the tower and go to the end of the bridge and see a control stand on the
left.
Control stand switch: Not much information yet to do
the puzzle. Go back to the man in the tower and talk to him again. The diagram
is behind the door. Close the door by clicking on the handle and see red, blue
and green icons. The drawing of the door icons is entered in the journal. Talk
to the man again and he asks that if you see pieces of his puzzle to bring it to
him. Go back to the switch stand again at the end of the bridge.
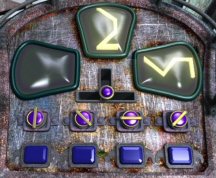
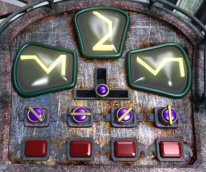
Bridge Switch panel
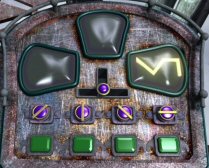
puzzle – Look close and see 4 round buttons and 4 square buttons. Turning
the buttons changes the color of the square buttons. There’s a handle at the
bottom of the screen.
Based on the door
drawing: The bridge will go left using the red colors,
middle using the blue colors and go right using green colors. The round
buttons pressed should be based on the sequence of the lines drawn on the door
viewed bottom to top line. Red = ― / │ Blue
= ― / │
Green = / │―
To turn the bridge to the
right: Press the round buttons until all the square
buttons are green. Click the handle at bottom of the screen and see it get
recessed. Press the round buttons in the sequence shown by the drawing
/ │― , from left to right buttons:
1324. If done correctly, see the lines formed. Click on the right pad and the
bridge will turn right.
Go forward to the top of the mountain. A left bridge goes to a closed
building. Go forward to the other side of the mountain to the tram. Sit on the
tram and automatically reach the other mountain. Turn left and go down the
stairs. Enter the door and talk to Armagast. Grifit is not there but Armagast
gives access to Dragast so that Umang can obtain what he seeks (the
tetrahedron). The journal shimmers. Look at journal to see 5 new drawings for
this world.
Go back and ride the tram, climb the steps to the bridge going to the right.
In front of the bridge is a large door similar to the fifth new drawing in the
journal. Cross the bridge and enter the now accessible building.
Temple: Enter and see statues planking the hallway.
The statue at the end of the hall is seen at the fourth new drawing in the
journal. To the left of the statue is a lever. A drawing on the left wall is
similar to the lines of the 5 lined circles at the center of the room.
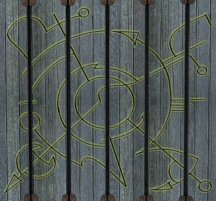
First circle puzzle –
The object of the puzzle is to arrange the lines to be similar to the drawing
on the left wall.
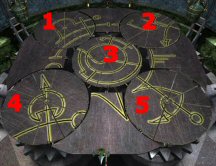
Go to the central 5 lined
circle puzzle. Save game here! Note that when the central circle is
clicked on, the 4 outside circles rotate. If you click on one outside circle,
it becomes inactive and will not turn when the central circle is activated.
There are lines in between the circles that can guide you as to which circles
need to be turned or not.
Go back to a saved game prior
to clicking on any circle. If the circles are numbered from top to bottom and
going left to right – 1 to 5 (with the central one as 3): Click on 1 3 5 3 3 2
3 1 3. If done correctly see the lever gets activated.
Go to the lever and click to pull the handle down. This turns the statue and
a manhole on its base is brought to the front. Go down the manhole and forward
to the cell door.
Cell: The man says he is trapped in the cell and
wants Umang to open the door.
Cell door puzzle –
Studying the puzzle, note that the middle row’s metal shape does not
conform to the shape of the top and bottom row. The 3 circles on the middle
row should be moved to the right end and the 3 triangles on the left end.
Here’s one solution – Numbering
the holes in the middle row from L-R: 1-4 on left end, 5 (middle), 6 (middle
bottom), 7-10 on the right end.
The directions stated below are
from left to right starting from top row. Click on first number to go to the
next number. Click on each hole to move one hole at a time.
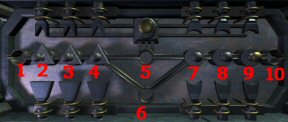
| 2 to 1 | 3 to 2 | 4 to 6 | 7 to 3 | 8 to 4 |
| 9 to 5 | 6 to 10 | 4 to 9 | 3 to 8 | 2 to 7 |
| 1 to 6 | 5 to 2 | 7 to 3 | 8 to 4 | 9 to 5 |
| 6 to 8 | 5 to 7 | 4 to 5 | 3 to 6 | 5 to 3 |
| 7 to 4 | 6 to 7 | 10 to 9 | Press gold button. | |
Meet Arkampus who gives Umang a
deal for not telling Armagast about him being there. He shows the key to a
secret passage out of the hall. An unknown amulet is in inventory.
Second Circle puzzle –
Arkampus shows a new pattern on the lined circles on the wall. The central
puzzle turns. The solution is exactly similar to the first puzzle. If the
circles are numbered from top to bottom and going left to right – 1 to 5 (with
the central one as 3): Click on 1 3 5 3 3 2 3 1 3. If done correctly see the
lever gets activated.
Pull the lever and see the statue
turn. Pull the lever again and see the statue lean backwards to have access to
the passage above the statue just like the right statue in the fourth new
drawing in the journal. Click on ladder and then up to a lit hallway. At the end
are 3 mirrors and a desk planking the hallway. Look close at the desk and click
on the book on the right to reveal 2 pieces of jigsaw puzzles. Take the
puzzle pieces. Go to the other side of the hall and take the left
mirror. Climb the ladder at end of the hallway and come out on the
rooftop of the temple. See a tumbler pillar with 5 glyphs. Not enough
information to do things here.
Go back down the ladder, down to the temple, exit the temple, go across the
bridge and take the right path to go back to the rotating bridge.
Bridge Switch panel: Now, we need to set the switch
panel to the blue color and lines ―
/ │ .
To turn the bridge to the middle – Press the round
buttons until all the square buttons are blue. Click the handle at bottom of
the screen and see it get recessed. Press the round buttons in the sequence
shown by the drawing ― /
│ , from left to right buttons: 3412. If done correctly,
see the lines formed. Click on the top pad and the bridge will turn to the
middle.
Go to the tower. Give the man the puzzle pieces. The journal has the drawing
of the finished puzzle. Now, those drawing looks like the one on the temple roof
top. Let’s go back to the temple rooftop. Click on the right lined pad on the
switch panel to turn the bridge to the right.
Temple Rooftop: Go behind the round tumbler with
glyphs and place the mirror to lean on curved metal rods. See the other side of
the tumbler. Turn the tumbler so that the glyphs seen on the mirror is the same
as the jigsaw puzzle. If done correctly, watch the petal like roof open up,
clamps are removed and the lever in the temple goes down.
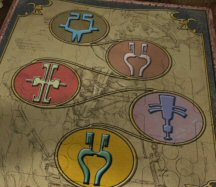
Go back down to the temple and pull the lever. See the statue straighten up.
Pull the lever again and see the statue rise up to show a grilled door at the
back wall. Go through the grilled door. Climb the ladder to another skyline
platform.
See an ornate tower on the other side. The bridge spanning here and there is
lowered. Go to the contraption on the right. See 4 circles that are reminiscent
of the third new drawings in the journal.
Raising the Bridge puzzle: Note that the red
arrows on the circles have distinct shapes. The top circle of the first panel
can not be rotated. The object of the puzzle is to arrange the bottom arrow of
top circle to be the mirror copy of the top red arrow of the bottom circle.
Note that the last circle on previous panel should be the same as the start of
the next panel. After the first set is done, click on the left rim of the
wheel on top to turn it clockwise and see the next continuing set of 4
circles. There are 4 sets. If done correctly the bridge rises
automatically.
First panel
Second Panel
Third Panel
Fourth
Panel
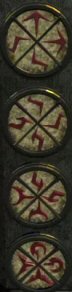
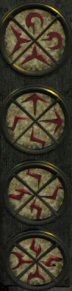
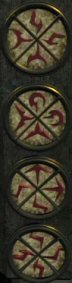
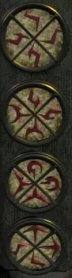
Cross the bridge to the ornate tower. Take the Tetrahedron of Dragast.
Go back to Armagast via the tram. Show the Tetrahedron to Armagast and he
tells Umang to combine the rings with the tetrahedron. To do this, you have to
activate the lift.
Activate the
lift:
1. Look around the room and
note icons on the floor of the recessed wall across Armagast. Go to the
machine left of Armagast’s desk. Use the oval button at the center to get the
icons seen on the floor. Press the central oval button 2xs.
2. Click on the 4 sets of
sliders to show wires with heads similar to the icons in the background. From
left to right: click on 4th slider, 2nd slider, 3rd slider and 3rd slider.
3. Go to the slider across
Armagast. Pull down the balls to the position shown by the sliders in the
other machine. From left to right: 4th position, 2nd position, third position
and third position.
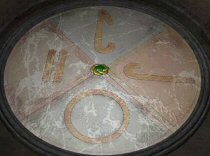
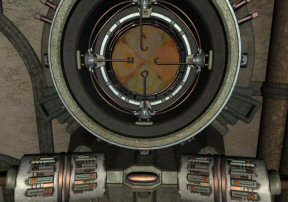
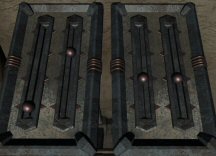
If done correctly, the lift comes
down. Climb on the lift to reach a secret room with more icons on the walls. Get
on the lift again by clicking the up arrow and reach another floor above. Place
the tetrahedron on the center of the stand. See the pillars in the icon room go
down.
Go down and talk to Armagast. He gives the hint to the icon room. The
icons show up on the floor and it is recorded in the journal. Memorize, memorize – that was too fast! Go back
up to the icon room via the lift.
Icon Room: Enter and study the icons. There
are 3 columns and each has 3 tiers of icons. Each column has 3 sides, so each
tier has 3 icons. Study the drawing on the journal and compare the icons on the
posts. The journal drawing 3 sets of icons and each set also shows 3 icons for
each tier.
The object of the puzzle is to arrange the icons on the columns to be
similar to the first and last icons in each segment in the drawing.
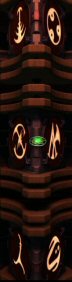
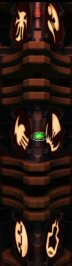
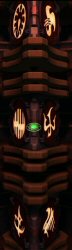
When completed, see energy go across the room and a ball of light enters the
Tetrahedron. Go to the lift and ride up. Take the Sphere within the
Tetrahedron. Armagast tells you to go to the dungeon entrance at the center
of Dragast. There you can combine the Tetrahedron with the Sacred Rings; without
the rings otherwise the theta shell will not be able to leave Dragast. Leave
room and ride the tram. Go to the turning bridge.
Bridge Switch
panel: Now, we need to set the switch panel to red
color and lines ― / │.
To turn the bridge to the
left – Press the round buttons until all the square buttons are red. Click
the handle at bottom of the screen and see it get recessed. Press the round
buttons in the sequence shown by the drawing ― / │, from left to right buttons: 2134. If done
correctly, see the lines formed. Click on the left pad and the bridge will
turn to the left.
Go forward and enter the building. Go forward until a round metal door. Pass
through and take the path to the right. The left path leads to a lift that is
not activated yet. Climb up the ladder and see a round contraption that has
pipes leading to the lift down below on the left side. The setup in this cavern
is the one depicted in the first new drawing in the journal.
Activating the lift –
1. Press the button on the
right of the contraption. See steam come out.
2. Standing close to the left
side of the contraption, pull the lever that is in front. See the clamps
rotate and steam come out.
3. Press the top of the
contraption and see the small gears rotate.
4. Press the button on the
right of the contraption again and see the view change but nothing
happens.
5. Click on the lever at left
of machine and see it turn to the other pipe.
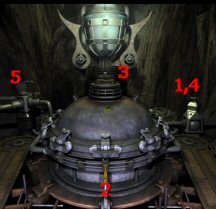
Go down to the lift at the left path. Click on the lever on the floor and the
lift goes down. Enter a cave. The waterwheel is depicted in the second new
drawing in the journal.
Activate the waterwheel: Follow the pipe
coming out left of the entrance while facing the entrance. Turn the faucet, pass
the 2 tanks, turn the next faucet and then click on the lever on the generator.
See the waterwheel in the background start to turn. Go closer to the left and
see the other drawn setup at the bottom of the cavern.
Go back up via the lift. Exit the cave through the round metal door. Go
forward and turn right. Go forward and check the machine setup with a raised
platform on the right. It is the setup shown on the fifth new drawing in the
journal. Pull the lever on the floor left of the raised platform. This
machine setup on the main raised platform is not activated.
Battery Room: Go forward pass the blacksmith to the end
of the tunnel. This is what we saw from above. Go forward to the 3 round battery
stands on the left. The left stand does not have a battery. Pull the lever on
the ground that is in front of the round battery stands. A mechanic comes out
and tells you – not enough contact on the batteries, to go to the blacksmith and
get a new one. A broken battery will be in inventory.
Go back to the tunnel and give the broken battery to the blacksmith. Take a
new battery from the bottom shelf. Go back to the battery stands.
Battery stand puzzle –
The object of the puzzle is to activate the battery stands by lowering the lid
of each stand. The lid lowers down when the exact turn is done on each stand
and the battery is in the correct position.
The hint for this puzzle is
seen on the 3 rows of 3 cylinders in a row at the back wall of this cavern.
Study the cylinders and note that they gray cylinders rotates but have a blank
circle. The stationary cylinders have red segments on the circle.
The position of the stationary
cylinder denotes which stand it gives the hint for: the top left cylinder is
for the left battery stand, the middle second row cylinder is for the middle
battery stand and the bottom right cylinder is for the right cylinder.
The circle denotes how many
quarter turn the stand will make. A complete white does not turn. So a quarter
of red in the circle means that the stand turns one quarter, half red means
half turn (2 movements) and three fourths red means the stand will move 3/4ths
of a circle or 3 times.
1. Place the new battery on the
left stand under the empty slot.
2. Check the hint cylinders as
to where to position the middle and right batteries so that it will fit the
slot on the lid when the turn ends.
1/4 red
means position the battery to be one hole away from the open slot on the
lid.
1/2 red
means position the battery to be two holes away from the open slot on the
lid.
3/4 red
means position the battery to be three holes away from the open slot on the
lid.
3. Pull the lever and see if
the correct position of the batteries was done. If correct, the lid closes.
4. This is a random puzzle. So
if it was not done correctly, a new set of hints are shown on the cylinders in
the back wall.
If done correctly see that the
inactive raised platform passed by earlier is now activated. Go there through
the tunnel.
Raised Platform: Pull the lever found on the
floor at left before the raised platform. The grill rises, go forward to the
center of the raised platform. Click on the central hole to raise a handle.
Click on the handle and see the opening of the round door at the other
mountain.
Click on the lever to lower the little platform. Go to that opened door that
is in front of the bridge to go the temple.
Joining the Sacred Rings with the Tetrahedron – Enter the opened door.
Click on the handle to go down. Turn around and go to the end of the ramp. Look
up and place the Tetrahedron on the round bar. Place the Sacred Ring on the
lowered pink circular bar. Watch the joining of the Tetrahedron and the Sacred
Ring to form Tetrahedron within the Rings.
Go to the airship. Click on the lever and fly away to Na-Tiexu.
Na-Tiexu
Save Game here! Exit the airship and enter the door of the Mirror house. The
house has 4 mirrors in each corner, a backdoor and a table with tuning forks of
different colors. The clue for the tuning fork puzzle is behind the table when
you first enter the room.
View this guide raw, exactly as the archive holds it