Art of Murder: FBI Confidential
Art
of Murder: FBI Confidential
By
City Interactive
Walkthrough by
MaGtRo May 2008
Gameplay:
This is a third person point and click game.
At the start of the
game, a game setting frame is seen. It has display, sound and about (information
about the engine of the game). The display has display
device, colors (16 or 32 bit) and antialiasing selections. The sound selection
is for the sound device to be used.
The main menu has Start,
Load, Game Settings, Credits and Quit Game. The Game Settings has volume control
for music, fx, dialogues and master. Later the in-game menu has Resume and Save
game.
ESC key skips intro,
cutscenes and also accesses the main menu.
The main game screen has
the PDA, Hints (magnifying lens icon) and Menu (briefcase icon). Labels of items
are seen on top of the game screen.
The PDA has the phone,
notepad, camera, photos and blue ledger of phone numbers. The Hints feature shows the exits or change screen area in the
game screen.
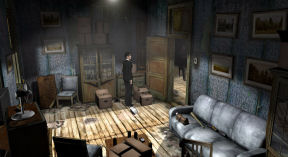
Nicole Bonnet is a fresh
graduate from the FBI Academy. She introduces herself to her new partner, James
Scott while doing a routine surveillance in an abandoned building. Returning from
being sent out to get coffee, James was shot. His last words to Nicole are
Take the message to Nick. A red car is seen leaving the scene.
Note: Double
click makes Nicole run. Right click gives information about items seen.
Use the hints icon to find all the exits and other hotspots.
Day
1
FBI
New York branch, Downtown
Chief Chaser’s office:
Talk to Leon Chaser, the chief. Learn about Nick Romsky, Nicole’s new partner.Front Office:
Exit the office and
Nicole talks to Ruth, the secretary at the Front Office.Nicole’s desk: Go to bottom
right and to the first desk to type the report. Use the keyboard and learn
that you need to consult with Nick first.Find Nick: Right click on the
other desks and learn that the middle desk is James’, the far one is Nick’s
and the one on the left is for a new recruit.Cork board:
Look close at the cork board and see Nick’s phone number; as well as Ruth
and Chaser’s.PDA:
Click on the PDA and click on the blue ledger icon at the bottom. See a
listing of phone numbers. Click on Nick’s number and automatically dial
the number. No one answers. Click on button at
right of PDA screen to close it.Talk to Ruth at the
front office and she e-mails the new phone number of Nick.Go back to Nicole’s
desk and see the e-mail with Nick’s new number. Use the PDA and then blue
ledger icon. Click on Nick’s new number.After Nicole’s message
on Nick’s answering machine, see an SMS-message from Nick.Report:
Nicole’s desk:
To make the report, click on the keyboard of Nicole’s computer. Click on the
report on the screen and see that the printer is out of paper.Storage room:
Go to the storage room at end of the hall. Check all the items there for
future use but it does not have printer paper.Mezzanine:
Exit the door on the left and look around. Take a ream of
printer paper from the box at bottom left.Go back to the
office which is the door on the left.Printer:
Go back to Ruth’s desk and look close at the printer on the left.Click on the bottom
tray-paper feeder to open it. Take the ream of printer paper in
inventory and place it on the tray.Close the tray and
the report is automatically printed. Take report.Chaser’s office:
Go to Chaser’s office. Give Chaser the report.He gives a new case. It is about ritual killing of 3 men:
Henry Fairbanks, Mark Chestum and Andrew Haig. The drawing of a knife used in the
murders is in inventory.Check the notebook
in the PDA for the dialogues-information said to Nicole by various
characters.Talk to Chaser several time
until he is finished.Exit the FBI office
through the mezzanine door. Go down the stairs and out the door to the street.Go to the black car at
right and automatically be inside. Click on the picture of the Museum of Pre
Columbian Art.
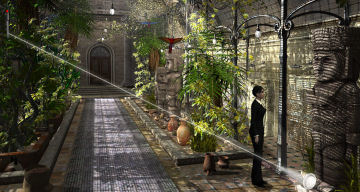
Museum of Pre Columbian Art
Enter the
museum. Talk to the Porter.
Exhibition room: Go through the Exhibition room. Talk to
Director Warren about sacrificial knives.Look around
at the different displays especially the one behind Warren. Check the golden
figurines on the right display.Go to the
mummy at the back wall. Take the fire extinguisher from the floor.Archives: Go the bottom
screen and enter the room on the left.Look around;
see the magnifying lens on the table and records in the bookcase. Exit the
room.Orangery:
Enter the door at right and be at the orangery.Look around
and note potting soil, vases and statue. Exit the room.Porter: Exit out to
the front area of the museum and talk to the porter several times. Find out that
he just packed things in crates for delivery to South America.He gives
Warren’s phone number. Use the PDA and then the blue ledger icon. Click on Warren’s
number. Talk to porter again.Storage
room: Go down to the Storage room. After finding out that
the lights are out, talk to the porter again.Go back down
to the storage room again.Light
switch casing: This puzzle is random.Open the light switch cabinet. See that there are
5 switches. When the switches are flipped up they are blue and when flipped
down they are red colored.The aim of the puzzle is to find the right
combination to have all 5 lights on: 2 on each side and one in the back of
the room.Nicole will not walk to that area if there is no
light on.Flip on
the switches and see that some lights are on and some off. Keep on making
variation on the flipped up and flipped down until all the 5 lights are on.Search the
room: Go to the metal flight case on the middle shelf on
the left side of the room.Open-click
the metal flight case in inventory and get an X-ray scanner.Go to top
left of room and take the dinghy from the floor beside the crate.Crates:
Go to top back part of the room. Check and use the X-ray scanner on the crates at top of the screen. Click
the ‘off’ button to exit
the scanner. No knives are seen on the small crate and the big one on top of
another crate.Right click on screen and see a gap
between the crates that was X-rayed scanned. Place the
dinghy in the gap between the small crate and the one behind it.Use the
fire extinguisher on the inserted rubber dinghy. This exposed the crate
behind the moved crate.Use the
X-ray scanner on the exposed crate. See that the knives are in pairs but one
similar to the sketch is missing.Return
the Metal case: Go back to the front part of the room.
In inventory, place the X-ray scanner back in the metal case. Place the
metal case back on the middle shelf on the left.Go back up to
the porter and talk to him. He shows the paperwork. Learn that the inventory
states 2 ritual knives – yes; one is missing.Exit the
museum. Go towards the car and get an SMS-message from Nick. Learn that
another murder happened; this time at Staten Island. It is John Rudolph, a
stockbroker.
Stockbroker’s Villa
Go to the car
and click on the picture of the stockbroker’s villa.Talk to Jeff
Macgregor, the policeman and learn about the murder. Enter the house.Table:
Go to the coffee table at center of room. Check the items on the coffee table.
See a folded newspaper that you can not pick up.Click on right chair and Nicole moves it closer.
Pull back
and take the business card that was under the chair. Right click the card in
inventory and learn that it is Allan Branford’s business card. His phone
number is now in the PDA.Annex:
Go to the hallway left of the door. Check the photos on the wall. Note a
graduation picture at the bottom.Pull back
and take the umbrella on the coat rack left of the door.Pool
table: Go back to the main door. Go to the
right where the pool table is located.Right click
the pool of blood on the floor.Look close
at the pool table. Take the #2 ball from the ball slot at base of
table.Drop the #2
ball on each of the pool table’s pocket. Find out that one of them (4th try)
is blocked. The location of the blockage is random.In
inventory, click on the umbrella and get a spoke-wire. Use the wire on
the blocked pocket.Take the
head of a Pre-Columbian figurine.Exit the house
and automatically end the day. Go to the car.Nicole had a
nightmare.
Day
2
FBI
New York branch, Downtown
Enter the building and
try to enter the Evidence deposit room left of the reception desk.Nicole does not have a
card.Front Office: Go upstairs and enter
the office. See Nick’s footprints on the floor.Talk to Ruth at bottom screen. Take the blue magnetic key card from her
desk. Talk to Ruth again.Enter Chaser’s room
and report to him twice or completely.Check Nicole’s desk
and take the origami boat. Click on the origami in inventory and see
the city plan with the place where James was killed and 4:30.Evidence deposit
room: Exit the office and go downstairs.Use the magnetic key
card on the door of the Evidence room.Note and check James’
box at far second to bottom shelf.Check the tailor’s box
at closer second to bottom shelf.Place the head of the
figurine on top shelf.Exit the room.
Use the PDA and call
Branford but no answer. Call Warren and make an appointment to see him. Branford
is in the museum now.
Museum
of Pre Columbian Art
Exit the building and go
to the black car. Click on museum photo.Exhibition room:
Talk to Warren about the sacrificial knives several times – completely. The
crates are already on the way to Bogotá.Orangery:
Enter the door on the right.Talk to Allan Branford completely. Nicole expertly checked the alibi of both Branford and Warren.
Allan says Huaquero, a word
that means grave robber.Exhibition room:
Go back to Exhibition room.Look close at the golden
figurines in front of Warren. See that one is missing a head.Talk to Warren to get
the figurine. He wants paper works-permission.Exit the museum and
enter the black car.
FBI
New York branch, Downtown
Enter the building and
go upstairs.Front Office:
Go and automatically talk to Ruth.
Go to the storage room
at back of the room with the desks. Take a white blank form from the
shelf.Give the blank form to
Ruth.Enter the office and
talk to the chief.Exit and take the
completed form from the desk.Exit the building and go
to the black car. Click on museum photo.
Museum
of Pre Columbian Art
Exhibition room:
Give the completed form to Warren.Talk to the porter. Go
back to Exhibition Hall.Look close at the
golden figurine case. Open the display case and take the headless figurine. The light blinks
and makes a sound.Talk to the porter
again. Now he needs to guard the museum all night. The display has to
have weight so that the alarm stops.Secure the golden
figurine display: This puzzle is random.Go to the Orangery. Go to the
vases on
the floor in front of the statue. Take a vase.Go to the left and
get some potting soil.Go back to the
display. Place the vase in the display case.Check if the red
light stops blinking or making a sound and turns green.If it doesn’t stop
making a sound or still blinks, take the pot out again and add the soil to
the vase.Place the vase with
soil in the display case again.Take more and add soil to the pot or get a
new
pot until the light turns green.You empty soil by clicking the vase on the sack of
potting soil. Replace the vase by clicking the empty vase on the floor in
front of the statue.Exit the museum and go
back to the car.It is time to meet Nick at the abandoned house. Click
on picture of abandoned house.
Abandoned house:
Enter the building.
Middle floor, far left
apartment: Go left to the hallway and enter the far left
apartment.WC:
Enter the WC (toilet). Take the plug from the floor left of the sink.Bedroom:
Enter the bedroom on the left. Nicole mentions the hot cigarette. Take the wire
brush on the table.Middle floor, far
right Kitchen: Go back to the hallway and enter
the far right room.Take the whiskey
inside the open refrigerator.Look close at the
counter left of the refrigerator. See a calendar that fell off the wall. Check the sink.Hallway:
Go down the hallway and back to the stairs. Go to the hallway right of the stairs.Number 9:
Enter the apartment at right. Enter the other room.See Nicole surprise a
drunk, Joel Tatum.Talk to Tatum
completely. Find
out that Nick left him here to give something to Nicole. He needs some body
fluids.Get Nick’s message: Give the whiskey
bottle to Tatum. He doesn’t like bourbon.Pick up the empty
bottle with chipped neck under the table on the left.Exit the apartment and
go back to the kitchen.Look close at the
sink. Use the plug on the sink. Place the empty bottle on the plugged sink.Turn on the faucet and
take the whiskey label.Use the whiskey label
on the full whiskey bottle.Go back to Tatum at #9. Give
him the relabeled whiskey bottle. Tatum gives an
origami bird.Click the origami bird in inventory. Nicole flattened
the paper and see James – mobile is written on it.Click on doorway and
Nicole talks to Tatum again. Tatum leaves.Take the blown fuse
on the couch. Exit the apartment 9.Upstairs:
Try to climb the stairs to go up. It is dark up there.Get light on stairs: Go right
of stairs. Look close at the
fuse box on the wall across the stairs.In inventory, click the wire brush taken from the bedroom
and get a handful of
bristle-wires.Use the bristles on
the fuse. Use the repaired fuse on the bottom empty slot second from right in
the fuse box. It blows.Go to the kitchen and look close at the counter left of the fridge.
See that the calendar
was burned off. Unplug the destroyed cord off the wall using the flattened
origami paper as
protection.Go back to the fuse
box. Take the blown fuse.In inventory, use the bristles on the blown fuse again. Use the repaired
fuse on the slot again. Now it didn’t blow.Landing:
Go back to the stairs and climb up.Mobile phone: At the landing, look close at the floor in
front of the radiator. Right click on screen to see the area with hole.Look close at hole with a mobile phone in it.
Use the wire brush on
the board with hole. The board is lifted.Take the damaged mobile phone and then the
wire brush.Exit the building and
go back to FBI building.
FBI
New York branch, Downtown
Enter the building and
then the Evidence deposit room left of the reception desk.Evidence deposit
room: Enter the Evidence room using the key card.The golden head is
missing. Place the headless figurine on deposit shelf.Look at James’ box and
take James’ ID. Look at the tailor’s box
and take scissors.Front Office:
Go upstairs and enter the office.Talk to Ruth and get the
result of the test on the golden head. Ooops!Storage room: Look for gloves
to prevent mistakes. Go to storage room at
back of the desk room.Take battery,
plastic bag and lamp from left shelf. Take luminol and
gloves from right shelf.Exit the office.
Laboratory:
Enter the door at far end of mezzanine. Look around. Take swabs in jar
from the table closest to the door.Mezzanine:
Exit to the mezzanine.Look at the hanging
wires on the left beam of the ceiling. Too high.Take the ladder at
bottom left. Click on the hanging wires. Use the scissors to cut some cables.Front Office:
Go back to the office.Fix James’ mobile
phone: Look close at Nicole’s desk.Place the cables at
bottom left of the desk (left of the keyboard).Add battery to cable.
Then use James’ mobile on the cable-battery setup.Pin number: It asks for a pin
number. Talk to Ruth. James’ birthday is May 24, 1956.Go back and look close
at the damaged mobile on Nicole’s desk.Enter the numbers by
pressing the keys. Use the blue top right button to backspace-clear errors.Press the blue Okay
button at the center when done.The permutation of
James’ birthdate is not the pin number.Use clean swab on
James’ ID and read it to get XFAD 8673.Enter 8673 on the
damaged mobile and then press the center blue button (Okay).Clear a wrong entry by clicking 4 times on the
button right of the blue button. Thanks, sierramindy.James’ data:
Click on the mobile’s screen and it downloads a photo. The mobile blows.Pull back and see a
fuzzy picture on the computer.Click on the picture
on the computer and Nicole summarizes the information she deduced about
Huaquero.Exit the building and
go to the car. Click on the thug’s hideout’s picture.
Thug’s hideout:
Go to the bottom
left screen and check the door. See that you can not enter that way.Enter the Thug’s
hideout: Go back to right screen and enter the alley at top
left.See a truck. Go to the
truck and pick up the crowbar by the rear left wheel.Look inside the truck
and release the handbrake. See the truck move down the alley.See a fire escape
ladder above it.Use the crowbar on the
fire escape ladder. Watch Nicole climb up.At the landing, click
on the left window and hear the thugs talk. They are looking for a key. Learn
that the old knife is in a drawer. Huaquero leaves.Look close at the air
conditioner. Use the crowbar on the air conditioner fan.The remaining thug
opens the window. Enter the apartment.Get the thug out of
the way: See one man sitting in the next room.Look around the room
and see a woman’s bag on the couch at right side of the door.Nicole will not go to
the bag or she might be seen. Move Nicole left of
the boxes closest to the door.
Click on the bag on
the couch. Click the PDA and then click the camera.Click the photo icon of the PDA and see the picture
of the bag.There is a paper with
numbers on it. The numbers are inverted and are randomly generated.Use the phone icon of
the PDA and dial the number seen on the paper. Click on left arrow to
backspace and erase an error. Then when numbers are entered, click on the
phone button.Hear the phone ring.
The thug leaves the room.Enter the room and
look around. Check the wardrobe and click on the back panel.Secret room:
It opens to a secret room. Look around.Check The Cold of
Morning picture on the wall and see a jammed hidden lever.Check the middle
drawer of the dresser and see the sacrificial knife.Try to take it but
gets hit on the head.Untie Nicole from
the chair: Watch as Nicole tied up on a chair is
interrogated by the thugs.After diverting
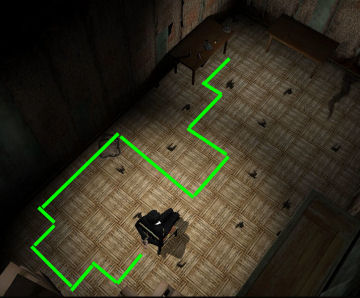
Huaquero to leave the room, see Nicole at center of the room. There’s a table
at top left that might help her.This is a timed
puzzle.Move Nicole one tile
at a time. Find out that if she lands on a creaky tile that the thug hears it
and warns her.After 3 warnings, the
thug hits her. Saved game here.Move Nicole as shown:
2 down, 1 left, 1 down, 2 left, 1 up, 1 left, 4 up, 4 right, 2 up 2 left, 2
up, 1 left and 2 up.Watch Nicole untie
herself.
Knife:
Enter the wardrobe. Look at the open drawer with the sacrificial knife.Use luminol on the
knife. Use the UV lamp on the luminol sprayed knife. Click the gloves on the
knife. See the knife in plastic bag.Trap door:
Lift the top left corner of the rug on the floor. See a trap door. Try to
open it.Click again on The
Cold of Morning picture on the wall and see a jammed hidden lever. Click on
the lever again now that the trap door is tried and see it move to the right.Try the trap door
again and see it opened. Go down.See the thug try to
follow but goes back up.Shop:
Look around.Door: Check the door and
see that it is locked. Check the lever on the right and see that it
doesn’t hold the blind
up.Key box:
Look left and see a key box. The key door is opened but cannot be pulled.Go to the right and
take the cherry can at bottom right of the screen (on the shelf). Open it and
take a coin.Close the can and place the tin can back.
Look close at key box
and use coin on the door. Take a key and get all the keys.Open the door: Try
different keys on the lock. The one that worked for me is the first one on the
left.Open the door and see that the blind is still down
and that lever doesn’t hold it up.Look close at the
panel above the lever right of the door.Use coin on the 4
screws to remove them. Click on the panel and it is removed to show the gear mechanism.Look at the ratchet at bottom left. See that the
ratchet holding the big gear is broken.Use the different keys on the bottom left ratchet to
see which one will stop-hold the big gear. The one that worked
for me is the fourth key from left.Use the lever and the
blind rises.Uh oh! See the thug waiting. Yay! The blind falls down and hits
the thug unconscious.Take the gun
beside the thug.Go right and Nicole
runs to the stakeout abandoned building.Watch as Nicole warns
the mysterious Nick and sees Huaquero handcuffed to the sink.Chaser interrogates
Huaquero. Ray? Chaser covers the mike and whispers something to Huaquero.
Day
3
FBI
New York branch, Downtown
Front Office:
Ruth talks to Nicole.Chief Chaser’s office:
Talk to Chaser. He wants more proof.Laboratory:
Exit the office and go to the lab.Test the knife:
Take the blood test results of the victims from the small table left of
the door.Go to the work bench at
back of room and look close at the analyzer on the left. Take an empty vial.In inventory, take a
clean swab and click it on knife in plastic bag to get dirty swab.Place dirty swab (active
sample) inside the empty vial to get vial with swab.Use the vial with swab
on the blue screen of the sample testing equipment.Click the report of
234.56 mg on the blue screen and it should be sent to Nicole’s computer.Nicole’s desk:
Go back to the office and Nicole’s desk.Look at the monitor and
see blood tests results from Huaquero’s knife.Take the blood test
results of victims in inventory and click it on the monitor that showed blood
tests results from Huaquero’s knife. Henry Fairbanks blood is positive on the
knife.Ruth’s desk:
Go to bottom screen and Nicole reports to Chaser. Learn that Huaquero was killed trying to escape.
Hmmm…
Check Evidences:Check the
figurines:Go down to the
Evidence deposit room. Look at James’ box and take the key. Note the
poster inside the box.Take the head of
figurine from top shelf and then the headless figurine from bottom
shelf.In inventory combine
the head and body of the figurine. A click is heard and see a bag of white
powder.Go to the lab upstairs. Look close at the
analyzer at left.Take an empty test
vial. Use clean swab on white powder bag. Place the swab with sample in test
vial to get active sample.Go to right screen and
place the active sample vial on the sample analyzer. Find out that it is uncut
heroin.Check Huaquero’s
picture:Go to Nicole’s desk.
Click on the keyboard and see Huaquero’s fuzzy picture. Click on the keyboard
twice more to filter the picture. See a clear second picture of the storage
room of the museum.
Museum
of Pre Columbian Art
Exit the building and go
to the black car. Click on museum photo.Porter:
Automatically, Nicole talks to the porter. He does not allow Nicole to check
around the museum.Get the porter out of the way of the storage room:
Archives:
Enter the Exhibition Hall and enter the door on the left.Take the lab
magnifying glass from the table and the aluminum foil left of the
blue-yellow cabinet on the back wall.Exhibition Hall:
Go to the back part of the hall. Take the ceramic bowl from the right
wall.Orangery:
Note that hanging on top left of the screen is a temperature sensor.Click the
hints-magnifying lens icon and see a hotspot at base of statue.Place the lab magnifying
glass on the base of the statue first, then the bowl and lastly, use the aluminum foil on the bowl.The temperature sensor
is hit by a beam of light and blares an alarm.Exit the Orangery and
meet the porter. Hehehehe.
Storage room:
Go down to the storage room.Go to the back part of
the room. Nicole comments about the
post with a poster at middle of room.Look close at the poster
on that post. James was also interested in this poster.Use James’ key on the small
cabinet under the poster. It opens.Take a clean swab from
inventory and use it on the scale to get a sample.Pull back and get an SMS
from Nick. Subway workers found the next victim.
Subway
Tenement:
Go to the building (door) at back and between the 2 cars.Check the closed door of
the tenement. Take the wire of the doorbell hanging right of the door.181 St Subway:
Go to the subway station at right.Take the coke bottle
right of the subway door.Enter the subway. Talk
to the policeman twice. The victim is Joel Tatum, the drunk met at the abandoned
building.Go to bench at right
close to the wall. Take the lighter from the floor.Go to bottom screen.
Check the scaffolding at back wall.Take gas can and
the newspaper from the floor. See pliers on the scaffold and a grid on
the wall.Grid:
Look close at the grid on back wall.Use the coke bottle on
the screws. Take all 4 butterfly screws and then take the grid off.Try to take the empty champagne
bottle 1986 vintage but it is crawling with beasties insects.Click on newspaper in inventory and they get rolled
up. Use the rolled up newspaper with empty champagne bottle.Use gas can on empty lighter. Then use lighter on
newspaper on bottle.Take the champagne
bottle after the icky insects leave. See that there’s a diploma inside the
bottle.Use the wire on the
bottle with diploma to get rolled paper.Look at diploma to find
out that it is Joel Tatum’s diploma of Fine Art from New York University.Go back to the car.
Day
4
FBI
New York branch, Downtown
Laboratory:
Go to the lab at mezzanine.Take a test vial. Use
test vial on the sample from the museum.Go to right screen at
the sample analyzer. Use the vial with swab on analyzer. It is heroin.Office:
Go to the office and talk to Ruth. The Chief is not here. Ruth gives more info
about Chaser. He lost his wife just before transferring here. Talk to Ruth
again. All the victims graduated from NYU.
NYU
Library:
Go down to the car and go to the library. Enter the
library.Reading room:
Go down to the bottom of the screen. Enter the door at end of the hallway.Find the 1986 year book: Go
and talk to the librarian using a lens instead of eyeglasses in order to read.Go right of the librarian and look close at the
bookshelves left of the door.Take the book from the shelf.
Go back to the librarian and give her the book. She
says that the page is torn out.Find the microfilm for 1986 yearbook torn page:
Talk to the librarian and ask about microfilms.Talk to her again until she opens the drawers of the
Microfilm room.Exit the Reading Room and enter the Microfilm room.
Look at the cabinet and realize that it is impossible to find the microfilm.Go back to the librarian
and she gives the catalogue number – 01-044-86. Go back to the Microfilm room
and realize that the catalogue numbers on the cabinet is different from the
number given.Go back to the librarian
and ask about the different numbers. Learn about the new catalogue numbers. Go back to the
Microfilm
room and check all the drawers on the left side that starts: with
001-044-1986#.Open the drawer labeled 001-044-19867
(fourth from top at left side) and take microfilm. (Thanks, SirGraham!)Repair the microfilm reader: Go back to Reading room
and talk to the librarian about the found microfilm.Look close at microfilm
reader on table at far right.Take the reel on
the left. Use microfilm on the reel and it gets wound on the reel. (Thanks,
Rushes!)Place the microfilm
on reel back on the reader.Turn the switch at left to
on position. Click the fuzzy display on the reader and Nicole will say no lens.Talk to Librarian again
about the reader and lens.Take the glasses
on the table at bottom right. The librarian is using a magnifying lens because
she has no glasses.Give the glasses to
librarian. She lays the focal lens she was using on the counter. Take focal
lens.Go back to microfilm
reader. Place focal lens on the middle bottom part of the reader.Click on screen and
Nicole reads about the Amazon expedition.Click the next page and
learn that the leader Samuel Dickinson, Alice Dickinson, Noel Raches went missing
in the Peruvian jungle and presumed taken by the Indians. Find out that Warren took over the
expedition.Get a list
of the expedition members. Click the screen several times until Nicole
finishes her deduction. Hmm… Only William Warren and Allan Branford are known
to be alive.Talk to the librarian
and Nicole will call for a police car to drive her home.Exit the library and go to the car.
Museum
of Pre Columbian Art
Enter the building and the Exhibition Hall. Go to the
Archives.Talk to Warren. Show Warren the list of expedition
members.Talk to Warren again. Learn about Juan Alvarado, an
archeologist in Cuzco was a late member of the expedition. Huaquero was also a
part of the expedition.Exit the museum and see Allan Branford outside.
Talk to Branford. Learn that Alvarado was in town during the murders but has now
left for Cusco. Branford lost the picture of Alvarado’s house in Cusco.Nicole calls Ruth to check on Alvarado’s flight back
to Peru.Go back inside the museum. Go to the Archives and talk
to Warren several times. Learn about Huaquero and blackmail. Chaser knew all
about the problem with Huaquero.Go to the Orangery. Pick up the photo of
Alvarado’s house on the floor beside the sack of potting soil.Exit the Orangery and get a call from Ruth. Learn that
Alvarado is back in Peru. Nicole asks Ruth to book a flight to Cusco for Nick
and herself. Nicole calls and leaves a message for Nick.Exit the museum and go to the car.
FBI
New York branch, Downtown
Office:
Talk to Ruth. Everything arranged.Chaser: Enter Chaser’s office
and talk to him. Listen to Nicole’s psychological profile of the murderer.
Interesting.Talk to Chaser completely until he kicks Nicole out of
his office.Exit the office and talk to Ruth again completely.
Exit the building and see Nicole’s flight to Cusco.
Day 5
Cusco, Peru
Hotel: Talk to Diego
completely. Learn about Alvarado.Check the closet-hutch right of the stairs. Take the
camera.Go to the table right of the hutch. Take buckthorn
leaves and coca leaves.Exit through the entryway behind Diego.
Street: See an ATM machine on
the wall of the hotel.San Martin Plaza: Go right from the
hotel and be in front of Alvarado’s (archeologist) house.Try to knock or enter the house. Check the windows.
Hotel: Go back to the left
and enter the hotel.Talk to Diego again and he has decided to help get an
appointment with Alvarado. In return he wants a favor. He explained about the
loss of a rental car of one of his guest. Jose Santamaria, the rental car owner
took Diego’s Jeep as replacement. Diego wants Nicole to rent the jeep and park
it in the hotel; the rest he will take care himself.Exit the hotel.
ATM machine: Look close at
ATM machine.Use the credit card on the slot at right.
Press any number on the keypad and get the card
and money automatically.Car workshop: Go down to the
street at bottom screen and be at the workshop.Right click and look at the 62 Chevy Impala.
Talk to Jose. No jeep at the moment.
Find the jeep: Look around
and click on all the rusty cars.Check the bicycle. Click on the garage.
Go back to the hotel and talk to Diego. Learn that the
jeep is in the garage, for sure.Go back to the scrap yard. Talk to Jose again to ask
to get in the garage.Jose says that he keeps her sister’s photo equipment
in the garage.Talk to him again about having picture with him. Talk
again about wanting a tripod.Go to the garage and see the rusty jeep. Take the
tripod and the bearing on the ground left of the opened garage door.Picture taking: See Jose on
the Impala ready to have his picture taken.In inventory combine the tripod and camera. Place
camera on a tripod on the ‘space for camera at end of the sidewalk next to
the wall.Automatically take a picture. Take the camera
back.Talk to Jose again about the jeep in the garage. He
can rent it for 100 dollars tomorrow.Give Jose the money. Talk to him several times until
Nicole says that she will leave it under this metal thing. Combine the bearing
and money in inventory to get cash under a bearing.Place cash under a bearing on the bench in front of
the house.Hotel: Go back to hotel and
talk to Diego completely.The photo of the house is the pass.
Leave the camera on the hutch right of the stairs.
Alvarado’s house: Exit the
hotel and go right to the plaza.Enter the house: See a native
seating on the bench.Go to the door. Use the photo on the gap-slot on the
door.Talk to the man behind the door several times. He
wants to look closely.Show ID: Nicole will mention
that there’s a small window above the man seating on the bench.Notice too that he’s continuously chewing and Nicole
mentions coca leaves. Hmm…In inventory combine the coca leaves and buckthorn.
Give the Inca the coca leaves mixed with buckthorn.
That’s not nice.Watch as Nicole shows her ID through the small window.
Talk through the door again and eventually, Nicole
enters the house.Alvarado: Enter the door at
right.Talk to Alvarado completely and learn about what
happened to the Expedition to Akakor. Learn how Warren subverted Dickinson.
Raches was in love with Alice. Branford initially stayed with the Dickinson but
left. He was Raches’ friend. Raches had a distinctive watch and that is how they
identified him. Huaquero was also betrayed by Warren. When asked about where the
treasure is now, Alvarado mentions about Warren’s grandfather owning a tenement.The jewels he owned taken from Akakor are hidden in a dry place
that
is password protected. He has a Google map of the way to Akakor. Alvarado finally agreed to take Nicole to the jungle.Exit the house.