Anacapri: The Dream
Middle should be green, change it to blue.
Bottom left should be violet, change it to yellow.
Bottom right should be blue, change it to green.
Hear a sound. Press black button. Pull back and enter the studio.
Take the unforged stamp and MacKowen’s red notebook. Read it in
inventory. Ah, Giulia was here. Read also about Tiberius using the Blue Grotto
as a private pool and hiding place for lost artifacts. Exit the studio.
Tower (C) – Turn right, forward and the left. Go forward until the
tower. Go left and around the tower to see the metal door.Look through the keyhole and… Look at the red word right of door. That is
familiar. Jump point for Damecuta is now present.
MacKowen’s house – Jump to Piazza Vittoria and walk down to the red
MacKowen’s house (3).Listen to Giulia and learn what happened to her father and his research. He found
the tunnel.A phone rings; this means there’s a phone call at Reality. Giulia
wants to meet you at 4 PM at Le Boffe, the small plaza down the road.
Look around at the pictures in the room.Exit and look close at the triangular artifact on the wall. The letters are the
same as the one at Damecuta tower.Use the blank (unforged) stamp on the
on incandescent triangular stone to get forged stamp.
Tower door – Jump to Damecuta and walk to the tower.
Look close at the red word right of door. Use the forged stamp on red word.
Pull back and enter the tower.
Tunnel – Go down the stairs until the dark tunnel.
The path splits left and forward. Go forward to the porthole at end of the
tunnel. Look through the porthole. See a cavernwith a starfish and hear snoring.
Turn around, forward and then go right to the other path. Go forward until the
opening that looks out to the Blue Grotto.
Claw – Press the red button and see the claw go down. The left button
raises it. Let’s leave it down in the water for now. We need to get to the water
side and see what we can find there.Turn back; turn right at first chance, forward, right and forward until you get
outside.Exit the ruin site and walk back to the blue bus caller panel at main road.
Press button and select Blue Grotto. Use blue bus pass.
Blue Grotto: The bus caller also asked if you’re going to
meet O Riccio. Climb the bus. Again, O Riccio is mentioned for a boat to get inside
the Blue Grotto.
O Riccio – Pan left at the bus stop area. Go down the step under the O
Riccio arch. Go forward or follow the white footsteps on the pavement. Turn
right at the metal arch. Go forward until the bar area way in the back of the
restaurant. Go right and see O Riccio.Listen to O Riccio.
He wants
you to play Scopa, the card game you practiced in Reality and he will lend you
his boat to enter the Blue Grotto if you win a Scopa game.
Scopa – Read the book at bottom right of the screen to review the cards,
rules and counting of the game.Have fun playing
and winning a game or use the bypass show at the Instructions in the main menu
page.Bypass – Go to frame 3945. The number of the frame is
seen at bottom right if you have checked it in the main menu.Turn around, go first left to enter the room and move
the cursor to the rightmost bottle in a wood box. The cursor will change to a
cross. Click on bottle and now the card game is won.The boat for
the Blue Grotto is waiting for you.
Hear a sound.Go left and forward to exit the restaurant.
Nereids – Go right, forward to the very end of the coastline and see an
aquarium. Looks familiar.Turn around and go left to the water. Look in the water and meet the fun loving
Nereids. Note the end of a pipe at left.Read about Nereids in the Guide of the Sea book. Learn that they are mad for
perfume, especially ones made in Capri. Also recall what the perfume seller
said. Pull back.
Catch the Nereids – Check the aquarium and see that the other end of the
pipe is attached to the aquarium. Hmmm…Turn around and look at water pump panel. The pump can be turned on or off and
the valve can be open or close.Fill the aquarium by turning on the pump. Open the valve to fill the tank. Wait
a bit and then close the valve – the tank is filled.Go to the aquarium and see it filled with water. Use the perfume. Now the water
is perfumed.Go back to the water pump panel. Press pump on. Open and immediately close the
valve.Look in the aquarium and see the Nereids are now in the aquarium.
Listen to the Nereids again and they will help you find Nereus. Nereus knows the
past, present and future.Pull back and take the aquarium with Nereids.
Nereus – Turn around and go forward until the stairs at the very end
below the parking lot. Go down the stairs to the boat dock.Enter the boat and row inside the Blue Grotto. See the rope of the claw that is
submerged in water and the glass window of the tunnel.Go left while in close up view of the rope. Go forward until the cavern.
You will hear
snoring again.At the cavern, see the porthole that was seen in the tunnel earlier.
Use the aquarium in the cavern. Nereus (Nico’s uncle) woke up and rose from the
familiar pink seashell.Nereus talks about the past and present. The arm is under water in the grotto.
You are spelled to be able to swim.Now he changes to a starfish.
The arm, the arm – Go back to the boat. Go forward to the hanging rope.
Dive down by the rope. Press the catch button to get the claw to grab the arm.
Turn around and go up. Ride the boat and go to the boat dock.
At the boat dock, jump to Damecuta. Go to the tower.
Enter the tower and go down to the tunnel.
Close to the end of the tunnel, go left to the window looking out to the Blue
Grotto.Use the up of the claw control panel. Click on ‘near’ button. Take Augustus’
arm.Climb back up a few steps and use the jump icon.
Palazzo a mare: Jump to Palazzo a mare. Go down the stairs and go to the statue.
Statue of Augustus – Give the arm to Augustus. The statue says to align
the stars in a particular alignment. This alignment makes Tiberius benevolent.
Pull back and see the statue activate the black oval puzzle.
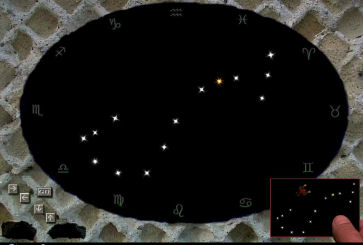
Constellation puzzle – Look close at the black oval on the wall again.
Stars are now present. The constellation of Scorpio is seen at bottom right.The aim of the puzzle is to arrange the stars like the picture at bottom right.
Select a star to move; it becomes red. Click the directional arrow as many times
you want the selected star to move and then click the ‘go’ button. At the
correct spot, a ping sound is heard. The properly placed star turns to white and
cannot be moved anymore.There’s a
bypass here. It can be found at the Instructions at main menu.
Pull back and watch the fireworks done by the statue.
Tiberius the snake – Go to the snake and listen to what he says.
Go forward and then turn around. Look at the hole on the wall right of path.
Take the azure wedge.Turtle appears and says that you should talk to Gunnar the philosopher at Punta
della Migliera.Look at the azure wedge in inventory.
Seagull
Via Migliera: Climb the stairs and jump to Piazza
Vittoria. Turn around and go right. Walk the road by the Anacapri bank.
See that the turtle is now gone. Go forward. On the way, see an
old red scooter and a big gas tank left
of the path.Go forward for a while and see a blue book hanging from a gate at right. It is
the Meditation upon Western Wisdom; Guide to The Capri Philosophical Park by Gunnar Adler-Karlsson. Turn around and see that the Philosophical Park is across
the street.
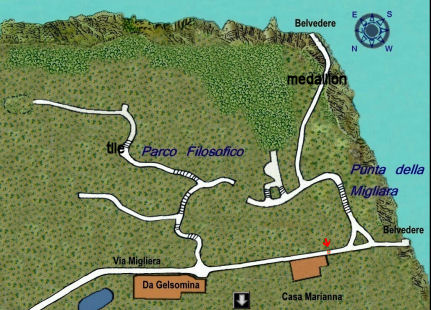
Punta della Migliera – Continue to the end of Via Migliera. Look around
at the beautiful sceneries at Punta della Migliera.Turn around, go forward and then go right until the end of the path. Before the
end of the path, look close at and take the medallion at the rock
enclosure. Look at medallion in inventory. Turn it to read – Limoncello
seasoning time 15 days.Go back to the main road. 2 jump points are now added to the map.
Gunnar at Casa Marianna – Go right and forward until the open gate of
the white house on the left.Enter and go down to the back of the house. Go forward to the far end and then
go left.By the rock wall meet Gunnar. He says for you to go to the Philosophical Park.
Pan right and go up the stairs.
Philosophical Park – Exit and go to main road. Go left and forward
until the wooden gate on the right.Enter the Philosophical Park. Go forward and read the wise words on the tiles.
Go left at first fork of the path. At the end of the path, listen to Gunnar again.
Go back to the main path and continue deeper in the park. Take the right path
before the curve on the main path. Gunnar is at the end of the path.Go back to main path and continue to the right by climbing up the steps.
At the next curve in the path, see a rock with a missing tile. Use the tile
given by the artisan on the rock. "Know yourself". Take the tile with the
wise words and the clock remote control 1. Gunnar says that you can
advance time forward a few hours. Find the monk in Cetrella that can help you
find the fourth spirit, Barbarossa.Continue to the end of the path to view sceneries and see the
Swedish Royal seal on a
tree trunk cut in half.
Reality 4: Right click
to see the icons at bottom of screen. Ring the bell at bottom left to go
back to Reality.
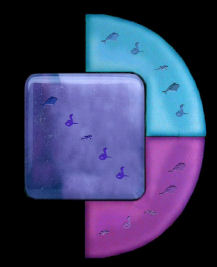
Locked door – Enter the animal codes seen on
the Azure wedge on the locked door.Top to bottom: dolphin, snake,
gecko, dolphin, snake.Kitchen – Enter and look around.
Read the letters from Adriano and Mirta on the
counter. Mirta met Nico at Le Boffe at 4 PM Monday. She talks of limoncello and
Mount Solaro. At Mount Solaro, her hat fell on the pool. She also mentions
Cetrella and Barbarossa. Adriano is now very threatening.Look at the tiles hanging on the walls. Pan left,
forward and turn around to see the tree ring tiles.The art of reading coffee grounds. Pour the coffee in
a container full of water. Drain the water, waiting for the grounds to appear in
the bottom. A message will appear if a ghost wishes to contact you.The art of reading the age of the trees. Count the
rings starting from the center to the outside of the tree. Each rings equals one
year. Every year is a fragment of the secret life of plants.Read the letter on the kitchen counter on the right.
It is about the Nelson & Sons security system installed in your home. There is a
strongbox also added.The guard of the local Security Service, Falchetti,
also watches the house every two hours.Take note of the picture of the seagull on a picnic table and
the Solar Panel fuse setup above the seagull.Check the message on the answering machine from
Adriano. Check the medallion left of the phone. Read the postit
note on the fridge.
Time to go back and dream. Right click to see the
icons at bottom of screen. Click on the syrup bottle at bottom of the screen.
Via Migliera:
Jump to Via Migliera. Go forward once and then take the left path. Go forward
until a giant clock.
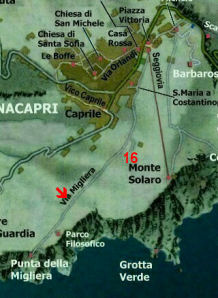
Clock (16) – It
is time to move the clock up to 4 PM to meet Giulia at Le Boffe.Go close and use the clock remote control 1
on the clock.Enter and look close
at the gears. Press the red button and the clock moves ahead to 4 PM.Turn around and look
close at the microwave that is set for 0, 15 or more days instead of minutes.Exit the clock.
Anacapri July 7th 2011 4 PM
Le Boffe (5):
Jump to the Caprile point. Go forward until Le Boffe. Listen to Giulia. She
wants limoncello and she mentions about the limoncello shop at Via Axel Munthe.
Limoncello:
Limoncello shop (11)
– Jump to Piazza Vittoria. Turn around and go left. Go forward until the
Limoncello shop.Enter, go left and
listen to the saleslady. There is still no limoncello available.She mentions that you
can make it yourself at the laboratory at Villa Migliera by the clock.
She gives the recipe-ingredients of limoncello. You can get the lemon
from the water seller. Be sure to soak the lemon peel in alcohol and season
it. The seasoning time can be found in the medallion given out by the owner.
There is also a tasting machine in the lab.Water seller (10) –
Exit the shop and go left. Go forward until the snack bar. Take a lemon.Laboratory –
Jump to Via Migliera. Go forward and then take the left path towards the clock
(16).Before getting to the
clock (6 clicks from making a left), go left through the trees. Forward until
the stone laboratory.Enter and look around. Pan left.
Read the recipe
given by the limoncello saleslady.1. Ingredients:
lemons, alcohol, sugar.2. Boil water and
sugar to get syrup.Gas – Go to
the copper setup on the bench at left. Note that the gas tank is empty. We
saw a gas tank earlier.Take the
propane cylinder. Exit the lab. Go to main road and go right to get to
Via Migliera.Go left, forward
~28 clicks, take the left road and forward until the big gas tank.Use the cylinder
on the gas tank faucet. Turn the faucet. Take the full cylinder.Go back to lab by
jumping to Via Migliera and back to the lab.Make syrup
– Look close at the copper setup over the stove. Place the full cylinder
back right of the stove.Turn the red tap
of the gas to get gas.Press the water
button, then the sugar button and then the gas button to get flame.Press the pour
button to automatically place a bottle and get pot with syrup.In case
the syrup is not done correctly, use the syrup bottle here destroying it
and start again.3. Mature lemon
peels in the alcohol.Get lemon peels
in alcohol – Look close at the machine on the left.Use the lemon on
machine and it will be placed on the hole at bottom left.Press the right
big oval button to get alcohol in a bottle.Press the left
small oval button to get lemon peels in the alcohol bottle. Take pot
with lemon peels.In case
you pressed
a wrong button and the lemon is destroyed, go back to the water seller
to
get
another lemon and start again.Mature the lemon
peels – Look close at the medallion in inventory. Turn it and it states to
mature for 15 days.Exit the lab and
go to main road. Go left to the big clock.Go close and use
the clock remote control 1 on the clock.Enter, turn around
and look close at the microwave.Press the left
button to set the ageing microwave machine to 15 days.Open the machine
and place the pot with lemon peels inside.Close ageing
machine and press the bottom button.Open machine and
take the aged pot with matured lemon peels.Close machine and
go back to the lab.For fun: You can
try to microwave-age the fish from the fridge or the whole lemon.In case
the pot is not done or aged correctly, use the pot at the alcohol machine
destroying it, go back to the water seller, get another lemon and start
again.4. Mix matured lemon
peels with the syrup.Go to the orange
machine at end of left counter.Use pot with syrup
and pot with matured lemon peels (syrup) on machine.Press the mix
button and get small bottle with limoncello.5. Serve cold.
Pan right and open
the fridge.Take the fish
out. Place limoncello inside and close
the door.Open fridge and
get limoncello bottle. Close door.6. Tasting machine.
Go to machine at
center of back wall.Look close and use
the chilled limoncello on machine.Press the lever.
‘Great! That’s the true limoncello.’Lift the lever and
take the limoncello.In case
the limoncello is not done correctly, use the limoncello bottle at the mix
machine destroying the bottle, go back to the water seller, get another
lemon and start again.
Giulia – Jump to the Caprile point. Go forward until Le Boffe. Give
the limoncello to Giulia.
If the
limoncello is not good, Giulia will tell you, take another lemon, destroy the
bottle and retry.Listen to Giulia. She advises to talk to the monk of
Cetrella at Mount Solaro. She
gives Roman coin 2.
Via Orlandi:
Villa Orlandi – Go to Dr. Orlandi’s house. Use the knocker and
talk to Dr. Orlandi’s assistant. Oh my!TV
broadcast (8) –
Go
to the shop where there is a TV set .
Watch
the afternoon news broadcasted through the window of the shop.Florist (4) –
Go forward to the florist.
She promises you help in case of need.
Mount Solaro:
Norbert Hadrawa (6) – Jump to Caprile point and walk back to Hadrawa’s office. Enter his office, climb
up the stairs and after listening to him, give him the Roman coin 2. Such a
sinister man. Get 10 caprini. Exit office.
Buy ticket – Jump to Piazza Vittoria and go forward until the green
vending machine (1). Press the button and use the 10 caprini on the machine.
Take the purple season chairlift pass for Monte Solaro.
Chair lift – Jump to Piazza Vittoria, turn around and go right. Enter the
building ahead. Give the season chairlift pass
to the ticket seller.The chairlift is out of service. He lets you fix it. The repairman said that it
only needs 4 fuses that can be found in scooters.
Fuses – Go upstairs and see a sign from De Angelis for electric supply.
He is found close to Church of Santa Sofia.
De Angelis – Go to Via Orlandi and walk forward until the De Angelis shop
seen on the right at the corner.Enter store and eavesdrop on the phone call. There is a red scooter bound for the scrap yard
left at Via Migliera with the key behind the seat.
Red scooter – Jump to Via Migliera. Turn around and go forward until a battered
red scooter is seen on the left.Go pass it and then turn around. Look close at the lock behind the seat. Lift
the seat and then look close at the fuses. Take 4 colored fuses.
Fix the solar panel – Jump to Piazza Vittoria. Turn around and go right
to the chair lift building. Climb up the stairs. Look close at the solar panel.The clue here was found earlier in the solar panel in the Reality’s kitchen.
Place the fuses similar to the fuse setup in the Reality’s kitchen.
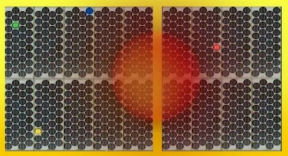
Place all 4 fuses on the Spare Fuses slots.
Then enter the group number, the fuse or circle location in that group and then
the color of the fuse. Click fix button.The group is a set of slots-circles in a rectangle. Count top row left to right
as 1 – 9. The bottom row is 10 – 18.The fuse number is the number of the circle showing its location. Count within a
group top to bottom: left column is 1 – 9, next column is 10 – 18, next 19 – 27
and right column in that group is 28 – 36.
Enter number by clicking on the buttons on the left:
Group 1, fuse 12, color green. Click fix button. A high pitched sound will be
heard if done right or a bass sound if wrong.Group 3, fuse 28, color blue. Click fix button. A high pitched sound will
be heard if done right.Group 7, fuse 33, color red. Click fix button. A high pitched sound will be
heard if done right or a bass sound if wrong.Group 11, fuse 7, color yellow. Click fix button. A high pitched sound will be
heard if done right or a bass sound if wrong.The fuses should be done correctly for all colors. If an error is done in one
color start over.The chair lift is working now. Go left and ride a chair. Go forward until the
top of Mount Solaro. Enjoy the view.
Top of Mount Solaro – Climb the stairs and look around at the gorgeous
view.
Giulia – Go forward to the building, left, then right, left towards the
tables and meet Giulia.She says that the path to Cetrella needs a pass. Her hat with the pass blew into the pool.
Get the hat – Turn around from Giulia. Go forward to the ivied arch.
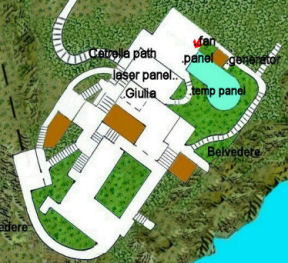
Generator – Go left and left again. Go down the steps, right and go down
the steps again on the left.Go forward and left by the wood fence. You can go forward and enjoy the view, if
you want.Go forward on the dirt path until you can go left to a door under the landing.
Turn on the orange switch on the azure frame. There is power now.
Fan –
Turn around, forward and left to the big fan.Climb the steps and see the hat at bottom of a dry pool.
Turn around, forward and turn around again
Look close at the panel under the path. It says laser on, water out.
Climb up and then to the steps on the right. Go up to the balcony and then go
right.Look at the laser control. Press a button and see that it runs the big fan. The
fan’s wind cannot touch the hat at bottom of pool.Go down to the panel under the path. Midway see a green panel. It is for
temperature control of
the pool. Press the green button to get Laser off, water in. Go up and see that
the pool is filled with water. The hat is still far off the edge of the pool.Go right and midway up the stairs on the right. Turn around and face the green
panel. Press the red button and see that it froze the pool water.Go back to the panel under the path. Press the button and see Laser on, water
frozen.Go back up to the balcony with the laser control panel. The blue button blows
wind and the red button sucks in wind. Press the red button. See the hat move to
the edge of the pool.Go down and pick up the hat. In inventory, look at and turn the hat twice
to get a Cetrella Hermitage pass.Mount Solaro now has a jump point.
Cetrella Hermitage:
Cetrella path – From the pool, turn around, forward, left,
forward, right and down the path. Go forward until the stand. Use the Cetrella
pass or the laser gate will stop you ahead.You will hear moaning while taking the nature walk. Go left and forward until
the tree people. They are moaning. Turn around and go back to the main path and
continue down the mountain.
Picnic table – Take the right path at the small altar. Go forward until
the picnic table on the right. Look close and take the crumpled paper 2. Read the
crumpled paper in inventory. Ah – Someone is following you and knows how many
wedges you already collected.
Guardian of Monastery – Continue on up stairs to the monastery. Listen to
the guardian of the Monastery. He wants you out of here. He also said the trees are
hungry.Go forward and check the door of the Hermitage. It needs a code. Turn
around and walk down the steps.Go left midway down the steps. At the end of the path, take lemon verbena
from the pot.
Talking trees – The Guardian said the trees are hungry.
Feed the trees – Jump to Piazza Vittoria. Go forward on Via Orlandi until
the florist (4). Listen to her and then pick up the fertilizer in a nice
pot.Jump back to Cetrella (or Monte Solaro). Turn around and go back to the trees.
Go left to the path up to Monte Solaro.Go right when you hear the trees groaning. Go forward and give the fertilizer to
the trees.Listen to the trees. They gave a hint that the code to the Hermitage might be
the guardian’s birth year.
Door Code – Jump to Cetrella and climb up the steps. Listen to the
guardian. He says that the trees where planted during the year of his birth.
Some of the trees were cut down in 1619.Go back to the trees and look at 2 tree trunks: one at main path and the other
right of the talking trees. Remember the clue seen in tiles in Reality’s
kitchen wall.Count the rings starting with the center ones. There are 19 rings.
The trees were cut down 1619 less 19. The guardian’s birth year is 1600.
Hermitage – Jump to Cetrella and go forward to the Hermitage.
Enter 1600 on the door lock. Enter the Hermitage and look around.
The Monk of Cetrella – Go forward and climb the stairs. Turn right to go
up to the veranda. Look at the scenery. Turn around and go left. Look in the
hole on the wall and see glowing eyes.Go back inside and down 2 flights of stairs.
Go left to the dining room and forward to the kitchen.
Call the monk – Remember the clue seen at the tiles on Reality’s
kitchen wall.Take the espresso coffee maker from the table on the left.
Go forward and then turn around. Look close at the sink on the left.
Turn on the faucet to fill the sink with water. Close faucet.
Use the espresso coffee on the sink filled with water.
Move the lever to the left. Move lever back to the right.
Look in the sink again. Read the monk’s message: Burn lemon verbena. I will
appear.Go to the dining room. See that a candle now burns. Use the lemon verbena taken
from the pot outside on the flame.Listen to the monk with the glowing eyes. The disk might be in Barbarossa’s
castle. First you must go to the cave and get what you need there. "Do not
return".Turn around and climb the stairs. Go left to be outside, go left pass the tables
and left again at end of the patio.Go down the steps and enter the cellar. Go left to first room. Open the cabinet
and take the wrench. This cabinet will be activated only after talking to the monk.Go to the next room and then outside. Turn around and get the elevator map
right of the entryway. Read the paper in inventory.Exit the Hermitage and listen to the Guardian.
Elevator – Go down the stone steps and go left to the stone path before
the picnic table.
Balls – Go forward to end of path and see the metal pipe hanging over the cliff. Take a
ball and drop it inside the metal pipe. Hear the ball fall into the sea.
Elevator – Turn around, forward and right to enter the dome. Look around and
then turn to face the entryway.Read the elevator map again and see that the top level is at 320 and a second
level is at 97 feet.
0 level – Press the button to open the elevator. Back up and enter the
elevator. Enter 0 on the panel. Then press the Go button.Exit and look around. At right is a chest and it is locked.
97 level – Go back in the elevator and now let’s check the other level.
Enter 97 and press the Go button.Exit and look around. Look close at the gear that changes the position of the
pipes. This might be the end of the pipe with the balls on top of the mountain.Use the wrench to change the position of the pipe.
320 level – Enter elevator, enter 320 and press Go button.
Exit and go to the balls and pipe – forward and left of the path.
Take a ball and place it in the pipe. Listen —- bang.
0 level – Go back to the elevator and go down to the beach level.
Turn to the chest and take the parchment.
Go up to top floor and exit the dome.
Walk back to town or you can use the chairlift at Monte Solaro. I would
recommend walking. Once you get to the small altar, go forward instead of left
to get to Monte Solaro. Pick up crumpled paper 3 from base of tree at
left of the path when close to town. Someone is still snooping. You can jump to
the Scala Fenicia point now.
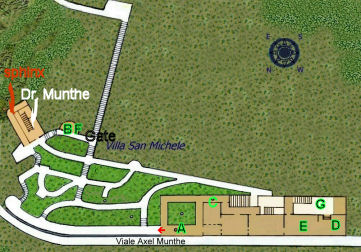
Villa San Michele: Turn around after jumping here. Go
forward and enter Villa San Michele or Axel Munthe’s house.
Entry – Talk to the man. He wants you to tell him the 3 pets of Dr.
Munthe.Take the animal card and the 3 tile picture clues.
The clue to get the answer can be found at Chiesa di San Michele. Go to the Church and climb up
to the balcony. Look down at the tiles of the animals found in the Garden of
Eden. Use the picture clues the man has given to recognize the 3 animals.Go back to Villa San Michele. Then using the animal card, select dog, owl and
monkey. Give the animal card to the man.Now, you may enter.
Tour of the Villa – Tour the villa and enjoy:
pewter plate room, kitchen, inner courtyard with a well at the center, Dr.
Munthe’s bedroom, book room where the phone rang
and an office with table,
chairs an a pendulum clock.Exit to go outside and see: a covered well at the
walkway, marble statue, busts and a marble table at the center.Go to the garden and look around the beautiful flowers
and the fresh water fountain.
Go forward on the ivy-covered walkway. Climb the stairs at end of path and then
climb left again to be at the building.
Roman cave – In the middle of the room is a
stairs that goes down to a Roman cave. Go down and right to cave. Pan right and
listen to Dr. Munthe. He asked the sphinx to help you.Sphinx – Exit the building and go right twice.
Go forward and look close at the sphinx overlooking the north side of the
island.Press the red button. Listen to the sphinx. Before she
gives you the key to Barbarossa Castle, she wants you to do the riddle.Sphinx quiz – Take the paper and read it in
inventory.
Just in front of the young boy,
round and round they always look,
on a big flat marble table,
under two green metal eyes.
You can put the bread on them,