Anacapri: The Dream
Anacapri the Dream
by S-G Software
Walkthrough by MaGtRo July 2007
Gameplay: This is a first
person point and click game. Read the different options on the main menu to
understand the game manipulations.
In Screen, the different screen resolutions needed for
proper operation of the game are explained.
It is
also shown the automatic classification of your computer – slow or fast – and
how to override the automatic classification for optimum graphic performances.
In Instructions, the different
icons, cursors and important gameplay manipulations are explained. It also has
shortcuts for 4 puzzles in the game.
Map shows the island of
Capri-Anacapri. Point to a location and a picture and description of that place
is seen.
Credits shows the acknowledgements and actors and
voiceovers of the different characters.
Designers shows the creators and collaborators of the
game.
Hotspots option is a selection to turn on or off a
black square during gameplay that shows where the active areas are. I would
highly recommend that you turn it on. Scene number
is an identification of that location and can be turned on or off.
The Start selection gives choices as to where to load
the game: from the beginning, from where you left of in the last gameplay, other
saved game spots or jumping points.
Exit closes the game.
I want to express my thanks to Silvio for his gracious
help. Also, I wish to thank Gey for the Mesola tile puzzle solution.
Anacapri July 7th 2011 11AM
You are Dr. Nico N.
The
Dream
Cafe:
The waitress gives an envelope from Dr. Orlandi. Pick
up the Dr. Orlandi’s message 1.
Right click to see the icon-options at the bottom of
the screen. The leftmost (computer screen) is a review of the dialogues and also
identifies the characters. The scissors (tools) icon is the main menu. The comet icon
is the jump to screen where you can jump to an area already visited in the map.
The globe icon shows the map of the immediate area where you are located. See
that you are at Piazza Vittoria by the blinking circle and the red arrow,
showing
the direction you are looking at.
The bag icon is the inventory. Click on the envelope
that is in inventory. The hand with tool is the use icon. The eye is to examine an
item. Click on eye icon. Click on right arrow twice to read the first page of the
letter. Click on the right arrow again to read the back of the letter. Click the
down arrow to exit the screen. Dr. Orlandi
talks about a legendary Obsidian disk. He wants you to come to his house and
gives directions.
Piazza Vittoria:
Exit the Cafe and if you have turned on the hotspots option see a black square
right and left of screen. Turn right after the Cafe, forward and see panning
arrows. During the rest of gameplay, be sure to check all the sides screens or you might miss hotspots.
Double click of the arrows speeds up the panning.
Red bus caller – Look close on the right side of the
Piazza and see the red bus caller. Press the button. The bus goes to Marina Piccola.
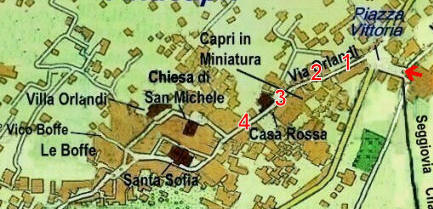
Via Orlandi: Pull back and
pan left. Go forward down Via Orlandi. The letter states that the townspeople
know about your arrival.
Transportation ticket vending machine (1) – Go forward left
of the store at the center of the screen. Go forward 3 times and see a green
vending machine that sells bus and chair lift tickets. It also has a map of the Anacapri
Public Transportation below the screen.Press the button and see that the cost of a ticket to
Marina Piccola is 10 caprini.Constantly check the globe icon to see where you are in the map.
It is a very helpful tool.Postcard and Museum (2) – Go forward 3 times and see a postcard stand on the
right. Look close at postcards and take a postcard. It is postcard 1,
Stairway to Torre la Guardia.Go forward once and enter the museum on the left. The
Majolica artisan explains about the Capri in miniature and history of the
obsidian disk.Go left and forward. Look at all the glass displays on
the wall especially the ones about the history of the disk and the miniature
Capri at the center of the room. Go back inside the shop and talk to the
Majolica artisan again. She gives a tile. Exit the store and continue to
the left.MacKowen house (3) – Go forward twice and see a
red house on the right. Look close at the call panel and press the button. Wow.
What was that all about? Continue down the road.Florist (4) – Go forward until the florist
shop on the right. Enter and talk to the florist. Now, we know some are helpful
in your quest for the disk and some not. Exit the shop and continue to the
right.Chiesa di San Michele – Go forward once from
the shop and check the signs at the corner. Go right as the signs to Chiesa di
San Michele and Casa Orlandi denotes. Go forward and enter the church on the
left. Go up the spiral staircase and enter the balcony. Look down on the tiled
floor depicting various animals and birds at the Garden of Eden. Go down
and go left to see the tiles from the floor level. Exit the church.Villa Orlandi
– Go left and forward to the corner. Use the knocker on the door, pull back and
talk to Dr. Orlandi’s assistant. He wants you to come back at 3:45 PM.Check the
mail box and take Dr. Orlandi’s message 2 and marble tablet. Read
the second letter. Dr. Orlandi explains about the disk you are supposed to
locate. He wants you to stop by Francesco Cerio at 1st Vico Boffe 7. Read the
inscription on the marble tablet. It states that the disk must be destroyed and
signed R.C. 1816.Francesco Cerio at 1st Vico Boffe – Turn
around from Dr. Orlandi’s door and go forward until the intersection. Go right
at 1st Vico Boffe. Go forward until the end and use the call button of the house
on the left. Listen to Mr. Cerio about ‘where everything began’ clue. Learn about
Grotta delle Felci. Open the mailbox and get Ignazio Cerio’s diary. Read
the diary carefully and also get a credit card.Turn around and go right at the intersection.
Come back
up Vico Le Boffe, then right at the next crossing.
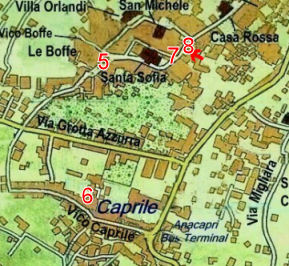
Le Boffe (5)
– Remember this small park.
Vico
Caprile:
Continue forward and check the map to see that you are now at Vico Caprile.
Norbert
Hadrawa (6)
– Once you get near the office of Hadrawa, the music becomes discordant. Enter
his office in Vico Caprile 160 . He says he will buy old coins in case you
wish to sell them.Caprile Bus terminal – Go forward until the main road. Pan around and
then turn to look close at the yellow bus caller. A jump point for Caprile is
now made here.
Via Orlandi: Go back and
continue to go forward until the red steps to the church’s courtyard.
Santa Sofia Church – Look around the courtyard and inside of the church.
Exit the church and go left.
Old man (7) – Listen to the man sitting on the tile bench. He gives a
newspaper. Read the newspaper.There are articles
about the disk, Ms Giulia MacKowen, you saw her in
(3), N. Hadrawa, Axel Munthe and traffic regulations. You can reach Torre La Guardia through a multi-exit portal
using a postcard – the one you picked up before.
De Angelis (7) – After talking to the old man, pull back and go right.
Enter the hardware store. The storekeeper says to come back after 4 PM. Exit the
store and continue left.TV
broadcast (8) –
Go one step
forward pass the old man and look left. Look close on the TV to watch the
interview of Dr. Cerio and learn more information about the disk
and the
current environment in Anacapri.
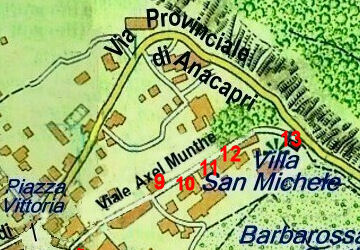
Let us find information about Grotta delle Felci.
Viale Axel Munthe: Jump to
Pizza Vittoria by using the comet icon at the bottom of the screen. Turn around
and go left.
Neapolitan song – Go forward 7 times and listen to man
with the guitar. Listen to a Neapolitan song.Perfume (9) – Go forward 6 times and enter
the Perfume shop on the left. Take the perfume. It’s supposed to attract
certain sea creatures. Exit the shop and continue to the left.Refreshment stand (10) – Go
forward and see a refreshment
stand on the right. They have lemons and drinks.Limoncello shop (11) – Go forward and enter the
Limoncello shop on the right. Listen to the sandal maker talk about illusion. Take the
sandal and then look at it in inventory – it disappears. He wants you to
talk to Dr. Munthe.Pull back and go left. Go forward and listen to the limoncello seller. There is no limoncello available right now. Go back to the
adjacent store and exit.Villa San Michele (12) – Go right and forward.
Enter Villa San Michele – Axel Munthe’s home. Listen to the man and learn that
Dr. Munthe went for a walk at Torre La Guardia. Ah, that’s the place shown at
the postcard we picked up at Via
Orlandi and mentioned in the newspaper. Exit the villa.Scala Fenecia--Multi-exit
portal
(13) – Go right
until the end and see a multi-exit
portal. A new jump point is now in the map. Place
the postcard (select postcard in inventory and click on the use icon) on the
metal frame on the right of the doorway. Wow!Torre La Guardia – Enter
and climb up. Take a nice walk and look around at the sceneries. Go forward
until the closed gate and listen to Dr. Axel Munthe. He talks about a church close
to the turtle and to ring the bell. Review what he said in the dialogue-monitor
icon. It is best to review the dialogues during gameplay so that you won’t miss
a given clue.
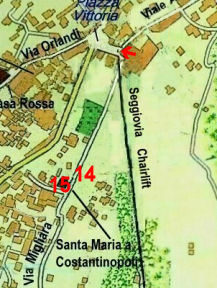
Via Migliera: Jump to
Piazza Vittoria. Turn around and go right. Go forward once and click on the road
left of the building (chairlift place) ahead.
Chair lift building – Enter the building ahead
and talk to the attendant at the window. He says thatthe chairlift will open 4 PM. Exit the
building and go the road left of the chair left building.See the Anacapri bank. We don’t need money and we
don’t have the pin code yet; so
we’ll come back here later.Turtle (14) – Go forward until the end and
meet the wise turtle. Listen to what she says and review it in the dialogues.
Learn the beginning of the history of the disk. Also learn how to go about
looking for the disk: she recommends to look for and talk to those who tried to
control the disk. The spirits are in animal form and destruction of the disk will ease
the pains of those animals.Church of Santa Maria Constantinopoli (15) –
Turn right and go forward until the church on the right. Enter and look inside
the church. Exit and remember what Dr. Munthe said –pull the rope
to
ring the bell
at the entrance of the church.
Reality 1: Where are we?
Dresser – Go left and then look at the dresser
left of the bed. See a picture of a woman and a security system remote dated today (7-7-2011) and total lock at 12:15. Read carefully the 10 Rules of
Dream by Dr. Camilla Greenturtle. Turtle!!! So the other time was a Dream and
we’re in Reality now. Take note of #3, #8 and #10.
Right side
table – Turn around and look at the side table. Read the note from Dr.
Greenturtle. Ah, that is why we’re here; we rang the church bell.Read the
May20, 1999 letter of Mirta about what happened at Grotta delle Felci. Look at
(bottom active spot of the bottle) the Syrup of Dream beside the spoon. If you
clicked to drink the syrup (top active spot of the bottle)to dream, ring the church bell
again to get back to the bedroom.Desk – Go to the other side of the
bed. Look at the computer that has the screensaver of the
multi-exit
portal
at Scala
Fenicia. Click
the
space bar
of the laptop to see one scene of
the Capri adventure game. Click again on the space bar.
Look at the calendar on the right and see that you have an appointment
with Adriano at 11 AM. Look at Piggy, the cute pink coin bank. Let’s take a look
at that Capri adventure game. Mirta says it true.Left side table – Pull back and look at the
left side table. See a picture of Mirta and Adriano dated September 1998. Look
at the box on top of the side table. Open it to see colored rocks.Hallway – Exit the bedroom. Check the bathroom
and see the perfume. All of these items seen here are symbolic in the dream.You (Nico Fredi), Mirta Marconi and Adriano Norberti in the Reality are
transposed respectively into Nico N, Ms Giulia MacKowen and Norbert Hadrawa in
the Dreamworld of Anacapri.Check
the purple handle of the locked door at end of hallway. The code lock is made up
of animals. Now you know that
you
are Nico Fredi, locked in the bedroom, but you don’t know why. Lost memory?Maybe you can
learn more about your life in Reality
if you
unlock the door and see the rest of the house.Syrup of Dream – Go back to the side table of
the bedroom and take (click the middle active spot) the Syrup of Dream.
You will now see the syrup bottle at bottom left. Click on the bottle to
continue our adventure in the Dreamworld of Anacapri. Or you can click the
active spot at top of the bottle to take a dose of the syrup.
Gecko
Via Migliera:
Church – Go forward and pick up the bell
on the right of the path and in front of Padre Pio. 10 Rules of Dream states that ringing a bell
will bring-wake us back to Reality. It is time to go to Grotta delle Felci. Look
in comet jump map that the Grotta is on the way to Marina Piccola. Remember that
we learn from the ticket vending machine that
a bus goes to Marina Piccola and we need 10 caprini for the bus ticket.Anacapri Bank – Jump to Piazza Vittoria. Turn
around, go right and then left to the road in front of the bank. Look close at
the ATM machine.ATM machine – See that the logo of the bank is
Piggy from Reality.Use the credit card given by Cerio on the ATM machine.
It wants a pin code. Ah – we know the clue from
Reality.Enter PIGGY or 74449. Then click OK.
Take the card, pull back and take the 10 caprini
bill.
Piazza Vittoria:
Transportation ticket vending machine (1) – Go
back to the Piazza Vittoria. Go forward left of the store at the center of the
screen. Go forward 3 times and see a green vending machine. Press the button and
use the 10 caprini. Take the white Anacapri-Marina Piccola season ticket.Bus ride – Jump to Piazza Vittoria and go
forward to the center of the Piazza. Pan to the bus caller machine at right.
Press the red button and then select Marina Piccola. Use the season ticket to
Marina Piccola. Pan left and enter the bus.Click forward until the Marina Piccola. Listen to what
the bus driver says – he gives important clues. He warns about the strangeness at
Grotta delle Felci and the sacrificed geckos. He also warns about the boat tour.
He mentions Massimo at Da Gioia Beach.
Marina Piccola: Get off the bus and go down
the stairs. A jump point for this place is now present in the map. Go forward and
then right to the refreshment stand.
Massimo at snack bar – Listen to Massimo. Take more
pages (pgs 25-34) of Ignazio Cerio’s diary. Read the diary in inventory.
He says to come back here after meeting the spirit.Climb back up the stairs. Midway, be sure to check the
clock on the green door.At the main road, use the bust ticket on the orange
bus caller across the road. Look right and enter the bus. Be sure to click on
the active frame at left on the side road to stop at Grotta delle Felci.
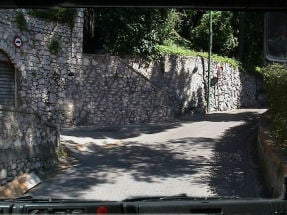
Grotta delle Felci:
Big gecko – Go forward and then take
the left path at split of the road. Look around at the houses and
sceneries on the way. Take the steps on the right and be on a nature hike to the Grotta. Go forward
twice and pick up crumpled paper 1. Read it in inventory.Someone
else is looking for the disk.
Go forward
until you can pan. Pan left and go forward to the gecko on
the rock. There’s a puzzle at the base. We cannot solve it yet.Grotta – Turn around, go right and forward until the end.
Turn around and pan right twice. Take more pages
of the diary (pg 15-24) under a Neolithic drawing. Read it in inventory.Pan left twice and look through the telescope. Ah, a
gecko is peeking out of the cave. Go forward and look at the small cave.Big gecko – Go back to the big gecko and
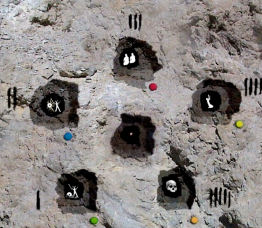
puzzle on the rock. A jump point is now made here.Gecko pictorial puzzle – Click on the different
buttons and see pictures.The pictures look familiar. Where have we seen them
before? Ignazio Cerio’s diary. Pull back and review the diary.Starting from 1 enter the story of the Neolithic
tribe’s shaman who used the disk.Solution: 1.The shaman finds the disk,
2. shining disk when he used the disk, 3. two people worshipped the shaman as
god, 4. one scared person when the shaman conquered other tribes and 5. skull
when the shaman died.
Look at the middle hole and take 4 obsidian stones.
Look at the obsidian stones in inventory and see a gecko, dolphin, snake and seagull.The spirit – Remember what the turtle said – to
look and talk to those who tried to control the disk. They are in animal form.Based on the diary, the shaman was the first
historical person that held the disk and tried to control it. He must be a
gecko.Turn around from the puzzle, go right and forward to
the Grotta and gecko peeking out of the cave. Turn right before the getting to
the telescope and see the small cave where the gecko peeked out from.Take obsidian stone 1 that showed a blue gecko
(arrowhead) and use it on this screen (no hotspot).Go to the telescope and look through the lens. Watch
the blue gecko go to the obsidian. Listen to the shaman’s story.Go forward and take the purple wedge. Look at
it in inventory. Turn the purple wedge and see the animal figures that we saw in
the door lock in Reality.
Dolphin
Reality 2: Right click
to see the icons at bottom of screen. Ring the bell at bottom left. Go to
the locked door at the end of the hallway.
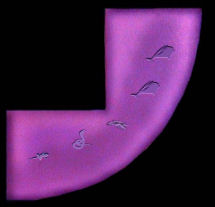
Door – Enter the figures as seen on the purple
wedge.Top to bottom: dolphin, dolphin,
seagull, snake, gecko. The door is unlocked.Family room – Read Adriano’s and Mirta’s
letters on the coffee table from 1999. Mirta talked about the Green grotto,
legends and blue dolphins.Pan right and check
the message on the answering machine on July
7,
2011 from Mirta.Pan around and look at the CD player under the TV. It
has The Best of Orpheus music.Look at the seashell and picture of Nico’s uncle on the
fireplace mantel.A blue dolphin is floating in the whirlpool. Go right
and see a purple seas picture on the wall. Check the
Neolithic wall painting inside the wicker table by the door. Check the locked
door and see a blue animal lock.
Time to dream again. Right click to see the icons at
bottom of screen. Click on the syrup bottle at bottom of screen.
Marina Piccola:
Massimo at Marina Piccola – As told to do, jump
to Marina Piccola and go down the stairs to listen to Massimo at Gioia snack bar.He says another spirit is near here – blue dolphin. He
gives the Guide to the Sea book and he will call Karonts to take you on a
boat ride in the sea of Marina Piccola.Read the Guide to the Sea book in
inventory. Learn about the Nereids, Nereus, dolphin, Poseidon, Sirens, Triton
and Green Grotto.Dolphin viewing area – Go
forward
on the beach keeping the sea at your left
and be under the restaurant. Go
forward to the
stairs by the canoes. Take the left stairs.Dolphin
– Use obsidian stone 2 with the dolphin on the metal funnel right of telescope.
Look through the telescope and see a view of the waters. Listen to Oebalus, the
blue dolphin. He will talk you later again.Karonts – Turn around to go back to the main
stairs. Before the main stairs, go right to get to the beach area. Look around
and later climb the stairs to get to the dock. At the end of the dock, wait for
the boat to arrive. Meet Karonts; but he’s a bearded man as mentioned in the book
(also Nico’s uncle in Reality).Boat ride on the coast – Get on the boat and
click to move the boat. Enjoy the sceneries.Triton – Go left at first choice of direction.
Go forward at the big monolith with an opening at the base Go left at the
opening of the monolith.If you hear a roar-grrr,
look back to check
ifKaronts is
notassaulting you.
Go forward and around the big rock. See Triton blowing
his horn. Go forward to the same opening under the monolith.Poseidon – After passing the opening turn
around again and this time go right in the opening. The opening is blocked by
fire. The sea turns purple when the fire is dowsed. Go forward and listen to
Poseidon. Learn about Oebalus, the son of Telon who was the king of the Telebois.Continue forward and back through the opening under
the monolith and blue waters.Green Grotto
(Grotta Verde)
– Take the left selection after the opening.Go forward and look at the rock in the middle of the sea. A fish tail disappears
behind the rock: it is a siren’s tail. Take the selection at right to Green grotto.
The water is up now. Turn around and go forward.Siren – Go forward until the rock with
the siren. Look close and see the siren. Back up, then go forward and take the
left selection to go back to the dock.Dolphin viewing area – At dock go forward until out of the beach area, go left
and back to the snack bar of Massimo. Go forward under the Ristorante Da Gioia
and go forward to the stairs by the canoes. Take the left stairs.Dolphin – Look through the telescope and see a
view of the waters. Listen to Oebalus, the blue dolphin again. He will explain what
happened to him and the disk (this occurs only after you saw Poseidon). He says that the blue
wedge is in Green Grotto (Grotto Verde).Go down the stairs, go right under the restaurant and
forward until the main stairs. Go right before the main stairs to the beach
area.Boat ride – Go forward to get back to Karonts at
the dock. Get in the boat.Green Grotto – Take the selection on the right
to hug the coast line and forward until the Green Grotto. Go close to the mouth
of the grotto and then go left. Go forward and take the blue wedge.Look at the blue wedge in inventory and see it attach
to the purple wedge. Turn it around and see another set of animals.Siren – Turn around and go forward until the
siren. Now, the siren traps you and Karonts.What to do? Remember the 10 Rules of Dream and the
clue in the Guide to the Sea book.Ring the bell to go back to Reality. Look at the CD
under the TV. Look close at the CD of The Best of Orpheus. Click the red arrow
button at bottom left to hear the music. Pull back while the music is still
playing.Right click to see the icons at bottom of screen. Take the syrup again. In the dreamworld, hear the
music of Orpheus drown the siren song. Immediately go close to the siren while
you can still hear the music. See the siren crack.Go forward and back to the beach.
Snake
Reality 3: Right click
to see the icons at bottom of screen. Ring the bell at bottom left to go
back to Reality.
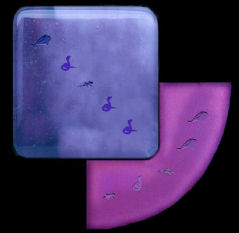
Door – Go to the locked door right of
fireplace. Enter the figures as seen on the blue wedge.Top to bottom: dolphin, snake,
gecko, snake, snake. The door is unlocked.Dining room
– Enter and look around. Open the drawer and see Adriano Norberti and Mirta Marconi’s
wedding invitation that was held on May 15, 2001.Turn around and look close at the armless statue of
Augustus.Living room – Pan right and go to the living room.
Look at the constellation of Scorpio on the wall. The bookcase on the left has
some interesting DVDs.Turn around and look at the aquarium.
Check the letters on the writing desk at the corner.
In the letters, Mirta talks about the Scala Fenicia Staircase and how O Riccio loaned
the boat after being beaten on the card game, Scopa. The letters also showed
Mirta turning down Nico and the start of Adriano’s financial help on Nico’s
research project; Mirta and Adriano’s marriage, Adriano’s forceful demands on
the research project and the interest of Dr. Greenturtle on the Syrup of Dreams.Nico was upset by the marriage of Mirta and their correspondence stopped for few
years.Open the drawers and see a deck of cards in left
drawer and the hand held Scopa game. Learn the rules and play-practice Scopa as
a rehearsal for a puzzle later.Turn around to the Constellation picture and then turn
around again to go to the locked door. See that it has dark blue handle.Check the picture on the wall of Prof. Nero Black.
Check the bookcase on the left and the small table
right of the door.
Check the
picture on the little table. She is the Nico’s cousin: the TV speaker in the
Dream.
Check the newspaper at the bottom of the small table
to see 2 very important men (handsome too).
Time to go back and dream. Right click to see the
icons at bottom of screen. Click on the syrup bottle at bottom of the screen.
Marina Piccola:
Massimo at Marina Piccola – Go back to Massimo
at the snack stand. Massimo gives postcard 2 showing the Scala Fenicia
entrance. He says that when you get all 5 wedges to come back and see him.
Scala Fenicia: Jump to the
end of Viale Axel Munthe or close to Villa San Michele. Go forward to the
entrance of the transport gate.
Use postcard 2 of the Scala Fenicia on the frame
right of the doorway.
Take a hike going down the mountain. Midway pick up an
emerald ring from the steps. Continue the trek and then pick up the
SPQR constellation book written by Caius Cornelius Trasillus shown by the
stars that dropped
down from the rock netting. Check the book in inventory.
Palazzo a mare: At the bottom of the staircase, check the
plaque on the wall of N. Hadrawa, the dealer in Antiques and Coins located
at Vico Caprile 160.
Statue of Augustus – At the seashore, see a black oval on the wall. Look
close and click to see if something happens. It has the 12 astrological signs.
This puzzle will not be activated until later in the game. Pull back and meet
the statue of Augustus, Emperor of Rome.Learn about how Augustus got and handled the obsidian disk. Tiberius found the
obsidian disk after his father’s death and now he is one of the spirits that roam.
Snake – Go left and forward. Meet Tiberius, the snake. Oops! He bit you
and you returned to Reality. Drink the syrup to get back to the Dream.Go back and listen to the statue of Augustus. He wants his arm back before he helps you with the snake.
Go back to the snake and this time before getting close to the snake; use the
snake obsidian stone 3 on the screen. Watch the snake touch the stone and go
back to his den.
Beach – Go forward until the very edge of the water. Look down at right
and remove the stone pile. Take Roman coin 1.
Climb the stairs again until you get the comet icon at bottom of screen. A jump
point for Palazzo a mare is now present.
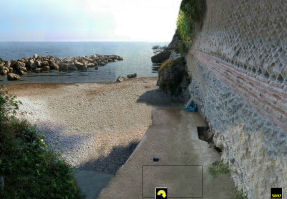
Find the arm of the statue of Augustus
MacKowen House (3): Jump to Piazza Vittoria. Go forward
to Via Orlandi. Turn right at the red house.
Giulia MacKowen – Enter and listen to Giulia, MacKowen’s daughter, Mirta in
Reality. Give her the emerald ring taken from the Scala Fenicia.She talks about her father who loves archeology. He mixes colors: blue was
green and vice versa, purple was yellow and vice versa. He has an office in
Damecuta. She never went to the studio at Damecuta.
Courtyard – Look around at the different decorations in the courtyard. A
triangular stone has a word that gets incandescent.Exit and jump to Via Caprile.
Vico Caprile:
Norbert Hadrawa (6) – Enter his office, climb up the stairs and meet
again the
sinister man who is Adriano in this dream. Give him Roman coin 1 and get 10 caprini
in return. Exit the office.
Damecuta
Buy ticket – Jump to Piazza Vittoria and go forward until the green
vending machine (1). Press the button and use the 10 caprini on the machine.
Take the blue season bus pass for Grotta Azzura (Blue Grotto).
Bus – Jump to Caprile. Press the button on the yellow bus caller. Select
Blue Grotto and then insert the blue bus pass.Turn around, forward and pan right. Enter bus. Listen carefully to the bus
driver talk about secret passage to the Blue Grotto. Exit at Damecuta. Take note of
the blue bus caller at left.
Ruins – Go forward until the gate. Enter and look around. Enjoy the
sceneries – they are great and breathtaking.Go forward just before the ruin’s near wall. Go right and continue to the right
until start of the ruins.Go forward until the far wall. Pan left and see that you can go up the stairs or
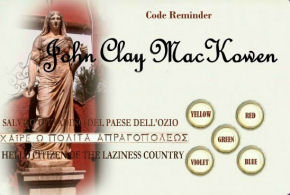
down by the fence.Go up the stairs until the very end. Check globe map. Pick up John Clay MacKowen’s
code reminder (A). Turn around and go back down the stairs. This
time go left by the fence.
At the north side of the ruins. there are 3 alcoves. Two are empty and the
middle one has glass doors.
MacKowen’s studio (B) – Look close at the circles right of the door.
Press the black button and see that the colored items appear in the circle.
Look at MacKowen’s code reminder in inventory and see the code of the lock.
But remember what Giulia said about her father mixing up colors: blue was green
and vice versa, purple was yellow and vice versa.Top left should be yellow, so change it to purple.
Top right should be red, leave it red.
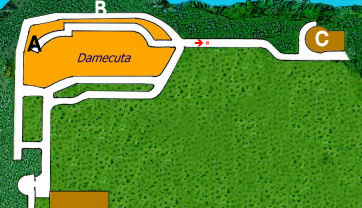
Middle should be green, change it to blue.
Bottom left should be violet, change it to yellow.
Bottom right should be blue, change it to green.
Hear a sound. Press black button. Pull back and enter the studio.
Take the unforged stamp and MacKowen’s red notebook. Read it in
inventory. Ah, Giulia was here. Read also about Tiberius using the Blue Grotto
as a private pool and hiding place for lost artifacts. Exit the studio.
Tower (C) – Turn right, forward and the left. Go forward until the
tower. Go left and around the tower to see the metal door.Look through the keyhole and… Look at the red word right of door. That is
familiar. Jump point for Damecuta is now present.
MacKowen’s house – Jump to Piazza Vittoria and walk down to the red
MacKowen’s house (3).Listen to Giulia and learn what happened to her father and his research. He found
the tunnel.A phone rings; this means there’s a phone call at Reality. Giulia
wants to meet you at 4 PM at Le Boffe, the small plaza down the road.
Look around at the pictures in the room.Exit and look close at the triangular artifact on the wall. The letters are the
same as the one at Damecuta tower.Use the blank (unforged) stamp on the
on incandescent triangular stone to get forged stamp.
Tower door – Jump to Damecuta and walk to the tower.
Look close at the red word right of door. Use the forged stamp on red word.
Pull back and enter the tower.
Tunnel – Go down the stairs until the dark tunnel.
The path splits left and forward. Go forward to the porthole at end of the
tunnel. Look through the porthole. See a cavernwith a starfish and hear snoring.
Turn around, forward and then go right to the other path. Go forward until the
opening that looks out to the Blue Grotto.
Claw – Press the red button and see the claw go down. The left button
raises it. Let’s leave it down in the water for now. We need to get to the water
side and see what we can find there.Turn back; turn right at first chance, forward, right and forward until you get
outside.Exit the ruin site and walk back to the blue bus caller panel at main road.
Press button and select Blue Grotto. Use blue bus pass.
Blue Grotto: The bus caller also asked if you’re going to
meet O Riccio. Climb the bus. Again, O Riccio is mentioned for a boat to get inside
the Blue Grotto.
O Riccio – Pan left at the bus stop area. Go down the step under the O
Riccio arch. Go forward or follow the white footsteps on the pavement. Turn
right at the metal arch. Go forward until the bar area way in the back of the
restaurant. Go right and see O Riccio.Listen to O Riccio.
He wants
you to play Scopa, the card game you practiced in Reality and he will lend you
his boat to enter the Blue Grotto if you win a Scopa game.
Scopa – Read the book at bottom right of the screen to review the cards,
rules and counting of the game.Have fun playing
and winning a game or use the bypass show at the Instructions in the main menu
page.Bypass – Go to frame 3945. The number of the frame is
seen at bottom right if you have checked it in the main menu.Turn around, go first left to enter the room and move
the cursor to the rightmost bottle in a wood box. The cursor will change to a
cross. Click on bottle and now the card game is won.The boat for
the Blue Grotto is waiting for you.
Hear a sound.Go left and forward to exit the restaurant.
Nereids – Go right, forward to the very end of the coastline and see an
aquarium. Looks familiar.Turn around and go left to the water. Look in the water and meet the fun loving
Nereids. Note the end of a pipe at left.Read about Nereids in the Guide of the Sea book. Learn that they are mad for
perfume, especially ones made in Capri. Also recall what the perfume seller
said. Pull back.
Catch the Nereids – Check the aquarium and see that the other end of the
pipe is attached to the aquarium. Hmmm…Turn around and look at water pump panel. The pump can be turned on or off and
the valve can be open or close.Fill the aquarium by turning on the pump. Open the valve to fill the tank. Wait
a bit and then close the valve – the tank is filled.Go to the aquarium and see it filled with water. Use the perfume. Now the water
is perfumed.Go back to the water pump panel. Press pump on. Open and immediately close the
valve.Look in the aquarium and see the Nereids are now in the aquarium.
Listen to the Nereids again and they will help you find Nereus. Nereus knows the
past, present and future.Pull back and take the aquarium with Nereids.
Nereus – Turn around and go forward until the stairs at the very end
below the parking lot. Go down the stairs to the boat dock.Enter the boat and row inside the Blue Grotto. See the rope of the claw that is
submerged in water and the glass window of the tunnel.Go left while in close up view of the rope. Go forward until the cavern.
You will hear
snoring again.At the cavern, see the porthole that was seen in the tunnel earlier.
Use the aquarium in the cavern. Nereus (Nico’s uncle) woke up and rose from the
familiar pink seashell.Nereus talks about the past and present. The arm is under water in the grotto.
You are spelled to be able to swim.Now he changes to a starfish.
The arm, the arm – Go back to the boat. Go forward to the hanging rope.
Dive down by the rope. Press the catch button to get the claw to grab the arm.
Turn around and go up. Ride the boat and go to the boat dock.
At the boat dock, jump to Damecuta. Go to the tower.
Enter the tower and go down to the tunnel.
Close to the end of the tunnel, go left to the window looking out to the Blue
Grotto.Use the up of the claw control panel. Click on ‘near’ button. Take Augustus’
arm.Climb back up a few steps and use the jump icon.
Palazzo a mare: Jump to Palazzo a mare. Go down the stairs and go to the statue.
Statue of Augustus – Give the arm to Augustus. The statue says to align
the stars in a particular alignment. This alignment makes Tiberius benevolent.
Pull back and see the statue activate the black oval puzzle.
Constellation puzzle – Look close at the black oval on the wall again.
Stars are now present. The constellation of Scorpio is seen at bottom right.The aim of the puzzle is to arrange the stars like the picture at bottom right.
Select a star to move; it becomes red. Click the directional arrow as many times
you want the selected star to move and then click the ‘go’ button. At the
correct spot, a ping sound is heard. The properly placed star turns to white and
cannot be moved anymore.There’s a
bypass here. It can be found at the Instructions at main menu.
Pull back and watch the fireworks done by the statue.
Tiberius the snake – Go to the snake and listen to what he says.
Go forward and then turn around. Look at the hole on the wall right of path.
Take the azure wedge.Turtle appears and says that you should talk to Gunnar the philosopher at Punta
della Migliera.Look at the azure wedge in inventory.
Seagull
Via Migliera: Climb the stairs and jump to Piazza
Vittoria. Turn around and go right. Walk the road by the Anacapri bank.
See that the turtle is now gone. Go forward. On the way, see an
old red scooter and a big gas tank left
of the path.Go forward for a while and see a blue book hanging from a gate at right. It is
the Meditation upon Western Wisdom; Guide to The Capri Philosophical Park by Gunnar Adler-Karlsson. Turn around and see that the Philosophical Park is across
the street.
Punta della Migliera – Continue to the end of Via Migliera. Look around
at the beautiful sceneries at Punta della Migliera.Turn around, go forward and then go right until the end of the path. Before the
end of the path, look close at and take the medallion at the rock
enclosure. Look at medallion in inventory. Turn it to read – Limoncello
seasoning time 15 days.Go back to the main road. 2 jump points are now added to the map.
Gunnar at Casa Marianna – Go right and forward until the open gate of
the white house on the left.Enter and go down to the back of the house. Go forward to the far end and then
go left.By the rock wall meet Gunnar. He says for you to go to the Philosophical Park.
Pan right and go up the stairs.
Philosophical Park – Exit and go to main road. Go left and forward
until the wooden gate on the right.Enter the Philosophical Park. Go forward and read the wise words on the tiles.
Go left at first fork of the path. At the end of the path, listen to Gunnar again.
Go back to the main path and continue deeper in the park. Take the right path
before the curve on the main path. Gunnar is at the end of the path.Go back to main path and continue to the right by climbing up the steps.
At the next curve in the path, see a rock with a missing tile. Use the tile
given by the artisan on the rock. "Know yourself". Take the tile with the
wise words and the clock remote control 1. Gunnar says that you can
advance time forward a few hours. Find the monk in Cetrella that can help you
find the fourth spirit, Barbarossa.Continue to the end of the path to view sceneries and see the
Swedish Royal seal on a
tree trunk cut in half.
Reality 4: Right click
to see the icons at bottom of screen. Ring the bell at bottom left to go
back to Reality.

Locked door – Enter the animal codes seen on
the Azure wedge on the locked door.Top to bottom: dolphin, snake,
gecko, dolphin, snake.Kitchen – Enter and look around.
Read the letters from Adriano and Mirta on the
counter. Mirta met Nico at Le Boffe at 4 PM Monday. She talks of limoncello and
Mount Solaro. At Mount Solaro, her hat fell on the pool. She also mentions
Cetrella and Barbarossa. Adriano is now very threatening.Look at the tiles hanging on the walls. Pan left,
forward and turn around to see the tree ring tiles.The art of reading coffee grounds. Pour the coffee in
a container full of water. Drain the water, waiting for the grounds to appear in
the bottom. A message will appear if a ghost wishes to contact you.The art of reading the age of the trees. Count the
rings starting from the center to the outside of the tree. Each rings equals one
year. Every year is a fragment of the secret life of plants.Read the letter on the kitchen counter on the right.
It is about the Nelson & Sons security system installed in your home. There is a
strongbox also added.The guard of the local Security Service, Falchetti,
also watches the house every two hours.Take note of the picture of the seagull on a picnic table and
the Solar Panel fuse setup above the seagull.Check the message on the answering machine from
Adriano. Check the medallion left of the phone. Read the postit
note on the fridge.
Time to go back and dream. Right click to see the
icons at bottom of screen. Click on the syrup bottle at bottom of the screen.
Via Migliera:
Jump to Via Migliera. Go forward once and then take the left path. Go forward
until a giant clock.

Clock (16) – It
is time to move the clock up to 4 PM to meet Giulia at Le Boffe.Go close and use the clock remote control 1
on the clock.Enter and look close
at the gears. Press the red button and the clock moves ahead to 4 PM.Turn around and look
close at the microwave that is set for 0, 15 or more days instead of minutes.Exit the clock.
Anacapri July 7th 2011 4 PM
Le Boffe (5):
Jump to the Caprile point. Go forward until Le Boffe. Listen to Giulia. She
wants limoncello and she mentions about the limoncello shop at Via Axel Munthe.
Limoncello:
Limoncello shop (11)
– Jump to Piazza Vittoria. Turn around and go left. Go forward until the
Limoncello shop.Enter, go left and
listen to the saleslady. There is still no limoncello available.She mentions that you
can make it yourself at the laboratory at Villa Migliera by the clock.
She gives the recipe-ingredients of limoncello. You can get the lemon
from the water seller. Be sure to soak the lemon peel in alcohol and season
it. The seasoning time can be found in the medallion given out by the owner.
There is also a tasting machine in the lab.Water seller (10) –
Exit the shop and go left. Go forward until the snack bar. Take a lemon.Laboratory –
Jump to Via Migliera. Go forward and then take the left path towards the clock
(16).Before getting to the
clock (6 clicks from making a left), go left through the trees. Forward until
the stone laboratory.Enter and look around. Pan left.
Read the recipe
given by the limoncello saleslady.1. Ingredients:
lemons, alcohol, sugar.2. Boil water and
sugar to get syrup.Gas – Go to
the copper setup on the bench at left. Note that the gas tank is empty. We
saw a gas tank earlier.Take the
propane cylinder. Exit the lab. Go to main road and go right to get to
Via Migliera.Go left, forward
~28 clicks, take the left road and forward until the big gas tank.Use the cylinder
on the gas tank faucet. Turn the faucet. Take the full cylinder.Go back to lab by
jumping to Via Migliera and back to the lab.Make syrup
– Look close at the copper setup over the stove. Place the full cylinder
back right of the stove.Turn the red tap
of the gas to get gas.Press the water
button, then the sugar button and then the gas button to get flame.Press the pour
button to automatically place a bottle and get pot with syrup.In case
the syrup is not done correctly, use the syrup bottle here destroying it
and start again.3. Mature lemon
peels in the alcohol.Get lemon peels
in alcohol – Look close at the machine on the left.Use the lemon on
machine and it will be placed on the hole at bottom left.Press the right
big oval button to get alcohol in a bottle.Press the left
small oval button to get lemon peels in the alcohol bottle. Take pot
with lemon peels.In case
you pressed
a wrong button and the lemon is destroyed, go back to the water seller
to
get
another lemon and start again.Mature the lemon
peels – Look close at the medallion in inventory. Turn it and it states to
mature for 15 days.Exit the lab and
go to main road. Go left to the big clock.Go close and use
the clock remote control 1 on the clock.Enter, turn around
and look close at the microwave.Press the left
button to set the ageing microwave machine to 15 days.Open the machine
and place the pot with lemon peels inside.Close ageing
machine and press the bottom button.Open machine and
take the aged pot with matured lemon peels.Close machine and
go back to the lab.For fun: You can
try to microwave-age the fish from the fridge or the whole lemon.In case
the pot is not done or aged correctly, use the pot at the alcohol machine
destroying it, go back to the water seller, get another lemon and start
again.4. Mix matured lemon
peels with the syrup.Go to the orange
machine at end of left counter.Use pot with syrup
and pot with matured lemon peels (syrup) on machine.Press the mix
button and get small bottle with limoncello.5. Serve cold.
Pan right and open
the fridge.Take the fish
out. Place limoncello inside and close
the door.Open fridge and
get limoncello bottle. Close door.6. Tasting machine.
Go to machine at
center of back wall.Look close and use
the chilled limoncello on machine.Press the lever.
‘Great! That’s the true limoncello.’Lift the lever and
take the limoncello.In case
the limoncello is not done correctly, use the limoncello bottle at the mix
machine destroying the bottle, go back to the water seller, get another
lemon and start again.
Giulia – Jump to the Caprile point. Go forward until Le Boffe. Give
the limoncello to Giulia.
If the
limoncello is not good, Giulia will tell you, take another lemon, destroy the
bottle and retry.Listen to Giulia. She advises to talk to the monk of
Cetrella at Mount Solaro. She
gives Roman coin 2.
Via Orlandi:
Villa Orlandi – Go to Dr. Orlandi’s house. Use the knocker and
talk to Dr. Orlandi’s assistant. Oh my!TV
broadcast (8) –
Go
to the shop where there is a TV set .
Watch
the afternoon news broadcasted through the window of the shop.Florist (4) –
Go forward to the florist.
She promises you help in case of need.
Mount Solaro:
Norbert Hadrawa (6) – Jump to Caprile point and walk back to Hadrawa’s office. Enter his office, climb
up the stairs and after listening to him, give him the Roman coin 2. Such a
sinister man. Get 10 caprini. Exit office.
Buy ticket – Jump to Piazza Vittoria and go forward until the green
vending machine (1). Press the button and use the 10 caprini on the machine.
Take the purple season chairlift pass for Monte Solaro.
Chair lift – Jump to Piazza Vittoria, turn around and go right. Enter the
building ahead. Give the season chairlift pass
to the ticket seller.The chairlift is out of service. He lets you fix it. The repairman said that it
only needs 4 fuses that can be found in scooters.
Fuses – Go upstairs and see a sign from De Angelis for electric supply.
He is found close to Church of Santa Sofia.
De Angelis – Go to Via Orlandi and walk forward until the De Angelis shop
seen on the right at the corner.Enter store and eavesdrop on the phone call. There is a red scooter bound for the scrap yard
left at Via Migliera with the key behind the seat.
Red scooter – Jump to Via Migliera. Turn around and go forward until a battered
red scooter is seen on the left.Go pass it and then turn around. Look close at the lock behind the seat. Lift
the seat and then look close at the fuses. Take 4 colored fuses.
Fix the solar panel – Jump to Piazza Vittoria. Turn around and go right
to the chair lift building. Climb up the stairs. Look close at the solar panel.The clue here was found earlier in the solar panel in the Reality’s kitchen.
Place the fuses similar to the fuse setup in the Reality’s kitchen.
Place all 4 fuses on the Spare Fuses slots.
Then enter the group number, the fuse or circle location in that group and then
the color of the fuse. Click fix button.The group is a set of slots-circles in a rectangle. Count top row left to right
as 1 – 9. The bottom row is 10 – 18.The fuse number is the number of the circle showing its location. Count within a
group top to bottom: left column is 1 – 9, next column is 10 – 18, next 19 – 27
and right column in that group is 28 – 36.
Enter number by clicking on the buttons on the left:
Group 1, fuse 12, color green. Click fix button. A high pitched sound will be
heard if done right or a bass sound if wrong.Group 3, fuse 28, color blue. Click fix button. A high pitched sound will
be heard if done right.Group 7, fuse 33, color red. Click fix button. A high pitched sound will be
heard if done right or a bass sound if wrong.Group 11, fuse 7, color yellow. Click fix button. A high pitched sound will be
heard if done right or a bass sound if wrong.The fuses should be done correctly for all colors. If an error is done in one
color start over.The chair lift is working now. Go left and ride a chair. Go forward until the
top of Mount Solaro. Enjoy the view.
Top of Mount Solaro – Climb the stairs and look around at the gorgeous
view.
Giulia – Go forward to the building, left, then right, left towards the
tables and meet Giulia.She says that the path to Cetrella needs a pass. Her hat with the pass blew into the pool.
Get the hat – Turn around from Giulia. Go forward to the ivied arch.
Generator – Go left and left again. Go down the steps, right and go down
the steps again on the left.Go forward and left by the wood fence. You can go forward and enjoy the view, if
you want.Go forward on the dirt path until you can go left to a door under the landing.
Turn on the orange switch on the azure frame. There is power now.
Fan –
Turn around, forward and left to the big fan.Climb the steps and see the hat at bottom of a dry pool.
Turn around, forward and turn around again
Look close at the panel under the path. It says laser on, water out.
Climb up and then to the steps on the right. Go up to the balcony and then go
right.Look at the laser control. Press a button and see that it runs the big fan. The
fan’s wind cannot touch the hat at bottom of pool.Go down to the panel under the path. Midway see a green panel. It is for
temperature control of
the pool. Press the green button to get Laser off, water in. Go up and see that
the pool is filled with water. The hat is still far off the edge of the pool.Go right and midway up the stairs on the right. Turn around and face the green
panel. Press the red button and see that it froze the pool water.Go back to the panel under the path. Press the button and see Laser on, water
frozen.Go back up to the balcony with the laser control panel. The blue button blows
wind and the red button sucks in wind. Press the red button. See the hat move to
the edge of the pool.Go down and pick up the hat. In inventory, look at and turn the hat twice
to get a Cetrella Hermitage pass.Mount Solaro now has a jump point.
Cetrella Hermitage:
Cetrella path – From the pool, turn around, forward, left,
forward, right and down the path. Go forward until the stand. Use the Cetrella
pass or the laser gate will stop you ahead.You will hear moaning while taking the nature walk. Go left and forward until
the tree people. They are moaning. Turn around and go back to the main path and
continue down the mountain.
Picnic table – Take the right path at the small altar. Go forward until
the picnic table on the right. Look close and take the crumpled paper 2. Read the
crumpled paper in inventory. Ah – Someone is following you and knows how many
wedges you already collected.
Guardian of Monastery – Continue on up stairs to the monastery. Listen to
the guardian of the Monastery. He wants you out of here. He also said the trees are
hungry.Go forward and check the door of the Hermitage. It needs a code. Turn
around and walk down the steps.Go left midway down the steps. At the end of the path, take lemon verbena
from the pot.
Talking trees – The Guardian said the trees are hungry.
Feed the trees – Jump to Piazza Vittoria. Go forward on Via Orlandi until
the florist (4). Listen to her and then pick up the fertilizer in a nice
pot.Jump back to Cetrella (or Monte Solaro). Turn around and go back to the trees.
Go left to the path up to Monte Solaro.Go right when you hear the trees groaning. Go forward and give the fertilizer to
the trees.Listen to the trees. They gave a hint that the code to the Hermitage might be
the guardian’s birth year.
Door Code – Jump to Cetrella and climb up the steps. Listen to the
guardian. He says that the trees where planted during the year of his birth.
Some of the trees were cut down in 1619.Go back to the trees and look at 2 tree trunks: one at main path and the other
right of the talking trees. Remember the clue seen in tiles in Reality’s
kitchen wall.Count the rings starting with the center ones. There are 19 rings.
The trees were cut down 1619 less 19. The guardian’s birth year is 1600.
Hermitage – Jump to Cetrella and go forward to the Hermitage.
Enter 1600 on the door lock. Enter the Hermitage and look around.
The Monk of Cetrella – Go forward and climb the stairs. Turn right to go
up to the veranda. Look at the scenery. Turn around and go left. Look in the
hole on the wall and see glowing eyes.Go back inside and down 2 flights of stairs.
Go left to the dining room and forward to the kitchen.
Call the monk – Remember the clue seen at the tiles on Reality’s
kitchen wall.Take the espresso coffee maker from the table on the left.
Go forward and then turn around. Look close at the sink on the left.
Turn on the faucet to fill the sink with water. Close faucet.
Use the espresso coffee on the sink filled with water.
Move the lever to the left. Move lever back to the right.
Look in the sink again. Read the monk’s message: Burn lemon verbena. I will
appear.Go to the dining room. See that a candle now burns. Use the lemon verbena taken
from the pot outside on the flame.Listen to the monk with the glowing eyes. The disk might be in Barbarossa’s
castle. First you must go to the cave and get what you need there. "Do not
return".Turn around and climb the stairs. Go left to be outside, go left pass the tables
and left again at end of the patio.Go down the steps and enter the cellar. Go left to first room. Open the cabinet
and take the wrench. This cabinet will be activated only after talking to the monk.Go to the next room and then outside. Turn around and get the elevator map
right of the entryway. Read the paper in inventory.Exit the Hermitage and listen to the Guardian.
Elevator – Go down the stone steps and go left to the stone path before
the picnic table.
Balls – Go forward to end of path and see the metal pipe hanging over the cliff. Take a
ball and drop it inside the metal pipe. Hear the ball fall into the sea.
Elevator – Turn around, forward and right to enter the dome. Look around and
then turn to face the entryway.Read the elevator map again and see that the top level is at 320 and a second
level is at 97 feet.
0 level – Press the button to open the elevator. Back up and enter the
elevator. Enter 0 on the panel. Then press the Go button.Exit and look around. At right is a chest and it is locked.
97 level – Go back in the elevator and now let’s check the other level.
Enter 97 and press the Go button.Exit and look around. Look close at the gear that changes the position of the
pipes. This might be the end of the pipe with the balls on top of the mountain.Use the wrench to change the position of the pipe.
320 level – Enter elevator, enter 320 and press Go button.
Exit and go to the balls and pipe – forward and left of the path.
Take a ball and place it in the pipe. Listen —- bang.
0 level – Go back to the elevator and go down to the beach level.
Turn to the chest and take the parchment.
Go up to top floor and exit the dome.
Walk back to town or you can use the chairlift at Monte Solaro. I would
recommend walking. Once you get to the small altar, go forward instead of left
to get to Monte Solaro. Pick up crumpled paper 3 from base of tree at
left of the path when close to town. Someone is still snooping. You can jump to
the Scala Fenicia point now.
Villa San Michele: Turn around after jumping here. Go
forward and enter Villa San Michele or Axel Munthe’s house.
Entry – Talk to the man. He wants you to tell him the 3 pets of Dr.
Munthe.Take the animal card and the 3 tile picture clues.
The clue to get the answer can be found at Chiesa di San Michele. Go to the Church and climb up
to the balcony. Look down at the tiles of the animals found in the Garden of
Eden. Use the picture clues the man has given to recognize the 3 animals.Go back to Villa San Michele. Then using the animal card, select dog, owl and
monkey. Give the animal card to the man.Now, you may enter.
Tour of the Villa – Tour the villa and enjoy:
pewter plate room, kitchen, inner courtyard with a well at the center, Dr.
Munthe’s bedroom, book room where the phone rang
and an office with table,
chairs an a pendulum clock.Exit to go outside and see: a covered well at the
walkway, marble statue, busts and a marble table at the center.Go to the garden and look around the beautiful flowers
and the fresh water fountain.
Go forward on the ivy-covered walkway. Climb the stairs at end of path and then
climb left again to be at the building.
Roman cave – In the middle of the room is a
stairs that goes down to a Roman cave. Go down and right to cave. Pan right and
listen to Dr. Munthe. He asked the sphinx to help you.Sphinx – Exit the building and go right twice.
Go forward and look close at the sphinx overlooking the north side of the
island.Press the red button. Listen to the sphinx. Before she
gives you the key to Barbarossa Castle, she wants you to do the riddle.Sphinx quiz – Take the paper and read it in
inventory.
Just in front of the young boy,
round and round they always look,
on a big flat marble table,
under two green metal eyes.
You can put the bread on them,
eat, but soup you cannot sip.
Count them up, how many are they?
Keep in mind and then proceed.
A. Go back to the hallway with marble statues and
count the number of round mosaic plates on the marble table – 9 plates.
They are blue, they are mute,
headed for the Faraglioni.
On the rocks they like to stay,
don’t be afraid, they won’t fall down.
They
don’t swim, they don’t know laugh,
they
don’t smile, they don’t cry.
They are few, just make your guess,
add it to the former number.
B. Go to the Olivetum – nature display building at
other end of the villa. Enter the building and look at the display behind the
post at the center – 2 blue lizards. 2 + 9 = 11
They are useful, aren’t they?
As you can’t be on your feet.
Count the ones inside the room
where sometimes Axel eats,
where the
old pendulum clock
beats out
time while it goes by.
Look and count, how many are they?
Add them up to what you have.
C. Go to Dr. Munthe’s
office inside the house – 6 chairs.
6 + 11 = 17.
Go now where the sweet delights
of the palate are prepared,
where aroma blends with wine
celebrating cooking art.
You can find them on a shelf
Count them carefully and then
multiply
their number by
that last
figure in your mind.D. Go to the kitchen – 7 mugs on the shelf. 7 x 17 =
119
They are involved in lunch or dinner.
If they fall dawn they don’t break
as their fragile brothers do.
Count them up, but only those
standing upright on the shelves
on the
hutch and dresser too.
Times the number found before
a new figure now you get.
E. Go next door to the pewter room – 35 upright pewter
plates. 35 x 119 = 4165
In the air, no more they wander,
nor the birds may fly with them.
since they are fastened with pins
in a show case. What bad luck!
What a shame! They rest in peace.
Count the ones behind the glass,
get a number, subtract it
from the old result you’ve got
F. Go back to the Olivetum and check the 2 butterfly
cases, one on each side of the room – 55 butterflies. 4165 – 55 = 4110
They are light or they are dark,
They are all around a well,
Looking up toward the sky
they can’t see, they have no eyes.
None of them have seven sides
but they share the ones they have.
Final code is former count
minus sides you figured out.
G. Go to the well at the inner courtyard just after
the kitchen and before Dr. Munthe’s bedroom – hexagon (6 sides) tiles. 4110 – 6 =
4104.
If the calculation is right,
that’s the code, so push the buttons.
So that little door will open
with a nice surprise for you.
Go back to the sphinx, press red button and enter
4104. Take Barbarossa gate key from the compartment.
Barbarossa Castle: Go to the
gate beside the Olivetum. Use the key on the lock of the gate. Go forward, open another gate
and continue forward. Take a left on the stone path.
Green door – Forward until the green door with
a map with a square hole blocking the entryway. That map looks familiar.Use the parchment taken from the chest on the map.
Continue up the steps to the top of the castle.
Seagull – At the balcony, see a familiar
scene. It is the painting in the kitchen in Reality. The door is locked.
Use the Obsidian stone 4 (seagull) on the frame-scene
of the table with the door ahead. Listen to Barbarossa.The door is opened. Enter and take the Turkish coin from the
counter. Turn around and take the red wedge.Listen to the turtle. Look at red wedge in inventory.
Exit the castle and go down the stone steps. Midway
down, take a left to the Barbarossa castle poster. Then forward to a picnic
table. Take crumpled paper 4. Read it in inventory. There are now jump points for Villa San Michele and Barbarossa’s castle.
Reality 5:
Right click to see the icons at bottom of screen.
Ring the bell at bottom left to go back to Reality.

Locked kitchen door – Enter the animal code
seen in the red wedge.Top to bottom: seagull, gecko,
snake, dolphin, seagull.Sitting room – Go to the desk and read the
letters from Mirta, Adriano, Falchetti the security person and Dr. Greenturtle.Look at the 2 framed tiles on the walls; they are
clues.In the
dream, you heard two phone rings: in De Angelis’ shop and in Villa San Michele.
Listen to the two
new messages in the answering machine.Check the gear and the clock on the table close to the
door.Exit sitting room and check the bathroom and green
locked door handle.
Time to go back and dream. Right click to see the
icons at bottom of screen. Click on the syrup bottle at bottom of the screen.
Last Wedge
Faro: Jump to Caprile.
Hadrawa – Go forward until Hadrawa’s office.
Climb up and give him the Turkish coin. Take envelope and open it in inventory.
The 10 caprini and a receipt for the previous coins is now in inventory.Check the handwriting of the receipt. It is the same
seen in
the crumpled papers! So it is Hadrawa who is following you
and
looking for the disk.
A phone call is heard. Exit the office.
Buy ticket – Jump to Piazza Vittoria and go forward until the green
vending machine (1). Press the button and use the 10 caprini on the machine.
Take the green season bus pass for Faro.
Bus – Jump to Caprile. Press the button on the yellow bus caller. Select
Faro and then insert the green bus pass.Turn around, forward and pan left. Enter bus. Listen carefully to the bus driver
about the French and English battle that happened in Faro and that there’s a ghost
that wanders around there. Exit the bus. Take note of
the pink-red bus caller.
Lighthouse – Go right and down the stairs. Go forward and take the path
at diagonal left towards the lighthouse. Pick up the red stone from the
right side of the path. Turn around and go back to the split in the path.
Round structure – Take the left path. On the way in an enclosure on the
left, take the gray stone. Go forward until the round structure. At right
side of the round building is a slot machine. Play with it. The clue will be
seen later. Go back to the path and go forward until the fork in the path.
Beach area – Take the left path to go to the beach area. Go right to the boat
shelter area. Go forward and look through the ring and take the yellow stone.Continue down the steps to the water’s edge. Take the blue stone from the
rocks at left.Go back up and up the red brick steps. Faro has a jump point now. Go left and
walk to Tombosiello.
Tombosiello:
Lt. Nelson – Meet the ghost of Lt. Nelson. Carry on. Go forward until
the dead end. Take crumpled paper 5 from the left. Ack,
Hadrawa is just waiting for you to find the last
wedge…Turn around and take a right at the split in the path. Go forward and then left on a gravel
path to get to Tombosiello.Go forward and listen to Lt. Nelson again. Learn that Capt. Church found the
disk. Nelson drew something on the ground, we’ll check it later. Now, go towards where
he pointed.Listen to Nelson again about the French strategy, what Cmdr.
Hudson Lowe ordered and
dismissal of Capt. Church. Nelson hid the disk.Take the key to Fort Pino. Each of the forts has a machine that
he and Capt. Church
made. Each
machine activates the next. Fort Orrico has an object that he hid that will lead
to the disk.He gave some advice – Place the horse in the pot and the teeth under the mouth.
If you are in need of kindling, look under the green roses, on the way to the
Fornace, the lime kiln.
Drawing – Go back and look at Nelson’s drawing on the ground. It shows a
square, X, O X and a structure that looks like the one below the lighthouse.
Slot machine – Jump to Faro and let’s see. Go forward until the
structure.Look at the map on the slot machine. Press the red button and then pull the
lever. Ah, Nelson’s drawing (after the second pull of the lever) is seen on the
slot machine. The machine made a sound.Look at the map again and see that Fort Pino is now activated. Ah – this is the
first of Nelson’s machine.
Fort Pino: Jump back to Tombosiello. Continue on the
road, check the tiles by the road and forward until Fort Pino.
Bunker – Go down inside the fort and look around. Use the key given by
Nelson on the green door.Pan left and look at the desk. Take Cmdr. Lowe’s diary and read it in
inventory. Learn what his reasoning is, plan S392 and about the 5 wedges. When
the 5 wedges are joined, they must be set into a round hollow during the full
moonto
get
the disk.Go to the other room and look at the desk. Take red die on the table.
Puzzle – Look inside the box and see a tile puzzle. It shows 14 tiles
depicting plants and animals. The setup is the one shown in the wall at
Reality’s sitting room. They are tiles seen on the road from here, Fort Pino to
Fort Mesola.Time for the nature hike then. Exit the fort and start taking notes of tiles on
the way. Jump point is now made for Fort Pino.Go left and see the first tile – verbasco. Continue the hike. Next tile is a
lizard at bottom left of screen. Be sure to make a drawing of the
tiles and that you have seen all 14 of them.Close to Fornace, see sedum growing in a big rock right of the path – it
looks like green roses. Remember what Nelson said about kindling. We’ll look here
later when we need it.
Fornace: After the first part of the trek, see a clearing
below.
Water’s edge – At the clearing, go left and down on a cement path to the
water’s edge. Take the bronze statue.
Furnace – There are 2 fish tiles and a gecko in this clearing; pan to
the side to check them.Go forward and see a tube sticking out to the stone furnace on the left.
Remember what Nelson said – place the teeth under the mouth. Place the die on
the shelf.Go forward and left to the cauldron. Nelson said to place the horse in the pot.
Look close at and place the horse bronze statue in the
cauldron.Now the kindling, backtrack to the sedum (green roses) at the path and take the
wood close by. The wood appears only after the horse and mouth clues of
Nelson have been completed.Go back to cauldron-pot. Use the wood on the cauldron. The bronze is melted. Go
to the die and take the gear.
Way to Fort Mesola: Continue the trek until an
inactive bridge.
Bridge – Press the button on the right frame and see that it is not
working. The right circle is not green.Turn around and see a blue machine. Look close and see that the bottom gear
setup is missing a small gear. Well, you made one. Use the gear on the machine.Go back to the bridge and push the button.
Fort Mesola:
Carry on and remember to look at the tiles beside the path. After seeing the
first tile on this side of the bridge, take the left path at the fork.
Go forward and enter Fort Mesola. Now that we have a jump point here, jump back
to Fort Pino to finish the tile puzzle that will activate Fort Mesola.
Fort Pino tile puzzle – Go to the bunker and the room on the right. Open
the box.Arrange the tiles in an S curve as seen in Reality’s framed tiles.
Select a tile and use the directional arrow to place it at the correct position.
Once it is at the right spot, a sound is heard. Applause! Close the lid of the
box when done.By the way – there’s a bypass here. It can be found at the Instructions at main
menu.
Turn around and look at the map right of the entryway. See that Fort Mesola is
now activated.Jump to Fortino di Mesola.
Now that the Fort is activated, look around the area.
Bunker – Go down the steps and go right to the room. Open the drawer and
take pages of Cmdr. Lowe’s diary. Read the red book. There’s the map on
the left wall. We need to activate Fort Orrico.Go the other room.
Colored rocks – Place the colored rocks collected in the lighthouse area
at Faro on the pans in order 1-4 and by the color of the pan: red, blue, yellow
and gray. After the laser fire, press the button to open the drawer.
Tile puzzle – See another tile puzzle.
The object of the puzzle is to move the British flag from 0 circle, to 1 and so
on until it comes back to the original bottom left position and then move it to
a final configuration seen in the clue in Reality.The path of the British flag tile
as
well as
the final configuration is seen above the sofa in Reality’s sitting
room.
The tiles can be moved only to an empty area. Good luck.
|
1.
2.
3.
4.
5.
6.
7.
8.
9.
10.
11.
12.
13.
14.
15. |
16.
17.
18.
19.
20.
21.
22. bilberry – down once, right
23.
24.
25.
26.
27.
28. |
29.
30.
31.
32.
33.
34.
35.
36.
37.
38.
39.
40.
41.
42. |
|
43.
44.
45.
46 –
47.
48.
49.
50.
51.
52.
53.
54.
55.
56.
57.
58.
59. |
60.
61.
62.
63.
64.
65.
66.
67.
68. bilberry
69.
70.
71.
72.
73.
74. |
75.
76.
77.
78.
79.
80.
81.
|
The bypass for this puzzle is also found in the Instructions at main menu.
Go to the other room and look at the map. Fort Orrico is now activated.
Fort Orrico: Exit Fort Mesola and go forward
until the first fork in the path. Take the left path.
Phone call – Go forward to the next fork. Take the right path and forward
until you reach a British red phone booth. Answer the phone and Nelson will warn you
that someone (guess who?) is following you.
Way to Fort Orrico – Go back through the path and when you reach the next
fork, take the one on the right.At the next fork, take the right one again. Check the globe icon to see where
you are.
At the bottom of the stone steps, turn left and go until the end where there is
a big rock on the left. Take Richard Church’s diary. Read it in inventory.
He is the R.C. that left the marble tablet that brought Nico here.Turn around and continue to go forward.
Meet Nelson again. He again warns about the one following you.
Fort Orrico – Enter the fort and look around. Go to the other side of the
tree at the center of the fort.Go and look at the grate on the ground at right side of the passage to go to the
bunker.Go back and face the steps down to the locked door. Press the button on the
right to open the door.Should we or shouldn’t we, that is the question?
Go down and enter the bunker. I knew it! We are locked in!
Take another set of pages of Cmdr. Lowe’s diary from the bed. Read it in
inventory.Take the green wedge from the corner. Look at it in inventory.
Go to the door and see if it can be opened.
Go back to the corner where the wedge was, then turn around from the corner and
look up at the ceiling there’s a hole up there.
Move
around in the room.Ah – a rope with a letter on the hook is dropped down. Take message and
read it. You know the
handwriting. It is from Hadrawa.Do we have a choice? Use the joined 5 wedges on the hook. Pull back. Hear that
malevolent laugh.Check the door again – Hadrawa left you.
Go back to the corner again and hear music. Look up to the hole at the ceiling.
Nelson reprimands you.Pull back and the door is opened by Nelson. Exit the bunker and the fort.
Walk the path and listen to Nelson again. ‘Run, there might still be a chance to
recover the 5 wedges.’
The
Obsidian Disk
Five Wedges: Go forward a few steps and jump to Caprile.
Hadrawa’s Office – Walk forward until Hadrawa’s office. Enter and go up.
Go forward until the book case and turn around. Look close at the desk drawer.
Take the 5 wedges and close the drawer.
Exit the office.
Reality 6:
Right click to see the icons at bottom of screen.
Ring the bell at bottom left to go back to Reality.

You heard two new
phone rings in Dream:
in Hadrawa’s office and at the English red booth. Listen to two new messages at
the answering machine.Locked door – Enter the animal codes seen on
the green wedge on the locked door.Top to bottom: snake, seagull,
dolphin, dolphin, snake. Open door.Room – Look around the room. Read the Science
outlook magazine at the table left of the entertainment center
and at
the magazine on the
left side of theentertainment center. Looking around, you will find objects and statues
seen
in Dream.Look at the picture
of Mirta under a full moon – ‘where we met the first time, where everything
began!’ Ah… We know that place.Click on the latch left of the frame and see the
security box that Falchetti installed. It needs a familiar code too.Go to the hallway and read Falchetti’s letter.
Time to go back and dream. Right click to see the
icons at bottom of screen. Click on the syrup bottle at bottom of the screen.
Marina Piccola: Massimo wants you
to go to him after you get the 5 wedges. Jump to Marina Piccola.
Massimo – Go down and listen to Massimo. Take
the clock remote control 2. The clock depicted on the remote control is
very familiar. Massimo wants you to see him tonight.Clock – Go to the stairs leading up and out of
the beach area.Use the clock remote control 2 on the clock on the
green door. Push the button below the clock to turn it to midnight.
Marina Piccola July 7th 12 PM
Close the clock door and go back to Massimo. Such
wonderful view and lights. Listen to Massimo.Turn right and then right again. Look up at the
constellation of Scorpio.Go to the boat dock by going forward towards the
stairs and turn right to go to the beach. Go forward and climb the boat dock
stairs. Go forward until the end. Turn left to face the full moon and the round
hollow on the wall.5 wedges – Use the 5 wedges on the round hollow
on the wall. Press the button on the left.Surprise! No obsidian disk is inside! See the new animal code.
Reality 7:
Right click to see the icons at bottom of screen.
Ring the bell at bottom left to go back to Reality.
Security box – safe: Enter: top left –
snake, top right – gecko, bottom right – seagull, bottom left – dolphin and
center – gecko.
Explanation of the story by Gey SavareseRead the letter from Dr. Greenturtle about
making your decision and the medical use of the Syrup of Dreams.
This letter is the last
piece of information you needed to fully recover your memory and understand why
you locked yourself in the house. Adriano wants your discovery of the molecule
NH160. He financed your research and threatens you to stop the funding if you
don’t hand over the CD-ROM (which holds your research on the synthesis of the
NH160 molecule). On the other hand, you are aware that the molecule is very
powerful and dangerous. Mirta doesn’t want you to give your discovery to
Adriano, who could misuse it. She suggests that she may even leave you forever
if you hand over the CD-ROM
to Adriano. Tormented by this dilemma, you decided to take the Syrup of Dream,
with the purpose to know better yourself, and find the solution of the dilemma
through the dream. A collateral effect of the treatment is the temporary loss of
memory, that can be rebuilt bit by bit during the waking-up periods between the
chapters of the dream. To avoid interference with the treatment, you locked
yourself in the house, scattered over the house documents to help the memory
recover and gave the key of your house to Falchetti, in case of any
unforeseen
problem.Take the CD-ROM that
holds your research on the synthesis of the NH160 molecule. The CD-ROM was
transposed into the obsidian disk in the dream. Your quest for the obsidian disk
in Anacapri was actually the quest of understanding what to do with the CD-ROM
in the Reality. The journey in the dream should give you wisdom for the next
choice!
Save Game here to see 2 endings:
Take the Obsidian disk – the CD that holds Nico’s
research on the synthesis of the NH160 molecule.Close the door and turn around. See Adriano come in the house,
using a key stolen to Mirta. Listen to Adriano,
save the game
and then make your choice…
Explanation of the
two endings by Gey SavareseEnding1:
You
decided to give the CD-ROM to Adriano, despite Mirta’s advice. After all, you
need to be financed for your further research activity, and Adriano paid your
research activity. But Adriano also wants you to hand over the full rights to
exploit the NH-160 molecule. You refuse, so he threatens you with a gun.
Falchetti (Lt. Nelson in the Dream) and Mirta enter the house using Falchetti’s
keys and arrest Adriano. Mirta is disappointed by your decision and leaves you,
Nico Fredi, for the second time, maybe forever.
Ending
2:
You
break the CD-ROM. Adriano gets mad and threatens you with a gun. He wants a copy
of the CD-ROM immediately. Falchetti and Mirta enter the house using Falchetti’s
keys and arrest Adriano. Mirta and Nico restart their tormented love story and
Mirta decides to write a novel inspired by Nico’s dream, named “The Legend of
the Obsidian Disk”. In the novel, Nico N finds the obsidian disk in the hollow
in Marina Piccola behind the 5 wedges. He destroys it and the spirits of the 4
animals (the gecko, the dolphin, the snake and the seagull) are finally set free.
Fine
This document may not be
distributed without express written permission of the author and the content
may not be altered in any way.
For Questions or Comments
on this Walkthrough, please write to:MaGtRo
Copyright © 7/2007MaGtRo