A Quiet Weekend in Capri Walkthrough
A Quiet Weekend in Capri
by Silvio & Gey Savarese
Walkthrough by MaGtRo
September, 2003
Introduction page: A choice of Italian or English Text is available.
There is a Sightseeing tour that will describe highlights of the island. Click on the tour and read instructions. Click on
Videogame to start playing the game.
Videogame Main Page: The map of Capri is seen.
At the bottom are: notebook – shows the dialogue of the characters you
meet in the game. Bag – where all the inventory is kept. Scene (camera
icon) – shows a number to keep track of each screen graphics. Help – this
shows where the active spots are. I recommend strongly to use it while playing.
Services (tools icon) – shows the Start, Save, Exit, Prologue,
Instructions, Credits of the game. There are 3 save slots. In the
Start icon – you can start from where you are, from Save, from beginning or more
importantly — jumping to different main places – Piazzetta, Tragara, La Croce and
Tiberio.
After getting the map in the game, be sure to check it frequently to orient yourself.
Take a walk around the area to familiarize and enjoy the sites before playing
the game. This walkthrough has supplement maps as reference only. The first
part of the walkthrough is arranged as close as possible to locating inventory
in a certain place to lessen walking around. The game is non-linear and this
walkthrough is just one way of approach. Any change in the steps still leads to
the end of the game. There are no dead ends that I have seen. Some objects and
information taken are not used in the gameplay and are red herrings or for
atmosphere.
You are a tourist visiting Capri for the first time. You have booked a room
at the Quisisana Hotel, but somebody or something is plotting against you…
Don’t give up (provided you can) do not refrain from having your weekend!
Luckily, you have a notebook with you…
Boat Dock: Click on Help – to show the frame where
the direction arrows can be located. In inventory (Bag) Coins (Euro), a 15 Euro
ticket to Capri, two 50 Euro bills and a First Express Credit Card. Turn left to boat. Click
forward until reaching the
Island of Capri. Get off boat at dock.
Taxi Drive: Go forward until the piazza, turn right, forward to a taxi. Enter the taxi and
ride to the top of the mountain city.
Pay the driver with some coins from bag. Select coin, click on ‘Use on Scene’
and it will show up on game screen as ‘use’ coin. Click on active frame and the
driver will be paid. Click Close notebook.
Piazzetta: Turn around, left, forward until the
clock tower and right at clock tower. Join the line and the newsagent guides you to Quisisana Hotel –
back up,
forward to Tourist Office door (left of newsstand) with i (information) enter
and take the map given to you.
Quisisana Hotel – Turn around and go NE direction. Go forward to sign at
intersection, look close at sign, turn right and forward until the the Hotel. Weird, we are now in a
time warp. All the tourist are gone. Go forward and read the notice on door of
Hotel Quisisana. It is closed and info will be found at square. Check where you
are in the globe/map at bottom bar.
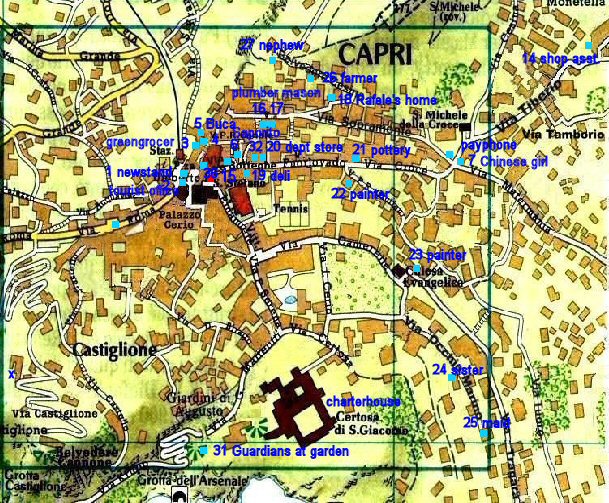
Piazzetta: Go back to newsstand (1) by
Tourist Office (2) by turning around and go forward. Take the left branch
by the RP gates, forward and then left at the sign post you saw earlier. Go forward and talk
again to the newsagent.
You’re Rafele, a shop boy. Saporito the greengrocer is looking for you.
You need to bring the newspaper to Mr. Conquibus, the banker at Via Occhio
Marino. Take the newspaper. Read the newspaper in the bag. Note the news
at bottom left of a kidnapping of Gravitiello. Via Belvedere Cesina Lab Destroyed
and that Interdimensional communications is available only at Faraglioni Area.
Looking for Greengrocer Saporito
Turn from newsagent. Go left, forward to the left arched opening and go
forward until fruits are seen on the left.
Other Greengrocers: (3) Meet the 2 ladies that sells
fruits and they tell you were Saporito is located. Exit and turn left.
First Delicatessen seller: (4) The seller has
fresh mozzarella for 10 caprini. Exit and turn left. Forward and left to
Trattoria Pizzeria Da Serafina.
Buca di Bacco (Trattoria Pizzeria Da Serafina): (5) Enter and Serafina
will tell you that Capri Salad is made with mozzarella, tomatoes and basil.
Capri cake is made with chocolate and almonds. Exit the restaurant, turn right
on main path and then turn left. Go forward, turn right, forward and turn left
to enter the
greengrocer shop.
V P R Canale -Greengrocer: (6) The
greengrocer gives you a postcard and issues orders.
Mr. Fermino at Via Arco Naturale is
looking for you.Find a key behind the gate of the
greengrocer . With this key you can open the house of Costanzo, the caretaker of
Belvedere. He will give you some tomatoes.Get a bundle of Arugula close to Villa Malaparte.
Go to the confectioner shop for
something to do.Get a bottle of wine from Totore at
via Belvedere Cesina.
Look at postcard from Carmelina in inventory with an address of Via Belvedere
Cesina #17. That is where you live.
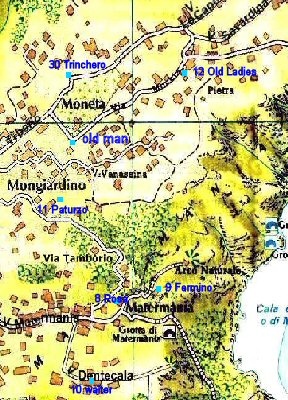
Running Errands for Mr. Fermino
Look at map and see that Arco Naturale is at the end of Via Matermania. Click
on Services, click on Start, click on ‘jumping to’ and select La Croce.
La Croce: Look close at the Chinese girl (7) at top
left. She wants 10 Caprini for a fruit converter. We don’t have money right now.
Back up and go forward to Via Matermania.
Via Matermania:
Plaque at #4 – 2 clicks from
the La Croce 4 way area, look at plaque on wall at right. Marguerite Yourcenar,
French Authoress of ‘The Memoirs of Hadrian’ lived here. She also wrote ‘Coup
the Grace’.Ristorante: Turn left, up
the stairs inside the building and go forward straight to the end. Take the
Swiss army knife hanging on the post. Go back and exit the terrace
restaurant. Continue going East on Via Matermania – check map and signs on road
frequently to see which path to take.
Arco Naturale: Take the left path from via
Matermania, to Arco Naturale.
Terrace Restaurant – Go forward and turn left to go inside the
restaurant. Talk to Rosa (8) about the menu for today. Go out, turn left and forward
to the path downhill until the end to see the gorgeous scenery.Mr. Fermino (9) – Turn back, forward and look
close at Mr. Fermino’s name on the gate to his home. Press the buzzer. Mr.
Fermino wants the Capri Salad he ordered at the restaurant at Via Dentecala.
Exit the restaurant area and immediately take a left going down to Grotta
Matromania.
Grotta Matermania:
Grotto – Tourist Informer – Go down the stairs
and read the sign (Cibele). Go down to very bottom and see caverns. The second
one has Informatore Turistico or Tourist Informer:Tourist Informer:
Press the left colored button to start the message and press the right button to
stop the message.Message Puzzle:
Brown button – A memorial tablet… Caprillo
the Fifth… above the large terra…Purple – has been granted re… and it has been pla…
es in
Via Arc…Green button – cently by King… ced on the Grotto… Arco Naturale…
Decipher:
1. Push the
green left button and then cycle the words until ‘naturale’ is stated.2.
Immediately push the red left button to coincide with the ‘le’ of naturale made
by the green left button. If the words overlap, click the right red button and
readjust the sequence again.3. When
both the green and red button words are in good cycle, press the left blue
button to coincide with ‘le’ of the naturale. If the words overlap, click the
right blue button and readjust the sequence again.You should
hear the complete sentence:A memorial tablet… has been
granted… recently by the King… Caprillo the Fifth… and it has been pla…
ced on
the Grotto… above the large terrace… in Via Arco Naturale.Back up, turn around and right down
the steps.Lembo’s digital fingerprint – Forward until you see a card
on the ground up the steps. Pick up the Digital Fingerprint of Giacomo Lembo,
born June 29, 1973 and resides at La Quercinella.Arugula – Continue 3 clicks away from card. Take the SW
arrow direction and pick up the Arugula. Go back to via Matermania or the way
you came
from.
Via Dentecala:
4 hearts house – Going south
on Via Dentecala from via Matermania, see the white facade
and green door of a house with a bell and a 4 hearts sigil. Pull the rope and
remember the 6 notes that is made.Ristorante Da Tonino- Waiter:
(10) Continue to Ristorante Da Tonino.Waiter – Forward to the door and use the door
handle (active spot appears only after talking to Mr. Fermino). Take the bag
the waiter is holding. Capri Salad is made
with mozzarella, tomatoes and basil.Herbs – Turn around and climb the stairs. Take
basil from right pot and sage from left pot. Exit restaurant area and
continue exploring going east.
Pian delle Noci –
Walnuts & Cell phone – Turn right at the split of path at end of Via Dentecala. Go to woody area that is to the right of the path. Go forward take the
left forward direction, then take the NW direction and pick up the walnuts
from base of right tree. Turn around, take NW direction, forward to small path
until the end. Take cell phone from rock. Exit the area by turning around
and forward until the path.View – Take the right path
after turning back from the woods and look at the gorgeous scenery. Walk back to
Via Matermania.
Via Tamborio: 3 clicks from the turn to Via Dentacala are steps going up from Via Matermania
to Via Tamborio.
Home of Paturzo – Enter the
Villa compound framed by ferns and ivies. Talk to Costanzo Paturzo (11) in the kitchen.
Remember what he says about the viewpoint of Piazzetta delle Noci where you can
see Arco Naturale, villa Malaparte and a natural grotto, just above the terrace
of a typical restaurant with a kitchen inside. Look around at the beautiful sceneries.
Via Savardina: Click on Services, then click Start,
select ‘jumping to’ and select Tiberio.
Turn right.
Carmelina plaque – Look at the A. Carmelina plaque on the stone wall
on the left of the tree. Go forward until the road splits. Take the lower left
path that ends in a close gate.Old Capri man (11) – Turn back and meet an Old Capri man with a
donkey. He mentions Carmelina tablet that we saw at the start of this path. Look
close at birds above the door on the left.
Via Maiuri -Villa Jovis: Take the upper right path at the
split of the road. Go forward and read the Villa Jovis sign.
Via Moneta:
Old Ladies: (12)
The road splits right and forward. Take the right road.
Forward and talk to 2 women by door with red box. Axel Munthe treated the old
lady.Old Capri man (13) Go forward and meet the old Capri man and his donkey again and he talks
about Jaques Fersen. Villa Lysis is now called Villa Fersen.
Via Lo Capo: Click on Services, then click Start,
jumping to and select Tiberio.
Fruit Converter Chart – Go forward at Via Lo Capo to the very end of the road and
take the piece of crumpled paper – Fruit Converter chart from the stand
at the corner.Turn around, go back and then turn left at the road with Fersen written on
the path. At the end is Villa Lysis. The gate is closed now.
Via Tiberio: Go back or click on Services, then click
Start, jumping to and select Tiberio. If you used the jumping to, turn around.
Shop Assistant (14) – Enter the store and take the catalogue of
Professor Costanzo Gravitiello’s Inventions. Examine the catalogue in the bag –
very informative and funny! Exit and take a look at the postcards outside the
door of the store.Payphone – Go forward until a split in the road and a pink house
at the crossroad.
By the wall across the pink house, see a payphone. Look close and take Capri Telecommunications phone
card.
Click on Services, click on Start, click on ‘jumping to’ and select Piazzetta.
Running Errands for Confectioner and Mother
Looking down at the Piazzetta, go forward to the right arched
opening between the stores (right of TOD’s). There’s a Tobacco shop at
immediate left. Go forward, take NW path and left to the confectionery shop.
Confectionery: (15)
The lady wants you to get the main ingredients for a Capri cake. Capri cake is
made with chocolate and almonds. Take
the box she gives you. Exit the shop, turn left and enter the greengrocer
shop.
Greengrocer: (6) Give him the Arugula and take the 10
caprini from the table. Exit store. Turn right, forward, right at
intersection and up the ramp by the balloons. Go forward until you climb up the
stairs.
Felice the Plumber: (16) Turn right to the plumber shop. See Felice,
the plumber and take the wrench and the screwdriver holder. Exit
and go right.
Mason: (17) At the top of the steps, turn right and talk to
the Mason. Take the trowel. Exit and turn right.
Rafele’s house: (18) Go forward until you see stairs on
the left (Via Belvedere Cesina). Climb the stone steps, forward until door
with purple flowered vines. Turn left and up the stairs. Press the Nannini buzzer and talk to Rafele’s mother. She wants you to go to the niece at Villa Jole and bring her
caciocavallo. The money is in lantern by Uncle’s house.
Uncle’s House: Turn around and go to the blue door with the flowered vine. Open the little
door on the right and take the Bagdad Gravitiello Lamp. Back up and look at the
lantern above the flowered vine. Take the 10 caprini bill.
Turn around, forward down the steps, turn right at main path, forward until there is split
going up or down forward close to where the Mason was. Take the forward (left side – going) down.
Go forward, pass the plumber’s place and take the left path under the covered
path. Go forward and turn right at end. Turn left to the Delicatessen.
2nd Delicatessen: (19) Give the 10 caprini to the
Deli man to get caciocavallo. Exit and turn right, forward
pass the camera store and left to the Department Store.
Department store: (20) Take Narcissistic Object
Transformer invented by Gravitiello. Exit and turn left. Go forward 5xs until
you see signs on the pillar on the right.
Pottery-seller store: (21) Go forward from the sign and
turn left to the pottery seller store. Take the map tile. Turn right from
store and left at path under the sign.
Search for the banker
1st Painter: (22) Check map and see that Via Occhio
Marino is at SE of the City. Go forward 2xs, pass the 1st painter’s place,
forward 4xs and right at end of path. Forward 5xs, turn right, forward and right
again pass the Church.
2nd Painter: (23) Forward, talk to second painter in
his shop and learn that Count Fourhearts loves music. Continue and left at end of
the road. Look at sign on wall and see that the road forward leads to where we
want to go.
Occhio Marino:
Giacomo
Lembo’s residence: Go forward until you see
an intercom with the name Lembo at right. Press the buzzer, and Lembo’s sister
(24) answers. Take the digital fingerprint card of Mr. Lembo from the bag. Click
the ‘use’ card on the receiving cup of the teleconveyer. Lembo went fishing for
Octopuses.Banker’s residence:
Continue forward to the
gates of 30 Occhio Marino. Look close at intercom and click on Karl. The maid
(25) says that Mr. Conquibus went to Traversa Sopramonte near the Greengrocer’s
house. Now we know where the greengrocer house is.
Greengrocer’s House – Look at the map and see that Via Sopramonte
is NE of the city. Click on Services, then click Start, jumping to and select La
Croce. Turn around to get the phones on the right side now, forward
4xs, turn right to the steps up the hill. Look close at ground behind the
grilled door and pick up the key to Costanzo’s house.
Go down the steps and turn right and forward until the steps up to Via
Belvedere Cesina and Rafele’s mother’s house.
Via Belvedere Cesina:
Farmer: (26) Go back to Rafele’s house, turn right to go
north at Via Belvedere Cesina. On the way, turn left at a gate, enter and take
the lemon give by farmer. Exit.Cactus fruit:
Take the cactus fruit on the side of the path just outside the
farmer’s gate and continue northward.Nephew-Costanzo: (27) Go
forward until the black door of the Belvedere. Go NW up the steps path.
Use the key on door and enter. Costanzo gives a tomato for his
Uncle.
Click on Services, then click Start, jumping to and select La Croce.
La Croce – Chinese girl: (7) Look close at the
Chinese girl at top left. Give her 10 caprini from the
bag to get the fruit converter.
Via Cesina: Back up and turn left. Go forward, pass the Parish Church and take the left path
after the minibus. Go forward pass Monte San Michele. Go forward (side path has
cat) and turn left at the side path with a sign Via Belvedere Cesina.
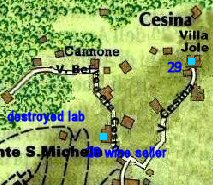
Via Belvedere Cesina:
Wine seller: Go
forward until green metal door. Enter the metal door and take the
wine bottle from wine seller (28).Gravitiello’s destroyed Lab: Go forward to the very end of the road. Enter
the destroyed building and turn right.Take and study the notebook that contains
Teletransporter experiments. It seems that there are 2 other laboratories – one
at the Gardens and one at Villa Lysis. Read the notebook carefully. It has major
clues for forthcoming puzzles. Look at the last page and click on note.Go out of room and turn right to the ruined
courtyard. Turn around and look close at the arrows on the door at the right.
h g h h f iVilla Jole – niece: (29) Go back out to the main path,
forward to the turnoff sign to Via Belvedere Cesina and turn left. Go forward to end of
the path to Villa Jole. Press the buzzer and talk to the niece. Take the caciocavallo from the bag
(use on scene), click the lower buzzer and the cheese will be on top of cup. Click the
buzzer to transport it. Take the cacao transported in return.Fig – Turn around from Villa
Jole, forward 5xs and look close at overhanging branch on the path and take the
fig.
Capri Cake and Capri Salad
Confectionery: (15) Go back to confectionery
and stand close to the counter.
How to make a Capri Cake: Take
a look at the crumpled paper-fruit converter chart found at the end of Via
lo Capo and Gravitiello’s notebook in bag. From these 2 clues, deduce the
process of fruit conversion.In bag, click on fruit
converter, then click on walnut and lemon. Click on fruit converter to switch it
on and get pear.Click on fruit converter again
and add pear and cactus fruit to get an orange.Click on fruit converter again, add orange and fig to get almonds.
While facing the
confectioner, click on box given by confectioner in inventory.Add cacao and almonds to
box. Use on scene and give it to confectioner.Take the Capri Cake.
She wants you to take it to Mr. Trinchero at via Tiberio.
Greengrocer: (6) Give the wine bottle
to the greengrocer. He also tells you to call Count Fourhearts. Take the
10 caprini. Exit and take a right, left, forward, left and right to go to the first delicatessen
seller.
First Delicatessen seller: (4) Give
seller 10 caprini from
the bag and take the mozzarella.
Call Count Fourhearts:
Fourhearts’ phone number – Go back to the gate of the Count at Via Dentecala to refresh
your memory to the sound of the bells when rang. This is the phone number of the
count. Use your own home phone with tones and dial each number and compare it to the tone of the
bells. Since the first, third and fifth tones are the same, just find out the
2nd, 4th and 6th number. The phone number is 1 0 1 8 1 6.Use the ‘jumping to’ to go to Via Croce, where the payphones
are. Use the phone card on the slot. Dial 1 0 1 8 1 6. The Count
will open the Royal Library for you and tells you to check the book of the French
Authoress who lived in Capri many years ago – remember the plaque we saw earlier
at Via Matermania.
Via Tiberio – Mr. Trinchero (30) Use the
‘jumping to’ to go to Via Tiberio.
Turn around from this point and go forward to the cream cement pillars with white frames and
grill gate. Look close at teleconveyer intercom panel. Take the cake from
bag and click the buzzer beside the O. Trinchero. The cake will be placed on the receiving cup. Press buzzer
again. Take the Skiaccia & Vinci he gives for tip.
Via Dentecala -Ristorante Da Tonino – Waiter: (10)
How to make Capri Salad: Go forward to the door and
then make the salad.Click on bag, then click
on the tomato given by Costanzo, the basil from the pot (leftmost herb) and the
mozzarella. Then use the bag with ingredients on the door handle.Take the Capri
Salad the waiter gives you. Now back to Mr. Fermino.
Arco Naturale – Mr. Fermino: (9) Take the Capri Salad from the bag to use on
the scene. Press the buzzer and this will place the salad on the left cup of the Teleconveyer. Then
press the buttons on the right of the panel. Take the blue lamp.
Gravitiello’s Experiments
Via Castiglione: Click on Services, then click Start,
jumping to and select piazzetta. Turn around while looking down at the piazzetta.
Climb the steps of the building, right and go forward (Via Madre Serafina). Pass the covered path until the steps to the right going up (with a
sign Belvedere Punta Cannona on the wall). Go right up this steps until the end of the road at Via Castiglione.
Pick up the rechargeable battery from rocks on dirt path.
Giardini Augusto – Guardians: (31) Click on
Services, then click Start, jumping to and select piazzetta. Go to Hotel
Quisisana. Take the road right
of Hotel Quisisana. Go forward and right at the end of the road. Go forward
until the Garden steps on the left. Enter the gardens.
Matches – Go forward from the main gate, up the path, turn
right, forward to the second gate. Go through and go to the lower patio
area. Climb up the steps behind the Lenin obelisk. Take the box of
matches close to the top step.Secret Lab – Go back up the main gardens and enter
the building where 2 guardians chat. One of them has his birthday today and was
fishing for octopuses (Mr. Lembo). Turn around 2xs, the guardians will disappear and
then enter the building. Go to the closet and take the green bulb from
the shelf. If you try to take the lit light bulb at the ceiling you’ll be
burned.Light Bulb Puzzle:
Flip the switch, the room darkens and
see an active frame.Take the match from bag and click it
on the active frame. Some light will allow the bulb to be taken by clicking on
it.Replace it with another bulb and then
turn the light switch on.Red Bulb – Magazzino di Energia
ColorataBlue bulb – Colored Energy
Kit: Bulbs, lamp holder, battery.Green bulb – shows the active
keyhole of the bottom cabinet. Click on the cabinet keyhole and take the lamp
holder.Be sure that you have the red,
blue and green bulbs in the bag.Note: from Gravitiello’s notebook, he
comments not to use the lamp holders inside the lab.
Villa Lysis
Via Lo Capo: Click on Services, then click Start,
jumping to and select Tiberio. Go forward and turn right at the P.V. sign. Go
forward until the closed gate of Villa Lysis. If the gate is closed turn around, go forward
1-2xs and then
comeback. If you meet a dog (the guardian’s) and it barks, the gate is opened.
Villa Lysis:
Power Panel – Enter and take the right path outside the
villa. Climb the stairs at the end of the path and look at the power panel on
the wall. Flip the black switch beside the red button.Floor Plan – Turn around and take the floor plan of the Villa with
labels of the 2nd, 0-lower level and 1st floor
written on it from the cement ledge at bottom of stairs. Look around the place. Go inside the villa.Check the main floor and the lower
level by going through the door on the right at the room on the left and looking
at the floor plan. The ones marked in red are not accessible.Wall Plaque – Climb the stairs. Turn
right at top of stairs, go forward to hall window and look outside to wall
plaque.Telepathic e-mail – Turn
around and enter the room on the right. Go right and see a Telepathic e-mail
transmitter on a stand. Go forward and then turn around and see letters
projected on the wall.Press the red button on the right to turn on the
machine. If nothing happens, go back to the power panel outside and flip the
black switch again. The doors and windows closes and the room darkens.Getting the code:
Based on the last place we where in a
dark room, we need to use the colored energy light of the bulbs.1. Construct the colored energy kit
by clicking on the lamp holder, then click the battery to add it to the lamp
holder and a lit button is seen on the lamp holder. Add a colored bulb to the
powered lamp holder. Use it in the dark room.2. Click on the active frame and see
letters.3. Do this using the red, green and
blue light bulbs.4. Put together the letters from the
4 different light source.Send
an e-mail
with the codeto
prof. Gravitiello.
He willanswer.
Type in the code
thenwait
until The answers
shows
up.heowxkqrmaziztk
5. Press the gold button on the left
to show the message area. Type in the code – heowxkqrmaziztk6. Press the green button on the
right to send
message. (Press the blue button to erase message.)Dear Tourist: I have hidden a
postcard in my laboratory. My warmest regards are on it! Prof. Costanzo
Gravitiello.
Blank Postcard, Memorial Tablet and Phone Call
Gravitiello’s
destroyed laboratory: Click on Services, then click
Start, jumping to and select La Croce. Turn left, forward, turn left at Via
Cesina just after the Church of St. Michael. Walk until the left turnoff at Via
Belvedere Cesina and go forward until the destroyed lab.
Enter and turn right in
the ‘kitchen’ of the destroyed lab. Look close at protruding tile of the stove.
Take Villa Jovis postcard. The back of the postcard is blank.
Blank Postcard Puzzle – Click on Services, then click Start, jumping to and select piazzetta.
The clue here is the
‘warmest regards’ comment by the professor and yet nothing written on the
postcard.Go to Buca di Bacco. Save Game here.
Look close at the
burning wood oven. Use the blank postcard on oven.Take the heated
postcard and read it in bag.Go to the photographer, he’s got something for you.
Another place is to use the postcard on the flame of
the two candles in front of the small Saint statue at Via Lo Capo.Note: A possibility of
increase in difficulty of the game might arise when the postcard is double read.
So a saved game should be done before the first attempt to read the card or just
after the first reading-heating.
Photographer (32): Go to the camera store located
at the same lane as the confectionery and just before the department store. The
Photographer lends you a camera. He wants you to take a picture of the
memorial tablet recently posted by King Caprillo the Fifth. Now, where did we
hear about that?
Memorial Tablet: Click on Services,
then click Start, jumping to and select La Croce.
Based on the clue of the Tourist Informer at the Grotto – A memorial tablet… has been
granted… recently by the King… Caprillo the Fifth… and it has been placed… on
the Grotto… above the large terrace… in Via Arco Naturale, and the words
of Costanzo Paturzo – look for a
place that you can see the terrace restaurant.Walk to Via Dentecala where the waiter (10) is found. Go to the very
end of Via Dentecala to a lookout point. Face the water and then turn inward-left
in order to see the cliffside. See the restaurant terrace across the way.
Click on camera at bottom right of frame.
Photographer (32): Go back to the
photographer shop. Take camera from bag and leave it on the counter. Go out
and then come back. The photographer gives you a close up picture of the
memorial tablet above the terrace restaurant. Look at the picture in bag and
see – Felice the plumber has the Time Machine.
Felice the Plumber (16): Go to the Plumber
and take the time machine.
Sunglasses at Via Tuoro – Click on Services, then click Start, jumping to and select Tragara.
Turn around from the patio, forward 14xs, turn right up the stairs and turn right at top of stairs.
Go forward and take the stairs going up the hillside. At the split on the path
up the hill, take the left path and take the sunglasses from the ground
at the end of the path.
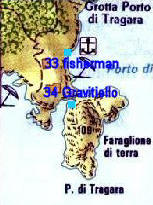
Faraglioni Area: Click on Services, then click Start, jumping to and select Tragara.
Take the NW direction from the patio. Go down all the way and take right going
down path at the 3 way intersection. Close to the shoreline, the path splits into
two. The first, La Fontelina has gorgeous scenery of the sea.
Porto di Tragara – The second
path leads to another beach area. Enter the building through the brown wood door of the Ufficio Hypercom. Go
forward and see the code clue.Telefonate InterDimensionali (Interdimensional
Telephone)Interdimensional prefix = Number of
the Dimension you wish to call divided by 2 + 77.Temporal prefix = Number of days
between present date and destination date.Fisherman (33) – Go out and forward pass the blue chairs to talk to the fisherman who
says that sea bass and breams can be found there.Turn around, forward to the blue
chairs under the patio restaurant and straight to the shoreline with monoliths on
the left. Hear the phone ring. Take phone from bag, use on scene and click in
active frame. Listen to Professor Gennaro Gravitiello.(34) He has
important information found in an envelope at the Charterhouse.Tourist Guide: (35) Go back to the terrace at Tragara or use the ‘jumping to’. He talks about
Gravitiello and gives you a
cigarette.