Just Adventure original
A New Beginning
CHAPTER 3
There are NO unduly complex or stand alone puzzles in this very short chapter 3. Just the ‘standard’ type of inventory-style puzzles etc. Some are straightforward and easy others are more abstruse! Any problems should be easily resolvable by consulting a regular walkthrough.
CHAPTER 4
ATTEMPT TO WARN THE CLIMATE CONFERENCE
Preface
In order to get the guard to allow Fay into the climate conference, she has to acquire a press card.
To achieve this, she has to return to the helicopter and use the megaphone on the thick bathroom door to get the reporter to hear, get out of there, and give Fay his press card.
Utilizing inventory (input, output, etc.) quite a bit, she needs to
photograph herself and clip the photo to size using the scissors. Then she has to stick the photo onto the press card.
Unconventionally, she takes a cube of sugar from a can, melts it on a burner, scrapes the resultant sticky goo off the burner with a knife.(If you are not quick enough, take another cube of sugar as above!).
Fay then applies the ‘gluey knife’ to the photo. Finally she sticks her photo onto the press card.
And – Hey Presto! Fay enters the conference hall using her false name and doctored press card on the thuggish guard!
++++++++++++++++++
***** Fay enters the auditorium.
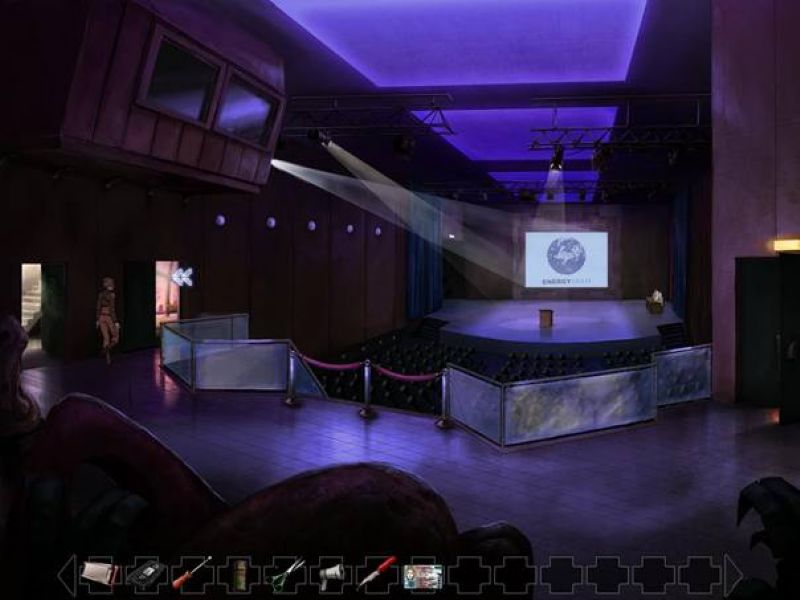
***** Fay tries in vain to argue with the speakers advocating the continuing use of nuclear power plants.
***** Exit the open doorway on the left nearest the stage.
***** In the reception hall, talk to Dr. Braun and complete all dialogs.
***** Exit the glass door on the left to the balcony.
***** Fay looks around below an imposing view including the crowd of protesters.
***** Return to the building‘s reception hall.
***** Walk through the exit under the 2 banners exhibiting the signs ‘Energy Oslo’.
***** Salvador contacts Fay (mobile phone ??) “You must find a way to get me into the building unnoticed!” – “I had (er!) a ‘little misunderstanding’ with the doorman!”.
***** Take the elevator down to the garage.
***** Scrutinize the various facilities there.
***** Return up using the elevator again.
***** Go through the opening between the elevator and then 2 doors back to the reception room.
***** The left exit further away from the stage leads to the electrician
***** Fay goes there.
***** Talk to the electrician and exhaust all dialog topics.
***** Examine everything in the room including the 3 monitors, the electrician’s car keys, the cupboard, and the VCR. Fay needs access to these items and hence has to get the electrician out of there!
***** Before that however she asks him what is in the abovementioned cupboard, and he replies “The controls to the ventilation shaft partitions at the entrance”.
***** Return to the balcony (See above!).
***** From inventory, bellow several slogans through the megaphone to the protesters below they mimic her 4 phrases as a repetitive chant.
***** Leave them still shouting the mantra “No reactor in the rain forest! Stop the clear cutting!”.
***** Go back inside up into the reception hall. Then Fay goes right to the auditorium (conference hall) and through the right exit to the entrance hall (lobby).
Start to talk to the guard again. He removes his earplugs, hears the shouted slogans, and goes berserk!
***** Return to the electrician (See above!).
***** Talk to the electrician. He is worried about the increasing noise from the protesters and is concentrating on his monitors.
Whilst he’s thus occupied, grab his car keys.
***** Go down again to the garage (See above!).
***** Try to open the rolling gate. Fay can’t with her bare hands.
***** Look at the lock at the right side of the rolling door.
***** Look at the key ring in inventory Fay notes that “A number of different keys are on the key ring”.
**** From the key ring in inventory, insert a key into the lock …
***** … and the rolling gate opens revealing a snazzy looking (exhaust belching) vehicle the one that the electrician is in love with and all the time checking on his monitors!
***** Fay muses”Let’s see what happens if I use this lever”.
***** The car shoots out of the garage, smoke pours out of its engine, and “Oops! That must have been the self destruction mechanism!”.
***** Return to the electrician’s room (See above!) understandably, he’s not there now.
***** Open the cupboard.
***** Inside this cabinet are the controls for the ventilation shaft partitions at the entrance.
***** Use these controls to open the partitions.
***** Phone Salvador and inform him that the partitions are now open and (if necessary) make sure that they are remaining open.
***** Fay gets to the elevator that leads down to the garage (See above!).
***** There are 2 doors there:- the right hand one leads to a hygiene chamber (sic;- toilet!!!) and the other leads to a storage room. Fay automatically enters the left hand door into the storage room. Salvador, who in the meantime has managed with Fay’s help to get into the building, awaits her there.
***** Salvador intends to have a direct talk with Dr. Braun. Since he is in the building ‘illegally’ he can’t approach Dr. Braun. So he orders Ray to get Dr. Braun to come to him instead !!
***** There is a cupboard to the right of Salvador
***** Open it.
***** Look at the orange juice inside the cupboard
***** and grab it.
***** Look at the orange juice in inventory. Ugh! Fay admits “I don’t know if there are small lumps or tiny animals swimming in there. And to be perfectly honest I don’t really want to know either!”. Exit the room
***** Exit the storage room.
***** Next to each of the doors (See above!) is a sign ‘hygiene chamber’ (i.e. toilet!!!) and ‘storage room’.
***** From inventory, use the screwdriver and remove both signs.
***** From inventory, replace the two signs but in the wrong positions (e.g. hygiene chamber sign on the LEFT)!!
***** Fay returns to the reception hall (See above!).
***** From the table, take one of the glasses of wine cooler.
***** In inventory, mix the wine cooler with the horrible orange juice, obtaining spoilt wine cooler.
***** Fay remarks”Well, there’s no way I would drink that”. – “It looks disgusting and smells even worse”.
***** From inventory, mix the wine cooler with the horrible orange juice, obtaining spoilt wine cooler.
***** Fay remarks”Well, there’s no way I would drink that”. – “It looks disgusting and smells even worse”.
***** From inventory, sprinkle some blend of spices on the canapés that Dr. Braun is greedily guzzling.
***** Dr. Braun munches a doctored canapé and starts choking, so immediately hand him the glass of spoilt wine cooler from inventory. N.B. If you are not quick enough, repeat sprinkling the spices and following until he drinks the spoilt wine cooler.
***** He dashes to the sign ‘Hygiene room’ and enters but of course it is NOT the toilet but the storage room!
***** Salvador is waiting for Dr. Braun, clobbers him, takes his clothes and wears them.
***** Salvador pretends to be Dr. Braun and delivers his own anti- nuclear plant speech as though he was the legitimate inspector of the International Energy Inspection Authority.
***** Fay is automatically in the electrician’s room.
***** From inventory, she inserts the video tape (of the nuclear power plant explosion at the Brazilian rain forest) into the VCR which is inside the middle drawer.
***** On the monitors, Fay watches Salvador deliver his anti-nuclear speech acting out as (a fraudulent) Dr. Braun followed by his exposure and arrest.
***** Fay now goes to the auditorium (See above!) and looks at the stage. She muses “How can I save Salvador”.
***** She then goes to the REAL storage room (See above!).
***** Open the door and enter the storage room.
***** Examine Dr. Braun’s suitcase and take his magnetic strip card for the parking lot.
***** Now Fay goes down to the garages.
***** From inventory, insert the key card (magnetic strip card) into the card lock there.
***** There follows a medium length cut scene:-
FAY PROMISES TO RETURN TO THE CONFERENCE IN 3 DAYS BRINGING CONCLUSIVE PROOF!
CHAPTER 5
TO DISARM THE BOMB.
Preface
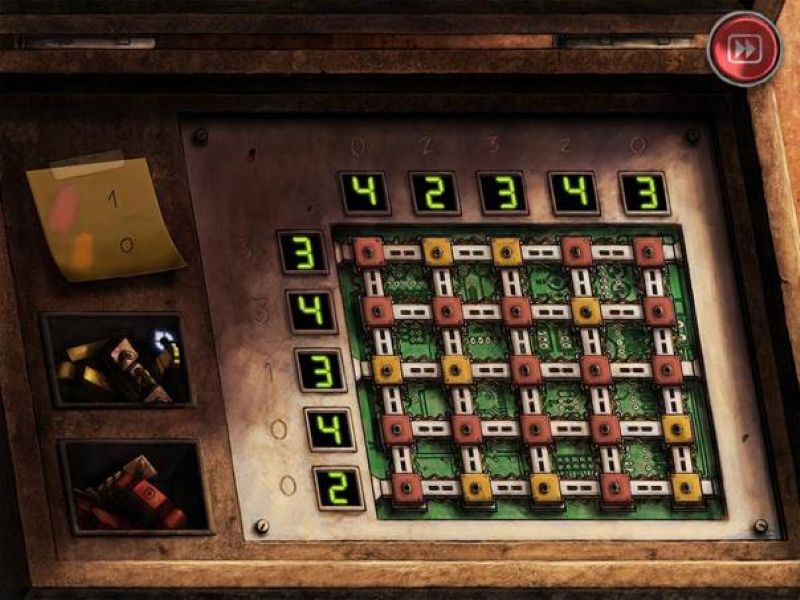
Bent has to disarm a bomb by swapping various yellow and red squares on its circuit board and thus altering the numbers at its top and left side (See below).
Instructions
Call the top horizontal numbers, i.e. the columns, A thro’ E from left to right, and the vertical left side numbers, i.e. the rows, 1 thro’ 5 from top to bottom
Then the columns have to be changed from their present values of 4; 2; 3; 4; 3 and the rows from 3 ;4; 3; 4; 2. Look carefully at the rows and columns which the saboteur has scratched (or etched) alongside the abovementioned numbers on the armed bomb. These are the final numbers to which Bent must change the live bomb in order to completely disarm it. These numbers are:- columns from left to right 0; 2; 3; 2; 0, and rows from top to bottom 3; 3; 1; 0; 0..
In order for you to do this, look at the 2 piles of clips to the left of the circuit board puzzle. The upper ones are yellow and below are red ones. As the instruction sheet above them both shows, the reds count as “1”s whilst the yellows count as “0”s.. Each clip fits onto a pair of coloured squares connecting them both: The pair of squares must be adjacent, and either both in one column or both in one row.
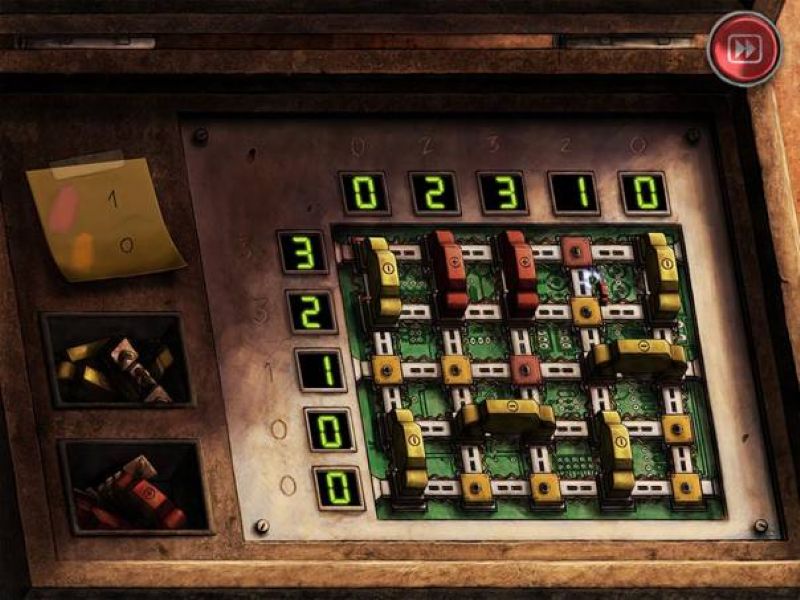
After each red or yellow clip fits over the space between 2 coloured squares, they change the colours of one or both of the squares from red to yellow or vice versa, and automatically alter the row or column total. If you wish to remove ANY red or yellow clip from the circuit board, simply click on it (with NO coloured clips attached to the cursor you can remove one, if necessary, by right clicking).
It is impossible to show the screencap at the very end of the puzzle since it immediately blacks out and continues to the next chapter which incidentally is the sign that you have fully solved the puzzle, otherwise the circuit board remains on your monitor! So the screenshot below shows the puzzle exactly one step before its final conclusion. All that remains to be done is to drag one red clip onto the space between squares D1 & D2. (See the screencap below). This automatically changes the 1 in column D to 2, and simultaneously changes the 2 in row 2 to 3 as needed for the final conclusion of the puzzle.
Solution
There are probably other solutions and sequences and better methods, but the way I did it is quite short and simple as follows:-
Yellow clip onto the gap between A4 & A5
Yellow clip onto the gap between E1 & E2
Yellow clip onto the gap between B4 & C4
Yellow clip onto the gap between D3 & E3
Yellow clip onto the gap between D4 & D5
Yellow clip onto the gap between A1 & A2
**** Red clip onto the gap between B1 & B2
**** Red clip onto the gap between C1 & C2
**** Red clip onto the gap between D1 & D2
THE BOMB HAS BEEN DISARMED.
CHAPTER 6
TO CUT THE ELECTRIC POWER, REACH THE HATCH, AND ESCAPE.
Fay and Bent are trapped after the bombs ignite and the main installation explodes. The only way out is through a hatch (9) near the top right corner of the screen. “That is our destination”!
But they can’t get there due to the electrical voltage that is blocking their way. So the electric power switch (8) must first be turned off. It is a small blue box close to the hatch at the right hand top corner of the screen.
The numbers in curly brackets refer to the yellow numerals on the graphic.
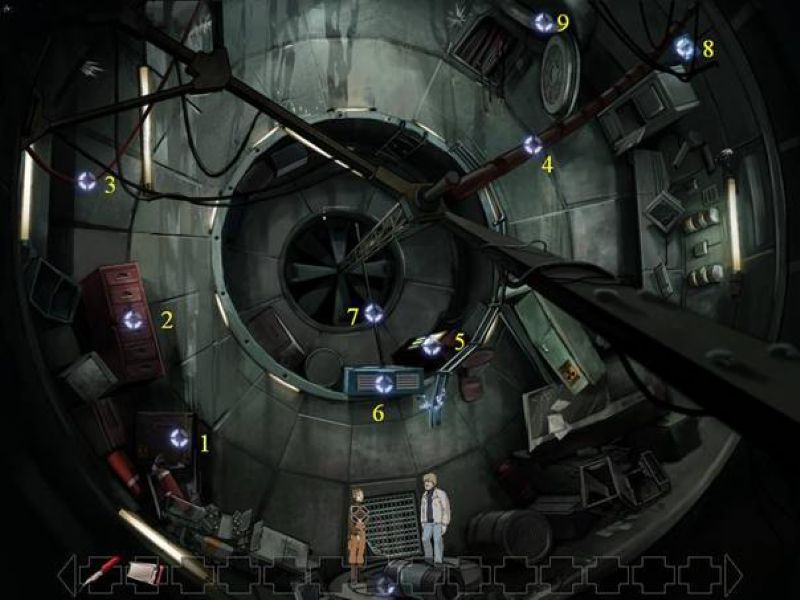
***** Fay climbs up to the junk {1} Bent helps her up.
***** Open the drawers of the filing cabinet {2}.
***** Clamber onto the filing cabinet.
***** Look at the red cable {3}”Torn electricity cables. I hope they’re not live”!
***** Swing up and to the right using the cables..
***** View the heating pipe {4}.
***** Fay wants to walk upwards along the heating pipe but can’t because “..it’s much too hot”.
***** There is a heater control {5} almost exactly below Fay which she must turn off Impossible… “I can’t reach it”, it’s too far away.
***** To the left and very close to the heater control there is a shelf {6} and on it a precariously balanced blue cabinet. Fay says that “The cabinet is dangerously close to the edge”.
***** Look at the rod {7} nearby. It’s “A long iron rod”.
***** Grab the rod and move it around. It knocks the cabinet down.
***** Automatically, Bent climbs up the cabinet and stands next to the heater control.
***** Turn the heater control off.
***** Fay checks the heating pipe “It’s cooling down”.
***** She walks along the pipe to the power switch {8} .
***** Turn off the power switch which cuts off all the electricity
***** It is now safe and Fay goes to the hatch {9}.
That should be the escape route for Fay and Bent.
Unfortunately however the villainous Mr. Kellerman appears again and puts a vicious spoke in the wheels!!
See the cut scene.
Fay is now down below near to Duve, with Bent working on an escape plan up above.
***** Talk to Duve and exhaust all dialog topics. He has broken his leg due to the fall, and Fay is determined to help him =- even against his stubborn will!
***** Look at the “new rod” on the ground a little to the left of Fay.
***** Pick up the rod.
***** Examine Lisa‘s body lying on the ground a bit to the right of Duve.
***** Remove Lisa’s scarf.
***** In inventory, combine the scarf and rod to make a track (i.e. a splint).
***** Fay ties the track onto Duve’s broken leg.
***** Bent has created a mechanism for the 3 of them to escape. THEY ALL GET OUT JUST IN TIME before the Atlas Plant explodes.
They fly in the helicopter to Brazil!
CHAPTER 7
TO GET THE GUARD DRUNK, STEAL HIS KEYS, AND HIJACK THE SWAMP BOAT .
Preface
There is a small amount of randomicity in this puzzle and so complete step by step instructions cannot be given. But the general solution is quite straightforward. Due to this you may have to repeat it say, a couple of times depending on your starting situation.
HENCE IT IS VERY ADVISABLE TO SAVE JUST BEFORE YOU BEGIN THIS PUZZLE.
The guard is a card gambler. Bent needs to get him drunk so that he can steal his keys to the swamp boat.
The card game (gamble) could not be simpler and is weighted 3 times out of 4 in favour of the guard!! The guard picks a card from the pack and Bent has to guess which of the 4 suits it is clubs ( [c] and C ) , diamonds ( [d] and D ), hearts ( [h] and H ), or spades ( [s] and S ).
Every time the guard loses he takes a very large drink. When he loses 3 times he is so sozzled that Bent can easily steal his swamp boat key.
CARD GAME – INTRODUCTION
***** Go to the card players.
***** Scrutinize the wall behind them. In particular examine the mirror, the red heart and the pink heart, the cross, and the hole in the wall “I can see through it to the other side”.
See the following screencap.
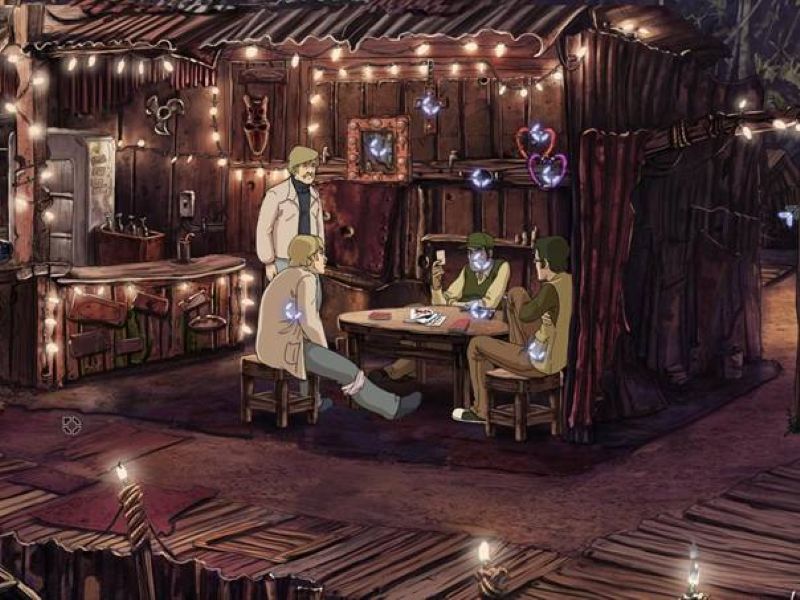
***** Bent goes to the shack behind the bar.
***** There are 4 plugs, a hole, 2 screws and a crate of beer ignore the yellow underlined upper case letters at this stage!
See the screencap below.
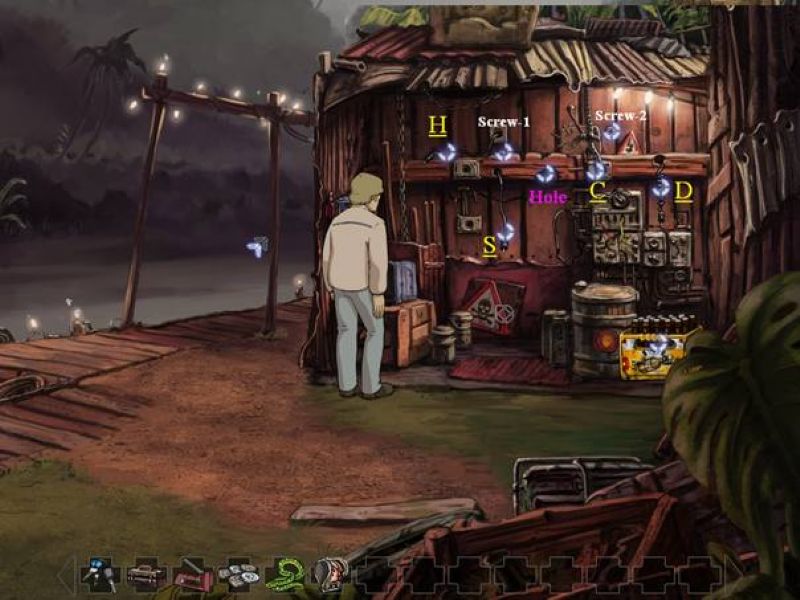
***** The plugs toggle the 4 ‘suits’ behind the card players to light up or turn off alternately. At any stage of this process, Bent can nip round to verify this and then return to the shack and continue
Just as one example:- One ‘use’ (click) on H in the shack causes [h] behind the card players to light up another ‘use’ (click) on H in the shack causes [h] behind the card players to light up use (click) on H in the shack causes [h] behind the card players to turn off – and so on.
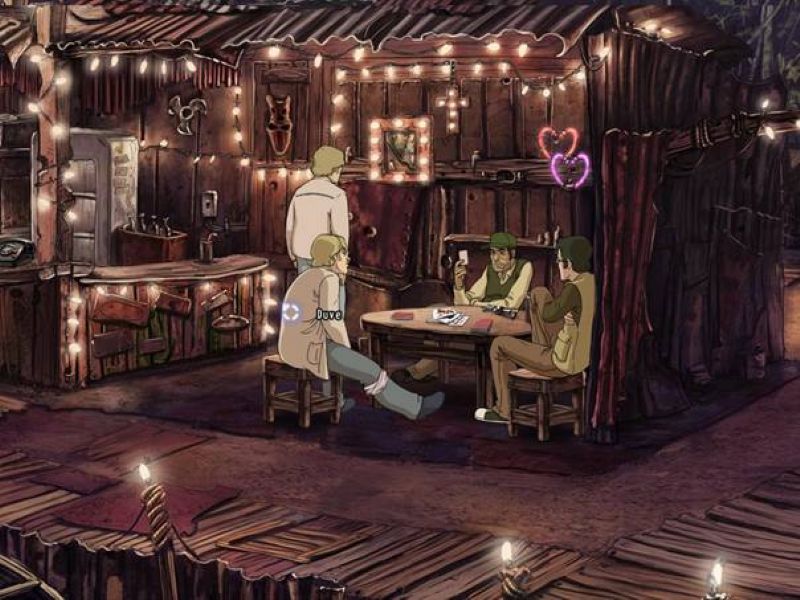
***** If not already so, perform the above with H, S, D, and C until all 4 objects behind the players [h], [s], [d], and [c] are all lit up.
See the next screencap here!
***** Finally, before starting the ‘game’ proper go again to the shack.
***** From inventory use a coin on screw-1 “Sounds like something toppled over”.
***** Go again to the card players.
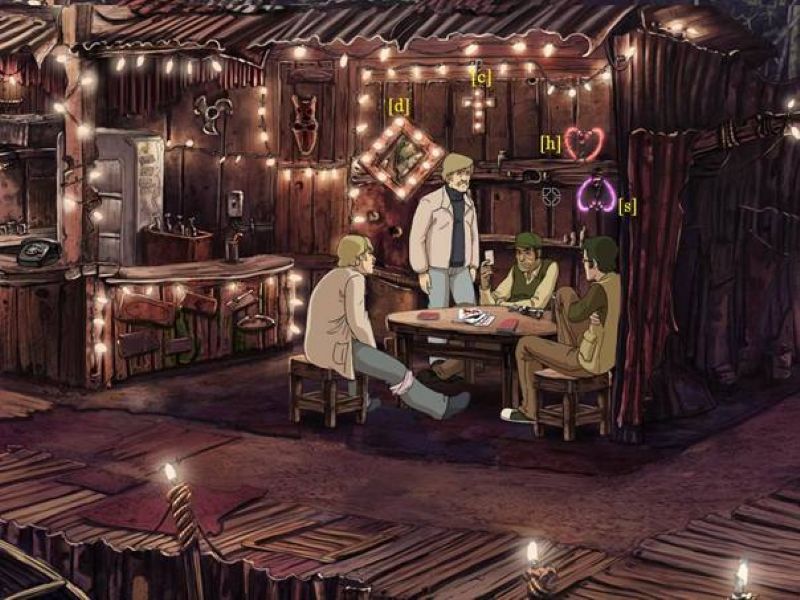
***** Check that the pink heart has changed and looks like a mauve coloured spade.
***** Return to the shack.
***** From inventory use another coin on screw-2 “Something moved on the other side”.
***** ***** Check that the mirror has tilted and instead of a square looks like a diamond.
See below:-
THE ‘GAME’ PROPER
***** Bent goes to the shack.
***** Look through the hole.
***** See (or actually hear) the name of one of the 4 suits that the guard is holding.
***** Use the plug that is appropriate for that suit.
N.B. The suit and its successors are randomly generated. But just as an example:- Suppose that the guard is holding spades, then simply click on the plug marked S and so on.
***** Each time the guard loses he drinks a beer.
Continue until the guard has lost 3 times he will admit that he is drunk and can’t continue. If Bent tries to use the hole further, he simply gets the mantra “The guard is drunk enough now”!
Incidentally Bent does not have to beat him 3 times IN SUCCESSION he can lose, even several times, along the way! But as soon as the guard has drunk 3 beers “He’s done in” completely despite his protestations that he can always hold his liquor!!
***** If you haven’t already done so, from the shack take some beer.
***** Give the beer to the guard who puts it on the table next to where they are playing cards.
***** Open the bottle. Bent asks the guard “Do you want me to open the beer for you?”. The guard agrees “You can use the bottle opener on my key ring” – “But don’t forget to put then back”.
***** Bent takes the guard’s boat keys from the table
***** and uses the bottle opener to open the beer bottle.
***** Bent makes a switch and returns the car keys instead of the boat keys they look almost the same! He retains the boat keys!
***** Go to Fay. Hear her transmission from Salvador Bad and even dangerous!!! Tell her that he’s repaired the swamp boat and ‘obtained’ its keys.
***** They both go to the guard at the swamp boat itself.
***** Ask the guard nicely if they can use the boat to go to the plant. The guard replies that they can go there in caskets!?!
***** From inventory, throw the snake onto the guard who is terrified and in panic falls into the water.
***** COMANDEER THE SWAMP BOAT AND SET SAIL FOR THE INDEZ PLANT.
###############################
CHAPTER 8
TO INFILTRATE THE INDEZ PLANT.
Foreword
This is a relatively long and fairly complex puzzle involving quite a number of steps!
There is a good deal of dialog during this puzzle primarily instructions from Salvador and statements from Fay: These have not been included below. This walkthrough only gives practical instructions of what exactly to DO! The aforementioned verbal statements etc. should help in solving all or part of the puzzle without the walkthrough, which is a good thing. So wherever these verbal exchanges occur you will simply be told to ‘Listen to Fay’s comments’ or ‘Hear Salvador’s reports’ etc.
Preface
It seems that Salvador has camped out for some time in a spot overlooking the Indez plant and compound. He has surveyed the whole extensive complex and has observed the points of possible entry without being caught by the many patrolling guards. He stayed in a tent overlooking the plant and used binoculars set up alongside it.
Apparently, Salvador has succeeded in arriving safely at Indez’s office. Fay is now using his recorded observations and knowledge to follow hm. In order to do this, she has to adjust his specialized binoculars so that they are constantly focused correctly and accurately on each of the different vital locations!
Puzzle gameplay
STAGE 1.
***** Search the tent Empty! “Salvador must have spent days here.”.
***** View the whole panorama of the Indez plant, (See the following screencap).
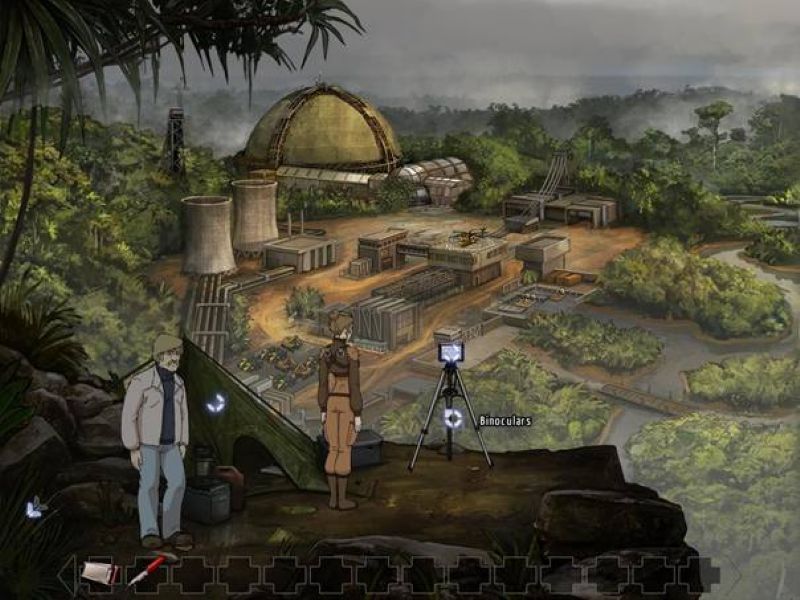
***** Use the binoculars. Fay remarks that you have to adjust the focus and select the area you are interested in.
The field of vision has a matrix of squares superimposed on it consisting of 11 rows from bottom to top and 16 columns from left to right.
***** Although the whole plant is very heavily guarded, Salvador reports “I’ll get in there somehow”!
STAGE 2 .
***** Try experimenting to understand the ‘controls’. Highlight different squares on the matrix: Examine the number on the counter: Use the up and down-arrows, etc. (Nothing of great significance results as yet!).
***** Highlight the matrix-square ‘Row 3, column 4’. (See screencap below).
***** Adjust the counter to read 14|95| (See next screencap). N.B. Each of the 4 digits (from 0 thro’ 9) individually is incremented by 1 with each single click on it.
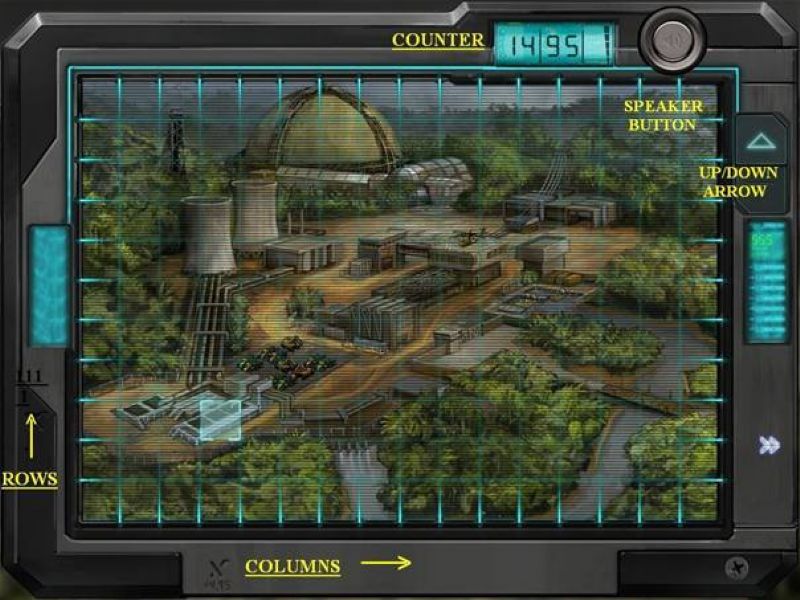
***** Click on the up-arrow (on the right side of your monitor) to zoom in.
Fay says that she will follow Salvador’s speaker-instructions and use the up/down-arrows to zoom in/out in order to inspect the plant!
STAGE 3 .
***** Fay examines the results – See screencap below.
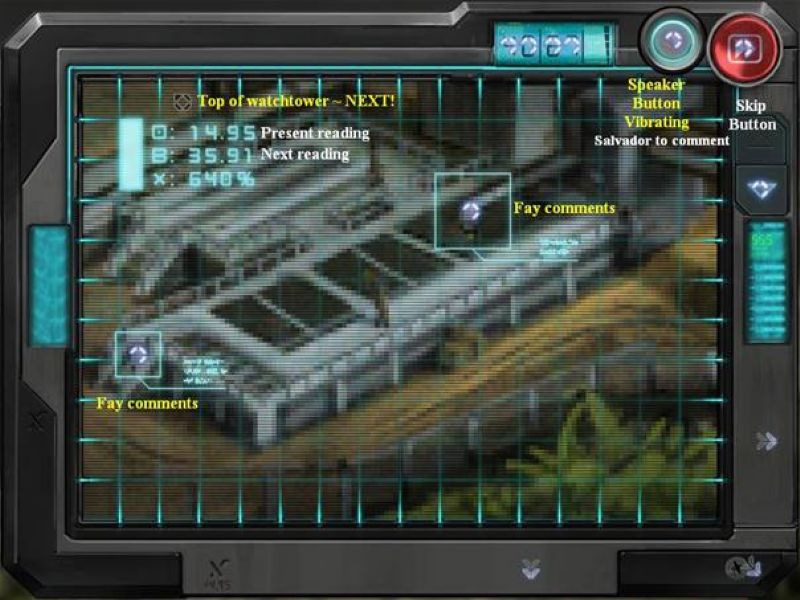
***** Look at the speaker button it’s vibrating. This means that Salvador has left a verbal report.
***** Press the speaker button and listen to Salvador’s remarks.
***** Click on BOTH of the light blue squares which have been automatically marked on the close-up, and listen to Fay’s comments. N.B. For recognition if necessary you can highlight these squares by pressing on the spacebar,
***** From the abovementioned 3 statements, deduce that the next place to investigate will be the top of the watchtower.
***** Examine the numbers which have automatically appeared near the top left corner of your monitor.
The top number, 14.95, is the counter reading in use at present. The number beneath it, 35.91, is the counter reading to be used in the next stage of the puzzle.
***** Click on the down-arrow (at the right side of your monitor) to zoom-out.
STAGE 4 .
***** Change the counter number to its new value of 35|91|.
***** Highlight the matrix-square ‘row 11, column 3’.
***** Click on the up-arrow to zoom in.
STAGE 5 .
***** Note the large close-up of the watchtower in the background.
***** Click on the vibrating speaker button and listen to Salvador’s report,
***** Click on the 3 light blue squares which have been automatically marked on the close-up, and listen to Fay’s comments. N.B. For recognition if necessary you can highlight these squares by pressing on the spacebar.
***** From the abovementioned 4 statements, it seems that there are patrolling guards who must be avoided at all costs, etc.
***** Examine the numbers which have automatically appeared near to the top left corner of your monitor.
The top number, 35.91, is the counter reading in use at present. The number beneath it, 28.97, is the counter reading to be used in the next stage of the puzzle.
***** Click on the down-arrow (at the right side of your monitor) to zoom-out.
STAGE 6 .
***** Change the counter number to its new value of 28.97|.
***** Highlight the matrix-square ‘row 6, column 12’.
***** Click on the up-arrow to zoom in.
STAGE 7 .
***** Note that the background has changed.
***** Click on the vibrating speaker button and listen to Salvador’s report,
***** Click on the 2 light blue squares which have been automatically marked on the close-up, and listen to Fay’s comments. N.B. For recognition if necessary you can highlight these squares by pressing on the spacebar.
***** From the abovementioned 3 statements, apparently Indez and his assistant arrived in 2 separate boats.
***** Examine the numbers which have automatically appeared near to the top left corner of your monitor.
The top number, 28.97, is the counter reading in use at present. The number beneath it, 11.52, is the counter reading to be used in the next stage of the puzzle.
***** Click on the down-arrow (at the right side of your monitor) to zoom-out.
STAGE 8 .
***** Change the counter number to its new value of 11.52|.
***** Highlight the matrix-square ‘row 9, column 9’.
***** Click on the up-arrow to zoom in.