Just Adventure original
A New Beginning Walkthrough
In trouble with some of the complex puzzles? Here’s a walkthrough to help you on your way to the finish!
A NEW BEGINNING
GIANT-PUZZLE WALKTHROUGH
by Len Green
([email protected])
13 September 2011
FOREWORD
A New Beginning is full of the usual inventory and dialog type puzzles etc. However there is also a considerable number of complex &/or stand-alone and multi-layered puzzles. Some contain just a relatively few steps, but many others contain a very large number of stages. In most of these cases, the player cannot save in a ‘straightforward’ way, during the middle of these steps, but CAN do so by exiting the puzzle first, saving, and then returning into the puzzle!!
Three or four of the most complex and exhaustive puzzles following can be skipped. After about 3 minutes of working on each of these, a large red circular button appears at the extreme top right corner of your monitor. Press it if you wish to skip the puzzle, ignore it if you don’t!. For many players the puzzles in adventures are a very important aspect of the games. For some folk they are even the most important aspect. This walkthrough deals with every COMPLEX puzzle fully and extensively on the assumption that none is to be skipped!
A few Important INSTRUCTIONS
- You should not necessarily have to follow the exact same order of performing all actions or even, accessing some locations.
- Every time you obtain a new item, it will appear in your inventory. You should observe each new inventory item immediately after it appears there by right clicking on it you will probably need it in some way or other.
- In the text (following), all objects which are acquired and entered into the inventory are written in bold, underlined, italicized, blue.
- All objects which are used from the inventory are written in bold, underlined, red.
- To highlight every hotspot (and exit) press the space bar. Every hotspot has a descriptive label. Each of these labels, in its original form in the game, is written in this walkthrough below in bold brown – when it is accessed in the following text for the first time only.
- In general, new items are only coloured when they appear for the first time in the text below.
- There are MANY hotspots with labels throughout the game which are never used at all. None of these ismentioned in this puzzle walkthrough only items essential for solving the puzzles are listed and described.
- All sentences or phrases within double quotes are taken verbatim from the game itself i.e. actual quotes from various characters!
- In the text below, wherever the instruction says to ‘click”, the meaning is to SINGLE LEFT CLICK on the mouse button only: Otherwise it will read, ‘‘right-click”, or “double click”, etc.
- Despite the fact that I fundamentally hate crticizing any Adventure game on principle, nevertheless, I must warn players of possible various bugs , technical quirks and even possible dead-ends !
- All the many graphics contain important, and very often essential, information for solving the puzzles. They are all ‘thumbnails’ and hence must be clicked to open up and reveal their visible wealth of detail!
PROLOGUE
TO REPAIR AND OPERATE THE “FOGGER”
This is a relatively easy straightforward puzzle to start with – a sort of Hors d’oeuvre if you like !
***** Bent Svensson is standing by the “fogger” his contraption for controlling &/or improving the environment.
***** Use the space-bar to highlight the hotspots – N.B. some are rather tricky to observe and access!
***** Operate the fogger the engine starts up but quickly dies!
**** Open the shutter.
**** Access the motor (immediately below the shutter) and obtain a close-up.
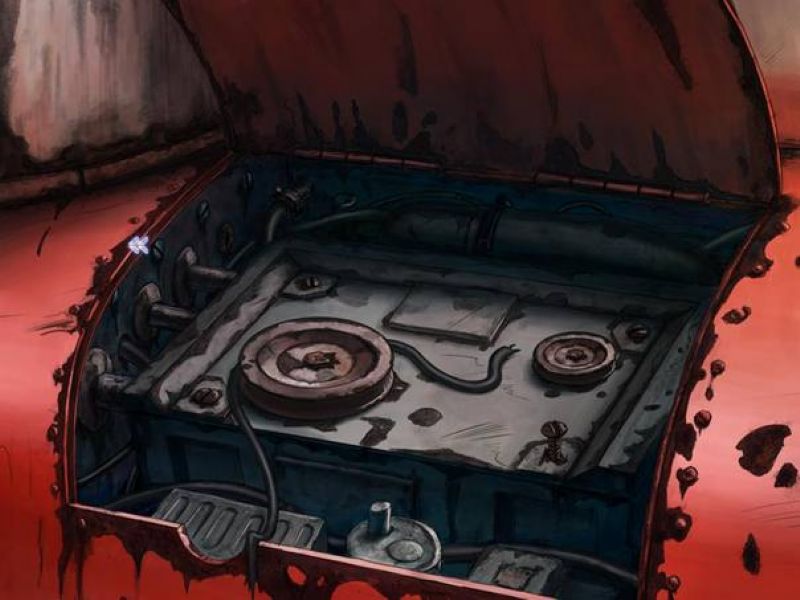
**** Look at:-
The broken/torn V-belt.
The impeller (Large wheel) it’s stuck!
Another, different, impeller (small wheel).
The screw – it’s loose like some of us maybe?!?
***** Remove the screw and ditch it, leaving a hole in its place.
***** Remove the torn V-belt.
***** In inventory, tie the ends of the torn V-belt and obtain a knotted belt.
***** From inventory, replace the knotted belt on the impellers.
***** Exit the motor.
***** Start the fogger again No good – the engine stalls again.
***** Access the close-up of the motor again.
***** Throw the broken V-belt away. A new replacement is needed!
***** There is an exit from this scene, down the stairway (seemingly in the water) fairly near to the bottom right corner of the screen.
***** Take that exit to Bent’s house.
***** Open the door.
***** Enter the house.
***** There are 2 paintings on the wall.
***** In close-up observe the left hand painting of the Atlas 11 team.
***** Pay special attention to the bulge at the bottom right corner of the picture. If you missed it, use the space bar to reveal it’s position.
***** Open up the bulge.
***** Find a key and take it into inventory.
***** Notice the cupboard.
***** Immediately below it is a shelf and on it a bottle of oil.
***** Take the rapeseed oil.
***** Exit the house.
***** Go down to the basement.
***** Open the basement door. No go! It’s locked!
***** From inventory, use the key to open the door
***** and enter.
***** Look at the cover
***** and pull it away revealing an inner room it was once Bent’s home laboratory; now unused and abandoned!
***** Look at and open the dresser.
***** Take the screwdriver which is in the dresser..
***** Observe and open the lodged door at the left of the screen.
***** Look at and take the bicycle-tube – Bent can’t! He needs proper tools.
***** From inventory, use the screwdriver to remove the bicycle tube. Note that the screwdriver breaks in the process – but is still in inventory but labeled now as a broken screwdriver.
***** Automatically, a helicopter lands and to Bent’s astonishment an unknown woman gets out and talks with him.
***** The woman’s name is Fay.
***** Exhaust all dialog topics.
***** Bent needs to finish his task before he can help Fay
***** and so he returns to his fogger.
***** Access the motor again.
***** If you haven’t done so previously, throw away the torn belt.
***** From inventory, replace the torn belt with the bicycle tube.
***** Exit the motor.
***** Again test the motor and once more it stops This time it is because the bicycle tube belt is too long,
***** From inventory, use the broken screwdriver on the abovementioned hole. That seems OK.
***** Once more start the motor and again it doesn’t work. The cause this time is that the shutter constantly keeps opening and closing which dislodges the broken screwdriver. Bent needs somebody to help by holding the shutter closed.
***** Return to Fay .
***** Convince her to cooperate by helping.
***** Fay agrees reluctantly.
***** Automatically Ben and Fay return together to the fogger. Fay does her bit by holding down the shutter andFINALLY THE FOGGER WORKS PROPERLY with some unexpected and somewhat dire results!
CHAPTER 1
TO ASSEMBLE THE TIME RADIO ANTENNA & RECEIVER
***** In inventory, examine the time radio transmitter and the suitcase.
***** From inventory, place the suitcase on the plateau (ground)., obtaining a close-up of the suitcase. “OK! Everything I need should be in the suitcase” says Fay!
***** Click the manual on the top of the suitcase, and study the schematic of the fully (not yet) assembled time radio antenna and receiver.
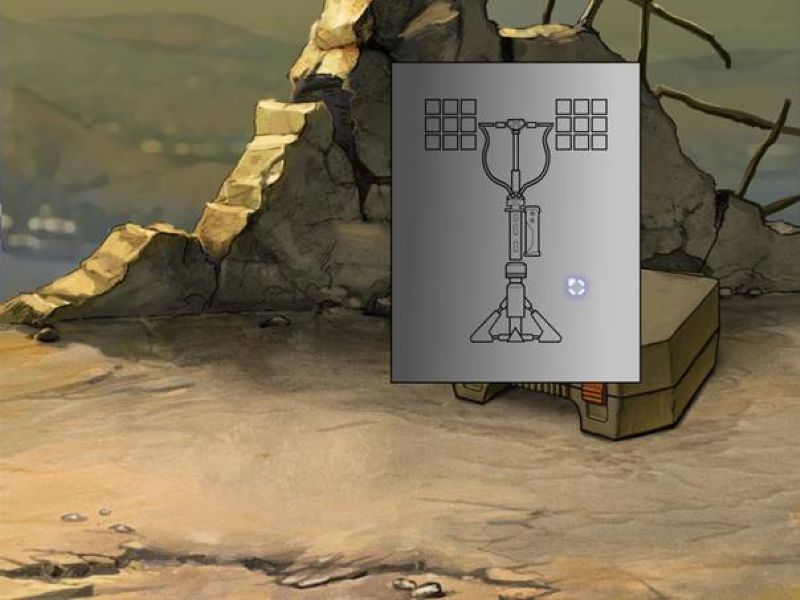
***** Open the suitcase.
***** Use the space-bar to view the whole required contents of the suitcase. The items inside are:- the foot; antenna;T-piece; coupler; cable; fuse – plus from the inside lid of the suitcase, the receiver (cube).
All these items will be taken for use by clicking on them first where they reside in the open suitcase, and then on the ground. They do not enter the inventory which in any case is inaccessible during this puzzle. Each item will be designated WHEN ACTUALLY USED by bold, italicized, underlined text.
***** From the suitcase, take the foot and stand it on the ground (plateau).
***** Click near the top of the foot and a tripod base opens up at the bottom of the foot for stability.
***** From the open suitcase take all the remaining seven items listed above, (N.B. There are TWO cables!) and place them on the ground around and near to the foot.
***** . From the ground, take the antenna and fix it onto the ring at the top of the foot.
***** From the ground, take the fuse and attach it to the antenna. (there are 2 identical ‘sockets’ for this, one below the other. Click the fuse on either of them).
***** Observe the switch near the top of the antenna.
***** Click on that switch and a tall extension antenna emerges upwards from the top of the antenna.
***** From the ground, attach the coupler to the bottom of the extended antenna.
***** From the ground, attach the T-piece to the top of the extended antenna.
***** Click on the button at the center of the T-piece thus extending its 2 arms.
***** From the ground, fix the receiver onto the coupler.
***** From the ground, attach each one of the two cables onto the two plug sockets on the coupler.
***** Attach the ends of the 2 cables to the 2 plug sockets on the two T-pieces (horizontal arms).
***** Fay congratulates herself!… “I did a pretty good job of this”! – “Well! Now we only have to determine the right sequence for the cubes” (This is the very next puzzle)!
***** FINITO – THE TIME RADIO ANTENNA & RECEIVER ARE NOW ASSEMBLED.
TO DETERMINE THE CORRECT SQUENCE FOR THE CUBES, AND INSTALL THEM ON THE TIME RADIO ANTENNA
Instructions
Fay has JUST assembled the time radio antenna. In the following description you might need to refer to the previous puzzle.
Six cubes have to be attached to the slots on the arms at the top of the time radio antenna. The cubes must be placed in a special sequence with 3 on each side of the T-piece at the top of the time radio antenna arms. It would seem that when this is completed successfully, the six cubes which have opened up into 6 panels presumably improve time radio reception?!?
The cubes reside on the inside of the lid of the suitcase and each is marked with a cross. To identify each cube, they will be referred to as top-left{T-L}, top-middle{T-M}, top-right{T-R}, bottom-left{B-L}, bottom-middle{B-M} and bottom-right{B-R}.
For the sake of clarity, in the following explanations (and graphics) I am calling the abovementioned 6 slots:- slot 1; slot 2; thro’ slot 6.
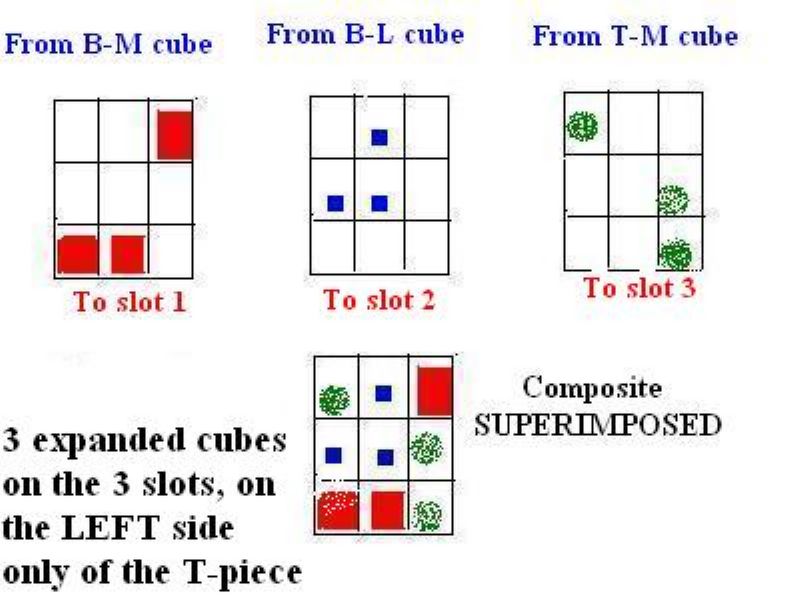
As described below, when opened up, each cube becomes a panel composed of 9 squares which form a matrix of 3 x 3. Each of these panels/matrices has only 3 out of the 9 small squares active a different ‘pattern’ of 3 for each panel (See the following screencap).
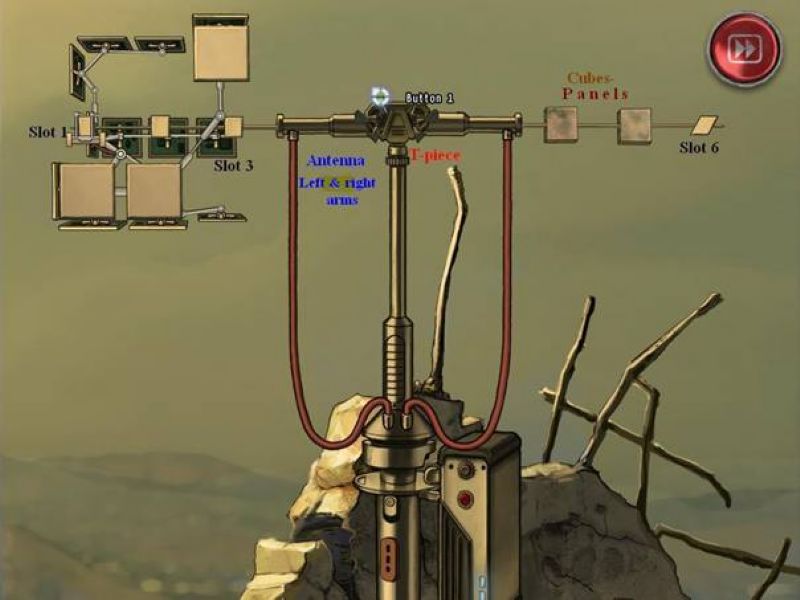
So the preliminary thing to do is to identify what different group or pattern of 3 squares belongs to each of the 6 panels (which originate from each of the 6 cubes).
Then, the puzzle itself is to install the correct 3 panels on each side of the antenna’s T-piece so that when they aretheoretically (visually not physically) superimposed on one another, they form a composite picture of a complete ‘solid’ 3 x 3 square (See the diagram below).
Solving the puzzle
Immediately after completing the assembly of the time radio antenna, i.e. at the end of the previous puzzle, Fay congratulates herself “Well! Now we only have to determine the right sequence for the cubes”. In other words she has to place ALL their panels correctly!
***** From the open suitcase, take a cube and drag it onto one of the slots (I recommend ‘slot 1’).
Pay close attention to the T-piece on that same side whilst you actually release the cube onto the slot You will see a green light flash on for a second or so only!
Don’t worry if you miss the light it’s very easy to do so first time you can repeat it as many times as you want; You don’t even have to return the cube to the suitcase each time! If you really can’t get it to work for whatever reason, the green light flashes on at button 1 for slot 1, thro’ button 6 for slot 6.
Solution
There may be more than 1 solution to this puzzle or even some randomization but I tend to think not! If there is only 1 unique solution then mine is below and should be universal!. If not however, then the method should explain ALL other variations!
***** Attach B-M cube onto slot 1 as described above.
***** Attach B-L cube onto slot 2.
***** Attach T-M cube onto slot 3.
***** The 3 aforementioned cubes ALL go on the left side of the T-piece. Check, as explained and illustrated above, that they are ‘correct’.
***** The other 3 cubes go on the right hand side of the T-piece. It does not matter in what order you place them there.
But in case there is any complication, I personally attached:-
***** T-R cube onto slot 4.
***** T-L cube onto slot 5.
***** B-R cube onto slot 6
***** When you have finished this, Fay will exultantly say’The main switch lit up”, and “I think I got it right”.
***** Notice that the red light on the main switch on the receiver has started to blink continuously. This indicates thatALL THE 6 CUBES HAVE BEEN INSTALLED CORRECTLY ON THE TIME RADIO ANTENNA.
TO CROSS THE ACID WATER (and rescue 2 teamsters)
Fay has managed to paddle a primitive ‘boat’ across muddy and acidic water. She is standing close to where the other 2 remaining members of the whole project are trapped. All the others are dead! Only Salvador and Delvin are still alive apart from Fay all the others are dead.
Fay has to rescue them before they too are swept away and killed in the abyss.
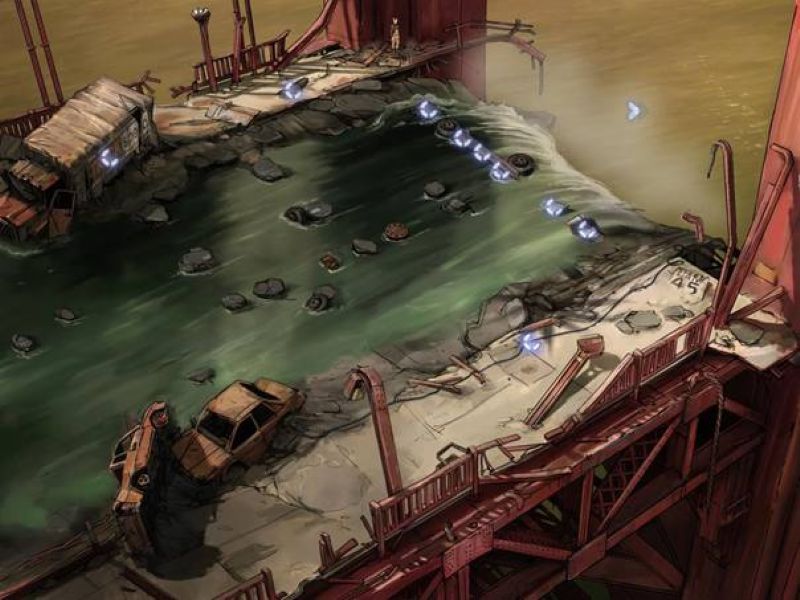
***** Click on the space-bar to see all the hotspots.
***** Fay has walked to the row of 6 stones (more like rocks!) and spoken to the 2 stranded members of the team. They have managed to fire a harpoon bringing a rescue rope but it is on the other side of the acid water. Fay has got to get there somehow!
***** Walk back just a bit and see a board sticking out of the mud.
***** Grab the (short) board.
***** Walk back further and approach an abandoned truck
***** Fay exclaims “Hm. Looks like there is something behind the canvas”.
***** Try to open the canvas “But I can’t get it off with my bare hands”.
***** From inventory, use the knife to rip a hole in the canvas.
***** See some empty barrels inside the truck.
***** ‘Roll out the barrel’ it floats away and fills a gap alongside one of the stones enabling Fay to cross them.
***** Return to the line of stones.
***** From inventory, place the short board on the first stone.
***** walk on the board to the first stone.
***** Pick up the short board and place it in inventory.
***** Move forward along the stones by repeating the previous 3 steps.
***** As Fay passes the halfway point, the gap between stones becomes larger and the short board is insufficient to span them! Don’t panic however! There is a convenient long board floating at hand in the water.
***** Take the long board and put it into inventory.
***** Continue as before using the long board from inventory instead of the short board.
***** Finally, from inventory, use the short board once again.
***** Fay arrives at the opposite side of the acid water and breathes a sigh of relief “I’m not going to do that again, ever“!
***** View the steel beam at the extreme right.
***** Walk to the left again and look at the rope that Delvin shot up using a harpoon “You’ll have to fix the rope to something”.
***** Walk left as far as you can go and examine the vehicle “Hm. .The key is in the (ignition) lock”! So test the engine – it works fine!
***** Look at the rear of the vehicle “The rear axle is covered in mud”.
***** Fay retorts “I can’t clear the mud with my bare hands”.
***** Use the dustpan to clear the heap of mud revealing the wheel rim.
***** Remove the wheel rim and put it into inventory “The back wheel is exposed now”..
***** Look at the rear axle.
***** From inventory, use the wheel rim on the steel beam “The wheel rim is fitted to the iron rod”.
***** Use the rope on the wheel rim which is fixed to the steel beam “I put the rope on the wheel rim”.
***** Pick up the rope
***** and, return to the vehicle.
***** Use the rope on the exposed rear axle.
***** Finally, once again activate the vehicle’s engine.
***** EUREKA – FAY HAS SAFELY RESCUED SALVADOR AND DELVIN.
CHAPTER 2
TO GET THE TURBINES TO WORK
***** Behind the terminal is a glass window with a full view of the turbine room. Verify that he turbines are not working.
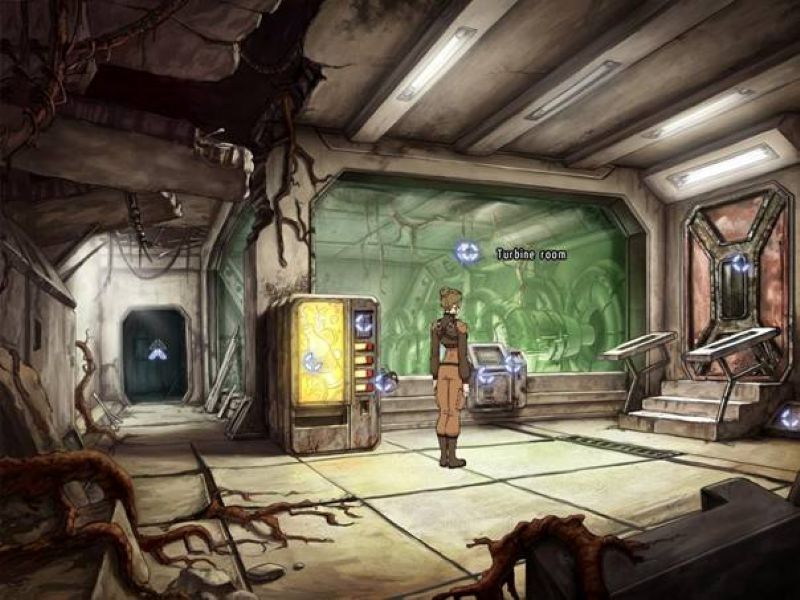
***** Check the above items.
***** Look at and check the terminal’s shutter.
***** Press the power switch No power!
***** Operate the terminal and see the puzzle: below
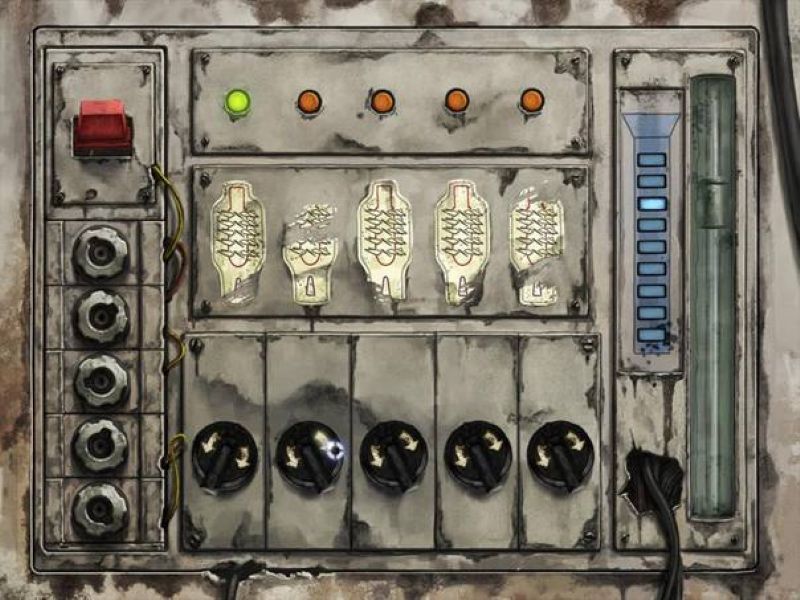
***** There are probably several solutions to this puzzle. One solution, not necessarily the ‘best’, is as follows::-
Designate the 5 knobs, from left to right, A thro’ E. Each can be turned either clockwise or anti clockwise by pressing anumber of times appropriately.
For the following solution, rotate each knob ONLY CLOCKWISE and in the IDENTICAL ORDER. e.g. In the following example D x 2; B x 1 etc. means: ‘Press D twice’ followed by ‘Press B once’.
The object of the exercise is to get the 5 lights at the top of the contraption to be green simultaneously.
++++ SOLUTION:-
D X 1; A x 1; E x 1; D x 1; A x 1; F x 1; B x 2; C x 2.
***** That’s it! OOPS a short circuit! Something new for Fay to repair!!
***** Return to the left and the previous room.
***** See the left display case.
***** Notice something sparking behind then left side of that case. View it.
***** Fay exclaims “An old exposed cable in a puddle. That must be the reason for the short”!
***** Examine the shorting cable.
***** “It runs along the wall” to the right and to a cover just past the opening to the next room.
***** Open up this cover.
***** Remove the (fuse) plug.
***** Fay rejoices “Problem solved”! ALL THE TURBINES ARE WORKING FINE NOW!
TO OBTAIN THE (UNBROKEN) DATA CRYSTAL
***** Deal with the terminal which is fairly close to the runnels, and beside the railing.
***** If you haven’t already done so, pick up the signal lamp from the floor to the left of the abovementioned terminal.
***** Approach the 3 sockets alongside the left wall.
***** Activate all 3 and examine the large panels which have sprung up.
***** Pay special attention to the middle one it is the only panel which has a switched-on lamp on it.
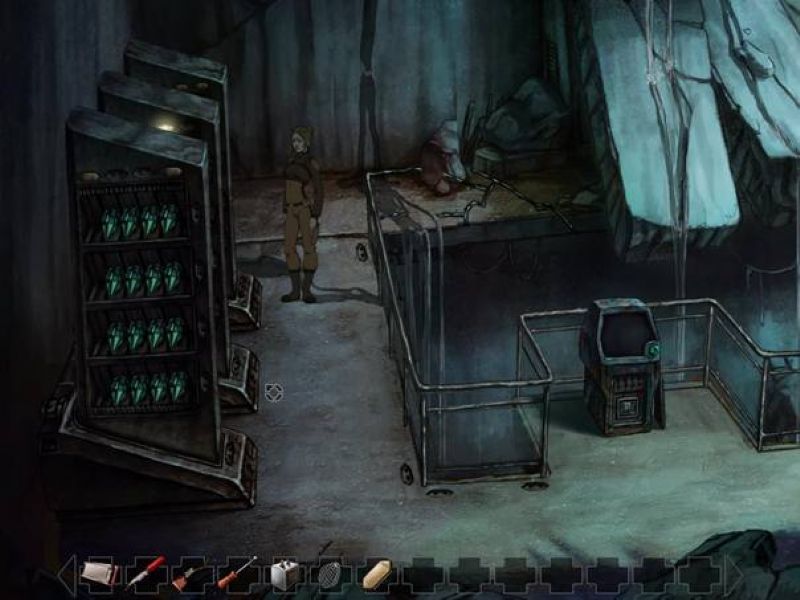
***** Retract the outside 2 sockets leaving only the middle one standing.
***** Use the space bar to highlight the active hotspot empty lamp slots.
***** Look at the vertical row of lamp slots on the right side. Concentrate on the one above the bottom
***** and from inventory, fit the lamp into that slot.
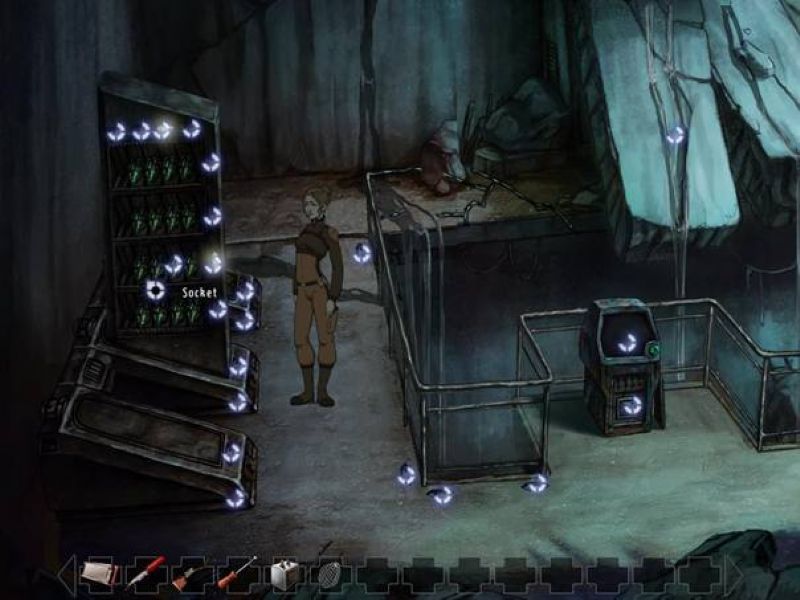
***** In imagination, drop a vertical line down from the ‘top lamp’ and a horizontal line to the left from the ‘side lamp’. They intersect 2 places horizontally to the left of the ‘side lamp’.
***** At that intersection point (slot), REMOVE THE (unbroken) DATA CRYSTAL.
[ ***** Also take the signal lamp into inventory. ]
TO GET INTO THE ARCHIVES AND OBTAIN THE VIDEO TAPES
***** Go to the turbine room (See screenshot above).
***** Examine the heavy reinforced door.
***** Talk to the man inhabiting the other side of the door.
***** He is starving hungry but won’t accept Fay’s offer of food pills!
***** He would like Fay to come and cook for him but Fay can’t &/or won’t.
***** Ascertain that there is an illuminated elevator on the other side of the door.
***** Exam the other side of the door in the dispensing machine and the electronic lock.
***** From inventory, put the membrane onto the electronic lock.
***** Again from inventory, take the battery and place it on the membrane which covers the lock.
***** The lock explodes destroying both the membrane and the battery.
***** Look into the coin chute and see something glittering there.
***** Pocket the coins.
***** There is a slot for money at the top right corner of the machine. From inventory,. feed the coins into it.
***** Operate the machine and obtain a bottle.
***** From the machine, take the bottle of red curry cola.
***** Look at it in inventory… “Red curry coke (sic) wakes you up”
***** In inventory, combine the red curry cola with the chicken a l’orange pills to get curry chicken “Eww! Really sticky!!”
***** From inventory, use the curry chicken on the heavy reinforced door. ***** The man inside tells Fay to leave the food on the stairs and then ‘Get out”
***** “I’ll let you in if I like you”.
***** Fay does as commanded – leaves the food – exits the room – and immediately returns.
THE HEAVY REINFORCED DOOR IS NOW OPEN AND FAY ENTERS.
***** Open the light (switch) in the darkness.
***** Talk to the survivor and exhaust all dialog topics.
***** Access the terminal which is just to the right if the survivor.
***** Converse with the on-screen Avatar called ‘Quickie’.
***** Fay orders the video tape which Salvdor has told her is artifact 2110-8321-00.
***** It seems that there are no less than 3 different artifacts with that identical ID#… a manuscript, a camera and the video tapes.
***** Fay requests only the video tapes.
***** Unfortunately neither the video tapes nor the manuscript are accessible.
***** So Fay asks for the camera.
***** It arrives packed in a glass box for protection/preservation.
***** Remove the camera from the box and view it in inventory.
***** In inventory, set the automatic timer for 1 minute.
***** From inventory, send the ‘timer-set’ camera back to Quickie by clicking it on the box
***** Access Quickie again in the terminal
***** Once again ask him for the camera.
***** Again remove the camera from the glass box (into inventory)
***** Examine the camera in inventory and see the photo taken automatically by the timer after 1 minute.
***** Fay sees a large case with the ID number printed on the side and alongside it are the video tapes.
**** Just as above, return the camera to Quickie.
***** As previously, access Quickie in the terminal and, despite Fay knowing in advance that it is empty, request the large container whose ID# is 3476-8970-9987.
***** Look at the empty box.
***** Fay notes “This box is much bigger than the others. Even I would fit in there”.
***** Open it up.
***** Fay checks and finds that the box is indeed big enough for her to get into.
***** Talk to the survivor and finish all dialog topics with him.
***** Only after Fay ‘promises’ (“Scout’s honor”) to cook for him does he agree to cooperate and help.
***** Fay gets into the glass box.
***** Request Sean, the survivor to order Quickie to send her down now!.
***** She arrives at the storage department.
***** Notice why the video tapes could not be accessed originally a troublesome broken crate.
***** Open the glass box containing the video tapes. No go!! The box is jammed.
***** From inventory, use the screwdriver on the glass box to open it.
***** Finally, TAKE THE 2 VIDEO TAPES.
[ N.B. (1) One covered the power plant accident and the other filmed the climate conference.
(2) Fay cannot exit the storage department without external assistance etc., etc. ]