Just Adventure original
Cold Case Summer

A walkthrough for the ninth game in the Carol Reed series
COLD CASE SUMMER
Carol Reed Mystery #9
WALKTHROUGH
By Len Green
There should be no need to use this walkthrough since there is a very sophisticated & detailed dynamic hint system built into the game itself! (It is fully described in the tutorial.)
It has been excellently and almost uniquely devised for a non-linear game so that the player can get help at EVERY stage of the game without revealing future gameplay.
But if you so desire – carry on!
FOREWORD
{A} This walkthrough describes ALL the actions which you must take in order to succeed, together with a relatively small number which are not essential to completing the game.
N.B. The game contains some ‘red herrings’.
However, please don’t use this walkthrough unless you absolutely have to. Some aspects which are not absolutely imperative have been omitted. A lot of these are interesting and provide much of the background story to the game, and particularly to the fascinating (and artistic) character, scenery and history of Norrköping … a relatively small town in Sweden, and home to the Developer, Mikael Nyqvist.
{B} “Warning”:- The main purpose of this game is to examine items, interview people, view the interesting sights and scenery, and apart from solving the mystery, generally ‘act the tourist in Sweden!’, etc.
If you simply take this walkthrough in your hand (or consult all the built in hints) and follow exactly what to do and not to do, you can probably finish the game quite quickly.However that would completely defeat its whole purpose!
{C} A very great part of the interest and beauty of the game is wandering around through the vast number of locations, views, residences, etc There are actually so many that I’m pretty certain that I missed a few ! :~)
There is a lot of interesting history and material in Norrköping, a small but quite important city whose population is a little under 100,000 and whose original roots date back to the 14th century, or earlier!
{D} This is a first-person game and much of the intricacy and pleasure lies in browsing around … and as mentioned above there is a lot of that. I personally frequently ‘got lost’ looking for some location or object (even occasionally inside a residence!), and sometimes after finding it, lost my way again on returning in order to continue the game.
{E} “Cold Case Summer” does not contain many ‘stand-alone’ puzzles, and those included are generally not difficult.
However there IS one main puzzle for some players which runs right throughout the game. It is the necessity to ramble around (maze-like) without losing one’s way and getting frustrated due to this.
Generally, the player is only told where to go, but not exactly how to get there, or sometimes even how to move around when actually there! Where this is really tricky, simple written descriptive hints are given to help in orientation. But there maybe some locations where this may not be sufficient for some players. In those cases this walkthrough contains exact instructions such as:-
Move right twice; then move forward once; then left three times; then move forward five times; and finally move right once again!
{F} Upon entering every new location, it is highly advisable to browse around as much as possible in order to explore the general layout. However, the walkthrough never tells you explicitly to do this!
{G} You should most certainly NOT have to follow the same order of accessing locations as described in this walkthrough since the game is not linear. There are a very great number of permutations of routes, and it is most unlikely that two players will followexactly the same itinerary. In addition it is most likely that this walkthrough does not describe the best or even optimum route to play the game (and finish it completely)!
Some locations of course will not appear on the map until you have completed certain tasks, and so a particular order is sometimes obligatory. Other than this, you are free to visit (&/or revisit) all locations on the map as and when you wish!
{H} There is no need to describe ANY of the ‘mechanics’ &/or interface of the game. It is all contained in the manual which is to be found in the “BM” folder on your Hard Disc (after installing of course), and also as a shortcut in the same program group as the installed game.
{I} There is no so-called ‘bad language’. It is all first person and mouse driven point & click. There are full (and excellent) subtitles for ALL speech.
{J} As in most games, it is easy to make a wrong or redundant move! So it is advisable to save frequently.
There are 100 save-slots… in case anybody needs that many! Since each save is fairly small, saving and loading is reasonably fast, presenting little delay to progress.
N.B. There are absolutely NO dead-ends or crashes in the game!
{K} EVERY TIME you obtain a new item, it will appear in your inventory. You should observe each new inventory item immediately it appears in inventory by right clicking on it to get an excellent greatly enlarged picture of the item together with a very short caption outlining its description.
N.B. It is imperative to view, and sometimes to manipulate, some of the inventory items in close-up to complete action upon them. In addition, some inventory items will combine with others there and attempts must be made to test this.
{L} There are no instructions in the walkthrough to close certain drawers, cupboards, cabinets, etc when they are left open since the game ensures that you cannot continue if you do NOT, and often informs the player of such!
{M} There are a number of puzzles in the game. Wherever there is an outright spoiler, I have inserted it in a much smaller print and a green color that is not TOO easy to read, as follows:- Spoilers are inserted like this ………
I have done this deliberately since many players do not want to see spoilers unless and until absolutely essential.
The walkthrough starts here!
In the text, all objects which are acquired and entered into the inventory are written in bold, underlined, and red.
All objects which are used from the inventory are written inbold, underlined, italicized, and blue.
EXTREMELY USEFUL UTILITY: In every frame, by pressing on the space-bar, EVERY hot-spot is revealed!
If you are not too acquainted with this type of Quest-Adventure game, play through the short tutorial which will familiarize you with the controls and interface.
**** Otherwise… skip it! ****
[ 1 ] Carol’s home {1st visit}
***** It’s morning and Carol jumps out of bed ready for a new day.
***** Go to the living room..
***** Look at the tablet computer on the table in the living room.
***** Read the message from Stina on the tablet.
***** Exit to the map.
[ 2 ] Stina’s store {1st visit}
***** Talk to Stina and exhaust all dialogs.
***** Retrieve Carol’s mislaid telephone from Stina.
***** Exit to the map.
[ 3 ] Carol’s allotment {1st visit}
***** Walk to the pedestal in front of the allotment’s hut.
***** Lift up the brick on the pedestal.
***** Take the keys to the hut from under the brick on the pedestal.
***** Use the keys to unlock the padlock on the door of the hut.
***** Enter the hut and look around.
***** Whilst leaving the hut, a mysterious stranger phones Carol.
***** Talk to the complete stranger (on the phone) and exhaust all dialogs – he DEMANDS a meeting with Carol at the Graffiti Heap.
***** Exit to the map,
[4] Graffiti Heap {1st visit}
***** Explore the area until you come across the stranger who is in hiding!
***** Talk to him – but he refuses to show himself and Carol won’t continue unless he reveals himself.
***** It’s getting late and Carol; needs to go home and get some well earned sleep.
***** Exit the Graffiti Heap.
[ 5 ] Carol’s home {2nd visit}
***** Carol’s bathroom and toilet is undergoing essential extensive repairs. Hence the landlord has fitted up a temporary shower in the boiler room.
***** Carol doesn’t want to have a shower with water alone!
***** Find and look at the liquid soap on one of the pipes.
***** Grab the expensive soap.
***** Carol has a shower in the boiler room now that she has obtained some expensive soap – she then automatically enters her apartment ready for bed.
***** Go to the bedroom
***** Move the knitted doll – called “Len”!
{{{ N.B. The wife of this walkthrough writer, Sylvia Green, makes scores of these hand-knitted dolls (every one unique and different) and gives them away (free) to family, friends and even acquaintances!! }}}
***** Carol goes to bed and forgets about Mr. X.
***** She is woken up next morning by the persistent ringing of her telephone.
***** Access Carol’s phone and press the right hand (green) phone symbol.
***** It is the police – exhaust all dialog options.
Apparently the stranger she tried to talk to, yesterday Mr. X has been murdered. His name is/was Harri Michelsen. He was strangled and his body was found near the Wire Lookout.
***** Access Carol’s tablet computer on the dining room table.
***** Obtain a full page informative entry (article) about Harri Michelsen.
***** Click on the link and get a similar full page informative entry on Christer Petterson (nicknamed Crille).
***** Once Again, click on the link and get a similar full page informative entry (article) on the murdered Swedish Prime Minister Olof Palme.
The last two entries (articles) are real life (or more appropriately ‘death’) characters and further details about them are on public record for anybody who is further interested! The first one is based upon a real person but partially fact and part fiction but with a fictitious name!
***** Exit to the map – two new locations have appeared (and are blinking since neither has yet been accessed).
[ 6 ] Amber’s apartment {1st visit}
***** Talk to Amber and exhaust all dialogs.
***** Exit to the map.
[ 7 ] Pamplestone {1st visit}
***** There are several things that can be done in the Pamplestone pumping station and the order is unimportant.
{i} Find and pick up a hammer.
{ii} Examine a couple of photos.
Turn them over and read the
message from Rita. Take those
pictures from Pamplestone.
{iii} Look at a wooden peg with
some wire wrapped around it.
Carol says that she might
need a piece of the wire.
***** Exit to the map – But Carol MUST return the hammer before she leaves.
[ 8 ] Carol’s allotment {2nd visit}
***** Find some asparagus peas and pick them for Stina.
***** Exit to the map
[9] Stina’s store {2md visit}.
***** Give Stina the asparagus peas that she wanted.
***** Talk to Stina and exhaust all dialogs.
***** Exit to the map.
[ 10 ] An Aurora Monument {1st visit}
***** Go to and read an elaborate notice board with some important background information inscribed on it including mention of the Aurora Temple.
***** Exit to the map.
[ 11 ] The Aurora Temple {1stt visit}
***** Take a good look at the ceiling paintings.
***** Observe the expensive camera zoom lens which apparently someone has forgotten and lost. It has a phone number stuck on it!
***** Get the camera lens with phone number.
***** Access Carol’s telephone in inventory and phone the abovementioned number.
***** You reach somebody called Rita. Talk to her and exhaust all dialogs – she provides Carol with the address of Harri’s apartment.
***** The camera lens with phone number is broken so Carol does not need it any more – neither does she need thepictures from Pamplestoneany further.
***** Exit to the map.
[ 12 ] Harri’s apartment {1st visit}
***** Open the front door. Impossible – it’s locked!
***** Go round the back and find a pair of unlocked white shutters.
***** Enter the apartment through these shutters.
***** Look for a sort of sideboard with a table lamp on top.
***** Access the brochure describing the Pamplestone pumping station.
***** Glance at the piggy-bank in the kitchen.
***** Scan the list of chapter headings for some written work (Maybe Harri’s manuscript?)
***** Open a white drawer in the living room.
***** Receive a message from Jonas – he has bought a snazzy new car and offers to take Carol for a ride anywhere!
***** Look at some bookshelves containing books, and a small TV set, and other odds and ends.
***** Take the rolled up sheet of white paper – it is the Morse Code.
***** On a table with some musical apparatus is a letter that has had a picture cut out – nothing can be done with it at present!
***** Enter the bedroom through the door.
***** Note the placard showing many types of mushrooms – each one numbered. This may have some importance much later in the game!
***** Go to a magazine stand.
***** Find and read a ‘To do’list – It appears that Harri had shown a manuscript to Amber??
***** Exit to the map.
[ 13] Amber’s apartment {2nd visit}
***** Talk to Amber and exhaust all dialogs.
***** Look at the picture of the exact place where Olof Palme was assassinated. Harri was going to use it as the frontispiece of his book.
***** Exit to the map.
***** Carol intends to go to the place where Olof Palme was murdered – But she needs a vehicle to get there.
***** Use Carol’s telephone and call Jonas.
***** Talk to Jonas and ask if she can borrow his OLD car.
***** They arrange to meet at the Pyramid Elm park.
[ 14 ] The Pyramid Elm park {1st visit}
***** Meet Jonas at the park.
***** Talk to Jonas and exhaust all dialogs.
***** Jonas easily agrees to let Carol use his old car and gives her the car key.
***** Exit to the map.
[ 15 ] Steiner parking lot {1st visit}
***** Unlock the car door with the car key.
***** Start the car using the car key on the steering column ignition lock – the engine coughs a bit and then dies.
***** Remove the car key.
***** Get out of the car.
***** Open the bonnet of the car.
***** Check the engine.
***** Carol needs to examine the spark plugs – but needs something to remove them.
***** Leave the bonnet and open the boot of the car.
***** Remove the spark plug wrench.
***** Leave the boot and open the bonnet again.
***** Use the spark plug wrench to remove a spark plug. It is filthy – it hasn’t been cleaned for ages!
***** Exit to the map.
[ 16 ] Wire Lookout {1st visit}
***** Look around and enjoy the view from the lookout – the river is where Harri’s body was washed up and found!
***** Scrutinize the steps nearby.
***** There is an object lying on one of the steps.
***** Get a close up view of that object and find that it is a steel brush.
***** Grab the steel brush.
***** Exit to the map.
***** Return to Jonas’ old car at the parking lot.
[ 17 ] Steiner parking lot {2nd visit}
***** Remove the spark plug as described just previously.
***** Clean the dirty plug with the steel brush.
***** Close the bonnet and enter the car – you don’t need the key this time!
***** Again use the car key on the ignition.
***** This time, the engine starts up excellently.
***** Exit automatically to the map.
[ 18 ]The Olof Palme murder scene {1st visit}
***** On the ground just a very little way into the location are some flowers..
***** Obtain the floral wire which was wrapped around the flowers.
***** Exit to the map.
[ 19 ] Carol’s home {3rd visit}
***** On the kitchen table is a pair of scissors.
***** Take the scissors.
***** Exit to the map.
[ 20 ] Pamplestone {2nd visit}
***** Find some wire wrapped around a wooden peg.
***** Cut a small length off the copper wire with the scissors.
***** Exit to the map,
[ 21 ] Harri’s apartment {2nd visit}
***** There is a door in Harri’s apartment which Carol could not open – she is now in a position to try again.
***** Use both the thin floral wire and the thicker copper wire on the stubborn door!
***** The closet door opens revealing some clothes hanging inside.
***** Read the note found in the pocket of a shirt – it is about a key in a furnace in the Pamplestone pumping station.
***** Leave the closet and go to the front door.
***** There is a letter in the letter-box.
***** Open the envelope and read the letter – it is a notification from a rental company warning Harri that he will have to pay weekly and in advance for renting a storage box in the Norrköping Central Station.
***** Exit to the map.
[ 22 ] Pamplestone {3rd visit}
***** Get the hammer – as described in [ 7]above.
***** Go to the huge combustion furnace which has two fuel hatches.
***** Use the hammer to open the (closed) left hand hatch.
***** Take a look into the furnace – it is cold since it is not in present use.
***** Take the key (from Pamplestone) from inside the furnace
***** Close the hatch.
***** There is a locked door near to the entrance.
***** Use the key (from Pamplestone) to open the locked door,
***** Examine the electrical cabinet on the right.
***** Read the note reminding Carol to phone the maintenance company about her bathroom repair.
***** You are forced to return the hammer before exiting to the map!
[ 23 ] Norrköping Central Station {1st visit}
***** Examine the storage box – but there is nothing you can do there at present.
***** Exit to the map.
[ 24 ] Carol’s home {4th visit}
***** The whole plumbing system in Carol’s apartment broke down a week ago and a complete new installation and reparation job is under way – what a nuisance!!
***** Pick up a carpenter pencil.
***** Exit to the map.
[ 25 ] Pamplestone {4th visit}
***** Return to and look at the note in the electrical cabinet – see[ 22 ]above.
***** Apply the carpenter pencil to the note and an impressed note appears.
***** Read the note.
***** It’s quite difficult to read so look at it more closely. It is a reminder to put some flowers on Crille’s grave on a certain date (possibly the anniversary of his death??).
***** Exit the cabinet and then the location and you are on the map.
[ 26 ] Harri’s apartment {3rd visit}
***** Open the closet – see[ 21 ] above.
***** Access the shelf (above the shirt which you went to there previously!).
***** Open the box on the shelf by solving the puzzle on it.
***** On the left there is the name ‘Crille’ written vertically downwards. On the right are some numbers. Press the appropriate numbers (in the correct order).
***** Apparently there is some previous connection between the name and the numbers!
***** If you can’t remember this connection, have a look at [ 25 ].
***** The numbers you have to press are:- 1; 3; 0; 4,
***** Turn the obituary of Christer Petterson (aka Crillle ) right way up and read it.
***** Continue examining the contents of the abovementioned box
***** Behind the obituary is an envelope ……….
***** ………. Open it!
***** Read the letter from the administrator of Christer Petterson’s ‘estate’ to Harri Michensen.
***** You then come across a two page draft description of ‘Meeting Christer – although there is no author on the draft I assume it is a part of Harri’s intended manuscript??
***** Then inspect the letter from Christer to Harri. It mentions the ‘Aviation Administration’ building.
***** Finally you see two keys in the box.
***** Take the hex key and the (ordinary) key (in either order!)
***** Close the box.
***** Exit the closet and then the location and you are on the map once more.
[ 27 ] The Aviation Administration (and bunker) {1st visit}
***** Carol remarks that she very much doubts that Christer lives in that building!!
***** Explore the whole area around the Aviation Administration and especially the mountain,
***** Read a placard describing the Air Force Bunker which is on the south side of the mountain.
***** Continue exploring and you will arrive at the padlocked entrance to the abovementioned bunker.
***** Open the padlock using the (ordinary ) key.
***** Enter the bunker.
***** Explore the bunker – but you can only advance a little way since it is extremely dark in there. You need a flashlight.
***** Exit the bunker and then the location. You are now on the map again.
[ 28 ] Carol’s home {5th visit}
***** Go to the computer room.
***** Take the (mini) flashlight.
***** Exit Carol’s computer room and then exit her home.
[ 29 ] Air Force bunker {1st visit}
***** Return to the place where it is pitch black.
***** Switch on your flashlight so that you can explore the whole very dark tunnel without any difficulties – Note the crude graffiti with the number 2007 beneath it; probably the date they were painted!
***** Search the bunker (you are limited at present) and find a map.
***** Locate the frame where you see a white block (seems to be made of stone??). Partly beneath it and partly exposed is a map (In case of difficulty, refer to A on the graphic below!).
***** Pick up the Air Force Map.
***** If you have difficulties with this, proceed as follows:-***** Immediately after lighting up (all the paths in) the bunker, proceed as follows:-
Go left once and you are facing a heavy steel door:- Open it by turning the control-wheel clockwise:- Go forward twice, and Carol says that she doesn’t want to proceed without some aid!:- Go left once:- Go forward once; and finally move left again once.
{{{ N.B. You do NOT NEED to use this ‘map’ during the whole game.
My wife happened to reasonably easily manage to traverse the whole rather complex bunker without ever accessing the Air Force Map, performing ALL the gameplay actions!
On the other hand , I myself kept referring to the map all the time I was in the bunker – now and later on. The large orange coloured spot pin pointed exactly where I was at every point in my travels and therefore greatly helped me to continue! }}}
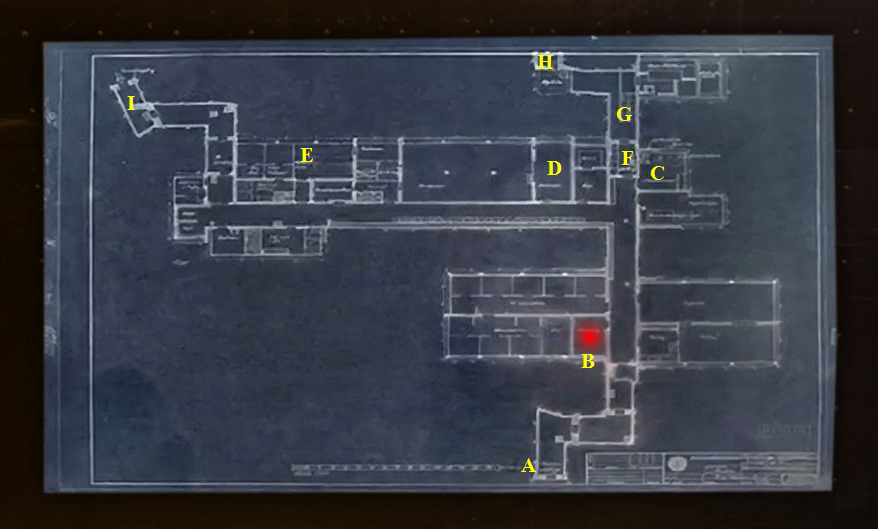
***** Continue exploring the bunker.
***** Move to the right , then ‘upwards’, then right again, until you find a park bench with a white mattress on it.
If you get lost in this rather complex bunker it’s a good idea to consult the map. Furthermore, the GRAPHIC ABOVE can help a great deal – just keep referring to the large orange spot as you move and you can see exactly where you came from, and where you need to go .
A marks the location where you entered the bunker:- B is the place where you obtained the map:- and C is where you find the park bench.
***** ………. Lift up the corner of the mattress revealing a sheet of paper underneath it.
***** Examine the sheet of paper – it has a crude funny face drawn on it which refers to somebody called Kim.
***** On further examination of the sheet of paper you obtain Kim’s address.
***** In front of the perk bench is a white rectangular concrete block… View it in close-up.
***** Push the block aside and underneath it is a well worn sheet of paper.
***** Take that Timeworn note from bunker… It has five fairly small hexagons marked on it (You will need this later on in the gane)
***** Return to the entrance of the bunker, “A”
***** Exit to the map.
game)
[ 30 ] Kim’s apartment {1st visit}
***** Talk to Kim and exhaust all dialogs. She happily gives Carol the address of her grandfather, Sigge,
Exit to the map.
[ 31 ] Sigge’s apartment {1st visit}
***** Look around the apartment.
***** Carol exclaims “It looks like there has been a burglar here” since papers and other items are scattered around all over the floor.
***** There are 5 hot spots amongst the objects scattered around on the floor. Only two of these are of any importance for continuation of the game ……….
***** ………. The most important one is a sheet of white paper.
***** Turn over the paper and note the four coloured stars on it – from left to right the colours are:- First-yellow; Second-blue; Third-green; and mauve.
***** The other item mentioned just above has some bearing on the narrative – it is a letter from, Harri to Sigge. In that letter, the Dead City is mentioned creating a new location.
***** Carry on around the apartment.
***** Find a chest of drawers.
***** The top drawer of the four is locked.
***** There are five stars on the drawer similar to those on the sheet of white paper mentioned just above – but these are not coloured.
***** Press on these five stars and four of them cause a different colour to light up but not on that star but on a different one. Note the positions of these four coloured lights and MENTALLY assign them numbers from 1 thro’ 5 from left to right.
Then press four of these five stars in the order of the four colours of the abovementioned white sheet of paper.
***** This may not be clear and possibly confusing. So just as an example at the beginning:-
On the white sheet of paper, the first colour is yellow. So where does the colout yellow appears on the drawer? It appears on the second star which you MUST note. (N.B. It actually appears whist you press the fifth i.e. last, star on the drawer – but this is actually irrelevant!!!
So the first star you must press in order to unlock the drawer is the second one from the left,
And so on. When you have pressed the correct four stars in the correct order, the drawer opens.
***** If you NEED a blatant spoiler r to open the drawer r:- Press the following stars in the following order:-2; 5; 3; 1.
***** Inside the drawer arte two important items :-
Read the letter from Alan, Sigge’s father , to his son. In it he mentions his revolver box.
Read also the printed article concerning the Dead City – you can also view two close up photographs of this abandoned old leper colony of Aciro.
There is also a salacious photo of a semi naked woman on the front cover of a magazine entitled‘Nympho librarian’ – but this is not helpful in advancing the game!!??!!
***** Close the drawer.
***** Exit to the map.
[ 32 ] The Dead City {1st visit}
***** Wander around and get to the (partially completed) building with the words “Pro Populo” inscribed above its entrance.
***** Look at an interesting coloured rock!
***** Search the building and find a tin of highly effective solvent seemingly used by the many graffiti artists around!
***** Carry on exploring the Dead City and you will be able to access there a ‘secondary map’.
***** Examine this ‘secondary map’ – and I would recommend saving this frame! On this secondary map are three locations only… these tare:- Hospital; Male Quarters; and Female Quarters. In addition to these three locations, in the top right hand corner is a link to return to the entrance of the Dead City and another link ‘Return to the large map’ in the bottom left corner.
***** From the secondary map choose the Female Quarters.
***** Advance to the building which has a number 9 written on it.
***** Look at another interesting and colourful rock.
***** Obtain a view from this same building and Carol exclaims cThat must be the Manager’s residence”
***** Exit the Female Quarters to the secondary map – note the added new location ‘Manager’s residence’ at the bottom right corner.
***** Exit to the (maim) map.
[ 33 ] Sigge’s apartment {2nd visit}
***** Sigge is at home so talk to him and exhaust all dialogs.
***** Sigge gives Carol a photo of Harri’s house , i.e, his summer house.
***** Exit to the map.
[ 34 ] Harri’s apartment {4th visit}
***** Go to the living room.
***** Observe the white cupboard.
***** Open one of the drawers in the cupboard.
***** Observe the sheet of paper in the drawer – it is a list of chapter headings for some document – it looks as though it might be an autobiography.??
***** Leave the cupboard and go to the computer room.
***** To the right of the computer mouse is a sheet of paper – look at it in close-up. It has some text on it and a large rectangle has been cut out.
***** Fit the photo of Harri’s houseinto the cut out space on the paper.
***** Exit to the map.
[ 35 ] Harri’s summer house {1st visit}
***** Enter the front door- No luck! There is a numerical keypad and you need the code.
***** Exit to the map.
[36] Graffiti Heap {2ndvisit}
***** Carol returns to the place where she met the unknown stranger (Harri) for the first and only time,
***** On the ground where the stranger stood is a piece of paper. Carol says “I wonder if Harri dropped this here”.
***** Pick up the note that Harri might have dropped ……….
***** ………. And scrutinize it.
I***** It contains four Morse code numbers:_ /// ..—///—..///—..///-….///.
***** Look at the full Morse code and decipher the number; It is:- 2; 8; 8; 6.
***** Exit to the map.
[ 37 ] Harri’s summer house {2nd visit}
***** Enter the code number ( See[36] ) on the numerical keypad at the front door.
***** Enter the summer house and look around.
***** To the left of the black stove is some firewood and paper – Grab them.
***** Examine the black wood-burning stove. There is a panel near the bottom of the stove with a round knob on it.
***** Open the panel.
***** Put the firewood and paper into the stove. – No way!… Carol says “It’s already too warm in here”!
***** Leave the stove.
***** On the wall close by are a pair of colourful posters.
***** View the right-hand poster, which has the large word ‘HOGANAS’ (a town in Sweden) written on it – Carol says “I think that’s something used for coal mining”.
***** Now go to the bread-bin which is next to the sink in the kitchen.
***** Look at the bread-bin in close-up ……….
***** ………. And see inside.
***** Take the key from bread box.
***** Close the bin.
***** Exit the close-up of the bin.
***** Find the tall large wardrobe which has three separate doors – the center one forming a tall mirror.
***** Use the key from bread box to open the left-hand door of the wardrobe.
***** Grab the memory card for digital camera inside and to the right of the wardrobe– view it, and Carol exclaims “That’s a memory card for a camera”.
***** Take it.
***** Close the wardrobe door.
***** Use the same key from bread box to open the middle door of the wardrobe.
***** Search the shirt hanging inside.
***** Take the key from Harri’s shirt
. ***** Close that wardrobe door.
***** You can try to open the right-hand wardrobe door, but it won’t open at all!
***** There are shelves of books in the room.
***** Underneath the middle shelf notice a screwdriver lying on some cassette cases.
***** Pick up the screwdriver.
***** See a black suitcase next to the refrigerator.
***** Unzip the suitcase.
***** Access the camera inside the suitcase
***** Open the right edge of the camera …
***** ………. And pop in the memory card for digital camera.
***** Close the right side of the camera
***** Press the on/off button of the camera and view on its screen one of the photos that was on the memory card for digital camera.
***** Over the large button close to the bottom right-hand corner of the screen is a ‘rotation arrow’ cursor.
***** Click that button three times, one after the other, and you will see four different photographs in all..
***** Return the camera to the suitcase.
***** Close the suitcase by using its zip.
***** Leave the suitcase.
***** Move to the stairs and see the ‘Go upstairs’ notification.
***** Climb to the upper floor.
***** Next to a couch see a chair.
***** There is a white sheet of paper on the chair…
***** … So pick it up.
***** Look at it – it is a Primitive map from Harri’s summer house.
***** Return down the stairs.
***** Go to the front door.
***** Exit to the map.