
Amber’s Blood Demo
Stuck in the demo? This walkthrough will guide you through!
 
“AMBER’S BLOOD“
Demo
Carol Reed Mystery # 8
WALKTHROUGH
Len Green lengreen@hotmail.com 17th January 2012
PREFACE
There should be no need to use this walkthrough since there is a very sophisticated & detailed dynamic hint system built into the game itself! (It is fully described both in the tutorial and the manual.)
It has been excellently and almost uniquely devised for a non-linear game so that the player can get help at ANY/EVERY stage of the game without revealing any future gameplay.
****** But if you so desire — carry on! ******
This walkthrough describes ALL the actions which you must take in order to succeed, together with a relatively small number which are not essential to completing the game.
However, please don’t use this walkthrough unless you absolutely have to. Some aspects which are not absolutely imperative have been omitted. A lot of these are interesting and provide much of the background story of the game and, particularly, of the fascinating (and artistic) character, scenery and history of Norrköping a relatively small town in Sweden, and home to the Developer, Mikael Nyqvist.
“Warning:” The main purpose of this game is to examine items, interview people, solve puzzles, unravel the mystery and reveal the criminal. In addition to all this, you’ll view the interesting sights and scenery, generally act the tourist in Sweden!, etc.
If you simply take this walkthrough in your hand (or consult all the built-in hints) and follow exactly what to do and what not to do, you can probably finish the game quite quickly. However that would completely defeat its whole purpose!
The walkthrough does not do justice to “Amber’s Blood”! A very great part of the interest and beauty of the game is wandering around through the vast number of locations, views, residences, etc.
There is a lot of interesting history and material in Norrköping, a small but quite important city whose population is a little under 100,000 and whose original roots date back to the 14th century, or earlier!
HINTS & TIPS
- This is a first-person, completely point ‘n’ click game covering many different locations and interesting places. It does not contain many ‘stand-alone’ puzzles, and those included are generally not too difficult.
- You should most certainly NOT have to follow the same order of accessing locations or performing actions as described in this walkthrough since the game is mainly non-linear.
- There is a very great number of permutations of routes, and it is almost impossible that two players will followexactly the same route and itinerary throughout the whole game from start to finish. Many locations, of course, will not appear on the map and will hence be unavailable until you have completed certain tasks. In these cases, a particular order IS mandatory. Other than that, you are free to visit (&/or revisit) all locations on the map and perform all actions as and when you see fit!
- In addition, it is quite possible that this walkthrough does not describe the best or even optimum route to play the game (and finish it completely)!
- In “Amber’s Blood” you cannot get killed or its equivalent! However, as in most adventure games, it is easy to make wrong or redundant moves! So it is advisable to save frequently. There are 200 save slots in case anybody needs that many! So you can save as often as you like.
- Every time you obtain a new item, it will appear in your inventory. You should observe each new inventory itemimmediately by right-clicking on it to get an excellent, greatly enlarged picture of the item together with a very short caption outlining its description (just in case it’s not 100% obvious!).
- It is imperative to view, and sometimes to manipulate, some of the inventory items in close-up to complete some action upon them. In addition, some inventory items will combine with others to form new items there. Attempts must be made to test this.
- In the text (following), all objects which are acquired and entered into the inventory are written in bold,underlined, italicized, blue.
- All objects which are used from the inventory are written in bold, underlined, red.
- Whenever a new location appears on the map and until you go there for the first time, the location-label remains continuously ‘blinking’ on the map!
- In the text, where the instruction says to ‘click,’ the meaning is to LEFT-click once. Otherwise it will read, ‘right-click’ etc.
- If you are not too acquainted with this type of Quest-Adventure game, play through the short tutorial which will familiarize you with the controls and interface.
******* Otherwise skip it, start the game, and ENJOY! ********
The Walkthrough
Carols apartment, 1st visit
***** Carol is having a sleep-in. She is woken by a persistent beeping! “Oh no, I forgot to turn off the alarm clock!”
***** Click on it to shut it off.
***** Carol reluctantly gets out of bed.
***** Go to the kitchen.
***** See the wallet on the table.
***** Open the wallet.
***** Click on the right side of the open wallet, and see the money.
***** Take the cash.
***** Click on the left side of the open wallet and view the card. It points to events later in the game!
***** Go to the library/computer room.
***** Notice the lipstick which is on the table very close to the computer.
***** Examine it in close-up.
***** Click on the lipstick and take the lipstick ballpoint pen which is revealed! However, it is empty.
***** Right next to the dolls house is a waste paper basket ……….
***** ……….so look inside it.
***** Take the ballpoint pen refill.
***** In inventory, combine the lipstick ballpoint pen with its ballpoint pen refill obtaining a complete recently refilled lipstick ballpoint pen .
***** The only adjoining room is the living room – enter it through the door.
***** Look at the mobile phone in close-up.
***** Click on it below its screen, and read the very important message from Stina.
***** Pick up the mobile phone.
***** Exit Carols apartment and automatically find yourself on the map.
Stinas kiosk, 1st visit
***** From the map, choose Stina’s kiosk.
***** Carol approaches the kiosk. It is all closed up.
**** There is a notice fixed to the kiosk
***** Read it!…”Closed due to accident!!”
***** Carol leaves the kiosk.
***** Exit onto the map.
Stinas home, 1st visit
***** From the map, choose Stina’s apartment..
***** Talk to Stina, exhaust all dialogue options and read her grandfather’s obituary.
Stina outlines what will turn out to be the beginning of a very serious mystery and crime!
Since she is laid up, she asks Carol to kindly look in her attic ( room 8 ) for further details.
***** Carol leaves Stina’s home..
***** Exit onto the map
Stinas attic, 1st visit
***** From the map, choose Stina’s attic.
***** Go to room 8.
***** Open the box of ‘Premium Bananas’ NO GO!… Carol can’t reach the box which is on a high shelf “I am far too short.”
N.B. This is where Stina fell and sprained her ankle.
***** Move around the same room and see a spare toilet bowl unit on the floor.
***** Carol lifts it up (???) ……….
***** ………. and takes the toilet bowl.
***** Return to the banana box.
***** From inventory, place the toilet bowl on the floor below it.
***** Carol stands on it safely and opens the banana box.
***** Inside the box view the miscellaneous papers etc. strewn around its right side.
***** Click on the lower part of these papers and observe an extremely old photograph.
***** Take the strange photo from Stina’s attic. The photograph is in black and white and was snapped decades ago.N.B. This has relevance later in the game!
***** Now click on the upper part of these papers revealing a doctor’s medical diploma granted on 4th June 1933 to Stina’s grandfather Alfons Larson.
***** Click on the bottom right corner of Alfons’s diploma,.
***** View his official ratification as a medical doctor as certified by the Norrköping Board of Medicine. Carol remarks…”There should be more information about this medical license somewhere.”
***** Take the medical license
***** Observe the metal box with a dozen numbers on it at the bottom left inside the banana box.You can’t do ANYTHING with this puzzle at present!
***** Exit the banana box and room 8.
***** Exit Stina’s attic and automatically find yourself on the map.
The Norrköping Board of Medicine , 1st visit
***** From the map choose the Norrköping Board of Medicine.
***** Talk to the fellow behind the reception desk and exhaust all dialogue options.
Carol is searching for information about Alfons Larson (Stina’s grandfather).
***** The chap searches in his computer… “I can’t find anything!” “It could have been revoked before the licensee’s death.” It may be in the archives in the basement.
***** Carol asks, “Could I have a look in the basement?”
***** But the chap says that this is only available to a small group of guest researchers who are listed on a sheet of paper on the table alongside his computer.
***** If you haven’t done so previously (see full details at the beginning of this walkthrough), you must obtain a lipstick from Carol’s apartment. You must click on it to reveal a snazzy but empty lipstick ballpoint pen. Get a ballpont refill. And finally, in inventory, fill the empty ballpoint pen with the refill obtaining a recently refilled lipstick ballpoint pen.
***** Ask the person again for information.
***** While he is busy searching on his computer, Carol grabs his above-mentioned sheet of paper.
***** From inventory, use the recently refilled lipstick ballpoint pen to add Carol Reed’s name to the bottom of the researchers list.
***** Carol suggests “Actually, I think I’m on that guest list,” (surprise! surprise!!) and when the chappie examines it lo and behold, she now actually IS on the list.
***** He now permits her to go down to the archives and informs her that she will have to use the entry code which was given to her by her Supervisor.
***** Automatically, Carol is transported down to the rooms where the archives are situated.
.
THE ARCHIVES
***** Proceed forward and observe a round blue tin.
***** From inside that tin take the desk key.
***** Not far away hangs a black-coloured jacket.
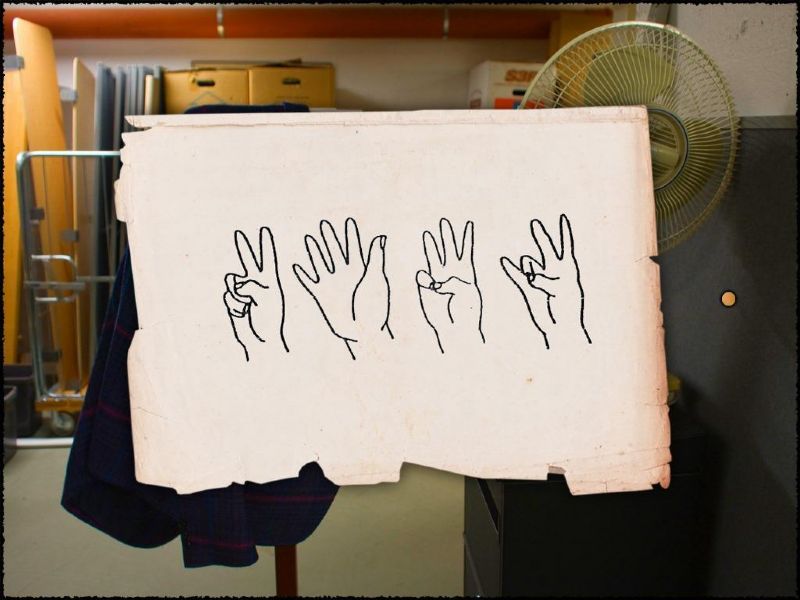
***** In one of its pockets is a piece of paper on which is drawn an important sketch of 3 hands
***** .. observe that slip of paper (See the screencap just below.). N.B. The jacket, not unusually, has a left and a right pocket. One of these (I think the left pocket) contains a book on the ear ailment ‘Tinnitus’. You CAN’T do anything withthat!!
***** Go to the grey-coloured unlocked door
***** Open it and enter the adjoining room.
***** Proceed and view a set of 4 locked safety drawers, fixed one on top of the other and coloured very pale orange.
***** Open the second one from the top using the desk key from inventory.
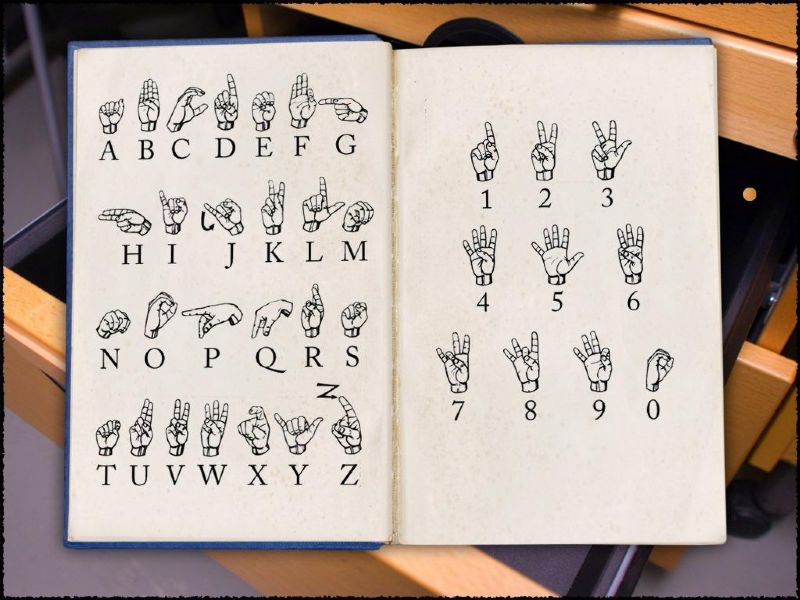
***** Look at the blue covered book inside ……
***** and take it. When opened (See screencap below) it turns out to be a sign language book.
***** Return via the same grey door to the original room.
Go to the locked white door to the actual archives themselves.
***** Open the door. Impossible it is locked.
Near its top right corner is a numeric keypad,
***** Enter the code to unlock the door.
In case of difficulties, here are some graduated spoilers:
- Consult the 2 screencaps above.
- The code consists of 4 characters.
- All 4 are numerals.
- They are the ‘translations of the above screencap of 4 hands.
- The code is 2; 5; 6; 7.
***** Alongside one of the walls, stretching from floor to ceiling, is a large standup bookcase containing 5 horizontal shelves and holding white-coloured box files
***** Look at it in close-up.
***** On the second shelf down (on the close-up) and left of the middle, a sheet of paper protrudes.
***** Examine the sheet of paper See the screencap below:
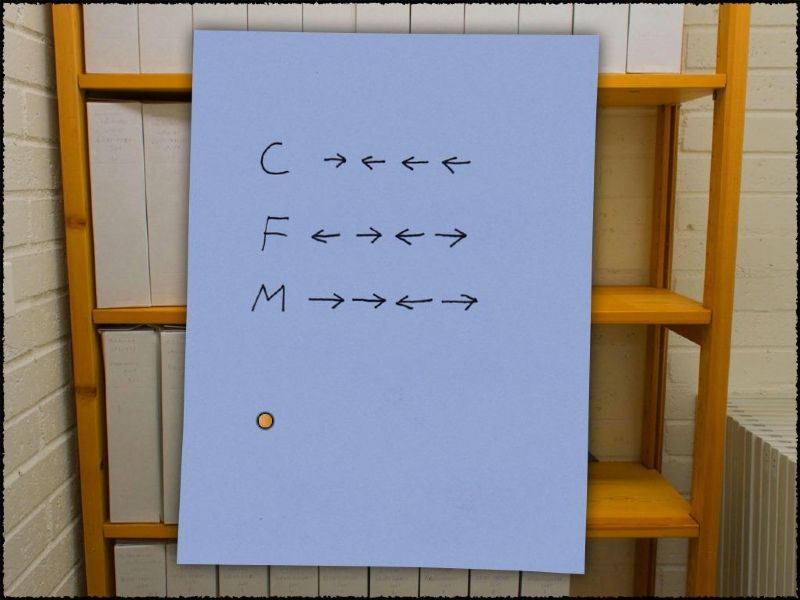
***** On a table nearby there is a turquoise-coloured brochure which informs that: “All data about revoked licenses have been moved to compartment 0460 in section M.“
***** Ranging alongside the whole of one long wall are a number of large heavy vaults. They are similar to those found in banks, with similar type (three-spoke) handles which can be rotated.
***** Go to a close-up of a pair of these vaults marked “M.”
The right-hand one is marked with a right-pointing (clockwise) arrow, whilst the left-hand one is marked with a left-pointing (anti-clockwise) arrow.
***** Remember the drawings illustrated in the screencap shown immediately above?
If this is not clear, rotate the handles as follows:
Twice to the right (on the right hand vault of course!), then once to the left (on the left hand vault) and finally once again to the right!
***** In one of the vaults find the section marked 0460
***** and take the folder.
***** Examine the folder which deals with the decision to revoke the medical doctor’s practicing license of Alfons Larson on 21st of May 1935. Oh oh the plot thickens!
Of greatest importance is the final (underlined) short paragraph: “A copy of the decision was sent to the Broxtowe Hospital“.
***** Click on this and Carol says “Maybe the doctor worked at Broxtowe.”
Maybe the reception clerk knows something about this? ……….
***** So return to him.
***** Exit the archives and surroundings,
THE RECEPTION DESK
***** You automatically find yourself in front of the reception desk once again.
***** Talk to the person there and exhaust all dialog options.
***** Carol is trying to find out about the Broxtowe Hospital, but he knows nothing about it before his time and not his department.
***** He suggests going to the Library.
***** Carol says, “That might be worth a try. Thank you.”
***** She is is automatically transferred to the map.
The Library, 1st visit
**** Choose the Library.
***** Carol goes to one of the bookcases there.
***** Click on the books.
***** Read the double page concerning “Broxtowe Psychiatric Institution for the criminally insane.” The investigation is becoming sinister!
N.B. Another available book there “From Bones to Stones” has no significance in this game.
***** On the right-hand page is a picture of the aforementioned ‘Hospital-Institution’ showing the pergola which appeared previously in the game in the photograph in Stina’s attic ……….
***** ………. Click on the picture.
Apparently it is a pencil sketch made by an artist called Julian Milius (1913 2004) whilst he was incarcerated at that mental institution!
An exhibition of Julian’s work is being held now at Green Chimney Alley 1.
***** Carol exclaims ” That’s the same place as in that photo. I’d better take a look at that Exhibition.”
***** Exit the bookcase and the Library and automatically find yourself on the map.
Julian Milius Exhibition, 1st visit
**** Choose the Julian Milius Exhibition.
***** Approach the entrance.
***** Read the notice attached to the door”Closed during summertime!!”
CONGRATULATIONS ON COMPLETING THE SHORT DEMO!
TO SEE VERY MUCH MORE, PLEASE BUY THE FULL GAME
Hope you enjoyed it !!
Leave a Reply