
Syberia II
 
When you are talking to another character in the game, always exhaust all topics of conversation. Many elements of the gameplay are triggered by the conversations, and if you leave some topics unfinished, you could feel stuck. In addition, many conversation topics won’t appear unless they are triggered by some action. For example, you can’t ask about a locked gate unless you have actually seen the gate and tried it. You may select topics of conversation in any sequence you wish, but the most logical order will be realized if you start at the top and work your way down.
After the introduction, Kate is standing in the train. Turn around and go to the rear compartment, where Hans Voralberg is standing, and talk to him about everything. It seems the train needs winding. Exit the train, and go to the front in order to talk with Oscar. On the way, there will be a brief cutscene where you meet Colonel Emeliov Goupatchev.
Find Oscar and talk with him.
Hans said Oscar would tell you how to wind the train, but nothing of the sort happens.
You must figure it out for yourself.
Just to the left of where Kate and Oscar are standing is the winder.
There is a wheel on the machine, and a lever next to it.
Turn the wheel to extend the winder.
Then pull the lever located at the left of the machinery to wind the train.
Turn the wheel again to retract the winder, and tell Oscar the train is wound and ready to depart.
You didn’t really think you would get going that easily, did you? Now it seems you must find a way to load the coal car. Go one step back toward the central platform, and turn right to inspect the coal dispensing machine.
Kate can pull the lever, lowering the coal-chute, but something’s not right – no coal is delivered.
Go into the station, where you saw the Colonel enter, and talk with him. He can’t help much; have to wait for maintenance people to arrive – maybe a week or two, maybe longer.
Return to the Coal machine, and look over the railing.
Talk to Malka, the little girl below. She’s friendly, but not much help.
Go to the far south end of the platform and inspect the gate. It’s locked.
Go back to Malka and ask her about the gate. She still doesn’t know much.
Go inside again, and talk to the Colonel.
It seems he has lost the only key to the gate, and only the maintenance folks can help.
Return to Malka and see what she knows about a key. It seems she can help, for a small price.
A bit of candy will encourage her. Return to the station house.
Just at the end of the counter are three candy machines, how convenient! The only problem is, it takes coins to operate them, and Kate doesn’t have any money. If you go to the back counter, where the Colonel was originally standing and working on something, you will discover a small key sitting there in a box. Take the key, and go look at the candy dispensers close-up. Using the key on the coin-drawer at the base of the gumball machine, the rightmost one, yields a pocketful of coins. You can place a coin in the slot on any machine, but only one coin is correct for a given machine. The gumball machine is now jammed, so don’t bother trying to get something out of it. The middle machine can be operated by placing the second coin in the slot, then turning the handle. It yields a packet of Fish-Candy. The leftmost machine uses the fifth coin, and provides the candy that Malka likes.
Go to Malka and give her the candy. (If you give her the Fish-Candy, she won’t like it. You need the Fish-Candy later in the game, so if you gave it away, you can get more. You would need to retrieve the coin you spent. Take the key from the Gumball Machine and use it to open the coin-drawer of the enter machine. Spend it again to get more Fish-Candy.)
Malka ties the key to her balloon and sends it up to Kate.
Unlock the gate and go to the lower village. Talk to Malka about everything.
Examine the lower portion of the Coal Dispenser.
Try to start the engine by pressing the button on the right. Koff-Koff. It’s out of fuel.
Take the empty Petrol Can on the left.
Back away from the machinery, and walk to the left, underneath the train. The scenery shifts as you walk, eventually providing further access to the left. Walk along the wooden fence, again going left, although you have turned the corner, and are actually walking in a different direction from before. Go until you see the wooden gate, with a small barred panel. Click on the panel to talk with Ivan. If you are really observant, you can see what looks like a Petrol Can inside there, sitting on a barrel.
Talk to Ivan about everything.
Then proceed further left along the fence, until you can look closeup at a Cirkos poster.
In the closeup view, check the torn spot at the top left of the poster, just above the letter “I”.
You can tear it down and enter through the gap in the fence
Notice the eyes peeking out of the crate? Open the crate and set Youki free.
Ivan is distracted, and you can go to the Barrel and take the Jerry Can, leaving the empty one in its place.
Exit through the gap in the fence.
Return to the Coal Machine, and put the fuel into the engine.
Start the engine, then go upstairs and dispense coal into the coal-car.
Just when you thought it would be time to go, Oscar arrives in a panic, and tells you Hans is missing.
Go below again. Talk to Malka, who says Hans went to Cirkos’ place.
(I think it’s polite to turn off the engine at the coal machine, but it’s not really necessary.)
Enter Cirkos Cabaret. Hans is there, looking at the mechanical horses.
He passes out, and ends up in the train, in a delirious state.
Exiting the train triggers a brief cutscene with Oscar. As usual he’s distressed, but not much help.
Return to Cirkos, and talk with him.
Cirkos informs Kate that the Head Monk may be a ding-a-ling, but may have some powers nonetheless.
To find the monastery, walk along Ivan’s fence again.
Keep going past the gap in the fence, which has been boarded up, by the way.
Try to walk up the hill, but it’s “Too cold.”
This is an example of another conversation trigger. (You can’t ask for clothing until you know it’s cold.)
Who in town might have provisions? The Colonel, of course.
Ask him to “Help” and he lets you into the attic, where there is a nice warm snowsuit.
For privacy, go into the train’s bathroom and change clothes.
Now Kate can climb the hill. (You can ignore the odd machine at the bridge for now.)
Pretty spiffy sunglasses, Kate.
Pull the bell cord. Kate waves at the Monk above, but she is not allowed to enter.
Feeling stuck? Return to the village and talk with Malka about the monastery and her mother.
Talk to Cirkos about everything, especially about the linen shrouds.
Ask Malka to let you have a shroud. She gives you a token.
Go to the machine at the bridge, and purchase a linen shroud. Return to the train.
Use the shroud on Hans’ face. Don’t bother talking to him, he’s still seriously whacked.
Climb the hill again, and walk to to the right of where the bell-rope is.
Talk to the Monk, who is doing laundry. It’s a long conversation, finish it all.
(If you have not pulled the bell-cord before, do it now and talk to the monk some more.)
You must distract him away from his post somehow. Return to Romansburg.
Go to the Colonel’s store and ask for a birdcall. He gives you three; gold, silver and black.
Return to the Monk. Give him the birdcall. The Gold and Black ones are no good.
Give him the Silver birdcall, and he runs in pursuit of the bird.
By the way, that is the same birdsong heard in the background in the Mayan region of “Beyond Time.”
Take a monk’s robe and slip into it. Pretty natty – now she looks like Dorko in “Dracula, Last Sanctuary.”
Pull the rope again and enter the monastery.
As you enter, you can see a machine of some kind on the left. It’s a candle-mold. Save it for later.
Go straight ahead, and observe the Wheelbarrow. Nothing to do there now, but there will be later.
Go ahead again, and find yourself in an overhead view of the central courtyard.
Straight up is the way you came in. Two other exits are visible, one straight down, and one to the left.
(The exit straight down takes you to a different overhead view – save it for later, too.)
Take the exit to the left, and enter the chapel. Observe the locked gate just inside the door.
Go all the way to the end of the chamber, and speak with the Patriarch.
He is pissed at first, that you are a woman and found your way into the Monastery.
Keep talking until he mellows and agrees to fetch Hans.
Cutscene from New York – Kate is being pursued.
Cutscene with the Patriarch – Hans is in bad shape.
Talk with him about everything.
Walk through the arch, and enter the door on the right. Talk with Hans about everything.
Exit the room and talk with the nosy monk about everything.
He gives Kate a parchment. The last line is a clue:
“The key is in the light of the Mammoth’s eye .” Whatever does that mean?
Exit the archway, and pick up the scrub-brush sitting there next to the bucket.
Re-enter the Chapel, and examine the two frescoes on the pillars, midway back.
The one on the left can be cleaned. Use the brush on the fresco, and a clue is revealed.
Exit the chapel, return to the other courtyard, and enter the Library.
The entrance is between the Archway and the circular graveyard.
The Library is of spiral construction. Go to the right to reach the lower level.
Pick up the lamplighter’s tool, it’s on a hook on the right-hand wall.
Light the candles indicated in the clue from the Fresco.
Think of a clockface with 12 at the top of the cross.
Light candles 12, 3, 4, 8, and 9. The Iris window at the top of the spiral ramp opens.
Climb up the ramp, and look out the window. It overlooks Romansburg.
Here’s where you could really feel stuck. Open your inventory (right-click) and open the Documents. Lo and behold, there is a Stained-Glass Mammoth sitting there. Use the eye icon to examine it, then use the hand icon to pick it up and use it. The fat-ass nosy monk who gave you the scroll also gave you that piece of stained glass and didn’t mention it.
Place the stained glass into the window. Now you need to control the beam of light.
Clicking on the four shutters in clockwise order controls the diameter of the iris.
Start with the bottom shutter to focus the Mammoth’s image on the far wall.
That is, click them in this order: Bottom, Left, Top, Right.
Now you can go over there and press a button revealing a hidden closet.
Pick up Alexei’s journal and READ IT. It is full of clues.
The clue you need at the moment concerns the Brambles and their healing power.
Take the other object from the shelf, the Youkol Relic, and exit the Library.
Enter the courtyard, and go into the circular graveyard visible at the top left.
You can go either side of the tree. Go to the right, and examine the grave.
It says “Alexei Toukianov” 1895-1996. Wow, he lived 101 years. Not long enough, I fear.
The Latin means something like “The Holy Life Stole my Science.”
Go to the other side of the tree, and click on the grave repeatedly. Not a good sign.
Cross both courtyards, and look at the Wheelbarrow again. Take the Shears.
Return to the headstone, and clip the brambles.
Now go all the way back to that original machine where you first entered the Monastery.
It’s a candle-mold.
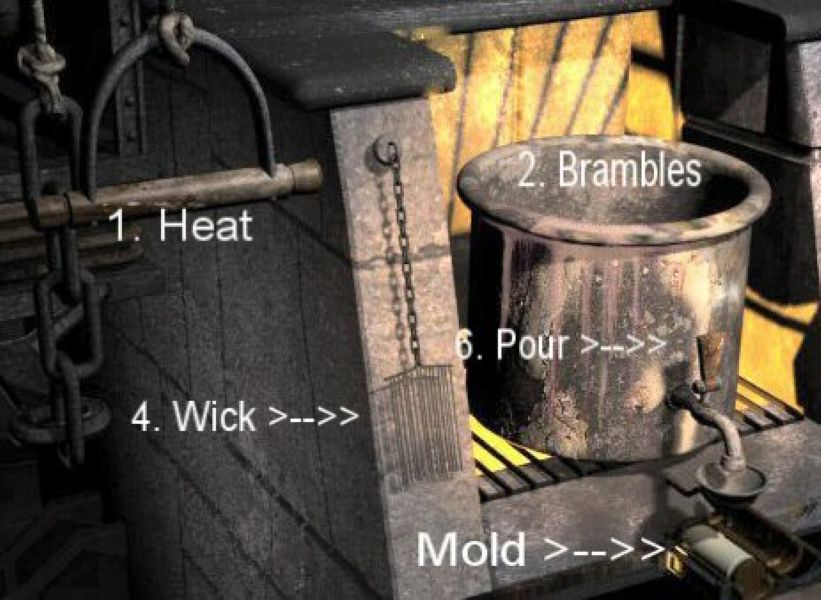
Making the Candle
1. Pull the handle on the left to heat the wax.
2. Place the Brambles in the tank.
3. Open the mold.
4. Take a wick and place it in the mold.
5. Close the mold.
6. Pour wax into the mold.
7. Open the mold and take the Herbal Candle.
Take the Matches.
Go to Hans’ room. Put the Youkol Relic on the Table.
Place the candle in the Relic, and light it.
The Mammoths’ spirits revive Hans. He is no longer quite so Blotto.
However, he can’t walk yet.
Go to the Chapel. Walk to the rear, and
Surprise! The Old Grump isn’t there, and you can go to the altar.
Take the Ornate Key. Use it to unlock that grate in the front of the Chapel, where the Bells are.
Pull the rope, calling the monks to prayer; even the gravedigger has to pray sometime.
Go to the cemetery, and push the casket into position between the big rocks.
Go get Hans, and go for a ride. Woohoo!
Talk to Hans. He gives you the repaired mechanical heart for the Horse Automaton.
Go to the Cabaret, to see Cirkos having not much luck teaching Youki a trick.
Talk to Cirkos. He will appreciate your help.
Go to the horses, and put the mechanical heart in place.
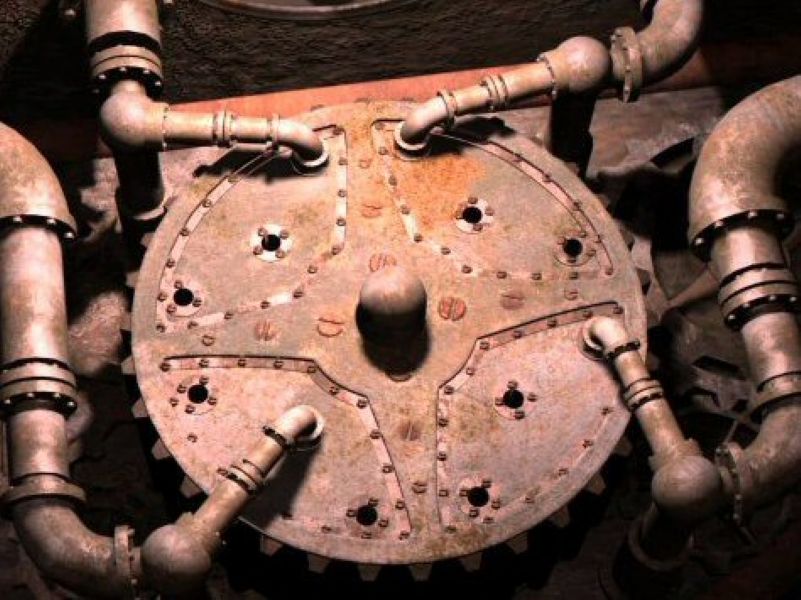
Each hose can be attached to three different outlets. Only one outlet is correct for each hose
You can experiment by pressing the center button on the heart and see which horses move.
With no hoses attached, press the center button on the heart to wind the spring. It takes three times.
Attach the hoses as shown in the image.
Press the center button again. The horses do their thing – Cute.
Oh No! The train is heard starting up, and it leaves Romansburg, apparently stranding Kate.
Go up to the tracks.
Pull that lever at the South end of the boardwalk, upper level.
The track inverts, bringing the handcar to the top side.
Climb aboard and it works! But not for very long.
G into the store and talk to the Colonel. Birth of an idea maybe? Let’s look for an animal.
Go below and talk to Malka. Several times. She tells you what you need to know.
Go to Ivan and Igor’s place. Listen to Oscar’s plight.
Go into their living quarters, where Youki is sulking.
Look on the table and pick up the old newspaper. A clue about Ivory reveals Ivan’s real motive.
Give Youki some Fish Candy and you have a friend for life. Now you can leave Romansburg,
Optional – you can say goodbye to Cirkos, Malka and the Colonel if you like.
Go to the Gangcar, click on it and Youki will take you out of Romansburg forever.
In the Wilderness
Whoops, that old bridge, she ain’t what she used to be.
The train is stuck on one side and you are on the other.
Might as well head on out. Ivan jeers from the train.
Continue along the trail. You should see a cairn (a pile of rocks,) with a fish frozen in it.
Further along, Youki spots a beaver gnawing on a tree, and decides to bark at it.
Walk beyond Youki, and see the house at the bottom of the falls.
You can’t get there from here; must cross the river somehow.
Looking at the house, search on the ground close to where you are standing, and pick up some brush.
Return to the Cairn, place the branches under it, and light the fire.
Aren’t you glad you still have those matches?
Take the fish to Youki. He is true to his stomach.
The beaver is brave enough to finish his work, and you can cross.
Continue along the trail. Pass the little pile of logs, and come to a broken rope-bridge.
You need to figure out how to get across.
Can’t go that way (yet) so continue to the house, getting a call from Kate’s Mum on the way.
Enter the house. Now try to leave via the front door. Woooh! Where’s Davey Crockett when you need him?
Now your problem is getting rid of that bear. Look around the room for useful things.
Look on the Mantel and take three items: The Russian Doll, a Hatchet, and the Fisherman’s Guide.
Read the guide. Orange Salmon’s preferred food: Green Frog.
Preferred habitat: Cold water, shady places.
Before going out the back door (yes, it’s safe) be sure to go to the kitchen counter and find the Creel.
They call it a Fish Tank. Exit the back door. Go down to the dock, and open the tackle-box.
You need to select one of the twelve lures. Green frog, remember?
Then, you need to select a place in the river to cast. There are three, right, center, and left.
Shade, remember?
Any time you catch the wrong color fish, Youki would be glad to take it off your hands. Of course, you could also traipse upstairs and feed it to the bear (through the window) but only the Orange one will please him.
That only comes to thirty-six combinations if you do it by brute force. Look for shade.
It is the far-right place in the stream. Now look for a green frog in the box.
There are several, three at least that seem to qualify. Obviously not the red or silver things.
The correct one is the top row, right end. Catch the Orange Salmon.
Enter the house, and throw the fish out the window. Ta-Ta for now, bear.
Important. When you exit the house, pick up the fish bones left behind by the bear.
They are found under the fence. (Improbable of course, bears eat fish whole.)
Actually, if you don’t take them, there will be more available when you really need them.
Take the trail to the left and return to the broken rope-bridge.
Use the Hatchet to cut the rope with wooden plate attached.
Swing the rope over the branch. Eeeek! Hope it holds!
Youki jumps too. Continue, watch Youki chase the Harfang (Owl) then the cinematic.
Those two bozos, Ivan and Igor are back, and trying to kill Kate.
Boris (remember him from the first game?) sacrifices his plane to save Kate’s life.
Got to climb the ice-cliff. Can’t get started? Use the hatchet. Here are the moves:
Hatchet,
up, up, right, right
up, up, up, up, left, left, left, left
up, up. right, right
up, up, right, right,
up, up, up, up – done.
Easier to read like this? U2, R2, U4, L4, U2, R2, U2, R2, U4.
At the fork, up-right takes you to a view of the train. It’s much too far away.
Left takes you to the wreck. Go past the wreck, to find Boris has bailed out.
He’s hanging from a tree, and asleep, no less!
(His ‘chute straps must be more comfortable than mine!)
He can’t hear Kate yell because he’s still wearing the headset.
She needs to figure out how to talk through the earphones.
Look in the cockpit. Turn on the power with the switch at the upper left.
Note that A and B are both on. To solve this puzzle, only one at a time will work.
Turn B off. Go to the lower left, and insure that both toggle switches under 1, 2, and 3 are on.
You should see the green light to the left of the toggle switches.
Flip 1 and 2 up, and 3 down. You should see “03” in the display at the top.
This is half the information you need.
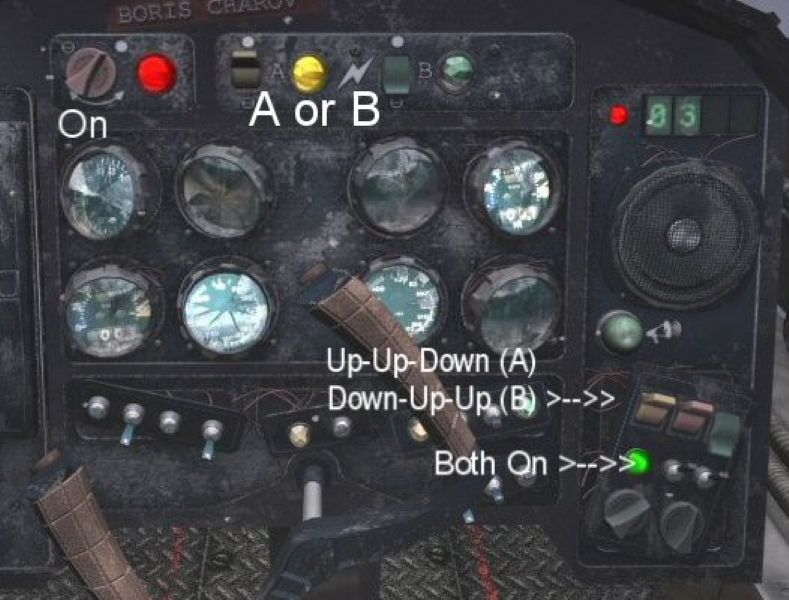
Now turn A off, and B on. Flip 1 down, and 2 and 3 up.
You should see “28” in the display. This is the remainder of the clue.
Exit the airplane, backtracking until you are at the fork. Exit the area to screen-bottom.
Those brutes almost run Kate over with the Snow-Sled.
Follow the track to the Antenna tower and shed. Enter the shed.
Turn the power on the radio (that’s the thing with eight red buttons.)
Use the buttons to enter the frequency you learned – 0328.
Press the button at the base of the microphone. Kate wakes up Boris.
Go to Boris and talk to him. You need to figure out the coordinates, so that if you
use the ejector seat, it will send you in the right direction.
Look in the cockpit. The controls for the ejector seat are now open, at the left.
Ignore all the other switches you used before.
The horizontal and vertical coordinates can be put in the display, then pressing the button –
Or maybe it’s Azimuth and Range.
How to learn the coordinates? Maybe the Radar can help. Return to the shed.
Turn on the power to the Radar. The switch is at the very lower-right of the square green screen.
You should see the scan working. It starts out showing the upper left quadrant.
You want to scan the lower right quadrant. That’s the direction the train lies in.
Climb the tower and rotate the antenna. It takes two turns from its original position.
Scanning the Southeast quadrant reveals a blip. You can hear it beep too! Hey, maybe it’s Sonar.
Anyway, read the coordinates; 80 and 17. Go to the plane.
Put those numbers in, push the button and enjoy the ride.
Yikes! I wouldn’t want to do that every day. Enter the engine. On the way, the Colonel calls.
Click on the engine’s controls and listen to what Kate says. “Nothing works without the key.”
Looks like you have to find the key. Go toward the passenger car.
Whoops – what’s that sticking out of the snow? Pull on it, only to discover Oscar buried there.
Talk to him, then enter the passenger car. Go through the car to Hans’ bedroom. Find the Plans on the floor.
Continue to the rear of the car and find the Oil Dispenser. It’s on the floor, under the fallen door.
Oil the Tin Man, Dorothy. He feels better, and goes to the Engine, telling Kate to get in the car.
Ooops, the train appears to be stuck on the collapsed bridge.
Go to the engine and talk with Oscar. Listen carefully to what he says about the panel:
“Call me when you find it.”
Go into the passenger car and find the panel. It’s where the pedestal was, before it tipped over.
Call Oscar on the phone, and he opens the panel. The sliders control two or three bars at a time.
You must get all of them open.
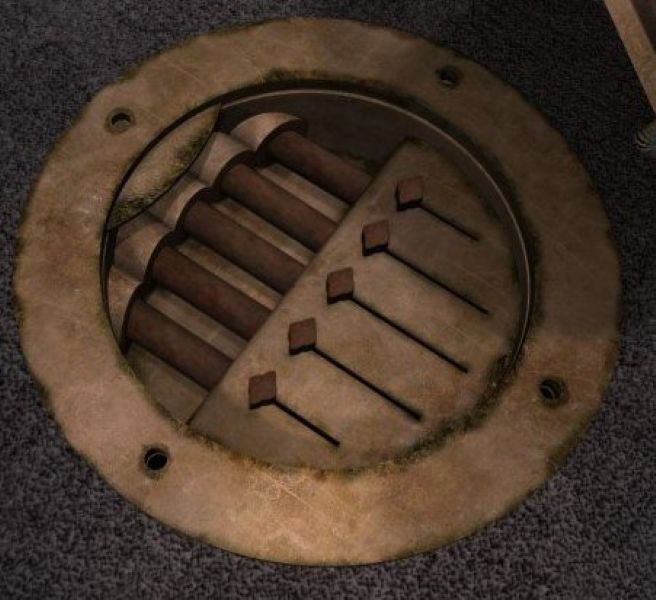
Just click on the middle slider and both end sliders.
The train is freed, and ends up near the entrance to the Youkol village.
Go around to the other side of the locomotive, and find Igor standing there, that Great Oaf.
He is afraid of the evil spirits, which is actually the sound of the wind whistling in the totem.
Go back to the front of the locomotive, and toward the Totem.
Try to climb the slope. It’s too slippery.
Inspect the Sno-Bike. Look in the saddle bag to find the Gauze Blanket.
Put the blanket into the Totem’s mouth to silence it.
Talk to Igor again, and he doesn’t hear the spirits any more. He is able to leave.
Look where the Sno-Cat was parked – and find the Crampons.
(In a previous play of this game, I was able to talk to Igor about the Crampons.)
Notice the Harfang sitting there, keeping an eye on Kate.
Now that you have crampons, climb the hill. Oh no, it’s Ivan the Terrible again.
I’ve about had it right up to here with that dude.
Talk to him, again and again until the conversations are finished.
Try to examine the sled at the top-center. Ivan won’t let you.
Call Oscar on the phone. He blows the train’s whistle, distracting Ivan.
Go to the sled, and take the Ivory Knife. Use the Knife to cut the rope.
The sled slides toward Ivan. Yikes!! Just when you think all is lost –
The ice under Kate and Ivan collapsed, and Kate wakes up in a hut in Youkol Village.
Look out the window if you like; it reveals that you are at the side of a river.
Exit the hut, and talk with the Chief.
After talking with Chief, turn around and take a set of Antlers from the basket. Exit to the right.
You should see drums in the distance, and your friend, the Harfang sitting on a perch.
Examine the perch to discover a hotspot. Something to do here, perhaps later.
Continue to the lower right, away from the drums.
In this scene, look on the ground, at the lower left. Find the Leather Strap.
It combines with the antlers to make a slingshot.
Go to the drums. You can talk to the two Youkols, but they don’t speak English.
Koonooqmaat. TookToot!
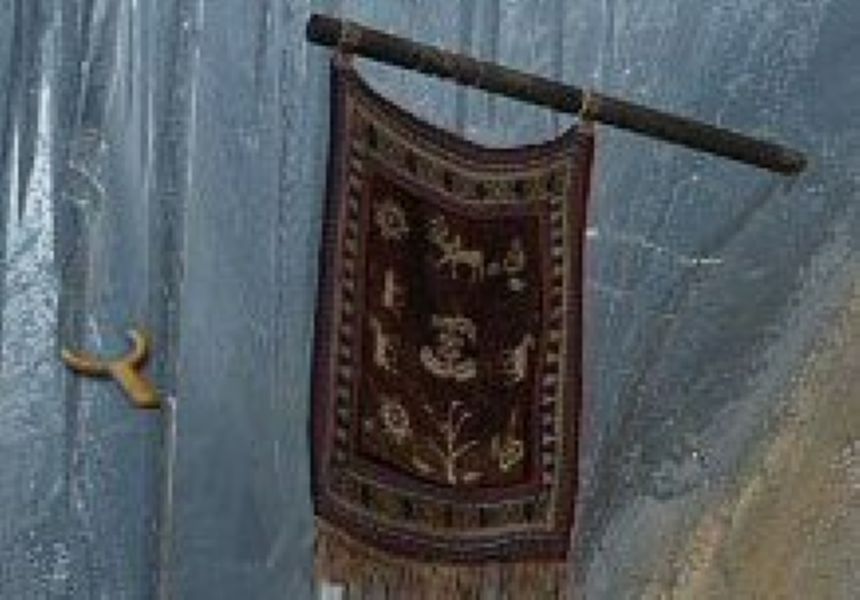
You could try to walk under the drums, but as long as they are operating, you can’t.
Look at the image. There is a hotspot high up on the wall, left of the banner.
If you have the Slingshot, use it on that spot.
Kate will automatically pick up the pebble at her feet and bring down a huge icicle.
The machinery is jammed, the drums are silenced, and you can enter the Shaman’s hut.
Look at Hans, poor thing. Then talk with Spirit Woman.
Talking with her about the dream world indicates that you must find fruit of laughing tree.
Important – before you leave the hut, take the Prayer Wheel from the table in the left alcove.
If you like, also take the Youkol Mask found hanging on the right wall near the fire. It’s used later.
Exit the hut, and continue to the spot where you found the leather strap, and once further in that direction.
You should see a device at the water’s edge made of branches lashed together, with a crank.
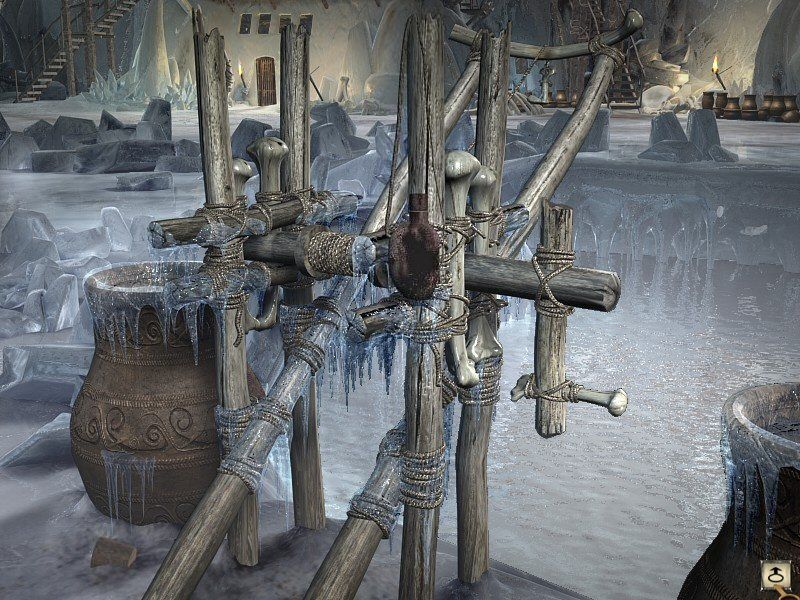
Take the empty flask, and hang it on the hook. Turn the crank to lower it into the water.
Take the flask full of water. Also take the Cork seen at the lower left.
Exit to the left. You can see an enormous gate to the upper right. Exit this scene to the left,
and see a railroad bridge very reminiscent of Romansburg.
Under the tracks, there is a bridge made of tusks, and an illuminated cave in the distance.
You need to enter that cave. At the entrance, there is a choice; right or left.
If you look at the right side, there is a Harfang perch.
If you look at the left, two steps in, there is another Harfang perch at the right,
and to the left, an ice-wall containing a frozen mammoth.
At the lower portion of the wall, there appears to be a tube-maze in the ice. Look close.
Frozen within the tubes are red berries – could it be – Fruit of Laughing Tree?
That animal is not afraid of Kate. You need to send it through the tubes somehow.
Maybe it’s afraid of owls. Can you bring the Harfang here?
Go to the perch. Hang the prayer wheel on the perch and spin it.
Sure enough, the Harfang comes, and the critter is frightened into the tubes.
Unfortunately, it hides in the lower right hole and quakes with fear. What to do?
Take the prayer wheel back. Go into the other side of the cave and hang it on the other perch.
Spin it to call the bird into the far side of the cave.
Now the animal is out of the tubes. Use the cork to block the right-hand hole.
Bring the bird back around to the left side.
The little guy goes into the left tube, and up to the deep pocket. He is afraid to jump across.
Take the cork back, and use it in the hole in the deep chamber.
Bounce-bounce. That worked, but now he can’t climb up the vertical passage.
Perhaps he could float to the top.
Take the cork back, and plug the hole at the bottom of the vertical tube.
Use the Flask Full of water at the top of that tube on the left.
Glug-glug, blub-blub. He makes it to the top, shakes dry, and fills his cheeks with berries. Yum!
Now, how to help him next? Maybe he can climb a ladder. Put the fish-bone into the top hole.
Yes! He tumbles down to the bottom, and unloads his cargo for you to pick up.
Take the berries, and go see the Spirit Lady.
(If you missed taking the fishbone at the house in the woods, you can find one at the Youki’s Corral here in the village. Just go to the gate of the corral and look on the ground.)
You have the choice of the cave, or an open path. Enter the cave, and find the Mammoth Doll.
Now take the path. It’s not a maze, just continue past the rowboat, through the woods to the park.
Talk with little Anna. Then continue, exiting to the left.
Keep going until you get to the entrance to the Voralberg complex.
You can examine all the paths, but only the Mansion, at the right, is accessible.
Look at the clock, It doesn’t work. In fact, it’s Sstuck!
Go upstairs and try the attic door. It’s locked, of course.
Go into the parlor, and talk with Rodolphe Voralberg. He’s not very nice.
You need to find a way to get him out of there.
Back to the foyer, and look at the clock. If you could set it to 7:15 – he might leave.
To get the clock working, read the time on the face. It says 2:45.
You need to set the chiming mechanism to match the clock.
Set it to 2:30 with the right switch, then add 15 minutes with the left switch.
Wind the both sides of the clock by clicking on the little men.
Start the pendulum swinging.
Advance the time by pulling down on the right weight.
Now set the chime timer to 7:15. Click on the bell.
Mr. Voralberg assumes it’s time to go to the factory, and he leaves, placing a key on the table.
Take the key, and use it to unlock the attic door.
Talk to Hans. Use the Mammoth Doll to get his attention.
He slips in and out of reality, and finally disappears.
Click on the table to return to the real world yourself.
As you exit the hut, check out the Dreamcatcher hanging there.
(That’s the circular webbed thing with feathers hanging from it.)
It repeats some of the things you heard in the dream.
Again you hear Hans say Oscar must open his heart.
Return to the elevated railroad tracks, and again, go under the tracks through the tusk-bridge.
This time, go the other way, away from the cave. (Down-screen.)
Keep going until you come to a tall ladder.
Go up the stairs, crossing left to right. You can check out the big winding device if you like.
Go down the stairs on the other side, and proceed left (down) to exit the cave.
Observe the cable lying on the tracks as you go.
Talk to the Youkol dudes. Beek Metaal Nanook TookToot Naa!!
My guess is they’re saying: “Big Metal Guy Not Friendly” – Yep, they are afraid of Oscar.
Enter the train and talk to Oscar. He doesn’t want to discuss the heart thing right now.
Get him to wear the mask and reassure the Youkols.
Try to attach the hook to the front of the train. It’s too heavy.
Talk to the little dudes.
Now they think he’s okay. Metaal TookToot! Ask them to help with the cable.
They attach the hook to the train. Examine it after it’s attached, and operate the ratchet.
With the cable under tension, the Big Winder will now function. Climb the steps, and pull the right lever.
The train is pulled into position at the far end of the tracks.
Great, but it looks like the track ends there. Now what?
(Tear-jerker warning – You might want to have a box of Kleenex handy.)
Go down the long ladder (there is one on this side of the tracks as well.)
Enter the train and talk to Oscar about his heart.
Oscar will bid farewell, exit the train, and walk to the Spirit Woman’s hut. Follow him
Look close at Oscar. His mechanical heart has twelve buttons, like a clock.
Remember the 7:15 idea? Press the buttons at the 3 and 7 positions.
The interior is revealed. To open it further, press the four cardinal points.
12, 6, 3 and 9. Take the Voralberg Key that appears.
Oscar has fulfilled his ultimate purpose; Hans had planned it this way all along.
Return to the engine. Place the Key in the top-center spot, between the two gauges.
Refer to the picture. Operate the controls in sequence.
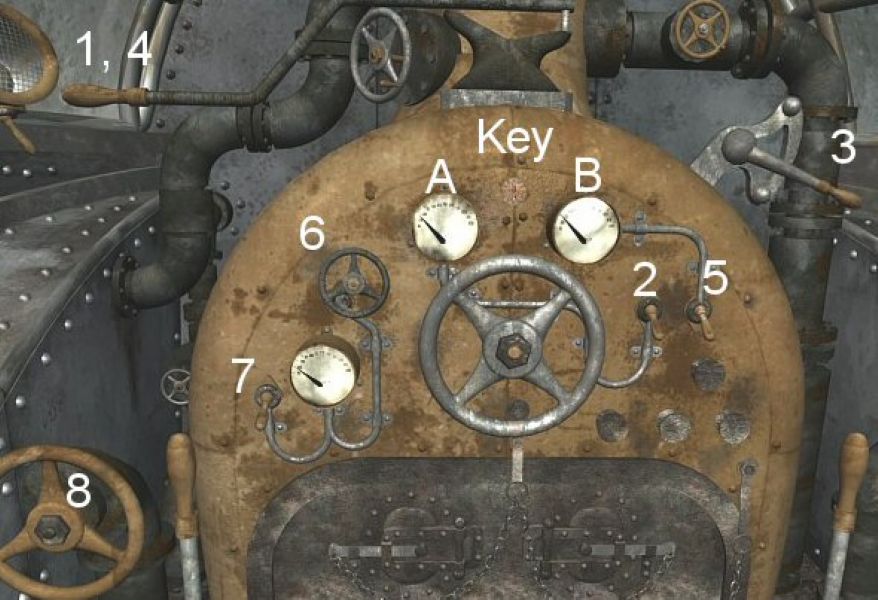
- Extends pickup arm downward.
- Fills water tank. Gauge A reads full, lever 1 resets.
- Enables upper pickup arm.
- Extends pickup arm to coal-car.
- Loads coal into engine. Gauge B reads full.
- Starts boiler, Gauge C reads full pressure. Steam is ready
- Extends front arm.
- Applies steam, melts ice.
The ark is revealed. Remember the boat in Alexei’s journal? – it’s all yours now.
Descend to the main level, and proceed toward the village. Go up to the large gates.
The Chief is there, waiting to talk with Kate. He will open the gates, but not until Youki goes too.
Go to the Youki-corral, and open the gate. Now you can leave on the Ark.
Ooops – we seem to be stuck on the ice. Exit the boat. Go forward twice, and find the Narwahl tusk.
That thing should come in handy! Now back away from there, and go to the far left.
Find the anchor and pry it loose from the ice with the tusk. Now you can go.
Return to the boat. Uh-oh, that swine, Ivan is back. He must have stowed away.
You can’t go to the boat because he raised the lift, so turn around and go see the penguins.
Proceed all the way to the point, where you can click on the boat in the distance.
Observe how the current carries the floating chunks of ice toward the side entrance on the boat.
You need to get those penguins to move out of the way.
Go left, and left again, toward the other flock of birds.
See the nest on the ground? It has two eggs in it. Look in your inventory for an idea.
Put the Russian Doll in the nest. Now it has three eggs! Call the birds’ attention to it.
The gaggle of penguins comes stumping over, and they gather ’round the nest in fascination.
Return to the point. Eeeek, a crack forms behind you.
Use the Narwahl Tusk in the crack to break off the ice-floe.
Risking it all, Kate is carried to the side door, and enters the lower level of the Boat.
Ivan can be seen pacing around over her head.
Pull the lever once, to lower a rope slightly from the sail mechanism.
Move the barrel so you can stand on it.
Looking at the apparatus above, there appears to be a looped rope and a capstan of some sort.
Go through the door, into the main cabin. Youki is there, sound asleep.
Talk with Hans. Go up the ladder. That’s where Ivan must have been hiding.
Take the Ivory Hook from the floor.
Return to the inner room, and stand on the barrel.
Place the Ivory Hook on the Capstan, then attach the rope to the hook.
Pull the lever to raise the sail. It has two effects: The boat is freed from the ice and
Ivan is flung overboard. He picks up an egg intending to throw it at Kate.
The penguins are protective, and have other ideas.
You can finally be sure; that is the last you will see of Ivan.
You are there at last. Hans heads on down the trail by himself.
IMPORTANT: There is a vital clue you may not have seen.
Re-enter the boat, and go into the room where the sail mechanism is.
Go to the other end of the room (down-screen) and inspect the wall.
You will find two parchments. Make a note of the patterns associated with the images.
Now you can explore the island.
By the way, Youki is still sound asleep.
There was something in Alexei’s journal about hibernating Youkis.
You will need to find something to wake him up.
As you exit the boat, you can go two ways; far left or far right. Go right. Climb the ladder.
Examine the man. No, it’s not Hans. This guy has been dead for years. Take the Youkol Medallion.
It shows Youkol symbols in their correct sequence.
Descend, and go left and down the steps. At the bottom, there is a chest in the foreground.
Come to the chest, open it, and take the three stone plates.
You will find a forward (up) exit cursor, and one to the left. Left takes you back, up takes you onward.
At the entrance to the tusk-covered path, there is a place you can examine, at the lower right.
Take the stone plate, AND take the Syberia flower.
Might as well revive Youki – go to the ark and give the Syberia Flower to Youki.
Exit the boat, and go left as before, down the steps, forward and through the tusks.
There is the gate, where Hans has been waiting.
Pull the lever, lowering the mechanism.
Youki has seen a Hamster-Cage before, and knows what to do.
Tha gate opens, Hans walks in, and you have further understanding into Oscar’s makeup, right?
Follow him.
See that thingy with the wheel attached?
That will provide the key to operate the machinery on the other side.
Look at it close-up. Recognize the pattern? It resembles the Youkol medallion, with some pieces missing.
You have found four stone plates, and there is a fifth one there, at the upper left.
All you have to do is put them in the correct position.
Some of them are very obvious because of their shape.
Exit the close-up, and use the wheel to spill some sand into the device.
If the stones are correct, the Ivory Key will rise and you can take it.
LOOK VERY CAREFULLY at the stones as you pick up the Ivory Key.
A clue is revealed that helps with the next problem.
Watch as ONE of the stone segments moves slightly as you take the key.
It’s the one at the bottom, slightly left of center.
Climb the steps and talk with Hans if you have not already done so.
He tells you to play the music that will attract the Mammoths.
Face the machinery. At first, you see a wooden panel, with a cross-shaped keyhole at the bottom
Use the Ivory Key in the keyhole, and the panel opens revealing five rows of five symbols.
Twenty-five choices. Not too bad, until you look at the rotating antenna above.
Aww, it’s Ssstuck!
If you place the Ivory Key into one of the symbols, then you can turn the antenna.
You realize it rotates into one of five positions.
Each row allows the antenna to be turned to a different direction.
Fine, that’s only 125 things to try. What now?
The clue comes from the stone that shifted when you took the Ivory Key.
If you know the symbol on the stone, then you need to look at the Medallion again.
The Stone symbol was in the 7 o’clock position. Find it on the inner row on the Medallion.
Look at the symbol on the outer row. Then find the matching one on the bottom row of five.
It’s the second from the left.
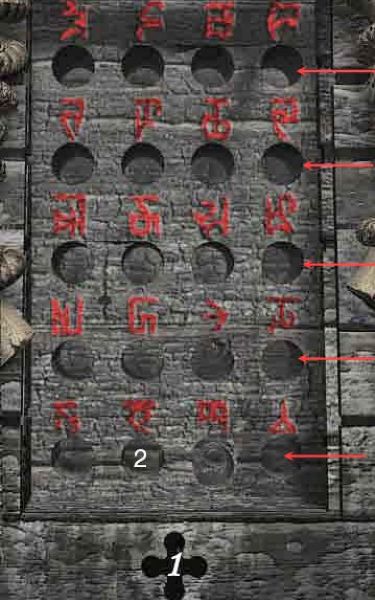
This clue came from the parchments in the boat. There were five clues, but you want only one.
The picture of the man riding a Mammoth would seem appropriate.
The clues consist of two rows of three markings.
The marks are large, small, and nothing.
The Mammoth clue shows Large – Small – Large on the top row.
It shows Small – Nothing – Large on the bottom row.
The pipes tuning device has two rows of three.
Corresponds to the clue.
Large means wide open, Small means half open, and Nothing means closed.
Set the top row: open – half – open.
Set the bottom row: half – closed – open.
(If you haven’t played with them, that is all are open, –
click once on the top-middle, once on the bottom-left, and twice on the bottom-middle.)
You should see a close-up view of the antenna, hear the pipes call, and the closing cinematique.
If you don’t shed a tear at the final scene, then I’ll do it for you.
Hans meets his destiny, and final satisfaction. Thank you, Benôit, for this wonderful game.

Leave a Reply